Knowledge requiredThis tutorial assumes that you’re familiar with building applications with C/C++ Pico-SDK for Raspberry Pi Pico (RP2040). If you’re unfamiliar with either of these you build binaries directly for your development board from the Deployment page in the studio.
Prerequisites
Make sure you’ve followed one of the tutorials and have a trained impulse. For the purpose of this tutorial, we’ll assume you trained a Continuous motion recognition model. Also install the following software: The below instructions assume you are using Debian-based Linux distribution. Alternative instructions for those using Microsoft Windows or Apple macOS are provided in the Getting started with Pico guide (Sections 9.1 and 9.2). To build the project, you will need the pico-sdk, CMake, a cross-platform tool used to build the software, and the GNU Embedded Toolchain for Arm. In Debian-based OS, you can install both these via apt from the command line.libstdc++-arm-none-eabi-newlib.
You’ll need the PICO SDK to compile the firmware. You can obtain it from https://github.com/raspberrypi/pico-sdk and then specify PICO_SDK_PATH environmental variable, that would point to exact PICO SDK location on your system. E.g.
Cloning the base repository
We created an example repository which contains a small application for Raspberry Pi Pico (RP2040), which takes the raw features as an argument, and prints out the final classification. Download the application as a .zip, or import this repository using Git:Deploying your impulse
Head over to your Edge Impulse project, and go to the Deployment tab. From here you can create the full library which contains the impulse and all required libraries. Select C++ library and click Build to create the library. Download the .zip file and extract the directories in the example-standalone-inferencing-pico folder. Your final folder structure should look like this:Running the impulse
With the project ready, it’s time to verify that the application works. Head back to the studio and click on Live classification. Then load a validation sample, and click on a row under ‘Detailed result’.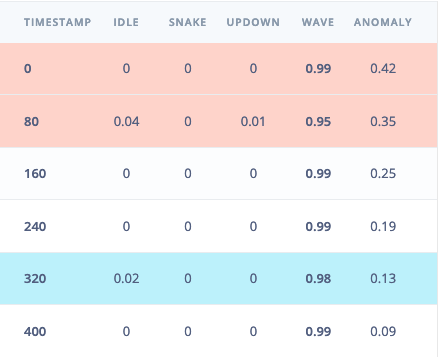
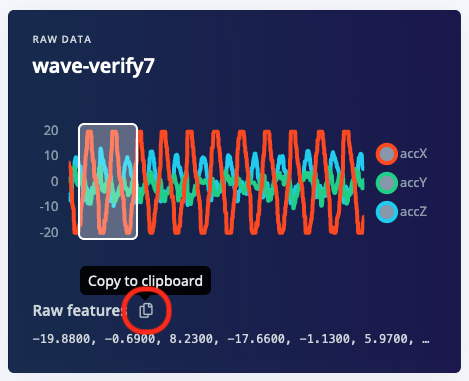
ei_main.cpp and paste the raw features inside the static const float features[] definition, for example:
make in the build directory of the project:
ei_rp2040_firmware.uf2 file from the build folder to the newly appeared USB Mass Storage device.
Seeing the output
To see the output of the impulse, connect to the development board over a serial port on baud rate115200 and reset the board. You can do this with your favorite serial monitor or with the Edge Impulse CLI: