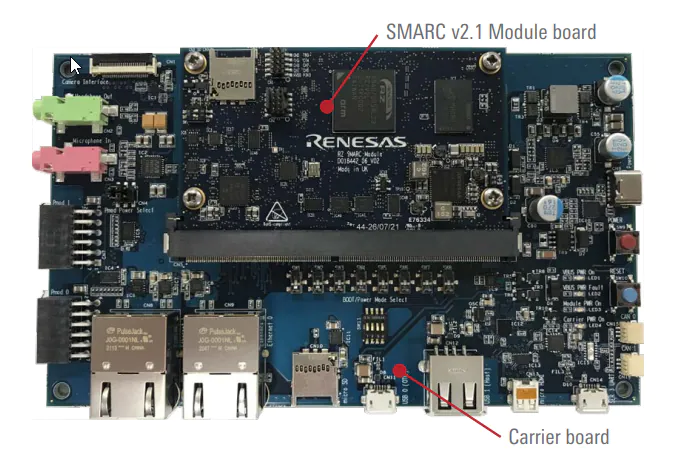
Renesas RZ/V2L

The Renesas RZ/V2L is a state-of-the-art general-purpose 64-bit Linux MPU with a dual-core ARM Cortex-A55 processor running at 1.2GHz and ARM Mali-G31 3D graphic engine.

The RZ/V2L EVK consists of a SMARC SOM module and an I/O carrier board that provides a USB serial interface, 2 channel Ethernet interfaces, a camera and an HDMI display interface, in addition to many other interfaces (PMOD, microphone, audio output, etc.). The RZ/V2L EVK can be acquired directly through the Renesas website. Since the RZ/V2L is intended for vision AI, the EVK already contains the Google Coral Camera Module.

The Renesas RZ/V2L board realizes hardware acceleration through the DRP-AI IP that consists of a Dynamically Configurable Processor (DRP), and Multiply and Accumulate unit (AI-MAC). The DRP-AI IP is designed to process the entire neural network plus the required pre- and post-processing steps. Additional optimization techniques reduce power consumption and increase processing performance. This leads to high power efficiency and allows using the MPU without a heat sink.

Note that, the DRP-AI is designed for feed-forward neural networks that are usually in vision-based architectures. For more information about the DRP-AI, please refer to the white paper published by the Renesas team.

The Renesas tool “DRP-AI TVM” is used to translate machine learning models and optimize the processing for DRP-AI. The tool is fully supported by Edge Impulse. This means that machine learning models downloaded from the studio can be directly deployed to the RZ/V2L board.

For more technical information about RZ/V2L, please refer to the Renesas RZ/V2L documentation.

1. Yocto image preparation/patch/build for V2L

Renesas provides Yocto build system to build all the necessary packages and create the Linux image. The Renesas documentation calls out that the build system must be based off of Ubuntu 20.04. The following instructions here outline the necessary steps to setup your build environment.

In order to use the Edge Impulse CLI tools, NodeJS v18 needs to be installed into the yocto image that you build. Given the instructions called out here, once the following files are downloaded from Renesas (specific versions specified are required):

RTK0EF0045Z0024AZJ-v3.0.5-update3.zip
RTK0EF0045Z13001ZJ-v1.2.0_EN.zip
RTK0EF0045Z15001ZJ-v1.2.0_EN.zip
oss_pkg_rzv_v3.0.5-update3.7z

In addition to the above files, you also need to download the DRP-AI package from Renesas' website as well. Please consult this link for the software download link. Thus, all of the files needed for the build are:

RTK0EF0045Z0024AZJ-v3.0.5-update3.zip
RTK0EF0045Z13001ZJ-v1.2.0_EN.zip
RTK0EF0045Z15001ZJ-v1.2.0_EN.zip
oss_pkg_rzv_v3.0.5-update3.7z
r11an0549ej0741-rzv2l-drpai-sp.zip

Once downloaded and extracted, you need to download the patch file (RZG2L_VLP306u1_switch_to_nodejs_18.17.1.patch - coming soon!) and place the patch file into the same directory. (NOTE: Yes, the patch was initially developed for the G2L board... but equally works with the V2L boards given the specific files versions referenced above).

NOTE: The current patch will have 3 rejections (gcc13.patch, nodejs_12.22.12.bb, nodejs_14.18.1.bb) all of which can be safely ignored.

After putting all of these files into a single directory + patch file, you will need to create and patch your V2L yocto build environment as follows (this can be exported into a script that can be run):

#!/bin/bash

DIR=`pwd`
export TEMPLATECONF=$DIR/meta-renesas/meta-rzv2l/docs/template/conf/
unzip ./RTK0EF0045Z0024AZJ-v3.0.5-update3.zip
unzip ./RTK0EF0045Z13001ZJ-v1.2.0_EN.zip
unzip ./RTK0EF0045Z15001ZJ-v1.2.0_EN.zip
unzip ./archive/r11an0549ej0741-rzv2l-drpai-sp.zip
tar zxf ./RTK0EF0045Z0024AZJ-v3.0.5-update3/rzv_vlp_v3.0.5-update3.tar.gz
tar zxf ./RTK0EF0045Z13001ZJ-v1.2.0_EN/meta-rz-features_graphics_v1.2.0.tar.gz
tar zxf ./RTK0EF0045Z15001ZJ-v1.2.0_EN/meta-rz-features_codec_v1.2.0.tar.gz
tar zxf ./rzv2l_drpai-driver/meta-rz-drpai.tar.gz
7z x ./archive/oss_pkg_rzv_v3.0.5-update3.7z
source poky/oe-init-build-env build
cd $DIR/build
bitbake-layers add-layer ../meta-qt5
bitbake-layers add-layer ../meta-rz-features/meta-rz-graphics
bitbake-layers add-layer ../meta-rz-features/meta-rz-codecs
bitbake-layers add-layer ../meta-rz-features/meta-rz-drpai
bitbake-layers add-layer ../meta-openembedded/meta-filesystems
bitbake-layers add-layer ../meta-openembedded/meta-networking
bitbake-layers add-layer ../meta-virtualization
cd $DIR
patch -N -p1 < ./RZG2L_VLP306u1_switch_to_nodejs_18.17.1.patch
cd $DIR/build
echo ""                                     >> ./conf/local.conf
echo "IMAGE_INSTALL_append = \" \\"         >> ./conf/local.conf
echo "    nodejs \\"                        >> ./conf/local.conf
echo "    nodejs-npm \\"                    >> ./conf/local.conf
echo "    \""                               >> ./conf/local.conf
echo ""                                     >> ./conf/local.conf
echo "IMAGE_INSTALL_append = \" \\"         >> ./conf/local.conf
echo "    nvme-cli \\"                      >> ./conf/local.conf
echo "    \""                               >> ./conf/local.conf
echo ""                                     >> ./conf/local.conf
#-# glibc2.31 instead of glibc2.28
sed -i 's/^CIP_MODE = "Buster"/CIP_MODE = "Bullseye"/g' ./conf/local.conf

You can then invoke your V2L yocto build process via:

#!/bin/bash

DIR=`pwd`
export TEMPLATECONF=$DIR/meta-renesas/meta-rzv2l/docs/template/conf/
export MACHINE=smarc-rzv2l
source poky/oe-init-build-env
time bitbake core-image-weston

Renesas documentation here then shows you different build options + how to flash your compiled images onto your V2L board. Once your build completes, your files that will be used in those subsequent instructions called out here to flash your V2L board can be found here:

#!/bin/bash

DIR=`pwd`
ls -al $DIR/build/tmp/deploy/images/smarc-rzv2l

Accessing the board using screen

The easiest way is to connect through serial to the RZ/V2L board using the USB mini b port.

  1. After connecting the board with a USB-C cable, please power the board with the red power button.

  2. Please install screen to the host machine and then execute the following command from Linux to access the board:

    screen /dev/ttyUSB0 115200
  3. You will see the boot process, then you will be asked to log in:

    • Log in with username root

    • There is no password

Note that, it should be possible to use an Ethernet cable and log in via SSH if the daemon is installed on the image. However, for simplicity purposes, we do not refer to this one here.

2. Installing Edge Impulse Linux CLI

Once you have logged in to the board, please run the following command to install Edge Impulse Linux CLI

npm install edge-impulse-linux -g --unsafe-perm

3. Connecting to Edge Impulse

With all software set up, connect your google coral camera to your Renesas board (see 'Next steps' further on this page if you want to connect a different sensor), and run:

edge-impulse-linux

This will start a wizard which will ask you to log in and choose an Edge Impulse project. If you want to switch projects run the command with --clean.

4. Verifying that your device is connected

That's all! Your device is now connected to Edge Impulse. To verify this, go to your Edge Impulse project, and click Devices. The device will be listed here.

5. Next steps: building a machine learning model

Currently, all Edge Impulse models can run on the RZ/V2L CPU which is a dedicated Cortex A55. In addition, you can bring your own model to Edge Impulse and use it on the device. However, if you would like to benefit from the DRP-AI hardware acceleration support including higher performance and power efficiency, please use one of the following models:

For object detection:

  • Yolov5 (v5)

  • FOMO (Faster objects More Objects)

For Image classification:

  • MobileNet v1, v2

It supports as well models built within the studio using the available layers on the training page.

Note that, on the training page you have to select the target before starting the training in order to tell the studio that you are training the model for the RZ/V2L. This can be done on the top right in the training page.

If you would like to do object detection with Yolov5 (v5) you need to fix the image resolution in the impulse design to 320x320, otherwise, you might risk that the training fails.

With everything set up you can now build your first machine learning model with these tutorials:

6. EON tuner

If you are interested in using the EON tuner in order to improve the accuracy of the model this is possible only for image classification for now. EON tuner supports for object detection is arriving soon.

If you use the EON tuner with image classification, you need to filter the int8 models since they are not supported by the DRP-AI. Also, you need to filter the grayscale models as well. Note that if you leave the EON tuner page, the filter will reset to the default settings, which means you need to re-filter the above models.

7. Deploying back to the device

To run your impulse locally, just connect to your Renesas RZ/V2L and run:

edge-impulse-linux-runner

This will automatically compile your model with full hardware acceleration and download the model to your Renesas board, and then start classifying.

Or you can select the RZ/V2L board from the deployment page, this will download an eim model that you can use with the above runner as follows:

Go to the deployment page and select:
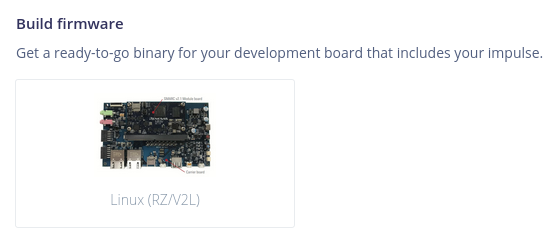
Then run the following on the RZ/V2L:

edge-impulse-linux-runner --model-file downloaded-model.eim

You will see the model inferencing results in the terminal also we stream the results to the local network. This allows you to see the output of the model in real-time in your web browser. Open the URL shown when you start the runner and you will see both the camera feed and the classification results.

8. DRP-AI library

Since the RZ/V2L benefits from hardware acceleration using the DRP-AI, we provide you with the drp-ai library that uses our C++ Edge Impulse SDK and models headers that run on the hardware accelerator. If you would like to integrate the model source code into your applications and benefit from the drp-ai then you need to select the drp-ai library.

We have an example showing how to use the drp-ai library that can be found in Deploy your model as a DRP-AI library.

Last updated