LogoLogo
HomeAPI & SDKsProjectsForumStudio
  • Getting started
    • For beginners
    • For ML practitioners
    • For embedded engineers
  • Frequently asked questions (FAQ)
  • Tutorials
    • End-to-end tutorials
      • Computer vision
        • Image classification
        • Object detection
          • Object detection with bounding boxes
          • Detect objects with centroid (FOMO)
        • Visual anomaly detection
        • Visual regression
      • Audio
        • Sound recognition
        • Keyword spotting
      • Time-series
        • Motion recognition + anomaly detection
        • Regression + anomaly detection
        • HR/HRV
        • Environmental (Sensor fusion)
    • Data
      • Data ingestion
        • Collecting image data from the Studio
        • Collecting image data with your mobile phone
        • Collecting image data with the OpenMV Cam H7 Plus
        • Using the Edge Impulse Python SDK to upload and download data
        • Trigger connected board data sampling
        • Ingest multi-labeled data using the API
      • Synthetic data
        • Generate audio datasets using Eleven Labs
        • Generate image datasets using Dall-E
        • Generate keyword spotting datasets using Google TTS
        • Generate physics simulation datasets using PyBullet
        • Generate timeseries data with MATLAB
      • Labeling
        • Label audio data using your existing models
        • Label image data using GPT-4o
      • Edge Impulse Datasets
    • Feature extraction
      • Building custom processing blocks
      • Sensor fusion using embeddings
    • Machine learning
      • Classification with multiple 2D input features
      • Visualize neural networks decisions with Grad-CAM
      • Sensor fusion using embeddings
      • FOMO self-attention
    • Inferencing & post-processing
      • Count objects using FOMO
      • Continuous audio sampling
      • Multi-impulse (C++)
      • Multi-impulse (Python)
    • Lifecycle management
      • CI/CD with GitHub Actions
      • Data aquisition from S3 object store - Golioth on AI
      • OTA model updates
        • with Arduino IDE (for ESP32)
        • with Arduino IoT Cloud
        • with Blues Wireless
        • with Docker on Allxon
        • with Docker on Balena
        • with Docker on NVIDIA Jetson
        • with Espressif IDF
        • with Nordic Thingy53 and the Edge Impulse app
        • with Particle Workbench
        • with Zephyr on Golioth
    • API examples
      • Customize the EON Tuner
      • Ingest multi-labeled data using the API
      • Python API bindings example
      • Running jobs using the API
      • Trigger connected board data sampling
    • Python SDK examples
      • Using the Edge Impulse Python SDK to run EON Tuner
      • Using the Edge Impulse Python SDK to upload and download data
      • Using the Edge Impulse Python SDK with Hugging Face
      • Using the Edge Impulse Python SDK with SageMaker Studio
      • Using the Edge Impulse Python SDK with TensorFlow and Keras
      • Using the Edge Impulse Python SDK with Weights & Biases
    • Expert network projects
  • Edge Impulse Studio
    • Organization hub
      • Users
      • Data campaigns
      • Data
        • Cloud data storage
      • Data pipelines
      • Data transformation
        • Transformation blocks
      • Upload portals
      • Custom blocks
        • Custom AI labeling blocks
        • Custom deployment blocks
        • Custom learning blocks
        • Custom processing blocks
        • Custom synthetic data blocks
        • Custom transformation blocks
      • Health reference design
        • Synchronizing clinical data with a bucket
        • Validating clinical data
        • Querying clinical data
        • Transforming clinical data
    • Project dashboard
      • Select AI hardware
    • Devices
    • Data acquisition
      • Uploader
      • Data explorer
      • Data sources
      • Synthetic data
      • Labeling queue
      • AI labeling
      • CSV Wizard (time-series)
      • Multi-label (time-series)
      • Tabular data (pre-processed & non-time-series)
      • Metadata
      • Auto-labeler | deprecated
    • Impulses
    • EON Tuner
      • Search space
    • Processing blocks
      • Audio MFCC
      • Audio MFE
      • Audio Syntiant
      • Flatten
      • HR/HRV features
      • Image
      • IMU Syntiant
      • Raw data
      • Spectral features
      • Spectrogram
      • Custom processing blocks
      • Feature explorer
    • Learning blocks
      • Anomaly detection (GMM)
      • Anomaly detection (K-means)
      • Classification
      • Classical ML
      • Object detection
        • MobileNetV2 SSD FPN
        • FOMO: Object detection for constrained devices
      • Object tracking
      • Regression
      • Transfer learning (images)
      • Transfer learning (keyword spotting)
      • Visual anomaly detection (FOMO-AD)
      • Custom learning blocks
      • Expert mode
      • NVIDIA TAO | deprecated
    • Retrain model
    • Live classification
    • Model testing
    • Performance calibration
    • Deployment
      • EON Compiler
      • Custom deployment blocks
    • Versioning
    • Bring your own model (BYOM)
    • File specifications
      • deployment-metadata.json
      • ei-metadata.json
      • ids.json
      • parameters.json
      • sample_id_details.json
      • train_input.json
  • Tools
    • API and SDK references
    • Edge Impulse CLI
      • Installation
      • Serial daemon
      • Uploader
      • Data forwarder
      • Impulse runner
      • Blocks
      • Himax flash tool
    • Edge Impulse for Linux
      • Linux Node.js SDK
      • Linux Go SDK
      • Linux C++ SDK
      • Linux Python SDK
      • Flex delegates
      • Rust Library
    • Rust Library
    • Edge Impulse Python SDK
  • Run inference
    • C++ library
      • As a generic C++ library
      • On Android
      • On your desktop computer
      • On your Alif Ensemble Series Device
      • On your Espressif ESP-EYE (ESP32) development board
      • On your Himax WE-I Plus
      • On your Raspberry Pi Pico (RP2040) development board
      • On your SiLabs Thunderboard Sense 2
      • On your Spresense by Sony development board
      • On your Syntiant TinyML Board
      • On your TI LaunchPad using GCC and the SimpleLink SDK
      • On your Zephyr-based Nordic Semiconductor development board
    • Arm Keil MDK CMSIS-PACK
    • Arduino library
      • Arduino IDE 1.18
    • Cube.MX CMSIS-PACK
    • Docker container
    • DRP-AI library
      • DRP-AI on your Renesas development board
      • DRP-AI TVM i8 on Renesas RZ/V2H
    • IAR library
    • Linux EIM executable
    • OpenMV
    • Particle library
    • Qualcomm IM SDK GStreamer
    • WebAssembly
      • Through WebAssembly (Node.js)
      • Through WebAssembly (browser)
    • Edge Impulse firmwares
    • Hardware specific tutorials
      • Image classification - Sony Spresense
      • Audio event detection with Particle boards
      • Motion recognition - Particle - Photon 2 & Boron
      • Motion recognition - RASynBoard
      • Motion recognition - Syntiant
      • Object detection - SiLabs xG24 Dev Kit
      • Sound recognition - TI LaunchXL
      • Keyword spotting - TI LaunchXL
      • Keyword spotting - Syntiant - RC Commands
      • Running NVIDIA TAO models on the Renesas RA8D1
      • Two cameras, two models - running multiple object detection models on the RZ/V2L
  • Edge AI Hardware
    • Overview
    • Production-ready
      • Advantech ICAM-540
      • Seeed SenseCAP A1101
      • Industry reference design - BrickML
    • MCU
      • Ambiq Apollo4 family of SoCs
      • Ambiq Apollo510
      • Arducam Pico4ML TinyML Dev Kit
      • Arduino Nano 33 BLE Sense
      • Arduino Nicla Sense ME
      • Arduino Nicla Vision
      • Arduino Portenta H7
      • Blues Wireless Swan
      • Espressif ESP-EYE
      • Himax WE-I Plus
      • Infineon CY8CKIT-062-BLE Pioneer Kit
      • Infineon CY8CKIT-062S2 Pioneer Kit
      • Nordic Semi nRF52840 DK
      • Nordic Semi nRF5340 DK
      • Nordic Semi nRF9160 DK
      • Nordic Semi nRF9161 DK
      • Nordic Semi nRF9151 DK
      • Nordic Semi nRF7002 DK
      • Nordic Semi Thingy:53
      • Nordic Semi Thingy:91
      • Open MV Cam H7 Plus
      • Particle Photon 2
      • Particle Boron
      • RAKwireless WisBlock
      • Raspberry Pi RP2040
      • Renesas CK-RA6M5 Cloud Kit
      • Renesas EK-RA8D1
      • Seeed Wio Terminal
      • Seeed XIAO nRF52840 Sense
      • Seeed XIAO ESP32 S3 Sense
      • SiLabs Thunderboard Sense 2
      • Sony's Spresense
      • ST B-L475E-IOT01A
      • TI CC1352P Launchpad
    • MCU + AI accelerators
      • Alif Ensemble
      • Arduino Nicla Voice
      • Avnet RASynBoard
      • Seeed Grove - Vision AI Module
      • Seeed Grove Vision AI Module V2 (WiseEye2)
      • Himax WiseEye2 Module and ISM Devboard
      • SiLabs xG24 Dev Kit
      • STMicroelectronics STM32N6570-DK
      • Synaptics Katana EVK
      • Syntiant Tiny ML Board
    • CPU
      • macOS
      • Linux x86_64
      • Raspberry Pi 4
      • Raspberry Pi 5
      • Texas Instruments SK-AM62
      • Microchip SAMA7G54
      • Renesas RZ/G2L
    • CPU + AI accelerators
      • AVNET RZBoard V2L
      • BrainChip AKD1000
      • i.MX 8M Plus EVK
      • Digi ConnectCore 93 Development Kit
      • MemryX MX3
      • MistyWest MistySOM RZ/V2L
      • Qualcomm Dragonwing RB3 Gen 2 Dev Kit
      • Renesas RZ/V2L
      • Renesas RZ/V2H
      • IMDT RZ/V2H
      • Texas Instruments SK-TDA4VM
      • Texas Instruments SK-AM62A-LP
      • Texas Instruments SK-AM68A
      • Thundercomm Rubik Pi 3
    • GPU
      • Advantech ICAM-540
      • NVIDIA Jetson
      • Seeed reComputer Jetson
    • Mobile phone
    • Porting guide
  • Integrations
    • Arduino Machine Learning Tools
    • AWS IoT Greengrass
    • Embedded IDEs - Open-CMSIS
    • NVIDIA Omniverse
    • Scailable
    • Weights & Biases
  • Tips & Tricks
    • Combining impulses
    • Increasing model performance
    • Optimizing compute time
    • Inference performance metrics
  • Concepts
    • Glossary
    • Course: Edge AI Fundamentals
      • Introduction to edge AI
      • What is edge computing?
      • What is machine learning (ML)?
      • What is edge AI?
      • How to choose an edge AI device
      • Edge AI lifecycle
      • What is edge MLOps?
      • What is Edge Impulse?
      • Case study: Izoelektro smart grid monitoring
      • Test and certification
    • Data engineering
      • Audio feature extraction
      • Motion feature extraction
    • Machine learning
      • Data augmentation
      • Evaluation metrics
      • Neural networks
        • Layers
        • Activation functions
        • Loss functions
        • Optimizers
          • Learned optimizer (VeLO)
        • Epochs
    • What is embedded ML, anyway?
    • What is edge machine learning (edge ML)?
Powered by GitBook
On this page
  • Installing dependencies
  • Connecting to Edge Impulse
  • Next steps: building a machine learning model
  • Deploying back to device
  • Troubleshooting

Was this helpful?

Export as PDF
  1. Edge AI Hardware
  2. Production-ready

Advantech ICAM-540

PreviousProduction-readyNextSeeed SenseCAP A1101

Last updated 2 months ago

Was this helpful?

The Advantech ICAM-540 series is a highly integrated Industrial AI Camera equipped with SONY IMX334 industrial grade image sensor, based on an NVIDIA Orin NX SoM with support for C-mount lens. Featuring CAMNavi SDK, Google Chromium web browser utility and NVIDIA Deepstream SDK, ICAM-540 series accelerates the development and deployment of cloud-to-edge vision AI applications.

The CAMNavi SDK uses Python language by default and is better adapted to image acquisition and AI algorithm integration. Meanwhile the HTML 5 web based utility can be used to setup the cameras and network configuration to lower the installation effort.

The preloaded, optimized Jetpack board support package allows to seamlessly connect to AI cloud services. Advantech ICAM-540 series is an all-in-one, compact and rugged industrial AI camera and is ideal for a variety of Edge AI vision applications.

Installing dependencies

Follow Advantech's setup instructions to configure, connect, power up, and discover your ICAM-540. You may also need to purchase a camera lens that is appropriate for you application. You will need to connect power, keyboard, mouse, HDMI monitor, and the Ethernet connector. The initial/first boot-up of the ICAM-540 can take awhile so be patient... once it comes up and is ready, you will see a ubuntu desktop that you are logged into already (initial username/pw: icam-540/icam-540). You should change the password to something unique.

Advantech ICAM-540 OS Setup/Update

First, lets update the underlying OS:

    icam-540@tegra-ubuntu:~$ sudo apt-get -y update
    icam-540@tegra-ubuntu:~$ sudo apt-get -y dist-upgrade
    icam-540@tegra-ubuntu:~$ sudo apt-get -y autoremove
    icam-540@tegra-ubuntu:~$ sudo apt-get -y autoclean

Disable the CamNavi Service

By default on a fresh install, the ICAM-540 has a service that captures and controls the camera. For Edge Impulse, we need to stop and disable that service before we can continue:

	icam-540@tegra-ubuntu:~$ sudo systemctl stop web.service
	icam-540@tegra-ubuntu:~$ sudo systemctl disable web.service
	icam-540@tegra-ubuntu:~$ sudo systemctl disable autoui.service

Camera sensor setup

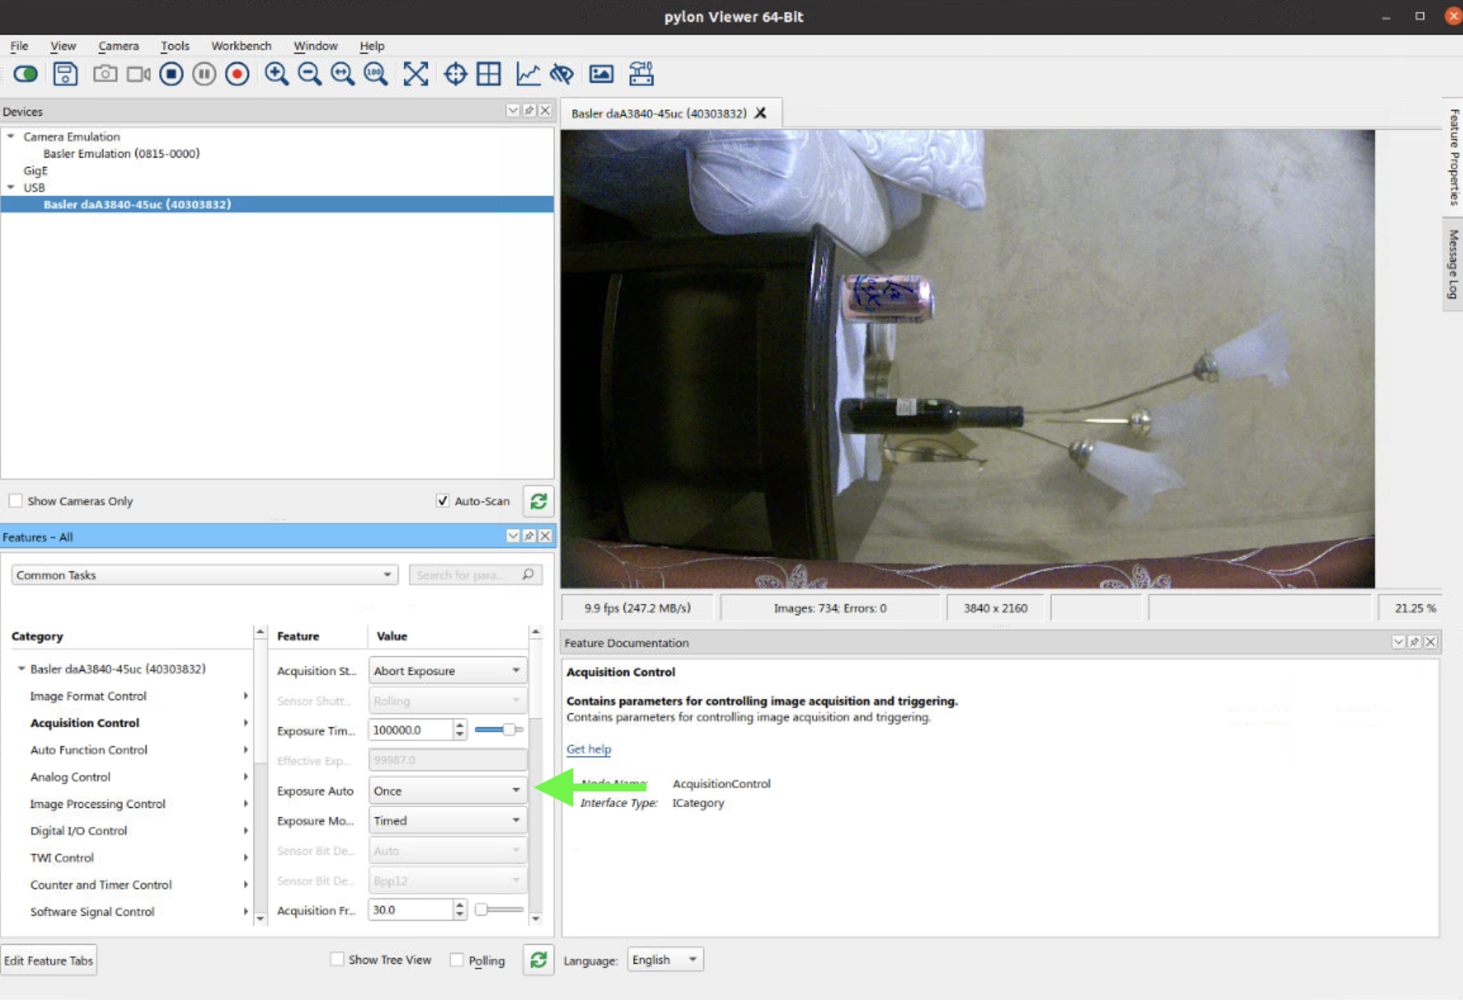
At fresh start the camera sensor initializes with default image parameters (e.g., gain, exposure, etc.). Most of the times the default parameters will not be suitable for the setting that you want to observe. One solution is to set up a camera with Basler Pylon Viewer visual tool, and save the camera sensor parameters for further use. Pylon Viewer comes preinstalled on ICAM-540.

First, launch the pylon Viewer tool from Basler:

$ /opt/pylon/bin/pylonviewer

Turn on the camera in the GUI application by flipping the trigger and starting a continuous stream.

Now, adjust the camera sensor configurations to ensure the images coming from the sensor are of desired quality and lighting.

If you don't know where to start, the initial suggestions are to set Exposure Auto to Once and Gain Auto to Once. This way the sensor will adjust to the current frame conditions. Setting these to Continuous will make the sensor adjust these parameters dynamically as the frame changes.

After you are satisfied with the configuration it needs to be saved in the filesystem in 
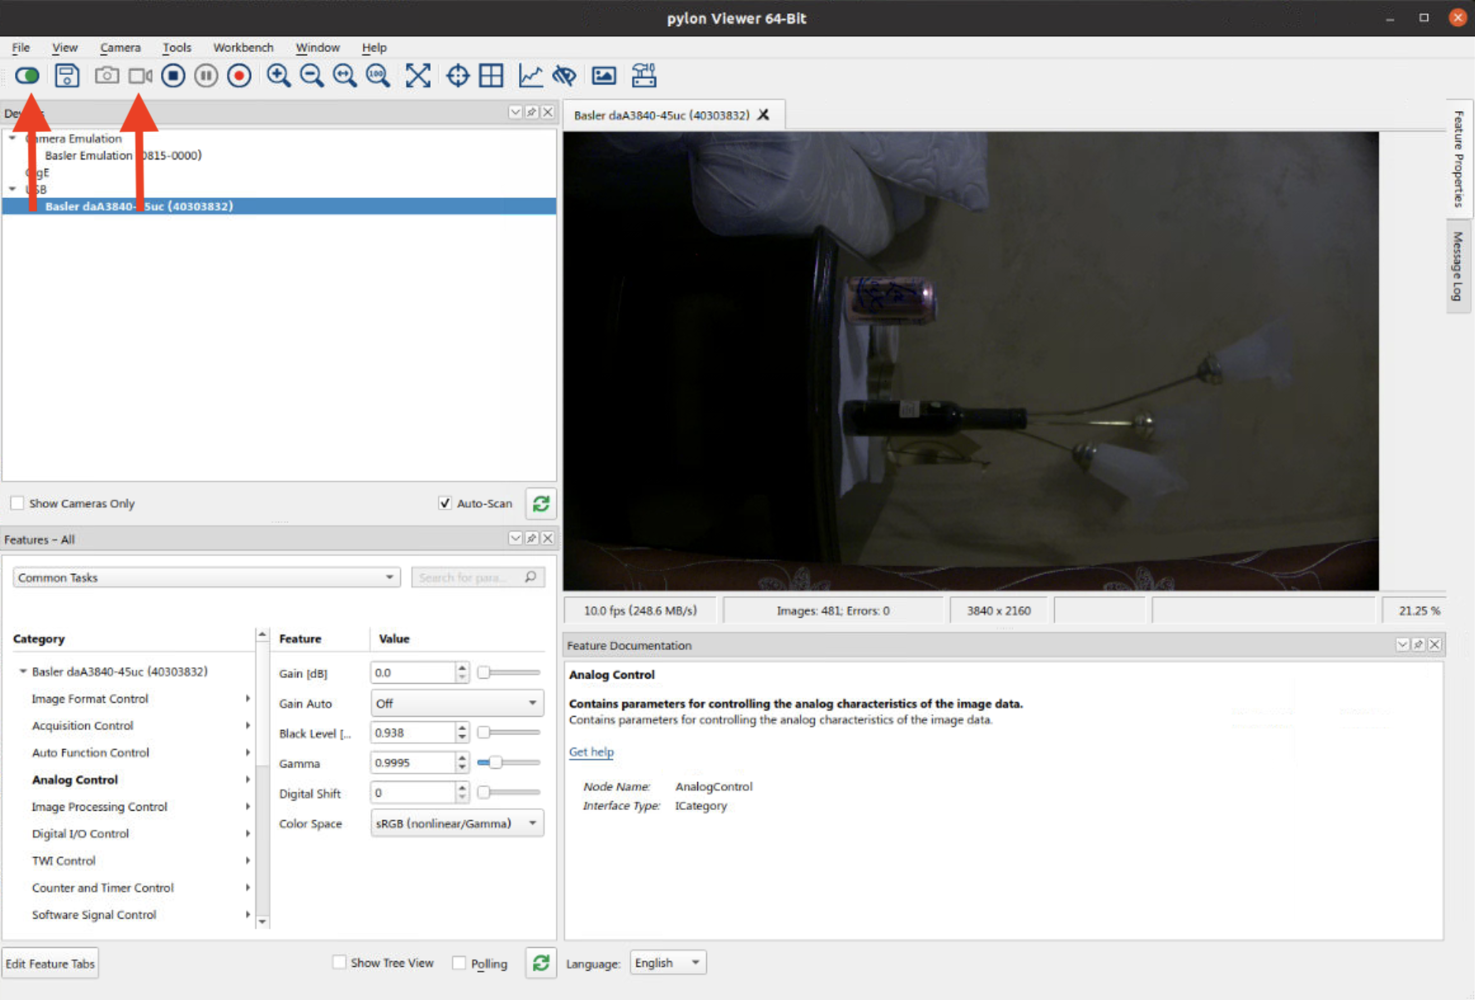
.pfs format for further reuse.

To do that:

  • Pause the stream by clicking on the "stop" icon

  • Open "Camera" menu on the top menu and click "Save Features"

  • Save the file in a filesystem path. It is recommended to create a directory for these configurations, e.g., /home/icam-540/basler-configs

Note: The next steps in 3) below assume you have saved the file as "config-1.pfs" and have stored that file in the following directory: $HOME/basler-configs:

	icam-540@tegra-ubuntu:~$ mkdir -p $HOME/basler-configs
	icam-540@tegra-ubuntu:~$ mv $HOME/*.pfs $HOME/basler-configs/config-1.pfs

Refer to Basler pylon Viewer documentation for more settings and usage tips

Running the setup script

To set this device up in Edge Impulse, run the following command (from any folder). When prompted, enter the password you created for the user on your ICAM-540 in step 1. The entire script takes a few minutes to run.

wget -q -O - https://cdn.edgeimpulse.com/firmware/linux/orin.sh | bash

Connecting to Edge Impulse

With camera settings configured and assuming they are saved in e.g., /home/icam-540/basler-configs/config-1.pfs, run the following command:

edge-impulse-linux --gst-launch-args "pylonsrc pfs-location=/home/icam-540/basler-configs/config-1.pfs ! video/x-raw,width=3840,height=2160,format=BGR ! videoconvert ! jpegenc"

This will start a wizard which will ask you to log in, and choose an Edge Impulse project. In the Data Acquisition tab of Edge Impulse Studio you may take images directly from the camera with those settings for use in developing your machine learning dataset.

Next steps: building a machine learning model

With everything set up you can now build your first machine learning model with these tutorials:

  • Image classification

  • Object detection

  • Object detection with centroids (FOMO)

Looking to connect different sensors? Our Linux SDK lets you easily send data from any sensor and any programming language (with examples in Node.js, Python, Go and C++) into Edge Impulse.

Deploying back to device

To run your impulse locally stop any previous Edge Impulse commands (CTRL+C) and run the following with the camera configurations you prefer (see above for info on camera configuration).
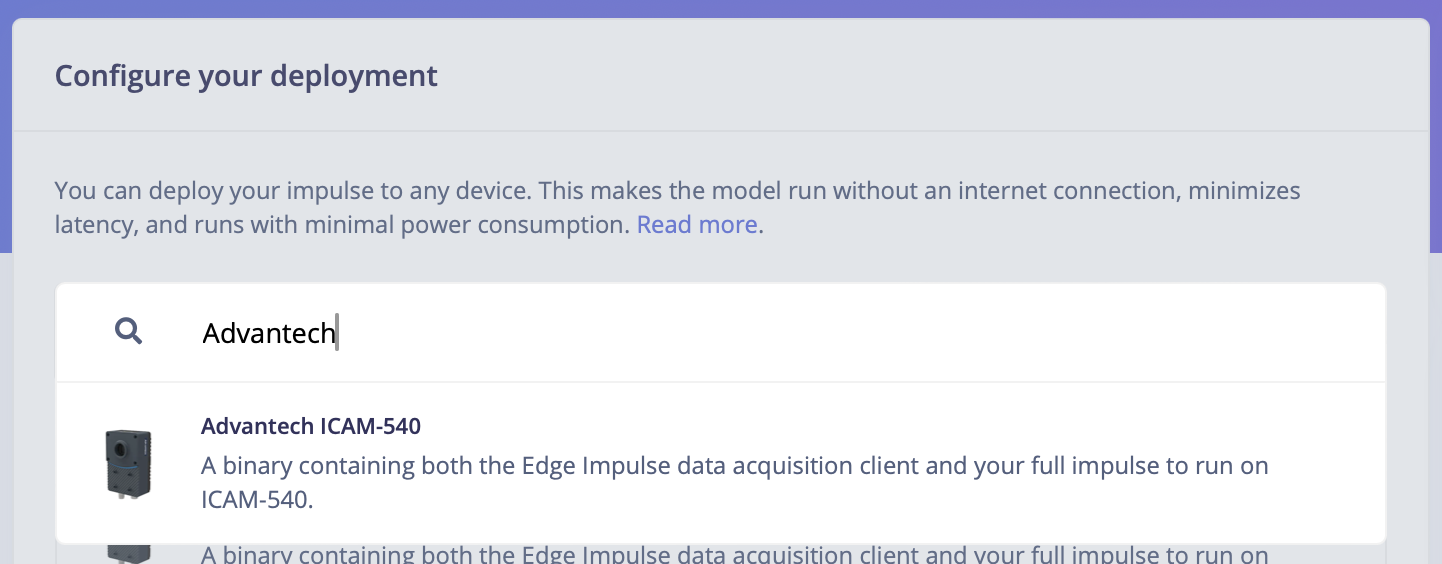
edge-impulse-linux-runner --gst-launch-args "pylonsrc pfs-location=/home/icam-540/basler-configs/config-1.pfs ! video/x-raw,width=3840,height=2160,format=BGR ! videoconvert ! jpegenc"

This will automatically compile your model with GPU and hardware acceleration, download the model to your device, and then start the inference, capturing the input with previously configured camera parameters. Our Linux SDK has examples on how to integrate the model with your favourite programming language.

Alternatively, you may download your model from the Deployment section of Edge Impulse Studio. Be sure to chose the Advantech ICAM-540 option to get the best acceleration possible.

Copy the downloaded .eim file to the device's file system and run this command on the device

edge-impulse-linux-runner --model-file path/to/file.eim --gst-launch-args <gstreamer-and-camera-configuration-override>

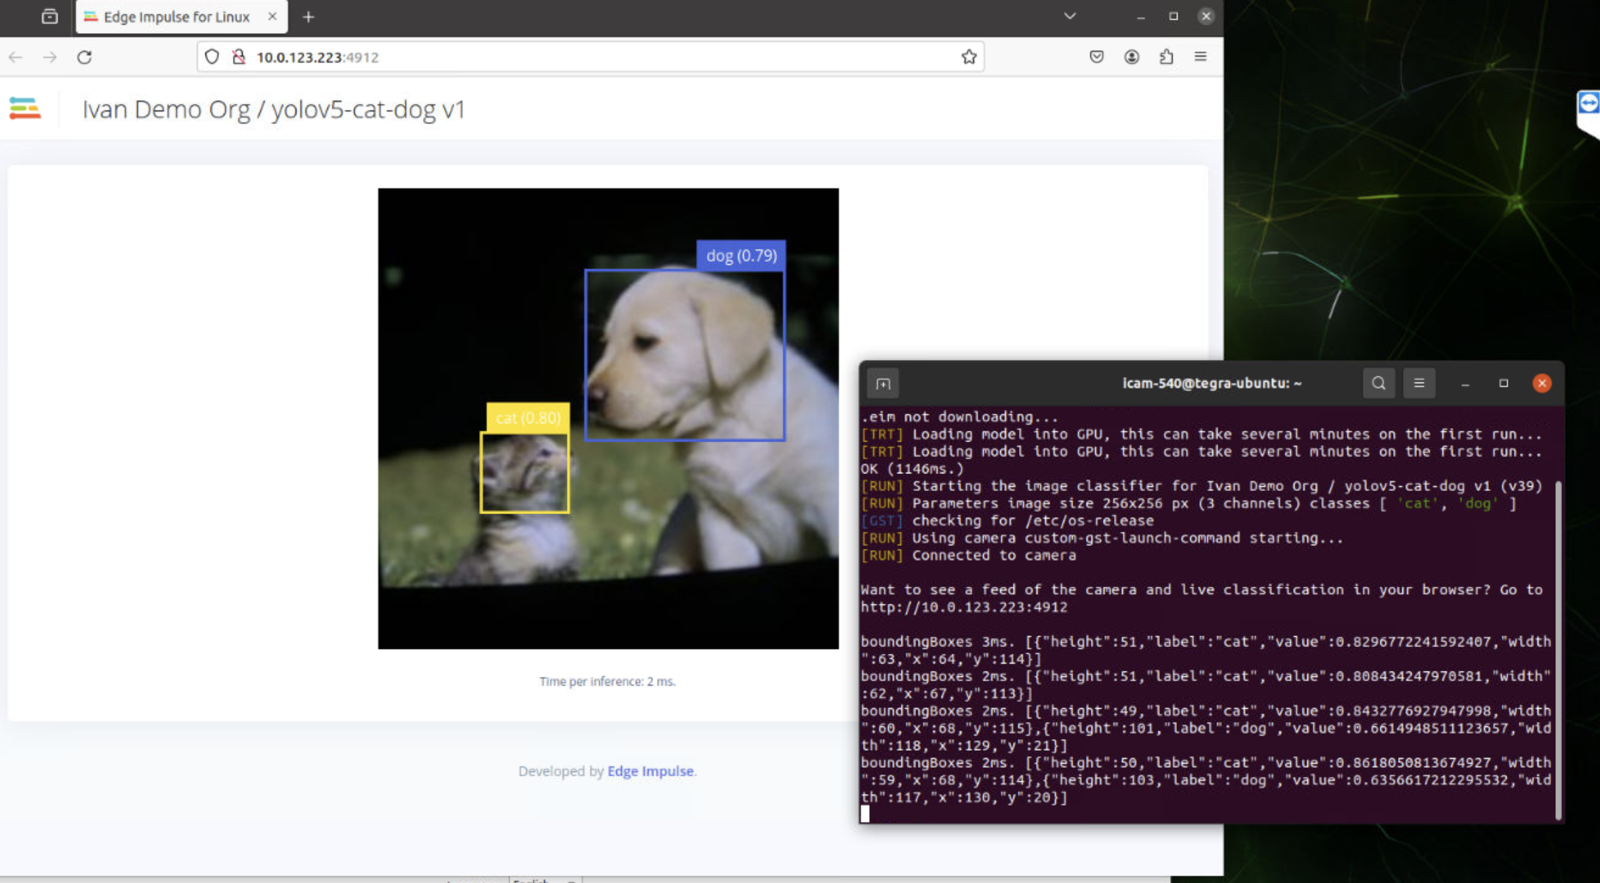
View inference in web browser

If you have an image model then you can get a peek of what your device sees by being on the same network as your device, and finding the 'Want to see a feed of the camera and live classification in your browser' message in the console. Open the URL in a browser and both the camera feed and the classification are shown:

Troubleshooting

edge-impulse-linux reports "OOM killed!"

Using make -j without specifying job limits can overtax system resources, causing "OOM killed" errors, especially on resource-constrained devices this has been observed on many of our supported Linux based SBCs.

Avoid using make -j without limits. If you experience OOM errors, limit concurrent jobs. A safe practice is:

make -j`nproc`

This sets the number of jobs to your machine's available cores, balancing performance and system load.

edge-impulse-linux reports "[Error: Input buffer contains unsupported image format]"

This is probably caused by a missing dependency on libjpeg. If you run:

vips --vips-config

The end of the output should show support for file import/export with libjpeg, like so:

file import/export with libjpeg: yes (pkg-config)
image pyramid export: no
use libexif to load/save JPEG metadata: no
alex@jetson1:~$

If you don't see jpeg support as "yes", rerun the setup script and take note of any errors.

edge-impulse-linux reports "Failed to start device monitor!"

If you encounter this error, ensure that your entire home directory is owned by you (especially the .config folder):

sudo chown -R $(whoami) $HOME

Long warm-up time and under-performance

By default, the Jetson Orin enabled devices use a number of aggressive power saving features to disable and slow down hardware that is detected to be not in use. Experience indicates that sometimes the GPU cannot power up fast enough, nor stay on long enough, to enjoy best performance. You can adjust your power settings in the menu bar of the Ubuntu desktop.

Additionally, due to NVIDIA GPU internal architecture, running small models on it is less efficient than running larger models. E.g. the continuous gesture recognition model runs faster on NVIDIA CPU than on GPU with TensorRT acceleration.

According to our benchmarks, running vision models and larger keyword spotting models on GPU will result in faster inference, while smaller keyword spotting models and gesture recognition models (that also includes simple fully connected NN, that can be used for analyzing other time-series data) will perform better on CPU.

Advantech ICAM-540
Unconfigured camera sensor in pylon Viewer
Configured camera sensor in pylon Viewer
Advantech ICAM-540 Deployment Option
ICAM540 - Live feed with classification results