- Fastest way to get started: Edge Impulse Python SDK with TensorFlow and Keras tutorial
- Reference documentation
- See the Python SDK in action with this video:
Bring Your Own Model (BYOM)
You can upload models trained in a variety of frameworks, such as TensorFlow, PyTorch, or MATLAB, to the Studio or use our new Python SDK to script the profiling and deployment processes.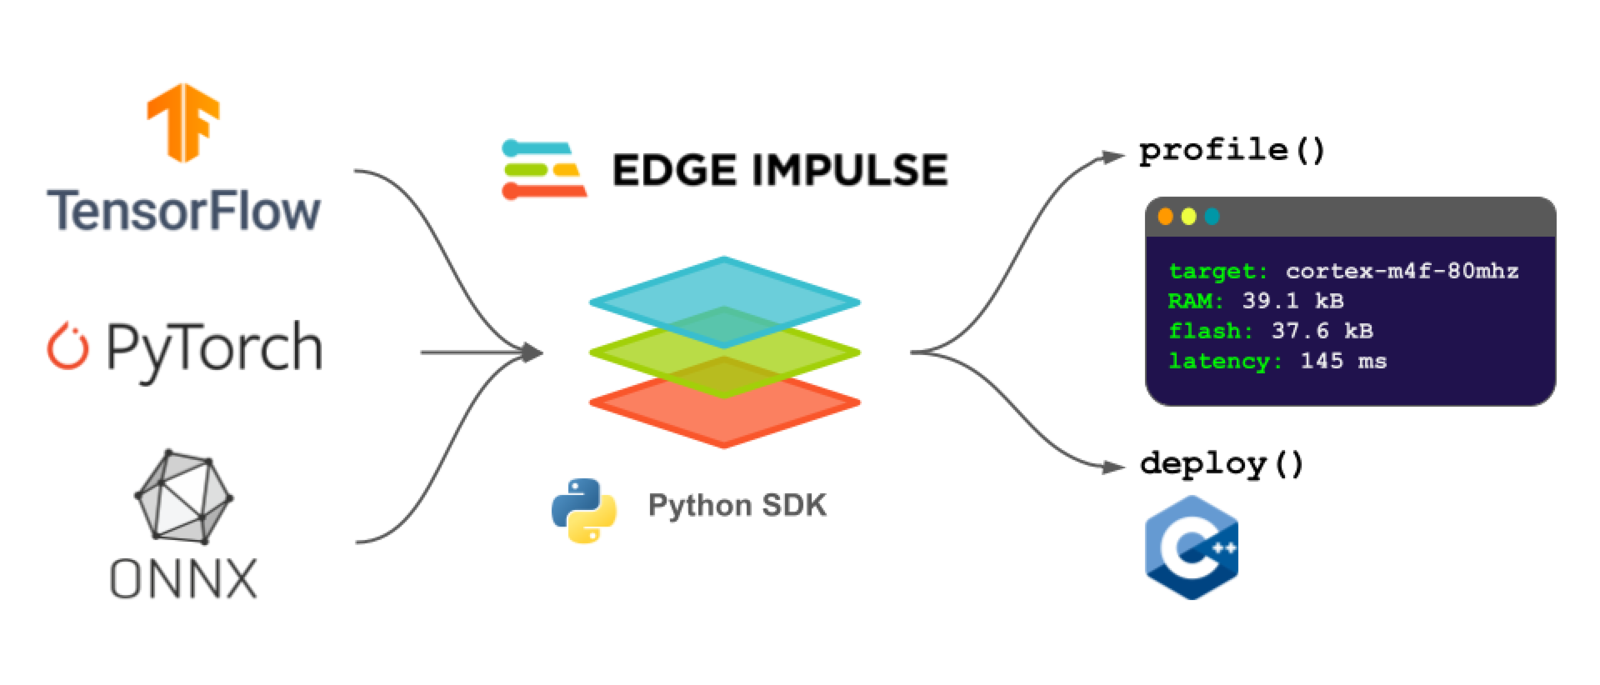
The Edge Impulse Python SDK
The Python SDK consists of two main libraries:- Python SDK - Classes and functions built using the Python API bindings to make the process of profiling and deploying your models easier. You can view the reference guide for the Python SDK here.
- Python API bindings - Python wrappers for the Edge Impulse Studio API that allow you to interact with projects programmatically (i.e. without needing to use the Studio graphical interface). You can view the API reference guide for the Python API bindings here.
Using the Python SDK
Install the Python SDK with:
Supported input formats
The following input formats are supported:- Keras Model instance
- TensorFlow SavedModel (directory location or .zip of SavedModel directory)
- LiteRT (previously Tensorflow Lite) model file (.lite or .tflite, or directly from memory)
- ONNX model file (use torch.onnx to export a PyTorch model to ONNX)
Profile
You can pass a model (in one of the supported input formats) along with one of several possible hardware targets to theprofile() function. This will send the model to your Edge Impulse project, where the RAM, ROM, and inference time will be estimated based on the target hardware.
To get the available hardware targets for profiling, run the following:
'cortex-m4f-80mhz', as this is a relatively low-power microcontroller family. From there, we can use the Edge Impulse Python SDK to generate a profile for your model to ensure it fits on your target hardware and meets your timing requirements.
resp) in your MLOPs pipeline to determine if your model will fit within your hardware constraints. For example, the following will print out the RAM and ROM requirements along with the estimated inference time (ms) for the cortex-m4f-80mhz target (assuming you are using the float32 version of the model):
Deploy
Once you are ready to deploy your model, you can call thedeploy() function to convert your model from one of the available input formats to one of the Edge Impulse supported outputs. Edge Impulse can output a number of possible deployment libraries and pre-compiled binaries for a wide variety of target hardware.
The default option downloads a .zip file containing a C++ library containing the optimized inference runtime and your trained model. As long as you have a C++ compiler for your target hardware (and enough RAM and ROM), you can run inference!
The following will convert "my_model" (which might be a SavedModel directory) to a C++ library. Note that you need to specify the model type (Classification, in this case).
output_directory, the file(s) will not be downloaded. Instead, you can use the return value of ei.model.deploy(), which is the file as a raw set of bytes. You can then write those bytes to a file of your choosing. See this example for a demonstration.
You can read more about using the C++ library for inference here.
To get the full list of available hardware targets for deployment, run the following:
ei.model.deploy() using the deploy_target argument, for example deploy_target='zip'.
Important! The deployment targets list will change depending on the values provided for model, model_output_type, and model_input_type in the next part. For example, you will not see openmv listed once you upload a model (e.g. using .profile() or .deploy()) if model_input_type is not set to ei.model.input_type.ImageInput(). If you attempt to deploy to an unavailable target, you will receive the error Could not deploy: deploy_target: .... If model_input_type is not provided, it will default to OtherInput. See this page for more information about input types.
Quantization
You can optionally quantize a model during deployment. A quantized model will use an internalint8 numeric representation rather than float32, which can result in reduced memory usage and faster computation on many targets.
Quantization requires a sample of data that is representative of the range (maximum and minimum) of values in your training data. It should either be an in-memory numpy array, or the path to a numpy file. Each element of the array must have the same shape as your model’s input.
You can pass the representative data sample via the representative_data_for_quantization argument: