




Important! This project will add data and remove any current features and models in a project. We highly recommend creating a new project when running this notebook! Don’t say we didn’t warn you if you mess up an existing project.
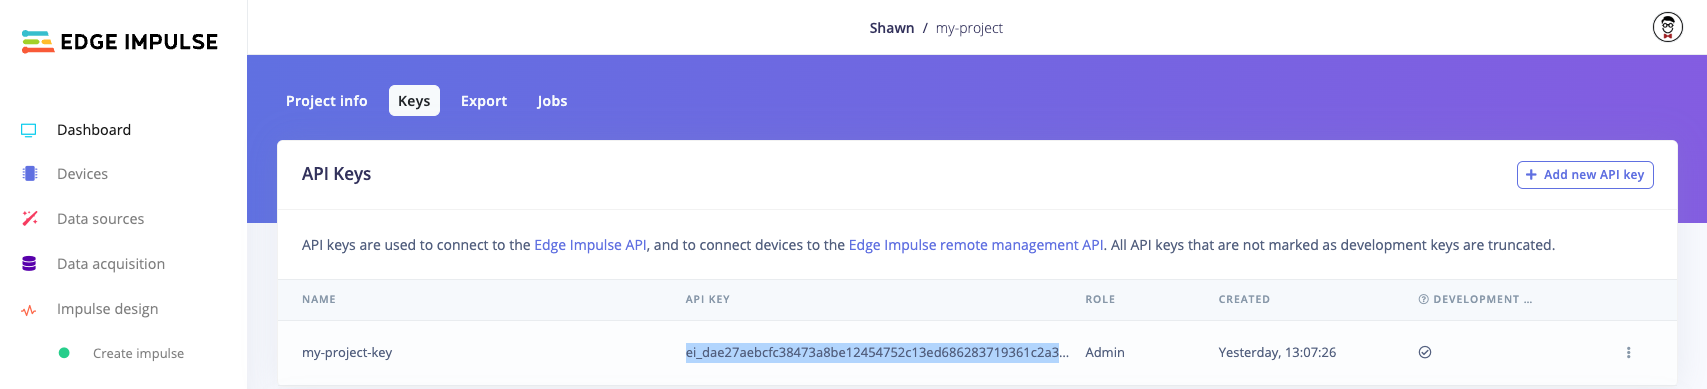
Copy API key from Edge Impulse project
EI_API_KEY value in the following cell:
Initialize API clients
The Python API bindings use a series of submodules, each encapsulating one of the API subsections (e.g. Projects, DSP, Learn, etc.). To use these submodules, you need to instantiate a generic API module and use that to instantiate the individual API objects. We’ll use these objects to make the API calls later. To configure a client, you generally create a configuration object (often from a dict) and then pass that object as an argument to the client.Initialize project
Before uploading data, we should make sure the project is in the regular impulse flow mode, rather than BYOM mode. We’ll also need the project ID for most of the other API calls in the future. Notice that the general pattern for calling API functions is to instantiate a configuration/request object and pass it to the API method that’s part of the submodule. You can find which parameters a specific API call expects by looking at the call’s documentation page. API calls (links to associated documentation):Upload dataset
We’ll start by downloading the gesture dataset from this link. Note that the Ingestion API is separate from the regular Edge Impulse API: the URL and interface are different. As a result, we must construct the request manually and cannot rely on the Python API bindings. We rely on the ingestion service using the string before the first period in the filename to determine the label. For example, “idle.1.cbor” will be automatically assigned the label “idle.” If you wish to set a label manually, you must specify thex-label parameter in the headers. Note that you can only define a label this way when uploading a group of data at a time. For example, setting "x-label": "idle" in the headers would give all data uploaded with that call the label “idle.”
API calls used with associated documentation:
Create an impulse
Now that we uploaded our data, it’s time to create an impulse. An “impulse” is a combination of processing (feature extraction) and learning blocks. The general flow of data is:data -> input block -> processing block(s) -> learning block(s)Only the processing and learning blocks make up the “impulse.” However, we must still specify the input block, as it allows us to perform preprocessing, like windowing (for time series data) or cropping/scaling (for image data). Your project will have one input block, but it can contain multiple processing and learning blocks. Specific outputs from the processing block can be specified as inputs to the learning blocks. However, for simplicity, we’ll just show one processing block and one learning block.
Note: Historically, processing blocks were called “DSP blocks,” as they focused on time series data. In Studio, the name has been changed to “Processing block,” as the blocks work with different types of data, but you’ll see it referred to as “DSP block” in the API.It’s important that you define the input block with the same parameters as your captured data, especially the sampling rate! Additionally, the processing block axes names must match up with their names in the dataset. API calls (links to associated documentation):
Configure processing block
Before generating features, we need to configure the processing block. We’ll start by printing all the available parameters for thespectral-analysis block, which we set when we created the impulse above.
API calls (links to associated documentation):
Run processing block to generate features
After we’ve defined the impulse, we then want to use our processing block(s) to extract features from our data. We’ll skip feature importance and feature explorer to make this go faster. Generating features kicks off a job in Studio. A “job” involves instantiating a Docker container and running a custom script in the container to perform some action. In our case, that involves reading in data, extracting features from that data, and saving those features as Numpy (.npy) files in our project. Because jobs can take a while, the API call will return immediately. If the call was successful, the response will contain a job number. We can then monitor that job and wait for it to finish before continuing. API calls (links to associated documentation):Use learning block to train model
Now that we have trained features, we can run the learning block to train the model on those features. Note that Edge Impulse has a number of learning blocks, each with different methods of configuration. We’ll be using the “keras” block, which uses TensorFlow and Keras under the hood. You can use the get_keras and set_keras functions to configure the granular settings. We’ll use the defaults for that block and just set the number of epochs and learning rate for training. API calls (links to associated documentation):Test the impulse
As with any good machine learning project, we should test the accuracy of the model using our holdout (“testing”) set. We’ll call theclassify API function to make that happen and then parse the job logs to get the results.
In most cases, using int8 quantization will result in a faster, smaller model, but you will slightly lose some accuracy.
API calls (links to associated documentation):
Deploy the impulse
Now that you’ve trained the model, let’s build it as a C++ library and download it. We’ll start by printing out the available target devices. Note that this list changes depending on how you’ve configured your impulse. For example, if you use a Syntiant-specific learning block, then you’ll see Syntiant boards listed. We’ll use the “zip” target, which gives us a generic C++ library that we can use for nearly any hardware. Theengine must be one of:
tflite, as that’s the most ubiquitous.
modelType is the quantization level. Your options are:
int8 quantization will result in a faster, smaller model, but you will slightly lose some accuracy.
API calls (links to associated documentation):