Impulses can be deployed as an Arduino library. This packages all of your signal processing blocks, configuration and learning blocks up into a single package. You can include this package in your own sketches to run the impulse locally. In this tutorial, you’ll export an impulse, and integrate the impulse in a sketch to classify sensor data.
This tutorial should work on most Arm-based Arduino development boards with at least 64K of RAM, like the Arduino Nano 33 BLE Sense, Arduino Portenta H7 + Vision shield and the Arduino Nicla Vision.
In October 2022, we also added support for ESP32 boards. It has been tested with the ESP-EYE and the ESP32-CAM AI Thinker.
For the Arduino Nicla Voice, refer to the Syntiant hardware tutorial.
Navigate further down this page, on the Board Manager section to see how to setup Edge Impulse-compatible boards.
Knowledge requiredThis tutorial assumes that you’re familiar with the Arduino IDE, and that you’re comfortable building Arduino sketches. If you’re unfamiliar with these tools you can build binaries directly for your development board from the Deployment page in the studio.
Prerequisites
Make sure you followed one of the following tutorials, and have a trained impulse:
Also, install the following software:
Download the Arduino Library
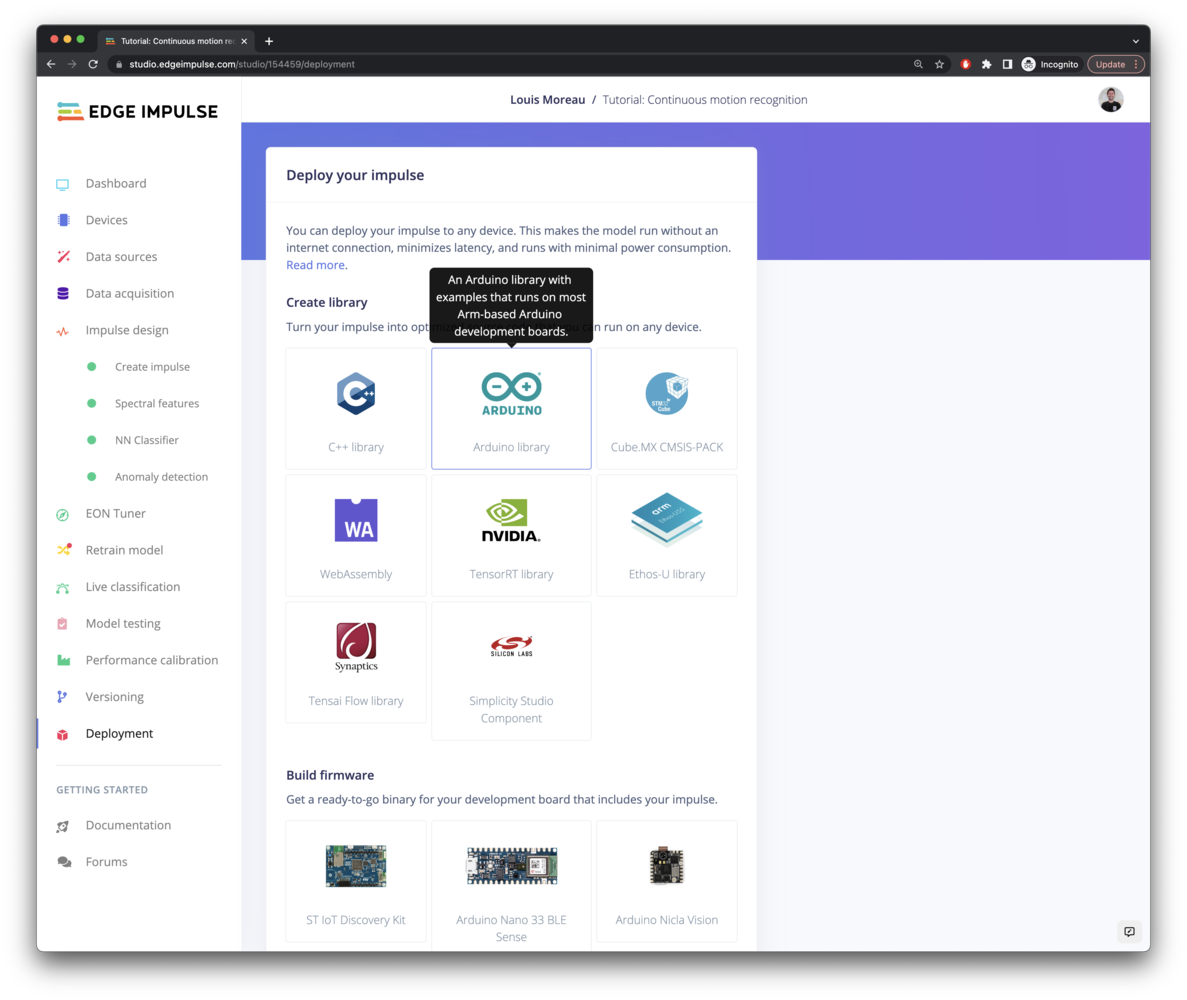
Head over to your Edge Impulse project, and go to Deployment.
From here you can create the full library which contains the impulse and all external required libraries. Select Arduino library and click Build to create the library. This will download the arduino-compatible .zip file:
Test your impulse the “static buffer” example
Before starting to write code with your custom logic, make sure your impulse runs as expected on your board. This will ensure that you can compile the generated Arduino library containing your impulse and that the inference results are correct.
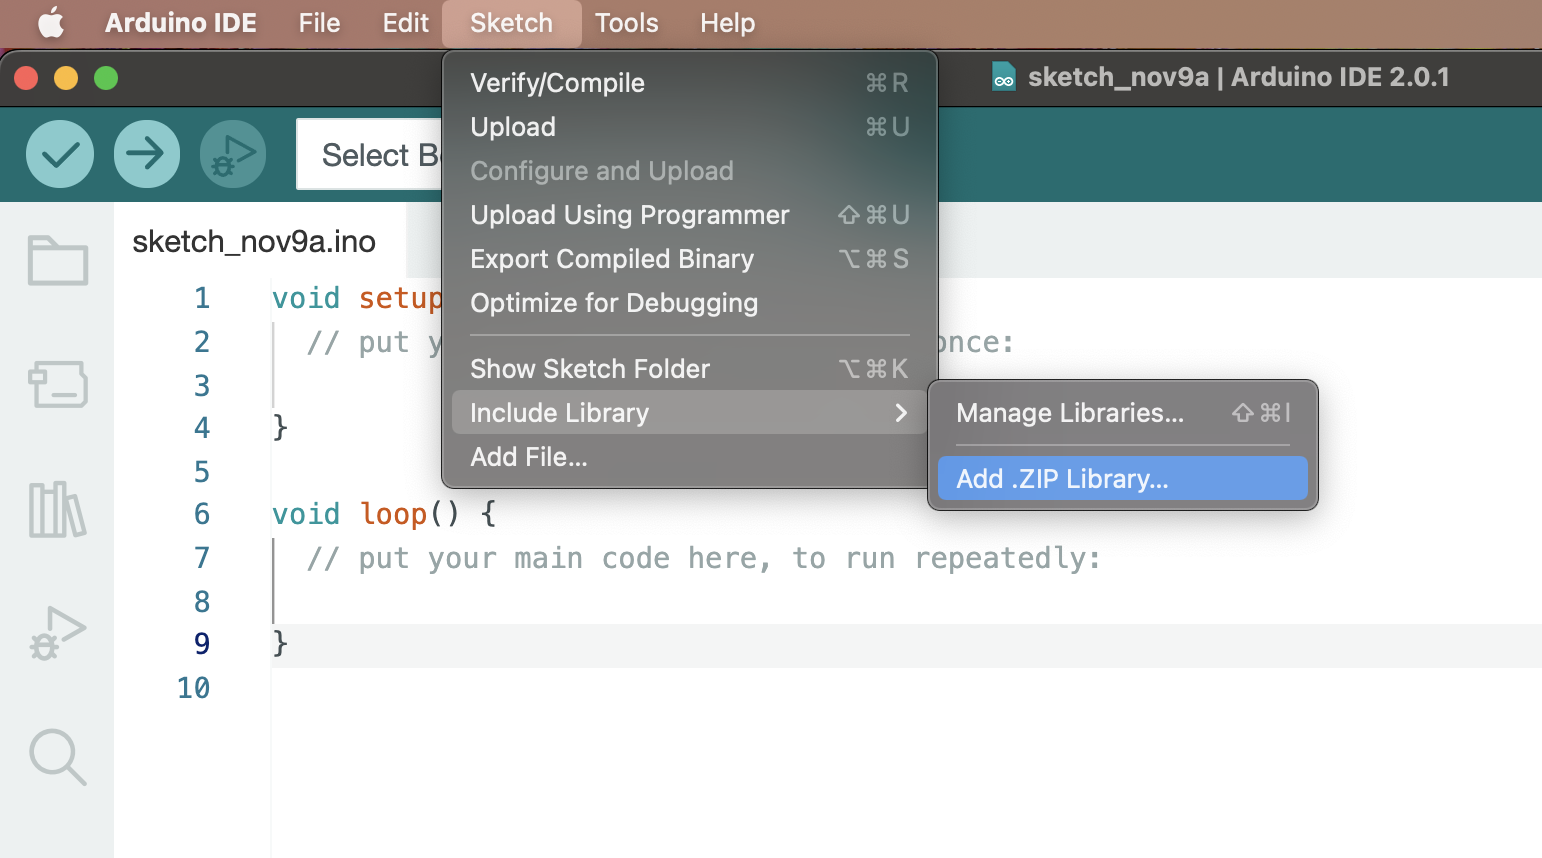
To do so, add the library and open an example, open the Arduino IDE and:
-
Choose Sketch > Include Library > Add .ZIP library….
-
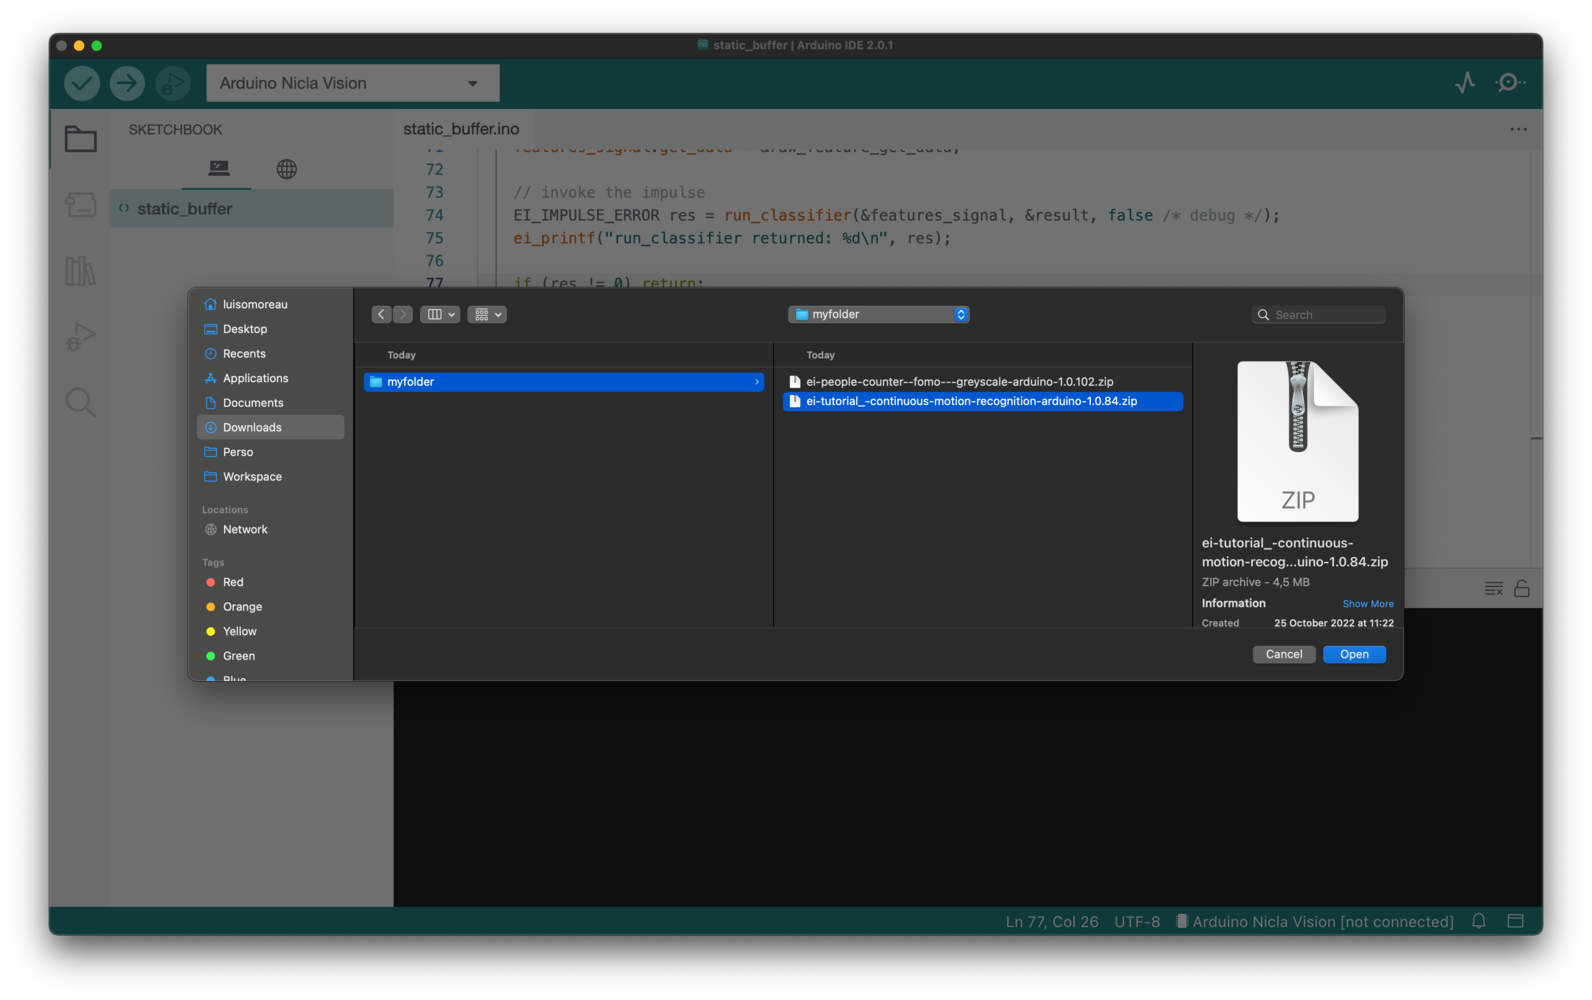
Select the ZIP file, and then click the Choose button.
-
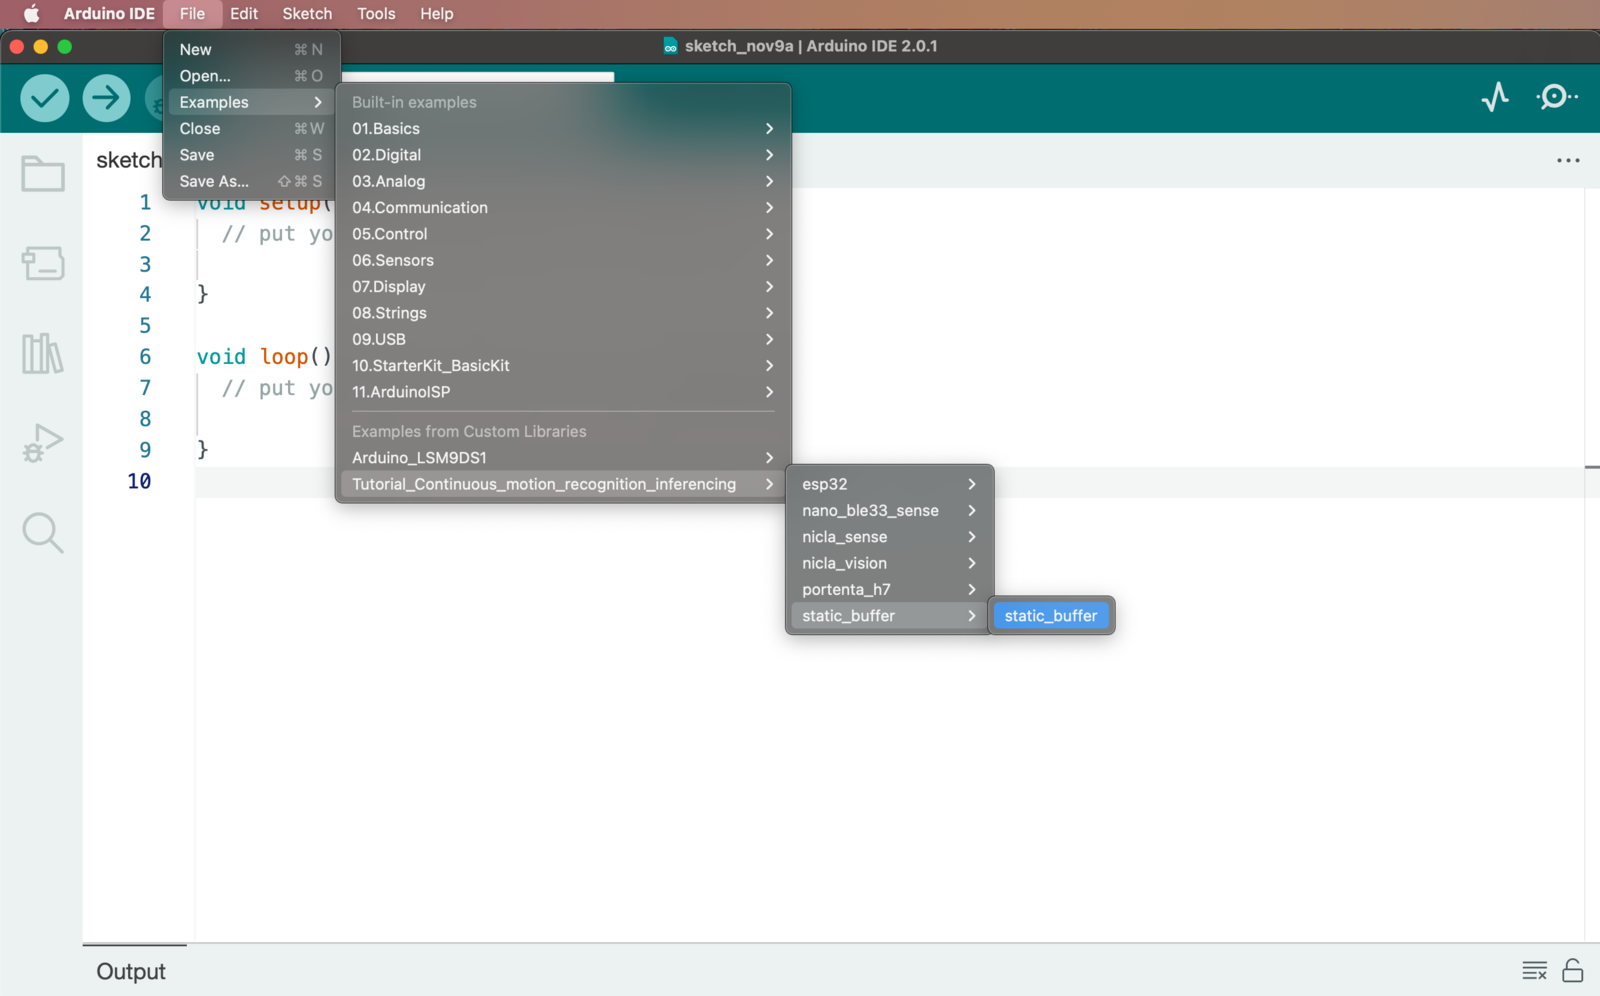
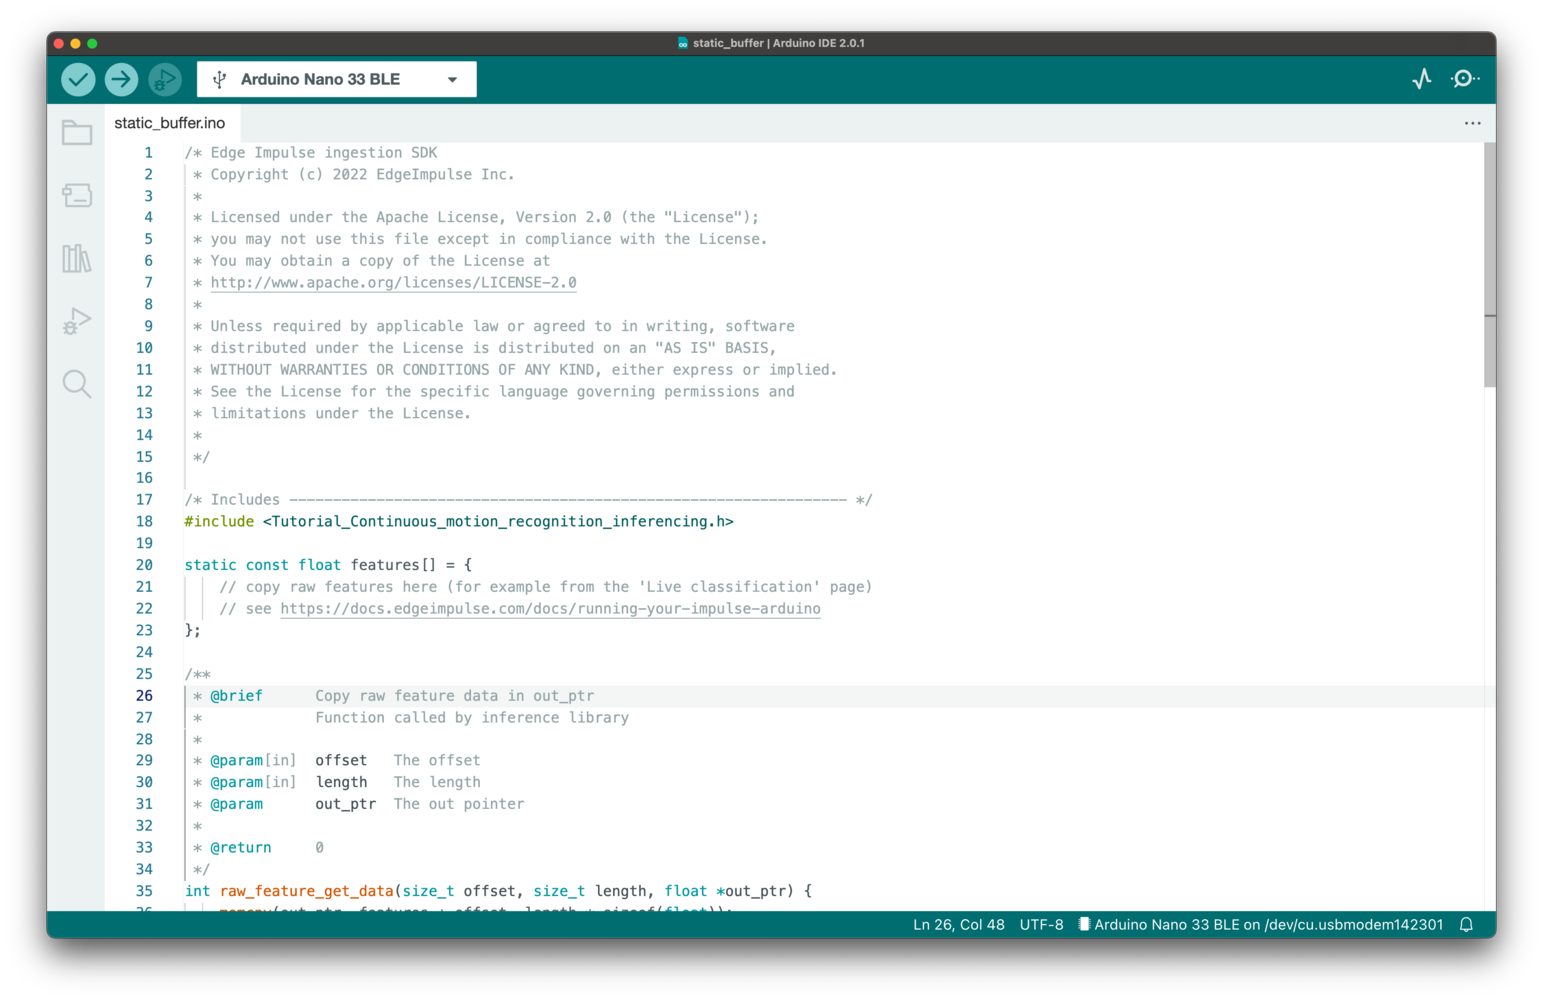
Then, load an example by going to File > Examples > Your project name - Edge Impulse > static_buffer > static_buffer.
In some configurations, it can be needed to restart Arduino IDE to see the examples.
-
Voila. You now have an example application that loads your impulse.
Running the impulse
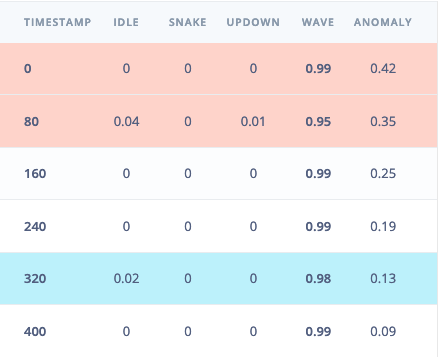
With the project ready it’s time to verify that the application works. Head back to the studio and click on Live classification. Then load a validation sample, and click on a row under ‘Detailed result’.
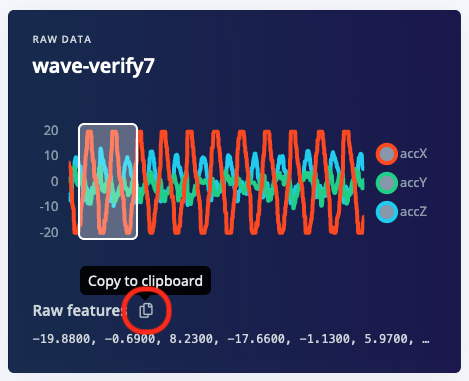
To verify that the local application classifies the same, we need the raw features for this timestamp. To do so click on the ‘Copy to clipboard’ button next to ‘Raw features’. This will copy the raw values from this validation file, before any signal processing or inferencing happened.
In the sketch paste the raw features inside the static const float features[] definition, for example:
static const float features[] = {
    -19.8800, -0.6900, 8.2300, -17.6600, -1.1300, 5.9700, ...
};
Seeing the output
To see the output of the impulse, open the serial monitor from the Arduino IDE via Tools > Serial monitor, and selecting baud rate 115,200.
This will run the signal processing pipeline, and then classify the output:
Edge Impulse standalone inferencing (Arduino)
Running neural network...
Predictions (time: 0 ms.):
idle:   0.015319
snake:  0.000444
updown: 0.006182
wave:   0.978056
Anomaly score (time: 0 ms.): 0.133557
run_classifier_returned: 0
[0.01532, 0.00044, 0.00618, 0.97806, 0.134]
Connecting sensors?
A demonstration on how to plug sensor values into the classifier can be found here: Data forwarder - classifying data (Arduino).
Boards manager
We also provide examples for all the officially supported targets that include sampling the raw features from the onboard sensors.
To use them, make sure to install the right development board under Tools->Boards->Boards Manager. We officially support:
-
the Arduino Nano 33 BLE Sense,
-
the Arduino Portenta H7 + Vision shield,
-
the Arduino Nicla Vision,
-
the Arduino Nicla Sense ME
-
the Espressif ESP-EYE (ESP32).
-
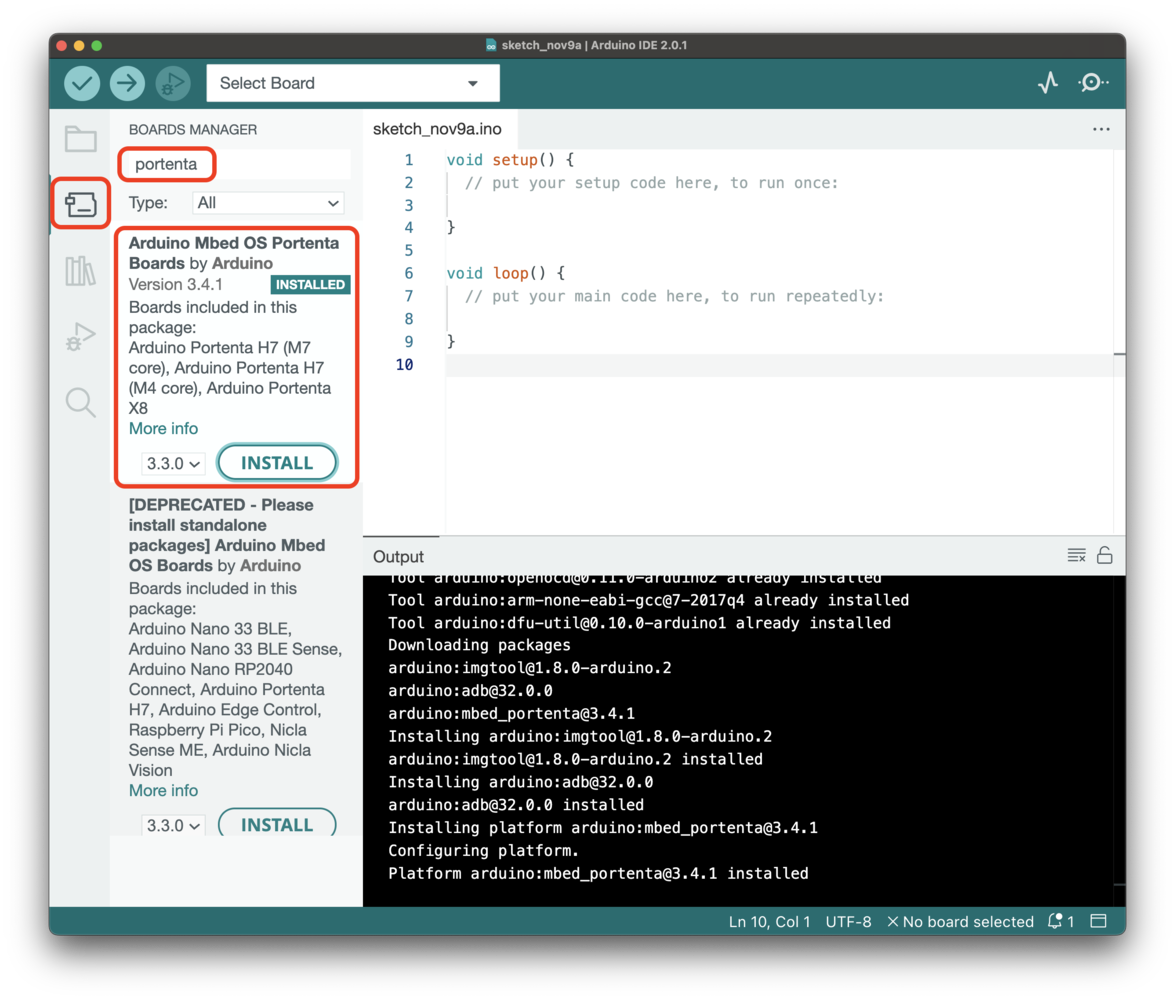
Arduino Nano 33 BLE Sense
For the Arduino Nano 33 BLE Sense, install the following board:
-
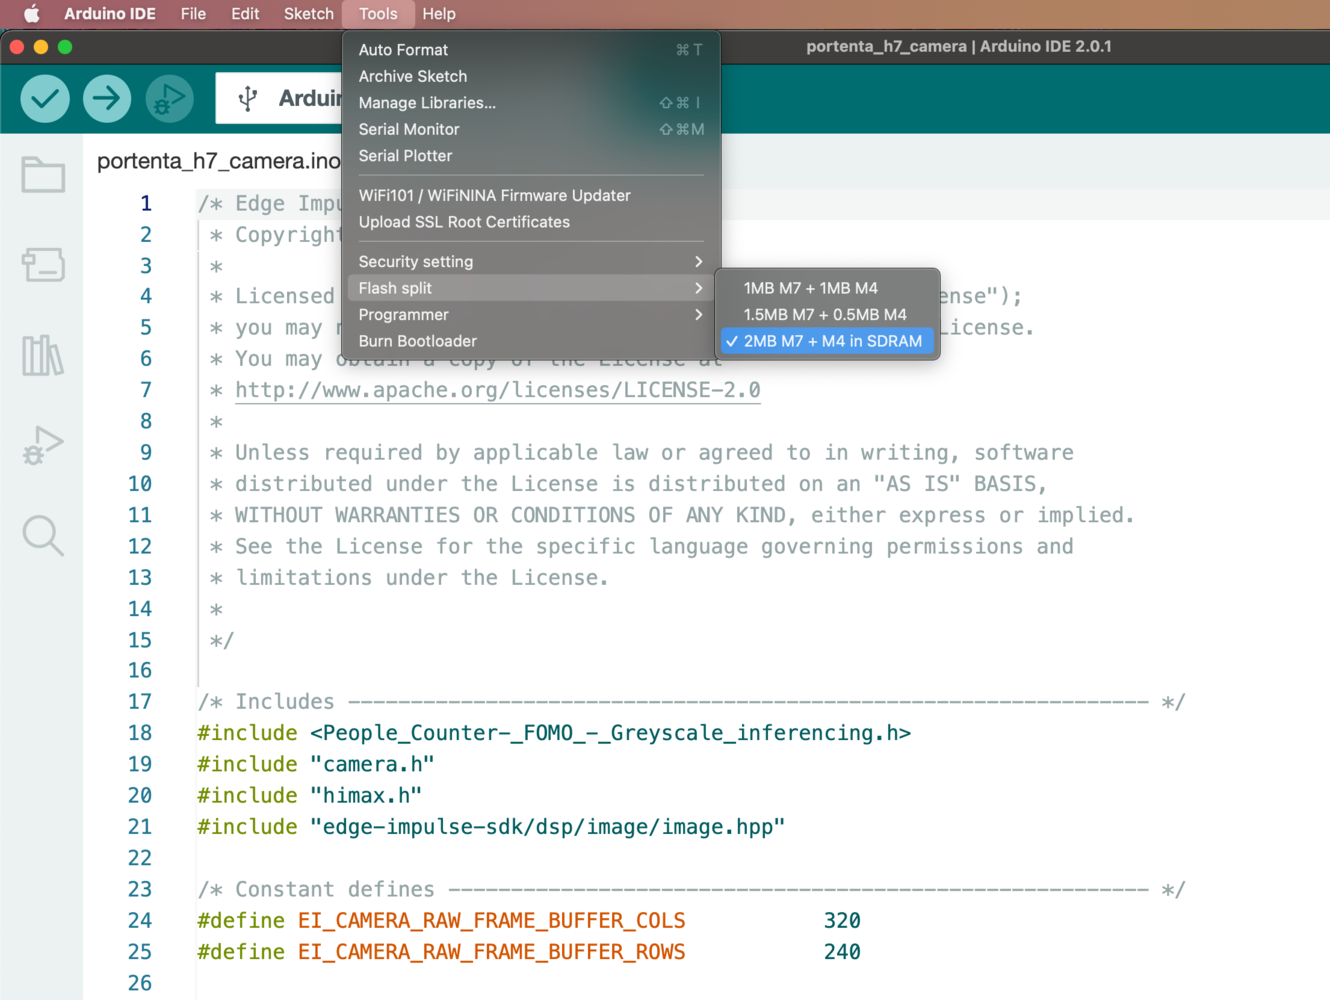
Arduino Portenta H7
For the Arduino Portenta H7, make sure to install the Arduino Mbed OS Portenta Boards v2.8.0 and to select the Arduino Portenta H7 (M7 core) board and the Flash Split 2 MB M7 + M4 in SDRAM:
-
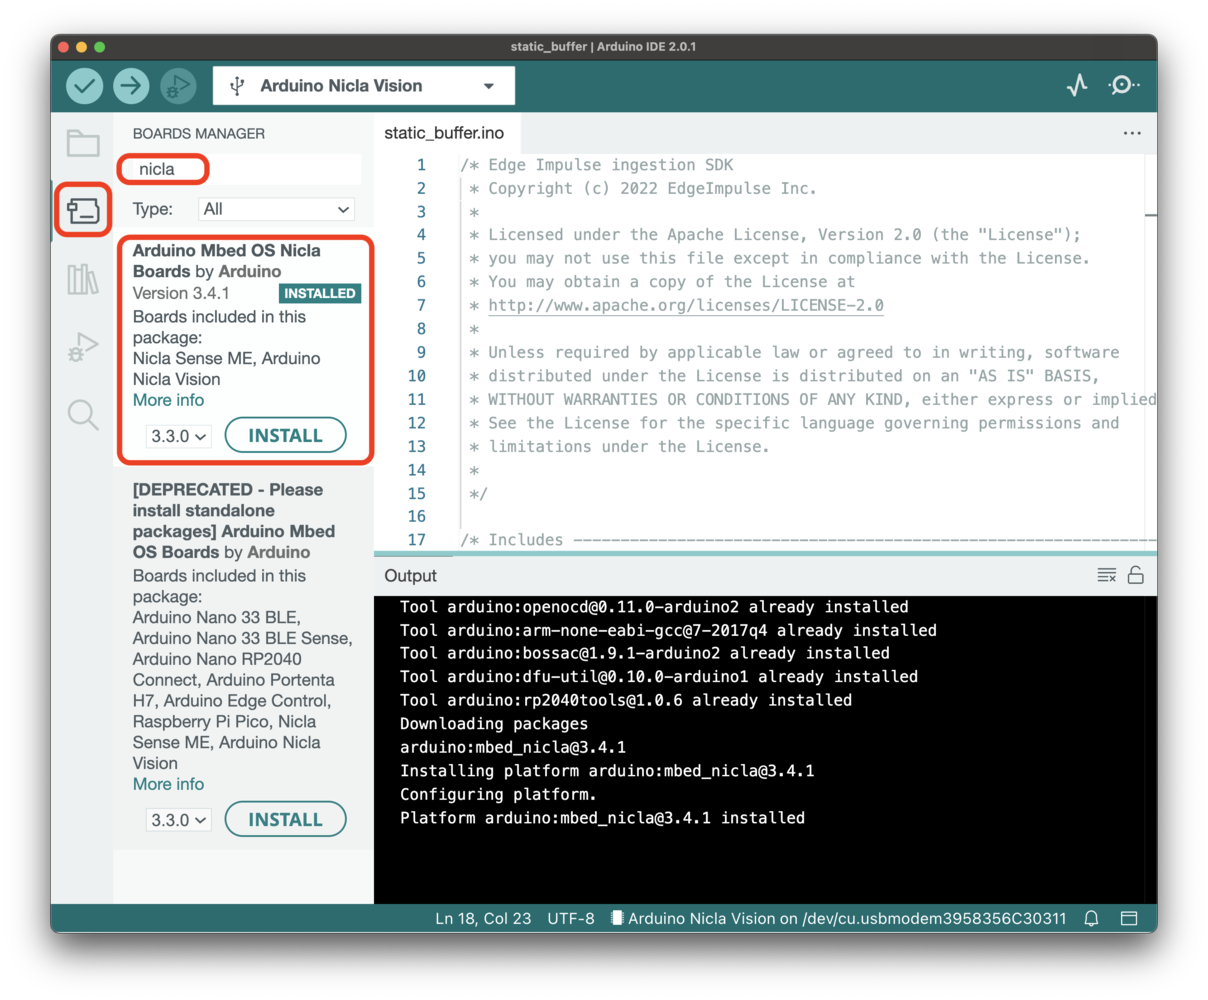
Arduino Nicla boards
For the Arduino Nicla Vision and the Arduino Nicla Sense ME, install the following board:
-
Espressif ESP32
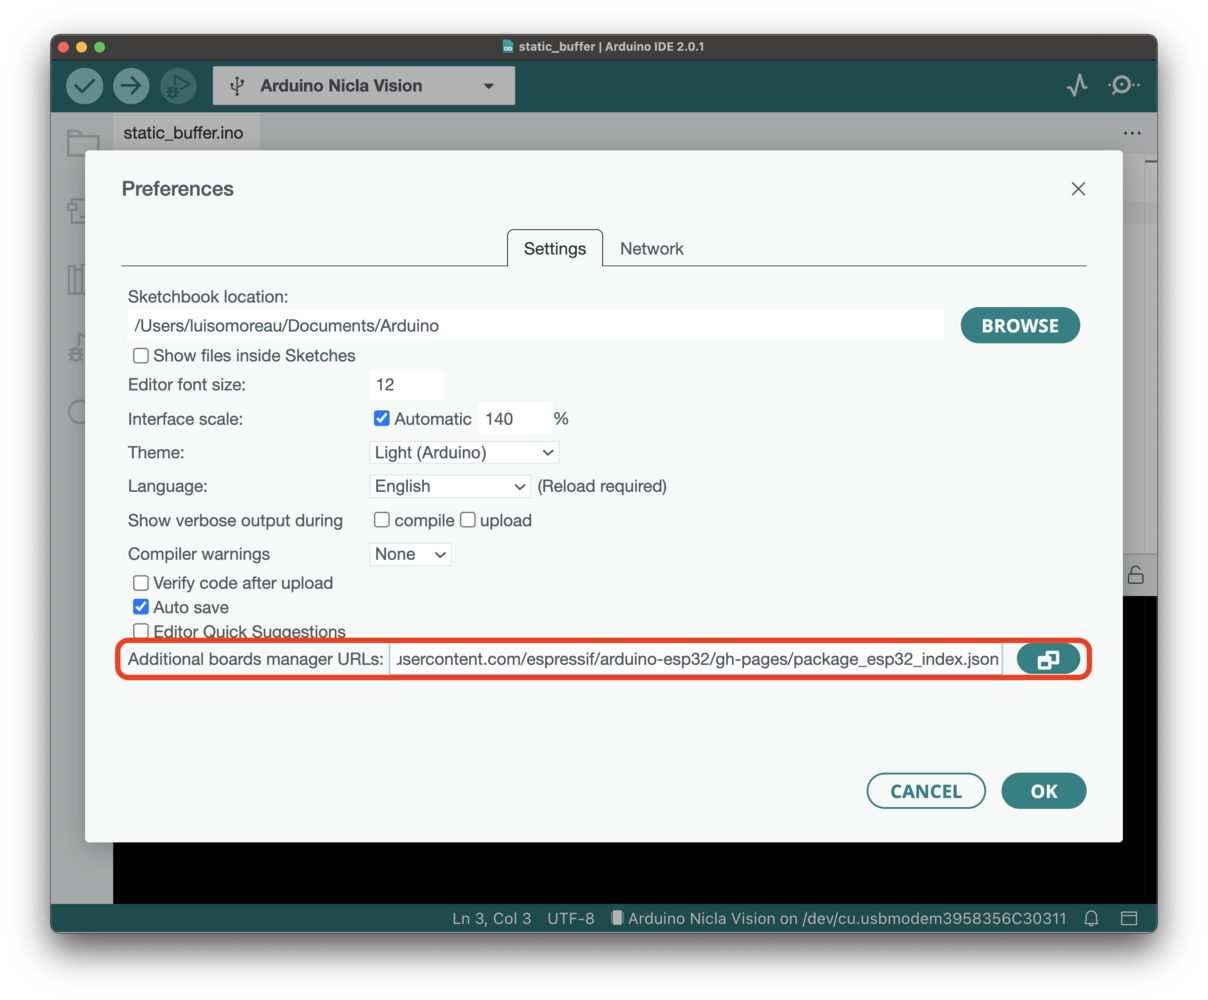
For the ESP32 boards, we officially support the ESP-EYE. Other boards have been tested such as the ESP32-CAM AI Thinker. To install ESP32 boards, go to Arduino->Preferences and add the following link to the additional boards manager URLs:
https://raw.githubusercontent.com/espressif/arduino-esp32/gh-pages/package_esp32_index.json. Then install the ESP32 boards from the board manager menu.
Make sure to enable PSRAM if you need to run image-based models (image classification or FOMO).
The following settings should work with the ESP-EYE and the ESP32-CAM AI-Thinker:
- Board Selection: ESP32 Dev Module
- PSRAM: Enabled
- Upload Speed: 115200
By default, the esp32-camera sketch is configured to work with the ESP-EYE. To change the camera model replace:
#define CAMERA_MODEL_ESP_EYE // Has PSRAM
//#define CAMERA_MODEL_AI_THINKER // Has PSRAM
//#define CAMERA_MODEL_ESP_EYE // Has PSRAM
#define CAMERA_MODEL_AI_THINKER // Has PSRAM
Troubleshooting
Error: ‘ei_run_impulse’ was not declared in this scope
If you see the following error:
error: either all initializer clauses should be designated or none of them should be
1789 | .channels = input->dims->data[3]
// These sketches are tested with 2.0.4 ESP32 Arduino Core
// https://github.com/espressif/arduino-esp32/releases/tag/2.0.4
Multiple libraries were found for …
Exported libraries are automatically versioned, but it’s possible that the Arduino IDE gets confused on which version to use leading to an error like: Multiple libraries were found for .... You can delete old versions of the libraries to mitigate this. The libraries are located at:
- Windows:
My Documents > Arduino > libraries
- macOS:
~/Documents/Arduino/libraries/
- Linux:
~/sketchbook/libraries
No such file or directory: include <arm_math.h>
~/Documents/Arduino/libraries/ei-accelerometer-impulse/src/edge-impulse-sdk/CMSIS/NN/Source/PoolingFunctions/arm_max_pool_s8.c:32:10: fatal error: arm_math.h: No such file or directory
 #include <arm_math.h>
macro “min” passed 3 arguments, but takes just 2
If you’re compiling on a SAMD21-based target, you’ll see the above error. This is a known bug in the Arduino core for the SAMD21. If you apply the following patch the issue will go away.
error: ‘va_start’ was not declared in this scope
This error can be seen while compiling for a SAMD21-based target. You will need to add the standard library in your sketch:
Empty array when printing results
If the predictions are not properly printed, e.g.:
Edge Impulse standalone inferencing (Arduino)
run_classifier returned: 0
Predictions (DSP: 369 ms., Classification: 3 ms., Anomaly: 4 ms.):
[, , , , ]
    ei_printf("Predictions (DSP: %d ms., Classification: %d ms., Anomaly: %d ms.): \n",
        result.timing.dsp, result.timing.classification, result.timing.anomaly);

    // print the predictions
    ei_printf("[");
    for (size_t ix = 0; ix < EI_CLASSIFIER_LABEL_COUNT; ix++) {
        ei_printf("%d", static_cast<int>(result.classification[ix].value * 100));
#if EI_CLASSIFIER_HAS_ANOMALY == 1
        ei_printf(", ");
#else
        if (ix != EI_CLASSIFIER_LABEL_COUNT - 1) {
            ei_printf(", ");
        }
#endif
    }
#if EI_CLASSIFIER_HAS_ANOMALY == 1
    ei_printf("%d", static_cast<int>(result.anomaly));
#endif
    ei_printf("]\n");
Slow DSP operations
Where possible the signal processing code utilizes the vector extensions on your platform, but these are not enabled on all platforms. If these are not enabled we fall back to a software implementation which is slower. We don’t enable these on all platforms because the wide variety of platform and core versions Arduino supports, but you can see enable them for your platform by adding the following code on the first line of your sketch, before any includes (only works on Arm cores):
#define EIDSP_USE_CMSIS_DSP		        1
#define EIDSP_LOAD_CMSIS_DSP_SOURCES    1
src/edge-impulse-sdk/dsp/config.hpp file in the library and add, before #ifndef EIDSP_USE_CMSIS_DSP:
#define EIDSP_USE_CMSIS_DSP		        1
#define EIDSP_LOAD_CMSIS_DSP_SOURCES    1
#define __STATIC_FORCEINLINE                   __attribute__((always_inline)) static inline
#define __SSAT(ARG1, ARG2) \
__extension__ \
({                          \
  int32_t __RES, __ARG1 = (ARG1); \
  __ASM volatile ("ssat %0, %1, %2" : "=r" (__RES) :  "I" (ARG2), "r" (__ARG1) : "cc" ); \
  __RES; \
 })
Code compiling fails under Windows OS
fork/exec C:\Users\MYUSER\AppData\Local\Arduino15\packages\arduino\tools\arm-none-eabi-gcc\7-2017q4/bin/arm-none-eabi-g++.exe: The filename or extension is too long.
- mbed platform.local.txt. Copy this file under the Arduino mbed directory, i.e:
C:\Users\MYUSER\AppData\Local\Arduino15\packages\arduino\hardware\mbed\1.1.4\ or C:\Users\MYUSER\AppData\Local\Arduino15\packages\arduino\hardware\mbed_nano\2.1.0\
- SAMD21 platform.local.txt. Copy this file under the Arduino SAMD directory, i.e:
C:\Users\MYUSER\AppData\Local\Arduino15\packages\arduino\hardware\samd\1.8.9\
- SAMD51 (Adafruit) platform.local.txt. Copy this file under the Arduino Adafruit SAMD directory, i.e:
C:\Users\MYUSER\AppData\Local\Arduino15\packages\adafruit\hardware\samd\1.6.3\
- ESP32 platform.local.txt. Copy this file under the Arduino ESP32 directory, i.e:
C:\Users\MYUSER\AppData\Local\Arduino15\packages\esp32\hardware\esp32\1.0.4\
- STM32 platform.local.txt. Copy this file under the Arduino STM32 directory, i.e:
C:\Users\MYUSER\AppData\Local\Arduino15\packages\esp32\hardware\stm32\1.9.0\
Failed to connect to COM3 (Arduino Portenta H7)
[SER] Connecting to COM3
[SER] Failed to connect to COM3 retrying in 5 seconds Opening COM3: Access denied
[SER] You might need `sudo` or set up the right udev rules
[SER] Failed to connect to COM3 retrying in 5 seconds Opening COM3: Access denied
[SER] You might need `sudo` or set up the right udev rules
[SER] Failed to connect to COM3 retrying in 5 seconds Opening COM3: Access denied
[SER] You might need `sudo` or set up the right udev rules
No DFU capable USB device available (Arduino Portenta H7)
arduino:mbed_portenta 2.6.1     2.6.1  Arduino Mbed OS Portenta Boards
Finding Arduino Mbed core OK
Finding Arduino Portenta H7...
Finding Arduino Portenta H7 OK at Arduino
dfu-util 0.10-dev

Copyright 2005-2009 Weston Schmidt, Harald Welte and OpenMoko Inc.
Copyright 2010-2021 Tormod Volden and Stefan Schmidt
This program is Free Software and has ABSOLUTELY NO WARRANTY
Please report bugs to http://sourceforge.net/p/dfu-util/tickets/

Warning: Invalid DFU suffix signature
A valid DFU suffix will be required in a future dfu-util release
No DFU capable USB device available
Error during Upload: uploading error: uploading error: exit status 74
Flashing failed. Here are some options:
If your error is 'incorrect FQBN' you'll need to upgrade the Arduino core via:
     $ arduino-cli core update-index
     $ arduino-cli core install arduino:mbed_portenta@2.6.1
Otherwise, double tap the RESET button to load the bootloader and try again
Press any key to continue . . .
Nicla sensors don’t match the sensors required in the model (Nicla Sense ME)
Starting inferencing in 2 seconds...
ERR: Nicla sensors don't match the sensors required in the model
Following sensors are required: accel.x + accel.y + accel.z + gyro.x + gyro.y + gyro.z + ori.heading + ori.pitch + ori.roll + rotation.x ...
eiSensors nicla_sensors[] (near line 70) in the sketch example to add your custom names. e.g.:
/** Used sensors value function connected to label name */
eiSensors nicla_sensors[] =
{
    "X", &get_accX,
    "Y", &get_accY,
    "Z", &get_accZ,
    "gyrX", &get_gyrX,
    "gyrY", &get_gyrY,
    "gyrZ", &get_gyrZ,
    "heading", &get_oriHeading,
    "pitch", &get_oriPitch,
    "roll", &get_oriRoll,
    "rotX", &get_rotX,
    "rotY", &get_rotY,
    "rotZ", &get_rotZ,
    "rotW", &get_rotW,
    "temperature", &get_temperature,
    "barometer", &get_barrometric_pressure,
    "humidity", &get_humidity,
    "gas", &get_gas,
};

 Make sure to enable PSRAM if you need to run image-based models (image classification or FOMO). The following settings should work with the ESP-EYE and the ESP32-CAM AI-Thinker:
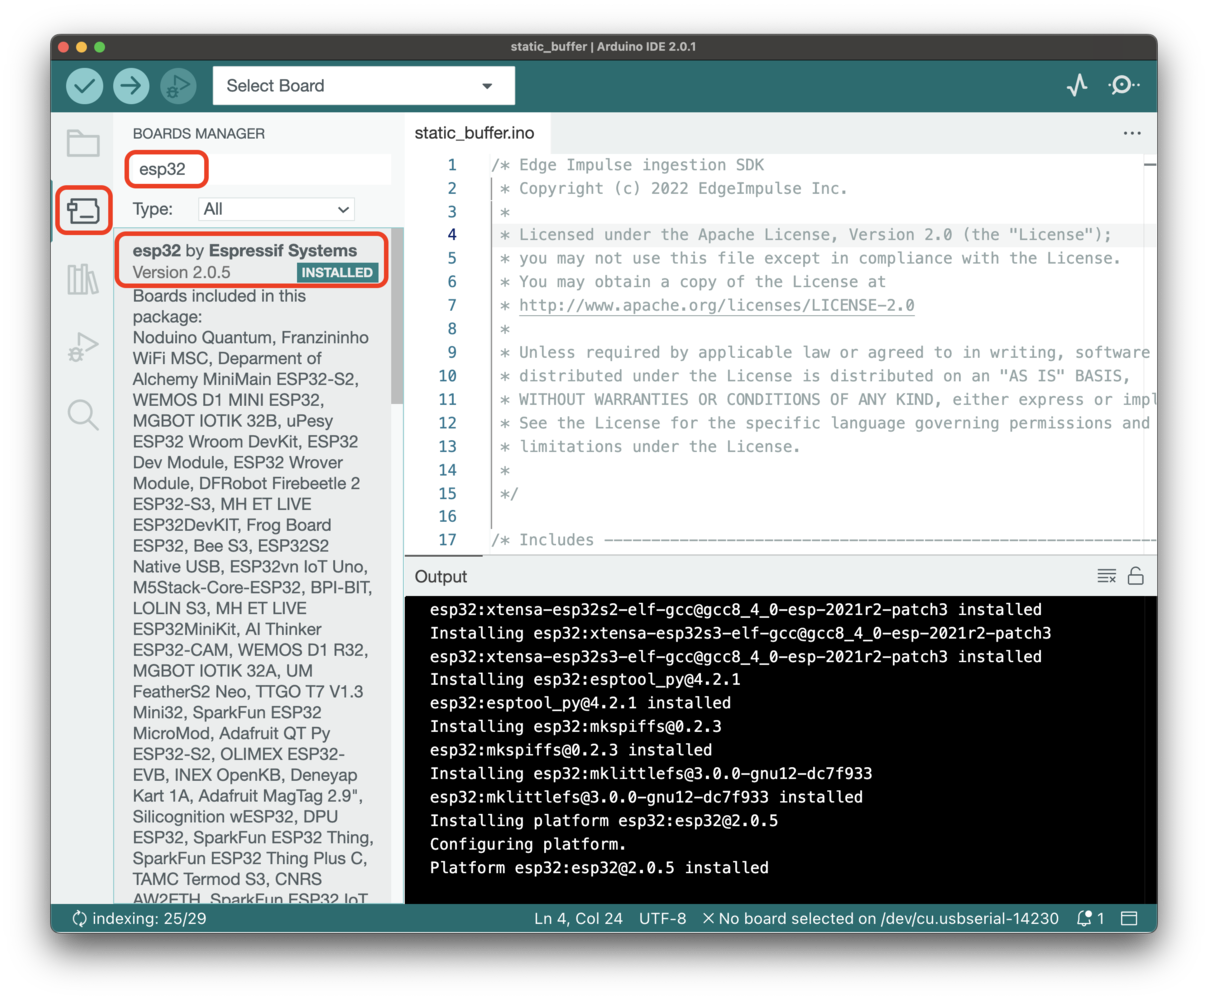
 byYou can find other camera model pin definitions here.