LogoLogo
HomeAPI & SDKsProjectsForumStudio
  • Getting started
    • For beginners
    • For ML practitioners
    • For embedded engineers
  • Frequently asked questions (FAQ)
  • Tutorials
    • End-to-end tutorials
      • Computer vision
        • Image classification
        • Object detection
          • Object detection with bounding boxes
          • Detect objects with centroid (FOMO)
        • Visual anomaly detection
        • Visual regression
      • Audio
        • Sound recognition
        • Keyword spotting
      • Time-series
        • Motion recognition + anomaly detection
        • Regression + anomaly detection
        • HR/HRV
        • Environmental (Sensor fusion)
    • Data
      • Data ingestion
        • Collecting image data from the Studio
        • Collecting image data with your mobile phone
        • Collecting image data with the OpenMV Cam H7 Plus
        • Using the Edge Impulse Python SDK to upload and download data
        • Trigger connected board data sampling
        • Ingest multi-labeled data using the API
      • Synthetic data
        • Generate audio datasets using Eleven Labs
        • Generate image datasets using Dall-E
        • Generate keyword spotting datasets using Google TTS
        • Generate physics simulation datasets using PyBullet
        • Generate timeseries data with MATLAB
      • Labeling
        • Label audio data using your existing models
        • Label image data using GPT-4o
      • Edge Impulse Datasets
    • Feature extraction
      • Building custom processing blocks
      • Sensor fusion using embeddings
    • Machine learning
      • Classification with multiple 2D input features
      • Visualize neural networks decisions with Grad-CAM
      • Sensor fusion using embeddings
      • FOMO self-attention
    • Inferencing & post-processing
      • Count objects using FOMO
      • Continuous audio sampling
      • Multi-impulse (C++)
      • Multi-impulse (Python)
    • Lifecycle management
      • CI/CD with GitHub Actions
      • Data aquisition from S3 object store - Golioth on AI
      • OTA model updates
        • with Arduino IDE (for ESP32)
        • with Arduino IoT Cloud
        • with Blues Wireless
        • with Docker on Allxon
        • with Docker on Balena
        • with Docker on NVIDIA Jetson
        • with Espressif IDF
        • with Nordic Thingy53 and the Edge Impulse app
        • with Particle Workbench
        • with Zephyr on Golioth
    • API examples
      • Customize the EON Tuner
      • Ingest multi-labeled data using the API
      • Python API bindings example
      • Running jobs using the API
      • Trigger connected board data sampling
    • Python SDK examples
      • Using the Edge Impulse Python SDK to run EON Tuner
      • Using the Edge Impulse Python SDK to upload and download data
      • Using the Edge Impulse Python SDK with Hugging Face
      • Using the Edge Impulse Python SDK with SageMaker Studio
      • Using the Edge Impulse Python SDK with TensorFlow and Keras
      • Using the Edge Impulse Python SDK with Weights & Biases
    • Expert network projects
  • Edge Impulse Studio
    • Organization hub
      • Users
      • Data campaigns
      • Data
        • Cloud data storage
      • Data pipelines
      • Data transformation
        • Transformation blocks
      • Upload portals
      • Custom blocks
        • Custom AI labeling blocks
        • Custom deployment blocks
        • Custom learning blocks
        • Custom processing blocks
        • Custom synthetic data blocks
        • Custom transformation blocks
      • Health reference design
        • Synchronizing clinical data with a bucket
        • Validating clinical data
        • Querying clinical data
        • Transforming clinical data
    • Project dashboard
      • Select AI hardware
    • Devices
    • Data acquisition
      • Uploader
      • Data explorer
      • Data sources
      • Synthetic data
      • Labeling queue
      • AI labeling
      • CSV Wizard (time-series)
      • Multi-label (time-series)
      • Tabular data (pre-processed & non-time-series)
      • Metadata
      • Auto-labeler | deprecated
    • Impulses
    • EON Tuner
      • Search space
    • Processing blocks
      • Audio MFCC
      • Audio MFE
      • Audio Syntiant
      • Flatten
      • HR/HRV features
      • Image
      • IMU Syntiant
      • Raw data
      • Spectral features
      • Spectrogram
      • Custom processing blocks
      • Feature explorer
    • Learning blocks
      • Anomaly detection (GMM)
      • Anomaly detection (K-means)
      • Classification
      • Classical ML
      • Object detection
        • MobileNetV2 SSD FPN
        • FOMO: Object detection for constrained devices
      • Object tracking
      • Regression
      • Transfer learning (images)
      • Transfer learning (keyword spotting)
      • Visual anomaly detection (FOMO-AD)
      • Custom learning blocks
      • Expert mode
      • NVIDIA TAO | deprecated
    • Retrain model
    • Live classification
    • Model testing
    • Performance calibration
    • Deployment
      • EON Compiler
      • Custom deployment blocks
    • Versioning
    • Bring your own model (BYOM)
    • File specifications
      • deployment-metadata.json
      • ei-metadata.json
      • ids.json
      • parameters.json
      • sample_id_details.json
      • train_input.json
  • Tools
    • API and SDK references
    • Edge Impulse CLI
      • Installation
      • Serial daemon
      • Uploader
      • Data forwarder
      • Impulse runner
      • Blocks
      • Himax flash tool
    • Edge Impulse for Linux
      • Linux Node.js SDK
      • Linux Go SDK
      • Linux C++ SDK
      • Linux Python SDK
      • Flex delegates
      • Rust Library
    • Rust Library
    • Edge Impulse Python SDK
  • Run inference
    • C++ library
      • As a generic C++ library
      • On Android
      • On your desktop computer
      • On your Alif Ensemble Series Device
      • On your Espressif ESP-EYE (ESP32) development board
      • On your Himax WE-I Plus
      • On your Raspberry Pi Pico (RP2040) development board
      • On your SiLabs Thunderboard Sense 2
      • On your Spresense by Sony development board
      • On your Syntiant TinyML Board
      • On your TI LaunchPad using GCC and the SimpleLink SDK
      • On your Zephyr-based Nordic Semiconductor development board
    • Arm Keil MDK CMSIS-PACK
    • Arduino library
      • Arduino IDE 1.18
    • Cube.MX CMSIS-PACK
    • Docker container
    • DRP-AI library
      • DRP-AI on your Renesas development board
      • DRP-AI TVM i8 on Renesas RZ/V2H
    • IAR library
    • Linux EIM executable
    • OpenMV
    • Particle library
    • Qualcomm IM SDK GStreamer
    • WebAssembly
      • Through WebAssembly (Node.js)
      • Through WebAssembly (browser)
    • Edge Impulse firmwares
    • Hardware specific tutorials
      • Image classification - Sony Spresense
      • Audio event detection with Particle boards
      • Motion recognition - Particle - Photon 2 & Boron
      • Motion recognition - RASynBoard
      • Motion recognition - Syntiant
      • Object detection - SiLabs xG24 Dev Kit
      • Sound recognition - TI LaunchXL
      • Keyword spotting - TI LaunchXL
      • Keyword spotting - Syntiant - RC Commands
      • Running NVIDIA TAO models on the Renesas RA8D1
      • Two cameras, two models - running multiple object detection models on the RZ/V2L
  • Edge AI Hardware
    • Overview
    • Production-ready
      • Advantech ICAM-540
      • Seeed SenseCAP A1101
      • Industry reference design - BrickML
    • MCU
      • Ambiq Apollo4 family of SoCs
      • Ambiq Apollo510
      • Arducam Pico4ML TinyML Dev Kit
      • Arduino Nano 33 BLE Sense
      • Arduino Nicla Sense ME
      • Arduino Nicla Vision
      • Arduino Portenta H7
      • Blues Wireless Swan
      • Espressif ESP-EYE
      • Himax WE-I Plus
      • Infineon CY8CKIT-062-BLE Pioneer Kit
      • Infineon CY8CKIT-062S2 Pioneer Kit
      • Nordic Semi nRF52840 DK
      • Nordic Semi nRF5340 DK
      • Nordic Semi nRF9160 DK
      • Nordic Semi nRF9161 DK
      • Nordic Semi nRF9151 DK
      • Nordic Semi nRF7002 DK
      • Nordic Semi Thingy:53
      • Nordic Semi Thingy:91
      • Open MV Cam H7 Plus
      • Particle Photon 2
      • Particle Boron
      • RAKwireless WisBlock
      • Raspberry Pi RP2040
      • Renesas CK-RA6M5 Cloud Kit
      • Renesas EK-RA8D1
      • Seeed Wio Terminal
      • Seeed XIAO nRF52840 Sense
      • Seeed XIAO ESP32 S3 Sense
      • SiLabs Thunderboard Sense 2
      • Sony's Spresense
      • ST B-L475E-IOT01A
      • TI CC1352P Launchpad
    • MCU + AI accelerators
      • Alif Ensemble
      • Arduino Nicla Voice
      • Avnet RASynBoard
      • Seeed Grove - Vision AI Module
      • Seeed Grove Vision AI Module V2 (WiseEye2)
      • Himax WiseEye2 Module and ISM Devboard
      • SiLabs xG24 Dev Kit
      • STMicroelectronics STM32N6570-DK
      • Synaptics Katana EVK
      • Syntiant Tiny ML Board
    • CPU
      • macOS
      • Linux x86_64
      • Raspberry Pi 4
      • Raspberry Pi 5
      • Texas Instruments SK-AM62
      • Microchip SAMA7G54
      • Renesas RZ/G2L
    • CPU + AI accelerators
      • AVNET RZBoard V2L
      • BrainChip AKD1000
      • i.MX 8M Plus EVK
      • Digi ConnectCore 93 Development Kit
      • MemryX MX3
      • MistyWest MistySOM RZ/V2L
      • Qualcomm Dragonwing RB3 Gen 2 Dev Kit
      • Renesas RZ/V2L
      • Renesas RZ/V2H
      • IMDT RZ/V2H
      • Texas Instruments SK-TDA4VM
      • Texas Instruments SK-AM62A-LP
      • Texas Instruments SK-AM68A
      • Thundercomm Rubik Pi 3
    • GPU
      • Advantech ICAM-540
      • NVIDIA Jetson
      • Seeed reComputer Jetson
    • Mobile phone
    • Porting guide
  • Integrations
    • Arduino Machine Learning Tools
    • AWS IoT Greengrass
    • Embedded IDEs - Open-CMSIS
    • NVIDIA Omniverse
    • Scailable
    • Weights & Biases
  • Tips & Tricks
    • Combining impulses
    • Increasing model performance
    • Optimizing compute time
    • Inference performance metrics
  • Concepts
    • Glossary
    • Course: Edge AI Fundamentals
      • Introduction to edge AI
      • What is edge computing?
      • What is machine learning (ML)?
      • What is edge AI?
      • How to choose an edge AI device
      • Edge AI lifecycle
      • What is edge MLOps?
      • What is Edge Impulse?
      • Case study: Izoelektro smart grid monitoring
      • Test and certification
    • Data engineering
      • Audio feature extraction
      • Motion feature extraction
    • Machine learning
      • Data augmentation
      • Evaluation metrics
      • Neural networks
        • Layers
        • Activation functions
        • Loss functions
        • Optimizers
          • Learned optimizer (VeLO)
        • Epochs
    • What is embedded ML, anyway?
    • What is edge machine learning (edge ML)?
Powered by GitBook
On this page
  • Block structure
  • Block interface
  • Inputs
  • Outputs
  • Adding visualizations
  • Graphs
  • Feature explorer
  • Initializing the block
  • Testing the block locally
  • With blocks runner
  • With ngrok and Docker
  • Viewing in Studio
  • Pushing the block to Edge Impulse
  • Using the block in a project
  • Running on device
  • Examples
  • Troubleshooting
  • Additional resources

Was this helpful?

Export as PDF
  1. Edge Impulse Studio
  2. Organization hub
  3. Custom blocks

Custom processing blocks

PreviousCustom learning blocksNextCustom synthetic data blocks

Last updated 13 days ago

Was this helpful?

Custom processing blocks are a way to extend the capabilities of Edge Impulse beyond the built into the platform. If none of the existing blocks created by Edge Impulse fit your needs, you can create custom processing blocks to implement your own feature generation algorithms for unique project requirements.

Ready to dive in and start building? Jump to the !

Hosting custom processing blocks in Edge Impulse is only available on the Enterprise plan

Hosting a custom processing block in the Edge Impulse infrastructure, and making it available to everyone in your organization, is only available on the Enterprise plan. Other developers can host their custom processing block themselves and expose it to projects. See in this document.

Block structure

The processing block structure is shown below. A key difference for processing blocks versus other types of blocks is that they implement an HTTP server within the application. Please see the overview page for more details.

Block interface

Processing blocks are expected to implement an HTTP server to handle requests. The sections below define the required and optional inputs (requests) and the expected outputs (responses) for custom processing blocks.

Inputs

Information will be provided to your custom processing block through the request headers and body.

Requests

Method
Path
Description

GET

/

Requesting general information about the processing block.

GET

/parameters

Requesting the parameters.json file for the block.

POST

/run

Requesting features be generated for a single data sample.

POST

/batch

Requesting features be generated for multiple data samples.

Request headers

Header
Passed
Description

x-ei-project-id

Conditional

Provided with GET /run or GET /batch requests. The ID of the project.

x-ei-sample-id

Conditional

Provided with GET /run request. The ID of the sample to be processed.

x-ei-sample-ids

Conditional

Provided with GET /batch request. A list of IDs of data samples to be processed.

Request body

The request body adheres to the following interfaces for the POST methods. GET methods do not have a request body.

interface DSPRequestBody {
    features: number[];
    axes: string[];
    sampling_freq: number;
    draw_graphs: boolean;
    project_id: number;
    implementation_version: number;
    params: { [k: string]: string | number | boolean | number[] | string[] | null };
    calculate_performance: boolean;
    named_axes: { [k: string]: string | false } | false | undefined;
}
interface DSPBatchRequestBody {
    features: number[][];
    axes: string[];
    sampling_freq: number;
    implementation_version: number;
    params: { [k: string]: string | number | boolean | number[] | string[] | null };
    state: string;
    named_axes: { [k: string]: string | false } | false | undefined;
}

The data samples that need to be processed by your script to generate features are provided as arrays in the features property.

The axes property provides the names of the signals for the data sample. For example, if this was an accelerometer data sample, the axes could be [ 'accX', 'accY', 'accZ' ]. These names could be mapped to other names in the named_axes property.

Outputs

The expected response from the HTTP server in your custom processing block varies depending on the type of request.

GET methods

GET /:

A plain text response with some information about the block. For example, the response could be the block name and author.

Custom processing block by Awesome Developer.

GET /parameters:

The parameters file returned as a JSON object.

POST methods

The POST response bodies are expected to adhere to the following interfaces.

{
    success: boolean,
    error?: string
} & DSPRunResponse

interface DSPRunResponse {
    features: number[];
    graphs: DSPRunGraph[];
    labels: string[] | undefined;
    fft_used: number[] | undefined;
    performance: {
        error: string | undefined | null,
        result: {
            time_ms: number
            memory: number
        }
    } | undefined;
    benchmark_fw_hash: string;
    output_config: DSPFeatureMetadataOutput;
    state_string: string | undefined;
}

interface DSPRunGraph {
    name: string;
    image?: string;
    imageMimeType?: string;
    X?: { [k: string]: number[] };
    y?: number[];
    suggestedYMin: number | undefined;
    suggestedYMax: number | undefined;
    suggestedXMin: number | undefined;
    suggestedXMax: number | undefined;
    type: string;
    lineWidth: number | undefined;
    smoothing: boolean;
    axisLabels?: { X: string; y: string; };
    highlights?: { [k: string]: number[] };
}

type DSPFeatureMetadataOutput = {
    type: 'image',
    shape: { width: number, height: number, channels: number, frames?: number },
    axes?: number
} | {
    type: 'spectrogram',
    shape: { width: number, height: number },
    axes?: number
} | {
    type: 'flat',
    shape: { width: number },
    axes?: number
};
{
    success: boolean,
    error?: string
} & DSPRunResponse

interface DSPBatchRunResponse {
    features: number[][];
    labels: string[];
    frequency: number | undefined;
    fft_used: number[] | undefined;
    output_config: DSPFeatureMetadataOutput;
    state_string: string | undefined;
    state: string | undefined;
}

type DSPFeatureMetadataOutput = {
    type: 'image',
    shape: { width: number, height: number, channels: number, frames?: number },
    axes?: number
} | {
    type: 'spectrogram',
    shape: { width: number, height: number },
    axes?: number
} | {
    type: 'flat',
    shape: { width: number },
    axes?: number
};

The features property is where you return the features that were generated by processing the data sample(s).

The labels property can be used return the names of the features you generated. For example, if you calculated the average, maximum, and minimum values of the signal, the labels could be [ 'Average', 'Maximum', 'Minimum' ]. These labels will be used for the feature explorer.

Adding visualizations

Graphs

Graphs can be of different types: linear, logarithmic, or an image. The type of graph is controlled by the type property of a graph object.

Graph
Type value

Linear

linear

Logarithmic

logarithmic

Image

image

Feature explorer

The results of generating features on all samples can be shown in the feature explorer. If you output high-dimensional data, you can enable dimensionality reduction for the feature explorer. This will run UMAP over the data to compress the features into two dimensions. To do so, you can set the visualization property in your parameters.json file to dimensionalityReduction.

Initializing the block

Testing the block locally

With blocks runner

The port you publish for your Docker container can be configured in the parameters.json file. The blocks runner will also look for the EXPOSE instruction in your Dockerfile and publish that port for you if you wish to override the default port.

 edge-impulse-blocks runner

Note down the public URL that is returned in the terminal. You can use this URL to add the block to an impulse in a Studio project.

With ngrok and Docker

For the second method, you can run Docker and ngrok directly instead of using the CLI blocks runner tool. First, you can build the Docker image and run the container.

docker build -t custom-processing-block .
docker run -p 4446:4446 -it --rm custom-processing-block

Then, after signing up for and installing ngrok, you can use their CLI to create a public forwarding URL. Note down the https:// forwarding address in the response. You can use this URL to add the block to an impulse in a Studio project.

ngrok http 4446
Session Status                online
Account                       Edge Impulse (Plan: Free)
Version                       2.3.35
Region                        United States (us)
Web Interface                 http://127.0.0.1:4040
Forwarding                    http://4d48dca5.ngrok.io -> http://localhost:4446
Forwarding                    https://4d48dca5.ngrok.io -> http://localhost:4446

Viewing in Studio

With a public URL for your custom processing block, you can go into your project and add a processing block to your impulse. When the processing block selection modal pops up, go to the bottom left corner and click the Add custom block button. In the next modal that pops up, enter your forwarding URL from above and save. The block can now be used in your project and you will be able to view the processing results, including any visualizations you have created.

Pushing the block to Edge Impulse

Using the block in a project

Running on device

One caveat for custom processing blocks is that Edge Impulse cannot automatically generate optimized code to run on-device as is done with processing blocks built into the platform. This code will need to be written by you. To help you get started, the structure is provided for you.

After exporting the C++ library from the Deployment page in Studio, you can see that a forward declaration for your custom processing block will have been created for you in the model-parameters/model_variables.h file.

int extract_my_preprocessing_features(signal_t *signal, matrix_t *output_matrix, void *config_ptr, const float frequency);

The name for the function comes from the cppType property in your parameters.json file.

extract_{cppType}_features(...)

Examples

Below are direct links to some examples:

Troubleshooting

Additional resources

The parameters defined in your parameters.json file will be passed to your block in the params property. If your parameter names contain dashes, these are replaced with underscores before being added to the request body. For example, a processing block parameter named custom-processing-param is passed as custom_processing_param. Please refer to the documentation for further details about creating this file, parameter options available, and examples.

The results of generating features can be shown in Studio through graphs and the .

When configuring parameters for a processing block in Studio, a preview of the feature generation results for a single sample is shown. This preview can include displaying graphs. These are the graphs that you define and return in the graphs property of the response body for the POST /run method. Graphs should be created in your feature generation script conditionally based on the draw_graphs property in the request body. See the interface for a graphs object in the section above.

The most convenient way to test your custom processing block before pushing it to Edge Impulse is to host it locally and then expose it to the internet so that it can be accessed by Studio. There are two ways to achieve this. You will need to have Docker and installed on your machine for either approach.

For the first method, you can use the CLI edge-impulse-blocks runner tool. See for additional details.

You will need to implement this function in the main.cpp file of the C++ library. Example implementations for the processing blocks built into Edge Impulse can be found in the .

Edge Impulse has developed several processing blocks that are built into the platform. The code for these blocks can be found in a public repository under the . See below. Additional examples can also be found in the Edge Impulse account. These repository names typically follow the convention of example-custom-processing-block-<description>. As such, they can be found by searching the repositories for example-custom-processing.

parameters.json
feature explorer
ngrok
C++ inferencing SDK
Edge Impulse GitHub account
processing-blocks
example-custom-processing-block-python
Custom blocks
Processing blocks
edge-impulse-blocks
parameters.json
Building a custom processing block
Outputs
processing blocks
custom blocks
examples
Testing the block locally

When you are finished developing your block locally, you will want to initialize it. The procedure to initialize your block is described in the overview page. Please refer to that documentation for details.

custom blocks
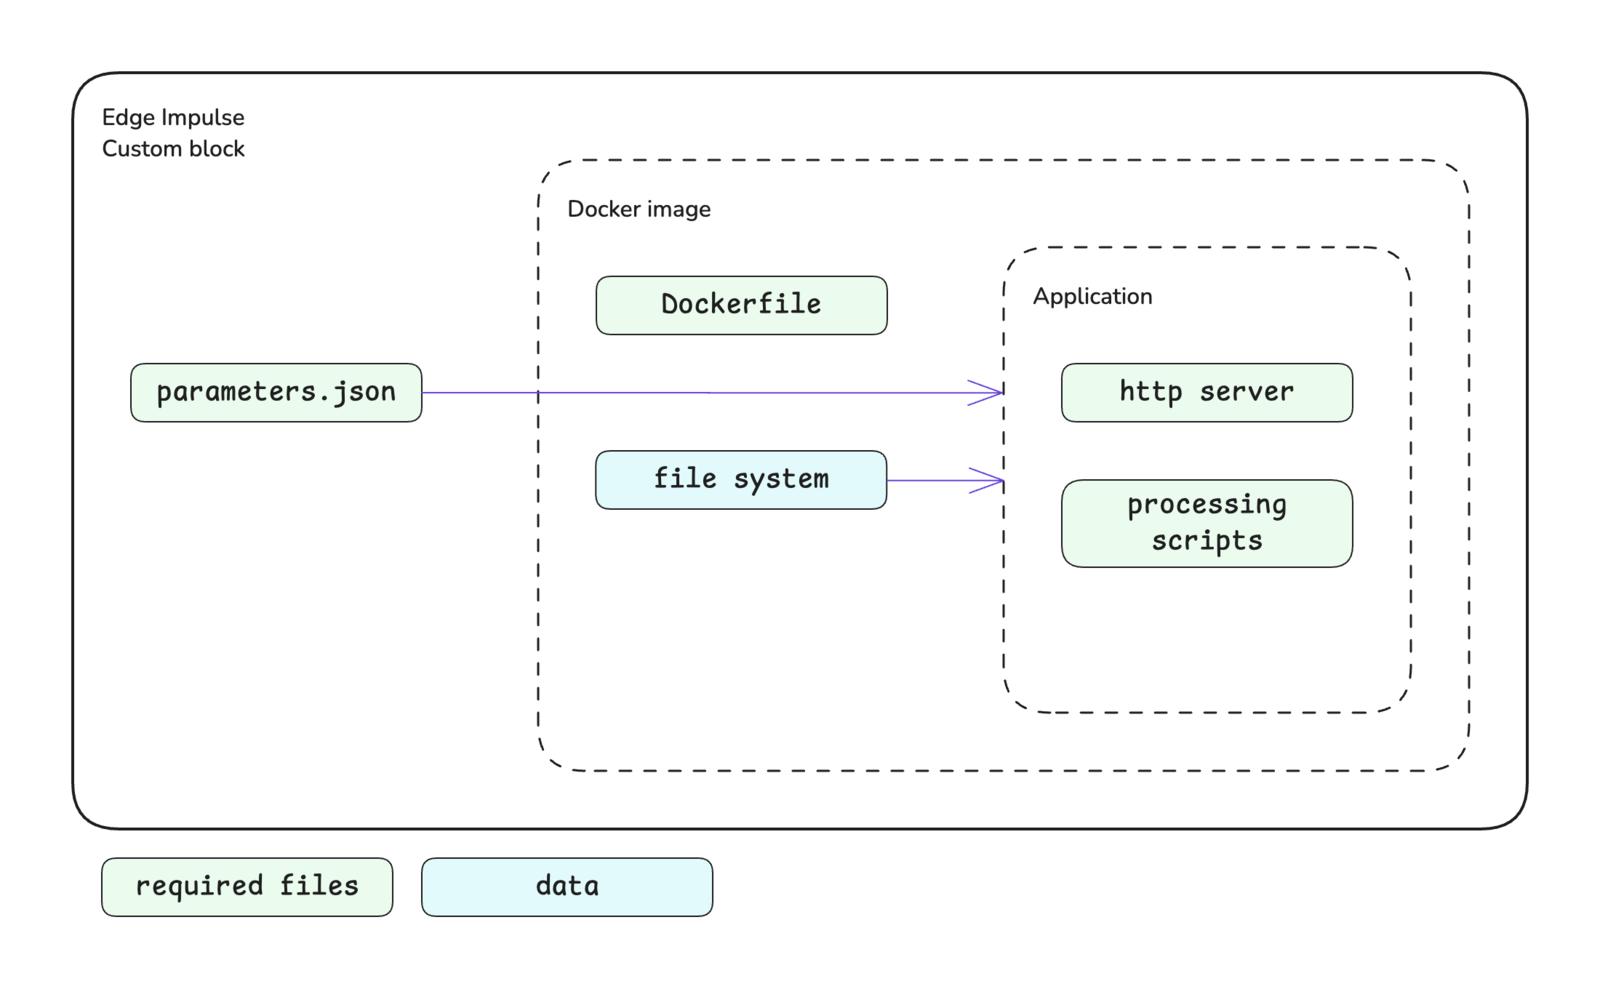
Custom processing block structure
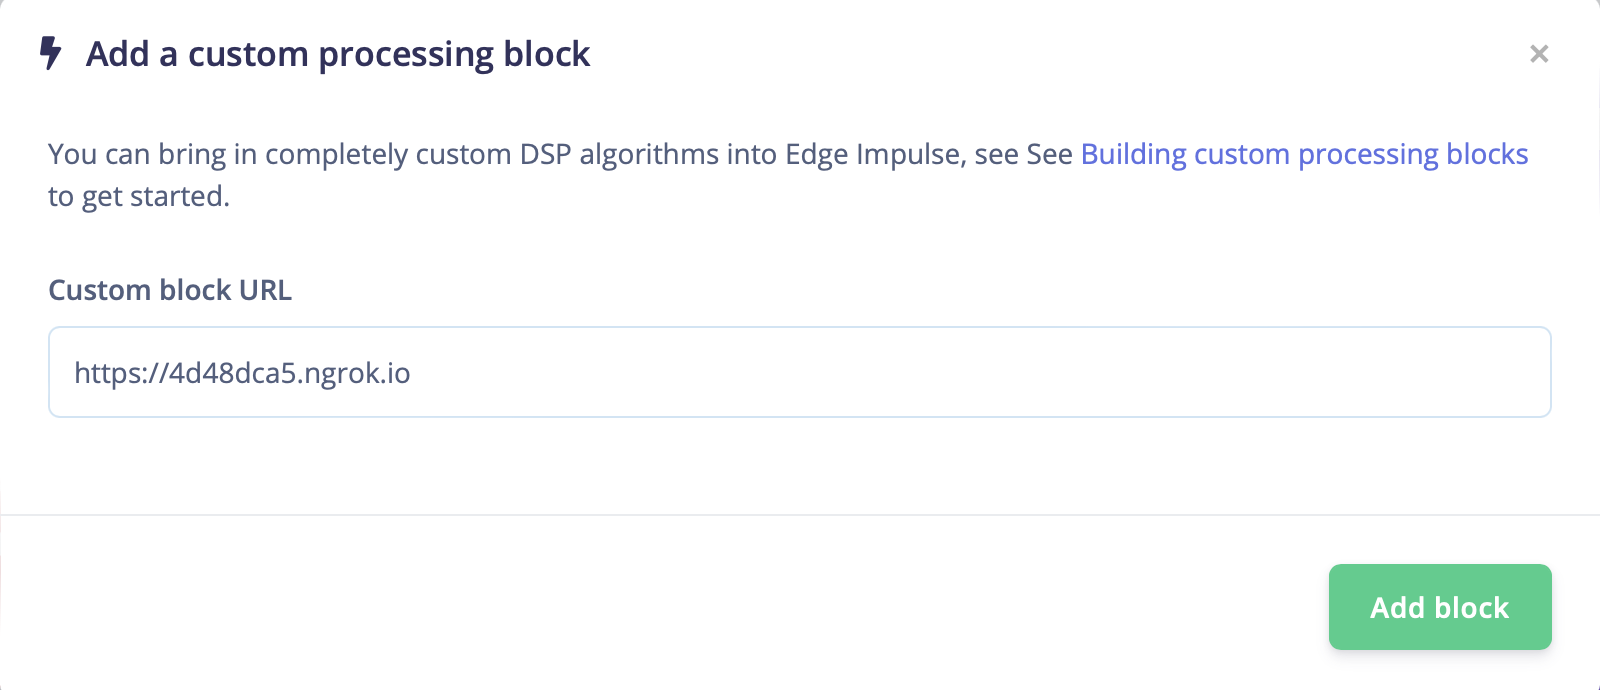
Adding a custom processing block using an ngrok forwarding URL
Block runner

When you have initalized and finished testing your block locally, you will want to push it to Edge Impulse. The procedure to push your block to Edge Impulse is described in the overview page. Please refer to that documentation for details.

custom blocks

After you have pushed your block to Edge Impluse, it can be used in the same way as any other built-in block.

No common issues have been identified thus far. If you encounter an issue, please reach out on the or, if you are on the Enterprise plan, through your support channels.

forum