LogoLogo
HomeAPI & SDKsProjectsForumStudio
  • Getting started
    • For beginners
    • For ML practitioners
    • For embedded engineers
  • Frequently asked questions (FAQ)
  • Tutorials
    • End-to-end tutorials
      • Computer vision
        • Image classification
        • Object detection
          • Object detection with bounding boxes
          • Detect objects with centroid (FOMO)
        • Visual anomaly detection
        • Visual regression
      • Audio
        • Sound recognition
        • Keyword spotting
      • Time-series
        • Motion recognition + anomaly detection
        • Regression + anomaly detection
        • HR/HRV
        • Environmental (Sensor fusion)
    • Data
      • Data ingestion
        • Collecting image data from the Studio
        • Collecting image data with your mobile phone
        • Collecting image data with the OpenMV Cam H7 Plus
        • Using the Edge Impulse Python SDK to upload and download data
        • Trigger connected board data sampling
        • Ingest multi-labeled data using the API
      • Synthetic data
        • Generate audio datasets using Eleven Labs
        • Generate image datasets using Dall-E
        • Generate keyword spotting datasets using Google TTS
        • Generate physics simulation datasets using PyBullet
        • Generate timeseries data with MATLAB
      • Labeling
        • Label audio data using your existing models
        • Label image data using GPT-4o
      • Edge Impulse Datasets
    • Feature extraction
      • Building custom processing blocks
      • Sensor fusion using embeddings
    • Machine learning
      • Classification with multiple 2D input features
      • Visualize neural networks decisions with Grad-CAM
      • Sensor fusion using embeddings
      • FOMO self-attention
    • Inferencing & post-processing
      • Count objects using FOMO
      • Continuous audio sampling
      • Multi-impulse (C++)
      • Multi-impulse (Python)
    • Lifecycle management
      • CI/CD with GitHub Actions
      • Data aquisition from S3 object store - Golioth on AI
      • OTA model updates
        • with Arduino IDE (for ESP32)
        • with Arduino IoT Cloud
        • with Blues Wireless
        • with Docker on Allxon
        • with Docker on Balena
        • with Docker on NVIDIA Jetson
        • with Espressif IDF
        • with Nordic Thingy53 and the Edge Impulse app
        • with Particle Workbench
        • with Zephyr on Golioth
    • API examples
      • Customize the EON Tuner
      • Ingest multi-labeled data using the API
      • Python API bindings example
      • Running jobs using the API
      • Trigger connected board data sampling
    • Python SDK examples
      • Using the Edge Impulse Python SDK to run EON Tuner
      • Using the Edge Impulse Python SDK to upload and download data
      • Using the Edge Impulse Python SDK with Hugging Face
      • Using the Edge Impulse Python SDK with SageMaker Studio
      • Using the Edge Impulse Python SDK with TensorFlow and Keras
      • Using the Edge Impulse Python SDK with Weights & Biases
    • Expert network projects
  • Edge Impulse Studio
    • Organization hub
      • Users
      • Data campaigns
      • Data
        • Cloud data storage
      • Data pipelines
      • Data transformation
        • Transformation blocks
      • Upload portals
      • Custom blocks
        • Custom AI labeling blocks
        • Custom deployment blocks
        • Custom learning blocks
        • Custom processing blocks
        • Custom synthetic data blocks
        • Custom transformation blocks
      • Health reference design
        • Synchronizing clinical data with a bucket
        • Validating clinical data
        • Querying clinical data
        • Transforming clinical data
    • Project dashboard
      • Select AI hardware
    • Devices
    • Data acquisition
      • Uploader
      • Data explorer
      • Data sources
      • Synthetic data
      • Labeling queue
      • AI labeling
      • CSV Wizard (time-series)
      • Multi-label (time-series)
      • Tabular data (pre-processed & non-time-series)
      • Metadata
      • Auto-labeler | deprecated
    • Impulses
    • EON Tuner
      • Search space
    • Processing blocks
      • Audio MFCC
      • Audio MFE
      • Audio Syntiant
      • Flatten
      • HR/HRV features
      • Image
      • IMU Syntiant
      • Raw data
      • Spectral features
      • Spectrogram
      • Custom processing blocks
      • Feature explorer
    • Learning blocks
      • Anomaly detection (GMM)
      • Anomaly detection (K-means)
      • Classification
      • Classical ML
      • Object detection
        • MobileNetV2 SSD FPN
        • FOMO: Object detection for constrained devices
      • Object tracking
      • Regression
      • Transfer learning (images)
      • Transfer learning (keyword spotting)
      • Visual anomaly detection (FOMO-AD)
      • Custom learning blocks
      • Expert mode
      • NVIDIA TAO | deprecated
    • Retrain model
    • Live classification
    • Model testing
    • Performance calibration
    • Deployment
      • EON Compiler
      • Custom deployment blocks
    • Versioning
    • Bring your own model (BYOM)
    • File specifications
      • deployment-metadata.json
      • ei-metadata.json
      • ids.json
      • parameters.json
      • sample_id_details.json
      • train_input.json
  • Tools
    • API and SDK references
    • Edge Impulse CLI
      • Installation
      • Serial daemon
      • Uploader
      • Data forwarder
      • Impulse runner
      • Blocks
      • Himax flash tool
    • Edge Impulse for Linux
      • Linux Node.js SDK
      • Linux Go SDK
      • Linux C++ SDK
      • Linux Python SDK
      • Flex delegates
      • Rust Library
    • Rust Library
    • Edge Impulse Python SDK
  • Run inference
    • C++ library
      • As a generic C++ library
      • On Android
      • On your desktop computer
      • On your Alif Ensemble Series Device
      • On your Espressif ESP-EYE (ESP32) development board
      • On your Himax WE-I Plus
      • On your Raspberry Pi Pico (RP2040) development board
      • On your SiLabs Thunderboard Sense 2
      • On your Spresense by Sony development board
      • On your Syntiant TinyML Board
      • On your TI LaunchPad using GCC and the SimpleLink SDK
      • On your Zephyr-based Nordic Semiconductor development board
    • Arm Keil MDK CMSIS-PACK
    • Arduino library
      • Arduino IDE 1.18
    • Cube.MX CMSIS-PACK
    • Docker container
    • DRP-AI library
      • DRP-AI on your Renesas development board
      • DRP-AI TVM i8 on Renesas RZ/V2H
    • IAR library
    • Linux EIM executable
    • OpenMV
    • Particle library
    • Qualcomm IM SDK GStreamer
    • WebAssembly
      • Through WebAssembly (Node.js)
      • Through WebAssembly (browser)
    • Edge Impulse firmwares
    • Hardware specific tutorials
      • Image classification - Sony Spresense
      • Audio event detection with Particle boards
      • Motion recognition - Particle - Photon 2 & Boron
      • Motion recognition - RASynBoard
      • Motion recognition - Syntiant
      • Object detection - SiLabs xG24 Dev Kit
      • Sound recognition - TI LaunchXL
      • Keyword spotting - TI LaunchXL
      • Keyword spotting - Syntiant - RC Commands
      • Running NVIDIA TAO models on the Renesas RA8D1
      • Two cameras, two models - running multiple object detection models on the RZ/V2L
  • Edge AI Hardware
    • Overview
    • Production-ready
      • Advantech ICAM-540
      • Seeed SenseCAP A1101
      • Industry reference design - BrickML
    • MCU
      • Ambiq Apollo4 family of SoCs
      • Ambiq Apollo510
      • Arducam Pico4ML TinyML Dev Kit
      • Arduino Nano 33 BLE Sense
      • Arduino Nicla Sense ME
      • Arduino Nicla Vision
      • Arduino Portenta H7
      • Blues Wireless Swan
      • Espressif ESP-EYE
      • Himax WE-I Plus
      • Infineon CY8CKIT-062-BLE Pioneer Kit
      • Infineon CY8CKIT-062S2 Pioneer Kit
      • Nordic Semi nRF52840 DK
      • Nordic Semi nRF5340 DK
      • Nordic Semi nRF9160 DK
      • Nordic Semi nRF9161 DK
      • Nordic Semi nRF9151 DK
      • Nordic Semi nRF7002 DK
      • Nordic Semi Thingy:53
      • Nordic Semi Thingy:91
      • Open MV Cam H7 Plus
      • Particle Photon 2
      • Particle Boron
      • RAKwireless WisBlock
      • Raspberry Pi RP2040
      • Renesas CK-RA6M5 Cloud Kit
      • Renesas EK-RA8D1
      • Seeed Wio Terminal
      • Seeed XIAO nRF52840 Sense
      • Seeed XIAO ESP32 S3 Sense
      • SiLabs Thunderboard Sense 2
      • Sony's Spresense
      • ST B-L475E-IOT01A
      • TI CC1352P Launchpad
    • MCU + AI accelerators
      • Alif Ensemble
      • Arduino Nicla Voice
      • Avnet RASynBoard
      • Seeed Grove - Vision AI Module
      • Seeed Grove Vision AI Module V2 (WiseEye2)
      • Himax WiseEye2 Module and ISM Devboard
      • SiLabs xG24 Dev Kit
      • STMicroelectronics STM32N6570-DK
      • Synaptics Katana EVK
      • Syntiant Tiny ML Board
    • CPU
      • macOS
      • Linux x86_64
      • Raspberry Pi 4
      • Raspberry Pi 5
      • Texas Instruments SK-AM62
      • Microchip SAMA7G54
      • Renesas RZ/G2L
    • CPU + AI accelerators
      • AVNET RZBoard V2L
      • BrainChip AKD1000
      • i.MX 8M Plus EVK
      • Digi ConnectCore 93 Development Kit
      • MemryX MX3
      • MistyWest MistySOM RZ/V2L
      • Qualcomm Dragonwing RB3 Gen 2 Dev Kit
      • Renesas RZ/V2L
      • Renesas RZ/V2H
      • IMDT RZ/V2H
      • Texas Instruments SK-TDA4VM
      • Texas Instruments SK-AM62A-LP
      • Texas Instruments SK-AM68A
      • Thundercomm Rubik Pi 3
    • GPU
      • Advantech ICAM-540
      • NVIDIA Jetson
      • Seeed reComputer Jetson
    • Mobile phone
    • Porting guide
  • Integrations
    • Arduino Machine Learning Tools
    • AWS IoT Greengrass
    • Embedded IDEs - Open-CMSIS
    • NVIDIA Omniverse
    • Scailable
    • Weights & Biases
  • Tips & Tricks
    • Combining impulses
    • Increasing model performance
    • Optimizing compute time
    • Inference performance metrics
  • Concepts
    • Glossary
    • Course: Edge AI Fundamentals
      • Introduction to edge AI
      • What is edge computing?
      • What is machine learning (ML)?
      • What is edge AI?
      • How to choose an edge AI device
      • Edge AI lifecycle
      • What is edge MLOps?
      • What is Edge Impulse?
      • Case study: Izoelektro smart grid monitoring
      • Test and certification
    • Data engineering
      • Audio feature extraction
      • Motion feature extraction
    • Machine learning
      • Data augmentation
      • Evaluation metrics
      • Neural networks
        • Layers
        • Activation functions
        • Loss functions
        • Optimizers
          • Learned optimizer (VeLO)
        • Epochs
    • What is embedded ML, anyway?
    • What is edge machine learning (edge ML)?
Powered by GitBook
On this page
  • Installing dependencies
  • Connecting to Edge Impulse
  • Next steps: building a machine learning model
  • Deploying back to device

Was this helpful?

Export as PDF
  1. Edge AI Hardware
  2. MCU

Arduino Nicla Vision

PreviousArduino Nicla Sense MENextArduino Portenta H7

Last updated 2 months ago

Was this helpful?

The Nicla Vision is a ready-to-use, standalone camera for analyzing and processing images on the Edge. Thanks to its 2MP color camera, smart 6-axis motion sensor, integrated microphone, and distance sensor, it is suitable for asset tracking, object recognition, and predictive maintenance. Some of its key features include:

  • Powerful microcontroller equipped with a 2MP color camera

  • Tiny form factor of 22.86 x 22.86 mm

  • Integrated microphone, distance sensor, and intelligent 6-axis motion sensor

  • Onboard Wi-Fi and Bluetooth® Low Energy connectivity

  • Standalone when battery-powered

  • Expand existing projects with sensing capabilities

  • Enable fast Machine Vision prototyping

  • Compatible with Nicla, Portenta, and MKR products

Its exceptional capabilities are supported by a powerful STMicroelectronics STM32H747AII6 Dual ARM® Cortex® processor, combining an M7 core up to 480 Mhz and an M4 core up to 240 Mhz. Despite its industrial strength, it keeps energy consumption low for battery-powered standalone applications.

The Arduino Nicla Vision is available for around 95 EUR from the .

Installing dependencies

To set this device up in Edge Impulse, you will need to install the following software:

  1. On Linux:

    • GNU Screen: install for example via sudo apt install screen.

Problems installing the CLI?

Connecting to Edge Impulse

There are two ways to connect the Nicla Vision to Edge Impulse:

  • Using the official Edge Impulse firmware - it supports all onboard sensors, including camera.

  • Using an ingestion script. This supports analog, IMU, proximity sensors and microphone (limited to 8 kHz), but not the camera. It is only recommended if you want to modify the ingestion flow for third-party sensors.

1. Connect the development board to your computer

Use a micro-USB cable to connect the development board to your computer. Under normal circumstances, flash process should work without entering the bootloader manually. However if run into difficulties flashing the board, you can enter the bootloader by pressing RESET twice. The onboard LED should start pulsating to indicate this.

2. Update the firmware

The development board does not come with the right firmware yet. To update the firmware:

  1. Open the flash script for your operating system (flash_windows.bat, flash_mac.command or flash_linux.sh) to flash the firmware.

  2. Wait until flashing is complete, and press the RESET button once to launch the new firmware.

3. Setting keys

From a command prompt or terminal, run:

edge-impulse-daemon

This will start a wizard which will ask you to log in and choose an Edge Impulse project. If you want to switch projects run the command with --clean.

Data ingestion

1. Connect the development board to your computer

Use a micro-USB cable to connect the development board to your computer.

2. Update the firmware

The development board does not come with the right firmware yet. To update the firmware:

  1. Open the nicla_vision_ingestion.ino (for IMU/proximity sensor) or nicla_vision_ingestion_mic.ino(for microphone) sketch in a text editor or the Arduino IDE.

  2. For IMU/proximity sensor data ingestion into your Edge Impulse project, at the top of the file, select 1 or multiple sensors by un-commenting the defines and select the desired sample frequency (in Hz). For example, for the accelerometer sensor:

/**
 * @brief   Sample & upload data to Edge Impulse Studio.
 * @details Select 1 or multiple sensors by un-commenting the defines and select
 * a desired sample frequency. When this sketch runs, you can see raw sample
 * values outputted over the serial line. Now connect to the studio using the
 * `edge-impulse-data-forwarder` and start capturing data
 */
#define SAMPLE_ACCELEROMETER
//#define SAMPLE_GYROSCOPE
//#define SAMPLE_PROXIMITY

/**
 * Configure the sample frequency. This is the frequency used to send the data
 * to the studio regardless of the frequency used to sample the data from the
 * sensor. This differs per sensors, and can be modified in the API of the sensor
 */
#define FREQUENCY_HZ        10

For microphone data ingestion, you do not need to change the default parameters in the nicla_vision_ingestion_mic.ino sketch.

  1. Then, from your sketch's directory, run the Arduino CLI to compile:

    arduino-cli compile --fqbn arduino:mbed_nicla:nicla_vision --output-dir .
  2. Then flash to your Nicla Vision using the Arduino CLI:

    arduino-cli upload --fqbn arduino:mbed_nicla:nicla_vision

Alternatively if you open the sketch in the Arduino IDE, you can compile and upload the sketch from there.

  1. Wait until flashing is complete, and press the RESET button once to launch the new firmware.

3a. Data forwarder (Fusion sensors)

From a command prompt or terminal, run:

edge-impulse-data-forwarder

This will start a wizard which will ask you to log in, and choose an Edge Impulse project. You will also name your sensor's axes (depending on which sensor you selected in your compiled nicla_vision_ingestion.ino sketch). If you want to switch projects/sensors run the command with --clean. Please refer to the table below for the names used for each axis corresponding to the type of sensor:

Sensor

Axis names

#define SAMPLE_ACCELEROMETER

accX, accY, accZ

#define SAMPLE_GYROSCOPE

gyrX, gyrY, gyrZ

#define SAMPLE_PROXIMITY

cm

Note: These exact axis names are required for the Edge Impulse Arduino library deployment example applications for the Nicla Vision.

3b. Data forwarder (Microphone)

From a command prompt or terminal, run:

edge-impulse-data-forwarder --baud 1000000 --frequency 8000

This will start a wizard which will ask you to log in and choose an Edge Impulse project. You will also name your sensor axes - in the case of the microphone, you need to enter audio. If you want to switch projects/sensors run the command with --clean.

4. Verifying that the device is connected

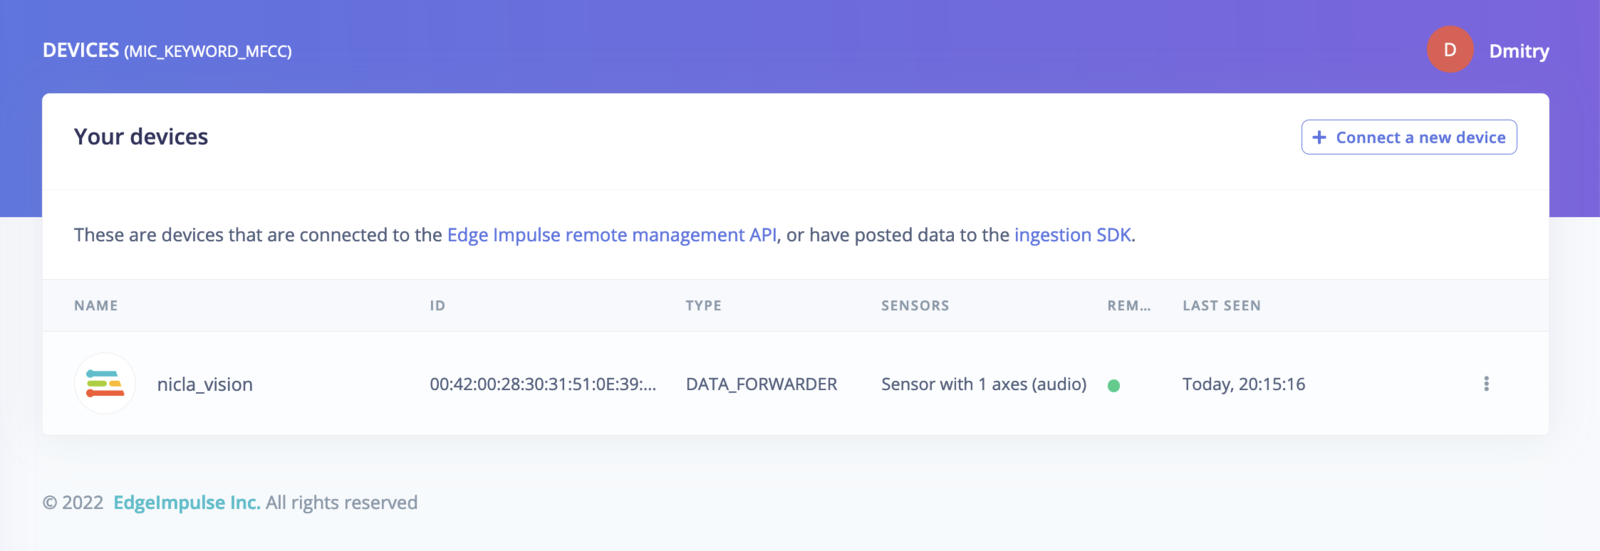
The above screenshots are for Edge Impulse Ingestion scripts and Data forwarder. If you use the official Edge Impulse firmware for the Nicla Vision, the content will be slightly different.

Next steps: building a machine learning model

With everything set up you can now build your first machine learning model with these tutorials:

Deploying back to device

With the impulse designed, trained and verified you can deploy this model back to your Arduino Nicla Vision. This makes the model run without an internet connection, minimizes latency, and runs with minimum power consumption. Edge Impulse can package the complete impulse - including the signal processing code, neural network weights, and classification code - up into a single library that you can run on your development board.

.

.

Here's an .

The has instructions for macOS and Linux.

See the guide.

, and unzip the file.

Alternatively, recent versions of Google Chrome and Microsoft Edge can collect data directly from your development board, without the need for the Edge Impulse CLI. See for more information.

and unzip the file.

That's all! Your device is now connected to Edge Impulse. To verify this, go to , and click Devices. The device will be listed here.

.

.

Looking to connect different sensors? Use the nicla_vision_ingestion.ino sketch and the to easily send data from any sensor on the Nicla Vision into your Edge Impulse project.

Use the tutorial and select one of the Nicla Vision examples.

Edge Impulse CLI
Arduino CLI
instruction video for Windows
Arduino website
Installation and troubleshooting
Download the latest Edge Impulse firmware
this blog post
Download the latest Edge Impulse ingestion sketches
your Edge Impulse project
Building a continuous motion recognition system
Recognizing sounds from audio
Keyword spotting
Image classification
Object detection with centroids (FOMO)
Edge Impulse data forwarder
Running your impulse locally: On your Arduino
Arduino Store
Arduino Nicla Vision
Press RESET twice quickly to launch the bootloader on the Arduino Nicla Vision.
Configuring the data forwarder for the Nicla Vision.
The Nicla Vision Data forwarder in the Devices tab.