LogoLogo
HomeAPI & SDKsProjectsForumStudio
  • Getting started
    • For beginners
    • For ML practitioners
    • For embedded engineers
  • Frequently asked questions (FAQ)
  • Tutorials
    • End-to-end tutorials
      • Computer vision
        • Image classification
        • Object detection
          • Object detection with bounding boxes
          • Detect objects with centroid (FOMO)
        • Visual anomaly detection
        • Visual regression
      • Audio
        • Sound recognition
        • Keyword spotting
      • Time-series
        • Motion recognition + anomaly detection
        • Regression + anomaly detection
        • HR/HRV
        • Environmental (Sensor fusion)
    • Data
      • Data ingestion
        • Collecting image data from the Studio
        • Collecting image data with your mobile phone
        • Collecting image data with the OpenMV Cam H7 Plus
        • Using the Edge Impulse Python SDK to upload and download data
        • Trigger connected board data sampling
        • Ingest multi-labeled data using the API
      • Synthetic data
        • Generate audio datasets using Eleven Labs
        • Generate image datasets using Dall-E
        • Generate keyword spotting datasets using Google TTS
        • Generate physics simulation datasets using PyBullet
        • Generate timeseries data with MATLAB
      • Labeling
        • Label audio data using your existing models
        • Label image data using GPT-4o
      • Edge Impulse Datasets
    • Feature extraction
      • Building custom processing blocks
      • Sensor fusion using embeddings
    • Machine learning
      • Classification with multiple 2D input features
      • Visualize neural networks decisions with Grad-CAM
      • Sensor fusion using embeddings
      • FOMO self-attention
    • Inferencing & post-processing
      • Count objects using FOMO
      • Continuous audio sampling
      • Multi-impulse (C++)
      • Multi-impulse (Python)
    • Lifecycle management
      • CI/CD with GitHub Actions
      • Data aquisition from S3 object store - Golioth on AI
      • OTA model updates
        • with Arduino IDE (for ESP32)
        • with Arduino IoT Cloud
        • with Blues Wireless
        • with Docker on Allxon
        • with Docker on Balena
        • with Docker on NVIDIA Jetson
        • with Espressif IDF
        • with Nordic Thingy53 and the Edge Impulse app
        • with Particle Workbench
        • with Zephyr on Golioth
    • API examples
      • Customize the EON Tuner
      • Ingest multi-labeled data using the API
      • Python API bindings example
      • Running jobs using the API
      • Trigger connected board data sampling
    • Python SDK examples
      • Using the Edge Impulse Python SDK to run EON Tuner
      • Using the Edge Impulse Python SDK to upload and download data
      • Using the Edge Impulse Python SDK with Hugging Face
      • Using the Edge Impulse Python SDK with SageMaker Studio
      • Using the Edge Impulse Python SDK with TensorFlow and Keras
      • Using the Edge Impulse Python SDK with Weights & Biases
    • Expert network projects
  • Edge Impulse Studio
    • Organization hub
      • Users
      • Data campaigns
      • Data
        • Cloud data storage
      • Data pipelines
      • Data transformation
        • Transformation blocks
      • Upload portals
      • Custom blocks
        • Custom AI labeling blocks
        • Custom deployment blocks
        • Custom learning blocks
        • Custom processing blocks
        • Custom synthetic data blocks
        • Custom transformation blocks
      • Health reference design
        • Synchronizing clinical data with a bucket
        • Validating clinical data
        • Querying clinical data
        • Transforming clinical data
    • Project dashboard
      • Select AI hardware
    • Devices
    • Data acquisition
      • Uploader
      • Data explorer
      • Data sources
      • Synthetic data
      • Labeling queue
      • AI labeling
      • CSV Wizard (time-series)
      • Multi-label (time-series)
      • Tabular data (pre-processed & non-time-series)
      • Metadata
      • Auto-labeler | deprecated
    • Impulses
    • EON Tuner
      • Search space
    • Processing blocks
      • Audio MFCC
      • Audio MFE
      • Audio Syntiant
      • Flatten
      • HR/HRV features
      • Image
      • IMU Syntiant
      • Raw data
      • Spectral features
      • Spectrogram
      • Custom processing blocks
      • Feature explorer
    • Learning blocks
      • Anomaly detection (GMM)
      • Anomaly detection (K-means)
      • Classification
      • Classical ML
      • Object detection
        • MobileNetV2 SSD FPN
        • FOMO: Object detection for constrained devices
      • Object tracking
      • Regression
      • Transfer learning (images)
      • Transfer learning (keyword spotting)
      • Visual anomaly detection (FOMO-AD)
      • Custom learning blocks
      • Expert mode
      • NVIDIA TAO | deprecated
    • Retrain model
    • Live classification
    • Model testing
    • Performance calibration
    • Deployment
      • EON Compiler
      • Custom deployment blocks
    • Versioning
    • Bring your own model (BYOM)
    • File specifications
      • deployment-metadata.json
      • ei-metadata.json
      • ids.json
      • parameters.json
      • sample_id_details.json
      • train_input.json
  • Tools
    • API and SDK references
    • Edge Impulse CLI
      • Installation
      • Serial daemon
      • Uploader
      • Data forwarder
      • Impulse runner
      • Blocks
      • Himax flash tool
    • Edge Impulse for Linux
      • Linux Node.js SDK
      • Linux Go SDK
      • Linux C++ SDK
      • Linux Python SDK
      • Flex delegates
      • Rust Library
    • Rust Library
    • Edge Impulse Python SDK
  • Run inference
    • C++ library
      • As a generic C++ library
      • On Android
      • On your desktop computer
      • On your Alif Ensemble Series Device
      • On your Espressif ESP-EYE (ESP32) development board
      • On your Himax WE-I Plus
      • On your Raspberry Pi Pico (RP2040) development board
      • On your SiLabs Thunderboard Sense 2
      • On your Spresense by Sony development board
      • On your Syntiant TinyML Board
      • On your TI LaunchPad using GCC and the SimpleLink SDK
      • On your Zephyr-based Nordic Semiconductor development board
    • Arm Keil MDK CMSIS-PACK
    • Arduino library
      • Arduino IDE 1.18
    • Cube.MX CMSIS-PACK
    • Docker container
    • DRP-AI library
      • DRP-AI on your Renesas development board
      • DRP-AI TVM i8 on Renesas RZ/V2H
    • IAR library
    • Linux EIM executable
    • OpenMV
    • Particle library
    • Qualcomm IM SDK GStreamer
    • WebAssembly
      • Through WebAssembly (Node.js)
      • Through WebAssembly (browser)
    • Edge Impulse firmwares
    • Hardware specific tutorials
      • Image classification - Sony Spresense
      • Audio event detection with Particle boards
      • Motion recognition - Particle - Photon 2 & Boron
      • Motion recognition - RASynBoard
      • Motion recognition - Syntiant
      • Object detection - SiLabs xG24 Dev Kit
      • Sound recognition - TI LaunchXL
      • Keyword spotting - TI LaunchXL
      • Keyword spotting - Syntiant - RC Commands
      • Running NVIDIA TAO models on the Renesas RA8D1
      • Two cameras, two models - running multiple object detection models on the RZ/V2L
  • Edge AI Hardware
    • Overview
    • Production-ready
      • Advantech ICAM-540
      • Seeed SenseCAP A1101
      • Industry reference design - BrickML
    • MCU
      • Ambiq Apollo4 family of SoCs
      • Ambiq Apollo510
      • Arducam Pico4ML TinyML Dev Kit
      • Arduino Nano 33 BLE Sense
      • Arduino Nicla Sense ME
      • Arduino Nicla Vision
      • Arduino Portenta H7
      • Blues Wireless Swan
      • Espressif ESP-EYE
      • Himax WE-I Plus
      • Infineon CY8CKIT-062-BLE Pioneer Kit
      • Infineon CY8CKIT-062S2 Pioneer Kit
      • Nordic Semi nRF52840 DK
      • Nordic Semi nRF5340 DK
      • Nordic Semi nRF9160 DK
      • Nordic Semi nRF9161 DK
      • Nordic Semi nRF9151 DK
      • Nordic Semi nRF7002 DK
      • Nordic Semi Thingy:53
      • Nordic Semi Thingy:91
      • Open MV Cam H7 Plus
      • Particle Photon 2
      • Particle Boron
      • RAKwireless WisBlock
      • Raspberry Pi RP2040
      • Renesas CK-RA6M5 Cloud Kit
      • Renesas EK-RA8D1
      • Seeed Wio Terminal
      • Seeed XIAO nRF52840 Sense
      • Seeed XIAO ESP32 S3 Sense
      • SiLabs Thunderboard Sense 2
      • Sony's Spresense
      • ST B-L475E-IOT01A
      • TI CC1352P Launchpad
    • MCU + AI accelerators
      • Alif Ensemble
      • Arduino Nicla Voice
      • Avnet RASynBoard
      • Seeed Grove - Vision AI Module
      • Seeed Grove Vision AI Module V2 (WiseEye2)
      • Himax WiseEye2 Module and ISM Devboard
      • SiLabs xG24 Dev Kit
      • STMicroelectronics STM32N6570-DK
      • Synaptics Katana EVK
      • Syntiant Tiny ML Board
    • CPU
      • macOS
      • Linux x86_64
      • Raspberry Pi 4
      • Raspberry Pi 5
      • Texas Instruments SK-AM62
      • Microchip SAMA7G54
      • Renesas RZ/G2L
    • CPU + AI accelerators
      • AVNET RZBoard V2L
      • BrainChip AKD1000
      • i.MX 8M Plus EVK
      • Digi ConnectCore 93 Development Kit
      • MemryX MX3
      • MistyWest MistySOM RZ/V2L
      • Qualcomm Dragonwing RB3 Gen 2 Dev Kit
      • Renesas RZ/V2L
      • Renesas RZ/V2H
      • IMDT RZ/V2H
      • Texas Instruments SK-TDA4VM
      • Texas Instruments SK-AM62A-LP
      • Texas Instruments SK-AM68A
      • Thundercomm Rubik Pi 3
    • GPU
      • Advantech ICAM-540
      • NVIDIA Jetson
      • Seeed reComputer Jetson
    • Mobile phone
    • Porting guide
  • Integrations
    • Arduino Machine Learning Tools
    • AWS IoT Greengrass
    • Embedded IDEs - Open-CMSIS
    • NVIDIA Omniverse
    • Scailable
    • Weights & Biases
  • Tips & Tricks
    • Combining impulses
    • Increasing model performance
    • Optimizing compute time
    • Inference performance metrics
  • Concepts
    • Glossary
    • Course: Edge AI Fundamentals
      • Introduction to edge AI
      • What is edge computing?
      • What is machine learning (ML)?
      • What is edge AI?
      • How to choose an edge AI device
      • Edge AI lifecycle
      • What is edge MLOps?
      • What is Edge Impulse?
      • Case study: Izoelektro smart grid monitoring
      • Test and certification
    • Data engineering
      • Audio feature extraction
      • Motion feature extraction
    • Machine learning
      • Data augmentation
      • Evaluation metrics
      • Neural networks
        • Layers
        • Activation functions
        • Loss functions
        • Optimizers
          • Learned optimizer (VeLO)
        • Epochs
    • What is embedded ML, anyway?
    • What is edge machine learning (edge ML)?
Powered by GitBook
On this page
  • Block structure
  • Block interface
  • Inputs
  • Outputs
  • Configuring advanced training settings
  • Getting profiling metrics
  • Editing built-in blocks
  • Initializing the block
  • Testing the block locally
  • With blocks runner
  • With Docker
  • Pushing the block to Edge Impulse
  • Using the block in a project
  • Examples
  • Troubleshooting
  • Additional resources

Was this helpful?

Export as PDF
  1. Edge Impulse Studio
  2. Organization hub
  3. Custom blocks

Custom learning blocks

PreviousCustom deployment blocksNextCustom processing blocks

Last updated 18 days ago

Was this helpful?

Custom learning blocks are a way to extend the capabilities of Edge Impulse beyond the learning blocks built into the platform. If none of the existing blocks created by Edge Impulse fit your needs, you can create custom learning blocks to integrate your own model architectures for unique project requirements.

Ready to dive in and start building? Jump to the examples!

Custom learning blocks are available for all users

Unlike other custom blocks, which are only available to customers on the Enterprise plan, custom learning blocks are available to all users of the platform. If you are an enterprise customer, your custom learning blocks will be available in your organization. If you are not an enterprise customer, your custom learning blocks will be available in your developer profile.

Expert mode

If you only want to make small modifications to the neural network architecture or loss function, you can instead use expert mode directly in Studio, eliminating the need to create a custom learning blocks. Go to any learning block settings page, select the three dots, and select Switch to Keras (expert) mode.

Block structure

The learning block structure is shown below. Please see the custom blocks overview page for more details.

Block interface

The sections below define the required and optional inputs and the expected outputs for custom learning blocks.

Inputs

Learning blocks have access to command line arguments and training data.

Command line arguments

The parameters defined in your parameters.json file will be passed as command line arguments to the script you defined in your Dockerfile as the ENTRYPOINT for the Docker image. Please refer to the parameters.json documentation for further details about creating this file, parameter options available, and examples.

In addition to the items defined by you, the following arguments will be automatically passed to your custom learning block.

Argument
Passed
Description

--info-file <file>

Always

Provides the file path for train_input.json as a string. The train_input.json file contains configuration details for model training options. See train_input.json.

--data-directory <dir>

Always

Provides the directory path for training/validation datasets as a string.

--out-directory <dir>

Always

Provides the directory path to the output directory as a string. This is where block output needs to be written.

--epochs <value>

Conditional

Passed if no custom parameters are provided. Provides the number of epochs for model training as an integer.

--learning-rate <value>

Conditional

Passed if no custom parameters are provided. Provides the learning rate for model training as a float.

Data

In addition to the datasets, a sample_id_details.json file (see sample_id_details.json) is located within the data directory. The location of this directory is specified by the --data-directory <dir> argument and its structure is shown below.

data/
├── X_split_test.npy
├── X_split_train.npy
├── Y_split_test.npy
├── Y_split_train.npy
└── sample_id_details.json

The X_*.npy files are float32 arrays in the appropriate shape. You can typically load these into your training pipeline without any modification.

The Y_*.npy files are int32 arrays with four columns: label_index, sample_id, sample_slice_start_ms, and sample_slice_end_ms, unless the labels are bounding boxes. See below.

Image data

The X_*.npy files follow the NHWC (batch_size, height, width, channels) format for image data.

The Y_*.npy files are a JSON array in the form of:

[
    {
        "sampleId": 234731,
        "boundingBoxes": [
            {
                "label": 1,
                "x": 260,
                "y": 313,
                "w": 234,
                "h": 261
            }
        ]
    }
]

Image data is formatted as NHWC

If you need your data in the channels-first, NCHW format, you will need to transpose the input data yourself before training your model.

Image data is provided to your custom learning block in the NHWC (batch_size, height, width, channels) format. If you are training a PyTorch model that requires data to be in the NCHW (batch_size, channels, height, width) format, you will need to transpose the data before training your model.

You do not need to worry about this when running on device. As long as your custom learning block outputs an ONNX model, the required transpose will be handled for you in the Edge Impulse SDK.

Image data is formatted as RGB

If you have a model that requires BGR input, you will need to transpose the first and last channels.

For models that require BGR channel format, you can have Edge Impulse automatically transpose the first and last channels by selecting the RGB->BGR option when configuring pixel scaling for your block. See below.

Image data has pixels that are already scaled

There is no need to scale the pixel values yourself for training nor for inference on-device. If the options provided in Edge Impulse do not suit your needs, please contact us to let us know what option(s) you require.

Image data is provided to your learning block with pixels that are already scaled. Pixel scaling is handled automatically by Edge Impulse. There are several options to scale your pixels, some of which include additional processing (e.g. standardization or centering):

  • Pixels ranging 0..1 (not normalized)

  • Pixels ranging -1..1 (not normalized)

  • Pixels ranging -128..127 (not normalized)

  • Pixels ranging 0..255 (not normalized)

  • PyTorch (pixels ranging 0..1, then standardized using ImageNet mean/std)

  • RGB->BGR (pixels ranging 0..255, then centered using ImageNet mean)

This can be configured when initializing your custom learning block with the Edge Impulse CLI, and changed later in Studio if required by editing your custom learning block.

Outputs

The expected output from your custom learning block should be in TensorFlow SavedModel, TFLite, ONNX, or pickled scikit-learn format.

For object detection models, it is also important to ensure that the output layer of your model is supported by Edge Impulse.

File output options

TFLite file(s):

  • model.tflite - a TFLite file with float32 inputs and outputs

  • model_quantized_int8_io.tflite - a quantized TFLite file with int8 inputs and outputs

At least one of the above file options is required (both are recommended). If the source of the TFLite files are a TensorFlow SavedModel, then also write the saved_model.zip file.

TensorFlow SavedModel:

  • saved_model.zip - a TensorFlow SavedModel file

Edge Impulse automatically converts this file to both unquantized and quantized TFLite files after training.

ONNX file:

  • model.onnx - an ONNX file with int8, float16 or float32 inputs and outputs

Edge Impulse automatically converts this file to both unquantized and quantized TFLite files after training.

Pickled scikit-learn file:

  • model.pkl - a pickled instance of the scikit-learn model

Internally Edge Impulse uses scikit-learn==1.3.2 for conversion, so pin to this scikit-learn version for best results. LightGBM (3.3.5) and XGBOOST (1.7.6) models are also supported.

Object detection output layers

Unfortunately object detection models typically don't have a standard way to go from neural network output layer to bounding boxes. Currently Edge Impulse supports the following types of output layers. The most up-to-date list can be found in the API documentation for ObjectDetectionLastLayer.

  • FOMO

  • MobileNet SSD

  • NVIDIA TAO RetinaNet

  • NVIDIA TAO SSD

  • NVIDIA TAO YOLOv3

  • NVIDIA TAO YOLOv4

  • YOLOv2 for BrainChip Akida

  • YOLOv5 (coordinates scaled 0..1)

  • YOLOv5 (coordinates in absolute values)

  • YOLOv7

  • YOLOX

  • YOLO Pro

Configuring advanced training settings

After pushing your custom learning block to Edge Impulse, in Studio you will notice that below the section of custom parameters that you have exposed for your block, there is another section titled "Advanced training settings". These settings allow you to optionally adjust the train/validation split, split on a metadata key, and profile the int8 version of your model.

If you are testing your block locally using the edge-impulse-blocks runner tool as described below, you can adjust the train/validation split using the --validation-set-size <size> argument but you are unable to split using a metadata key. To profile your model after training locally, see Getting profiling metrics.

Getting profiling metrics

After training a custom learning block locally, you can use the profiling API to get latency, RAM and ROM estimates. This is very useful as you can immediately see whether your model will fit on device or not. Additionally, you can use this API as part your experiment tracking (e.g. in Weights & Biases or MLFlow) to wield out models that won't fit your latency or memory constraints.

Editing built-in blocks

Most learning blocks built in the Edge Impulse (e.g. classifier, regression, or FOMO blocks) can be edited locally and then pushed back to Edge Impulse as a custom block. This is great if you want to make heavy modifications to these training pipelines, for example to do custom data augmentation. To download a block, go to any learning block settings page in your project, click the three dots, and select Edit block locally. Once downloaded, follow the instructions in the README file.

Initializing the block

Testing the block locally

The train_input.json file is not available when training locally

If your script needs information that is contained within train_input.json, you will not be able to train locally. You will either need to push your block to Edge Impulse to train and test in Studio or alter your training script such that you can pass in that information (or eliminate it all together).

To speed up your development process, you can test and train your custom learning block locally. There are two ways to achieve this. You will need to have Docker installed on your machine for either approach.

With blocks runner

Argument
Description

--epochs <number>

If not provided, you will be prompted to enter a value.

--learning-rate <learningRate>

If not provided, you will be prompted to enter a value.

--validation-set-size <size>

Defaults to 0.2 but can be overwritten.

--input-shape <shape>

Automatically identified but can be overwritten.

--extra-args <args>

Additional arguments for your script.

For the additional arguments, you will need to provide the data directory (/home), an output directory (e.g. /home/out), and any other parameters required for your script.

 edge-impulse-blocks runner --extra-args "--data-directory /home --out-directory /home/out --custom-param foo"

Using the above approach will create an ei-block-data directory within your custom block directory. It will contain a subdirectory with the associated project ID as the name - this is the directory that gets mounted into the container as /home.

The first time you enter the above command, you will be asked some questions to configure the runner. Follow the prompts to complete this. If you would like to change the configuration in future, you can execute the runner command with the --clean flag.

With Docker

For the second method, you can use the block runner to download the required data from your project, then build the Docker image and run the container directly. The advantage of this approach is that you do not need to go through the feature generation and data splitting process each time you want to train your block. If your data changes, you can download it again.

edge-impulse-blocks runner --download-data data/
docker build -t custom-learning-block .
docker run --rm -v $PWD/data:/data custom-learning-block --epochs 30 --learning-rate 0.01 --data-directory /data --out-directory /data/out --custom-param foo

Pushing the block to Edge Impulse

Using the block in a project

Examples

Edge Impulse has developed several example custom learning blocks. The code for these blocks can be found in public repositories under the Edge Impulse GitHub account. The repository names typically follow the convention of example-custom-ml-<description>. As such, they can be found by going to the Edge Impulse account and searching the repositories for ml-block.

Below are direct links to some examples:

  • Fully connected model (Keras)

  • Fully connected model (PyTorch)

  • Logistic regression model (scikit-learn)

  • EfficientNet (Keras)

  • YOLOv5 (PyTorch)

Troubleshooting

Block parameters do not update

If changes you have made to your parameters.json file are not being reflected, or there are no parameters at all, in your block after being pushed to Studio, you may need to update the Edge Impulse CLI:

npm update -g edge-impulse-cli

Additional resources

  • Custom blocks

  • Learning blocks

  • edge-impulse-blocks

  • parameters.json

  • train_input.json

Learning blocks operate on data that has already been processed by an and a processing block. This processed data is available to your learning block in a single directory, in the NumPy format, and already split into training (train) and validation (test) datasets. By default the train/validation split is 80/20. You can change this ratio using the advanced training settings. The NumPy datasets can be converted to the required format (e.g. tf.data.Dataset) for your model and batched as desired within your custom learning block training script.

Edge Impulse will automatically convert this file to the required format. Note that arbitrary scikit-learn pipelines cannot be converted. For a list of supported model types, please refer to .

You can also use the Python SDK to profile your model easily. See for an example on how to profile a model created in Keras.

For the first method, you can use the CLI edge-impulse-blocks runner tool. See for additional details. The runner expects the following arguments for learning blocks.

input block
Block runner
Supported classical ML algorithms
here

When you are finished developing your block locally, you will want to initialize it. The procedure to initialize your block is described in the overview page. Please refer to that documentation for details.

custom blocks

After you have pushed your block to Edge Impluse, it can be used in the same way as any other built-in block.

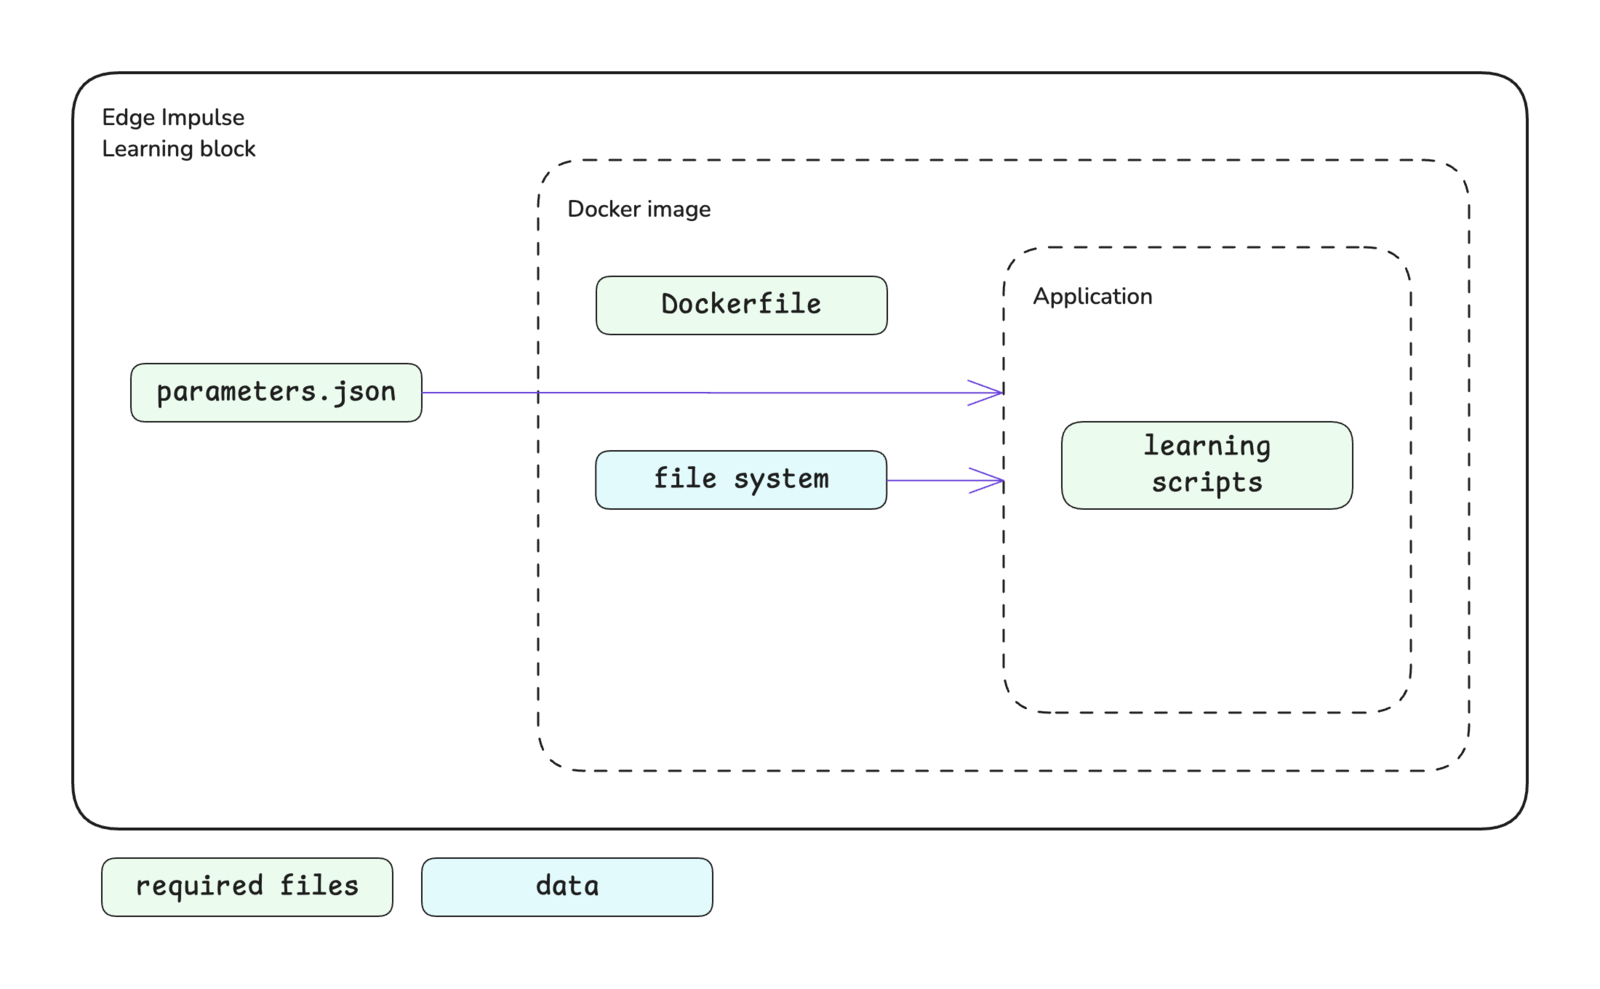
Custom learning block structure
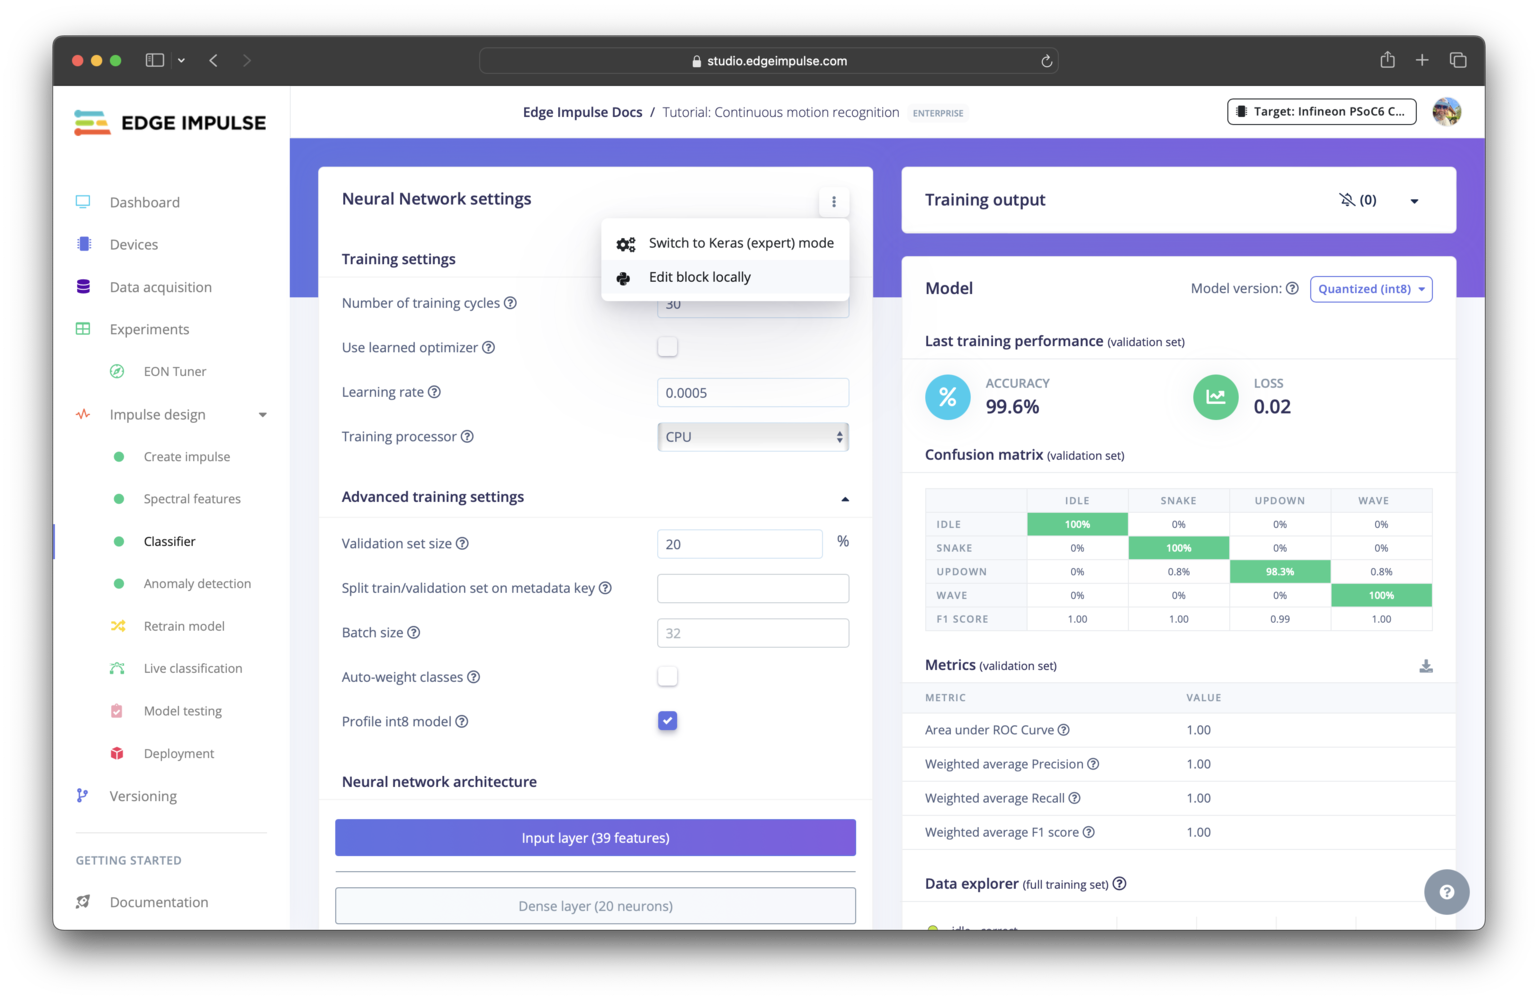
Option to edit a built-in block locally

When you have initalized and finished testing your block locally, you will want to push it to Edge Impulse. The procedure to push your block to Edge Impulse is described in the overview page. Please refer to that documentation for details.

custom blocks