Overview
The Edge Impulse integration with AWS IoT Core and AWS IoT Greengrass is as follows: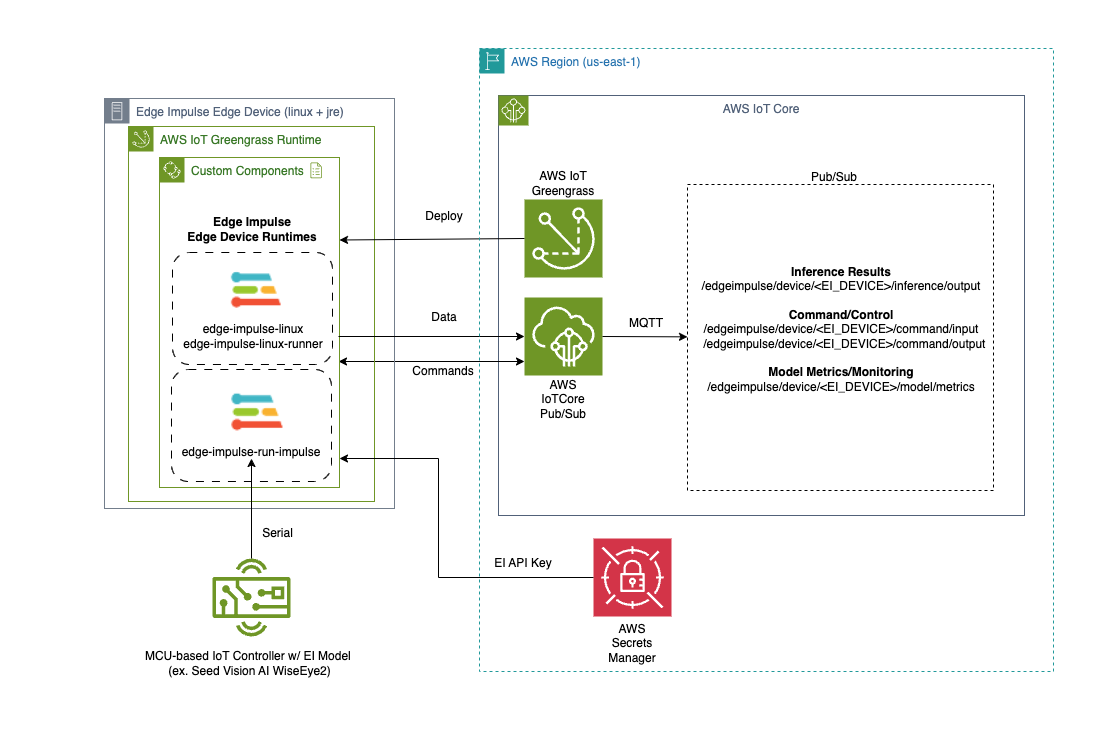
- Edge Impulse Linux/Runner services now have a “—greengrass” option that enables the integration.
- AWS Secrets Manager is used to protect the Edge Impulse API Key by removing it from view via command line arguments
- The Greengrass Token Exchange Role must have Secrets Manager and IoT Core publication permission for the integration to operate correctly.
- Edge Impulse has several custom Greengrass components that can be deployed and run on the Greengrass-enabled edge device for several purposes outlined below. The component recipes and artifacts can be found here: Repo.
”EdgeImpulseLinuxServiceComponent” Greengrass Component
The “edge-impulse-linux-service” allows a linux-based edge device to register itself to the Edge Impulse studio service as a device capable of relaying its sensory (typically, camera, microphone, etc…) to the Edge Impulse service to be used for data creation and model testing. The associated Greengrass component for this service allows for easy/scalable deployment of this service to edge devices.This component will attempt to capture camera devices so typically it cannot be installed in the same edge device that has the “edge-impulse-linux-runner” component (described below) at the same time.
”EdgeImpulseLinuxRunnerServiceComponent” Greengrass Component
The “edge-impulse-linux-runner” service downloads, configures, installs, and executes an Edge Impulse model, developed for the specific edge device, and provides the ability to retrieve model inference results. In this case, our component for this service will relay the inference results into AWS IoT Core under the following topic:This component will attempt to capture camera devices so typically it cannot be installed in the same edge device that has the “edge-impulse-linux-runner” component (described prior) at the same time.
”EdgeImpulseSerialRunnerServiceComponent” Greengrass Component
The “edge-impulse-run-impulse” service is typically used when you want to utilize a MCU-based device to run the Edge Impulse model and you further want that device tethered to an edge device via serial/usb connections to allow its inference results to be relayed upstream. Like with the “edge-impulse-linux-runner” service, the “edge-impulse-run-impulse” component will relay inference results into AWS IoT Core via the same topic structure:Installation
The following sections outline how one installs AWS IoT Greengrass… then installs the Edge Impulse custom components for inclusion into a Greengrass deployment down to edge devices.1. Install AWS IoT Greengrass Prerequisites
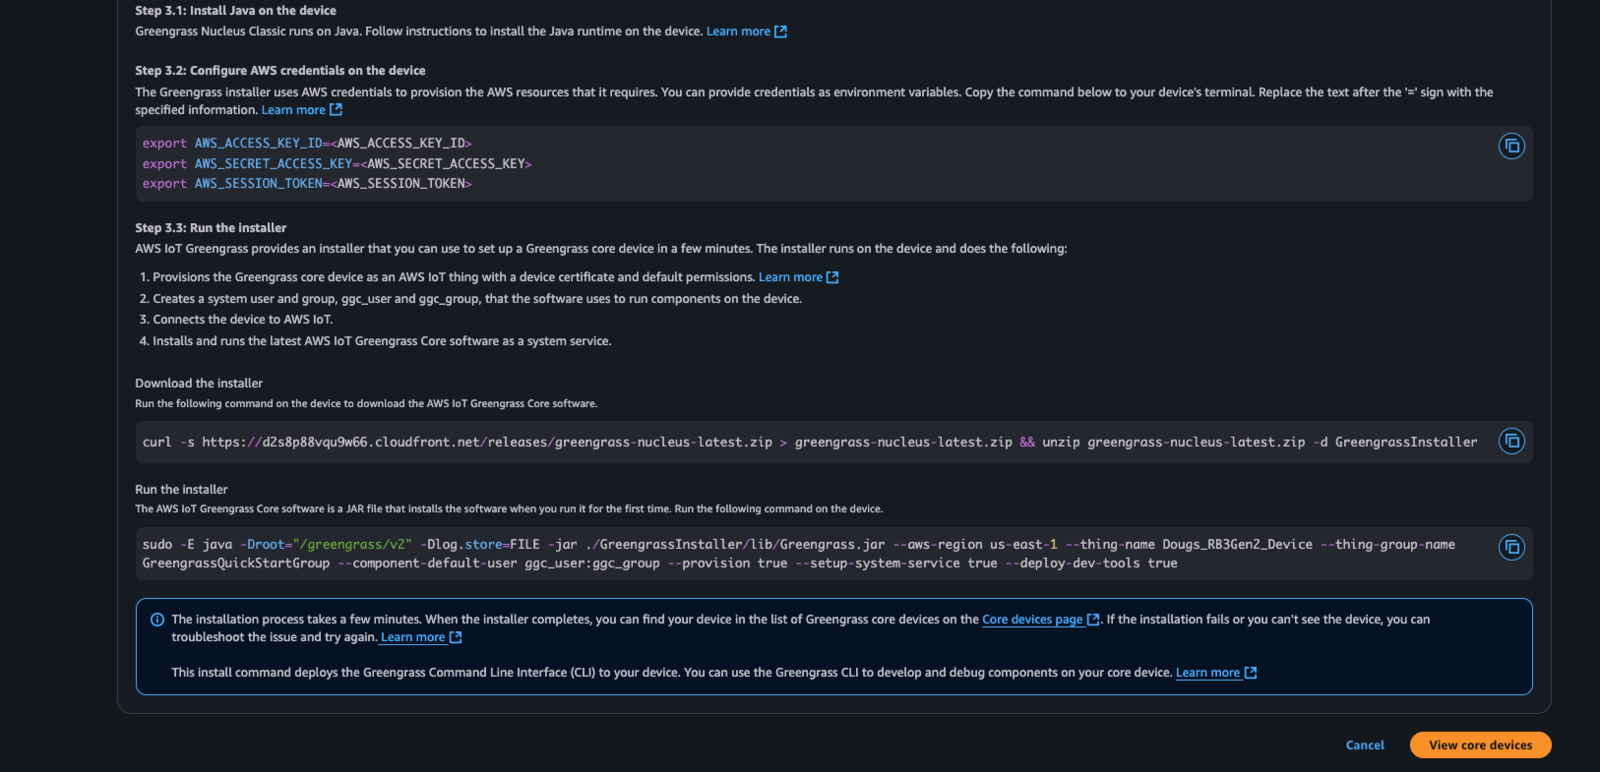
AWS IoT Greengrass is based on Java and thus a Java runtime must be installed. For most linux-based devices a suitable Java can be run by simply typing: Debian-based Linux:2. Install AWS IoT Greengrass
Greengrass is typically installed from within the AWS Console -> AWS IoT Core -> Greengrass -> Core Devices menu… select/press “Set up one core device”. There are multiple ways to install Greengrass - “Nucleus Classic” is the version of Greengrass that is based on Java. “Nucleus Lite” is a native version of Greengrass that is typically part of a Yocto-image based implementation. In this example, we choose the “Linux” device type and we are going to download the installer for Greengrass and invoke it as part of the installation of a “Nucleus Classic” instance: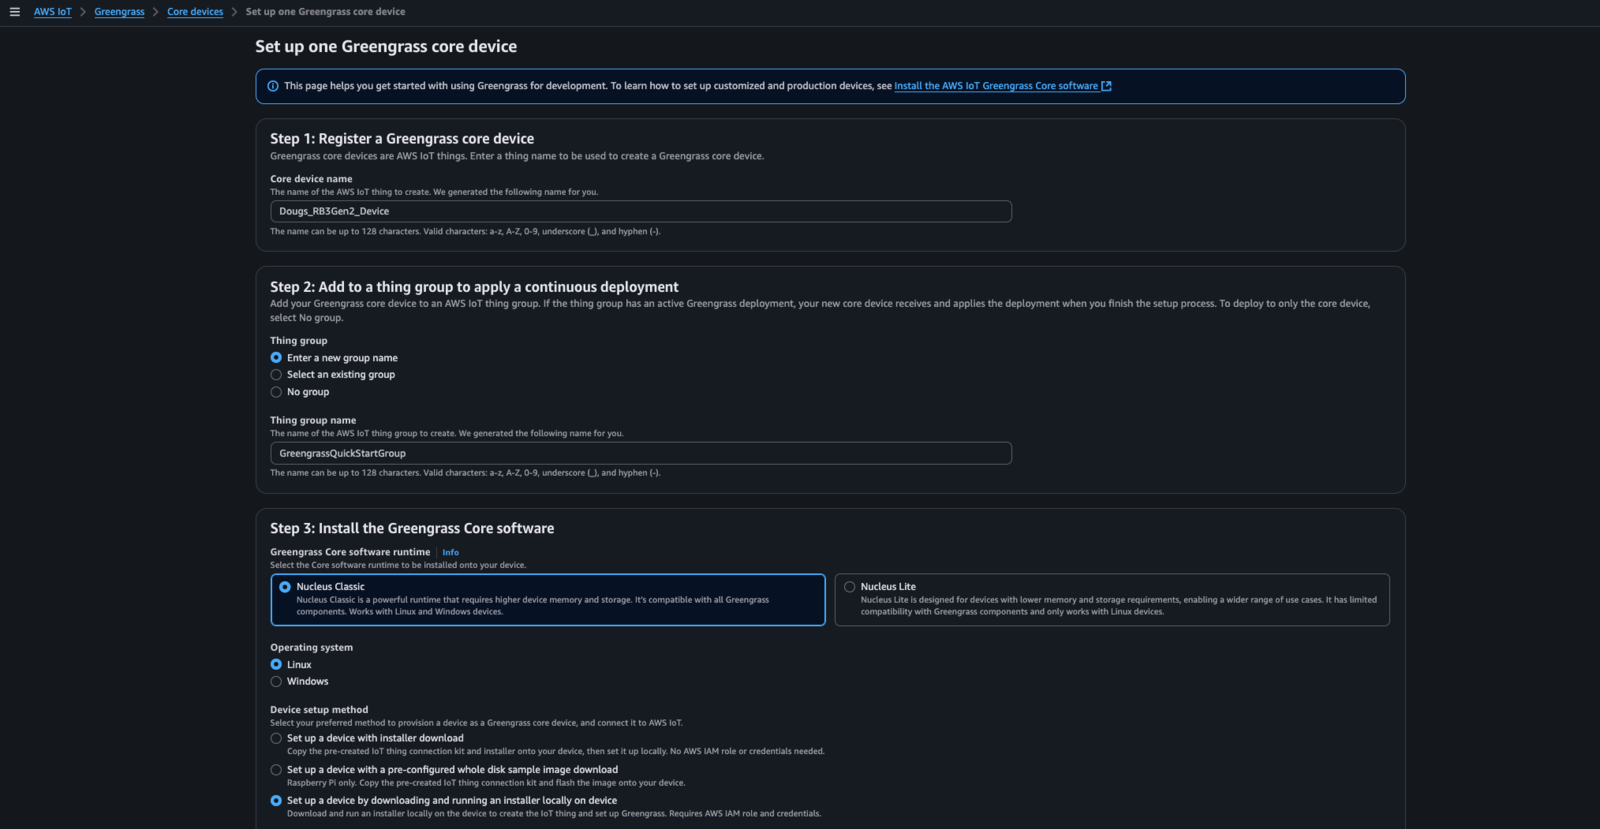
3. Install defaulted AWS IoT Greengrass components
When doing a Greengrass installation/deployment, a default deployment for the target device will typically get created and that deployment will install the two components below. If one is not created, it is recommended that you create a deployment in Greengrass for your newly added Greengrass edge device and add the following available AWS Components:4. Modify the Greengrass TokenExchange Role with additional permissions
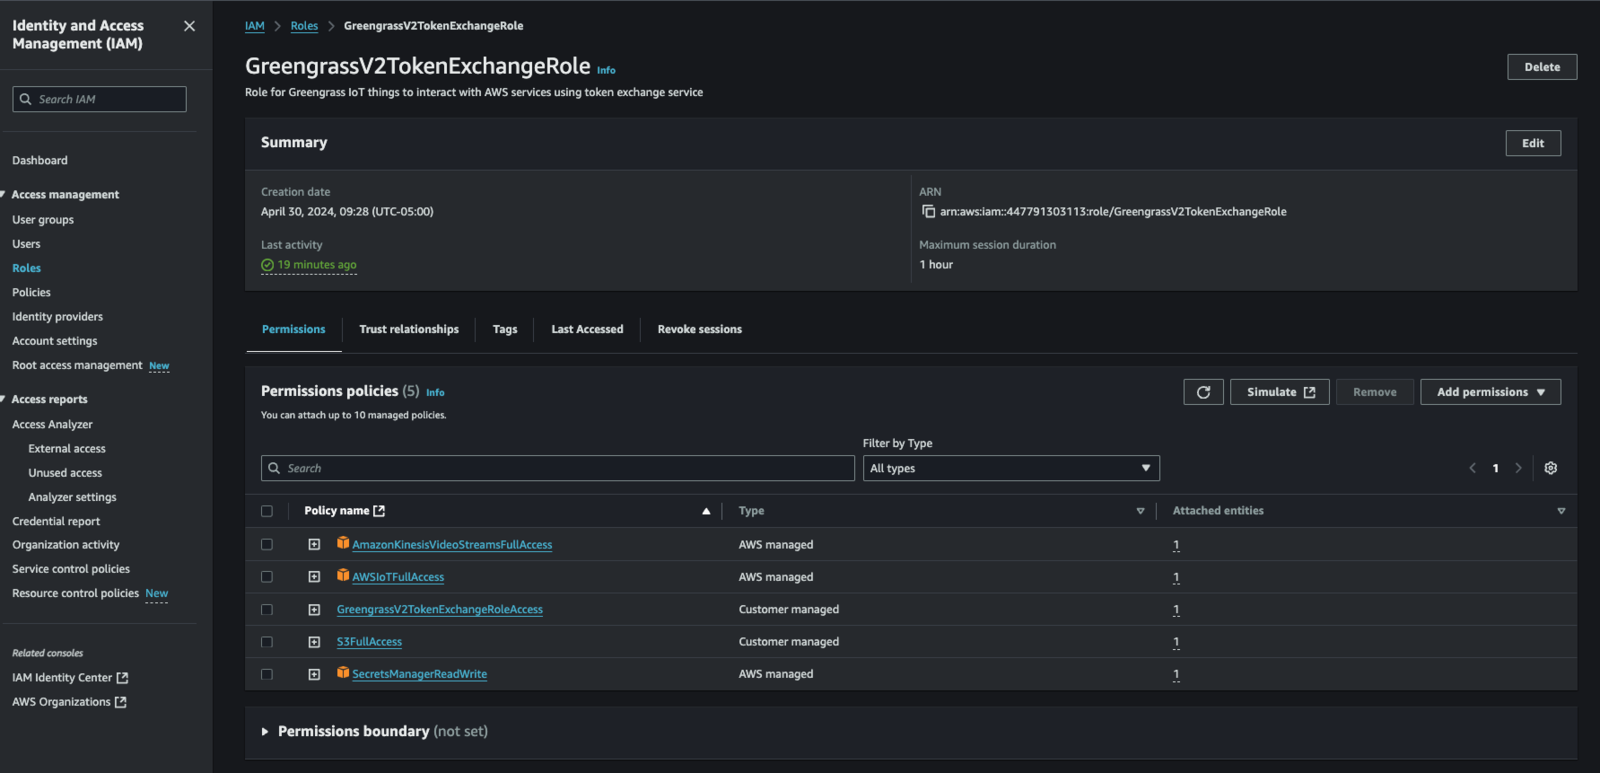
When you run a Greengrass component within Greengrass, a service user (typically a linux user called “ggc_user” for “Nucleus Classic” installations) invokes the component, as specified in the lifecycle section of your recipe. Credentials are passed to the invoked process via its environment (NOT by the login environment of the “Greengrassc_user”…) during the invocation spawning process. These credentials are used by by the spawned process (typically via the AWS SDK which is part of the spawned process…) to connect back to AWS and “do stuff”. These permissions are controlled by a AWS IAM Role called “GreengrassV2TokenExchangeRole”. We need to modify that role and add “Full AWS IoT Core Permission” as well as “AWS Secrets Manager Read/Write” permission. To modify the role, from the AWS Console -> IAM -> Roles search for “GreengrassV2TokenExchangeRole”, Then:- Select “GreengrassV2TokenExchangeRole” in the search results list
- Select “Add Permissions” -> “Attach Policies”
- Search for “AWSIoTFullAccess”, select it, then press “Add Permission” down at the bottom
- Repeat the search for “S3FullAccess” and “SecretsManagerReadWrite”
5. Clone the repo to acquire the Edge Impulse Component recipes and artifacts
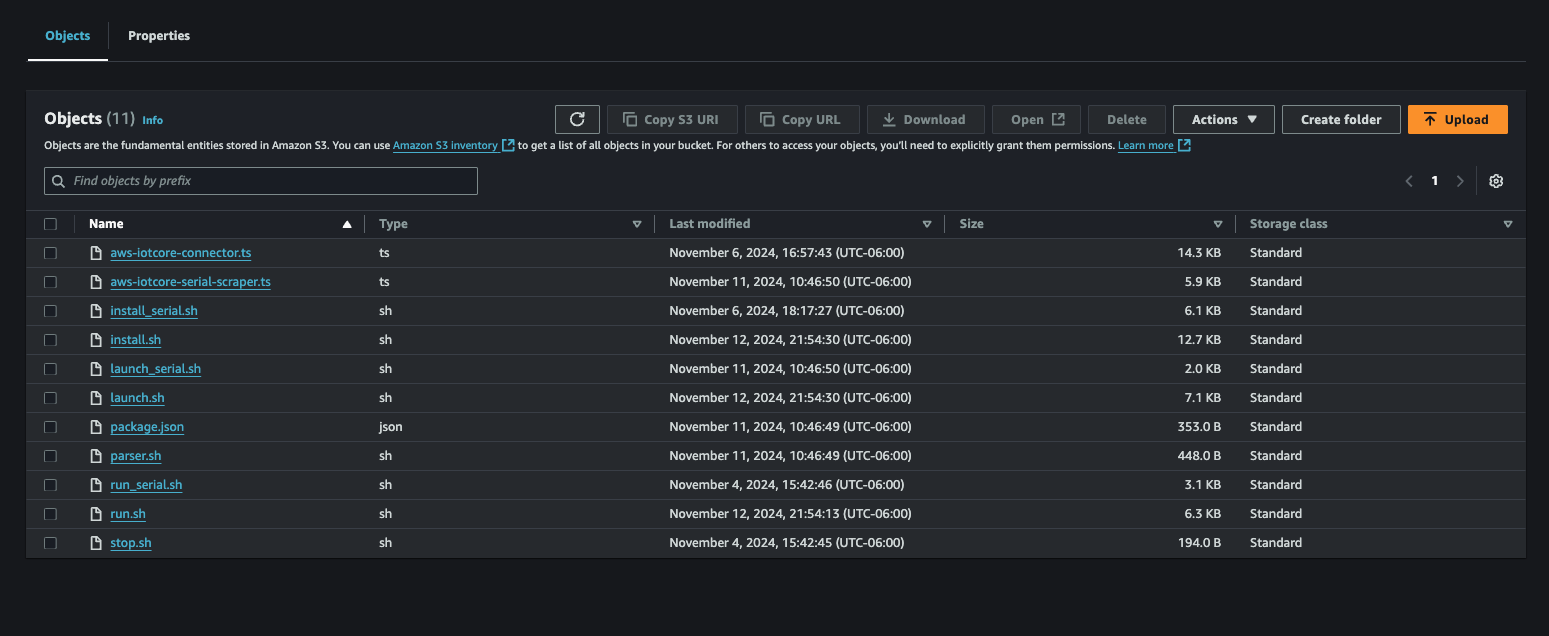
Clone this repo to retrieve the Edge Impulse component recipes (yaml files) and the associated artifacts: Repo.6. Upload Edge Impulse Greengrass Component artifacts into AWS S3
First, you need to go to the S3 console in AWS via AWS Console -> S3. From there, you will create an S3 bucket. For sake of example, we name this bucket “MyS3Bucket123”.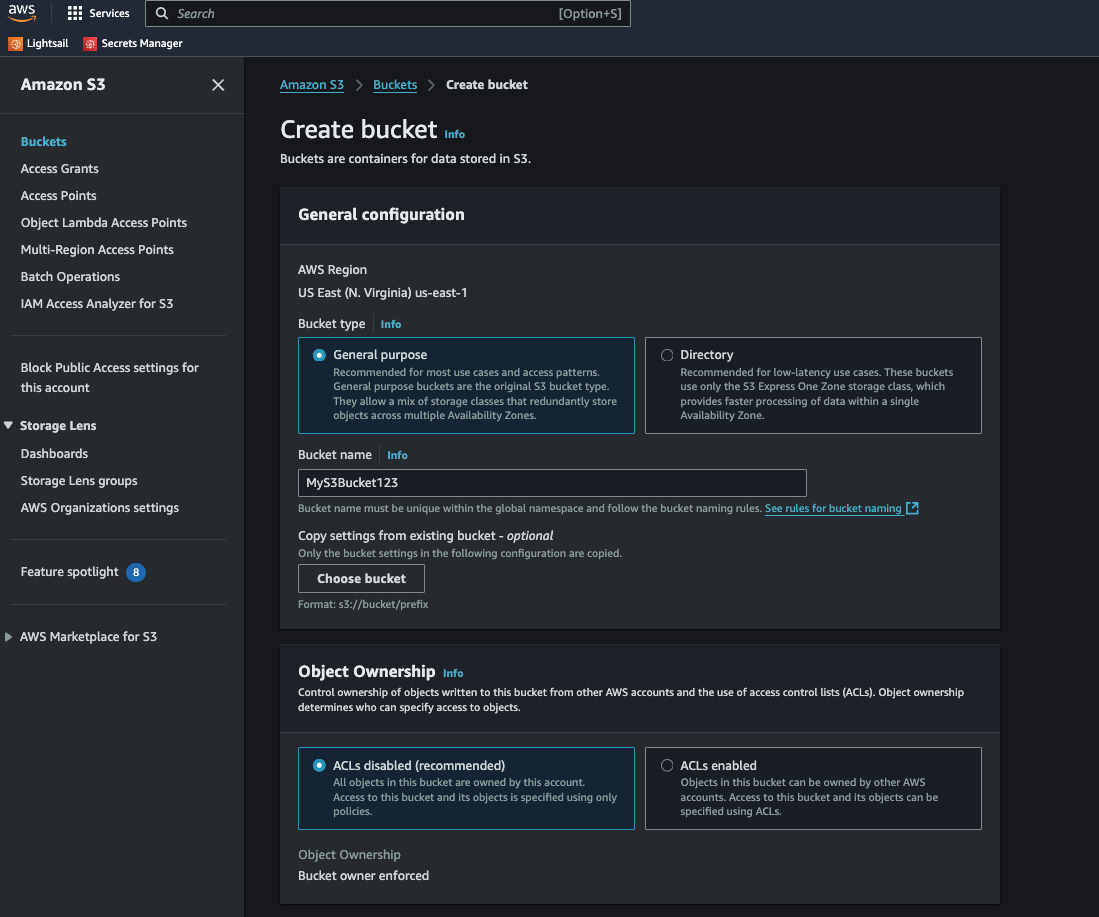
7. Customize the component recipe files
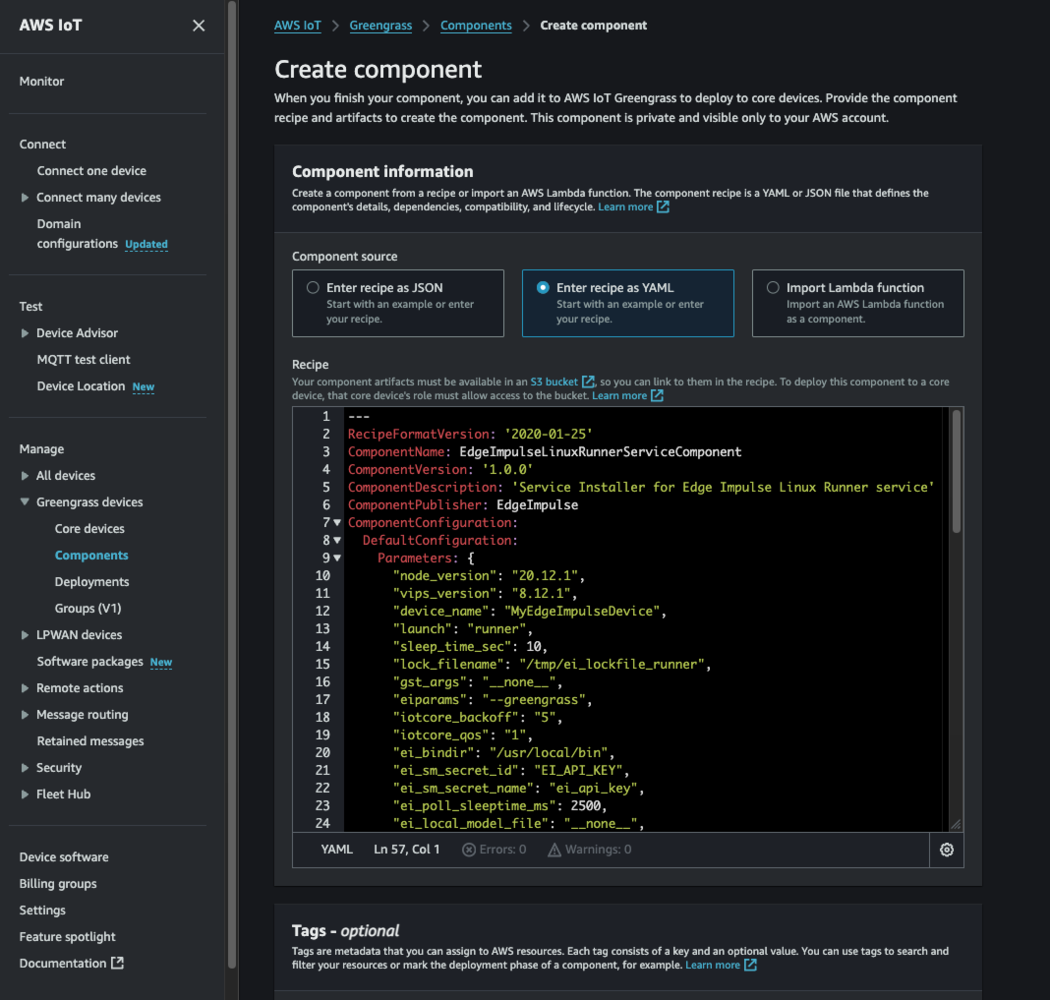
Next we need to customize our Greengrass component recipe files to reflect the actual location of our artifacts stored in S3. Please replace ALL occurrences of “YOUR_S3_ARTIFACT_BUCKET” with your S3 bucket name (i.e. “MyS3Bucket123”). Please do this for each of the 3 yaml files you have in your cloned repo under ”./AWSGreengrassComponents”. Additionally, we can customize the defaulted configuration of your custom component by editing, within each yaml file, the default configuration JSON. Each yaml file’s JSON is DIFFERENT… so don’t edit one then copy to the other 2 yaml files… that will break your components. You must edit each yaml file separately without copy/paste of this json information. The default configuration contains the following attributes:Attribute Description
The attributes in each of the above default configurations is outlined below:- node_version: Version of NodeJS to be installed by the component
- vips_version: Version of the libvips library to be compiled/installed by the component
- device_name: Template for the name of the device in EdgeImpulse… a unique suffix will be added to the name to prevent collisions when deploying to groups of devices
- launch: service launch type (typically just leave this as-is)
- sleep_time_sec: wait loop sleep time (component lifecycle stuff… leave as-is)
- lock_filename: name of lock file for this component (leave as-is)
- gst_args: optional GStreamer args, spaces replaced with ”:”, for custom video invocations
- eiparams: additional parameters for launching the Edge Impulse service (leave as-is)
- iotcore_backoff: number of inferences to “skip” before publication to AWS IoTCore… this is used to control publication frequency (AWS $$…)
- iotcore_qos: MQTT QoS (typically leave as-is)
- ei_bindir: Typical location of where the Edge Impulse services are installed (leave as-is)
- ei_ggc_user_groups: A list of additional groups the Greengrass service user account will need to be a member of to allow the Edge Impulse service to invoke and operate correctly (typically leave as-is). For JetPack v6.x and above, please add “render” as an additional group.
- ei_sm_secret_id: ID of the Edge Impulse API Key within AWS Secret Manager
- ei_sm_secret_name: Name of the Edge Impulse API Key within AWS Secret Manager
- install_kvssink: Option (default: “no”, on: “yes”) to build and make ready the kvssink gstreamer plugin
- publish_inference_base64_image: Option (default: “no”, on: “yes”) to include a base64 encoded image that the inference result was based on
- enable_cache_to_file: Option (default: “no”, on: “yes”) to enable both inference and associated image to get written to a specified local directory as a pair:
<guid>.imgand<guid>.jsonfor each inference identified with a<guid> - cache_file_directory: Option (default: “none”) to specify the local directory when enable_cache_to_file is set to “yes”
New options (January 2025 Integration Enhancements)
In the 2025 updated integration, the following additional component recipe attributes are required:- ei_poll_sleeptime_ms: time (in ms) for the long polling message processor (typically leave as-is)
- ei_local_model_file: option to utilize a previously installed local model file
- ei_shutdown_behavior: option to alter the shutdown behavior of the linux runner process. (can be set to “wait_for_restart” to cause the runner to pause after running the model and wait for the “restart” command to be issued (see “Commands” below for more details on the “restart” command))
- enable_threshold_limit: option to enable/disable the threshold confidence filter (must be “yes” or “no”. Default is “no”)
- metrics_sleeptime_ms: option to publish the model metrics statistics (time specified in ms).
- default_threshold: option to specify threshold confidence filter “limit” (a value between 0 < x <= 1.0). Default setting is 0.7
- threshold_criteria: option to specify the threshold confidence filter criteria (must be one of: “gt”, “ge”, “eq”, “le”, or “lt”)
- enable_cache_to_s3: option to enable caching the inference image/result to an AWS S3 bucket
- s3_bucket: name of the optional S3 bucket to cache results into
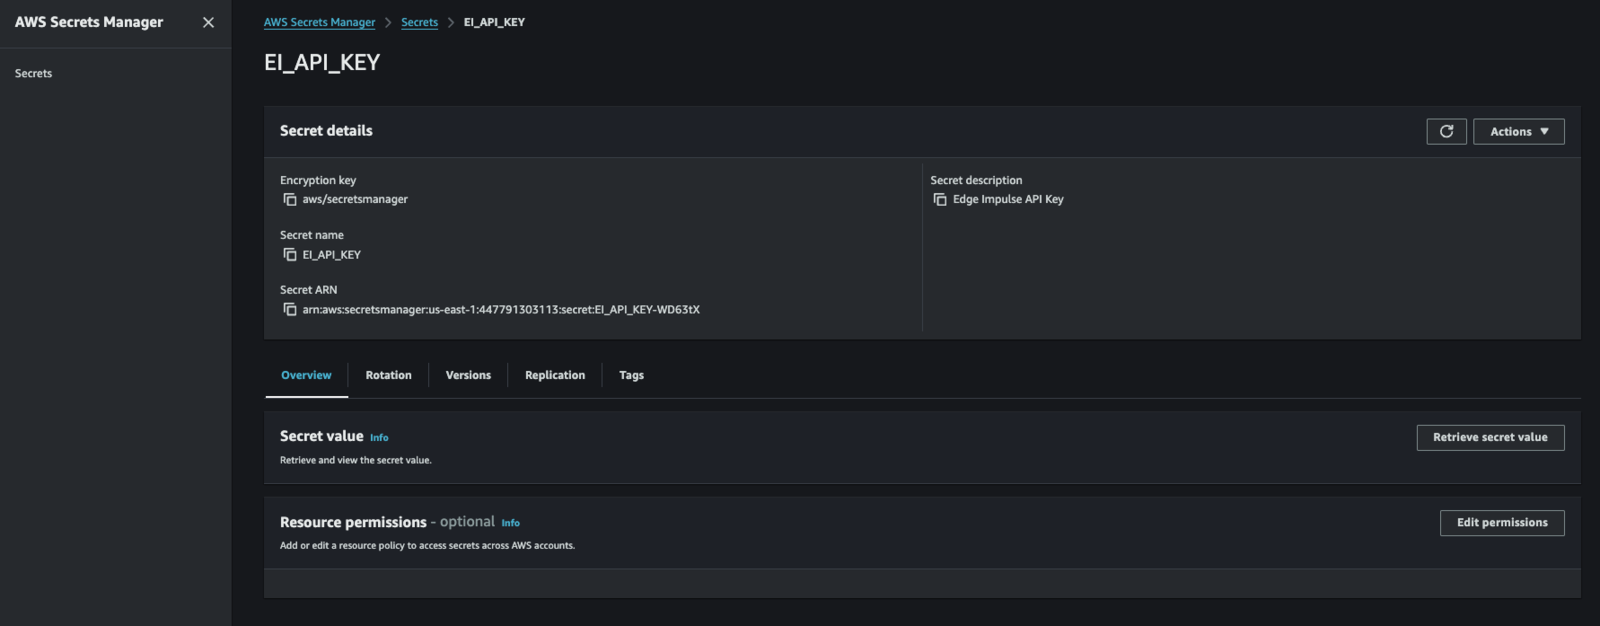
8. Gather and install an EdgeImpulse API Key into AWS Secrets Manager
First we have to create an API Key in Edge Impulse via the Studio. Next, we will go into AWS Console -> Secrets Manager and press “Store a new secret”. From there we will specify:- Select “Other type of secret”
- Enter “ei_api_key” as the key NAME for the secret (goes in the “Key” section)
- Enter our actual API Key (goes in the “Value” section)
- Press “Next”
- Enter “EI_API_KEY” for the “Secret Name” (actually, this is its Secret ID…)
- Press “Next”
- Press “Next”
- Press “Store”
9. Register the custom component via its recipe file
From the AWS Console -> IoT Core -> Greengrass -> Components, select “Create component”. Then:- Select the “yaml” option to Enter the recipe
- Clear the text box to remove the default “hello world” yaml recipe
- Copy/Paste the entire/edited contents of your EdgeImpulseLinuxServiceComponent.yaml file
- Press “Create Component”
10. Deploy the custom component to a selected Greengrass edge device or group of edge devices.
Almost done! We can now go back to the AWS Console -> IoT Core -> Greengrass -> Deployments page and select a deployment (or create a new one!) to deploy our component down to as selected gateway or group of gateways as needed.
Running
After the deployment is initiated, on the FIRST invocation of a given deployment, expect to wait several moments (upwards of 5-10 min in fact) while the component installs all of the necessary pre-requisites that the component requires… this can take some time so be patient. You can also log into the edge gateway, receiving the component, and examine log files found in /greengrass/v2/logs. There you will see each components’ current log file (same name as the component itself… ie. EdgeImpulseLinuxServiceComponent.log…) were you can watch the installation and invocation as it happens… any errors you might suspect will be shown in those log files. While the components are running, in addition to the /greengrass/v2/logs directory, each component has a runtime log in /tmp. The format of the log file is: “ei_lockfile_[linux | runner | serial]_<EI DEVICE>.log. Users can “tail” that log file to watch the component while it is running. Additionally, for Jetson-based devices where the model has been compiled specifically for that platform, one can expect to have a 2-3 minute delay in the model being loaded into the GPU memory for the first time. Subsequent invocations will be very short.Model Metrics (January 2025 Integration Enhancements)
Basic model metrics are now accumulated and published in the integration into IoT Core. The metrics will be published at specified intervals (per the “metrics_sleeptime_ms” component configuration parameter) to the following IoT Core topic:- accumulated mean: running accumulation of the average confidences from the linux runner while running the current model
- accumulated standard deviation: running accumulation of the standard deviation from the linux runner while running the current model
Commands (January 2025 Integration Enhancements)
In the 2025 January integration update, the following commands are now available with the Edge Impulse Greengrass Linux Runner Greengrass integration. The following commands are dispatched via the integration’s IoT Core Topic as a JSON:Initial Invocation
When the runner process is started/restarted, the following JSON will be published to the command output topic above:Restart Command
Command JSON:
Command Description:
This command directs the integration to “restart” the Edge Impulse linux runner process. In conjunction with the “ei_shutdown_behavior” option being set to “wait_for_restart”, the linux runner process will continue operating after the model has completed its operation. The linux runner process will continue to process input commands and will restart the linux runner via dispatching this command.Enable Threshold Filter Command
Command JSON:
Command Description:
This command directs the integration to enable the threshold filter. The filter will control which inferences will get published into IoT Core. By default the filter is disabled so that all inferences reported are sent into IoT Core.Command Result:
The command output will be published as follows and will include the filter config:Disable Threshold Filter Command
Command JSON:
Command Description:
This command directs the integration to disable the threshold filter.Command Result:
The command output will be published as follows and will include the filter config:Set Threshold Filter Criteria Command
Command JSON:
Command Description:
This command directs the integration to set the threshold filter criteria. The available options for the criteria are:- “gt”: publish if inference confidence is “greater than”…
- “ge”: publish if inference confidence is “greater than or equal to”…
- “eq”: publish if inference confidence is “equal to”…
- “le”: publish if inference confidence is “less than or equal to”…
- “gt”: publish if inference confidence is “less than”…