Introduction
According to the National Highway Traffic Safety Administration in America, over 1 million vehicle thefts were reported in 2023 - showing that a vehicle was stolen every 32 seconds! The estimated value of vehicles stolen nation-wide reaches nearly $4.1 billion each year, with 45 percent of stolen vehicles never recovered. As vehicle usage continues to grow, so does the rise in their thefts. Several factors contribute to this issue, such as the location where the vehicle is parked, its value, security features such as reinforced components (riveting), car alarms, dashboard cameras, etc. While existing anti-theft measures are widely used, they have proven to be insufficient in curbing the increasing number of thefts. Parking lots remain hotspots for such crimes, and most of the current vehicle monitoring systems lack the ability to detect suspicious activities near vehicles, leaving them highly vulnerable to theft. Computer vision is a sector of Artificial Intelligence (AI) that enables computers to see and analyze images similar to our sense of sight. The goal is to allow models to be taught to recognize visual cues and make data-driven decisions, interpreting their environment to perform tasks requiring visual understanding. Imagine a security guard stationed in a parking lot, attentively monitoring vehicles and being able to identify suspicious activities, such as someone attempting to break into a car or detach components like side mirrors, tires, or wipers. In a similar way, computers can also be trained to recognize such visual actions. Using AI and computer vision, systems can be developed to detect unauthorized behavior, such as a person tampering with car tires or breaking a window, replicating the way a person would interpret the visual actions.Project Overview
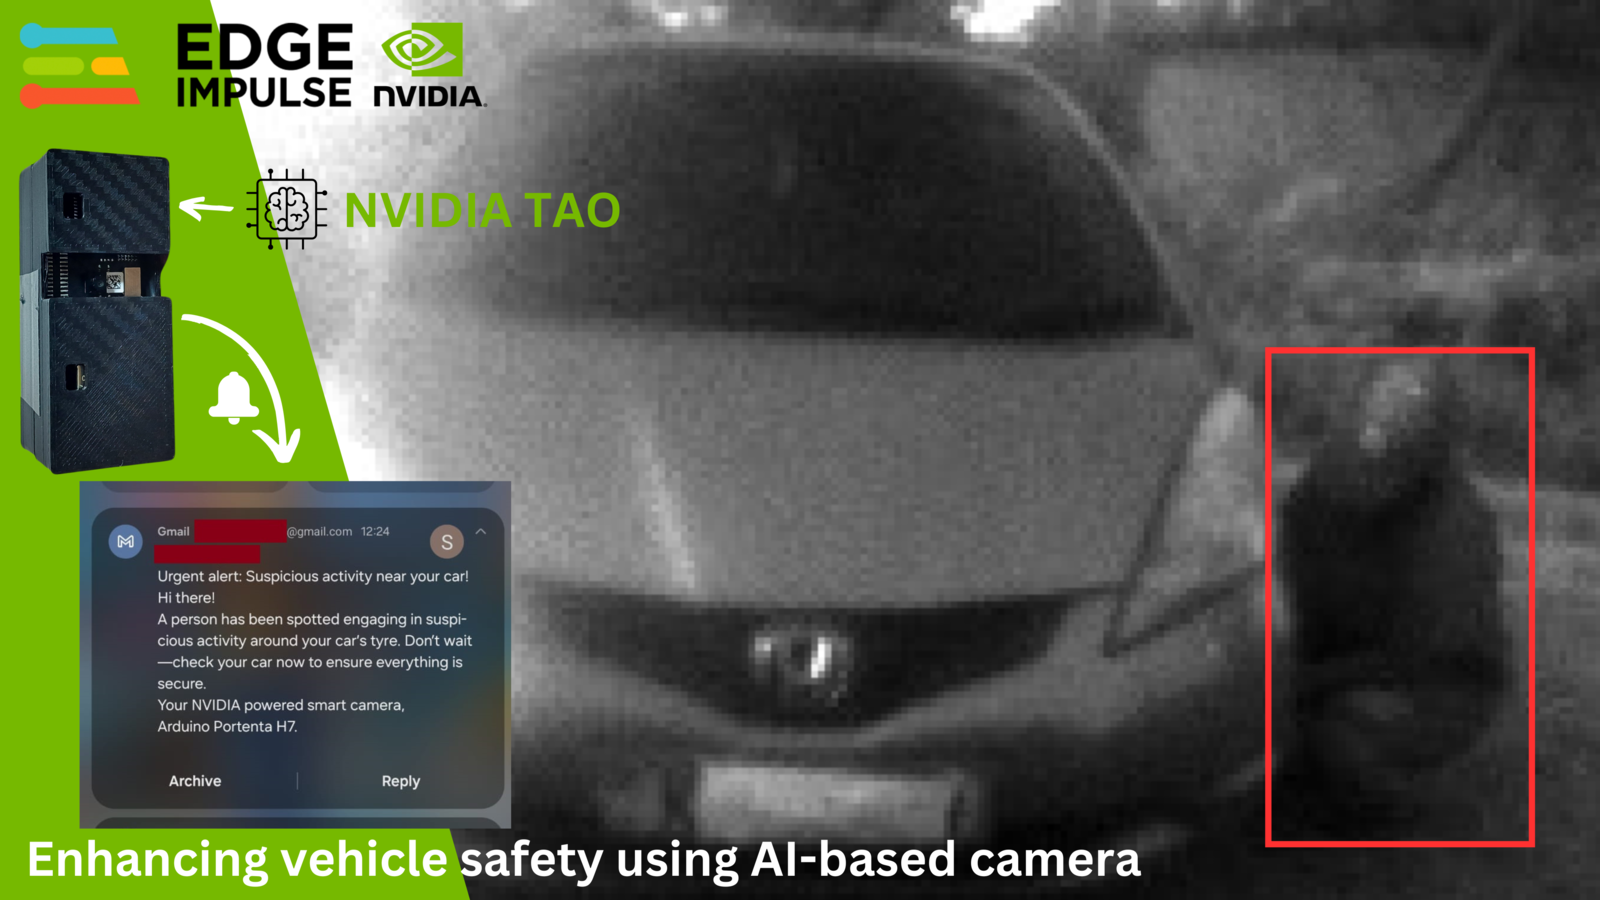
My intention in this project is to develop an innovative smart surveillance camera that can interpret suspicious visual actions around a vehicle such as spotting someone tampering with car tires, or spotting someone trying to break a car’s window. To protect our vehicles, we often rely on security guards to keep watch and occasionally we also check on our cars to ensure that they are safe and intact. Even with CCTV cameras in parking lots, human intelligence is still essential for visual inspection and interpreting activities around vehicles. This got me thinking: what if we could transfer our human intelligence to machines and enable them to interpret suspicious actions, such as tampering with a car tire or attempting to break a window. This task can be realized with image classification and/or object detection, showcasing an innovative application of AI to enhance vehicle security. A Machine Learning model needs to be trained to recognize the actions that we seek to monitor. For demonstration and hypothesis testing, we can train a model to detect various scenarios: when a vehicle is safe, when someone is tampering with its tires, or when someone is attempting to break into its window. By simulating these actions on a vehicle and capturing them as video or image data, we can use this dataset to train the model. Once trained, the model can identify these activities in real-time and send alerts whenever such actions are detected, enhancing vehicle security.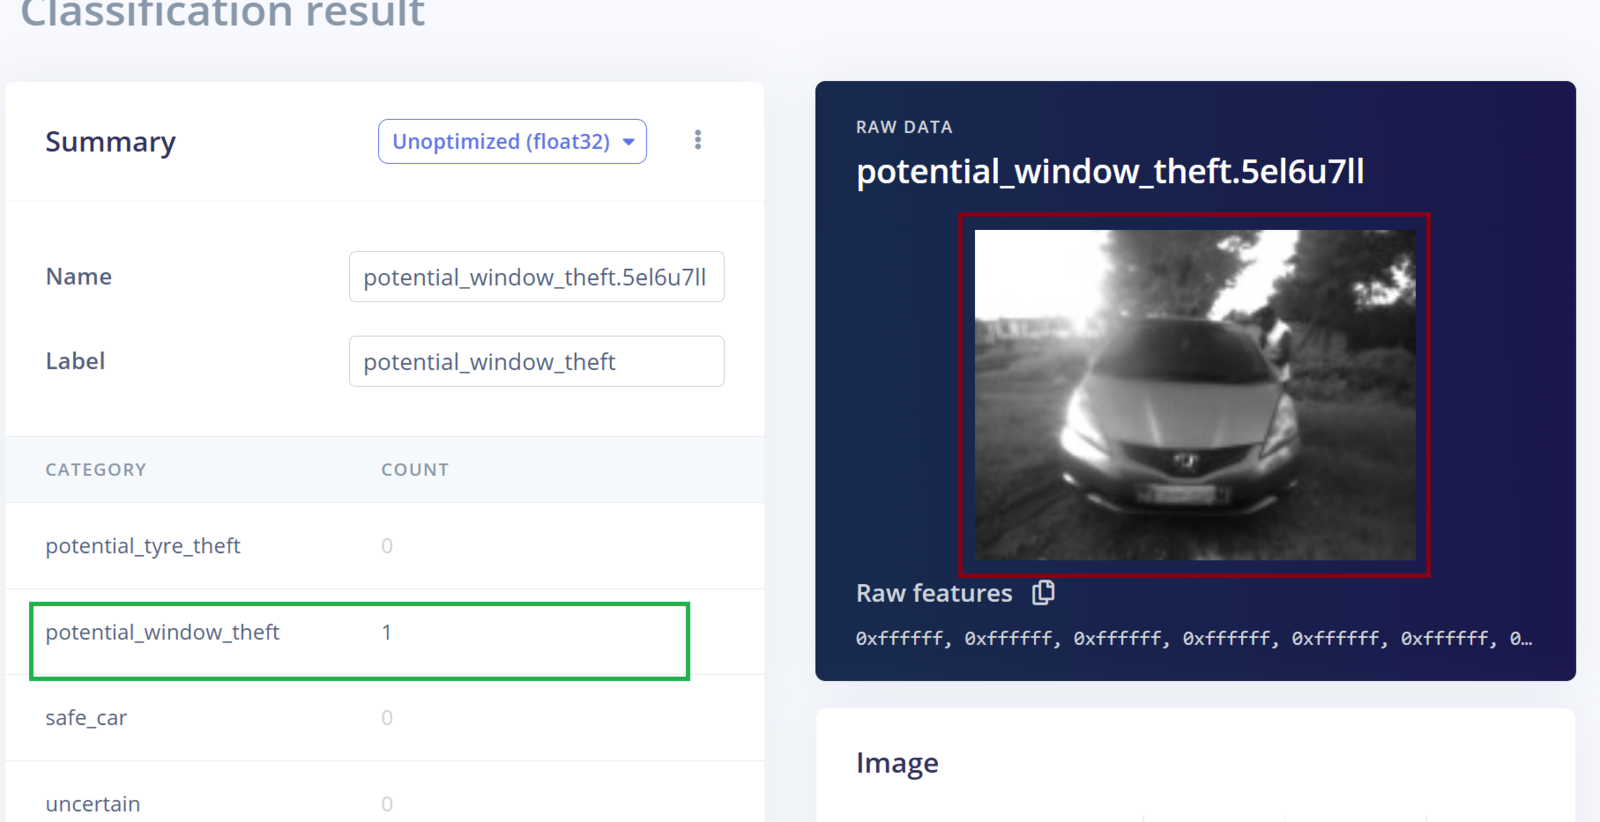
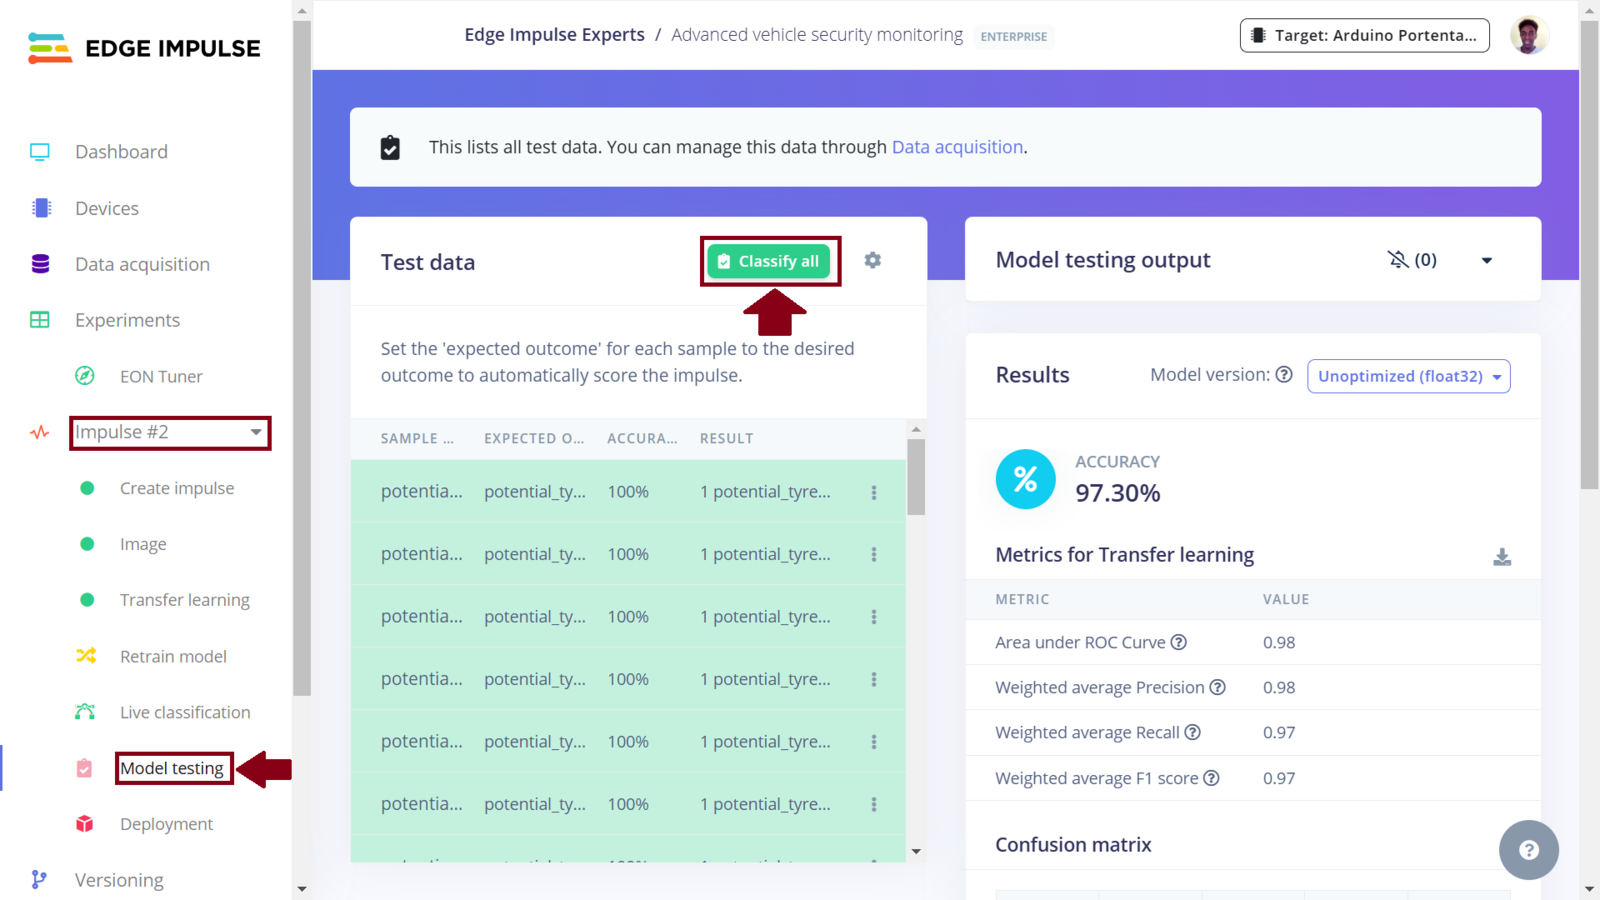
Model testing
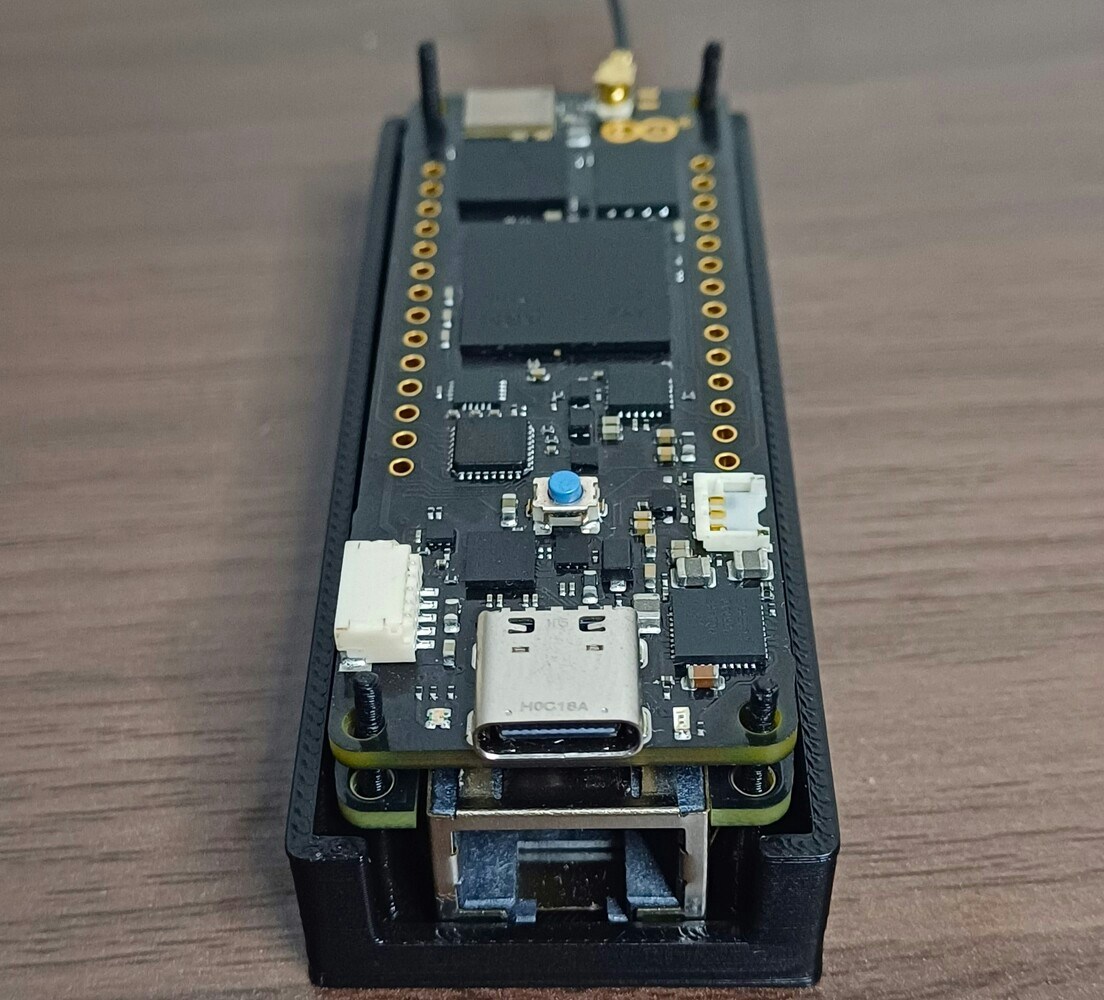
Arduino Portenta H7
Use Case Explanation
The use of security guards to guard vehicles has proven to be effective, and in certain circumstances it outperforms security alternatives like car alarms and CCTV cameras. While CCTV has numerous benefits, the debate over whether the technology is more successful than security personnel remains. However, one thing is certain: both CCTV and security guards are effective deterrents to potential criminals. Studies have found that neighborhoods with visible cameras have decreased crime rates, including vehicle theft. A combined approach of CCTV and security guards will maximize deterrent, monitoring, and response capability, resulting in increased protection. While CCTV technology has existed for some time, it still requires human intervention to analyze the footage. However, progress in the Artificial Intelligence (AI) field combined with an increase in computational power has improved the scale, accuracy and development time of image data processing. At its core, computer vision seeks to replicate the capabilities of human vision by digitally perceiving and interpreting the world. In this project, the intention is to have a computer look at an image and interpret the actions seen in the image such as someone touching a car tire, or someone attempting to break a window. Once these actions are detected, the device will then send an email notification to the vehicle owner. By using pre-trained networks, we can train Machine Learning models to understand visual actions such as breaking a car window, removing a car tire, removing components such as a side mirror, etc. The transfer learning approach uses a pretrained model which is already trained using a large amount of data. This approach can significantly reduce the amount of labeled data required for training. It also reduces the training time and resources, and improves the efficiency of the learning process, especially in cases where there is limited data available. Even for a demonstration project, we are still looking for a faster, easier way to create highly accurate, customized, and enterprise-ready AI model to power our smart vehicle surveillance camera. In this case, I experimented with the Nvidia TAO (Train, Adapt, Optimize) Toolkit. Nvidia TAO Toolkit uses the power of transfer learning while simultaneously simplifying the model training process and optimizing the model for inference throughput on the target platform. With TAO, users can select one of 100+ pre-trained vision AI models from NGC and fine-tune and customize on their own dataset without writing a single line of code. The image below shows an overview of TAO (source: https://docs.nvidia.com/tao/tao-toolkit/text/overview.html)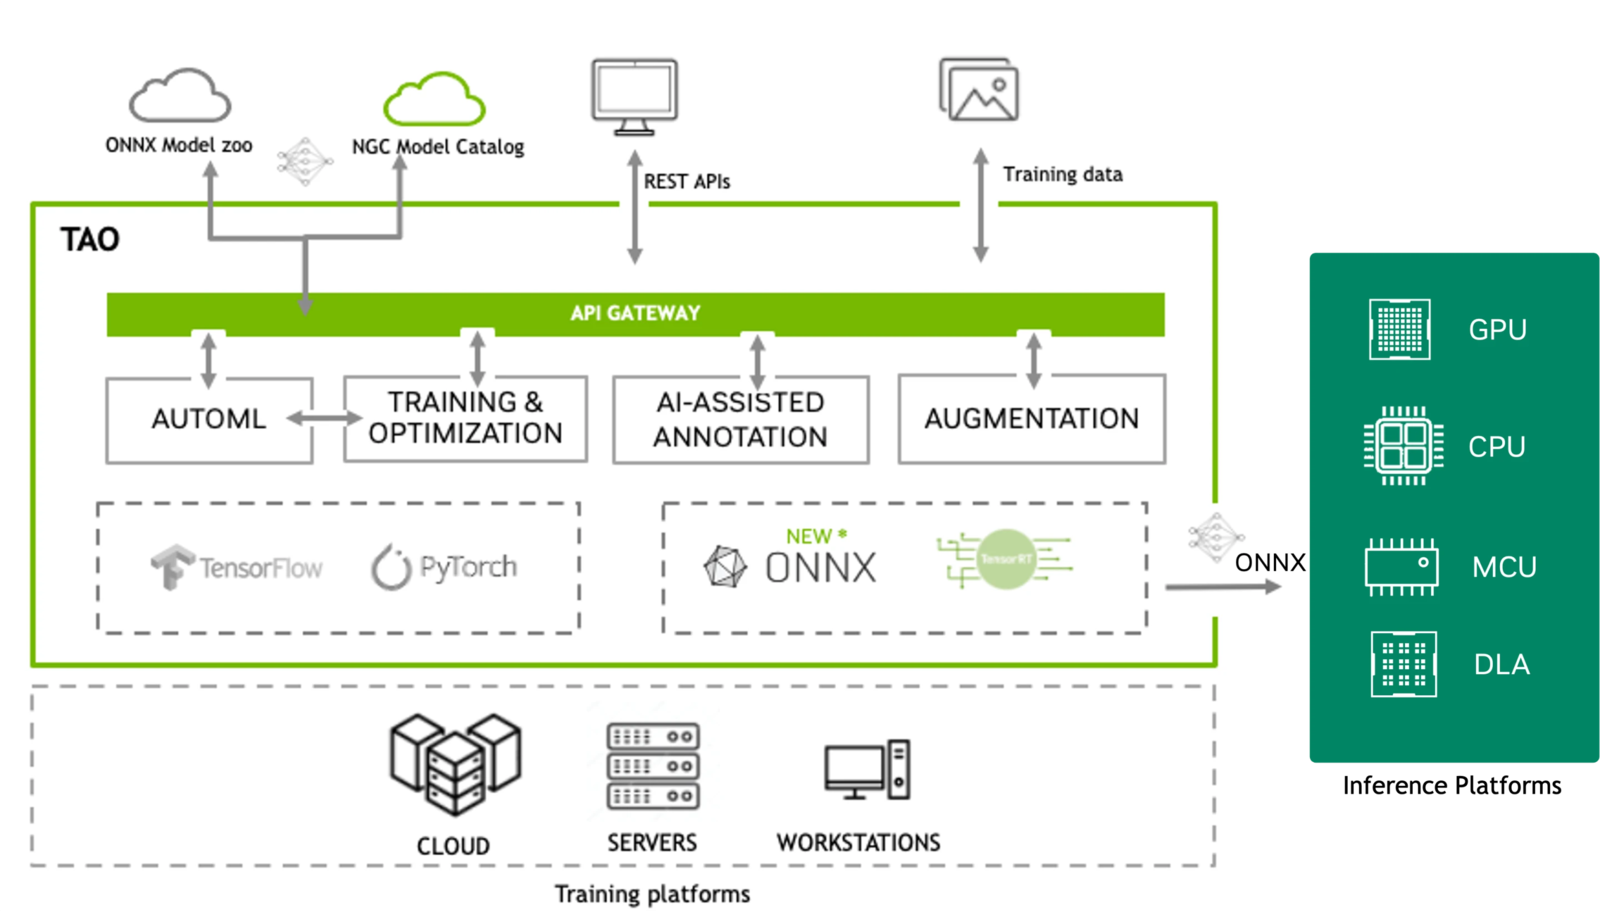
NVIDIA TAO overview
Components and Hardware Configuration
Software components:- Edge Impulse Studio account
- OpenMV IDE
- Arduino IDE
- A personal computer
- Arduino Portenta H7 with Portenta Vision Shield
- 2.4GHz WiFi antenna with female U.FL connector
- 3D printed case for the Portenta H7. Available to download on Printables.com
- USB-C cable for programming the Portenta H7
Building the Model
Collecting Data
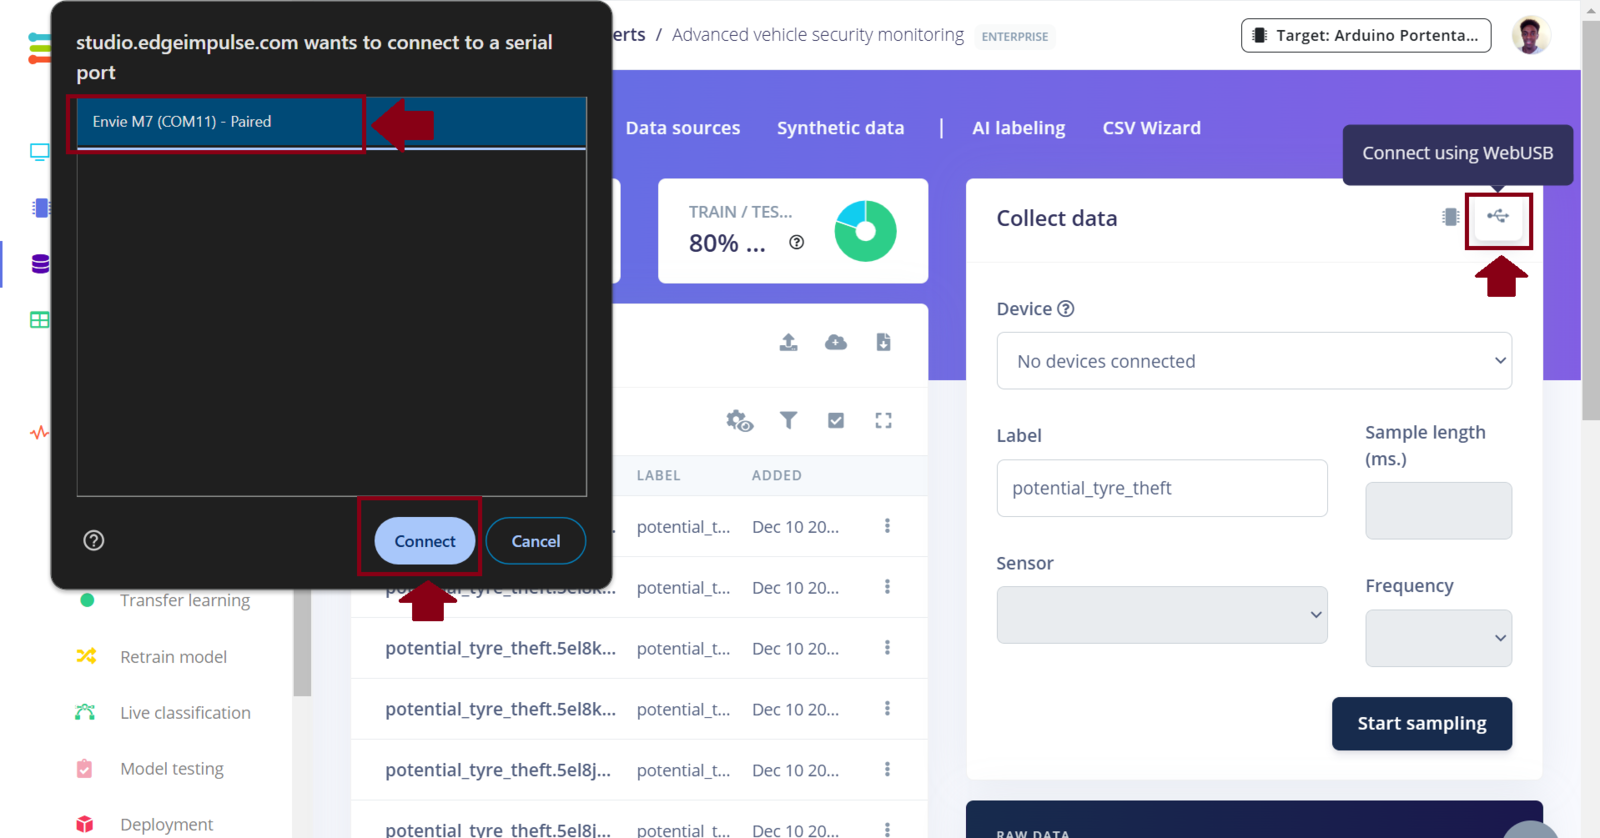
In this project, a Machine Learning model will be classifying images into three classes: safe_car, potential_window_theft and potential_tire_theft for three situations where a car is safe, someone is seen tampering with a window, or tire respectively. In Machine Learning, it is best to train a model with data that is a good representation of what the model will see when it is deployed. In this case, instead of relying on open source car images datasets, I opted to collect custom data by simulating vehicle tampering scenarios in a controlled environment. Using a personal car in a compound, I safely acted out scenarios that I was tampering with the car tires and attempting to break the windows. During these simulations, the Arduino Portenta H7 was capturing images and automatically uploading them to an Edge Impulse project, ensuring the dataset was both relevant and tailored for the task. Since the Arduino Portenta H7 is fully supported by Edge Impulse, the data collection process is easy. Following the Edge Impulse documentation we first download the Edge Impulse data collection firmware for the Portenta H7. This firmware allows us to collect sensor data from the Portenta H7 (such as an image or sound) and automatically have the data uploaded to an Edge Impulse project. Using a USB-C cable with data transfer, connect the Portenta H7 to your computer and double-press the reset button to put it in bootloader mode (this allows us to update the device’s firmware). Run the flashing script according to your Operating System and then press the reset button once to launch the new firmware. Edge Impulse has also created a short and comprehensive video tutorial on these steps. Next, create a project in the Edge Impulse Studio platform. Before starting to work on the project, I prefer informing the platform about the device that I am targeting. To do this we can click the “Target” button on the top right section of the page and select “Arduino Portenta H7 (Cortex-M7 480MHz)” from the dropdown list for “Target device”. When you set the target device in the Studio (or using the Python SDK), it automatically generates on-device performance metrics for tasks such as the digital signal processing, model’s classification time, and RAM and ROM usage. This information is invaluable as it provides insights into how efficiently the digital processing and model will perform on the targeted device, such as the Portenta H7. Most importantly, the information also assists us to determine whether the processing algorithm and model are capable of “fitting” within the constraints of the target device.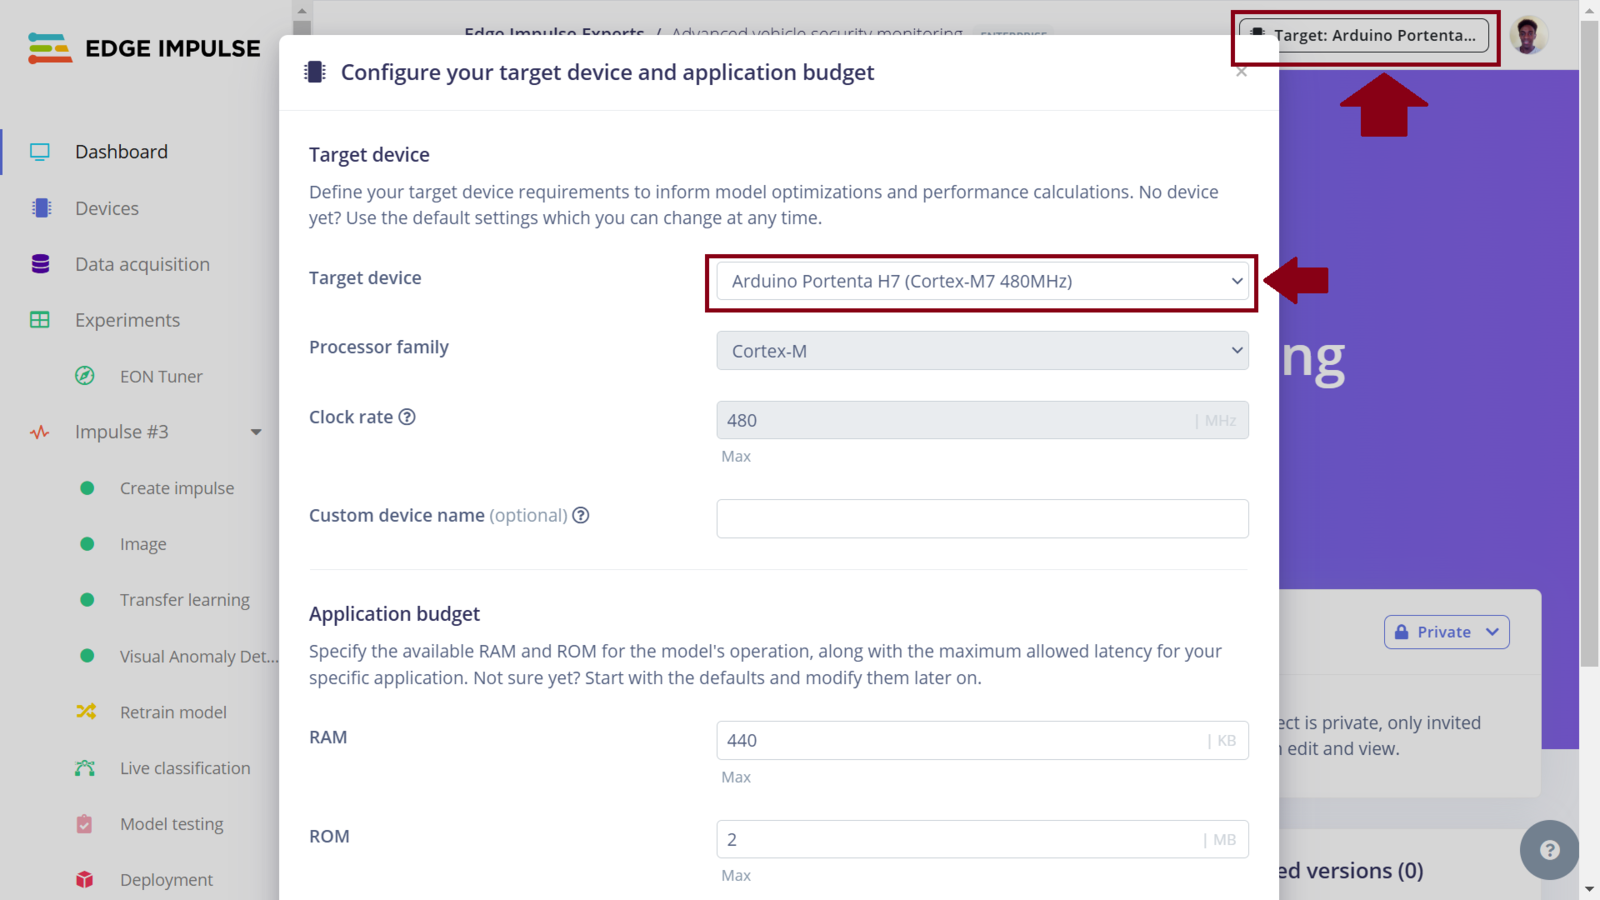
EI set target board
EI connect WebUSB

EI WebUSB camera settings

Data acquisition setup

Data acquisition camera overexposure
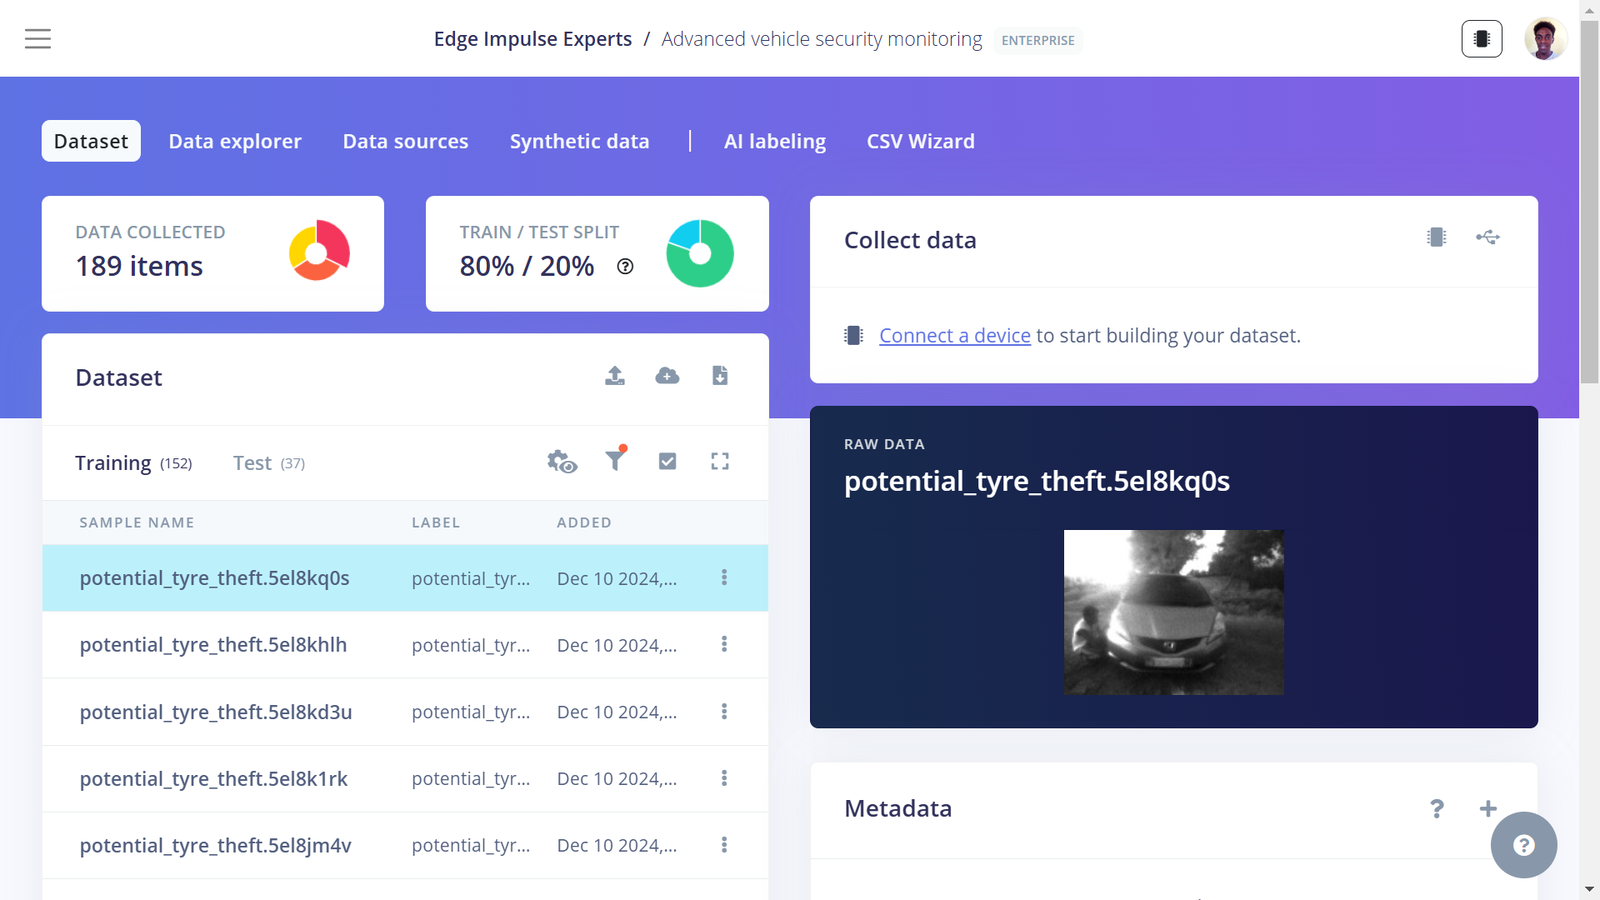
Tire theft class
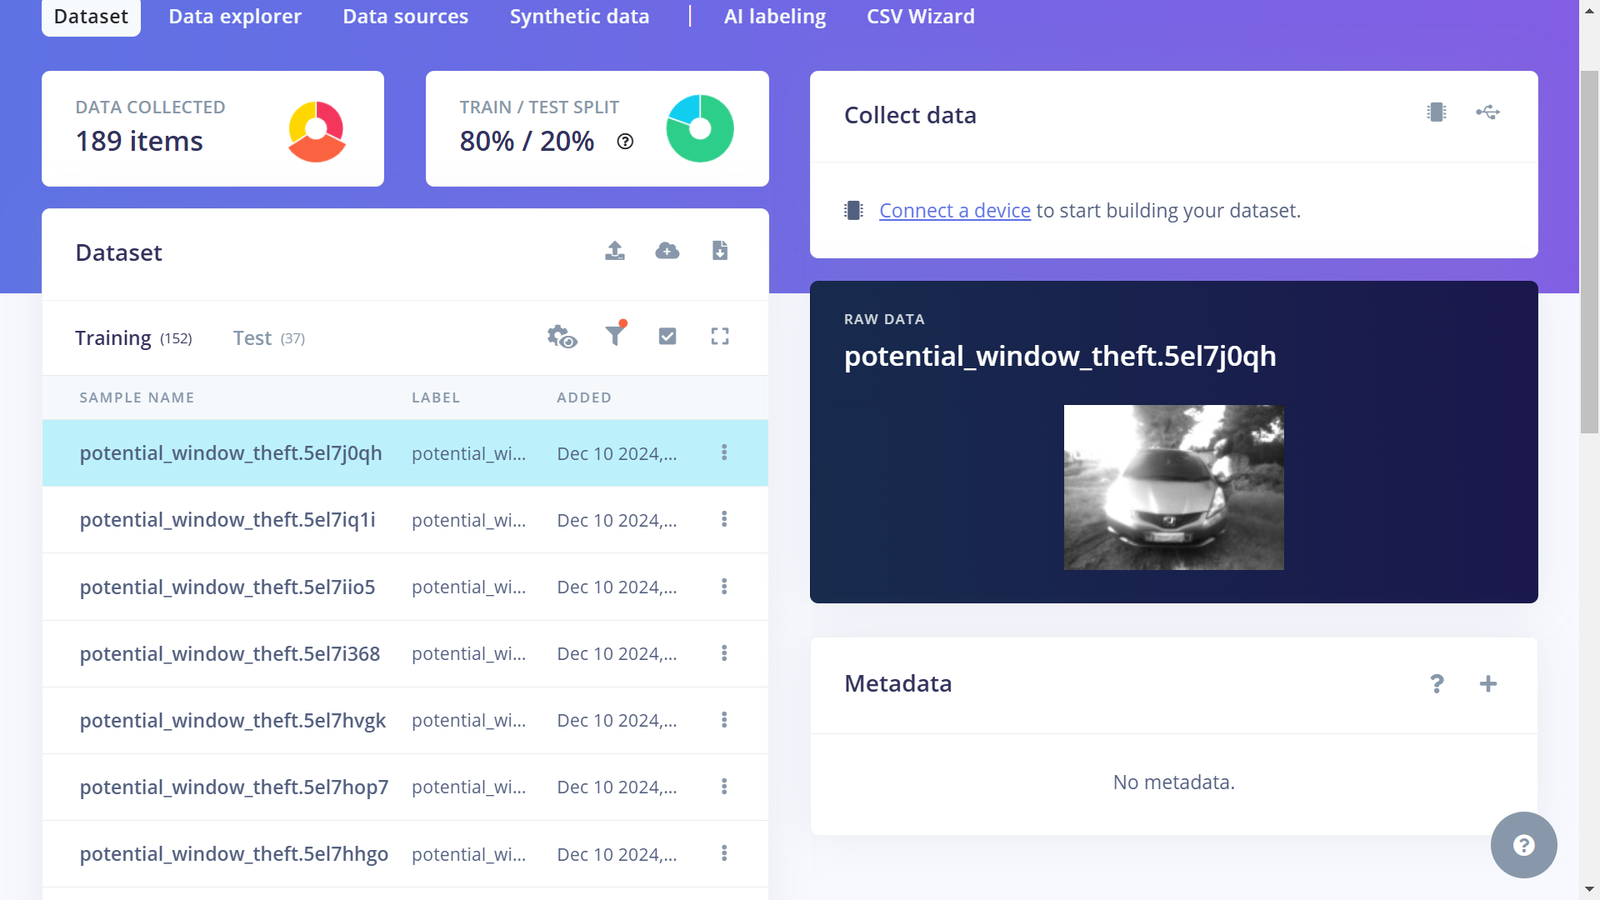
Window break-in class
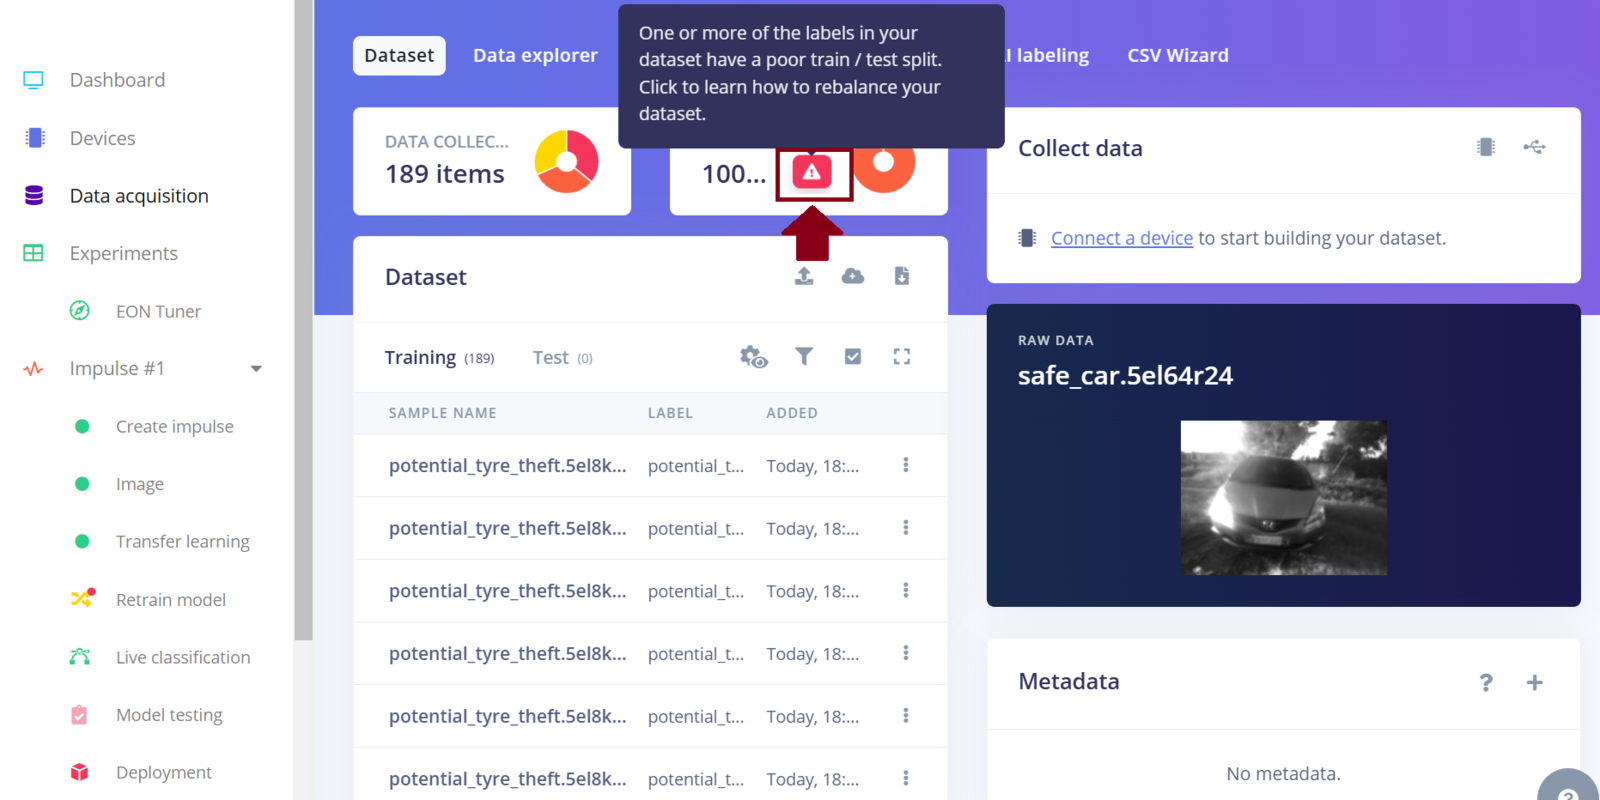
EI perform split
Training the Machine Learning Model, with Experiments
After collecting data for our project, we can now train a Machine Learning model for the required image classification task. To do this, on the Edge Impulse project, we need to create an Impulse. An Impulse is a configuration that defines the input data type, data pre-processing algorithm, and the Machine Learning model training. One of the great features of the Edge Impulse platform is the simplified development and deployment of Machine Learning models. Recently, Edge Impulse released the Experiments feature which allows projects to contain multiple Impulses, where each Impulse can contains either the same combination of blocks or a different combination. This allows us to view the performance for various types of learning and processing blocks, while using the same input training and testing datasets.1. Experimenting with Nvidia TAO Toolkit
Still on the Edge Impulse project, I proceeded to create the first Impulse. For the image data configuration, I set it to 128x128 pixels and the resize mode to squash. I selected the “Image” processing block since it preprocesses and normalizes image data, and optionally reduces the color depth. For the learning block, I selected “Transfer Learning (Images)” as this fine tunes a pre-trained image classification model on your data. It gives a good performance even with relatively small image datasets. Once set, click “Save Impulse” to set these configurations.
Impulse 1 design

Impulse 1 features
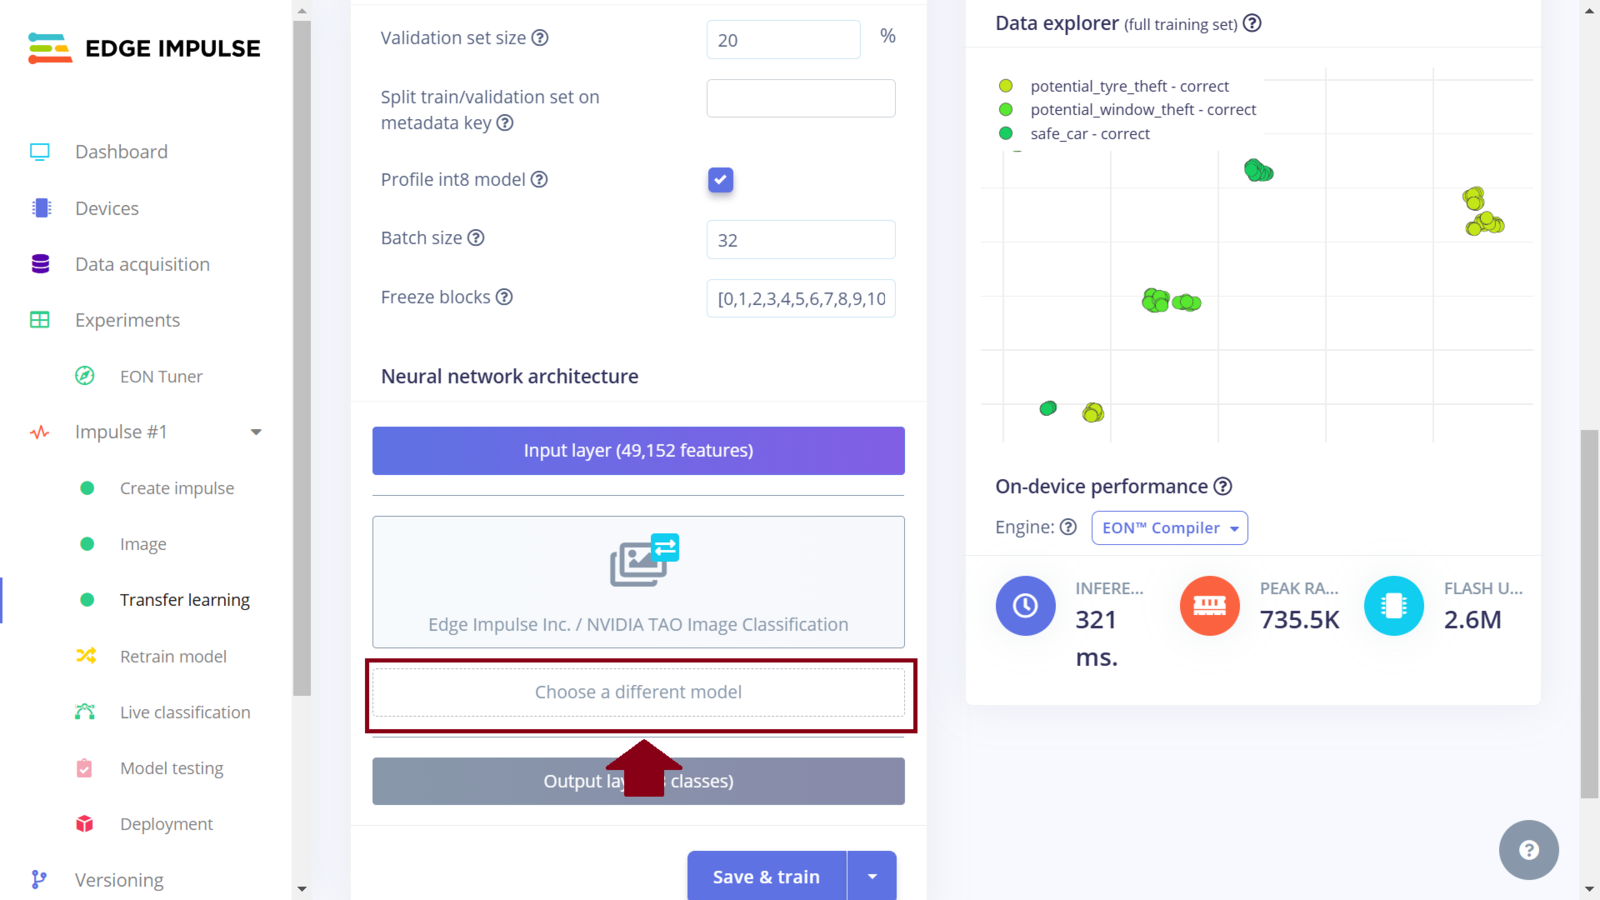
Impulse 1 chose model
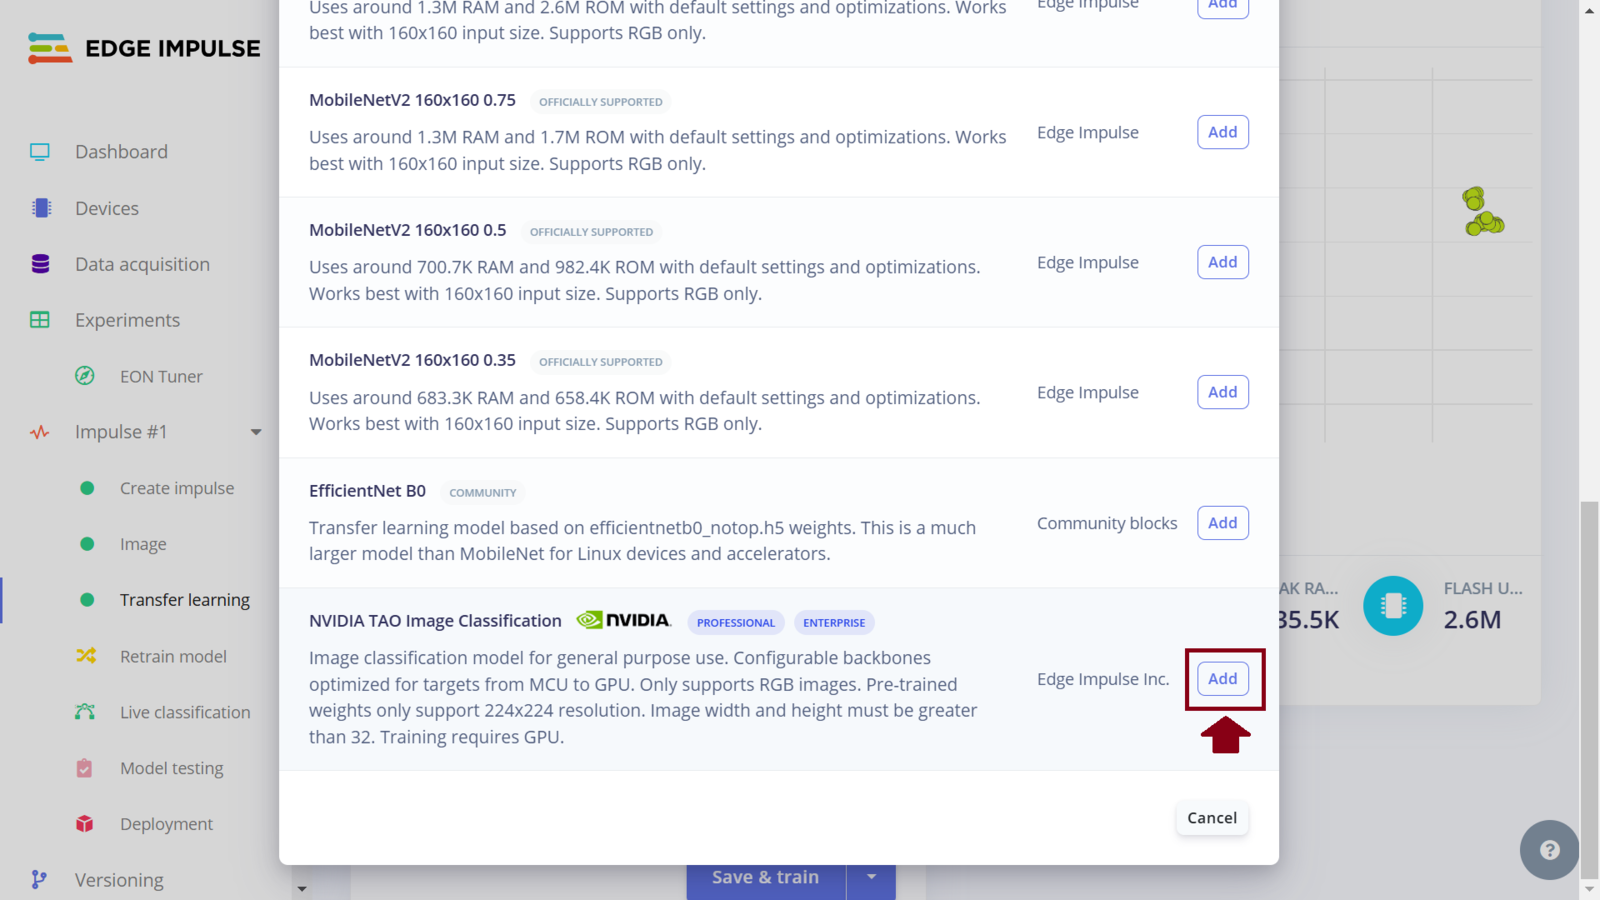
Impulse 1 select Nvidia TAO
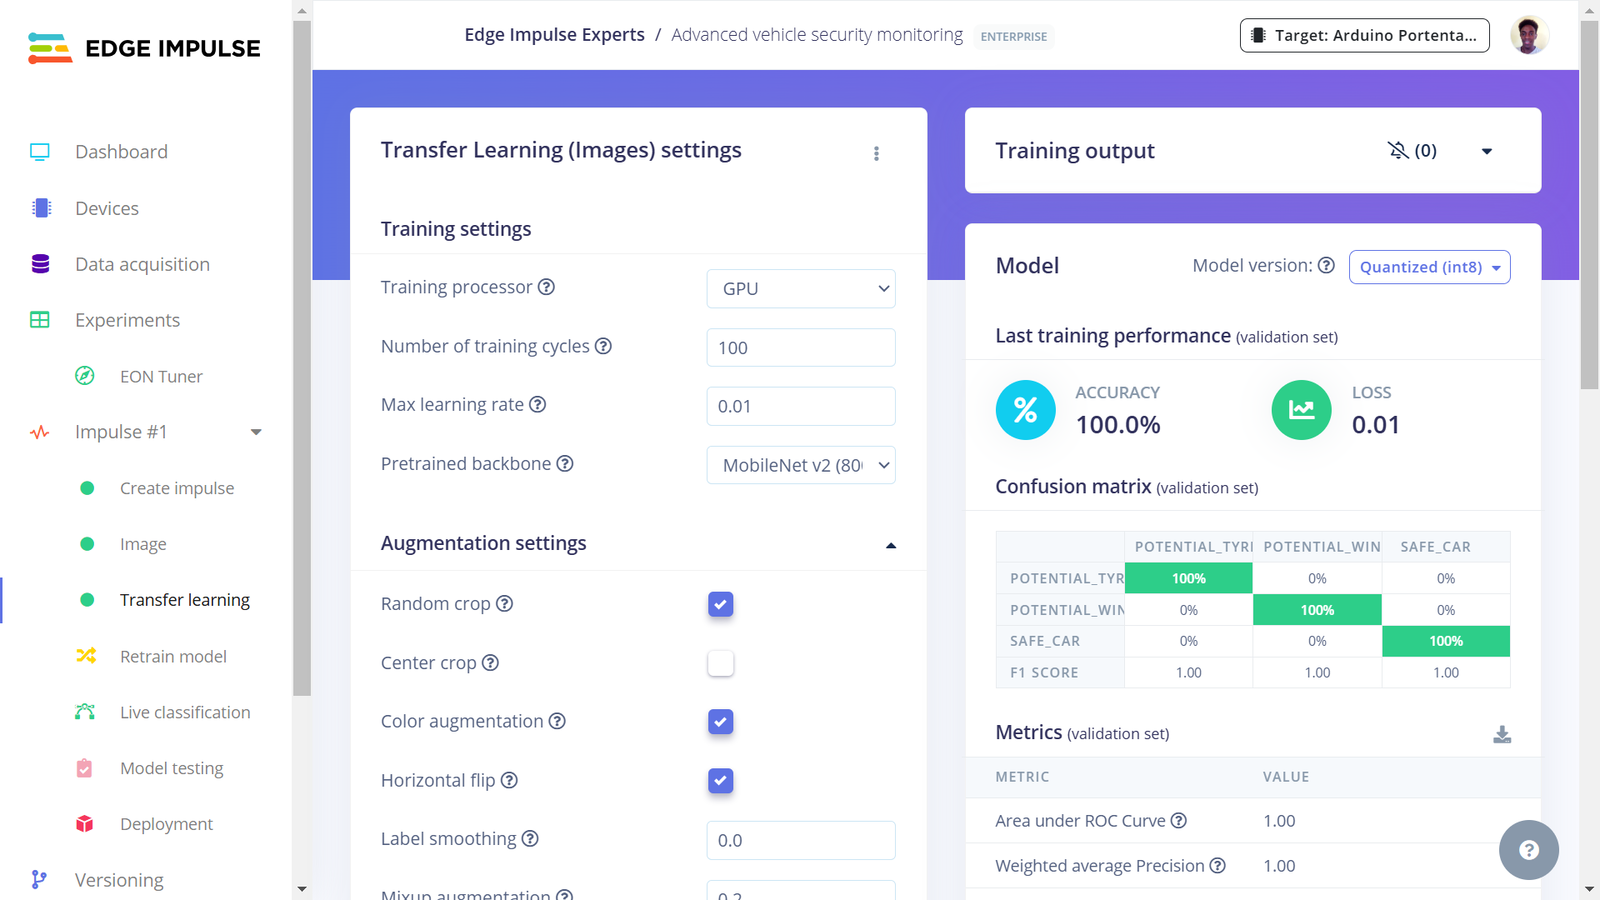
Training performance

Test performance
2. Experimenting with MobileNetV2
Edge Impulse offers the MobileNetV2 model, in the free version, and I wanted to experiment how it would perform compared to the MobileNetV2 backbone in the Nvidia TAO. The Impulse design is similar to the first one with the only difference being in the model choice for the learning block. To add another Impulse, we click the current Impulse (Impulse #1) followed by “Create new Impulse”.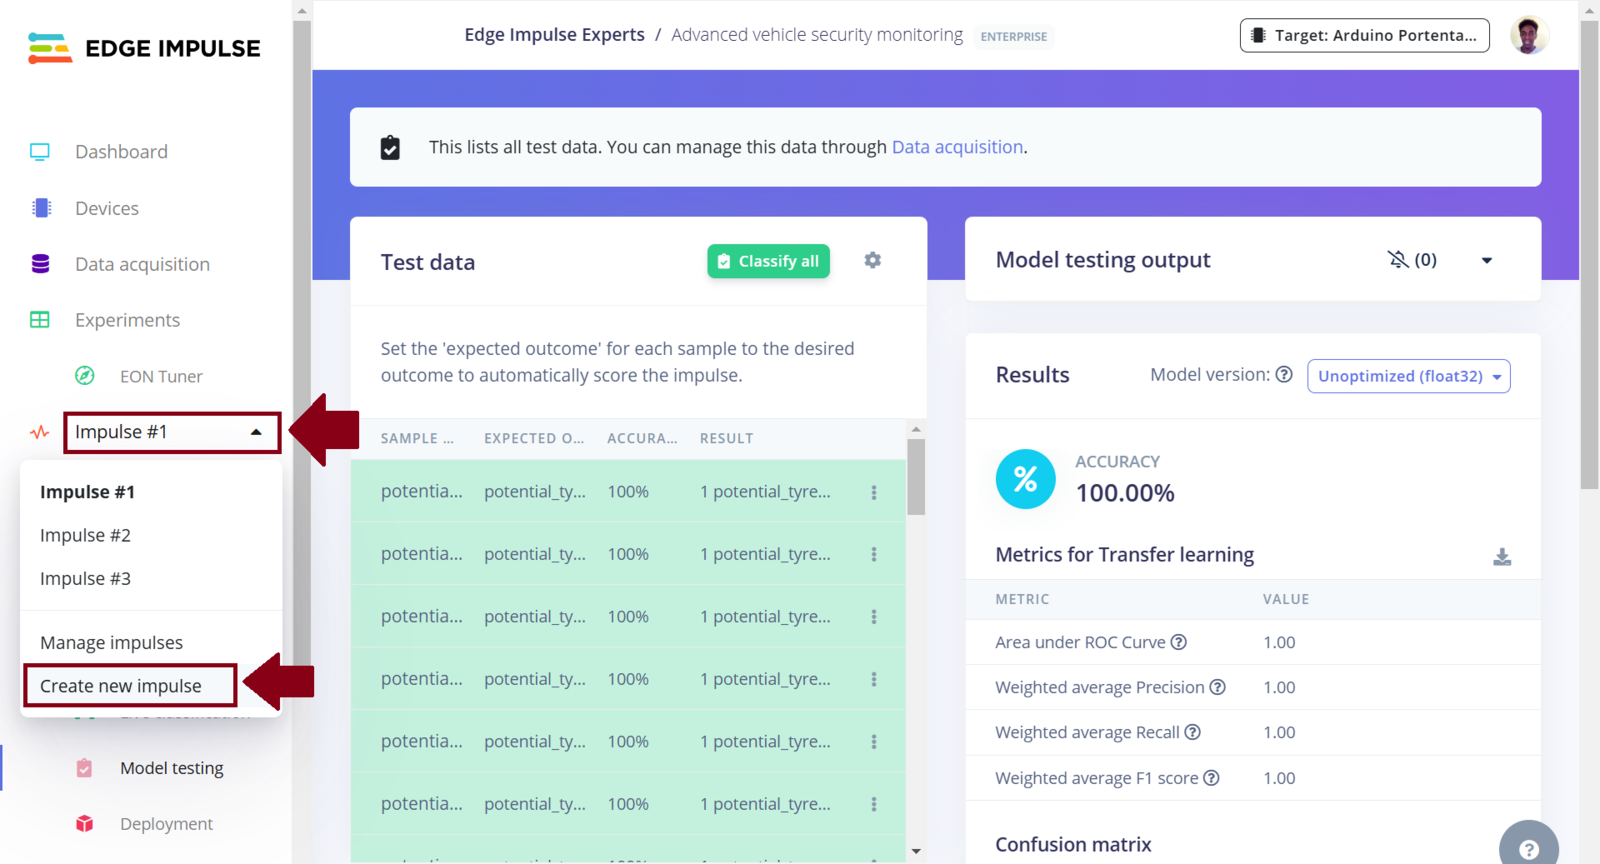
EI create new Impulse
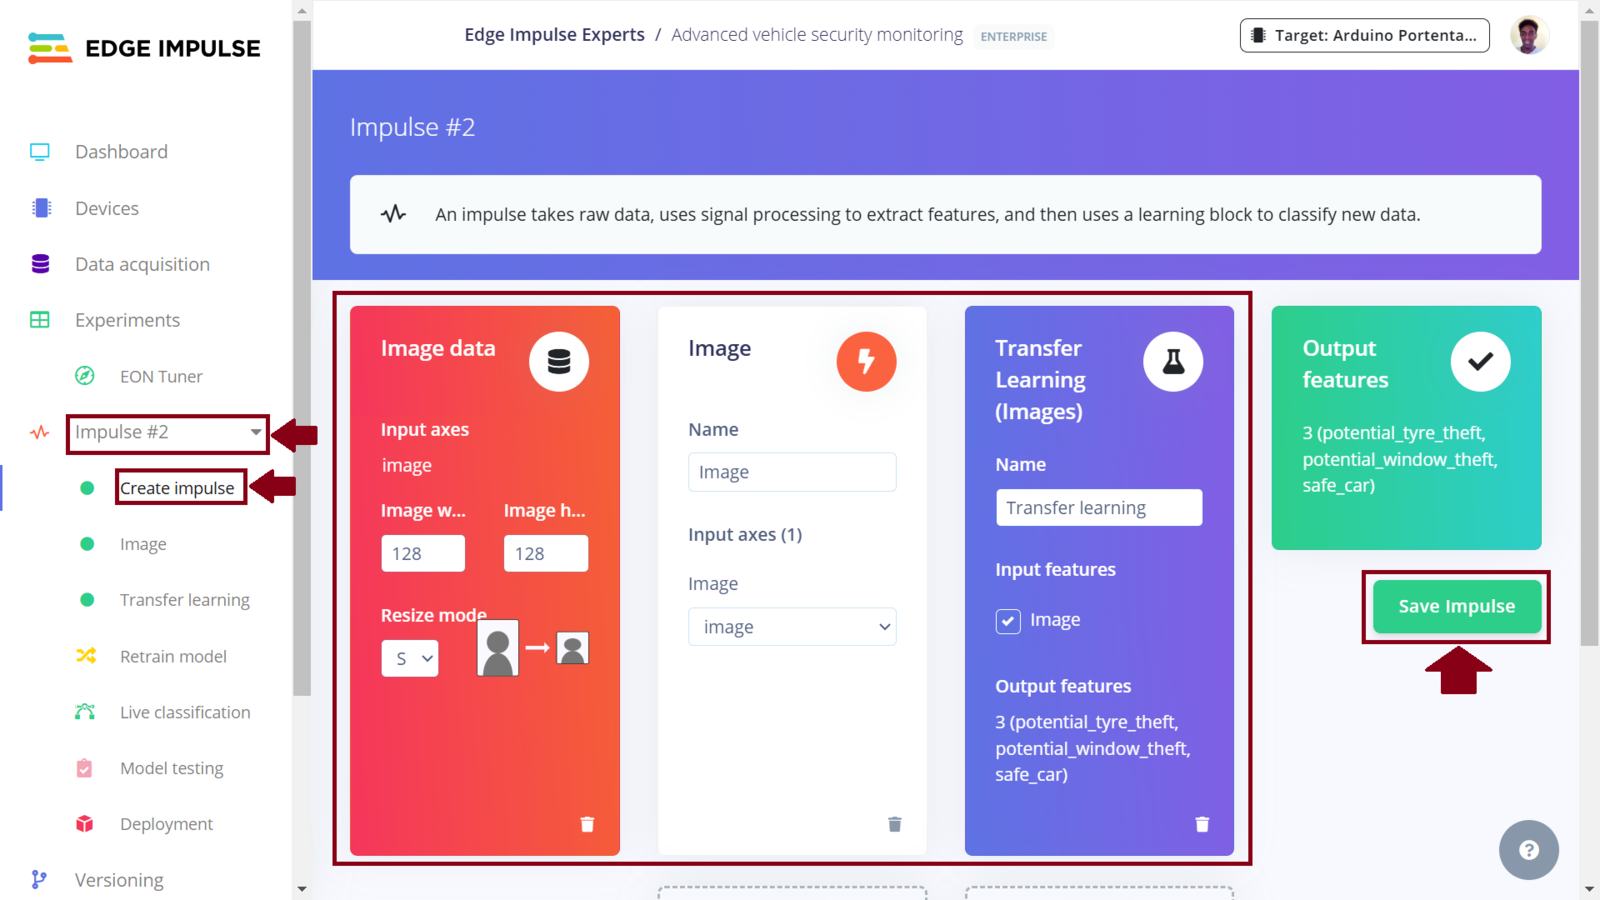
Impulse 2 design
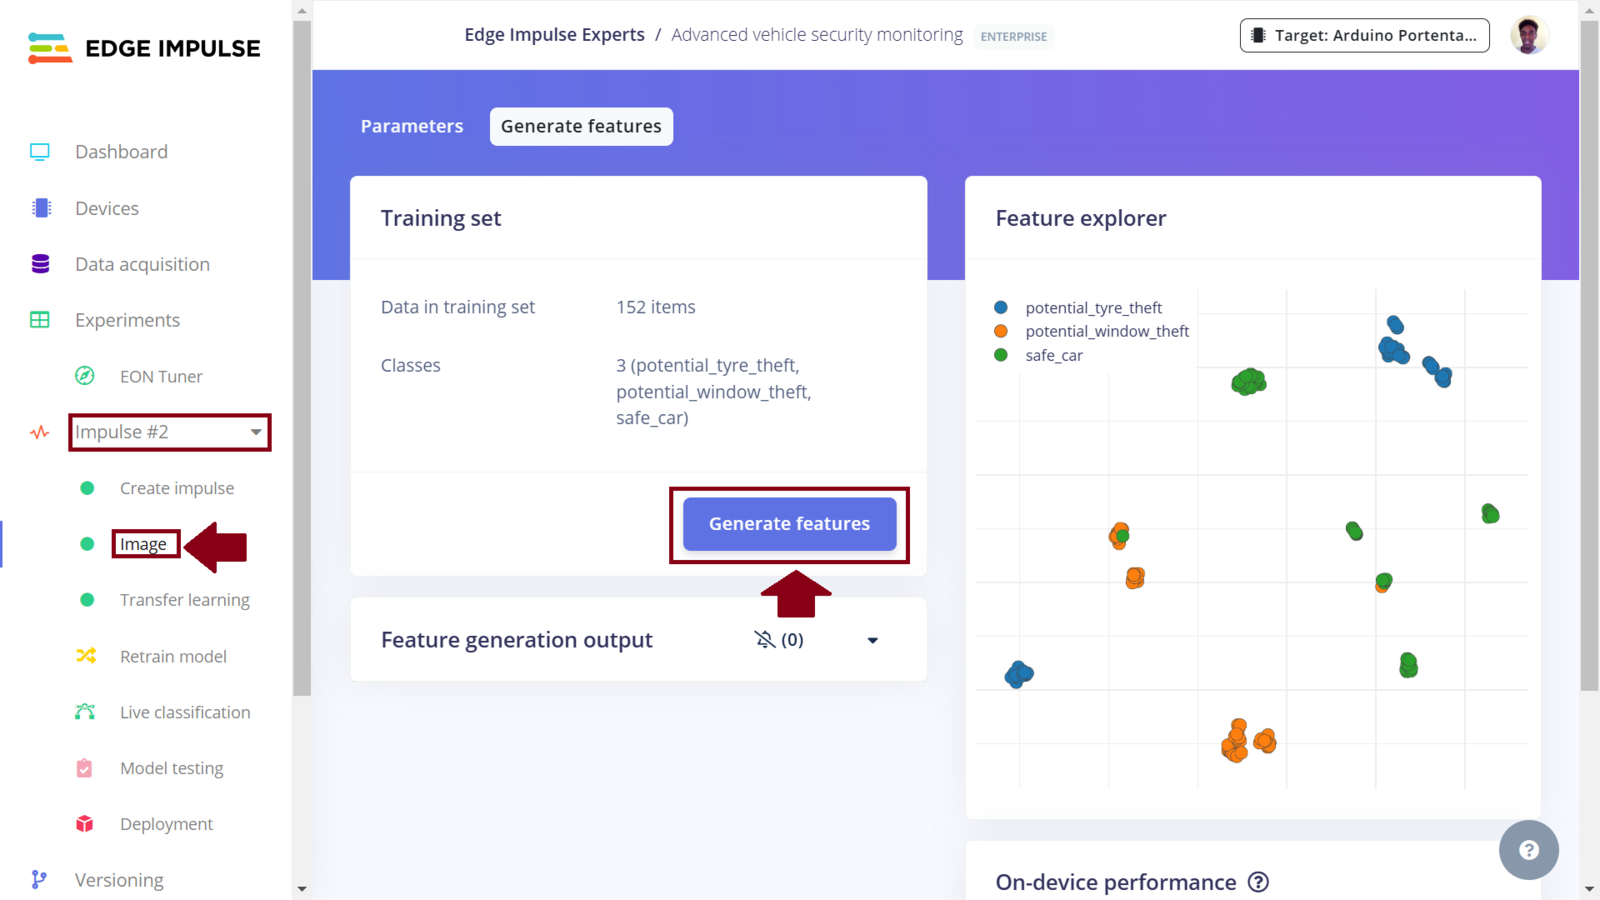
Impulse 2 features
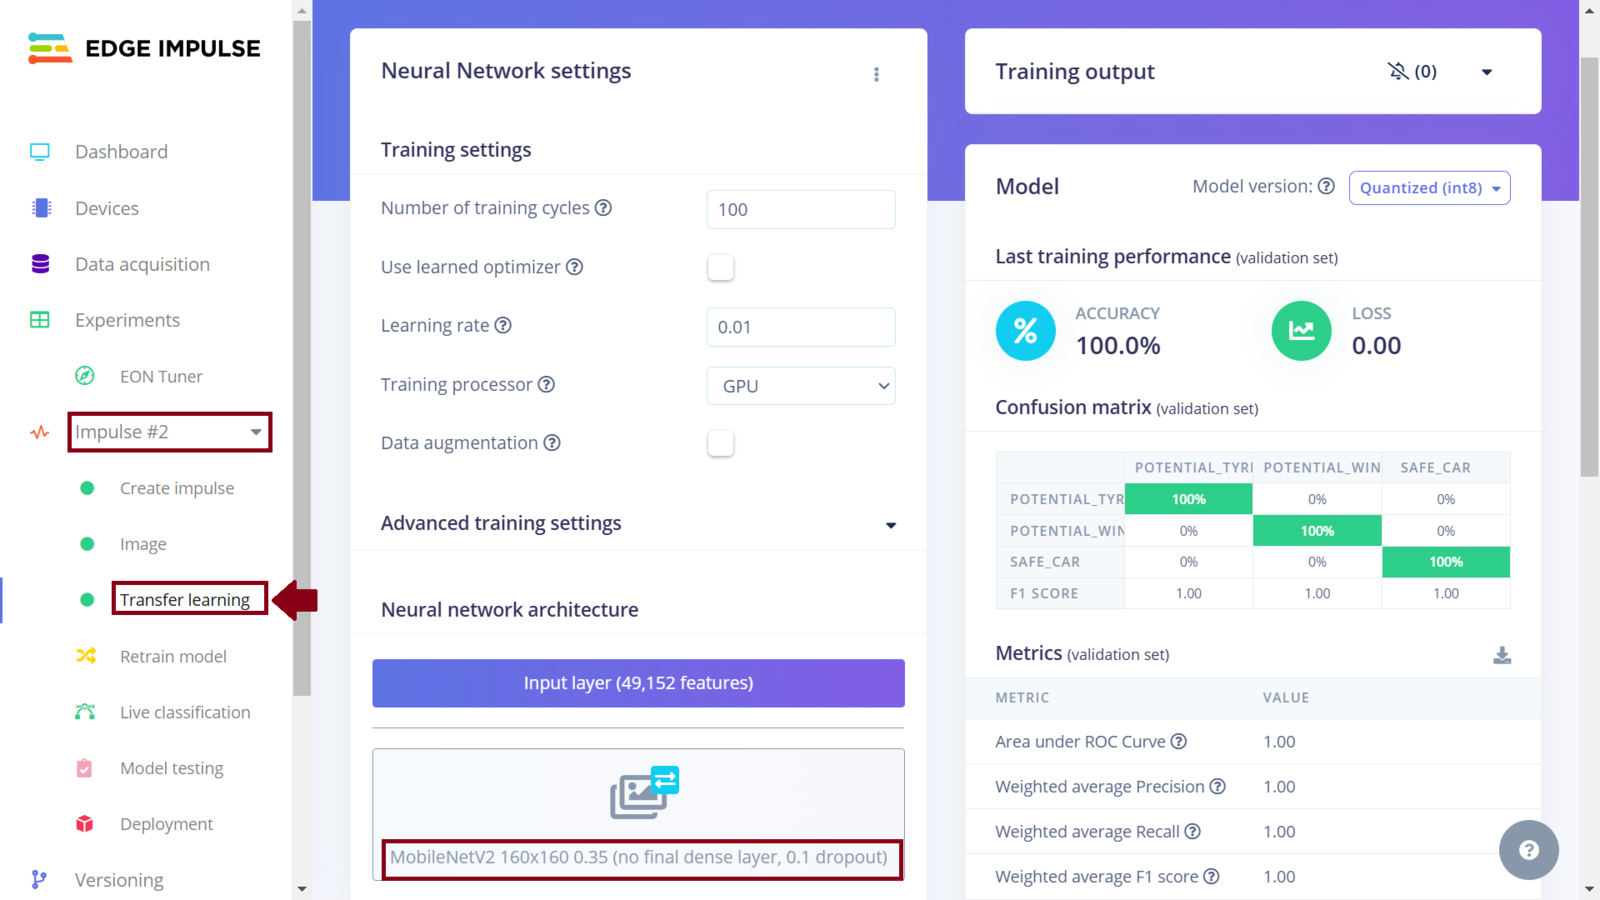
Impulse 2 training performance
Impulse 2 test performance
3. Experimenting with both MobileNetV2 and Visual Anomaly Detection
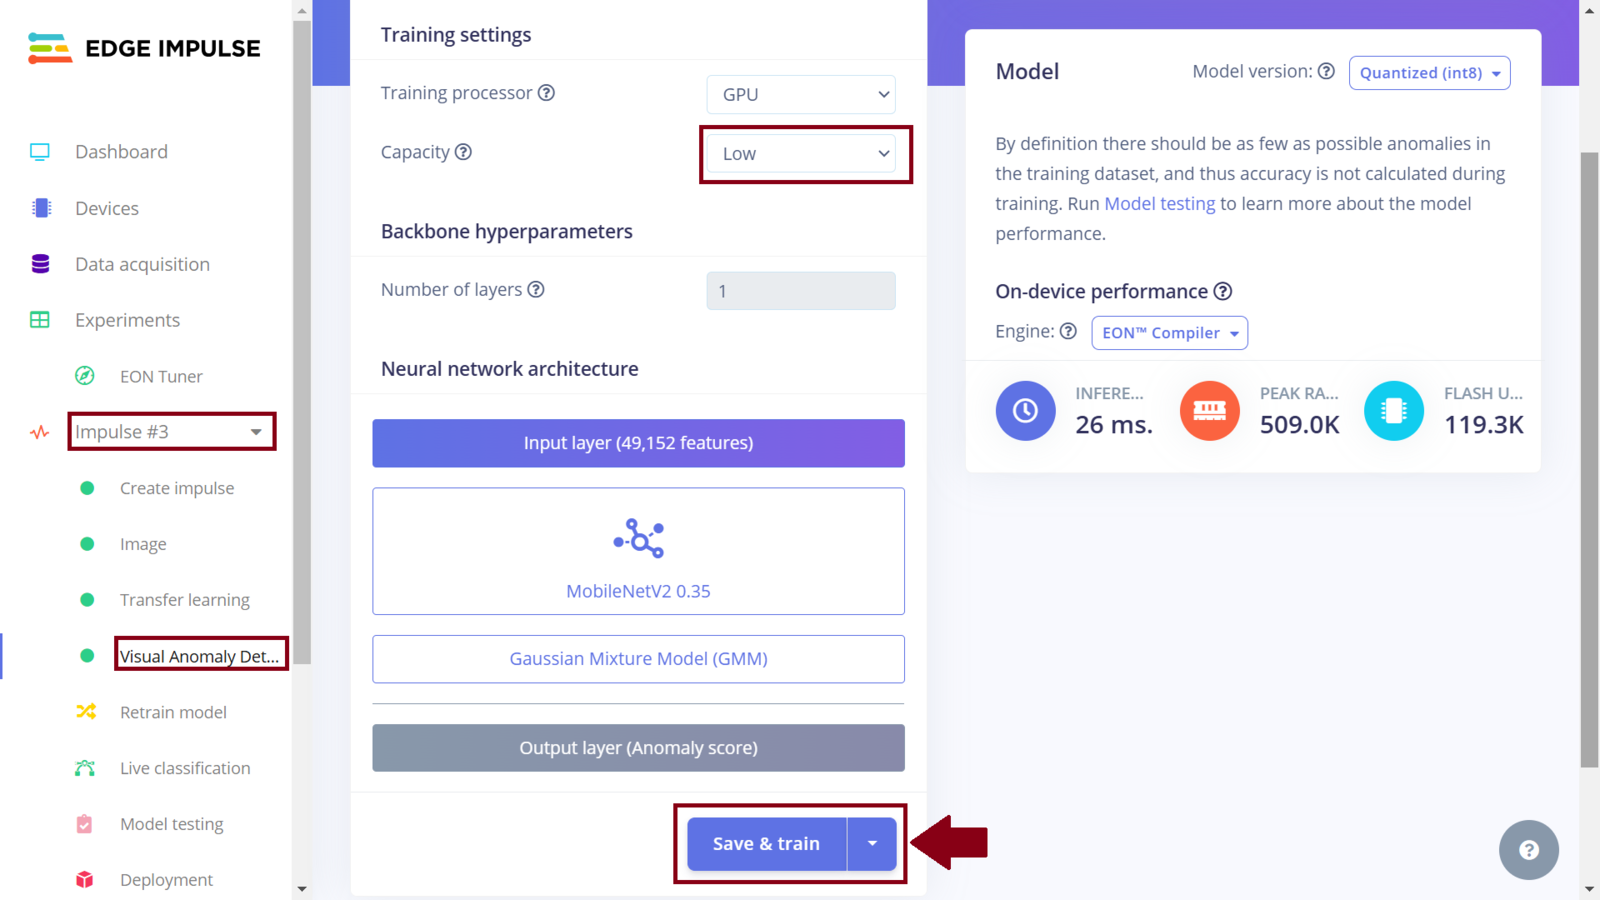
In my third experiment, I wanted to explore visual anomaly detection. Edge Impulse recently added a visual anomaly detection model, FOMO-AD that can identify unusual patterns or anomalies in image data that do not conform to the expected behavior. Neural networks are powerful, but have a major drawback: handling unseen data, like an photo with no vehicle present, is a challenge due to their reliance on existing training data. Even entirely novel inputs often get misclassified into existing categories. During my data collection, I did not take into account situations such as when a vehicle is not present in a photo, or when there is more than 1 person being seen tampering with a car tires/windows. FOMO-AD is offered in the Enterprise plan. You can request an expert-led trial to explore the functionality. The Impulse design is similar to the first two, with the difference being that we add two learning blocks: Transfer Learning (Images) and Visual Anomaly Detection - FOMO-AD. To be precise, this impulse is a duplicate of the second Impulse with an additional learning block. I created a new Impulse and similar to how we selected “Transfer Learning (Images)” from the learning block list, I added another block, “Visual Anomaly Detection - FOMO-AD”. Next, I generated features and trained a “MobileNetV2 160x160 0.35” model with the same parameters as the second Impulse. Once the training is finished, I clicked the “Visual Anomaly Detection” and trained the model with a low capacity setting.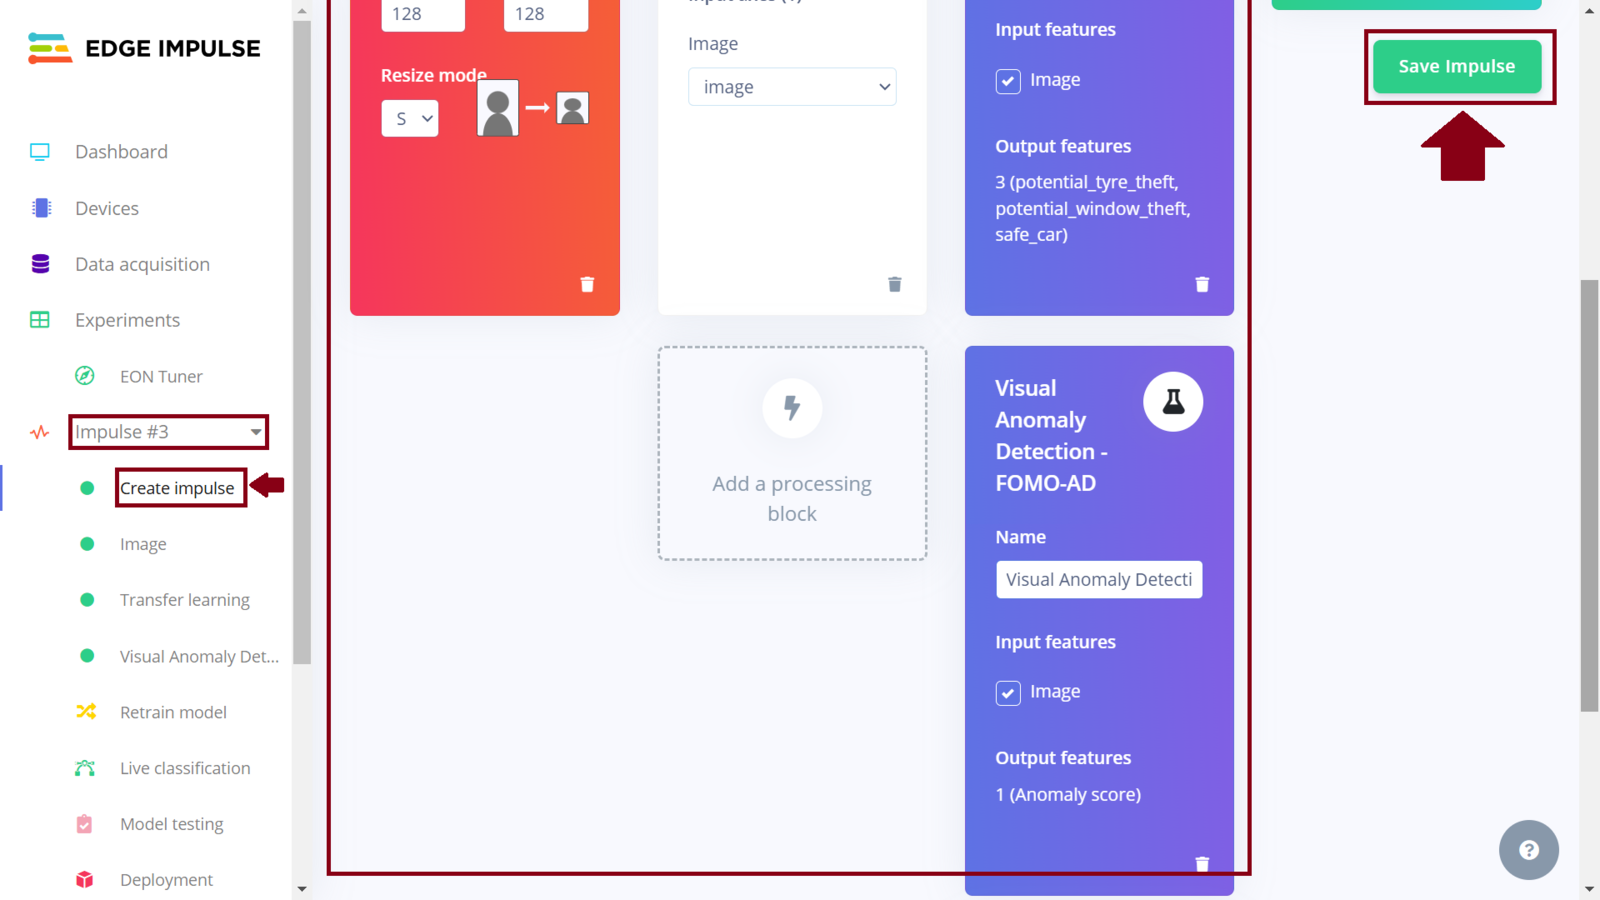
Impulse 3 design
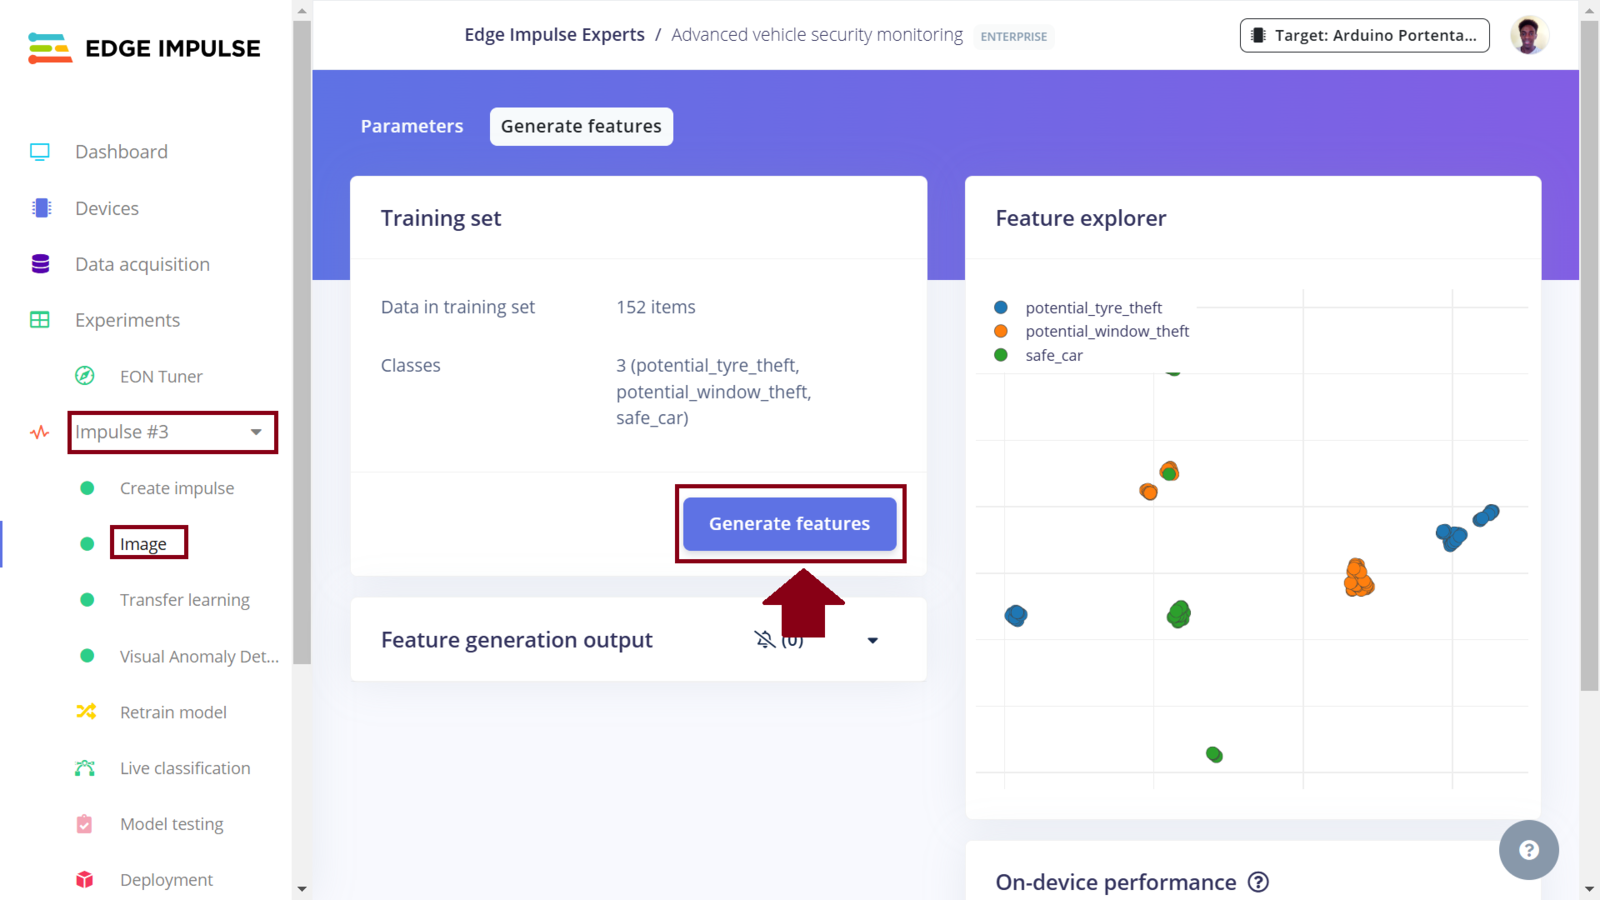
Impulse 3 features
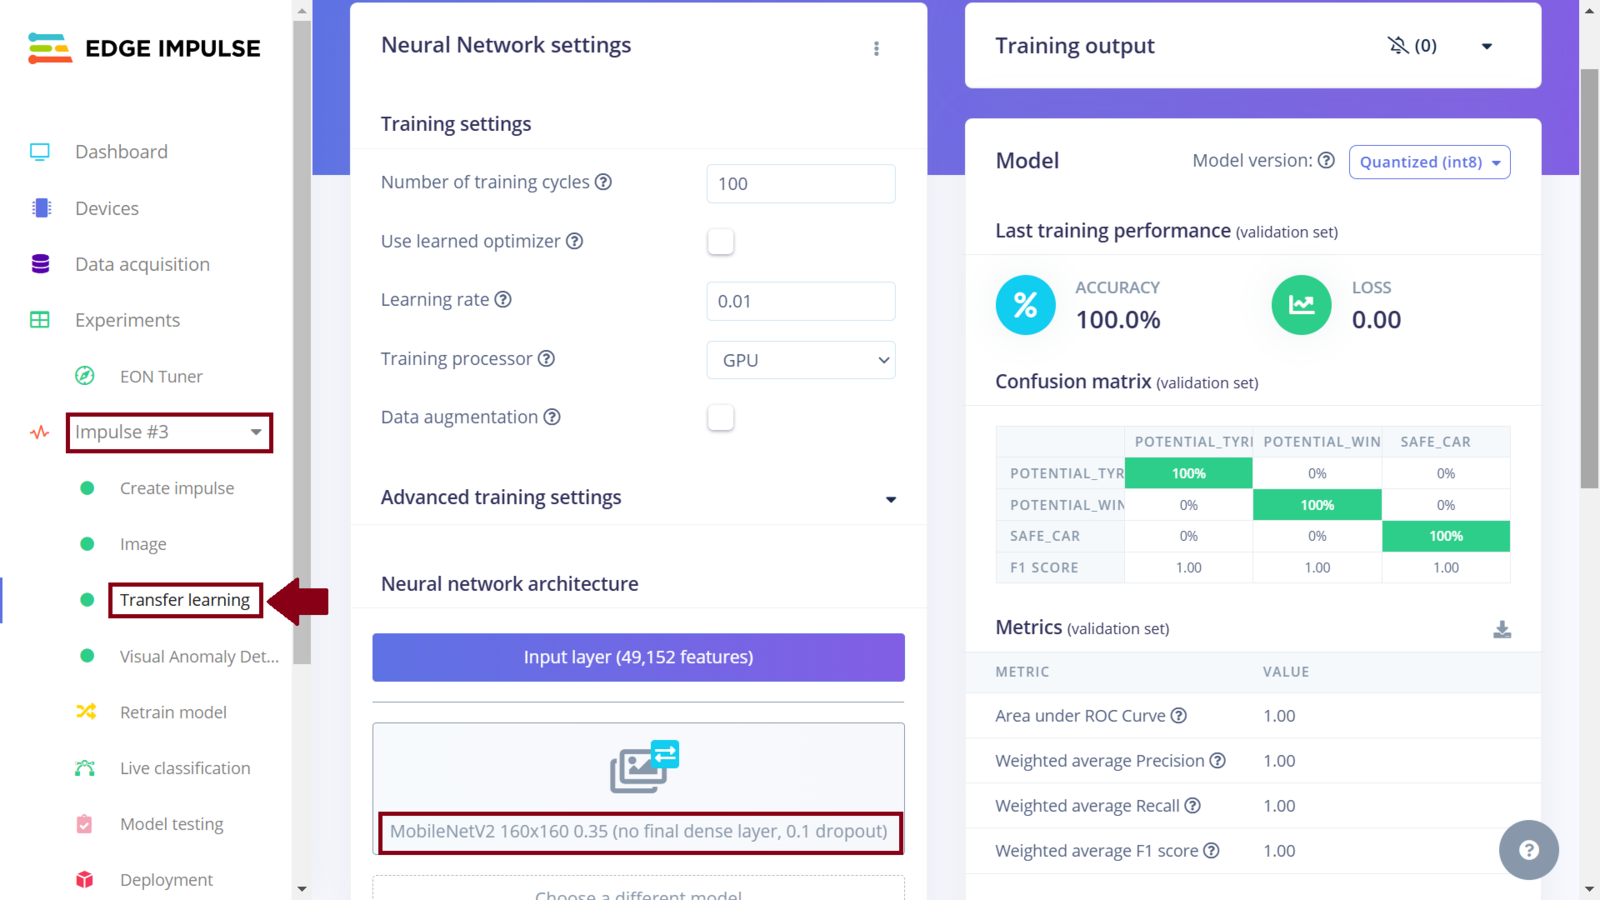
Impulse 3 training performance
Impulse 3 FOMO-AD training
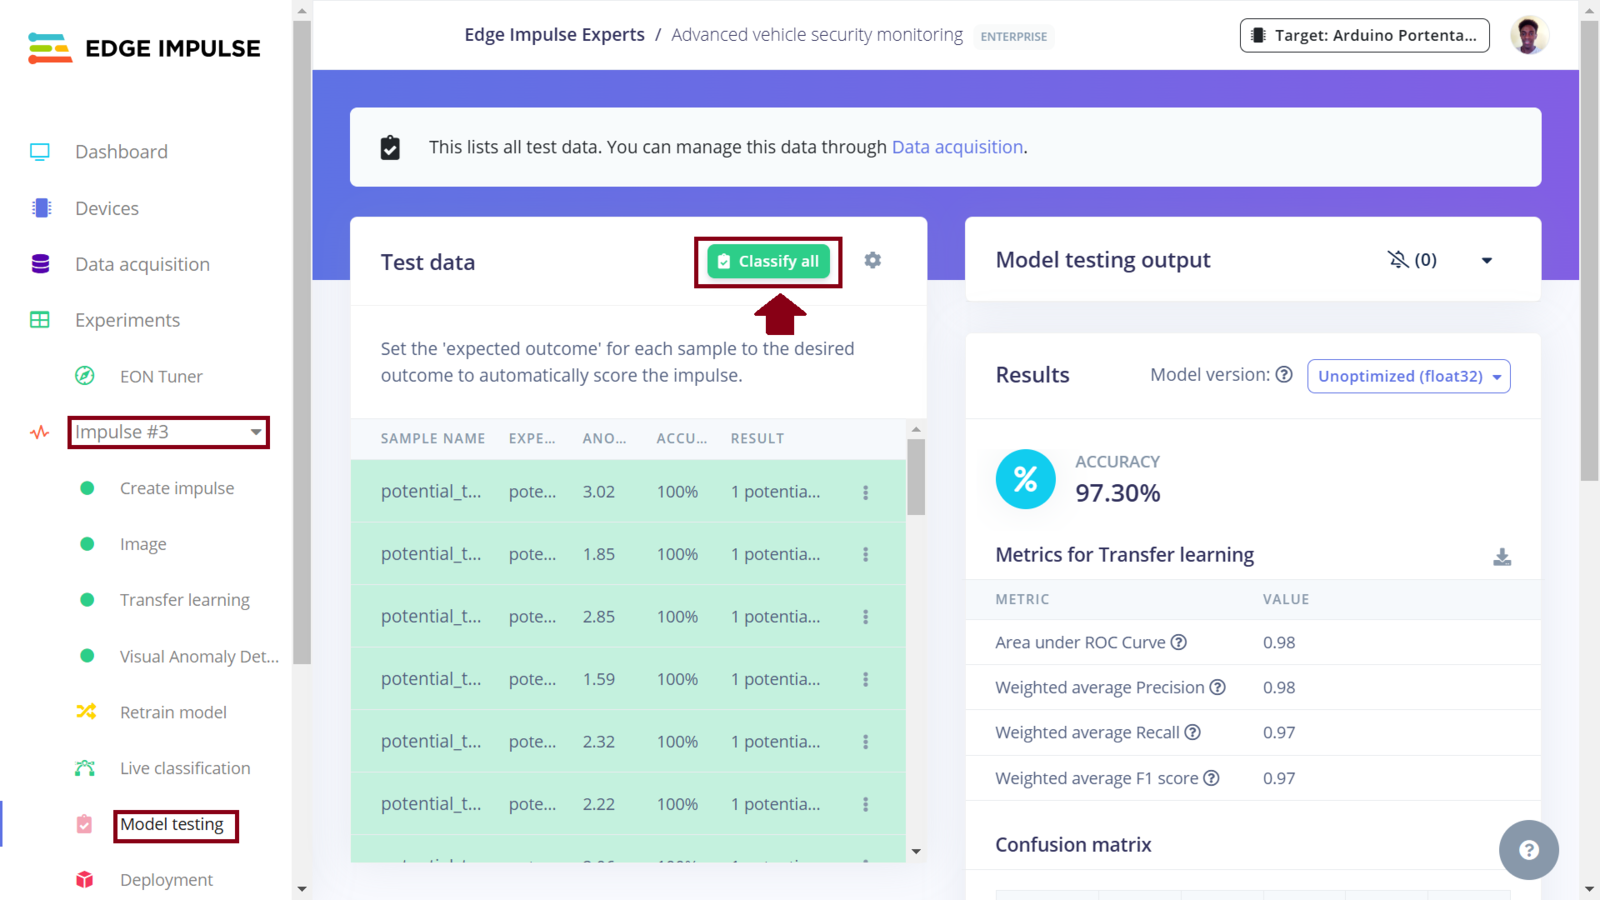
Impulse 3 test performance
Deploying the Impulses to Arduino Portenta H7
In this project, we now have three Impulses utilizing Nvidia TAO model, MobileNetv2, and both MobileNetv2 and visual anomaly detection, respectively. The Experiments feature not only allows us to setup different machine learning processes, but it also allows us to deploy any Impulse to a wide variety of hardware ranging from MCUs, CPUs and AI-accelerated boards. Among the various deployment options that are available, I chose to experiment with an Arduino library, OpenMV library, and deploying the Impulses as binary firmware. In my deployment experiments, I faced several challenges whereby the Studio and even Arduino IDE would fail to compile the library and camera example code, respectively, since the sketch ran out of the available flash that is on the board. Deploying the Impulse with Nvidia TAO model as an Arduino Library was too large to fit in the Portenta memory. Later, I realized that we can fix this issue by deploying an Impulse as an OpenMV library. However, for the third Impulse, this option cannot work since Impulses can only support a single learning block when deploying to OpenMV. To deploy an Impulse as a binary firmware, first ensure it is the current Impulse and then navigate to the “Deployment” section. In the field “Search deployment options” select Arduino Portenta H7. Since memory and CPU clock rate is limited for our deployment, we can optimize the model so that it can utilize the available resources on the Arduino Portenta H7 (or simply, so that it can fit and manage to run on the board). Model optimization often has a trade-off whereby we decide whether to trade model accuracy for improved performance, or reduce the model’s memory (RAM) use. Edge Impulse has made model optimization very easy with just a click. Currently we can get two optimizations: EON compiler (gives the same accuracy but uses 18% less RAM) and TensorFlow Lite. The Edge Optimized Neural (EON) compiler is a powerful tool, included in Edge Impulse, that compiles machine learning models into highly efficient and hardware-optimized C++ source code. It supports a wide variety of neural networks trained in TensorFlow or PyTorch - and a large selection of classical ML models trained in scikit-learn, LightGBM or XGBoost. The EON Compiler also runs far more models than other inferencing engines, while saving up to 65% of RAM usage. TensorFlow Lite (TFLite) is an open-source machine learning framework that optimizes models for performance and efficiency, making them able to run on resource constrained devices. To enable model optimizations, I selected the EON Compiler and Quantized (int8).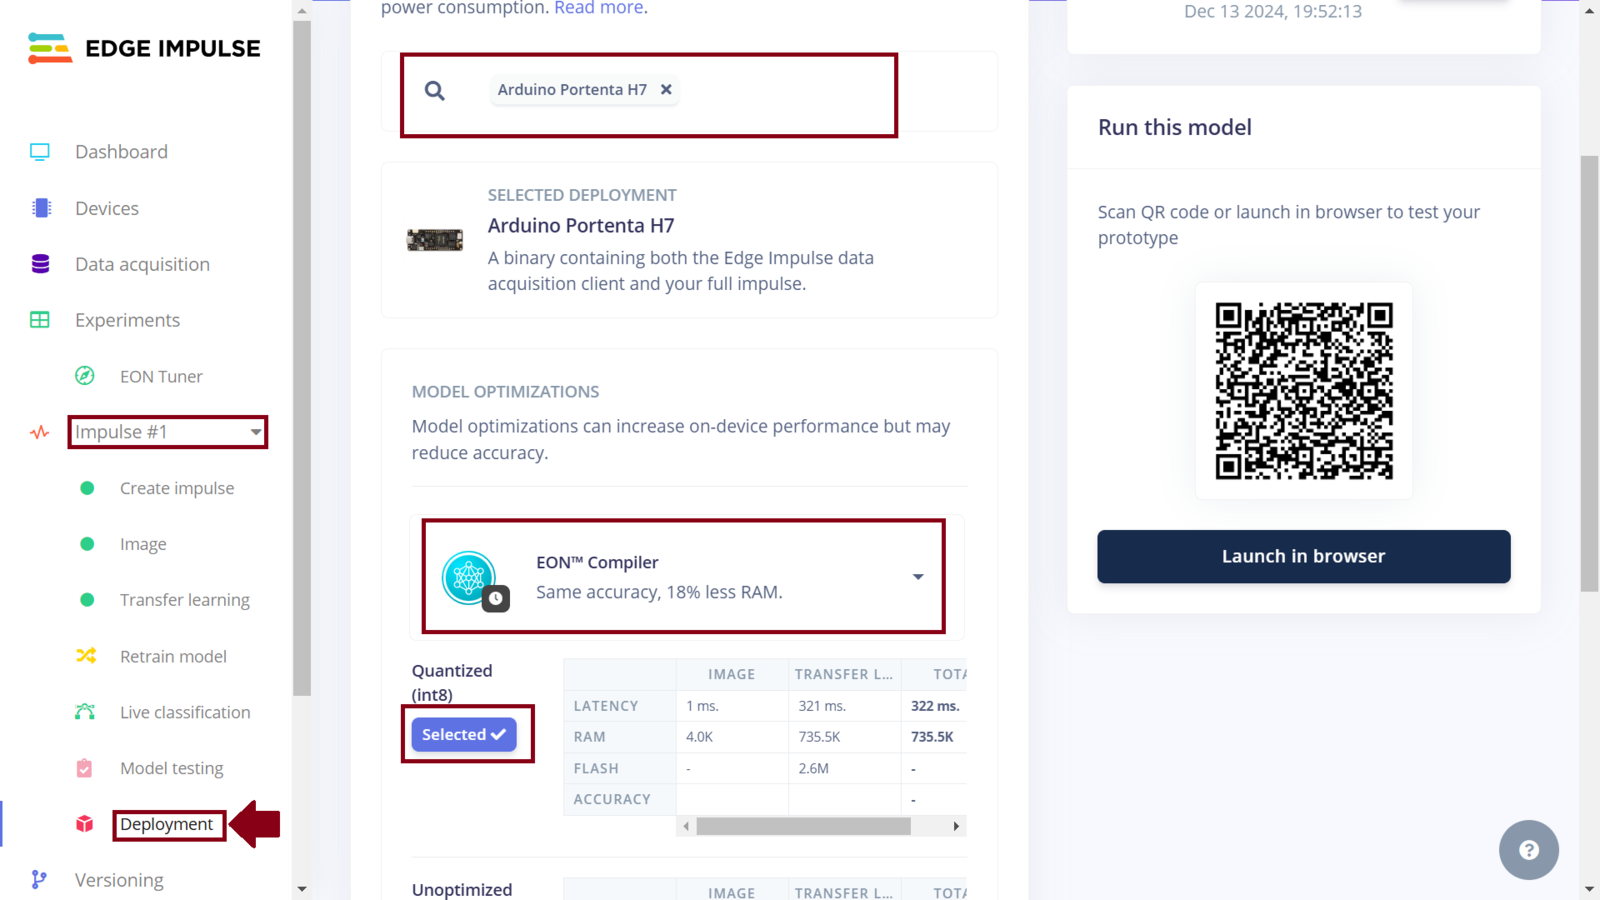
Impulse 1 deployment as firmware
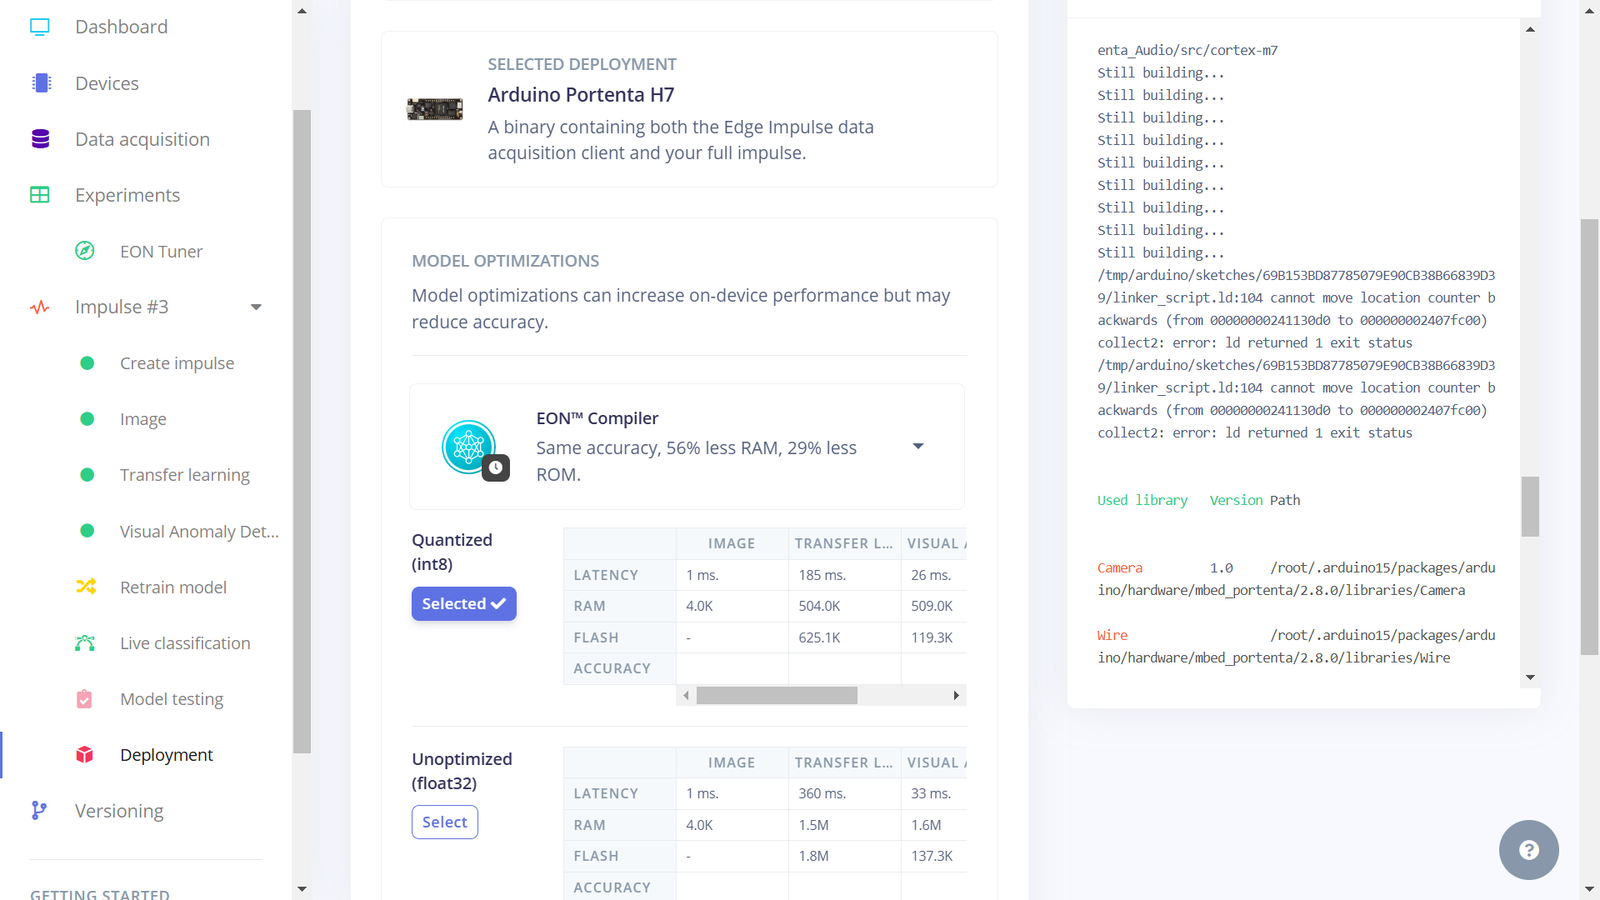
Impulse 3 deployment fail
Impulse 2 inference
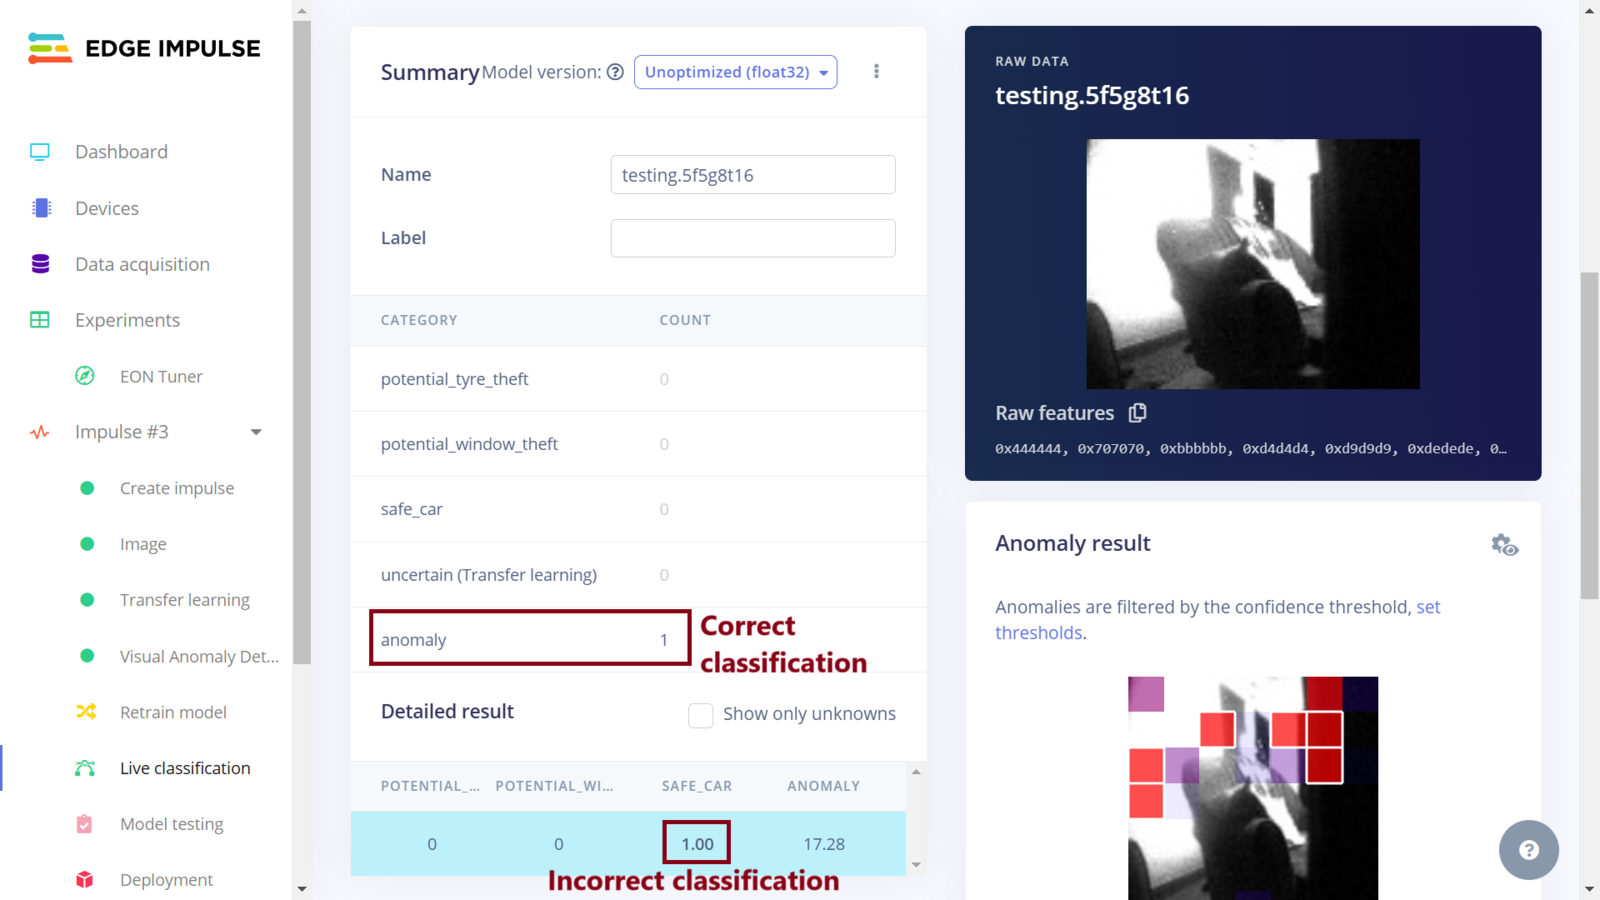
Impulse 3 test sample
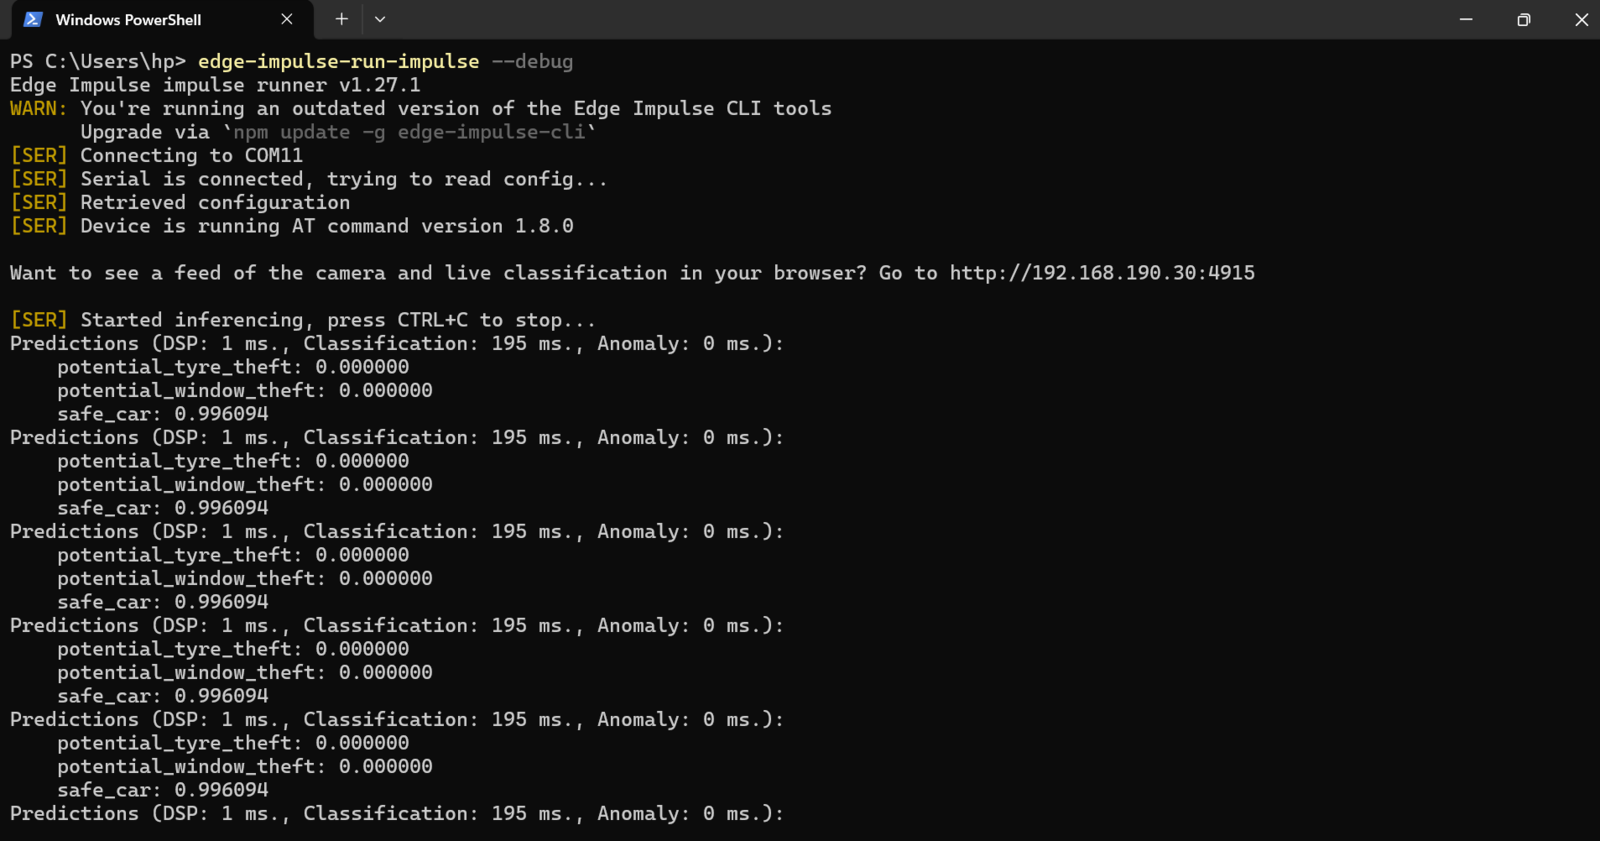
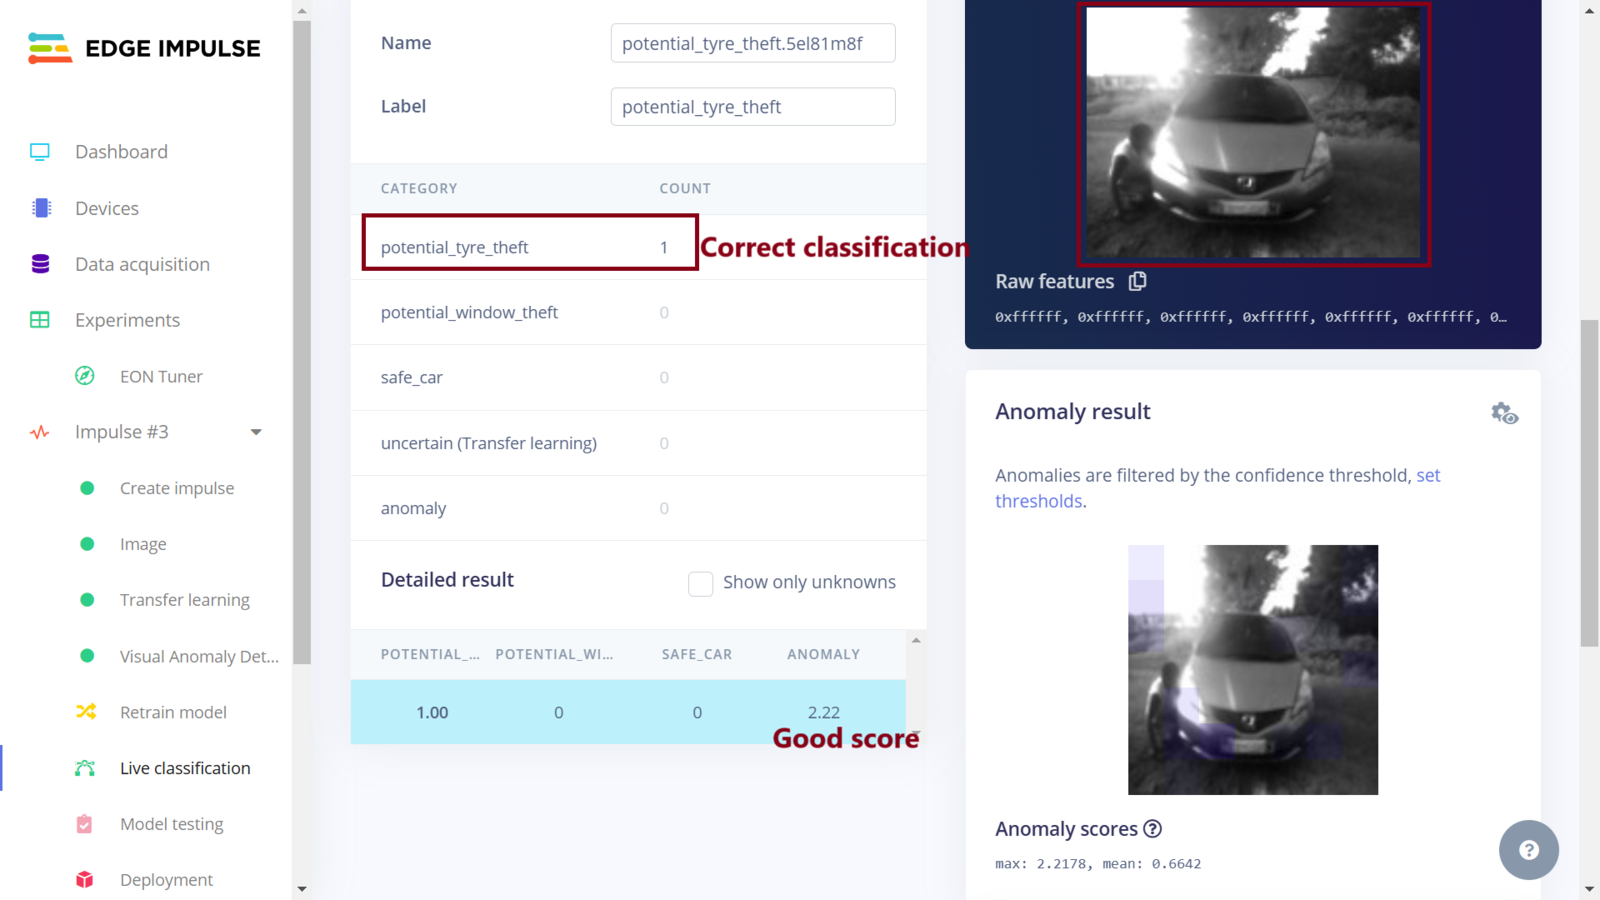
Impulse 3 live classification
Assembling a Smart Camera
Uploading Code to the Portenta H7
We are close to finishing the smart vehicle surveillance camera — time to put the camera together. First, we need to download first Impulse as an OpenMV library and also download the OpenMV IDE. Once we have installed the OpenMV IDE, we need to ensure that we have the latest version of the bootloader. To do this, we can use the Arduino IDE to upload the sketch for updating the bootloader. Afterwards, we connect the Portenta H7 board to the OpenMV IDE and install the latest firmware. These procedures have been well documented by Marcelo Rovai in one of his Hackster.io projects - in the section “Installing the OpenMV IDE” of the tutorial. Having the Portenta H7 connected to the computer and flashed with the latest OpenMV firmware, we will see a new drive on our computer. We need to extract the downloaded .zip file from Edge Impulse and drag and drop the .zip file contents to the Portenta H7 drive. The zip file has the Nvidia TAO model, a labels file, and an python script that runs inference while showing results. To include processing the inference results and sending an email, I created a simple python script that analyzes the inference results and sends an email via SMTP2GO service when a person is seen around the vehicle tampering with tires or windows. The Portenta H7’s WiFi capabilities is used to connect to a WiFi network and an email will be sent when the model is 0.8 confident that either a potential tire theft or window break-in attempt is ongoing. Note that before copying this Python file to the Portenta H7, we need to connect a 2.4GHz WiFi antenna.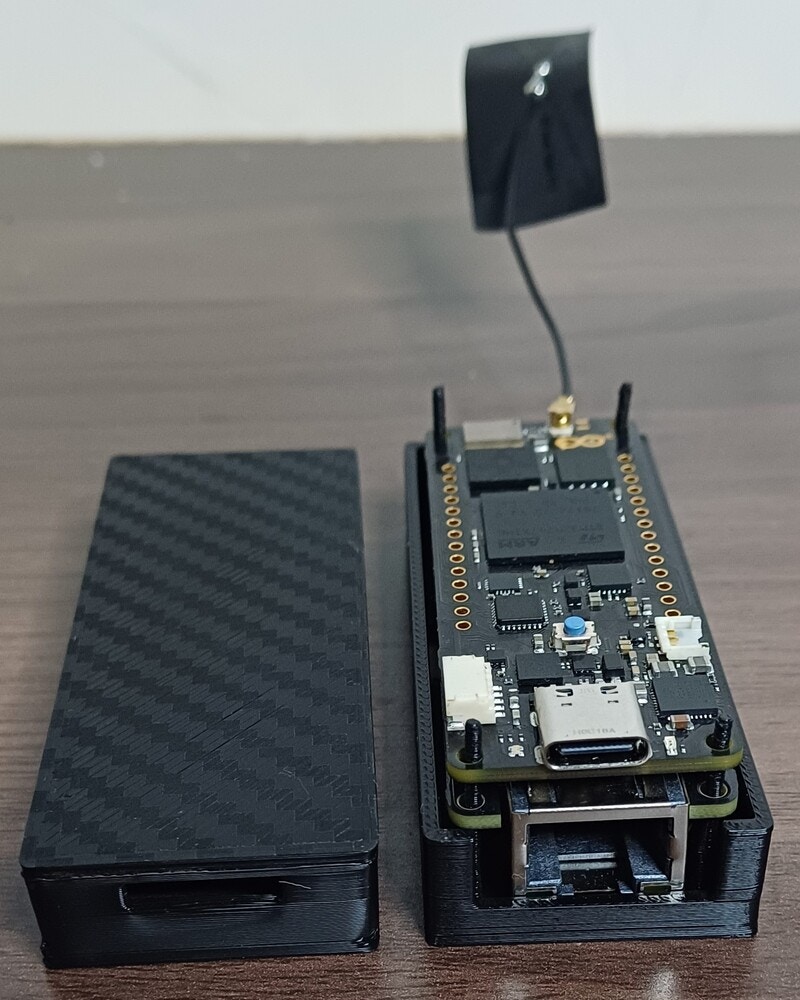
Portenta H7 with antenna

Python script
3D Printing Case Designs and Assembly
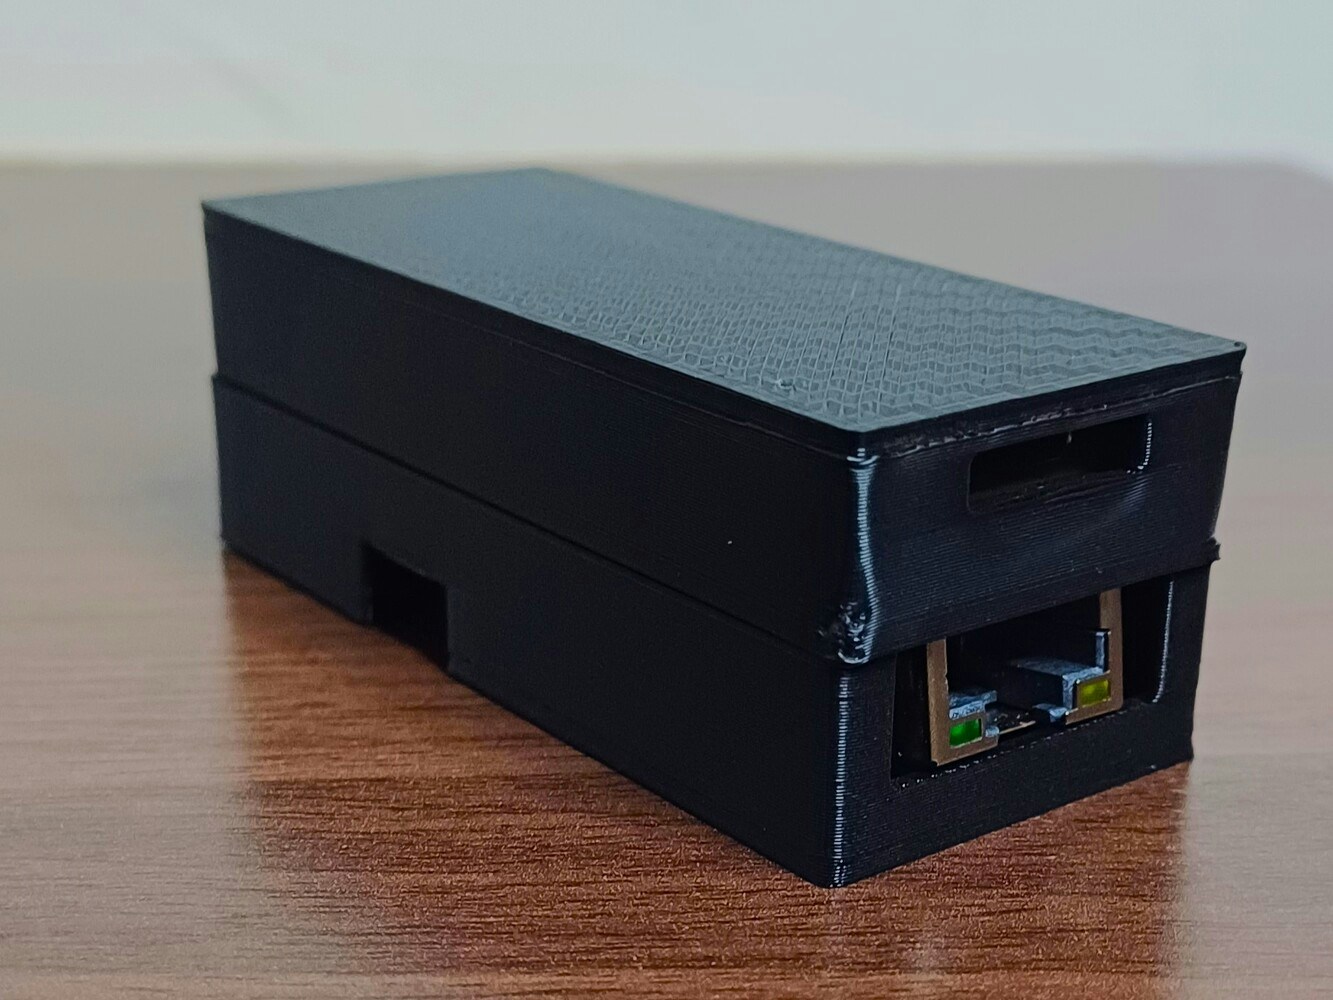
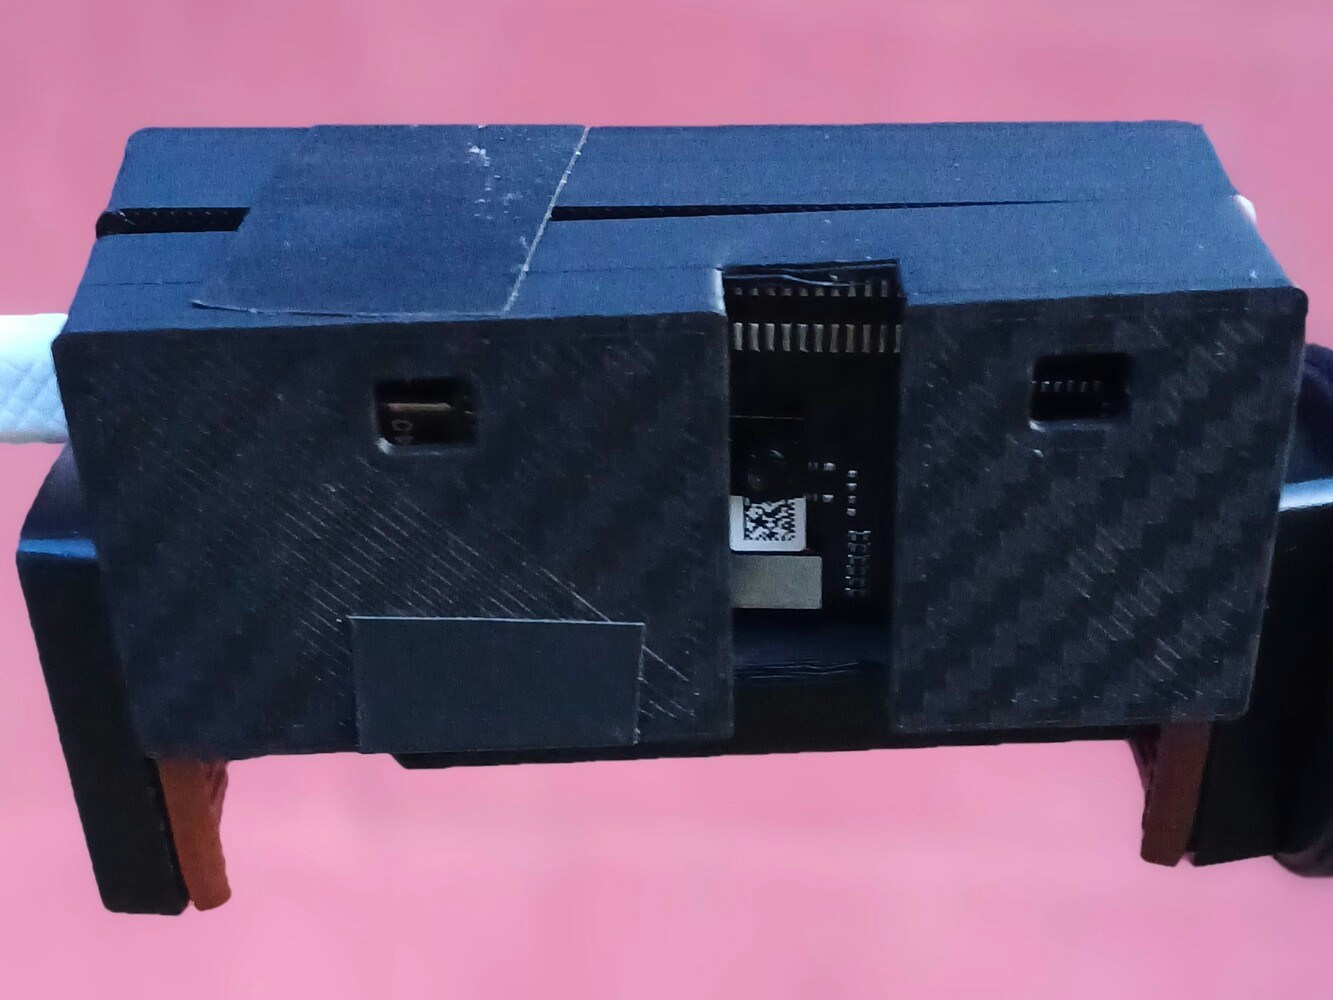
To secure the Portenta H7, I designed a simple case for the development board and later 3D printed them with PLA material. The case has cutouts for the camera, microphone, Ethernet and USB-C slots. For future use, I would advise adding slots for the connectors on the Portenta board such as the battery slot. The design files can be downloaded from printables.com.
Portenta H7 case
Portenta H7 in case
Inference on the Portenta H7
Results
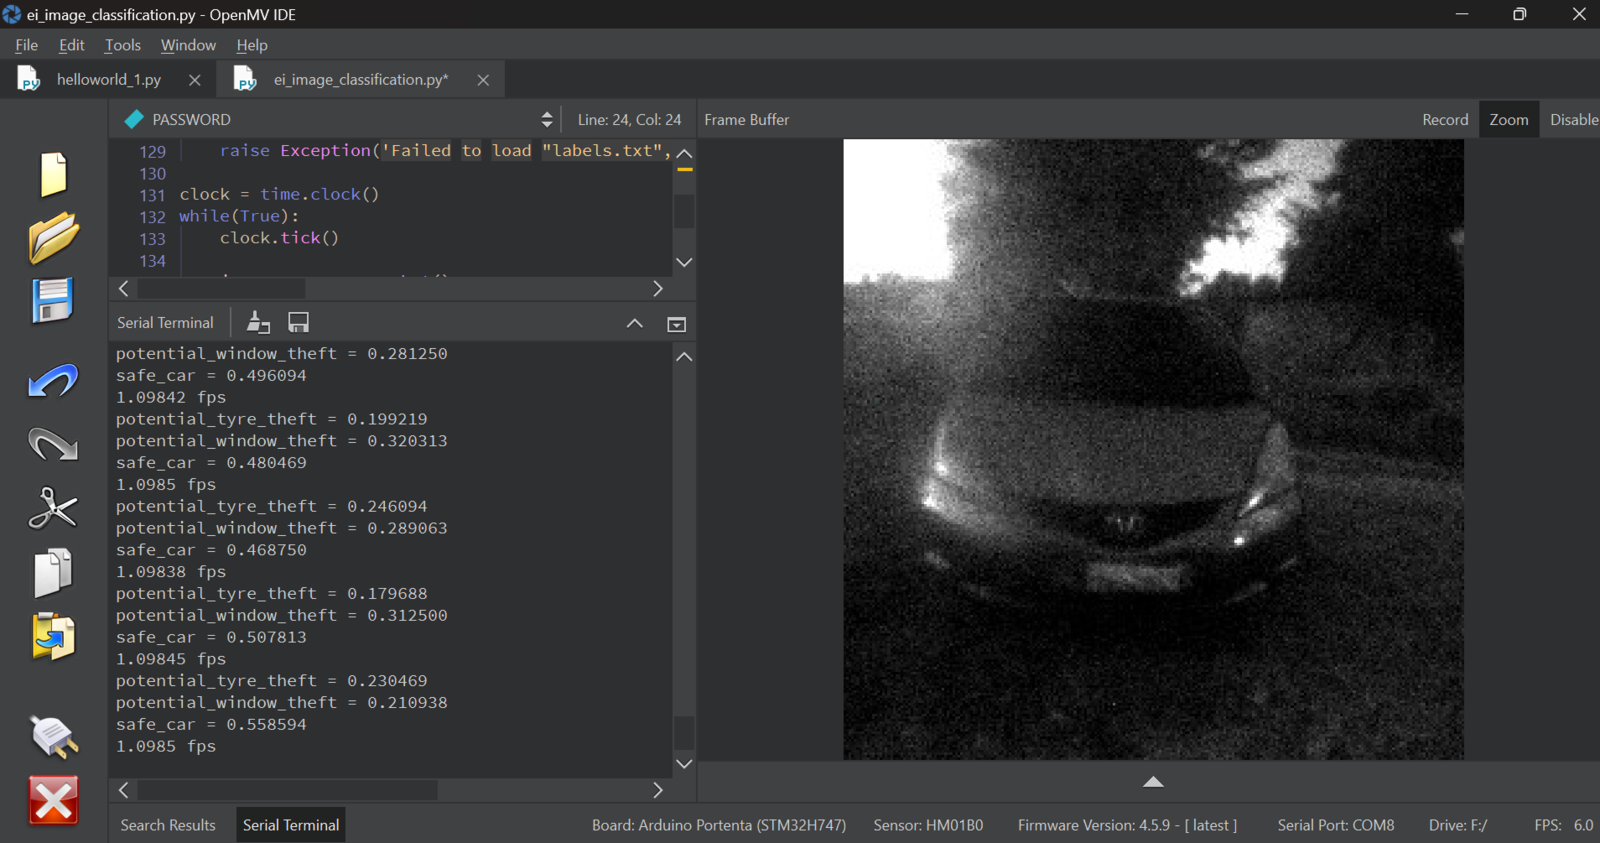
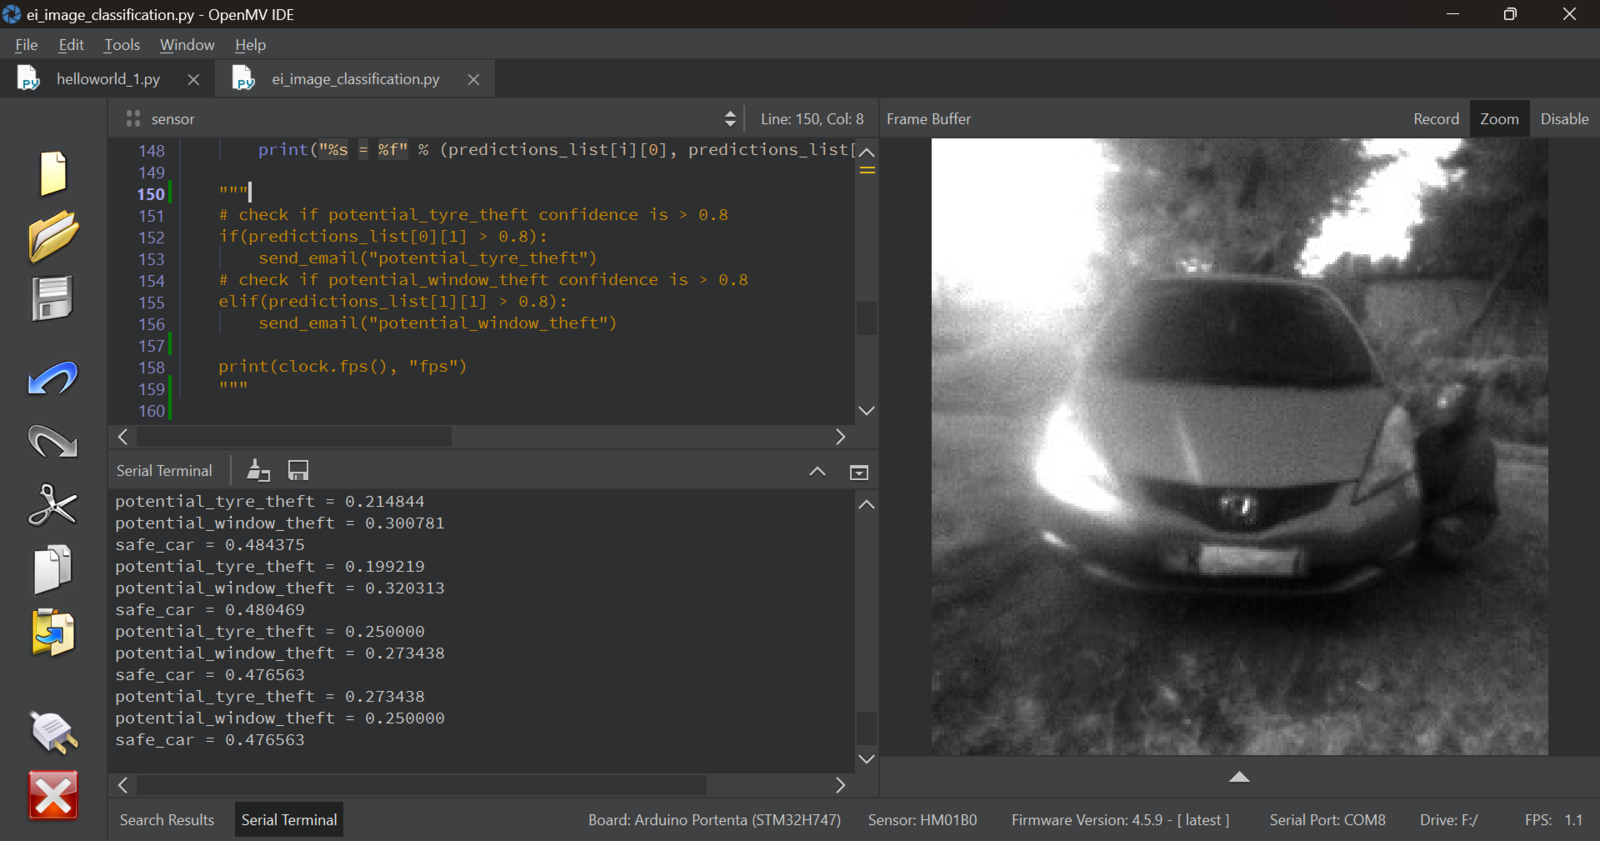
Finally, our smart vehicle surveillance camera is complete. We have successfully trained, tested, optimized, and deployed a Machine Learning model to the Arduino Portenta H7 board. Once the device is powered, the Portenta H7 board will first connect to the configured WiFi and after this is successful, the code will load the Nvidia TAO model and start running inference. This process runs at around 1 frame per second and the software is constantly analyzing the model predictions to see if situations where someone is near the vehicle tires or window is detected. Once these threatening situations are detected, and with a confidence of 0.8 and above, the Portenta H7 then automatically sends an email to the set email address using SMTP2GO. I chose email notifications as it was the easiest alternative for this demonstration since the service is free. For a commercial product it will be better to alert the vehicle owner using SMS, voice calls, and even alerting the authorities.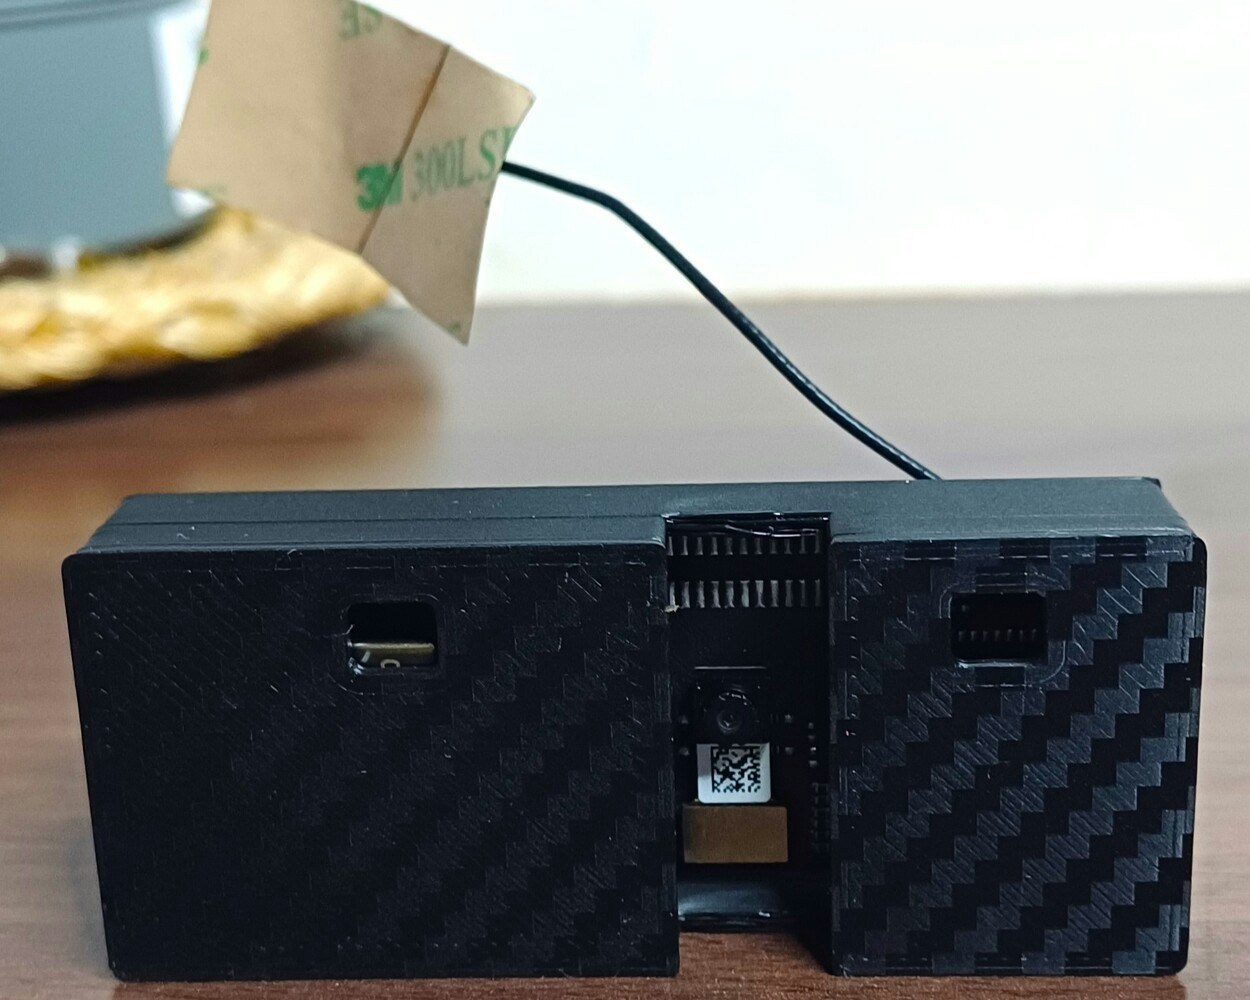
Assembled camera
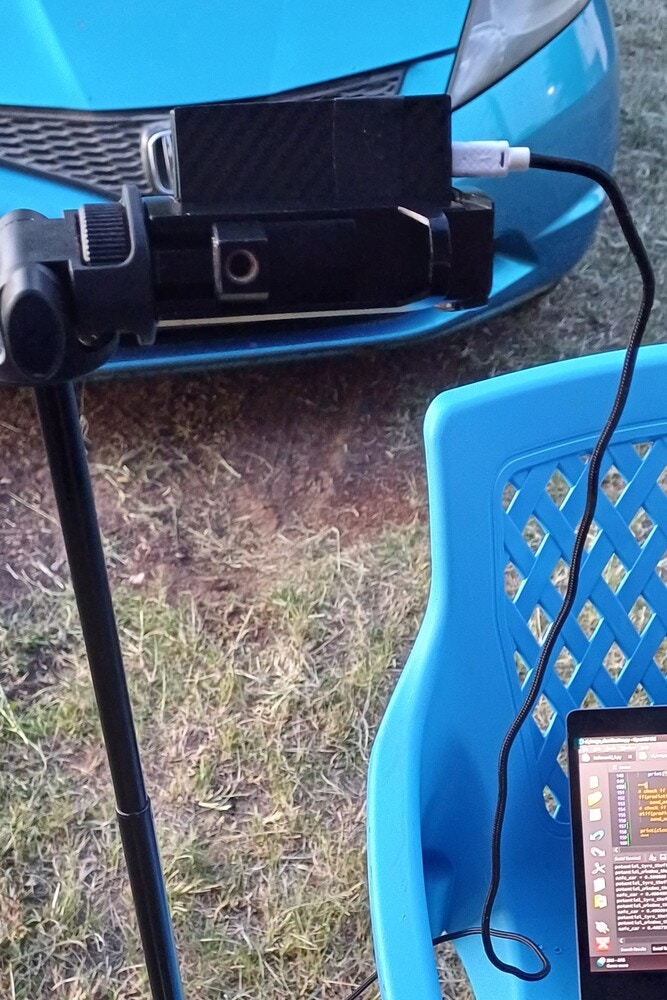
Camera on tripod
Camera on tripod
potential_tire_theft and potential_window_theft classes was low at around 0.28 to 0.3, but a good number of times the model would accurately classify the action with a confidence of 0.8. This can be related to several factors such as change in sunshine from the day when data was collected for training. We can also improve the model’s performance by adding more training data and increasing the number of training cycles.
Inference on Portenta H7
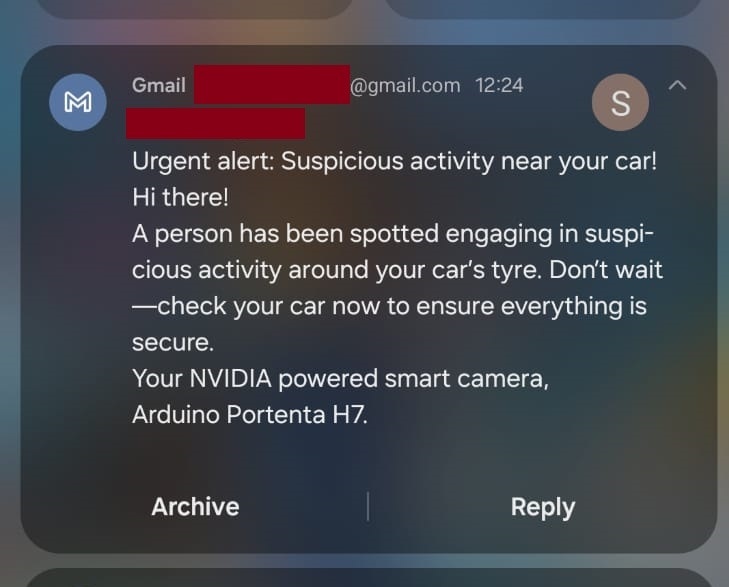
Email notification