LogoLogo
HomeDocsAPI & SDKsProjectsForumStudio
  • Welcome
    • Featured Machine Learning Projects
      • Getting Started with the Edge Impulse Nvidia TAO Pipeline - Renesas EK-RA8D1
      • Smart City Traffic Analysis - NVIDIA TAO + Jetson Orin Nano
      • ROS 2 Pick and Place System - Arduino Braccio++ Robotic Arm and Luxonis OAK-D
      • Optimize a cloud-based Visual Anomaly Detection Model for Edge Deployments
      • Rooftop Ice Detection with Things Network Visualization - Nvidia Omniverse Replicator
      • Surgery Inventory Object Detection - Synthetic Data - Nvidia Omniverse Replicator
      • NVIDIA Omniverse - Synthetic Data Generation For Edge Impulse Projects
      • Community Guide – Using Edge Impulse with Nvidia DeepStream
      • Computer Vision Object Counting - Avnet RZBoard V2L
      • Gesture Appliances Control with Pose Detection - BrainChip AKD1000
      • Counting for Inspection and Quality Control - Nvidia Jetson Nano (TensorRT)
      • High-resolution, High-speed Object Counting - Nvidia Jetson Nano (TensorRT)
    • Prototype and Concept Projects
      • Renesas CK-RA6M5 Cloud Kit - Getting Started with Machine Learning
      • TI CC1352P Launchpad - Getting Started with Machine Learning
      • OpenMV Cam RT1062 - Getting Started with Machine Learning
      • Getting Started with Edge Impulse Experiments
  • Computer Vision Projects
    • Workplace Organizer - Nvidia Jetson Nano
    • Recyclable Materials Sorter - Nvidia Jetson Nano
    • Analog Meter Reading - Arduino Nicla Vision
    • Creating Synthetic Data with Nvidia Omniverse Replicator
    • SonicSight AR - Sound Classification with Feedback on an Augmented Reality Display
    • Traffic Monitoring - Brainchip Akida
    • Multi-camera Video Stream Inference - Brainchip Akida
    • Industrial Inspection Line - Brainchip Akida
    • X-Ray Classification and Analysis - Brainchip Akida
    • Inventory Stock Tracker - FOMO - BrainChip Akida
    • Container Counting - Arduino Nicla Vision
    • Smart Smoke Alarm - Arduino Nano 33
    • Shield Bot Autonomous Security Robot
    • Cyclist Blind Spot Detection - Himax WE-I Plus
    • IV Drip Fluid-Level Monitoring - Arduino Portenta H7
    • Worker PPE Safety Monitoring - Nvidia Jetson Nano
    • Delivered Package Detection - ESP-EYE
    • Bean Leaf Disease Classification - Sony Spresense
    • Oil Tank Measurement Using Computer Vision - Sony Spresense
    • Object Counting for Smart Industries - Raspberry Pi
    • Smart Cashier with FOMO - Raspberry Pi
    • PCB Defect Detection with Computer Vision - Raspberry Pi
    • Bicycle Counting - Sony Spresense
    • Counting Eggs with Computer Vision - OpenMV Cam H7
    • Elevator Passenger Counting - Arduino Nicla Vision
    • ESD Protection using Computer Vision - Seeed ReComputer
    • Solar Panel Defect Detection - Arduino Portenta H7
    • Label Defect Detection - Raspberry Pi
    • Dials and Knob Monitoring with Computer Vision - Raspberry Pi
    • Digital Character Recognition on Electric Meter System - OpenMV Cam H7
    • Corrosion Detection with Computer Vision - Seeed reTerminal
    • Inventory Management with Computer Vision - Raspberry Pi
    • Monitoring Retail Checkout Lines with Computer Vision - Renesas RZ/V2L
    • Counting Retail Inventory with Computer Vision - Renesas RZ/V2L
    • Pose Detection - Renesas RZ/V2L
    • Product Quality Inspection - Renesas RZ/V2L
    • Smart Grocery Cart Using Computer Vision - OpenMV Cam H7
    • Driver Drowsiness Detection With FOMO - Arduino Nicla Vision
    • Gastroscopic Image Processing - OpenMV Cam H7
    • Pharmaceutical Pill Quality Control and Defect Detection
    • Deter Shoplifting with Computer Vision - Texas Instruments TDA4VM
    • Smart Factory Prototype - Texas Instruments TDA4VM
    • Correct Posture Detection and Enforcement - Texas Instruments TDA4VM
    • Visual Anomaly Detection with FOMO-AD - Texas Instruments TDA4VM
    • Surface Crack Detection and Localization - Texas Instruments TDA4VM
    • Surface Crack Detection - Seeed reTerminal
    • Retail Image Classification - Nvidia Jetson Nano
    • SiLabs xG24 Plus Arducam - Sorting Objects with Computer Vision and Robotics - Part 1
    • SiLabs xG24 Plus Arducam - Sorting Objects with Computer Vision and Robotics - Part 2
    • Object Detection and Visualization - Seeed Grove Vision AI Module
    • Bike Rearview Radar - Raspberry Pi
    • Build a Self-Driving RC Vehicle - Arduino Portenta H7 and Computer Vision
    • "Bring Your Own Model" Image Classifier for Wound Identification
    • Acute Lymphoblastic Leukemia Classifier - Nvidia Jetson Nano
    • Hardhat Detection in Industrial Settings - Alif Ensemble E7
    • Motorcycle Helmet Identification and Traffic Light Control - Texas Instruments AM62A
    • Import a Pretrained Model with "Bring Your Own Model" - Texas Instruments AM62A
    • Product Inspection with Visual Anomaly Detection - FOMO-AD - Sony Spresense
    • Visual Anomaly Detection in Fabric using FOMO-AD - Raspberry Pi 5
    • Car Detection and Tracking System for Toll Plazas - Raspberry Pi AI Kit
    • Visual Anomaly Detection - Seeed Grove Vision AI Module V2
    • Object Counting with FOMO - OpenMV Cam RT1062
    • Visitor Heatmap with FOMO Object Detection - Jetson Orin Nano
    • Vehicle Security Camera - Arduino Portenta H7
  • Audio Projects
    • Occupancy Sensing - SiLabs xG24
    • Smart Appliance Control Using Voice Commands - Nordic Thingy:53
    • Glass Window Break Detection - Nordic Thingy:53
    • Illegal Logging Detection - Nordic Thingy:53
    • Illegal Logging Detection - Syntiant TinyML
    • Wearable Cough Sensor and Monitoring - Arduino Nano 33 BLE Sense
    • Collect Data for Keyword Spotting - Raspberry Pi Pico
    • Voice-Activated LED Strip - Raspberry Pi Pico
    • Snoring Detection on a Smart Phone
    • Gunshot Audio Classification - Arduino Nano 33 + Portenta H7
    • AI-Powered Patient Assistance - Arduino Nano 33 BLE Sense
    • Acoustic Pipe Leakage Detection - Arduino Portenta H7
    • Location Identification using Sound - Syntiant TinyML
    • Environmental Noise Classification - Nordic Thingy:53
    • Running Faucet Detection - Seeed XIAO Sense + Blues Cellular
    • Vandalism Detection via Audio Classification - Arduino Nano 33 BLE Sense
    • Predictive Maintenance Using Audio Classification - Arduino Nano 33 BLE Sense
    • Porting an Audio Project from the SiLabs Thunderboard Sense 2 to xG24
    • Environmental Audio Monitoring Wearable - Syntiant TinyML - Part 1
    • Environmental Audio Monitoring Wearable - Syntiant TinyML - Part 2
    • Keyword Spotting - Nordic Thingy:53
    • Detecting Worker Accidents with Audio Classification - Syntiant TinyML
    • Snoring Detection with Syntiant NDP120 Neural Decision Processor - Arduino Nicla Voice
    • Recognize Voice Commands with the Particle Photon 2
    • Voice Controlled Power Plug with Syntiant NDP120 (Nicla Voice)
    • Determining Compressor State with Audio Classification - Avnet RaSynBoard
    • Developing a Voice-Activated Product with Edge Impulse's Synthetic Data Pipeline
    • Enhancing Worker Safety using Synthetic Audio to Create a Dog Bark Classifier
  • Predictive Maintenance and Defect Detection Projects
    • Predictive Maintenance - Nordic Thingy:91
    • Brushless DC Motor Anomaly Detection
    • Industrial Compressor Predictive Maintenance - Nordic Thingy:53
    • Anticipate Power Outages with Machine Learning - Arduino Nano 33 BLE Sense
    • Faulty Lithium-Ion Cell Identification in Battery Packs - Seeed Wio Terminal
    • Weight Scale Predictive Maintenance - Arduino Nano 33 BLE Sense
    • Fluid Leak Detection With a Flowmeter and AI - Seeed Wio Terminal
    • Pipeline Clog Detection with a Flowmeter and AI - Seeed Wio Terminal
    • Refrigerator Predictive Maintenance - Arduino Nano 33 BLE Sense
    • Motor Pump Predictive Maintenance - Infineon PSoC 6 WiFi-BT Pioneer Kit + CN0549
    • BrickML Demo Project - 3D Printer Anomaly Detection
    • Condition Monitoring - Syntiant TinyML Board
    • Predictive Maintenance - Commercial Printer - Sony Spresense + CommonSense
    • Vibration Classification with BrainChip's Akida
    • AI-driven Audio and Thermal HVAC Monitoring - SeeedStudio XIAO ESP32
  • Accelerometer and Activity Projects
    • Arduino x K-Way - Outdoor Activity Tracker
    • Arduino x K-Way - Gesture Recognition for Hiking
    • Arduino x K-Way - TinyML Fall Detection
    • Posture Detection for Worker Safety - SiLabs Thunderboard Sense 2
    • Hand Gesture Recognition - OpenMV Cam H7
    • Arduin-Row, a TinyML Rowing Machine Coach - Arduino Nicla Sense ME
    • Fall Detection using a Transformer Model – Arduino Giga R1 WiFi
    • Bluetooth Fall Detection - Arduino Nano 33 BLE Sense
    • Monitor Packages During Transit with AI - Arduino Nano 33 BLE Sense
    • Smart Baby Swing - Arduino Portenta H7
    • Warehouse Shipment Monitoring - SiLabs Thunderboard Sense 2
    • Gesture Recognition - Bangle.js Smartwatch
    • Gesture Recognition for Patient Communication - SiLabs Thunderboard Sense 2
    • Hospital Bed Occupancy Detection - Arduino Nano 33 BLE Sense
    • Porting a Posture Detection Project from the SiLabs Thunderboard Sense 2 to xG24
    • Porting a Gesture Recognition Project from the SiLabs Thunderboard Sense 2 to xG24
    • Continuous Gait Monitor (Anomaly Detection) - Nordic Thingy:53
    • Classifying Exercise Activities on a BangleJS Smartwatch
  • Air Quality and Environmental Projects
    • Arduino x K-Way - Environmental Asthma Risk Assessment
    • Gas Detection in the Oil and Gas Industry - Nordic Thingy:91
    • Smart HVAC System with a Sony Spresense
    • Smart HVAC System with an Arduino Nicla Vision
    • Indoor CO2 Level Estimation - Arduino Portenta H7
    • Harmful Gases Detection - Arduino Nano 33 BLE Sense
    • Fire Detection Using Sensor Fusion and TinyML - Arduino Nano 33 BLE Sense
    • AI-Assisted Monitoring of Dairy Manufacturing Conditions - Seeed XIAO ESP32C3
    • AI-Assisted Air Quality Monitoring - DFRobot Firebeetle ESP32
    • Air Quality Monitoring with Sipeed Longan Nano - RISC-V Gigadevice
    • Methane Monitoring in Mines - Silabs xG24 Dev Kit
    • Smart Building Ventilation with Environmental Sensor Fusion
    • Sensor Data Fusion with Spresense and CommonSense
    • Water Pollution Detection - Arduino Nano ESP32 + Ultrasonic Scan
    • Fire Detection Using Sensor Fusion - Arduino Nano 33 BLE Sense
  • Novel Sensor Projects
    • 8x8 ToF Gesture Classification - Arduino RP2040 Connect
    • Food Irradiation Dose Detection - DFRobot Beetle ESP32C3
    • Applying EEG Data to Machine Learning, Part 1
    • Applying EEG Data to Machine Learning, Part 2
    • Applying EEG Data to Machine Learning, Part 3
    • Liquid Classification with TinyML - Seeed Wio Terminal + TDS Sensor
    • AI-Assisted Pipeline Diagnostics and Inspection with mmWave Radar
    • Soil Quality Detection Using AI and LoRaWAN - Seeed Sensecap A1101
    • Smart Diaper Prototype - Arduino Nicla Sense ME
    • DIY Smart Glove with Flex Sensors
    • EdgeML Energy Monitoring - Particle Photon 2
    • Wearable for Monitoring Worker Stress using HR/HRV DSP Block - Arduino Portenta
  • Software Integration Demos
    • Azure Machine Learning with Kubernetes Compute and Edge Impulse
    • ROS2 + Edge Impulse, Part 1: Pub/Sub Node in Python
    • ROS2 + Edge Impulse, Part 2: MicroROS
    • Using Hugging Face Datasets in Edge Impulse
    • Using Hugging Face Image Classification Datasets with Edge Impulse
    • Edge Impulse API Usage Sample Application - Jetson Nano Trainer
    • MLOps with Edge Impulse and Azure IoT Edge
    • A Federated Approach to Train and Deploy Machine Learning Models
    • DIY Model Weight Update for Continuous AI Deployments
    • Automate the CI/CD Pipeline of your Models with Edge Impulse and GitHub Actions
    • Deploying Edge Impulse Models on ZEDEDA Cloud Devices
Powered by GitBook
On this page
  • Introduction
  • Understanding the ML Lifecycle
  • Introduction to MLOps
  • CI/CD in Machine Learning
  • Continuous Integration (CI)
  • Continuous Deployment (CD)
  • Practical Guide on CI/CD with GitHub Actions & Edge Impulse
  • Setup
  • Data Collection
  • Conclusion

Was this helpful?

Edit on GitHub
Export as PDF
  1. Software Integration Demos

Automate the CI/CD Pipeline of your Models with Edge Impulse and GitHub Actions

Use GitHub workflows as a CI/CD solution for efficiently building and deploying your AI models.

Created By: Haziqa Sajid

Introduction

As machine learning models evolve, one of the biggest challenges is keeping up with constant updates, retraining, and redeployment, especially when targeting edge devices. These environments are particularly vulnerable to data drift. This is when the incoming data gradually changes from the data the model was trained on. Data drift can lead to degraded model performance over time. Without frequent updates, models can become less reliable, and detecting these changes manually can be slow and error-prone.

The need for an automated pipeline is clear. It should ensure that models are consistently updated, tested, and deployed without compromising time or quality. This article aims to use GitHub workflows as a CI/CD solution for efficiently building and deploying your Edge Impulse model.

Understanding the ML Lifecycle

Like all software, a machine learning (ML) project has phases. The ML lifecycle involves six key phases:

  1. Data Collection: Gathering raw data from various sources, ensuring quality and diversity.

  2. Data Preprocessing: Cleaning, transforming, and scaling data to make it model-ready.

  3. Training: Feeding data into ML algorithms to learn patterns involving optimization and tuning.

  4. Evaluation: Using test datasets to assess model performance with metrics like accuracy and recall.

  5. Deployment: Integrating validated models into production environments for real-world use.

  6. Monitoring: Continuously tracking performance to detect drift or degradation, ensuring reliability.

Unlike traditional software development, ML projects often involve iterative processes. For example, adding more data, modifying data processing techniques, or training models for additional epochs. MLOps was introduced to streamline these complexities.

Introduction to MLOps

MLOps (Machine Learning Operations) combines ML, DevOps, and Data Engineering principles to streamline and automate the ML lifecycle. It enhances each phase by:

  • Automating data pipelines

  • Accelerating training

  • Validating models with CI/CD

  • Simplifying deployment

  • Enabling real-time monitoring

This fosters collaboration between teams and ensures smoother transitions from development to production. The processes can still struggle without continuous feedback. Dynamic environments require models to adapt to changing data and user needs.

Continuous feedback loops detect data drift, incorporate new insights, and improve user experience through iterative updates. Automated retraining pipelines in MLOps frameworks efficiently manage these updates, minimizing manual effort.

CI/CD in Machine Learning

Continuous Integration (CI) and Continuous Deployment (CD) are pivotal in modern machine learning (ML) workflows. They ensure efficiency and reliability across the ML lifecycle.

Continuous Integration (CI)

CI involves automating the testing and validating changes in code, data pipelines, or models. Every update, whether to feature engineering scripts, model architectures, or training pipelines, is integrated into a shared repository and undergoes rigorous automated testing. This ensures that new changes do not break existing functionality and maintain consistency.

Continuous Deployment (CD)

CD focuses on automating the process of deploying validated changes to production environments. This includes seamlessly transitioning models, data updates, or pipeline modifications while minimizing downtime. CD ensures models are always up-to-date and responsive to evolving real-world conditions. In the MLOps framework, CI/CD plays a crucial role in:

  1. Accelerating Iterations: CI/CD enables rapid prototyping and iteration by automating repetitive tasks like testing and deployment.

  2. Ensuring Consistency: Rigorous validation during CI prevents errors from propagating to production, while CD ensures smooth rollouts.

  3. Fostering Creativity: Automating integrations allows teams to focus on innovation rather than manual processes.

CI/CD pipelines also address ML challenges like data drift, performance degradation, and reproducibility through automated retraining, metrics monitoring, and versioning. Rollback mechanisms ensure quick recovery from deployment issues. Integrating CI/CD into MLOps keeps ML systems adaptive, robust, and aligned with evolving business and data demands.

This article explains how to use GitHub Actions to build and deploy an Edge Impulse model, a cloud platform for AI/ML on embedded systems.

Practical Guide on CI/CD with GitHub Actions & Edge Impulse

The following guide will walk you through the process of developing a practical audio classification system using Edge Impulse to detect when a baby is crying or sleeping. Let’s start with the setup.

Setup

Data Collection

In this step, we create a dataset of synthetic audio clips representing two categories: baby crying and baby sleeping sounds. Using Edge Impulse’s synthetic data generation capabilities, we can simulate realistic audio samples tailored to our needs. These samples will serve as the foundation for training and testing our audio classification model.

Leveraging parameters like prompt influence, sample length, and frequency ensures the dataset is diverse, balanced, and representative of real-world scenarios.

Steps to Generate Synthetic Data

  1. Navigate to the Synthetic Data tab in the Data Acquisition section of your project.

  2. Select Edge Impulse Inc. / ElevenLabs Synthetic Audio Generator as the data source.

  3. Input a descriptive Prompt, such as “Baby crying” or “Baby sleeping,” to guide the audio generation.

  4. Assign a Label for the prompt, e.g., crying or sleeping, to categorize the generated audio samples.

  5. Adjust the Prompt Influence parameter (e.g., 0.65) to balance between creativity and adherence to the prompt.

  6. Set the Number of Samples to specify how many audio clips you want to generate.

  7. Define the Minimum Length (seconds) to ensure all samples meet your required duration (e.g., 3 seconds).

  8. Set the Frequency (Hz), typically at 16000 Hz, for audio classification tasks.

  9. Choose how the data is distributed between training and testing, such as an 80/20 split.

  10. Click Generate Data to produce the synthetic audio samples.

  11. Review the output to ensure the generated samples are accurate and appropriately labeled.

Design an Impulse using Edge Impulse

An impulse in Edge Impulse defines the end-to-end processing pipeline for your data—from raw input to classification. In this step, we design an impulse tailored for audio data to distinguish between baby crying and sleeping sounds. The impulse includes the configuration of audio data as time-series input, feature extraction using MFCC (Mel-Frequency Cepstral Coefficients), and classification using a machine learning block.

Steps to Create an Impulse:

  1. Configure Input (Time-Series Data)

    • Navigate to the Impulse Design tab in your project.

    • Select Time Series Data as the input block for audio signals.

    • Set the Window Size to 1000 ms (1 second), which defines the duration of audio analyzed per segment.

    • Configure the Window Increase (Stride) to 300 ms to determine the overlap between consecutive segments, ensuring sufficient coverage of the audio signal.

    • Specify the Frequency as 16000 Hz to match the sampling rate of your audio data.

    • Enable Zero-pad Data to ensure all audio inputs meet the required window size.

  2. Add the MFCC Processing Block

    • Select MFCC as the feature extraction block.

    • Name the block (e.g., MFCC) and link the Input Axes to audio.

    • MFCC transforms the raw audio into a spectrogram-like representation that captures key features for audio classification, making it effective for distinguishing sounds like crying and sleeping.

  3. Add the Classification Block

    • Choose the Classification learning block to map the extracted MFCC features to output labels (crying and sleeping).

    • Name the block (e.g., Classifier).

    • Ensure that MFCC is selected as the input feature for this block.

    • Verify that the output features are correctly labeled as crying and sleeping.

  4. Save the Impulse

    • Click on Save Impulse to finalize the configuration.

Configuring the MFCC Block

The Mel-Frequency Cepstral Coefficients (MFCC) block transforms audio into a visual representation known as a spectrogram, where:

  • Rows represent frequency ranges.

  • Columns represent time spans.

  • Cell values indicate the amplitude for specific frequencies over time, with intensity shown as colors.

The spectrogram reveals sound patterns, such as the differences between a baby crying and sleeping. These patterns, though subtle, are enough for a neural network to recognize.

Steps to Configure the MFCC Block

  1. Preview Audio Data

    • Open the MFCC tab in the left menu.

  • Use the sample dropdown to explore audio segments and their spectrograms.

  1. Adjust Parameters

    • The Parameters box provides default settings, which work well for most cases.

  2. Generate Features

    • Click Generate Features to process all audio windows into spectrograms.

  • Wait for the process to complete (it may take time for large datasets).

  1. Visualize Features

    • Use the Feature Explorer to visualize data clusters, identify class separations, and spot mislabeled data.

Create a Neural Network

With the data processed, you can now train a neural network to classify audio into two categories.

Steps to Train the Neural Network:

  1. Open the Classifier

    • Click Classifier in the left menu to access the neural network setup.

  2. Neural Network Overview

    • The network consists of layers of "neurons."

    • The MFCC features pass through layers, transforming into probabilities for crying or sleeping classification.

  3. Training the Network

    • You can use Edge Impulse's default architecture or customize it (e.g., via TensorFlow/Keras). We have used the default architecture.

    • Our data was limited to only 3 minutes, so we incorporated data augmentation. Data augmentation involves applying various transformations to existing data, such as scaling, flipping, or adding noise, to artificially increase the diversity of the training set. In Edge Impulse, we just need to configure it:

  • Click Save & Train. Training takes a few minutes, and results are displayed in the Model panel.

  1. Evaluate the Results

    • Accuracy: Indicates the percentage of correctly classified audio windows.

    • Confusion Matrix: Shows how well the model classifies each class. Misclassifications reveal areas for improvement. The results are as follows:

At this stage, our model is trained and performing well. However, since the results are exceptionally good, there is a risk of overfitting. To ensure its reliability, it's important to test the model thoroughly.

Model Testing

Model testing evaluates the trained neural network's performance on unseen data to ensure it generalizes well. In this step, we check how accurately the model classifies test data into its respective categories.

Steps for Model Testing

  1. Access the Testing Interface

    • Navigate to Model Testing in the left-hand menu of Edge Impulse.

  2. Run Classification

    • Click Classify All to run the model on all test samples. These test samples are derived from the 78/22 split we applied to the prepared dataset. The results, including predictions and classification accuracy, will be displayed for each sample.

  3. Analyze the Results

    • Accuracy: Check the overall classification accuracy displayed in the Model Testing Output panel.

    • Metrics: Review metrics like precision, recall, and F1 score for a deeper performance evaluation.

    • Confusion Matrix: Understand how well the model differentiates between classes and identify misclassifications. Here are the results:

  1. Refine as Needed

    • If accuracy is unsatisfactory, consider refining your model by improving the training dataset, adjusting the architecture, or re-tuning hyperparameters.

With the testing complete, the model is ready for deployment.

Deploy to Device using Edge Impulse

Once your Impulse is designed, trained, and verified, you can deploy it to your device for offline operation, reduced latency, and low power consumption. Edge Impulse allows you to package the entire Impulse into a C++ library for your embedded software.

To export, go to the Deployment menu, select your development board, and click Build.

Adding GitHub Action to the Workflow

We can use GitHub Actions to automate the build and deployment of your Edge Impulse model. This process streamlines the workflow, ensuring that the model is automatically built and deployed whenever there is a push to the main branch. Below are the steps to set up the GitHub repository, configure the action, and define the necessary workflow to achieve this.

Steps

  1. Create a Workflow

First, create a new repository in GitHub to store your project. Once created, clone the repository to your local machine to begin setting up the workflow. Create a .github/workflows directory in your repository. Inside this directory, create a YAML file for the workflow configuration.

.github/workflows/build\_deploy.yml
  1. Define the Trigger Event

In the YAML file, specify that the workflow should run when there is a push event to the main branch.

 on:
  push:
    branches:
      - main
  1. Add the Build Job

Define a job within the workflow to build and deploy the Edge Impulse model. This job will run on an ubuntu-22.04 environment.

 jobs:
  build:
    name: Build & Deploy
    runs-on: ubuntu-22.04
  1. Build and Deploy the Edge Impulse Model

Use the edgeimpulse/build-deploy@v1 action to automate the build and deployment of your Edge Impulse model. Make sure to use your GitHub secrets for the project_id and api_key.

 - name: Build and deploy Edge Impulse Model
   uses: edgeimpulse/build-deploy@v1
   id: build-deploy
   with:
     project_id: ${{ secrets.PROJECT_ID }}
     api_key: ${{ secrets.API_KEY }}

The project ID can be found in the URL like this:

https://studio.edgeimpulse.com/studio/<Project-Id>

The API key is available under the "Keys" tab on the Dashboard page.

  1. Extract the Model and SDK

After the deployment, unzip the generated deployment file and move the necessary files into the project directory. This includes the Edge Impulse SDK, model parameters, and the TFLite model.

 - name: Extract the Model and SDK
  run: |
    mkdir temp
    unzip -q "${{ steps.build-deploy.outputs.deployment_file_name }}" -d temp
    mv temp/edge-impulse-sdk/ .
    mv temp/model-parameters/ .
    mv temp/tflite-model/ .
    rm -rf "${{ steps.build-deploy.outputs.deployment_file_name }}"
    rm -rf temp/

Now, when someone pushes to main, this will be built automatically, and the action workflow will look like this:

By adding this GitHub Action to your workflow, you automate the build and deployment of your Edge Impulse model.

Conclusion

PreviousDIY Model Weight Update for Continuous AI DeploymentsNextDeploying Edge Impulse Models on ZEDEDA Cloud Devices

Last updated 3 months ago

Was this helpful?

To begin, visit and log in to your account. If you don’t already have an account, create one for free. For this project, we’ll use the Enterprise Plan to access advanced features such as synthetic data generation. After logging in, create a new project and name it something meaningful, like Baby Audio Classification.

Automating your Edge Impulse model integration with GitHub Actions streamlines your workflow. This includes automated testing, which saves time and boosts efficiency. However, high-quality data remains crucial for any ML project. Edge Impulse Enterprise addresses this by enabling AI-powered synthetic data generation, whether it's images, audio, or text. Visit today to learn about Enterprise access or begin a free trial.

Edge Impulse
Edge Impulse
Fig 1: Generating Synthetic Data
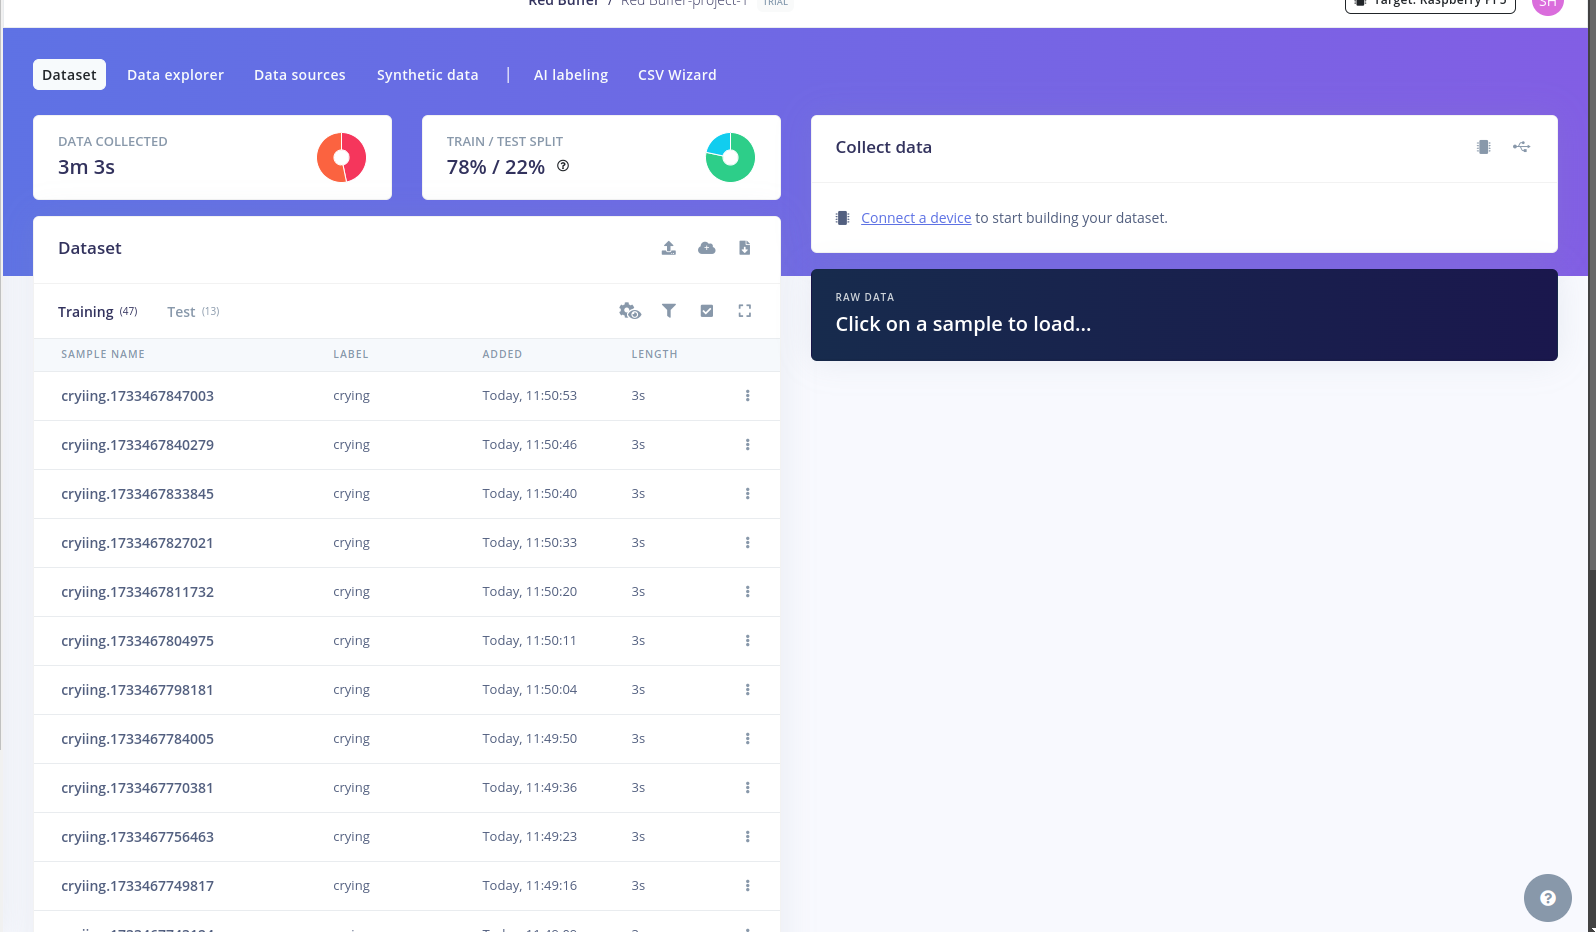
Fig 1.2: Prepared Dataset
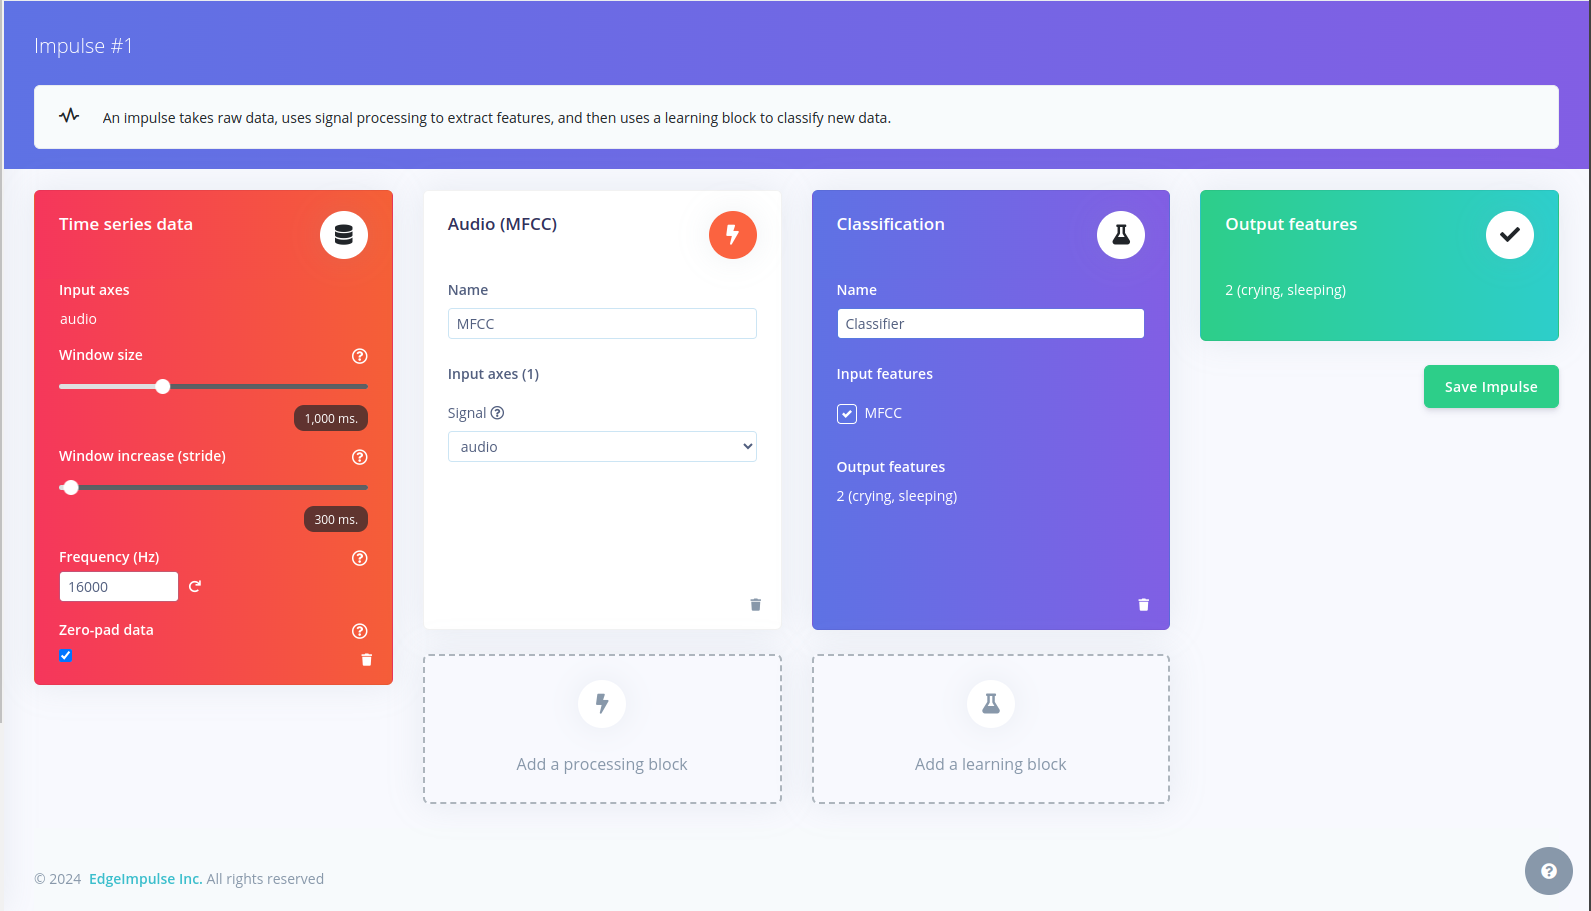
Fig 2: Designing an Impulse in Edge Impulse
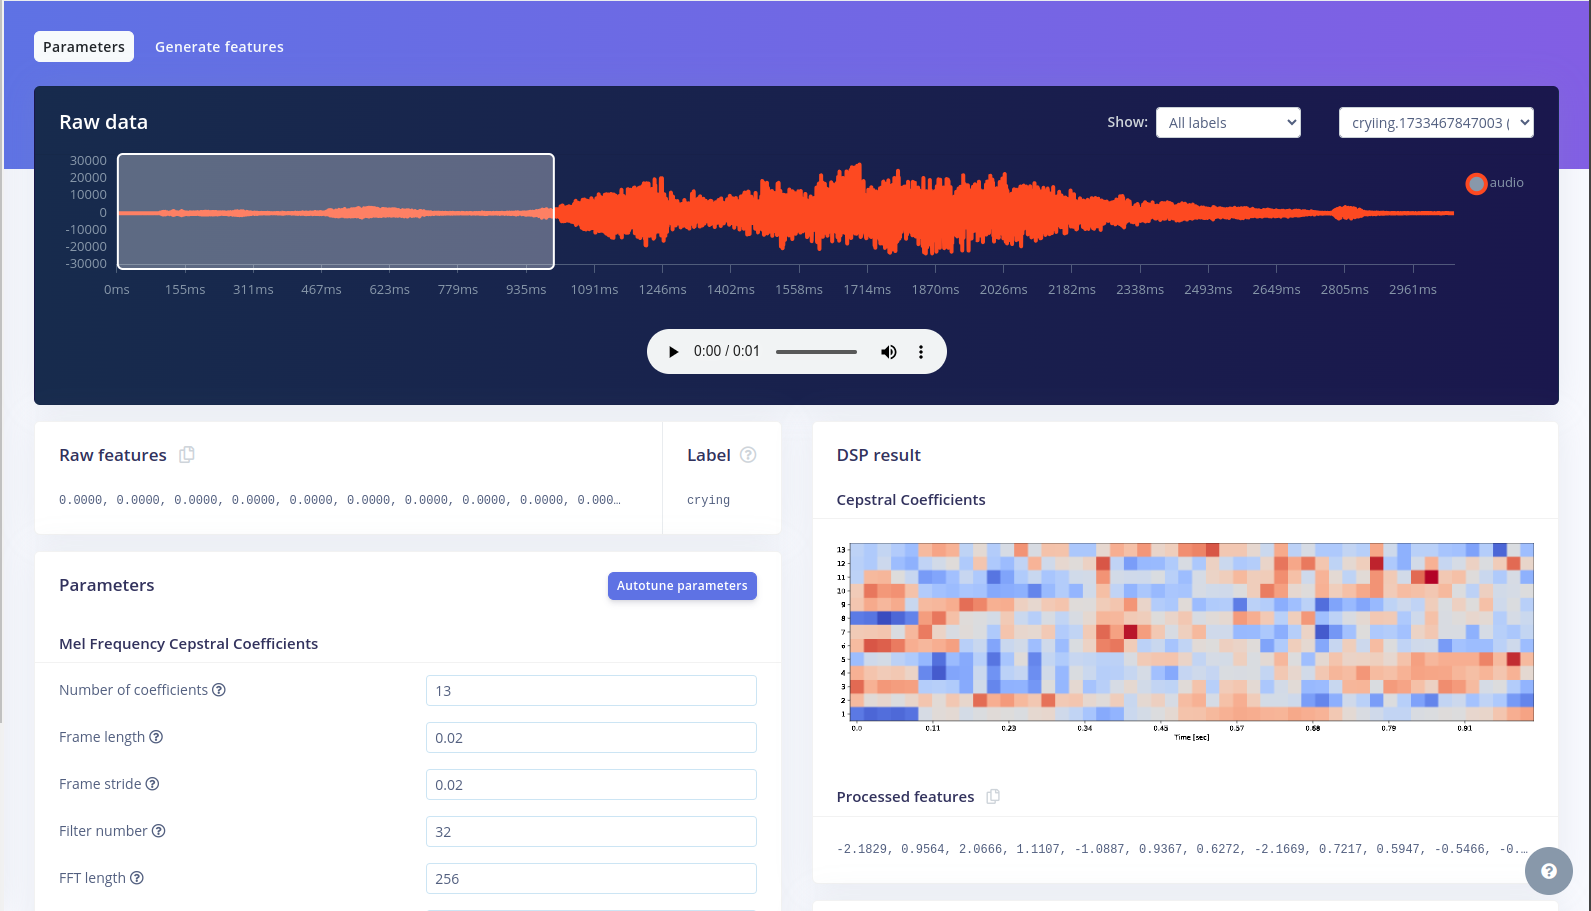
Fig 3: Configuration of MFCC Block
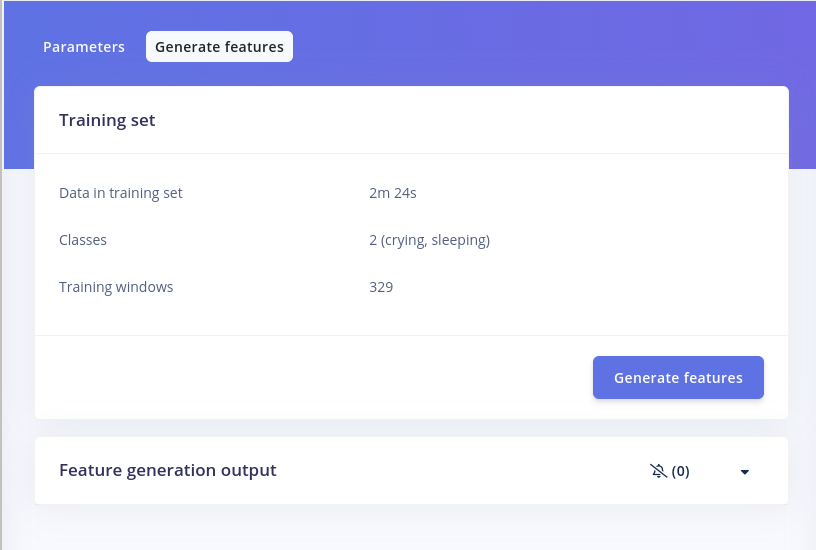
Fig 4: Generating Features for Our Data
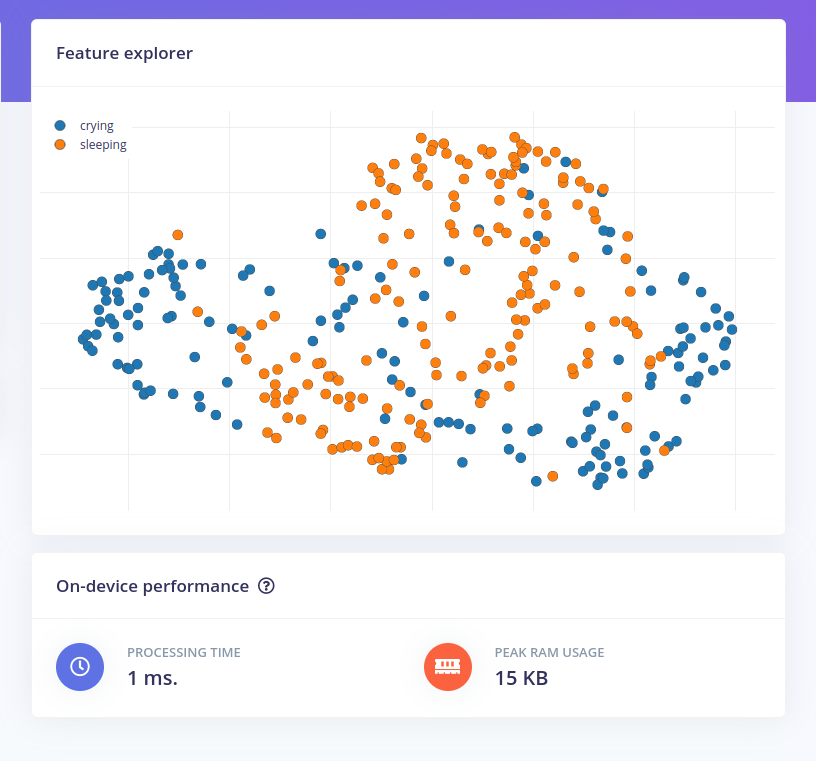
Fig 5: Feature Visualization of the Dataset
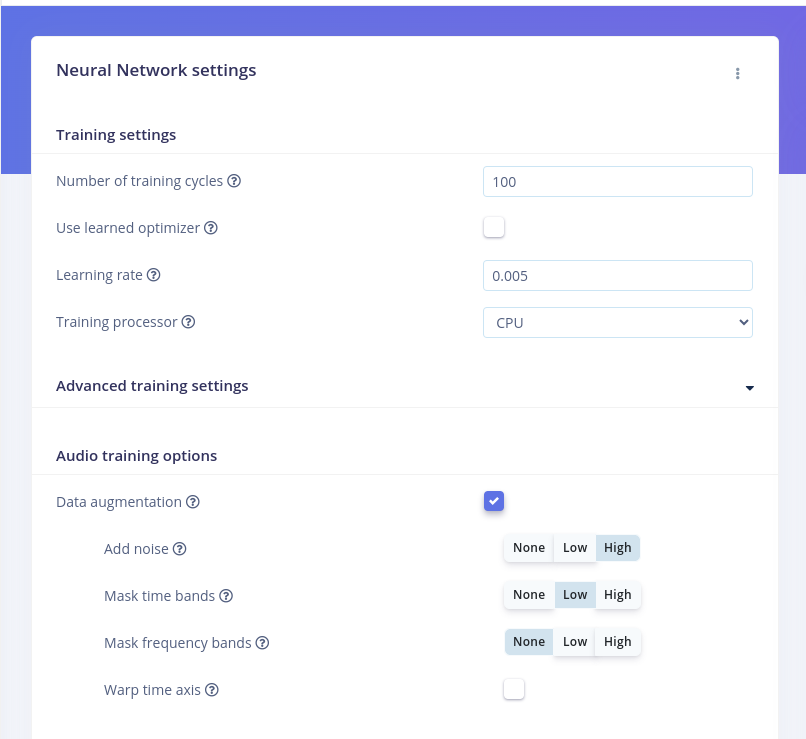
Fig 6: Enabling Data Augmentation
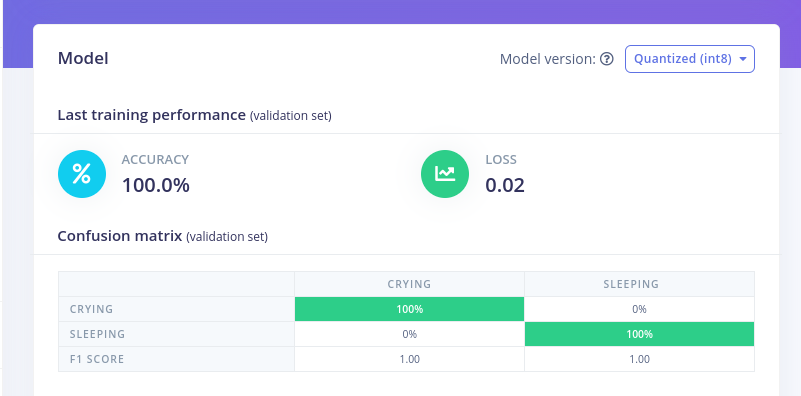
Fig 7: Accuracy, Loss, and Confusion Matrix for the Model
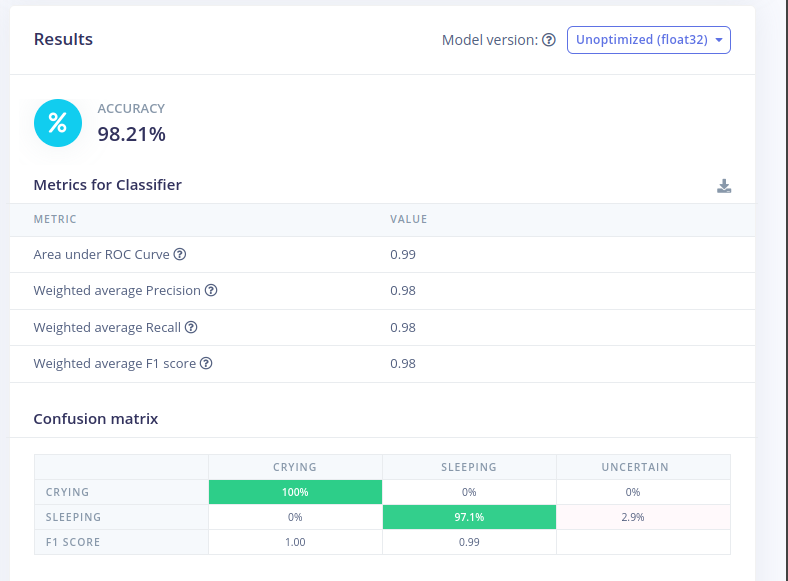
Fig 8: Metrics for Classifier and Confusion Matrix
Fig 9: Deploying to Device using Edge Impulse
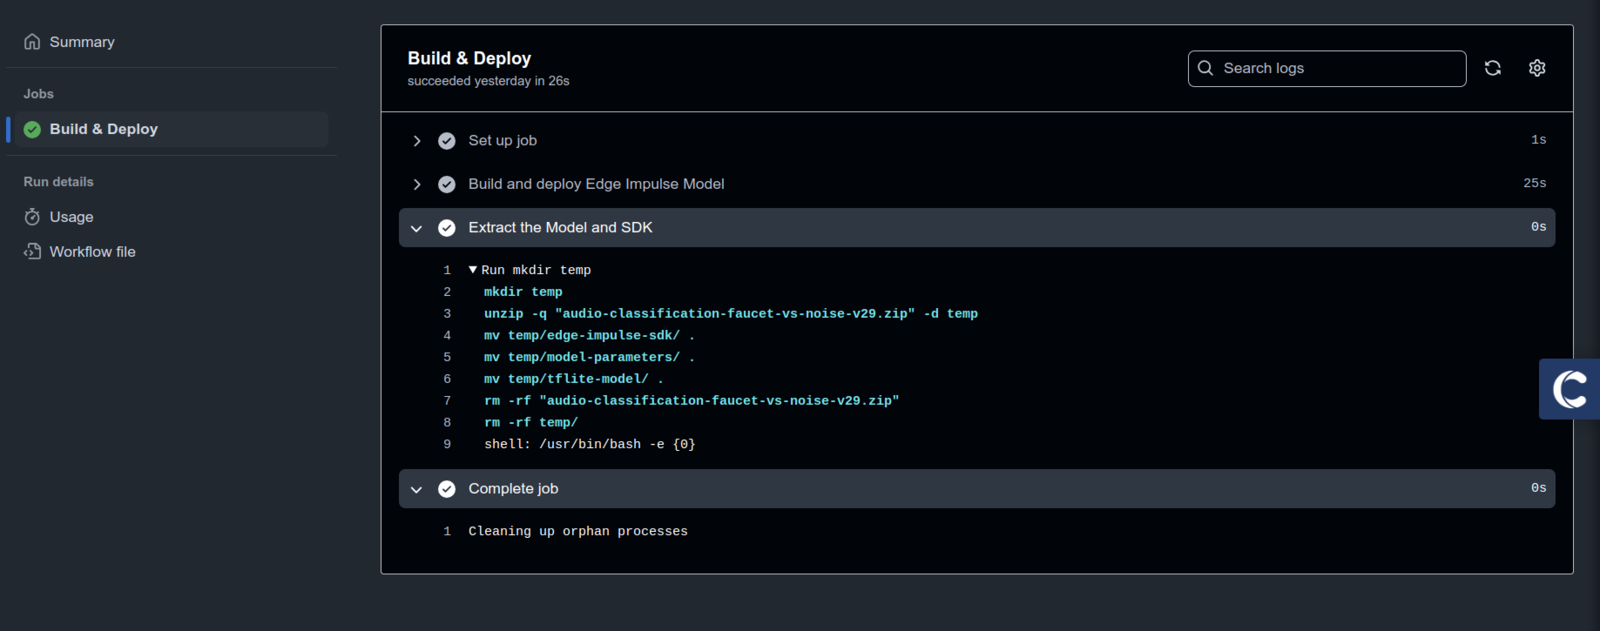
Fig 10: The Success Workflow Run From Actions