LogoLogo
HomeDocsAPI & SDKsProjectsForumStudio
  • Welcome
    • Featured Machine Learning Projects
      • Getting Started with the Edge Impulse Nvidia TAO Pipeline - Renesas EK-RA8D1
      • Smart City Traffic Analysis - NVIDIA TAO + Jetson Orin Nano
      • ROS 2 Pick and Place System - Arduino Braccio++ Robotic Arm and Luxonis OAK-D
      • Optimize a cloud-based Visual Anomaly Detection Model for Edge Deployments
      • Rooftop Ice Detection with Things Network Visualization - Nvidia Omniverse Replicator
      • Surgery Inventory Object Detection - Synthetic Data - Nvidia Omniverse Replicator
      • NVIDIA Omniverse - Synthetic Data Generation For Edge Impulse Projects
      • Community Guide – Using Edge Impulse with Nvidia DeepStream
      • Computer Vision Object Counting - Avnet RZBoard V2L
      • Gesture Appliances Control with Pose Detection - BrainChip AKD1000
      • Counting for Inspection and Quality Control - Nvidia Jetson Nano (TensorRT)
      • High-resolution, High-speed Object Counting - Nvidia Jetson Nano (TensorRT)
    • Prototype and Concept Projects
      • Renesas CK-RA6M5 Cloud Kit - Getting Started with Machine Learning
      • TI CC1352P Launchpad - Getting Started with Machine Learning
      • OpenMV Cam RT1062 - Getting Started with Machine Learning
      • Getting Started with Edge Impulse Experiments
  • Computer Vision Projects
    • Workplace Organizer - Nvidia Jetson Nano
    • Recyclable Materials Sorter - Nvidia Jetson Nano
    • Analog Meter Reading - Arduino Nicla Vision
    • Creating Synthetic Data with Nvidia Omniverse Replicator
    • SonicSight AR - Sound Classification with Feedback on an Augmented Reality Display
    • Traffic Monitoring - Brainchip Akida
    • Multi-camera Video Stream Inference - Brainchip Akida
    • Industrial Inspection Line - Brainchip Akida
    • X-Ray Classification and Analysis - Brainchip Akida
    • Inventory Stock Tracker - FOMO - BrainChip Akida
    • Container Counting - Arduino Nicla Vision
    • Smart Smoke Alarm - Arduino Nano 33
    • Shield Bot Autonomous Security Robot
    • Cyclist Blind Spot Detection - Himax WE-I Plus
    • IV Drip Fluid-Level Monitoring - Arduino Portenta H7
    • Worker PPE Safety Monitoring - Nvidia Jetson Nano
    • Delivered Package Detection - ESP-EYE
    • Bean Leaf Disease Classification - Sony Spresense
    • Oil Tank Measurement Using Computer Vision - Sony Spresense
    • Object Counting for Smart Industries - Raspberry Pi
    • Smart Cashier with FOMO - Raspberry Pi
    • PCB Defect Detection with Computer Vision - Raspberry Pi
    • Bicycle Counting - Sony Spresense
    • Counting Eggs with Computer Vision - OpenMV Cam H7
    • Elevator Passenger Counting - Arduino Nicla Vision
    • ESD Protection using Computer Vision - Seeed ReComputer
    • Solar Panel Defect Detection - Arduino Portenta H7
    • Label Defect Detection - Raspberry Pi
    • Dials and Knob Monitoring with Computer Vision - Raspberry Pi
    • Digital Character Recognition on Electric Meter System - OpenMV Cam H7
    • Corrosion Detection with Computer Vision - Seeed reTerminal
    • Inventory Management with Computer Vision - Raspberry Pi
    • Monitoring Retail Checkout Lines with Computer Vision - Renesas RZ/V2L
    • Counting Retail Inventory with Computer Vision - Renesas RZ/V2L
    • Pose Detection - Renesas RZ/V2L
    • Product Quality Inspection - Renesas RZ/V2L
    • Smart Grocery Cart Using Computer Vision - OpenMV Cam H7
    • Driver Drowsiness Detection With FOMO - Arduino Nicla Vision
    • Gastroscopic Image Processing - OpenMV Cam H7
    • Pharmaceutical Pill Quality Control and Defect Detection
    • Deter Shoplifting with Computer Vision - Texas Instruments TDA4VM
    • Smart Factory Prototype - Texas Instruments TDA4VM
    • Correct Posture Detection and Enforcement - Texas Instruments TDA4VM
    • Visual Anomaly Detection with FOMO-AD - Texas Instruments TDA4VM
    • Surface Crack Detection and Localization - Texas Instruments TDA4VM
    • Surface Crack Detection - Seeed reTerminal
    • Retail Image Classification - Nvidia Jetson Nano
    • SiLabs xG24 Plus Arducam - Sorting Objects with Computer Vision and Robotics - Part 1
    • SiLabs xG24 Plus Arducam - Sorting Objects with Computer Vision and Robotics - Part 2
    • Object Detection and Visualization - Seeed Grove Vision AI Module
    • Bike Rearview Radar - Raspberry Pi
    • Build a Self-Driving RC Vehicle - Arduino Portenta H7 and Computer Vision
    • "Bring Your Own Model" Image Classifier for Wound Identification
    • Acute Lymphoblastic Leukemia Classifier - Nvidia Jetson Nano
    • Hardhat Detection in Industrial Settings - Alif Ensemble E7
    • Motorcycle Helmet Identification and Traffic Light Control - Texas Instruments AM62A
    • Import a Pretrained Model with "Bring Your Own Model" - Texas Instruments AM62A
    • Product Inspection with Visual Anomaly Detection - FOMO-AD - Sony Spresense
    • Visual Anomaly Detection in Fabric using FOMO-AD - Raspberry Pi 5
    • Car Detection and Tracking System for Toll Plazas - Raspberry Pi AI Kit
    • Visual Anomaly Detection - Seeed Grove Vision AI Module V2
    • Object Counting with FOMO - OpenMV Cam RT1062
    • Visitor Heatmap with FOMO Object Detection - Jetson Orin Nano
    • Vehicle Security Camera - Arduino Portenta H7
  • Audio Projects
    • Occupancy Sensing - SiLabs xG24
    • Smart Appliance Control Using Voice Commands - Nordic Thingy:53
    • Glass Window Break Detection - Nordic Thingy:53
    • Illegal Logging Detection - Nordic Thingy:53
    • Illegal Logging Detection - Syntiant TinyML
    • Wearable Cough Sensor and Monitoring - Arduino Nano 33 BLE Sense
    • Collect Data for Keyword Spotting - Raspberry Pi Pico
    • Voice-Activated LED Strip - Raspberry Pi Pico
    • Snoring Detection on a Smart Phone
    • Gunshot Audio Classification - Arduino Nano 33 + Portenta H7
    • AI-Powered Patient Assistance - Arduino Nano 33 BLE Sense
    • Acoustic Pipe Leakage Detection - Arduino Portenta H7
    • Location Identification using Sound - Syntiant TinyML
    • Environmental Noise Classification - Nordic Thingy:53
    • Running Faucet Detection - Seeed XIAO Sense + Blues Cellular
    • Vandalism Detection via Audio Classification - Arduino Nano 33 BLE Sense
    • Predictive Maintenance Using Audio Classification - Arduino Nano 33 BLE Sense
    • Porting an Audio Project from the SiLabs Thunderboard Sense 2 to xG24
    • Environmental Audio Monitoring Wearable - Syntiant TinyML - Part 1
    • Environmental Audio Monitoring Wearable - Syntiant TinyML - Part 2
    • Keyword Spotting - Nordic Thingy:53
    • Detecting Worker Accidents with Audio Classification - Syntiant TinyML
    • Snoring Detection with Syntiant NDP120 Neural Decision Processor - Arduino Nicla Voice
    • Recognize Voice Commands with the Particle Photon 2
    • Voice Controlled Power Plug with Syntiant NDP120 (Nicla Voice)
    • Determining Compressor State with Audio Classification - Avnet RaSynBoard
    • Developing a Voice-Activated Product with Edge Impulse's Synthetic Data Pipeline
    • Enhancing Worker Safety using Synthetic Audio to Create a Dog Bark Classifier
  • Predictive Maintenance and Defect Detection Projects
    • Predictive Maintenance - Nordic Thingy:91
    • Brushless DC Motor Anomaly Detection
    • Industrial Compressor Predictive Maintenance - Nordic Thingy:53
    • Anticipate Power Outages with Machine Learning - Arduino Nano 33 BLE Sense
    • Faulty Lithium-Ion Cell Identification in Battery Packs - Seeed Wio Terminal
    • Weight Scale Predictive Maintenance - Arduino Nano 33 BLE Sense
    • Fluid Leak Detection With a Flowmeter and AI - Seeed Wio Terminal
    • Pipeline Clog Detection with a Flowmeter and AI - Seeed Wio Terminal
    • Refrigerator Predictive Maintenance - Arduino Nano 33 BLE Sense
    • Motor Pump Predictive Maintenance - Infineon PSoC 6 WiFi-BT Pioneer Kit + CN0549
    • BrickML Demo Project - 3D Printer Anomaly Detection
    • Condition Monitoring - Syntiant TinyML Board
    • Predictive Maintenance - Commercial Printer - Sony Spresense + CommonSense
    • Vibration Classification with BrainChip's Akida
    • AI-driven Audio and Thermal HVAC Monitoring - SeeedStudio XIAO ESP32
  • Accelerometer and Activity Projects
    • Arduino x K-Way - Outdoor Activity Tracker
    • Arduino x K-Way - Gesture Recognition for Hiking
    • Arduino x K-Way - TinyML Fall Detection
    • Posture Detection for Worker Safety - SiLabs Thunderboard Sense 2
    • Hand Gesture Recognition - OpenMV Cam H7
    • Arduin-Row, a TinyML Rowing Machine Coach - Arduino Nicla Sense ME
    • Fall Detection using a Transformer Model – Arduino Giga R1 WiFi
    • Bluetooth Fall Detection - Arduino Nano 33 BLE Sense
    • Monitor Packages During Transit with AI - Arduino Nano 33 BLE Sense
    • Smart Baby Swing - Arduino Portenta H7
    • Warehouse Shipment Monitoring - SiLabs Thunderboard Sense 2
    • Gesture Recognition - Bangle.js Smartwatch
    • Gesture Recognition for Patient Communication - SiLabs Thunderboard Sense 2
    • Hospital Bed Occupancy Detection - Arduino Nano 33 BLE Sense
    • Porting a Posture Detection Project from the SiLabs Thunderboard Sense 2 to xG24
    • Porting a Gesture Recognition Project from the SiLabs Thunderboard Sense 2 to xG24
    • Continuous Gait Monitor (Anomaly Detection) - Nordic Thingy:53
    • Classifying Exercise Activities on a BangleJS Smartwatch
  • Air Quality and Environmental Projects
    • Arduino x K-Way - Environmental Asthma Risk Assessment
    • Gas Detection in the Oil and Gas Industry - Nordic Thingy:91
    • Smart HVAC System with a Sony Spresense
    • Smart HVAC System with an Arduino Nicla Vision
    • Indoor CO2 Level Estimation - Arduino Portenta H7
    • Harmful Gases Detection - Arduino Nano 33 BLE Sense
    • Fire Detection Using Sensor Fusion and TinyML - Arduino Nano 33 BLE Sense
    • AI-Assisted Monitoring of Dairy Manufacturing Conditions - Seeed XIAO ESP32C3
    • AI-Assisted Air Quality Monitoring - DFRobot Firebeetle ESP32
    • Air Quality Monitoring with Sipeed Longan Nano - RISC-V Gigadevice
    • Methane Monitoring in Mines - Silabs xG24 Dev Kit
    • Smart Building Ventilation with Environmental Sensor Fusion
    • Sensor Data Fusion with Spresense and CommonSense
    • Water Pollution Detection - Arduino Nano ESP32 + Ultrasonic Scan
    • Fire Detection Using Sensor Fusion - Arduino Nano 33 BLE Sense
  • Novel Sensor Projects
    • 8x8 ToF Gesture Classification - Arduino RP2040 Connect
    • Food Irradiation Dose Detection - DFRobot Beetle ESP32C3
    • Applying EEG Data to Machine Learning, Part 1
    • Applying EEG Data to Machine Learning, Part 2
    • Applying EEG Data to Machine Learning, Part 3
    • Liquid Classification with TinyML - Seeed Wio Terminal + TDS Sensor
    • AI-Assisted Pipeline Diagnostics and Inspection with mmWave Radar
    • Soil Quality Detection Using AI and LoRaWAN - Seeed Sensecap A1101
    • Smart Diaper Prototype - Arduino Nicla Sense ME
    • DIY Smart Glove with Flex Sensors
    • EdgeML Energy Monitoring - Particle Photon 2
    • Wearable for Monitoring Worker Stress using HR/HRV DSP Block - Arduino Portenta
  • Software Integration Demos
    • Azure Machine Learning with Kubernetes Compute and Edge Impulse
    • ROS2 + Edge Impulse, Part 1: Pub/Sub Node in Python
    • ROS2 + Edge Impulse, Part 2: MicroROS
    • Using Hugging Face Datasets in Edge Impulse
    • Using Hugging Face Image Classification Datasets with Edge Impulse
    • Edge Impulse API Usage Sample Application - Jetson Nano Trainer
    • MLOps with Edge Impulse and Azure IoT Edge
    • A Federated Approach to Train and Deploy Machine Learning Models
    • DIY Model Weight Update for Continuous AI Deployments
    • Automate the CI/CD Pipeline of your Models with Edge Impulse and GitHub Actions
    • Deploying Edge Impulse Models on ZEDEDA Cloud Devices
Powered by GitBook
On this page
  • Introduction
  • Hardware and Software Setup
  • Hardware and Software Check
  • Project A. Fixed-Length Gestures
  • Data Collection
  • Impulse Design
  • Deployment
  • Project B. Continuous-Motion Gestures
  • Data Collection
  • Impulse Design
  • Deployment
  • Conclusion

Was this helpful?

Edit on GitHub
Export as PDF
  1. Novel Sensor Projects

8x8 ToF Gesture Classification - Arduino RP2040 Connect

A pair of projects that use an 8x8 Time of Flight sensor to identify and classify hand gestures.

PreviousNovel Sensor ProjectsNextFood Irradiation Dose Detection - DFRobot Beetle ESP32C3

Last updated 1 year ago

Was this helpful?

Created By: Simone Salerno

Public Project Link:

Introduction

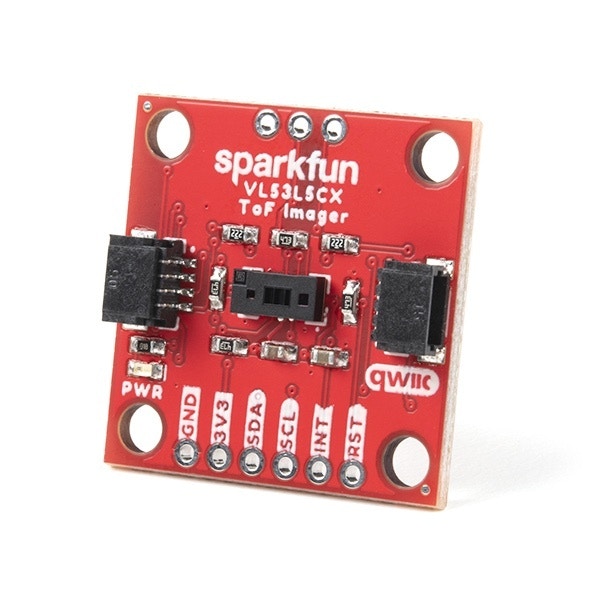
Human-Computer Interfaces come in many shapes and sizes in our everyday life. We're greatly accustomed to point-and-click devices, touchscreens and voice commands.

In recent years (and even more since the beginning of the pandemic), touchless interfaces have grown in popularity and have proven to work well in different use-cases:

Among the many technologies that enable touchless interfaces, one that is low power and suitable for the embedded industry is known as "Time of Flight".

The main objective of this project is to recognize user gestures from the sensor imaging data. The gestures can either be:

  1. of "fixed" length, like a swipe (Project A)

  2. or continuous motion, like waving your hand (Project B)

Both of these sub-projects share most of the code and application logic, so it's probably best not to not to skip any sections in this tutorial.

Hardware and Software Setup

To implement this project on your own, you will need:

  1. a board supported by Edge Impulse (I'm using an Arduino RP2040 Connect)

  2. a VL53L5CX 8x8 Time of Flight sensor

The VL53L5CX communicates via the I2C protocol; default address is 0x52, but you can change this via software if you have other devices (or if you want to use more than one at the same time!)

On the software side, you need to install a couple of Arduino libraries:

You can find both of them in the Arduino Library Manager.

Hardware and Software Check

Once you're done with the setup, let's check that everything is wired correctly and that you can access the VL53L5CX sensor from the EloquentArduino library.

Load this demo sketch on your board and confirm that you're not getting any error messages.

/**
 * Capture data from VL53L5CX 8x8 Time of Flight sensor
 */

#include  <Wire.h>
#include  <eloquent.h>
#include  <eloquent/modules/vl53l5cx/8x8.h>


void  setup() {
	Serial.begin(115200);
	Wire.begin();

	// (optional) turn on high speed communication
	Wire.setClock(1000000);
	vllcx.highFreq();

	// (optional) truncate readings lower than 30 (3 cm) 
	// and higher than 500 (50 cm)
	vllcx.truncateLowerThan(30);
	vllcx.truncateHigherThan(500);

	// (optional) rescale distances from millimeters to 0-1 range 
	// (aka normalize distances)
	vllcx.scaleToRange(0, 1);

	if (!vllcx.begin())
		eloquent::abort(Serial, "vl53l5cx not found");

	Serial.println("vl53l5cx is ok");
}

void  loop() {
	// await for new data
	if (!vllcx.hasNewData() || !vllcx.read())
		return;

	// print readings to Serial
	vllcx.printTo(Serial);
}

If you see the vl53l5cx not found message, first thing you should check is the wiring.

Otherwise, if everything is working fine, it's time to start creating our dataset for model training and testing.

We begin from Project A: Fixed Length Gestures.

Project A. Fixed-Length Gestures

Fixed-length gestures have a clear beginning and a clear ending. They start when our hand enters the field of view of the sensor and end when our hand exits the field of view.

This means that, first and foremost, we need to detect when something is in the field of view of the VL53L5CX and when not. The EloquentArduino library implements this basic check by testing each of the 64 distances that the sensor captures: if N (configurable) of them are below a given threshold, it returns true. Otherwise it returns false.

Examples of fixed-length gestures are swipe left/right, swipe up/down and tap (approximate to the sensor then leave).

Data Collection

To collect our dataset, we'll configure this kind of object detection and we'll print the sensor readings only when something is in the field of view.

#include  <Wire.h>
#include  <eloquent.h>
#include  <eloquent/modules/vl53l5cx/8x8.h>

void  setup() {
	Serial.begin(115200);
	Wire.begin();
	Wire.setClock(1000000);

	vllcx.highFreq();
	vllcx.truncateLowerThan(30);
	vllcx.truncateHigherThan(200);
	vllcx.scaleToRange(0, 1);

	// detect object when at least 10 values out of 64 are below 0.95
	vllcx.detectObjectsWhenNearerThan(0.95, 10);

	if (!vllcx.begin())
		eloquent::abort(Serial, "vl53l5cx not found");

	Serial.println("vl53l5cx is ok");
	Serial.println("Start collecting data...");
	delay(3000);
}

void  loop() {
	if (!vllcx.hasNewData() || !vllcx.read())
		// await data is ready
		return;
	
	if (!vllcx.hasObjectsNearby())
		// await object in field of view
		return;

	vllcx.printTo(Serial);
}

The vllcx.printTo(Serial) line prints the sensor data to the Serial port in CSV format, so we can use the edge-impulse-data-forwarder tool to load our data directly into the Edge Impulse Studio.

Load the sketch and start edge-impulse-data-forwarder: now choose a gesture that you can perform in about 0.5 - 1 seconds and start iterating in front of the sensor.

For optimal accuracy, you should repeat each gesture at least 50 times. It will be even better if different people perform it, so as to capture more intra-gesture variability. (For the sake of this project, though, 30 repetitions of each should suffice)

After you finish collecting data, you can move on the Impulse design.

Impulse Design

If we consider a single sensor array capture as an 8x8 matrix, we can (conceptually) assimilate it to a grayscale image.

Since each gesture is made of many frames, our features are, in fact, a time series of images.

As you may already know, when working with images Convolutional Neural Networks (CNN) on the raw pixel values, without much pre-processing (apart from data augmentation, if any), proved to work really well. Even though our "images" are pretty tiny, the 2D convolution approach will still suit our needs.

Keeping this in mind, we will design our Impulse as follows:

  • Window size of 700 ms with 300 ms overlap (change according to your requirements!)

  • Raw data processing block

  • CNN made of:

    • Input layer

    • reshape to 8 columns

    • 2D conv with 8 filters

    • Dropout at 0.2

    • 2D conv with 16 filters

    • Dropout at 0.2

    • Flatten

    • Output layer

You are free to edit the above topology as you see fit. On my own dataset, it achieved 99% accuracy on the validation set.

Deployment

After you have tweaked the model to fit your requirements, it is time to deploy it back to your board.

The Edge Impulse library contains a few skeleton sketches for a supported list of sensors, but the VL53L5CX is not one of them, so we need to write the acquisition and inference logic by ourselves.

The EloquentArduino library comes in handy once again here.

Other than a VL53L5CX wrapper, it also implements a circular buffer data structure that we can use to replicate the Edge Impulse windowing function without hassle.

Once we fill the buffer, we can feed it as input to the Edge Impulse network and get the predictions back.

#include  <Wire.h>
#include  <eloquent.h>
#include  <eloquent/modules/vl53l5cx/8x8.h>
#include  <eloquent/collections/circular_buffer.h>

// replace this with the library downloaded from Edge Impulse
#include  <tof_inferencing.h>
#include  <eloquent/tinyml/edgeimpulse.h>


Eloquent::Collections::FloatCircularBuffer<EI_CLASSIFIER_DSP_INPUT_FRAME_SIZE> buffer;
Eloquent::TinyML::EdgeImpulse::Impulse  impulse;

void  setup() {
	Serial.begin(115200);
	Wire.begin();
	Wire.setClock(1000000);

	vllcx.highFreq();
	vllcx.truncateLowerThan(30);
	vllcx.truncateHigherThan(100);
	vllcx.scaleToRange(0, 1);
	vllcx.detectObjectsWhenNearerThan(0.95, 10);

	if (!vllcx.begin())
		eloquent::abort(Serial, "vl53l5cx not found");

	Serial.println("vl53l5cx is ok");
	Serial.println("Start collecting data...");
}

void  loop() {
	if (!vllcx.hasNewData() || !vllcx.read())
		// await data is ready
		return;

	if (!vllcx.hasObjectsNearby()) {
		// No object detected, clear buffer to start 
		// data collection from scratch
		buffer.clear();
		return;
	}

	if (!buffer.push(vllcx.distances, 64))
		// Queue is not full yet
		return;

	// we are ready to classify the gesture
	uint8_t prediction = impulse.predict(buffer.values);

	Serial.print("Predicted label: ");
	Serial.print(impulse.getLabel());
	Serial.print(" with probability ");
	Serial.println(impulse.getProba());

	// debug class probabilities and timings
	//impulse.printTo(Serial);
}

Load the sketch to your board and start performing your gestures in front of the sensor.

You should see the predicted gesture's name and confidence score on the Serial monitor.

The FloatCircularBuffer is a data structure that holds an array where you can push new values. When the buffer is full, it shifts the old elements to make room for the new ones. This way, you an an "infinite" buffer that mimics the windowing scheme of Edge Impulse.

By allocating a buffer of EI_CLASSIFIER_DSP_INPUT_FRAME_SIZE items, you are always sure that the impulse model will get the exact number of features it needs to perform inference.

That completes the Fixed-Length Gesture Project. You can have a look at a video of this project, here:

[[@todo add demo video here]]

The next project follows the same guidelines of this one, but implements a few changes that allow you to perform gesture inference on continuous data, instead of discrete as this one.

One main change is the introduction of a voting mechanism to make more robust predictions in sequence.

Project B. Continuous-Motion Gestures

Continuous-motion gesture detection behaves a bit differently from the discrete case.

This time the model has to classify a stream of gestures, instead of one at a time. The application code we already discussed in the previous project will still remain valid, but we will introduce a few modifications:

  1. we change the object detection logic

  2. we add a voting mechanism to smooth the stream of predictions and make it less noisy

Data Collection

The data collection sketch is pretty much the same as earlier. The only modification is the object detection algorithm: instead of checking if N out of 64 values are below a given threshold, we check if the mean value of the readings is below a threshold.

The core idea here is that if no object is present, all the distances will map to 1 (max distance). If an object is in the field of view, some of the values will be lower, and so will be the mean value.

#include  <Wire.h>
#include  <eloquent.h>
#include  <eloquent/modules/vl53l5cx/8x8.h>

void  setup() {
	Serial.begin(115200);
	Wire.begin();
	Wire.setClock(1000000);

	vllcx.highFreq();
	vllcx.truncateLowerThan(30);
	vllcx.truncateHigherThan(200);
	vllcx.scaleToRange(0, 1);

	if (!vllcx.begin())
		eloquent::abort(Serial, "vl53l5cx not found");

	Serial.println("vl53l5cx is ok");
	Serial.println("Start collecting data...");
	delay(3000);
}

void  loop() {
	if (!vllcx.hasNewData() || !vllcx.read())
		// await data is ready
		return;
	
	if (vllcx.mean() > 0.98)
		// await object is in field of view
		return;

	vllcx.printTo(Serial);
}

As always, boot the edge-impulse-data-forwarder tool and collect your own dataset.

In this case I suggest you collect at least 60 seconds of continuous motion for each gesture to get good results.

Impulse Design

Nothing needs to be changed here.

Deployment

As stated earlier, the main difference here is that we want to reduce the amount of noise in the predictions.

By classifying a stream of data, it is very likely that once in a while the model will output wrong predictions due to the high variability of the input data.

For example, it would be pretty normal that while performing gesture A, you see these kind of predictions from the model: AAAA B AAA C AAAA.

Our main goal is to eliminate those spot, isolated predictions.

A naive but effective strategy is to use a running voting scheme: every time a new prediction is made, we check the last few ones. If the latest agrees with the others, we can be more confident that it is accurate (this only applies in this case of continuous motion!).

The EloquentArduino library has such a voting scheme.

#include  <Wire.h>
#include  <eloquent.h>
#include  <eloquent/modules/vl53l5cx/8x8.h>
#include  <eloquent/collections/circular_buffer.h>

// replace this with the library downloaded from Edge Impulse
#include  <tof_inferencing.h>
#include  <eloquent/tinyml/edgeimpulse.h>
#include  <eloquent/tinyml/voting/quorum.h>

Eloquent::Collections::FloatCircularBuffer<EI_CLASSIFIER_DSP_INPUT_FRAME_SIZE> buffer;
Eloquent::TinyML::EdgeImpulse::Impulse  impulse(false);
// replace 7 with the number of votes you want to use
// the higher the value, the less noisy the predictions will be
// setting a too high value, though, will make the classifier less responsive
Eloquent::TinyML::Voting::Quorum<7> voting;


void  setup() {
	Serial.begin(115200);
	Wire.begin();
	Wire.setClock(1000000);

	vllcx.highFreq();
	vllcx.truncateLowerThan(30);
	vllcx.truncateHigherThan(100);
	vllcx.scaleToRange(0, 1);

	// a prediction is considered not noisy if it equals 
	// at least half of the last N
	voting.atLeastMajority();

	if (!vllcx.begin())
		eloquent::abort(Serial, "vl53l5cx not found");

	Serial.println("vl53l5cx is ok");
	Serial.println("Start collecting data...");
}

void  loop() {
	if (!vllcx.hasNewData() || !vllcx.read() || vllcx.mean() > 0.98)
		// await data is ready or object is in the field of view
		return;

	if (!buffer.push(vllcx.distances, 64))
		// Queue is not full
		return;

	// we are ready to classify the gesture
	uint8_t prediction = impulse.predict(buffer.values);

	if (impulse.getProba() < 0.7)
		// (optional) discard weak predictions
		return;

	if (voting.vote(prediction) < 0)
		// prediction is noisy
		return;

	Serial.print("Predicted label: ");
	Serial.print(impulse.getLabel());
	Serial.print(" with probability ");
	Serial.println(impulse.getProba());

	// debug class probabilities and timings
	//impulse.printTo(Serial);
}

As you can see, we introduced only a few modifications from the previous project.

Tweaking the number of votes to use and the weak prediction threshold is a process of trial and error, but it can have a huge impact on the accuracy of your model if done correctly.

Load the sketch on your board and start performing your continuous motion gestures.

You will find that there is a lag when you switch gesture: this is because the buffer will contain mixed data from the old gesture and the new, so the model will be confused.

After the buffer fills with all data from the current gesture, the model will pick it up.

Conclusion

This project described two different kinds of gesture classification with Time of Flight technology:

  1. Fixed-length gesture

  2. Continuous-motion gesture

These same concepts will apply to other kind of classification problems, as well. For example, gesture classification from accelerometer and gyroscope data.

measures the distance of objects from the sensor, either via direct or indirect measurement. Arranged in a matrix scheme, these sensors can be used as a depth imaging system, making it possible to extract useful knowledge about the nearby environment.

There are many types available in the market, but this project employs a from ST Microelectronics, which is capable of producing an 8x8 distance array at 15 FPS. You can buy a development board for it with I2C connectivity for easy prototyping from many online resellers.

for direct access to the VL53L5CX sensor
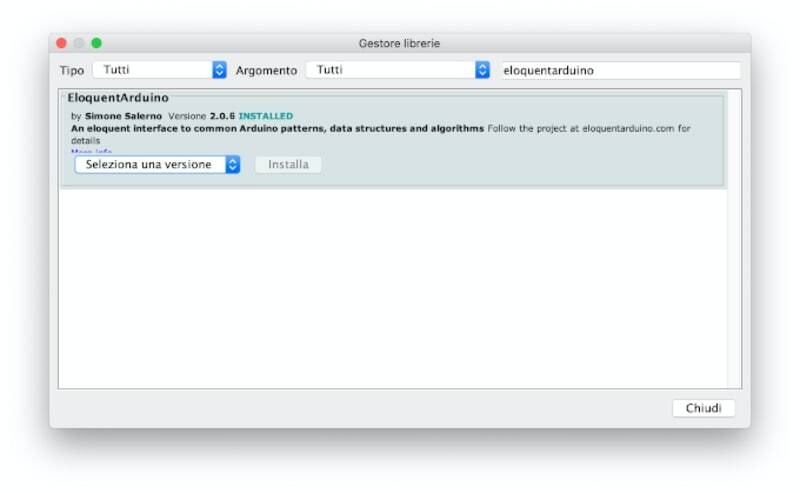
for high level VL53L5CX data manipulation

Elevator controls
Home thermostats
Automotive dashboard controls
Time of Flight
VL53L5CX chip
SparkFun_VL53L5CX_Arduino_Library
EloquentArduino library
https://studio.edgeimpulse.com/public/94474/latest
EloquentArduino library installation
Impulse design