Project Demo
GitHub Repo
https://github.com/baljo/Muse-EEGObjective
The objective of this tutorial is to show how you, by using a Muse EEG-device, can communicate with the outer world through a computer app. To be precise, this is without moving your limbs or touching the computer at all, instead you “just” need to concentrate! While this is a stand-alone tutorial, it is still recommended you check Part 1 for background information. If you try to replicate the steps - please do! - it is recommended to start with Part 1 as the learning curve is shallower there.Introduction

Prerequisites
To be able to reproduce examples found in this tutorial, you’ll need:- A Muse EEG-device, any model should work, although Muse-01 (from 2014) streams with 220 Hz instead of 256 Hz and might require a few code changes if you are collecting raw data. They cost around 250 USD/EUR and are manufactured by the Canadian company Interaxon Inc.
- iPhone or Android phone
- Mind Monitor app for iPhone or Android, one-time cost is ~15 USD/EUR
- A computer able to run Python + WiFi
- only PC/Win10 tested although Mac and Linux computers are expected to work
- Python 3.x
Data flow
The data flow for both Part 1 and Part 2 is: Your brain → Muse → Bluetooth → Phone/Mind Monitor → WiFi → ComputerPreparations
Python modules- Install Python-OSC, PYGame, PYGame-menu, and Tensorflow from a command prompt with:
pip install python-oscpip install pygamepip install pygame-menupip install tensorflow
- The code repository (MIT-license) might later include other EEG- and ML-related programs as well.
OSC Stream Target IP: here you should add your computer’s local IP-address, on Win10 you can runipconfigin a command prompt to find it, often starts with 192.168.x.xOSC Stream Port: set to5000
- You might need to allow the computer’s firewall to allow traffic through port 5000.
Step-by-step instructions
How does it work?
In short, you will here need to collect EEG-data - when trying to move your hands - from your Muse device, and train a ML model in Edge Impulse. The trained model will then be used in the Mind Reader app.Process flow
While this is not as complex as brain surgery (:smirk:), it does involve a few steps. The data gathering will also probably require more time than in Part 1, although you can or even should spread it out over a few days. The main steps are listed here and will later on be explained in detail.- Collect EEG-data for the events you want to classify, in this case
left,right, andbackgroundbrain “noise” - Create a project in Edge Impulse and upload the EEG-data to it
- Create, train, and test a ML-model in EI
- Download the trained Tensorflow ML-model to your computer
- Plug the model into the Mind Reader app and test it
- Rinse and repeat from 1 as you’ll probably need more data.
Installation
- Download the following Python programs into a folder you remember
- Collect OSC-data.py which you will use for collecting data
- Mind Reader.py which is the app itself
Detailed instructions
In this chapter you will get detailed instructions from start to end on how to collect data, train a model, and test it in practice. While not necessarily every click and detail is listed, you should with normal computer proficiency be able to follow and replicate the steps. 0. Connect Muse and start streaming- Connect the Muse EEG-device to your phone
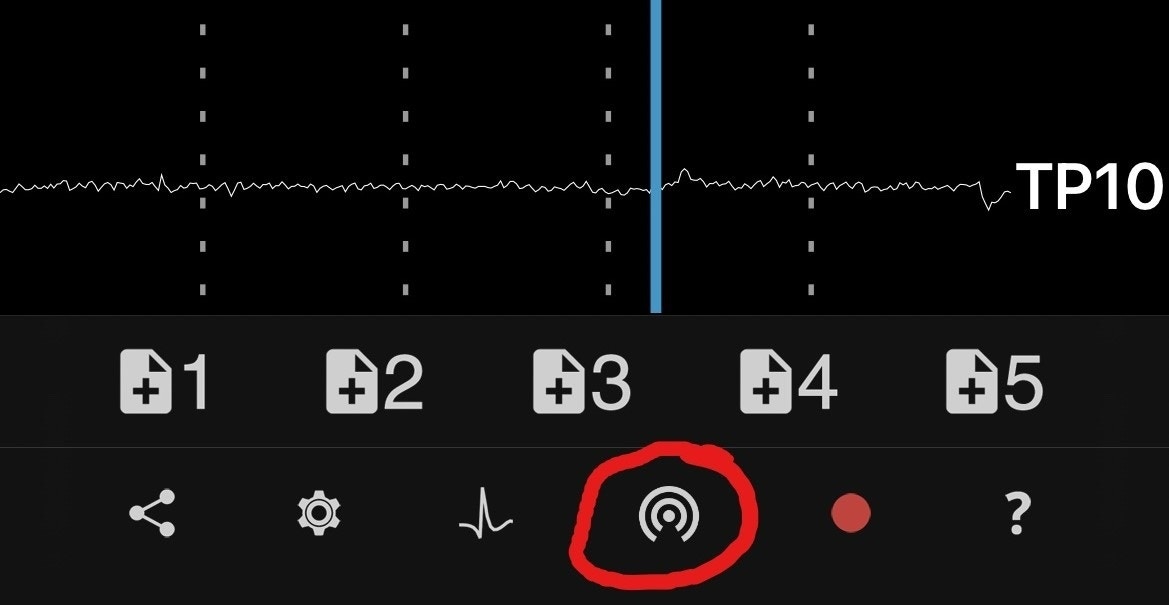
- Wait until the horseshoe in MindMonitor has disappeared and the graph lines for all sensors have calmed down like in the picture. You might need to wait a few minutes to acquire good signals, but it’s possible to speed up the process a bit by moistening the sensors with e.g. a wet finger.
- Especially in this tutorial it is very important to have excellent signals, so do not compromise on them!
- Start streaming from Mind Monitor by clicking on the button showed in the picture
- Edit
Collect OSC-data.pywith your favourite IDE or with any text editor-
This Python-program is common for both Tutorial 1 and 2 and possible upcoming tutorials as well, hence you need to comment out code not relevant for this tutorial. Look for the below code snippet in the code and comment (= insert # in front) of the rows related to the Blink Pong game, and remove # in front of the rows related to the Mind Reader app. You can rename the events to whatever you want, but keep in mind that when running inferencing the events will be in alphabetical order, where e.g.
Backgroundwill have index 0,Leftindex 1, andRightindex 2.
-
This Python-program is common for both Tutorial 1 and 2 and possible upcoming tutorials as well, hence you need to comment out code not relevant for this tutorial. Look for the below code snippet in the code and comment (= insert # in front) of the rows related to the Blink Pong game, and remove # in front of the rows related to the Mind Reader app. You can rename the events to whatever you want, but keep in mind that when running inferencing the events will be in alphabetical order, where e.g.
- Important: Drink some water, relax a bit, and find a quiet place as next steps will require concentration.
- Run
Collect OSC-data.pyfrom your favourite IDE or from the command prompt withpython "Collect OSC-data.py" - To start recording events, click on #1 in MindMonitor (see picture above).
- You will in the terminal window see
Backgroundfor 3 seconds. During this time you should just relax, try to avoid blinking or moving your limbs. - Next time you’ll see
Leftfor 3 seconds. During this time you should try or imagine you are moving your left hand. I’ve found it working better if I actually don’t move the hand, or even tension any muscles. It might help to put an object a few centimeters (= an inch or two) in front of your hand, simulating it is just out of reach, and you are unsuccessfully able to reach it. - Repeat above with the
Rightevent. - The program will record each event in a separate CSV-file.
- It is not easy to concentrate for a long time, especially for the recording done in this tutorial. Hence you are recommended to take a break every now and then. Based on experience, it is also good to remove the EEG-device when not recording and, if you have a longer break, turn it off to save battery. Additionally, next time you use your device it will inevitable be in a slightly different place on your head, and as a result you will probably get a more robust ML-model when recording data.
- Head over to Edge Impulse. If you are new to EI, you are recommended to take a look at their great Getting started instructions.
- Create a project
- Select
Data acquisitionand click the icon labeledUpload existing data - Use default settings
- Upload the files you’ve recorded in the previous step.
- Click
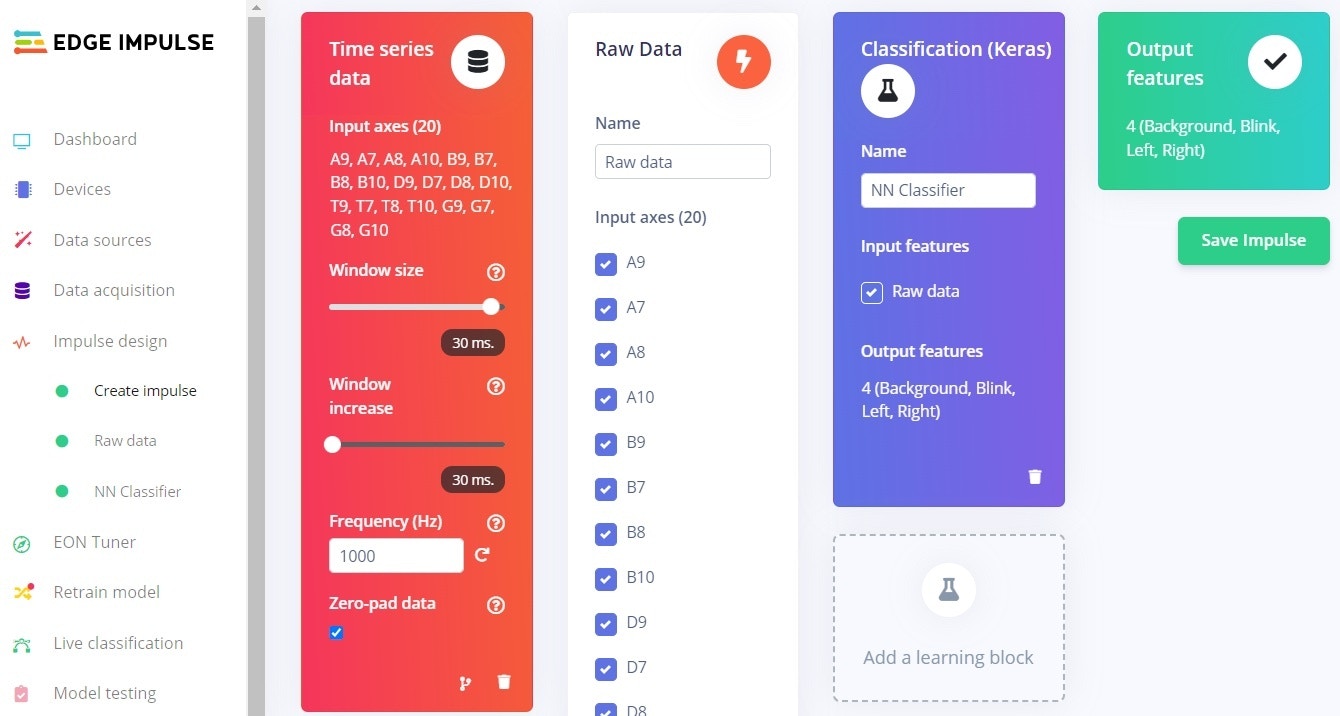
Create an impulseand fill in theTime series dataas shown in the picture. While the length of the samples are in fact 3000 ms (= 3 seconds), I’ve found that using 30 ms (as in 30 lines for each sample) works at least as good. - Add the processing block
Raw dataand let all axes be checkmarked. You can later try to find which axes do not impact much or at all for your model and uncheck them, but then you also need to modify the lineexpected_samples = 30inMind Reader.pyaccordingly. This is explained more detailed in the code itself. - Add the learning block
Classification (Keras), in this tutorial you will have 3 output features:Background,LeftandRight. In the screenshot below alsoBlinkis used, but you are recommended to add that one later if you need it. The Mind Reader app actually uses the blink detection feature included in the Muse-device as it removes a complexity layer.
- Click
Save impulseandRaw dataon the left hand menu- You will see a graph of one of the samples as well as the raw features.
- In this case you don’t need to change anything, so click
Save parameterswhich will take you to the second tab. - Click
Generate features- This processes the samples
- After a while you will see a graph in the Feature explorer. This gives you a view of how well your data can be clustered into different groups. In an ideal situation all similar samples would be clustered into same group with a clear distinction between groups. If that’s not the case, no worries at this point, the neural network algorithm will in many cases still be able to do a very good job!

- Click
NN Classifierfrom the left hand menu - Change the
Number of training cyclesto 200. This is another parameter to tweak, the higher this number is, the longer time the training will take, but also the better the network will perform, at least until it can’t improve anymore. - Click on
Start training- Within a few minutes, depending on the number of labels and data quantity you have, the training will finish.
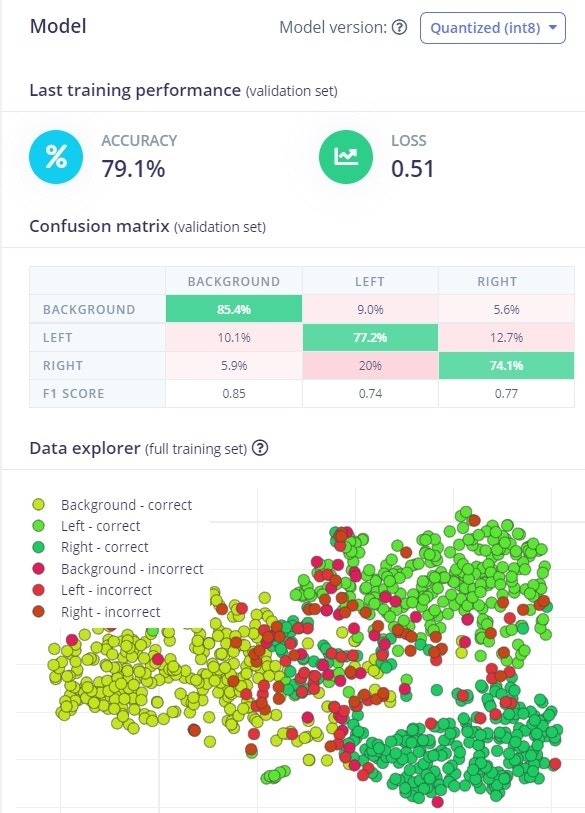
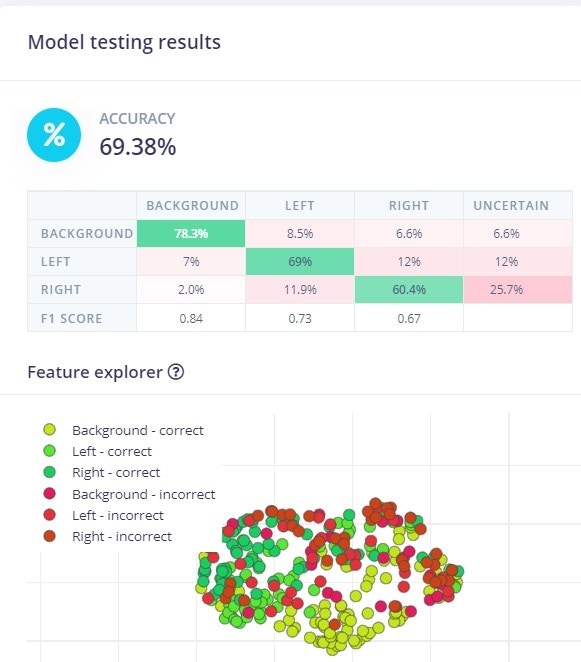
- The graph shows the training performance and accuracy. In the screenshot it is 79 % which for this type of data is quite good. More important though is the accuracy for unseen data and when the model is in real use. Unfortunately these tend to be worse than the training performance. But for a consumer based EEG-device having only 4 electrodes, an accuracy over 60 % in real use can be considered ok.
- Click on
Model testingin the menu - Click on
Classify all- This will run the test samples through the trained model
- After just a short while, depending on the amount of test samples and model complexity, you will get a performance report. Unless you have lots of data or a perfect model, the performance is seldom 100 %. Depending on your use case and what performance you require, you might need to go back a few steps by collecting more and different data, or by tweaking the parameters, to reach your minimum expectations.
- Click
Dashboardfrom the left hand menu - Scroll down to the section
Download block outputand click on the icon next toNN Classifier model TensorFlow Lite (float32) - Save the file to a folder of your choice (and which you remember as you’ll need it soon!)
- The file will get the name
ei-[ your project name ]-nn-classifier-tensorflow-lite-float32-model.lite. Although you can rename it if you really want to, why not save your brain cells to more important stuff :smirk:
- The file will get the name
- Copy or move the file from the previous step to the folder where you put your Python programs.
- Open
Mind Reader.pywith your favourite IDE or a text file editor like Notepad- Scroll to the first function
initiate_tfand locate the line withlite_file = "ei-.......lite" - Replace the file name after
=with your own file name, remember the double quotes" "and.liteat the end
- Scroll to the first function
- Run the app from your favourite IDE or from the command prompt with
python "Mind Reader.py" - App usage instructions are found in next chapter
- Please note the following:
- The model explained in this tutorial is based on 3 second long samples. This also means that the Mind Reader app will collect EEG-data for 3 seconds before trying to classify it and take actions.
- In the Github repo you’ll find
.lite-files trained by the author. You can try the app using one of them, without the need to record own EEG-data, but you should be very surprised if they give good results as brains tend to be different…
App usage instructions
- Watch this 2 min. video to get a quick grasp of the app
- Connect the Muse EEG-device to your phone
- Start streaming from Mind Monitor by clicking on the button showed in the picture
- The objective of the app is really to learn how to use your brain and EEG-data to initiate actions. As this is not a game, you are not awarded with points, although it would be a nice addition to the app. Feel free to implement it!
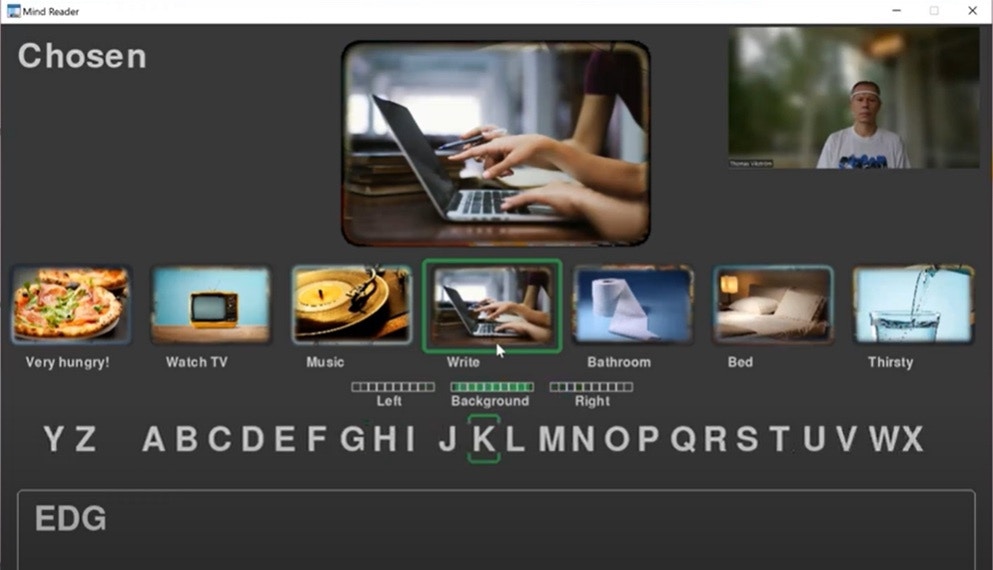
- As shown in the video - you did watch it, didn’t you? - you are presented with an image carousel which can roll left or right.
- Not necessarily all images are shown at the screen at the same time. If you want to add more images, ensure they have same aspect ratio as the example images, and name them
0nn Image Descriptionwherennis a running number between00and99, andImage Descriptionis the text you want to be visible under the image.
- Not necessarily all images are shown at the screen at the same time. If you want to add more images, ensure they have same aspect ratio as the example images, and name them
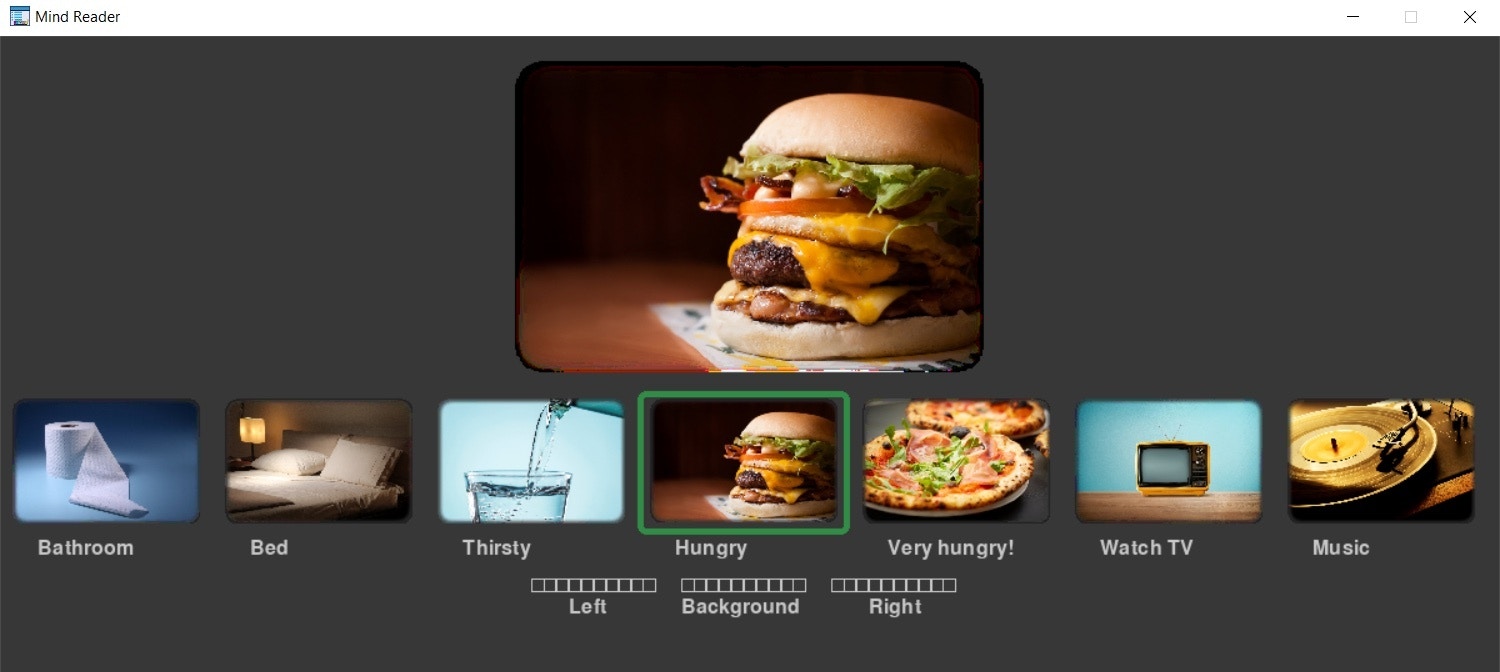
Mind Reader app
- Similarly as when you collected the training data, you are now expected to try moving your left or right hand to start rolling the carousel.
- The three “health” bars below the images are showing the classification result for each of the three events (Left, Background, Right). The logic is such that if the ML-model classified the EEG-data e.g.: Left=70%, Background=20%, and Right=10% →→ 7, 2, and 1 green bars would be shown in each of the fields.
- The health bars are also a biofeedback mechanism in the sense that they can help you to understand the connection between what you are doing (i.e. trying to move a hand), and the corresponding result from the ML-model. This is described in more detail in next chapter.
- Blink once when you want to choose an image. This also stops the carousel.
- When you select the laptop image, you are presented with a text editing field at the bottom of the screen. Similarly as when navigating between the images, you can now navigate left or right through the alphabet, and select a letter by blinking.
- As an ‘Easter Egg’ or very simple text prediction example, why not try writing
EDGEand see what happens :smiley:
- As an ‘Easter Egg’ or very simple text prediction example, why not try writing
- Double blink (= 2 blinks within 0.7 seconds) when you want to stop writing and go back to the carousel. You can also cheat by pressing
ESC
Recommendations for Further Improvements
The standard way to improve a ML-model is to gather more data, and then even some more. If that does not help enough, next steps might be to tweak the ML-model, or even change the approach drastically. EEG-data in both this and the previous tutorial is put into frequency bands by the API used by Mind-Monitor, but you might instead want to try with raw data measured in millivolts (mV), and use Edge Impulse’s spectral analysis learning block for further signal processing. The Python-program used in these tutorials is however not collecting raw data, but this simple Python program can be used as a starting point. If you don’t want to use the Mind-Monitor app at all, you can instead use Muse-LSL As earlier mentioned, by using an additional electrode, you might be able to get data closer to the sensorimotor cortex, and as a result increase the performance of the ML-model. Another idea - that I’m myself interested in trying - is to use the “health” bars as a biofeedback mechanism to record more data, and supposedly more correct data. In practice the Mind Reader app would itself be used for recording data, but recording is done only when a confidence threshold (e.g. 60 %) is reached. So, if e.g. the event was classified to beLeft with a confidence level of 65 %, the EEG-data recorded for the classification would be stored and imported into Edge Impulse to retrain the ML-model. By repeating this a few times, the resulting ML-model is expected to provide higher accuracy.