LogoLogo
HomeDocsAPI & SDKsProjectsForumStudio
  • Welcome
    • Featured Machine Learning Projects
      • Getting Started with the Edge Impulse Nvidia TAO Pipeline - Renesas EK-RA8D1
      • Smart City Traffic Analysis - NVIDIA TAO + Jetson Orin Nano
      • ROS 2 Pick and Place System - Arduino Braccio++ Robotic Arm and Luxonis OAK-D
      • Optimize a cloud-based Visual Anomaly Detection Model for Edge Deployments
      • Rooftop Ice Detection with Things Network Visualization - Nvidia Omniverse Replicator
      • Surgery Inventory Object Detection - Synthetic Data - Nvidia Omniverse Replicator
      • NVIDIA Omniverse - Synthetic Data Generation For Edge Impulse Projects
      • Community Guide – Using Edge Impulse with Nvidia DeepStream
      • Computer Vision Object Counting - Avnet RZBoard V2L
      • Gesture Appliances Control with Pose Detection - BrainChip AKD1000
      • Counting for Inspection and Quality Control - Nvidia Jetson Nano (TensorRT)
      • High-resolution, High-speed Object Counting - Nvidia Jetson Nano (TensorRT)
    • Prototype and Concept Projects
      • Renesas CK-RA6M5 Cloud Kit - Getting Started with Machine Learning
      • TI CC1352P Launchpad - Getting Started with Machine Learning
      • OpenMV Cam RT1062 - Getting Started with Machine Learning
      • Getting Started with Edge Impulse Experiments
  • Computer Vision Projects
    • Workplace Organizer - Nvidia Jetson Nano
    • Recyclable Materials Sorter - Nvidia Jetson Nano
    • Analog Meter Reading - Arduino Nicla Vision
    • Creating Synthetic Data with Nvidia Omniverse Replicator
    • SonicSight AR - Sound Classification with Feedback on an Augmented Reality Display
    • Traffic Monitoring - Brainchip Akida
    • Multi-camera Video Stream Inference - Brainchip Akida
    • Industrial Inspection Line - Brainchip Akida
    • X-Ray Classification and Analysis - Brainchip Akida
    • Inventory Stock Tracker - FOMO - BrainChip Akida
    • Container Counting - Arduino Nicla Vision
    • Smart Smoke Alarm - Arduino Nano 33
    • Shield Bot Autonomous Security Robot
    • Cyclist Blind Spot Detection - Himax WE-I Plus
    • IV Drip Fluid-Level Monitoring - Arduino Portenta H7
    • Worker PPE Safety Monitoring - Nvidia Jetson Nano
    • Delivered Package Detection - ESP-EYE
    • Bean Leaf Disease Classification - Sony Spresense
    • Oil Tank Measurement Using Computer Vision - Sony Spresense
    • Object Counting for Smart Industries - Raspberry Pi
    • Smart Cashier with FOMO - Raspberry Pi
    • PCB Defect Detection with Computer Vision - Raspberry Pi
    • Bicycle Counting - Sony Spresense
    • Counting Eggs with Computer Vision - OpenMV Cam H7
    • Elevator Passenger Counting - Arduino Nicla Vision
    • ESD Protection using Computer Vision - Seeed ReComputer
    • Solar Panel Defect Detection - Arduino Portenta H7
    • Label Defect Detection - Raspberry Pi
    • Dials and Knob Monitoring with Computer Vision - Raspberry Pi
    • Digital Character Recognition on Electric Meter System - OpenMV Cam H7
    • Corrosion Detection with Computer Vision - Seeed reTerminal
    • Inventory Management with Computer Vision - Raspberry Pi
    • Monitoring Retail Checkout Lines with Computer Vision - Renesas RZ/V2L
    • Counting Retail Inventory with Computer Vision - Renesas RZ/V2L
    • Pose Detection - Renesas RZ/V2L
    • Product Quality Inspection - Renesas RZ/V2L
    • Smart Grocery Cart Using Computer Vision - OpenMV Cam H7
    • Driver Drowsiness Detection With FOMO - Arduino Nicla Vision
    • Gastroscopic Image Processing - OpenMV Cam H7
    • Pharmaceutical Pill Quality Control and Defect Detection
    • Deter Shoplifting with Computer Vision - Texas Instruments TDA4VM
    • Smart Factory Prototype - Texas Instruments TDA4VM
    • Correct Posture Detection and Enforcement - Texas Instruments TDA4VM
    • Visual Anomaly Detection with FOMO-AD - Texas Instruments TDA4VM
    • Surface Crack Detection and Localization - Texas Instruments TDA4VM
    • Surface Crack Detection - Seeed reTerminal
    • Retail Image Classification - Nvidia Jetson Nano
    • SiLabs xG24 Plus Arducam - Sorting Objects with Computer Vision and Robotics - Part 1
    • SiLabs xG24 Plus Arducam - Sorting Objects with Computer Vision and Robotics - Part 2
    • Object Detection and Visualization - Seeed Grove Vision AI Module
    • Bike Rearview Radar - Raspberry Pi
    • Build a Self-Driving RC Vehicle - Arduino Portenta H7 and Computer Vision
    • "Bring Your Own Model" Image Classifier for Wound Identification
    • Acute Lymphoblastic Leukemia Classifier - Nvidia Jetson Nano
    • Hardhat Detection in Industrial Settings - Alif Ensemble E7
    • Motorcycle Helmet Identification and Traffic Light Control - Texas Instruments AM62A
    • Import a Pretrained Model with "Bring Your Own Model" - Texas Instruments AM62A
    • Product Inspection with Visual Anomaly Detection - FOMO-AD - Sony Spresense
    • Visual Anomaly Detection in Fabric using FOMO-AD - Raspberry Pi 5
    • Car Detection and Tracking System for Toll Plazas - Raspberry Pi AI Kit
    • Visual Anomaly Detection - Seeed Grove Vision AI Module V2
    • Object Counting with FOMO - OpenMV Cam RT1062
    • Visitor Heatmap with FOMO Object Detection - Jetson Orin Nano
    • Vehicle Security Camera - Arduino Portenta H7
  • Audio Projects
    • Occupancy Sensing - SiLabs xG24
    • Smart Appliance Control Using Voice Commands - Nordic Thingy:53
    • Glass Window Break Detection - Nordic Thingy:53
    • Illegal Logging Detection - Nordic Thingy:53
    • Illegal Logging Detection - Syntiant TinyML
    • Wearable Cough Sensor and Monitoring - Arduino Nano 33 BLE Sense
    • Collect Data for Keyword Spotting - Raspberry Pi Pico
    • Voice-Activated LED Strip - Raspberry Pi Pico
    • Snoring Detection on a Smart Phone
    • Gunshot Audio Classification - Arduino Nano 33 + Portenta H7
    • AI-Powered Patient Assistance - Arduino Nano 33 BLE Sense
    • Acoustic Pipe Leakage Detection - Arduino Portenta H7
    • Location Identification using Sound - Syntiant TinyML
    • Environmental Noise Classification - Nordic Thingy:53
    • Running Faucet Detection - Seeed XIAO Sense + Blues Cellular
    • Vandalism Detection via Audio Classification - Arduino Nano 33 BLE Sense
    • Predictive Maintenance Using Audio Classification - Arduino Nano 33 BLE Sense
    • Porting an Audio Project from the SiLabs Thunderboard Sense 2 to xG24
    • Environmental Audio Monitoring Wearable - Syntiant TinyML - Part 1
    • Environmental Audio Monitoring Wearable - Syntiant TinyML - Part 2
    • Keyword Spotting - Nordic Thingy:53
    • Detecting Worker Accidents with Audio Classification - Syntiant TinyML
    • Snoring Detection with Syntiant NDP120 Neural Decision Processor - Arduino Nicla Voice
    • Recognize Voice Commands with the Particle Photon 2
    • Voice Controlled Power Plug with Syntiant NDP120 (Nicla Voice)
    • Determining Compressor State with Audio Classification - Avnet RaSynBoard
    • Developing a Voice-Activated Product with Edge Impulse's Synthetic Data Pipeline
    • Enhancing Worker Safety using Synthetic Audio to Create a Dog Bark Classifier
  • Predictive Maintenance and Defect Detection Projects
    • Predictive Maintenance - Nordic Thingy:91
    • Brushless DC Motor Anomaly Detection
    • Industrial Compressor Predictive Maintenance - Nordic Thingy:53
    • Anticipate Power Outages with Machine Learning - Arduino Nano 33 BLE Sense
    • Faulty Lithium-Ion Cell Identification in Battery Packs - Seeed Wio Terminal
    • Weight Scale Predictive Maintenance - Arduino Nano 33 BLE Sense
    • Fluid Leak Detection With a Flowmeter and AI - Seeed Wio Terminal
    • Pipeline Clog Detection with a Flowmeter and AI - Seeed Wio Terminal
    • Refrigerator Predictive Maintenance - Arduino Nano 33 BLE Sense
    • Motor Pump Predictive Maintenance - Infineon PSoC 6 WiFi-BT Pioneer Kit + CN0549
    • BrickML Demo Project - 3D Printer Anomaly Detection
    • Condition Monitoring - Syntiant TinyML Board
    • Predictive Maintenance - Commercial Printer - Sony Spresense + CommonSense
    • Vibration Classification with BrainChip's Akida
    • AI-driven Audio and Thermal HVAC Monitoring - SeeedStudio XIAO ESP32
  • Accelerometer and Activity Projects
    • Arduino x K-Way - Outdoor Activity Tracker
    • Arduino x K-Way - Gesture Recognition for Hiking
    • Arduino x K-Way - TinyML Fall Detection
    • Posture Detection for Worker Safety - SiLabs Thunderboard Sense 2
    • Hand Gesture Recognition - OpenMV Cam H7
    • Arduin-Row, a TinyML Rowing Machine Coach - Arduino Nicla Sense ME
    • Fall Detection using a Transformer Model – Arduino Giga R1 WiFi
    • Bluetooth Fall Detection - Arduino Nano 33 BLE Sense
    • Monitor Packages During Transit with AI - Arduino Nano 33 BLE Sense
    • Smart Baby Swing - Arduino Portenta H7
    • Warehouse Shipment Monitoring - SiLabs Thunderboard Sense 2
    • Gesture Recognition - Bangle.js Smartwatch
    • Gesture Recognition for Patient Communication - SiLabs Thunderboard Sense 2
    • Hospital Bed Occupancy Detection - Arduino Nano 33 BLE Sense
    • Porting a Posture Detection Project from the SiLabs Thunderboard Sense 2 to xG24
    • Porting a Gesture Recognition Project from the SiLabs Thunderboard Sense 2 to xG24
    • Continuous Gait Monitor (Anomaly Detection) - Nordic Thingy:53
    • Classifying Exercise Activities on a BangleJS Smartwatch
  • Air Quality and Environmental Projects
    • Arduino x K-Way - Environmental Asthma Risk Assessment
    • Gas Detection in the Oil and Gas Industry - Nordic Thingy:91
    • Smart HVAC System with a Sony Spresense
    • Smart HVAC System with an Arduino Nicla Vision
    • Indoor CO2 Level Estimation - Arduino Portenta H7
    • Harmful Gases Detection - Arduino Nano 33 BLE Sense
    • Fire Detection Using Sensor Fusion and TinyML - Arduino Nano 33 BLE Sense
    • AI-Assisted Monitoring of Dairy Manufacturing Conditions - Seeed XIAO ESP32C3
    • AI-Assisted Air Quality Monitoring - DFRobot Firebeetle ESP32
    • Air Quality Monitoring with Sipeed Longan Nano - RISC-V Gigadevice
    • Methane Monitoring in Mines - Silabs xG24 Dev Kit
    • Smart Building Ventilation with Environmental Sensor Fusion
    • Sensor Data Fusion with Spresense and CommonSense
    • Water Pollution Detection - Arduino Nano ESP32 + Ultrasonic Scan
    • Fire Detection Using Sensor Fusion - Arduino Nano 33 BLE Sense
  • Novel Sensor Projects
    • 8x8 ToF Gesture Classification - Arduino RP2040 Connect
    • Food Irradiation Dose Detection - DFRobot Beetle ESP32C3
    • Applying EEG Data to Machine Learning, Part 1
    • Applying EEG Data to Machine Learning, Part 2
    • Applying EEG Data to Machine Learning, Part 3
    • Liquid Classification with TinyML - Seeed Wio Terminal + TDS Sensor
    • AI-Assisted Pipeline Diagnostics and Inspection with mmWave Radar
    • Soil Quality Detection Using AI and LoRaWAN - Seeed Sensecap A1101
    • Smart Diaper Prototype - Arduino Nicla Sense ME
    • DIY Smart Glove with Flex Sensors
    • EdgeML Energy Monitoring - Particle Photon 2
    • Wearable for Monitoring Worker Stress using HR/HRV DSP Block - Arduino Portenta
  • Software Integration Demos
    • Azure Machine Learning with Kubernetes Compute and Edge Impulse
    • ROS2 + Edge Impulse, Part 1: Pub/Sub Node in Python
    • ROS2 + Edge Impulse, Part 2: MicroROS
    • Using Hugging Face Datasets in Edge Impulse
    • Using Hugging Face Image Classification Datasets with Edge Impulse
    • Edge Impulse API Usage Sample Application - Jetson Nano Trainer
    • MLOps with Edge Impulse and Azure IoT Edge
    • A Federated Approach to Train and Deploy Machine Learning Models
    • DIY Model Weight Update for Continuous AI Deployments
    • Automate the CI/CD Pipeline of your Models with Edge Impulse and GitHub Actions
    • Deploying Edge Impulse Models on ZEDEDA Cloud Devices
Powered by GitBook
On this page
  • Introduction
  • A Solution
  • Hardware
  • How It Works
  • Data Collection
  • Model Preparation
  • Deployment
  • Conclusion
  • References

Was this helpful?

Edit on GitHub
Export as PDF
  1. Predictive Maintenance and Defect Detection Projects

Condition Monitoring - Syntiant TinyML Board

Use machine learning classification to monitor the operation of a DC motor, and identify fault conditions that indicate a need for maintenance.

PreviousBrickML Demo Project - 3D Printer Anomaly DetectionNextPredictive Maintenance - Commercial Printer - Sony Spresense + CommonSense

Last updated 4 months ago

Was this helpful?

Created By: Swapnil Verma

Public Project Link:

Introduction

Nearly all machines require routine maintenance to maintain proper functionality. If not provided, they can break down abruptly. Sometimes, even between routine maintenance being performed, parts of a machine may fail. A failure of a mission-critical or high availability system can be disastrous for an organisation. To avoid such a scenario, a condition monitoring system is recommended for predictive maintenance, to help detect a potential failure in advance to possible reduce downtime.

Most condition monitoring systems have an architecture similar to the below image:

This generally works, but it has few potential problems:

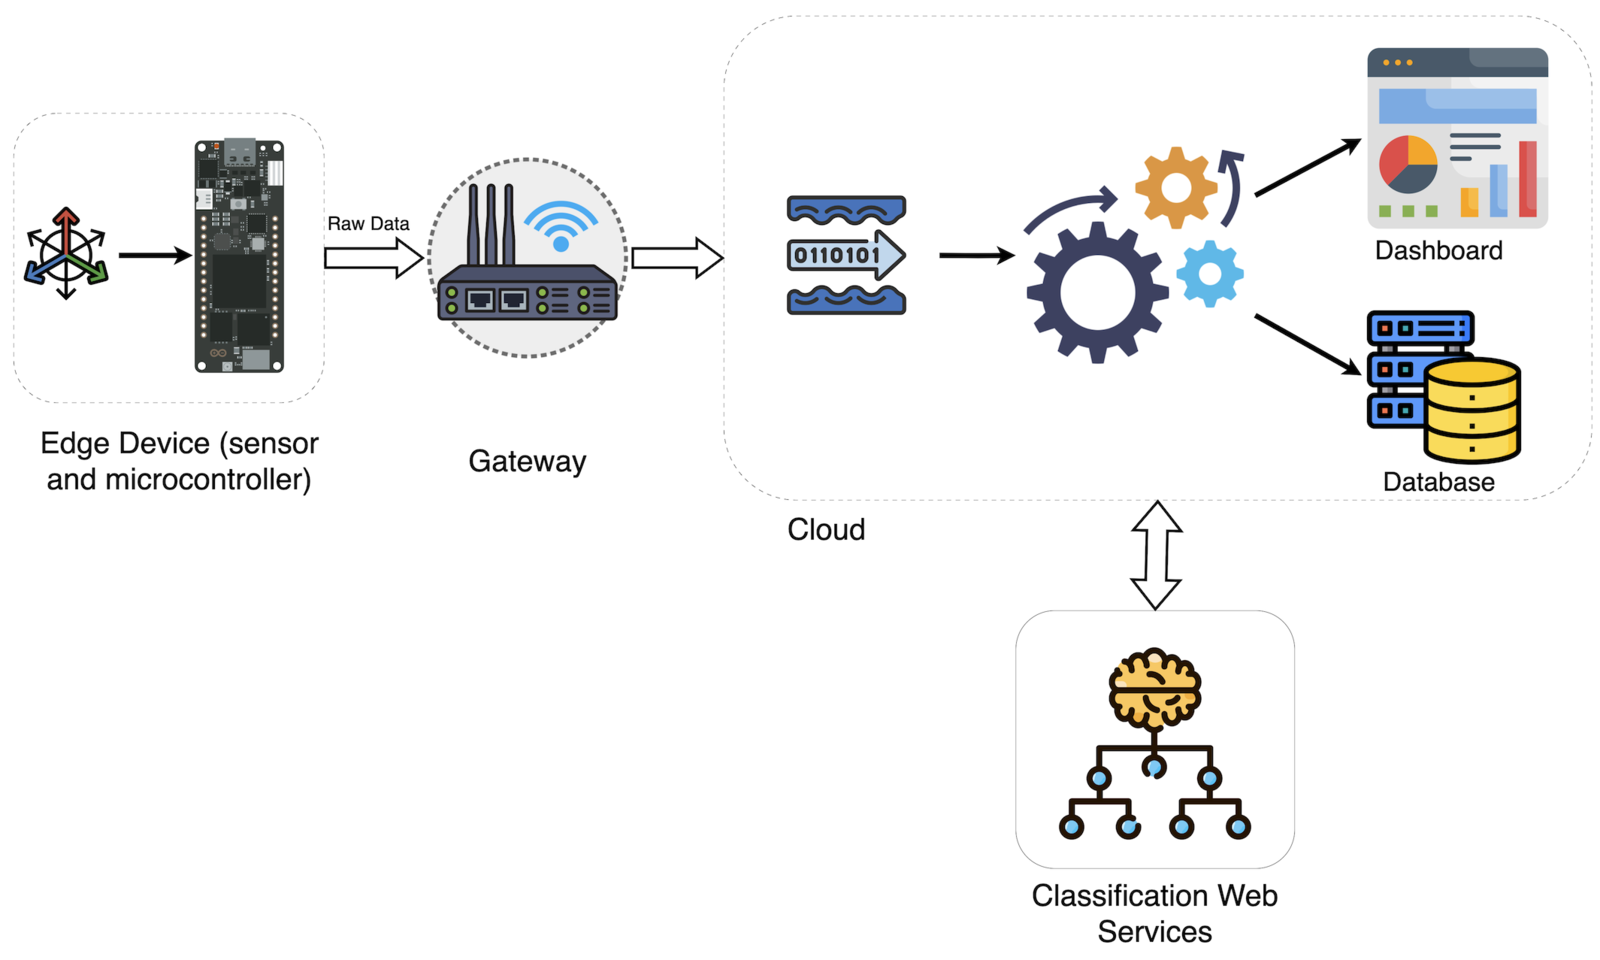
  • Cloud services used in condition monitoring or predictive maintenance systems cost a lot of money in licensing and subscription fees.

  • Confidential data which an organisation may want to process and store on-site may also require an on-premise server to run the cloud services and software, which again adds to the cost of the system.

  • Microcontrollers are cheap and have a lot of computing power. They are not always used to their full potential. We are mostly using them for data capture.

A Solution

A solution I am proposing focuses on the machine learning part of the conventional condition monitoring architecture. Instead of using cloud services for inferencing of the classification algorithm, we can use a microcontroller and TinyML.

Other parts of the architecture (e.g. database, dashboard, data ingestion model etc.) can also be replaced with in-house developed solutions, if desired.
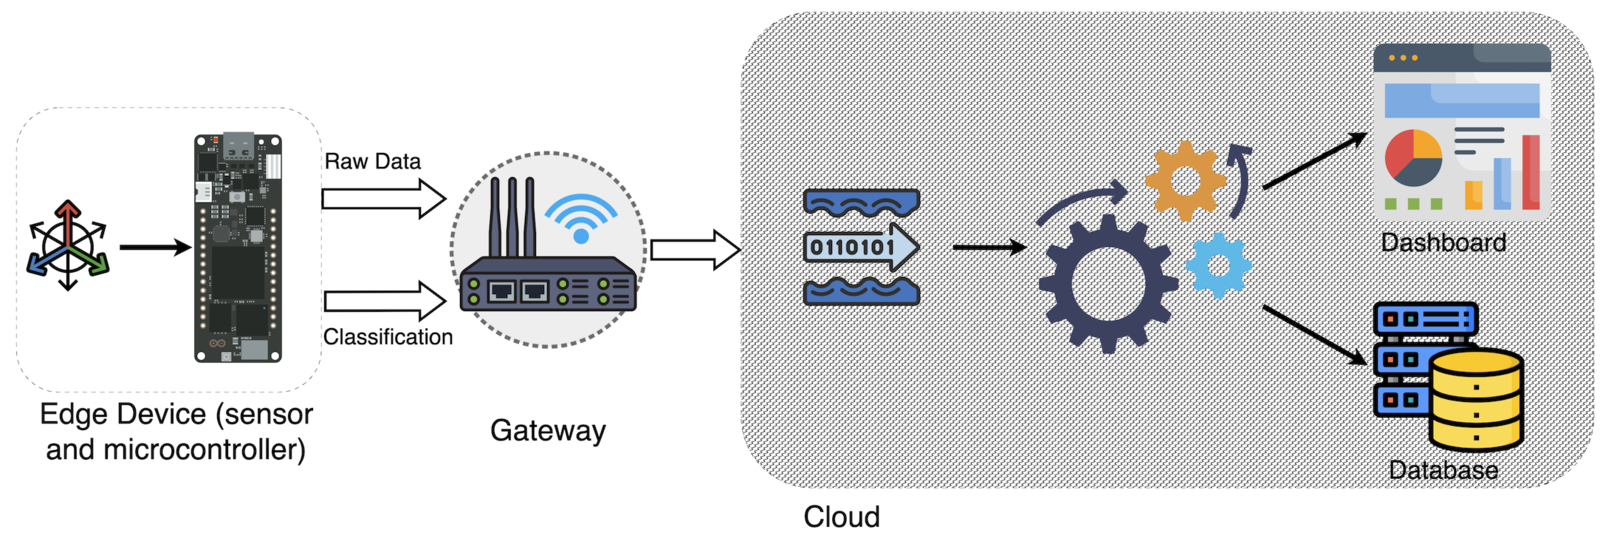
Hardware

To demonstrate my solution, I prepared a test setup which requires the following components:

  • Syntiant TinyML board

  • A microSD card - Syntiant TinyML board requires this for IMU data collection.

  • A DC motor

  • A motor controller - For this application I have used the below items to prepare a motor controller circuit:

    • Arduino MKR WiFi 1010

    • MKR motor shield

    • A battery

  • Different loads to simulate normal and failure operations

  • A 3D printed workbench

I have used this hardware setup for data collection and testing the neural network model.

Note: Look close at the picture of the fan blades, as there are some that are intentionally missing blades in order to trigger imbalances and rotational movements that are abnormal from a "regular" fan, to simulate fault conditions.

How It Works

To build this prototype, the following steps are required:

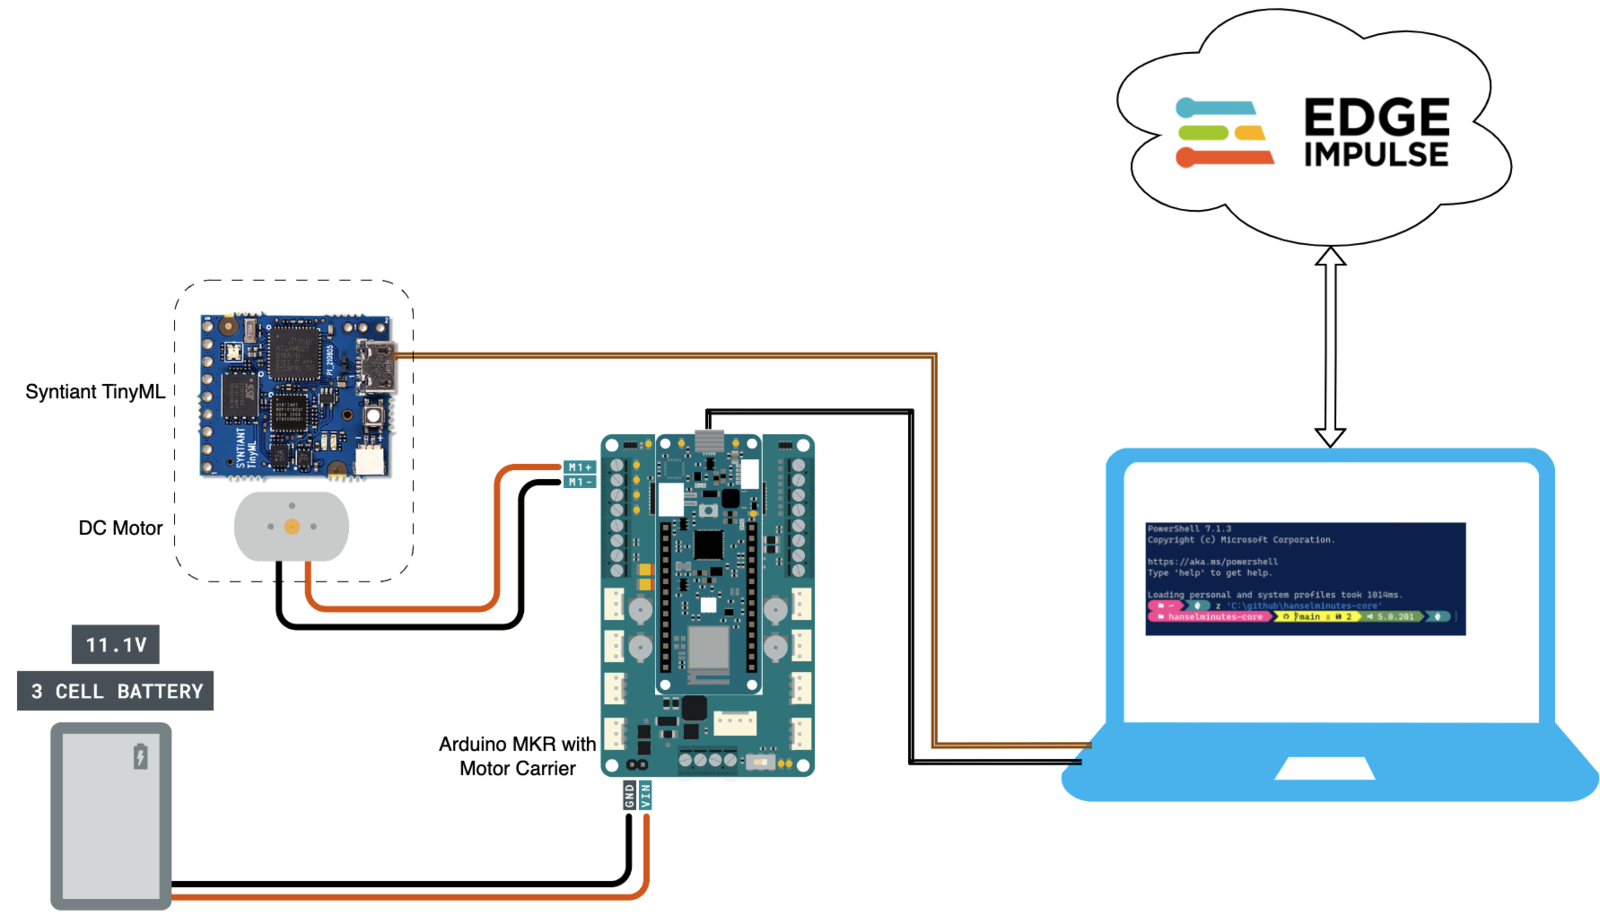
  1. The computer in this setup performs multiple jobs. It is a UI for controlling the DC motor by a serial connection to the Arduino, and it is also a gateway for connecting to the Syntiant TinyML board with the Edge Impulse Studio.

  1. A user can start or stop the DC motor via the Arduino serial connection, which then generates vibrations as it turns on and off. The pitch and amplitude of the vibration varies based on the load attached to the motor shaft.

  2. The Syntiant TinyML board is physically attached to the motor mount. The board has a 6-axis motion sensor which picks up the vibrations generated by the motor and the load.

  3. The vibration data is collected and sent to the Edge Impulse Studio for training and testing.

Data Collection

Edge impulse has simplified the machine learning pipeline extensively for TinyML. It has made data collection, training a model using collected data, testing the model, and deployment of that model back to the embedded board trivial.

Note: Please make sure to download and flash the IMU firmware and NOT the Audio firmware.

  • After flashing the firmware run the below command:

edge-impulse-daemon

This will start a wizard, and ask you to login and choose an Edge Impulse project. This is a good time to prepare a project in Edge Impulse if you have not already done so.

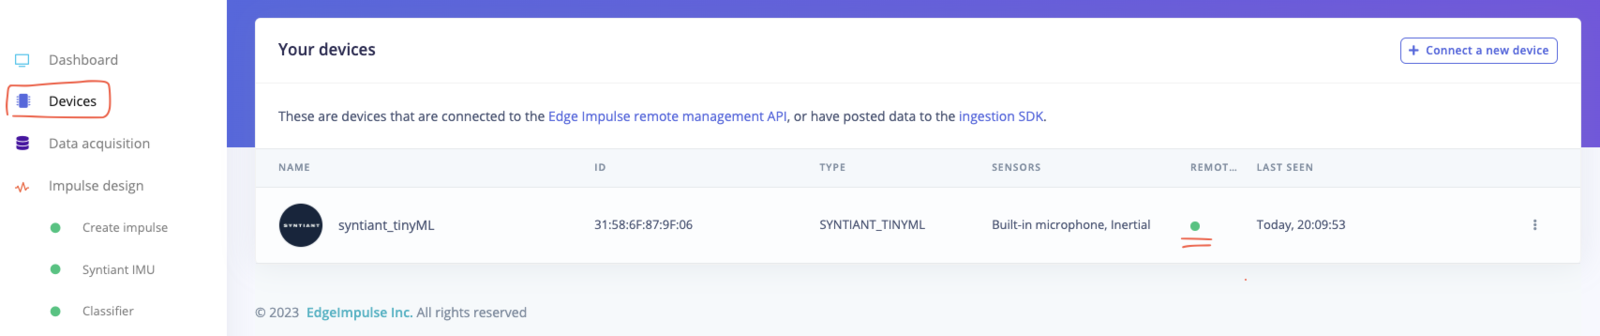
  • The above step should establish a communication between the Syntiant TinyML board and your Edge Impulse project. To verify that, navigate to the Devices tab of the project. You should see the Syntiant TinyML board listed, and the Remote management column should have a green dot in it.

After establishing a connection between the Syntiant TinyML board and Edge Impulse Studio, we will now setup the Arduino and rest of the test bench for simulating a machine status.

  • Download the Arduino code from the below GitHub repository and flash it to the MKR WiFi 1010:

The Arduino takes the following commands via its serial connection: - MOTORON: Turn the motor ON - MOTOROFF: Turn the motor OFF - MOTORSPEED <-100 to 100>: Change motor speed and direction based on the number provided.

  • After connecting a load to the motor, turn on the motor by sending MOTORON via serial to the Arduino.

  • Now navigate to the Data acquisition tab in the Edge Impulse Studio. Here you will find the device we connected in the previous step, and the sensor list. Select the Accelerometer sensor and use the default parameters.

  • Add a Label name based on the load connected. If it is a balanced load then use Normal_Motion as a label, and for unbalanced loads (fans that are missing blades), use Error as a label. Labels are classes of your data.

  • Click Start Sampling, which will start the sample collection process. Once the sample is collected, it will be automatically uploaded to the Studio.

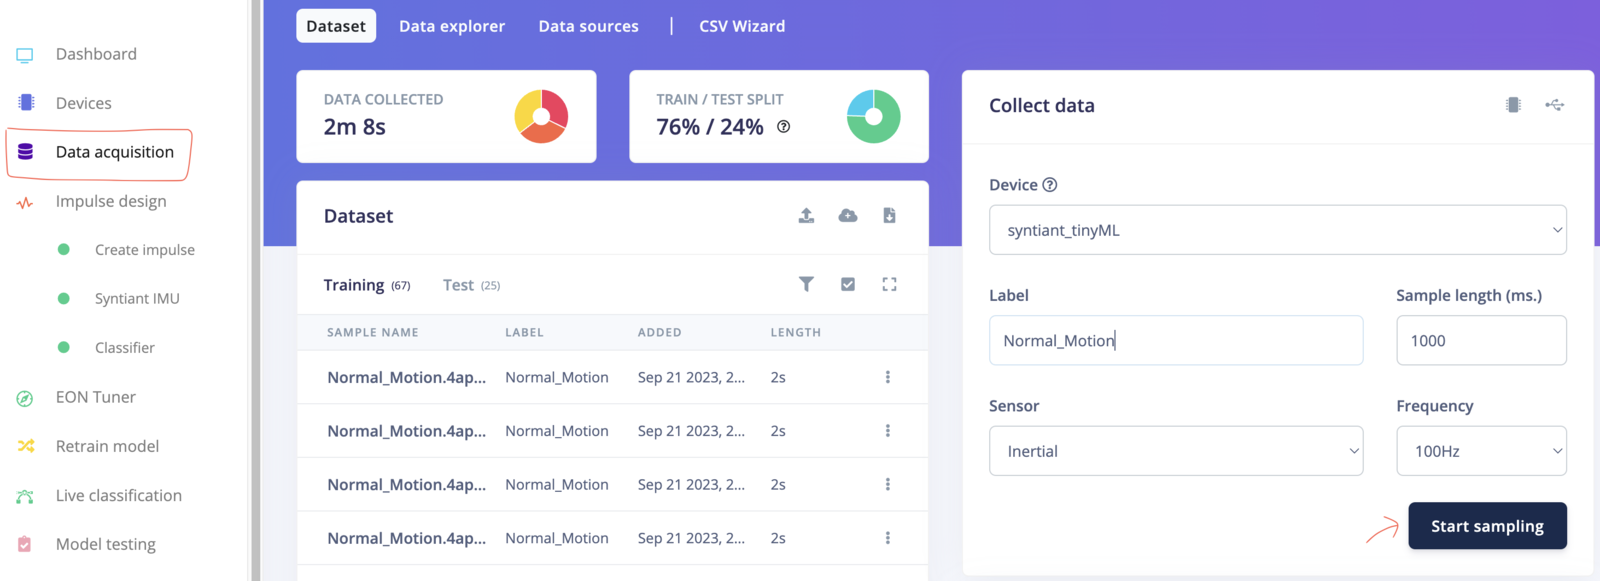
  • Repeat this process for unbalanced loads and also for the "Motor off" condition. Also make sure to collect a proportional amount of data per class.

Note: The Syntiant NDP chip requires a negative class on which no predictions will occur, in our example this is the Z_No_Motion (motor off condition) class. Make sure the class name is last in alphabetical order with the negative class at the end.

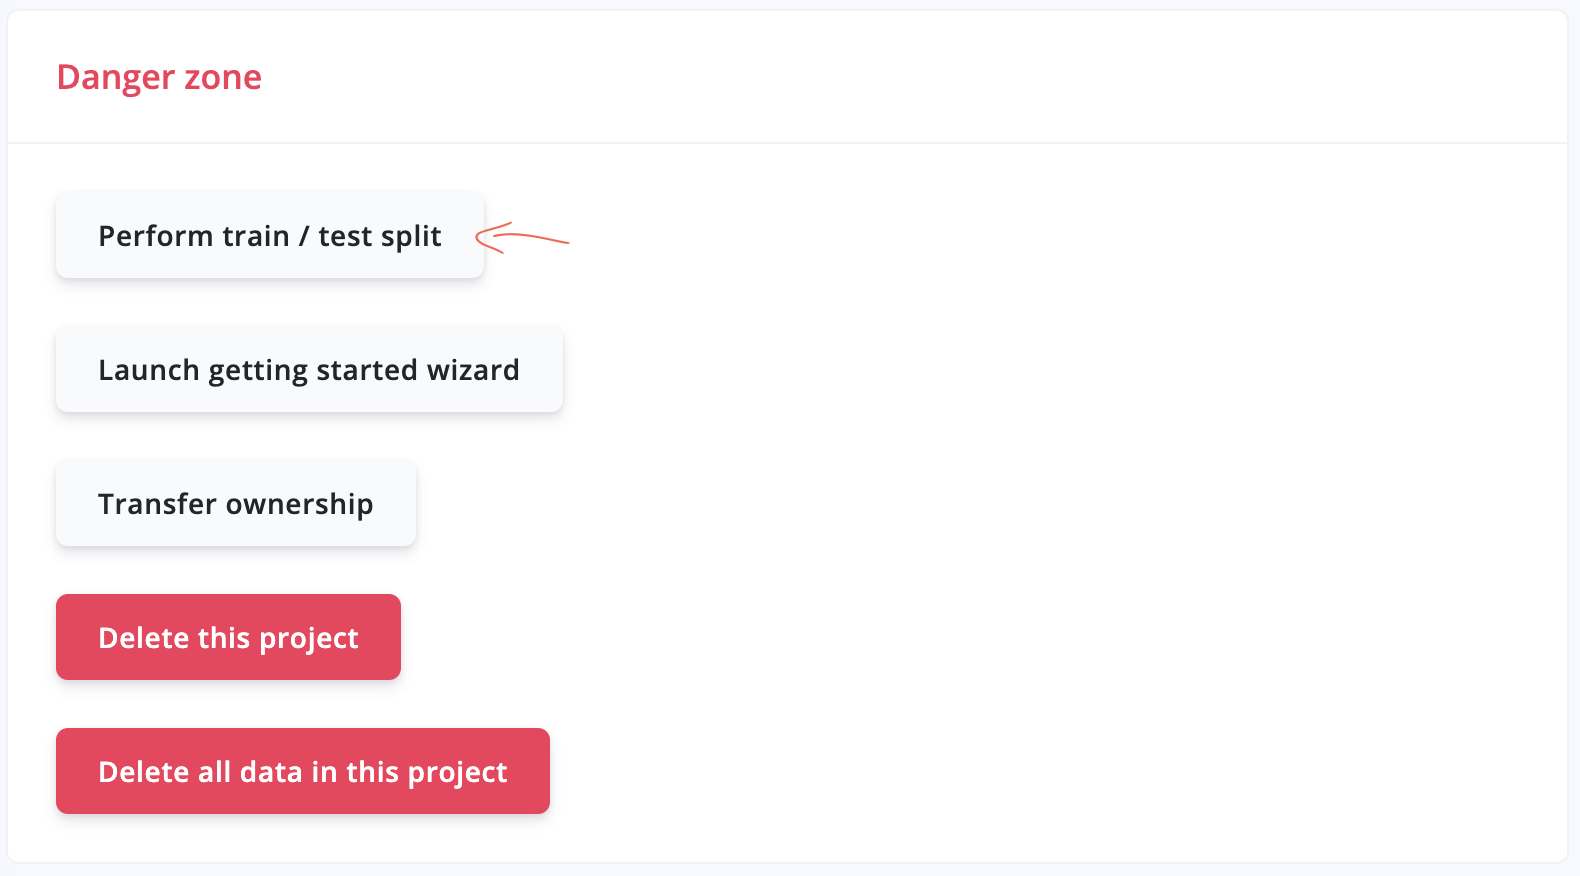
  • Once enough data is collected, split it into Train and Test datasets from the Dashboard:

Model Preparation

After data collection, the next step will be machine learning model preparation. To do so, navigate to the Impulse design tab and add the relevant Preprocessing and Learning blocks to the pipeline.

  • The Edge Impulse Studio will automatically add an input block and it will recommend a suitable Preprocessing and Learning block based on the data type ((IMU and Classification, in this case). I have used the recommended ones in this project with the default arguments.

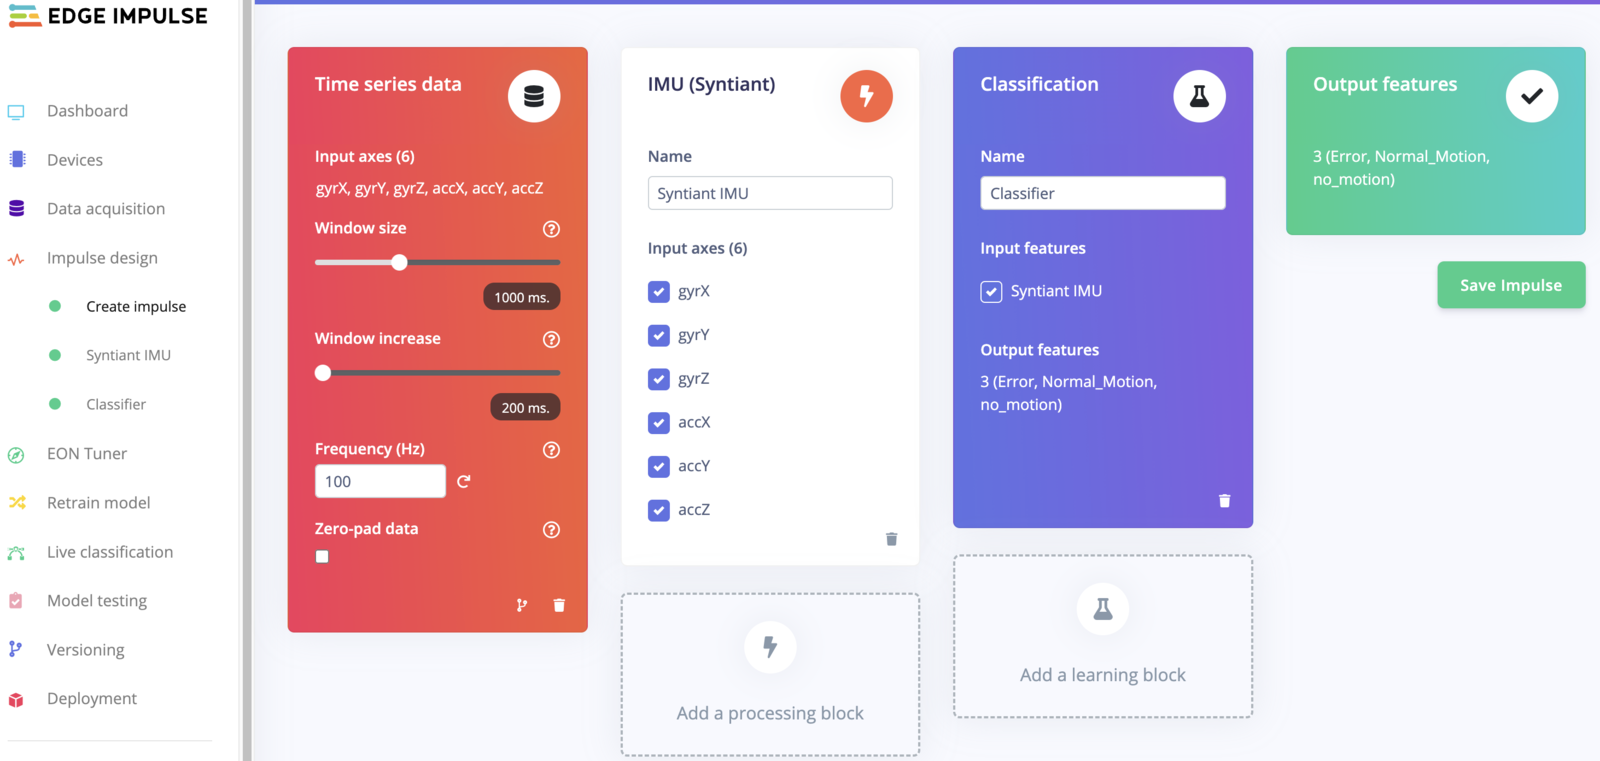
  • After Impulse design is complete, save the design and navigate to the Preprocessing tab (Spectral features in this case) for the feature generation.

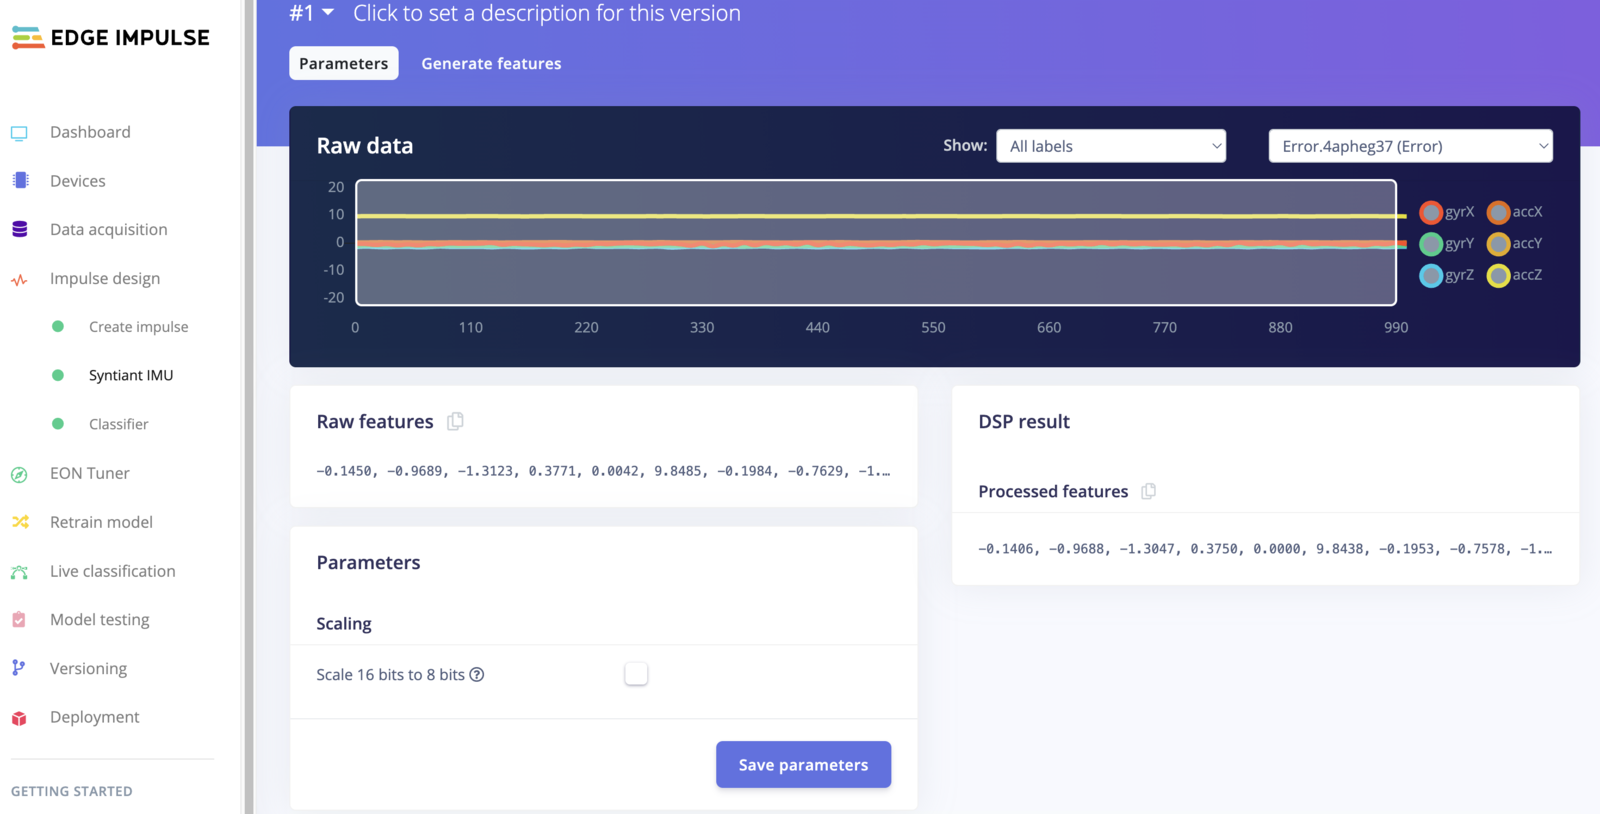
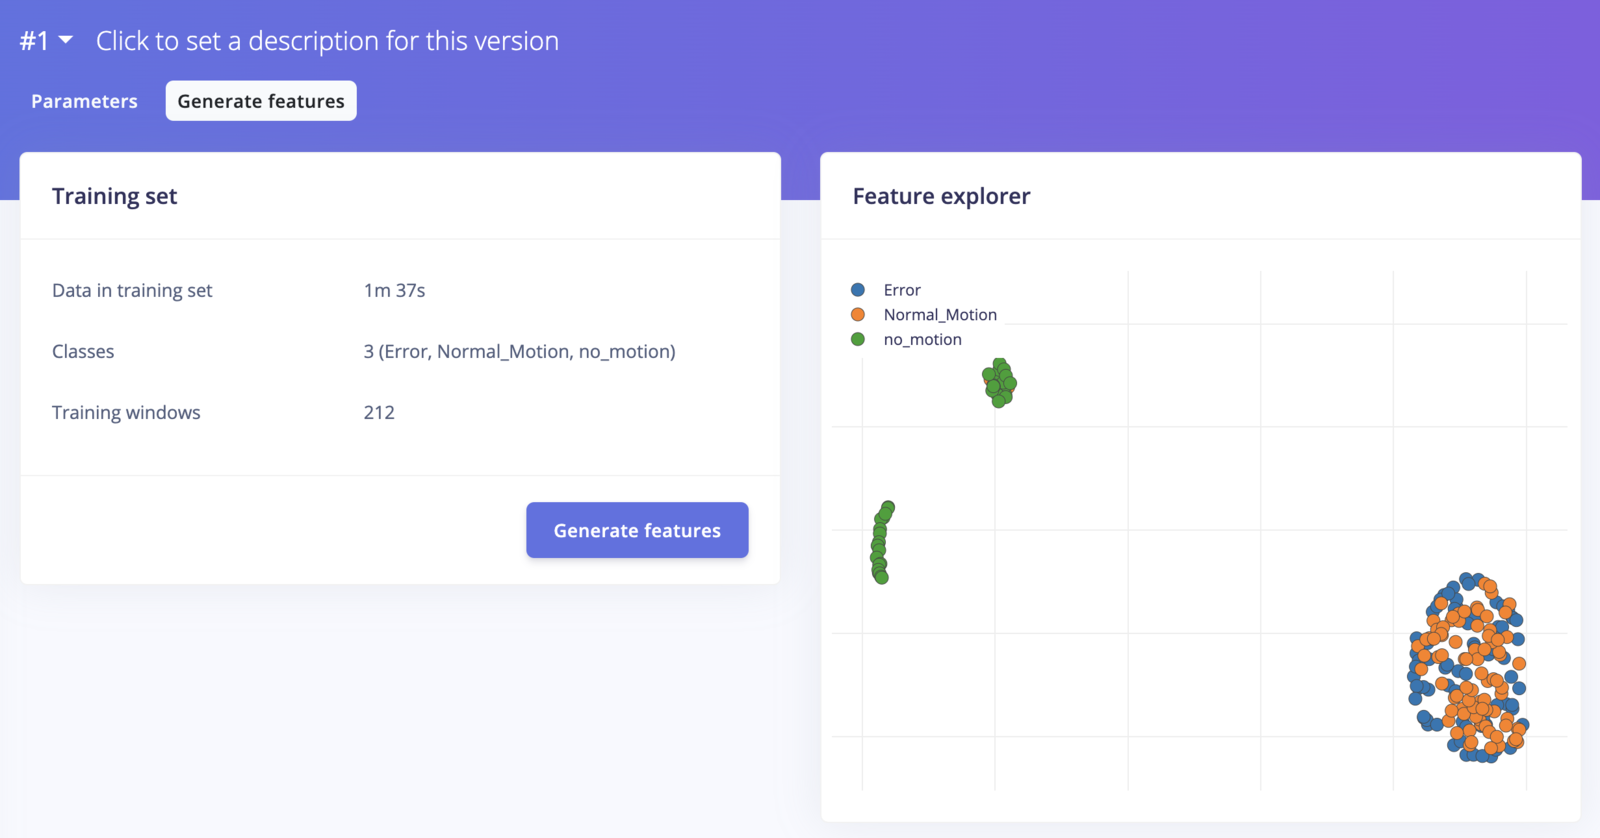
  • Click on the Save parameters button, then navigate to the Generate features tab and click the Generate features button for data preprocessing.

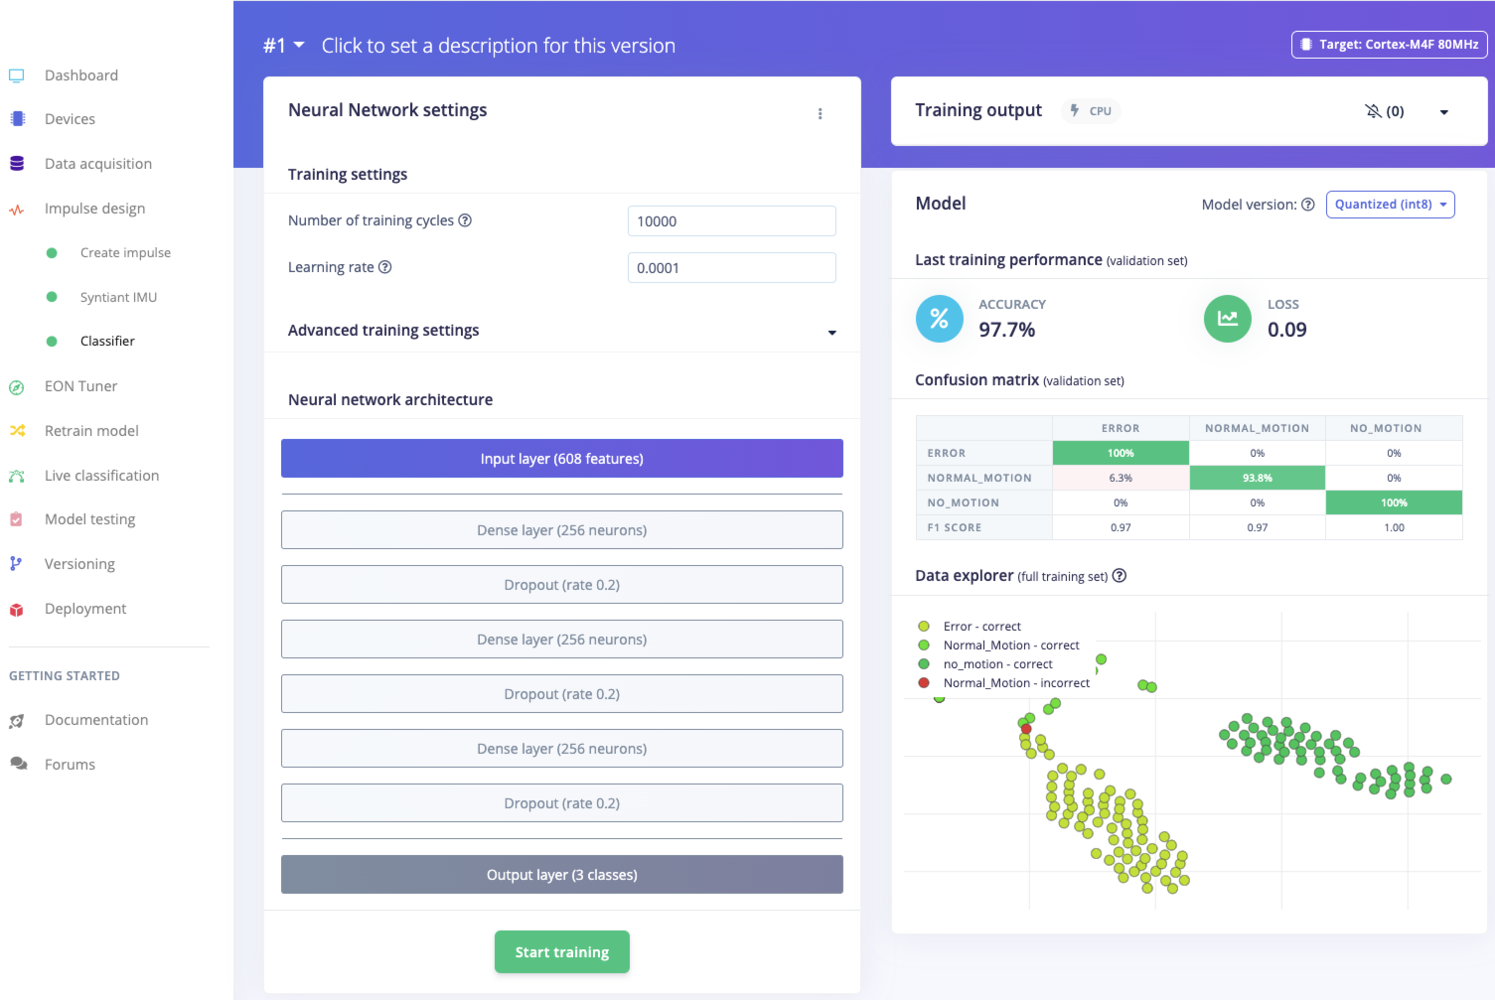
  • After feature generation is complete (it could take a few minutes), please navigate to the Learning tab (Classifier in this case) to design the neural network architecture. Here again, I have used the default architecture and parameters recommended by the Edge Impulse Studio. After selecting a suitable training cycle and learning rate, click on the Start training button.

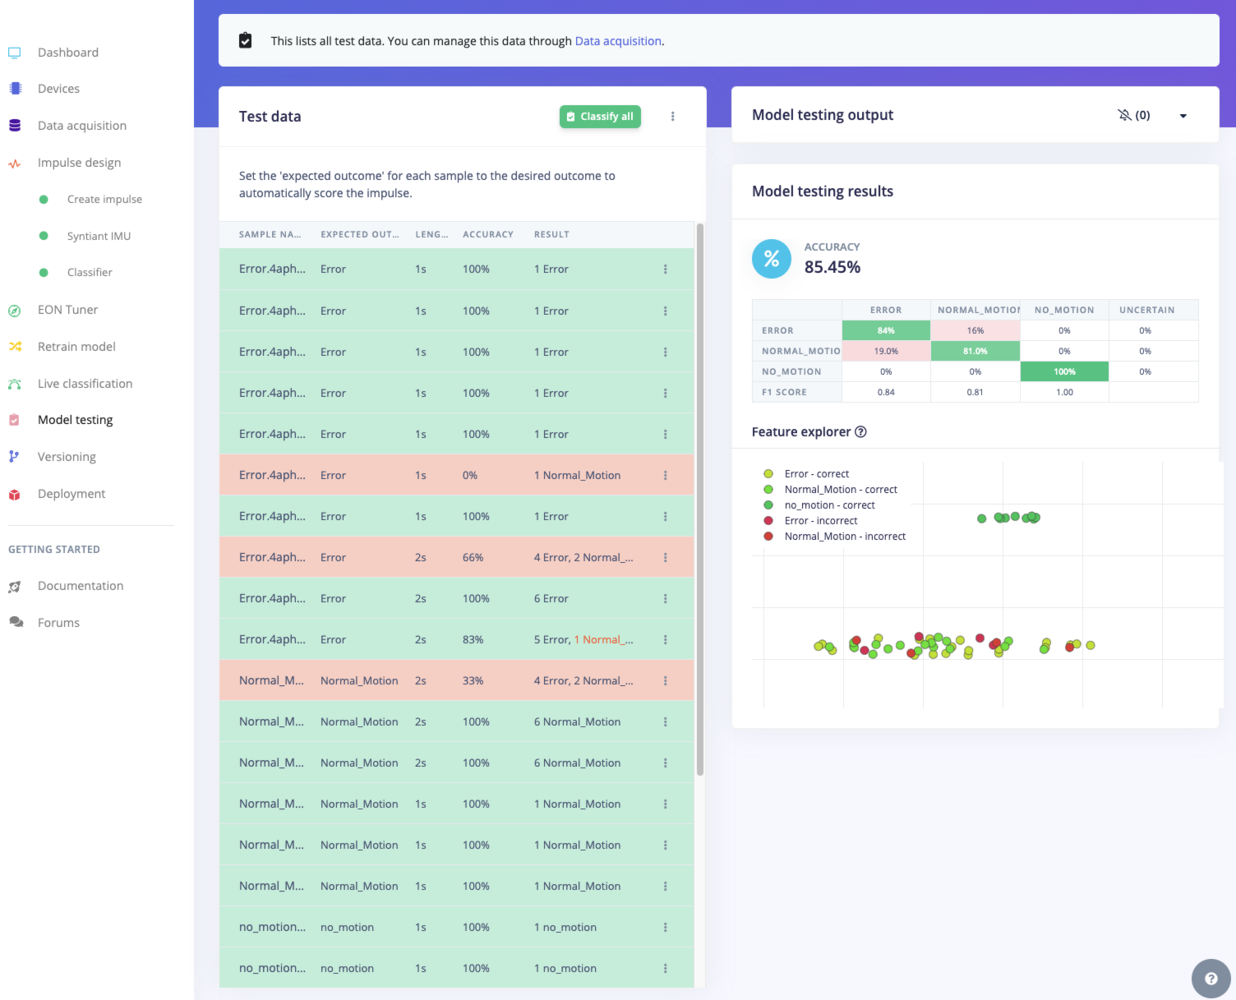
  • Once the training is complete, navigate to the Model testing tab, and click the Classify all button. This will begin the process of evaluating the built model against unseen data, which was the Test bucket of data set aside early when we did the split.

After testing is finished, the Edge Impulse Studio will show the model accuracy, and other parameters.

Even though it is a simple example, the Edge Impulse Studio prepared an excellent machine learning model just by using the default recommended parameters, in just a couple of minutes.
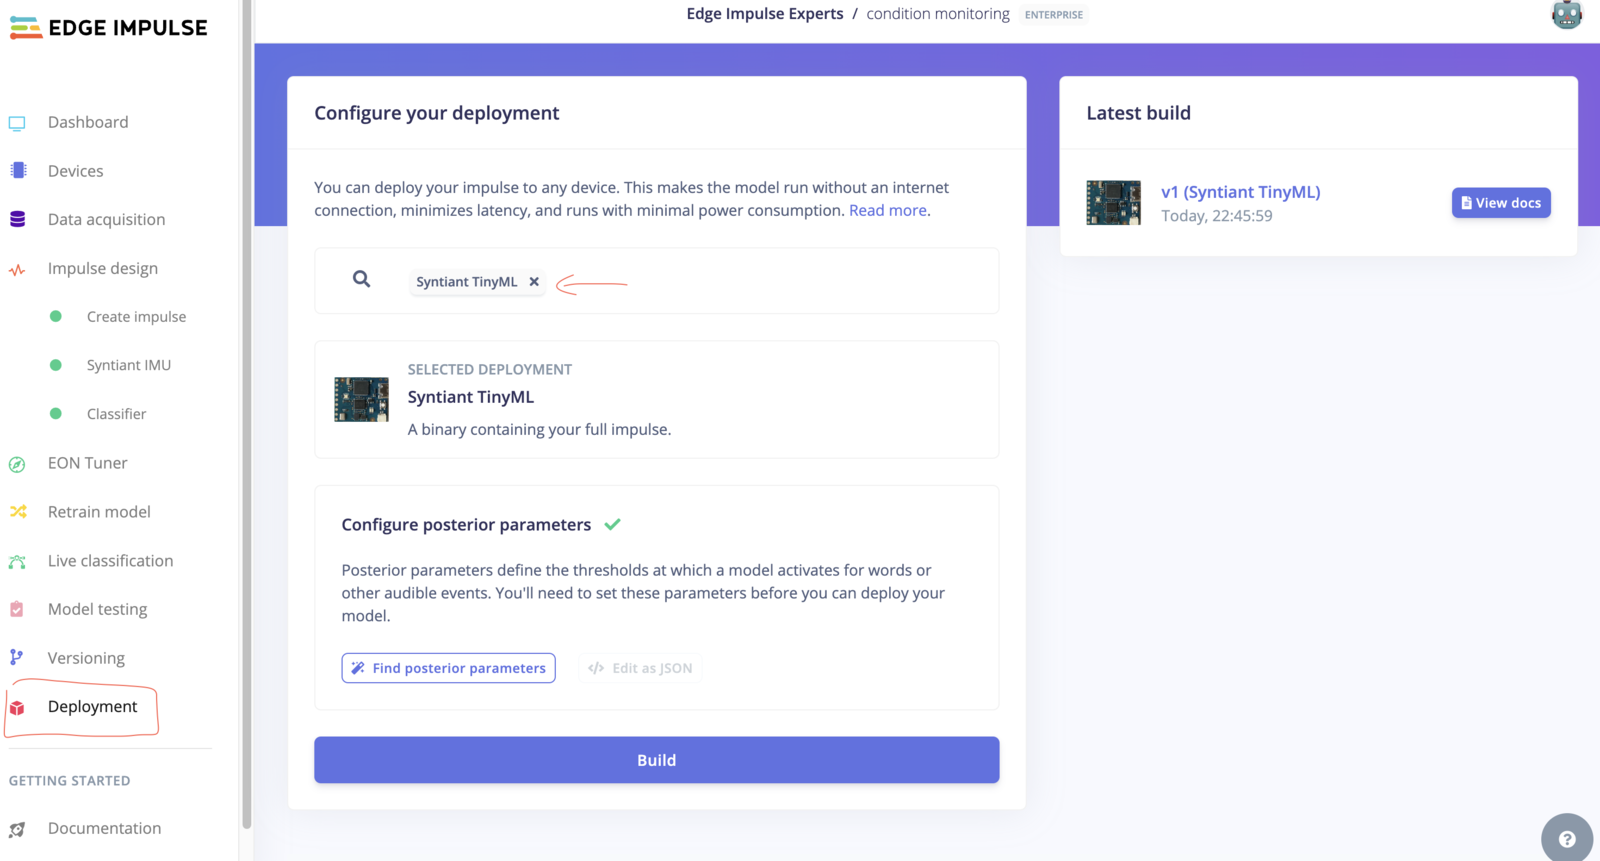
Deployment

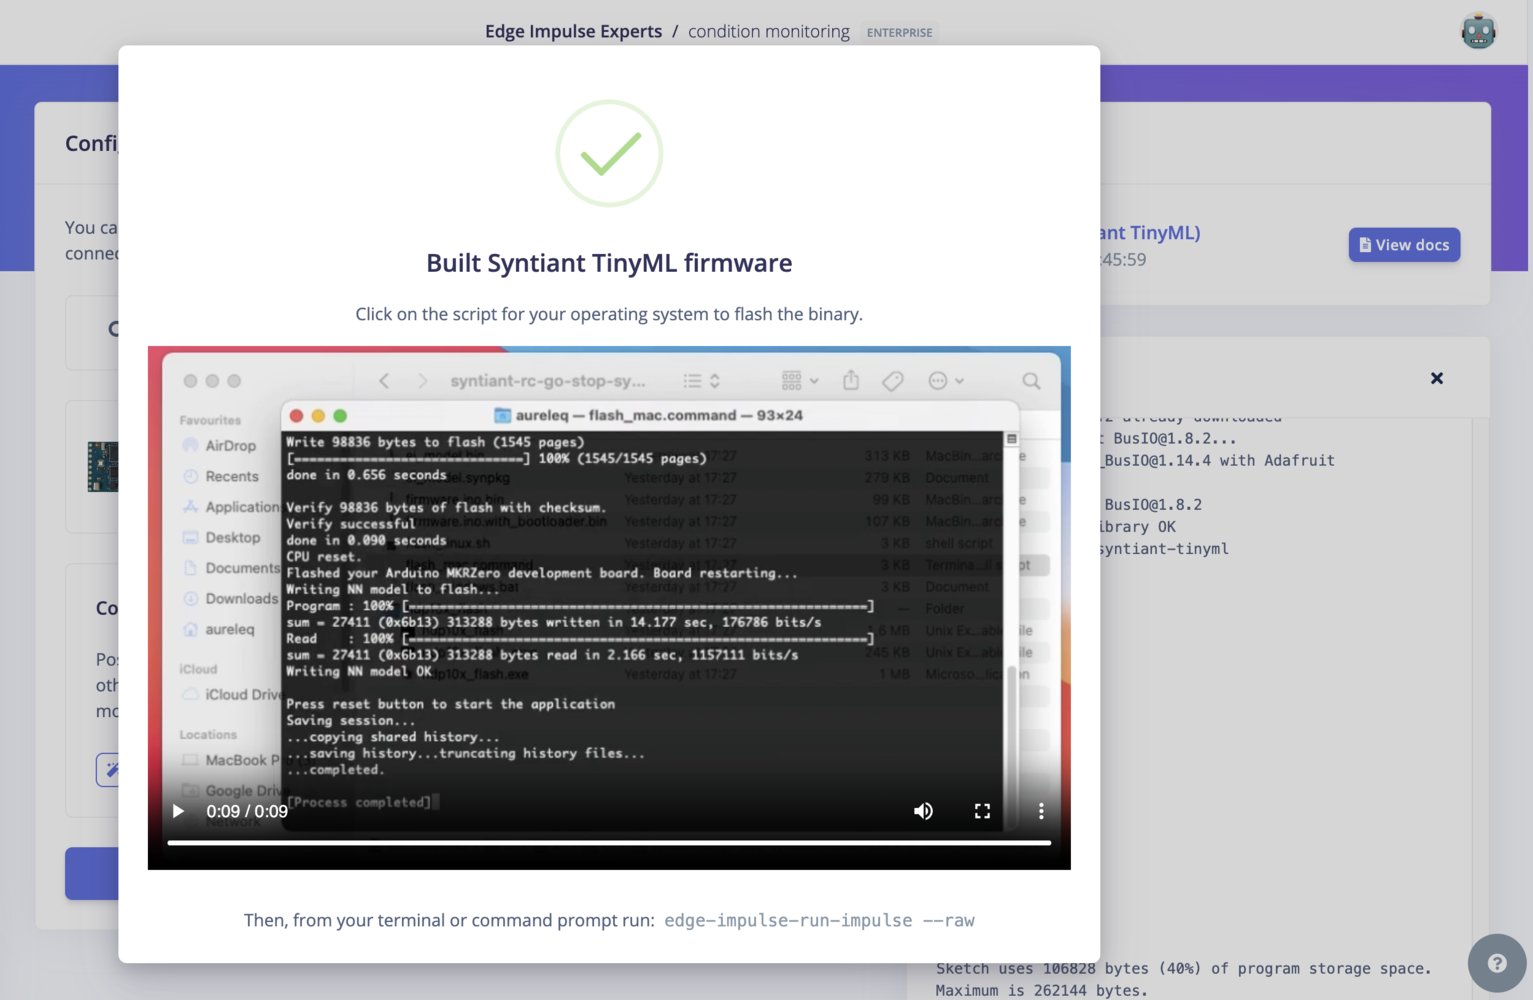
Once the training and testing is complete, we can convert the machine learning model into a library or binary for the Syntiant TinyML board and deploy it for local inference on the device.

Because the Syntiant TinyML board is fully supported by the Edge Impulse, this task is as easy as the previous procedures.

  • Simply navigate to the Deployment tab and select the target device. Also, specify the deployment type based on the options provided and click Build.

  • After building the binary or library, the Studio will automatically download the firmware to the computer, and provide guidance on how to flash it to the selected board. Usually it requires running the downloaded flash_<operating_system> script, which should flash the binary onto the Syntiant TinyML board.

Conclusion

Once the firmware is loaded onto the board, you can run inference locally on the Syntiant TinyML board by using the Edge Impulse CLI to launch a runner application. With the TinyML board attached to your computer via USB, run the following command from a terminal to begin inferencing:

edge-impulse-run-impulse

This will output classification results in the terminal, and you can verify that your model is properly predicting the normal, unbalanced, and off states of the motor.

At this point, you can iterate and build your own firmware, integrate the inferencing into your own application, and develop alerting capabilities to raise awareness of unexpected or out-of-bounds conditions.

References

Microcontrollers like the one found on the are powerful enough to run machine learning models with 3 dense layers, and 256 neurons in each layer. Further, this is accomplished with ultra low power consumption. We can utilise this board to capture data and perform classification locally with the help of Edge Impulse.

More information about how to connect a supported MCU board with Edge Impulse is .

To proceed with the IMU data collection using the Syntiant TinyML board and the Edge Impulse, you must flash the provided in . If it is your first time using the Syntiant TinyML board with the Edge Impulse, then I would recommend following from the beginning.

Syntiant TinyML board
available here
IMU firmware
this documentation
this documentation
https://github.com/sw4p/condition_monitoring
Classification icons created by SBTS2018 - Flaticon
Performance icons created by Design Circle - Flaticon
Automation icons created by Becris - Flaticon
Stream icons created by juicy_fish - Flaticon
https://studio.edgeimpulse.com/public/283457/latest
Conventional Architecture
TinyML Architecture
How it Works
Devices
Data Acquisition
Data Proportion
Train and Test Split
Impulse Design
Preprocessing
Generate Feature
Model Training
Model Testing
Deployment Tab
Flash Instruction