LogoLogo
HomeDocsAPI & SDKsProjectsForumStudio
  • Welcome
    • Featured Machine Learning Projects
      • Getting Started with the Edge Impulse Nvidia TAO Pipeline - Renesas EK-RA8D1
      • Smart City Traffic Analysis - NVIDIA TAO + Jetson Orin Nano
      • ROS 2 Pick and Place System - Arduino Braccio++ Robotic Arm and Luxonis OAK-D
      • Optimize a cloud-based Visual Anomaly Detection Model for Edge Deployments
      • Rooftop Ice Detection with Things Network Visualization - Nvidia Omniverse Replicator
      • Surgery Inventory Object Detection - Synthetic Data - Nvidia Omniverse Replicator
      • NVIDIA Omniverse - Synthetic Data Generation For Edge Impulse Projects
      • Community Guide – Using Edge Impulse with Nvidia DeepStream
      • Computer Vision Object Counting - Avnet RZBoard V2L
      • Gesture Appliances Control with Pose Detection - BrainChip AKD1000
      • Counting for Inspection and Quality Control - Nvidia Jetson Nano (TensorRT)
      • High-resolution, High-speed Object Counting - Nvidia Jetson Nano (TensorRT)
    • Prototype and Concept Projects
      • Renesas CK-RA6M5 Cloud Kit - Getting Started with Machine Learning
      • TI CC1352P Launchpad - Getting Started with Machine Learning
      • OpenMV Cam RT1062 - Getting Started with Machine Learning
      • Getting Started with Edge Impulse Experiments
  • Computer Vision Projects
    • Workplace Organizer - Nvidia Jetson Nano
    • Recyclable Materials Sorter - Nvidia Jetson Nano
    • Analog Meter Reading - Arduino Nicla Vision
    • Creating Synthetic Data with Nvidia Omniverse Replicator
    • SonicSight AR - Sound Classification with Feedback on an Augmented Reality Display
    • Traffic Monitoring - Brainchip Akida
    • Multi-camera Video Stream Inference - Brainchip Akida
    • Industrial Inspection Line - Brainchip Akida
    • X-Ray Classification and Analysis - Brainchip Akida
    • Inventory Stock Tracker - FOMO - BrainChip Akida
    • Container Counting - Arduino Nicla Vision
    • Smart Smoke Alarm - Arduino Nano 33
    • Shield Bot Autonomous Security Robot
    • Cyclist Blind Spot Detection - Himax WE-I Plus
    • IV Drip Fluid-Level Monitoring - Arduino Portenta H7
    • Worker PPE Safety Monitoring - Nvidia Jetson Nano
    • Delivered Package Detection - ESP-EYE
    • Bean Leaf Disease Classification - Sony Spresense
    • Oil Tank Measurement Using Computer Vision - Sony Spresense
    • Object Counting for Smart Industries - Raspberry Pi
    • Smart Cashier with FOMO - Raspberry Pi
    • PCB Defect Detection with Computer Vision - Raspberry Pi
    • Bicycle Counting - Sony Spresense
    • Counting Eggs with Computer Vision - OpenMV Cam H7
    • Elevator Passenger Counting - Arduino Nicla Vision
    • ESD Protection using Computer Vision - Seeed ReComputer
    • Solar Panel Defect Detection - Arduino Portenta H7
    • Label Defect Detection - Raspberry Pi
    • Dials and Knob Monitoring with Computer Vision - Raspberry Pi
    • Digital Character Recognition on Electric Meter System - OpenMV Cam H7
    • Corrosion Detection with Computer Vision - Seeed reTerminal
    • Inventory Management with Computer Vision - Raspberry Pi
    • Monitoring Retail Checkout Lines with Computer Vision - Renesas RZ/V2L
    • Counting Retail Inventory with Computer Vision - Renesas RZ/V2L
    • Pose Detection - Renesas RZ/V2L
    • Product Quality Inspection - Renesas RZ/V2L
    • Smart Grocery Cart Using Computer Vision - OpenMV Cam H7
    • Driver Drowsiness Detection With FOMO - Arduino Nicla Vision
    • Gastroscopic Image Processing - OpenMV Cam H7
    • Pharmaceutical Pill Quality Control and Defect Detection
    • Deter Shoplifting with Computer Vision - Texas Instruments TDA4VM
    • Smart Factory Prototype - Texas Instruments TDA4VM
    • Correct Posture Detection and Enforcement - Texas Instruments TDA4VM
    • Visual Anomaly Detection with FOMO-AD - Texas Instruments TDA4VM
    • Surface Crack Detection and Localization - Texas Instruments TDA4VM
    • Surface Crack Detection - Seeed reTerminal
    • Retail Image Classification - Nvidia Jetson Nano
    • SiLabs xG24 Plus Arducam - Sorting Objects with Computer Vision and Robotics - Part 1
    • SiLabs xG24 Plus Arducam - Sorting Objects with Computer Vision and Robotics - Part 2
    • Object Detection and Visualization - Seeed Grove Vision AI Module
    • Bike Rearview Radar - Raspberry Pi
    • Build a Self-Driving RC Vehicle - Arduino Portenta H7 and Computer Vision
    • "Bring Your Own Model" Image Classifier for Wound Identification
    • Acute Lymphoblastic Leukemia Classifier - Nvidia Jetson Nano
    • Hardhat Detection in Industrial Settings - Alif Ensemble E7
    • Motorcycle Helmet Identification and Traffic Light Control - Texas Instruments AM62A
    • Import a Pretrained Model with "Bring Your Own Model" - Texas Instruments AM62A
    • Product Inspection with Visual Anomaly Detection - FOMO-AD - Sony Spresense
    • Visual Anomaly Detection in Fabric using FOMO-AD - Raspberry Pi 5
    • Car Detection and Tracking System for Toll Plazas - Raspberry Pi AI Kit
    • Visual Anomaly Detection - Seeed Grove Vision AI Module V2
    • Object Counting with FOMO - OpenMV Cam RT1062
    • Visitor Heatmap with FOMO Object Detection - Jetson Orin Nano
    • Vehicle Security Camera - Arduino Portenta H7
  • Audio Projects
    • Occupancy Sensing - SiLabs xG24
    • Smart Appliance Control Using Voice Commands - Nordic Thingy:53
    • Glass Window Break Detection - Nordic Thingy:53
    • Illegal Logging Detection - Nordic Thingy:53
    • Illegal Logging Detection - Syntiant TinyML
    • Wearable Cough Sensor and Monitoring - Arduino Nano 33 BLE Sense
    • Collect Data for Keyword Spotting - Raspberry Pi Pico
    • Voice-Activated LED Strip - Raspberry Pi Pico
    • Snoring Detection on a Smart Phone
    • Gunshot Audio Classification - Arduino Nano 33 + Portenta H7
    • AI-Powered Patient Assistance - Arduino Nano 33 BLE Sense
    • Acoustic Pipe Leakage Detection - Arduino Portenta H7
    • Location Identification using Sound - Syntiant TinyML
    • Environmental Noise Classification - Nordic Thingy:53
    • Running Faucet Detection - Seeed XIAO Sense + Blues Cellular
    • Vandalism Detection via Audio Classification - Arduino Nano 33 BLE Sense
    • Predictive Maintenance Using Audio Classification - Arduino Nano 33 BLE Sense
    • Porting an Audio Project from the SiLabs Thunderboard Sense 2 to xG24
    • Environmental Audio Monitoring Wearable - Syntiant TinyML - Part 1
    • Environmental Audio Monitoring Wearable - Syntiant TinyML - Part 2
    • Keyword Spotting - Nordic Thingy:53
    • Detecting Worker Accidents with Audio Classification - Syntiant TinyML
    • Snoring Detection with Syntiant NDP120 Neural Decision Processor - Arduino Nicla Voice
    • Recognize Voice Commands with the Particle Photon 2
    • Voice Controlled Power Plug with Syntiant NDP120 (Nicla Voice)
    • Determining Compressor State with Audio Classification - Avnet RaSynBoard
    • Developing a Voice-Activated Product with Edge Impulse's Synthetic Data Pipeline
    • Enhancing Worker Safety using Synthetic Audio to Create a Dog Bark Classifier
  • Predictive Maintenance and Defect Detection Projects
    • Predictive Maintenance - Nordic Thingy:91
    • Brushless DC Motor Anomaly Detection
    • Industrial Compressor Predictive Maintenance - Nordic Thingy:53
    • Anticipate Power Outages with Machine Learning - Arduino Nano 33 BLE Sense
    • Faulty Lithium-Ion Cell Identification in Battery Packs - Seeed Wio Terminal
    • Weight Scale Predictive Maintenance - Arduino Nano 33 BLE Sense
    • Fluid Leak Detection With a Flowmeter and AI - Seeed Wio Terminal
    • Pipeline Clog Detection with a Flowmeter and AI - Seeed Wio Terminal
    • Refrigerator Predictive Maintenance - Arduino Nano 33 BLE Sense
    • Motor Pump Predictive Maintenance - Infineon PSoC 6 WiFi-BT Pioneer Kit + CN0549
    • BrickML Demo Project - 3D Printer Anomaly Detection
    • Condition Monitoring - Syntiant TinyML Board
    • Predictive Maintenance - Commercial Printer - Sony Spresense + CommonSense
    • Vibration Classification with BrainChip's Akida
    • AI-driven Audio and Thermal HVAC Monitoring - SeeedStudio XIAO ESP32
  • Accelerometer and Activity Projects
    • Arduino x K-Way - Outdoor Activity Tracker
    • Arduino x K-Way - Gesture Recognition for Hiking
    • Arduino x K-Way - TinyML Fall Detection
    • Posture Detection for Worker Safety - SiLabs Thunderboard Sense 2
    • Hand Gesture Recognition - OpenMV Cam H7
    • Arduin-Row, a TinyML Rowing Machine Coach - Arduino Nicla Sense ME
    • Fall Detection using a Transformer Model – Arduino Giga R1 WiFi
    • Bluetooth Fall Detection - Arduino Nano 33 BLE Sense
    • Monitor Packages During Transit with AI - Arduino Nano 33 BLE Sense
    • Smart Baby Swing - Arduino Portenta H7
    • Warehouse Shipment Monitoring - SiLabs Thunderboard Sense 2
    • Gesture Recognition - Bangle.js Smartwatch
    • Gesture Recognition for Patient Communication - SiLabs Thunderboard Sense 2
    • Hospital Bed Occupancy Detection - Arduino Nano 33 BLE Sense
    • Porting a Posture Detection Project from the SiLabs Thunderboard Sense 2 to xG24
    • Porting a Gesture Recognition Project from the SiLabs Thunderboard Sense 2 to xG24
    • Continuous Gait Monitor (Anomaly Detection) - Nordic Thingy:53
    • Classifying Exercise Activities on a BangleJS Smartwatch
  • Air Quality and Environmental Projects
    • Arduino x K-Way - Environmental Asthma Risk Assessment
    • Gas Detection in the Oil and Gas Industry - Nordic Thingy:91
    • Smart HVAC System with a Sony Spresense
    • Smart HVAC System with an Arduino Nicla Vision
    • Indoor CO2 Level Estimation - Arduino Portenta H7
    • Harmful Gases Detection - Arduino Nano 33 BLE Sense
    • Fire Detection Using Sensor Fusion and TinyML - Arduino Nano 33 BLE Sense
    • AI-Assisted Monitoring of Dairy Manufacturing Conditions - Seeed XIAO ESP32C3
    • AI-Assisted Air Quality Monitoring - DFRobot Firebeetle ESP32
    • Air Quality Monitoring with Sipeed Longan Nano - RISC-V Gigadevice
    • Methane Monitoring in Mines - Silabs xG24 Dev Kit
    • Smart Building Ventilation with Environmental Sensor Fusion
    • Sensor Data Fusion with Spresense and CommonSense
    • Water Pollution Detection - Arduino Nano ESP32 + Ultrasonic Scan
    • Fire Detection Using Sensor Fusion - Arduino Nano 33 BLE Sense
  • Novel Sensor Projects
    • 8x8 ToF Gesture Classification - Arduino RP2040 Connect
    • Food Irradiation Dose Detection - DFRobot Beetle ESP32C3
    • Applying EEG Data to Machine Learning, Part 1
    • Applying EEG Data to Machine Learning, Part 2
    • Applying EEG Data to Machine Learning, Part 3
    • Liquid Classification with TinyML - Seeed Wio Terminal + TDS Sensor
    • AI-Assisted Pipeline Diagnostics and Inspection with mmWave Radar
    • Soil Quality Detection Using AI and LoRaWAN - Seeed Sensecap A1101
    • Smart Diaper Prototype - Arduino Nicla Sense ME
    • DIY Smart Glove with Flex Sensors
    • EdgeML Energy Monitoring - Particle Photon 2
    • Wearable for Monitoring Worker Stress using HR/HRV DSP Block - Arduino Portenta
  • Software Integration Demos
    • Azure Machine Learning with Kubernetes Compute and Edge Impulse
    • ROS2 + Edge Impulse, Part 1: Pub/Sub Node in Python
    • ROS2 + Edge Impulse, Part 2: MicroROS
    • Using Hugging Face Datasets in Edge Impulse
    • Using Hugging Face Image Classification Datasets with Edge Impulse
    • Edge Impulse API Usage Sample Application - Jetson Nano Trainer
    • MLOps with Edge Impulse and Azure IoT Edge
    • A Federated Approach to Train and Deploy Machine Learning Models
    • DIY Model Weight Update for Continuous AI Deployments
    • Automate the CI/CD Pipeline of your Models with Edge Impulse and GitHub Actions
    • Deploying Edge Impulse Models on ZEDEDA Cloud Devices
Powered by GitBook
On this page
  • Overview
  • Hardware Selection
  • Setting up the Development Environment
  • Data Collection
  • Model training
  • Confusion Matrix
  • Model Testing
  • Deployment
  • Application Development
  • Run Inferencing
  • Demo
  • Conclusion

Was this helpful?

Edit on GitHub
Export as PDF
  1. Computer Vision Projects

Traffic Monitoring - Brainchip Akida

A computer vision project that monitors vehicle traffic in real-time using video inferencing performed on the Brainchip Akida Development Kit.

PreviousSonicSight AR - Sound Classification with Feedback on an Augmented Reality DisplayNextMulti-camera Video Stream Inference - Brainchip Akida

Last updated 1 year ago

Was this helpful?

Created By: Naveen Kumar

Public Project Link:

Overview

A highly efficient computer-vision system that can detect moving vehicles with great accuracy and relative motion, all while consuming minimal power.

By capturing moving vehicle images, aerial cameras can provide information about traffic conditions, which is beneficial for governments and planners to manage traffic and enhance urban mobility. Detecting moving vehicles with low-powered devices is still a challenging task. We are going to tackle this problem using a Brainchip Akida neural network accelerator.

Hardware Selection

In this project, we'll utilize BrainChip’s . BrainChip's neuromorphic processor IP uses event-based technology for increased energy efficiency. It allows incremental learning and high-speed inference for various applications, including convolutional neural networks, with exceptional performance and low power consumption.

The kit consists of an Akida PCie board, a Raspberry Pi Compute Module 4 with Wi-Fi and 8 GB RAM, and a Raspberry Pi Compute Module 4 I/O Board. The disassembled kit is shown below.

The Akida PCIe board can be connected to the Raspberry Pi Compute Module 4 IO Board through the PCIe Gen 2 x1 socket available onboard.

Setting up the Development Environment

After powering on the Akida development kit, we need to log in using an SSH connection. The kit comes with Ubuntu 20.04 LTS and Akida PCIe drivers preinstalled. Furthermore, the Raspberry Pi Compute Module 4 Wi-Fi is preconfigured in Access Point (AP) mode.

Completing the setup requires the installation of a few Python packages, which requires an internet connection. This internet connection to the Raspberry Pi 4 can be established through wired LAN. In my situation, I used internet sharing on my Macbook with a USB-C to LAN adapter to connect the Raspberry Pi 4 to my Macbook.

To log in and install packages execute the following commands. The password is brainchip for the user ubuntu.

$ ssh ubuntu@<ip-address>
$ pip3 install akida
$ pip3 install opencv-python
$ pip3 install scipy
$ pip3 install Flask

Data Collection

Capturing video of moving traffic using a drone is not permitted in my area so I used a license-free video from pexels.com (credit: Taryn Elliot). For our demo input images, we extracted every 5th frame from the pexels.com video using the Python script below.

python
import cv2
import sys

if __name__ == '__main__':
    video_path = './traffic-3840x2160-24fps.mp4'
    videoCapture = cv2.VideoCapture(video_path)
    if not videoCapture.isOpened():
        logging.error("Cannot open video file")
        sys.exit(-1)
    i = 0
    j = 0
    while True:
        ret, frame = videoCapture.read()
        if ret:
            img = frame[440:440+1280, 1280:1280+1280]
            cv2.imshow('Frame', img)
            i = i + 1
            if i % 5 == 0:
                j += 1
                cv2.imwrite(f'./data/images/img_{j:04d}.jpg', img)

            key = cv2.waitKey(1) & 0xFF
            if key == ord('q'):
                print('Exited gracefully')
                cv2.destroyAllWindows()
                break

We will use Edge Impulse Studio to build and train our demo model. This requires us to create an account and initiate a new project at https://studio.edgeimpulse.com.

To upload the demo input images extracted from the pexels.com video into the demo Edge Impulse project, we will use the Edge Impulse CLI Uploader. Follow the instructions at the link: https://docs.edgeimpulse.com/docs/cli-installation to install the Edge Impulse CLI on your host computer..

Execute the command below to upload the dataset.

$ edge-impulse-uploader --category split images/*.jpg

The command above will upload the demo input images to Edge Impulse Studio and split them into "Training" and "Testing" datasets. Once the upload completes, the demo input datasets are visible on the Data Acquisition page within Edge Impulse Studio..

Now we can label the data with bounding boxes in the Labeling queue tab as shown in the GIF below.

Model training

Go to the Impulse Design > Create Impulse page, click Add a processing block, and then choose Image. This preprocesses and normalizes image data, and optionally allows you to choose the color depth. Also, on the same page, click Add a learning block, and choose Object Detection (Images) - BrainChip Akida™ which fine-tunes a pre-trained object detection model specialized for the BrainChip AKD1000 PCIe board. This specialized model permits the use of a 224x224 image size, which is the size we are currently utilizing. Now click on the Save Impulse button.

On the Image page, choose RGB as color depth and click on the Save parameters button. The page will be redirected to the Generate Features page.

Now we can start feature generation by clicking on the Generate features button:

After feature generation, go to the Object Detection page and click on Choose a different model and select Akida FOMO. Then click on the Start training button. It will take a few minutes to complete the training.

The FOMO model uses an architecture similar to a standard image classification model which splits the input image into a grid and runs the equivalent of image classification across all cells in the grid independently in parallel. By default the grid size is 8x8 pixels, which means for a 224x224 image, the output will be 28x28 as shown in the image below.

For localization, it cuts off the last layers of the classification model and replaces this layer with a per-region class probability map, and subsequently applies a custom loss function that forces the network to fully preserve the locality in the final layer. This essentially gives us a heat map of vehicle locations. FOMO works on the constraining assumption that all of the bounding boxes are square, have a fixed size, and the objects are spread over the output grid. In the aerial view images, vehicles look similar in size hence FOMO works quite well.

Confusion Matrix

Once the training is completed we can see the confusion matrices as shown below. By using the post-training quantization, the Convolutional Neural Networks (CNN) are converted to a low-latency and low-power Spiking Neural Network (SNN) for use with the Akida runtime. We can see in the below image, the F1 score of 94% of the Quantized (Akida) model is better than that of the Quantized (int8) model.

Model Testing

On the Model testing page, click on the Classify All button which will initiate model testing with the trained model. The testing accuracy is 100%.

Deployment

We will be using Akida Python SDK to run inferencing, thus we will need to download the Meta TF model (underlined in red color in the image below) from the Edge Impulse Studio's Dashboard. After downloading, copy the ei-object-detection-metatf-model.fbz model file to the Akida development kit using command below.

$ scp ei-object-detection-metatf-model.fbz ubuntu@<ip-address>:/home/ubuntu

Application Development

The application loads the MetaTF model (*fbz) and maps it to the Akida neural processor. The inferencing is done on the images from a video file. We have converted several Edge Impulse C++ SDK functions to Python to preprocess FOMO input. Below is the main code for inferencing.

import akida
import cv2
import math
import time
import signal
import threading
import numpy as np
from queue import Queue
from scipy.special import softmax
from flask import Flask, render_template, Response

app = Flask(__name__, static_folder='templates/assets')

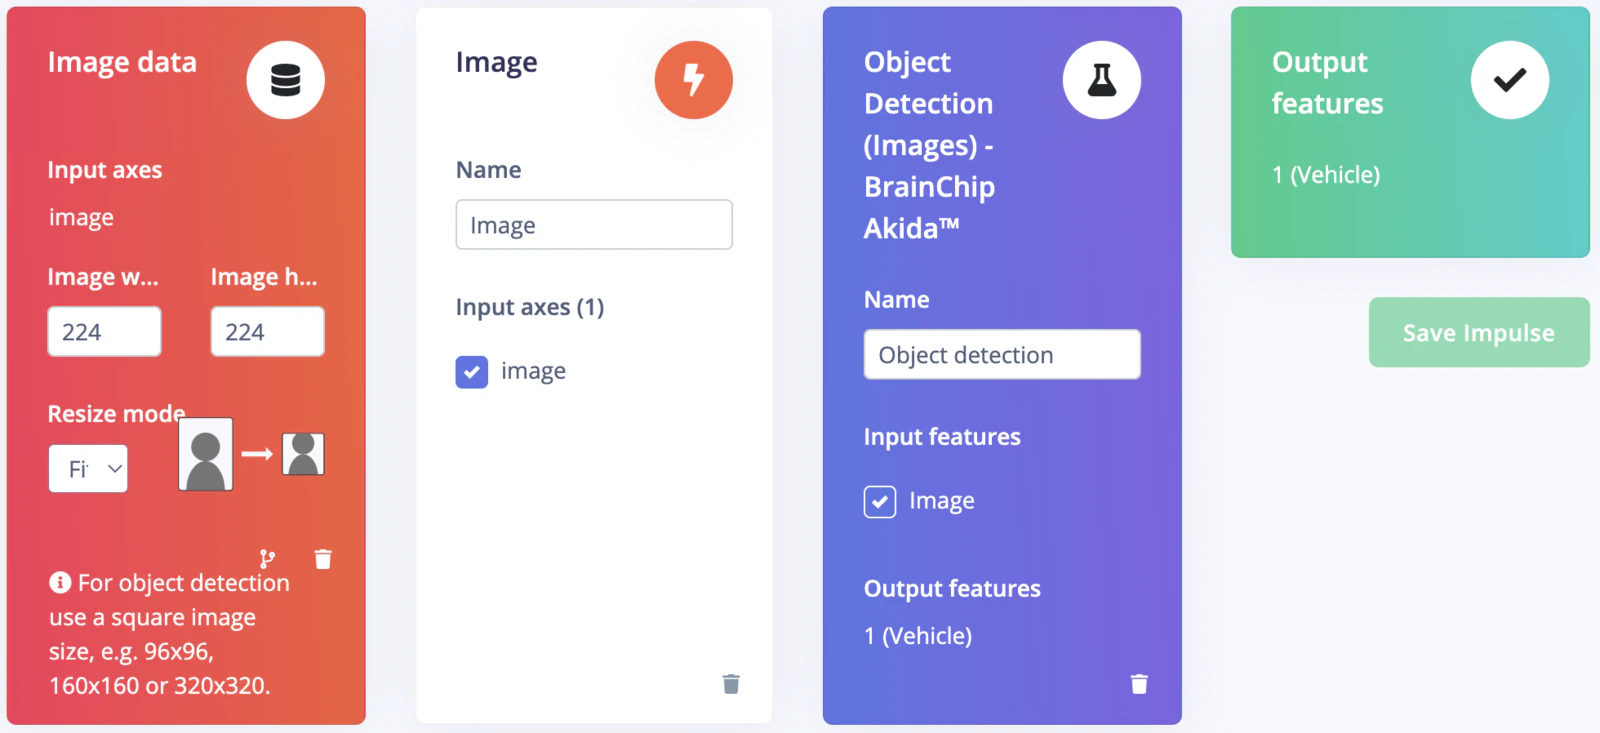
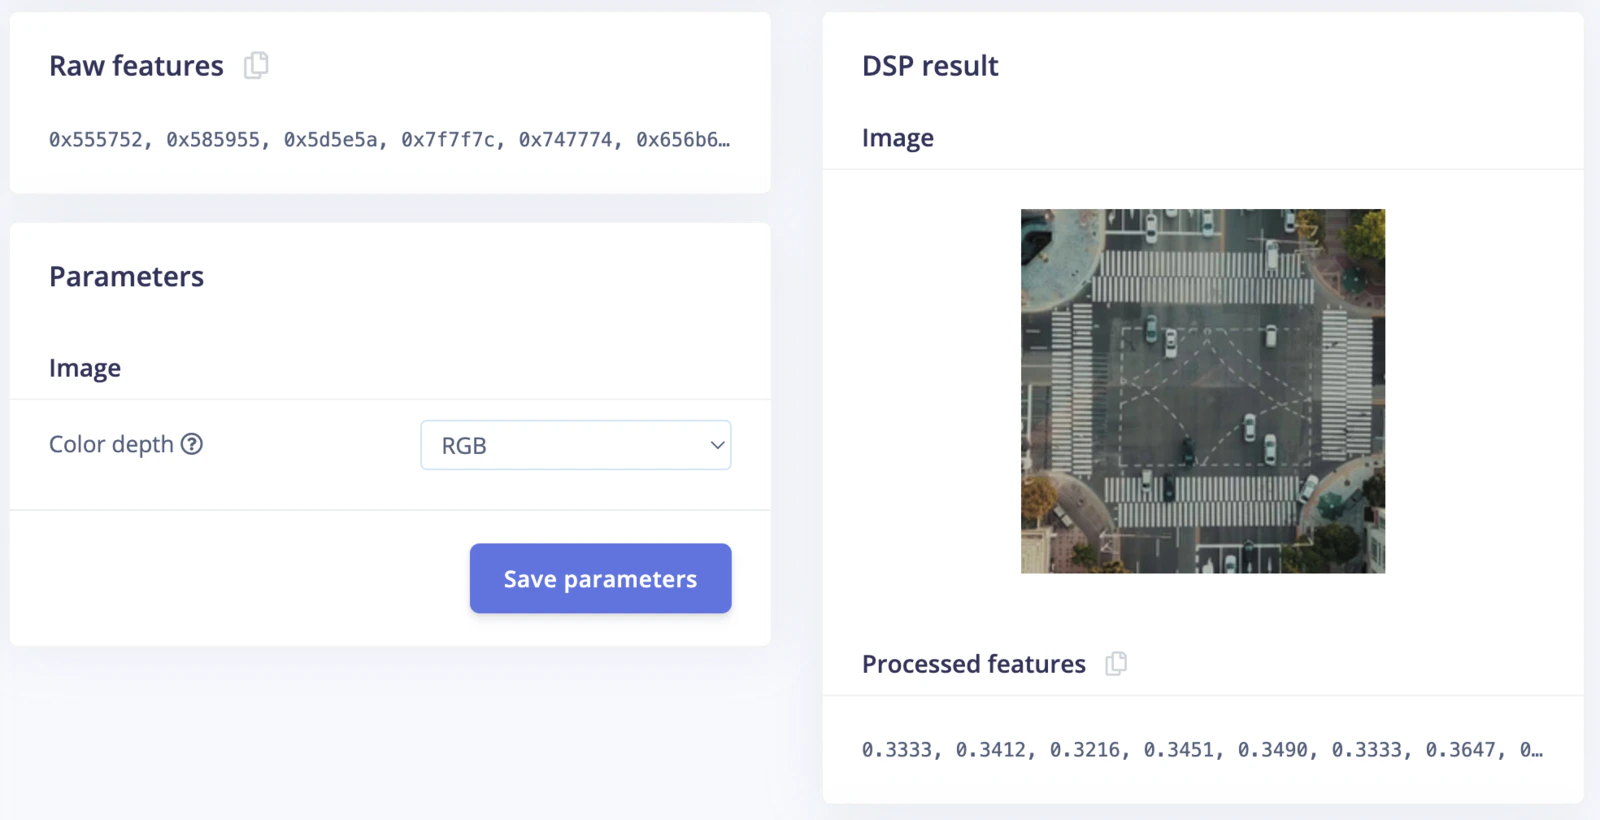
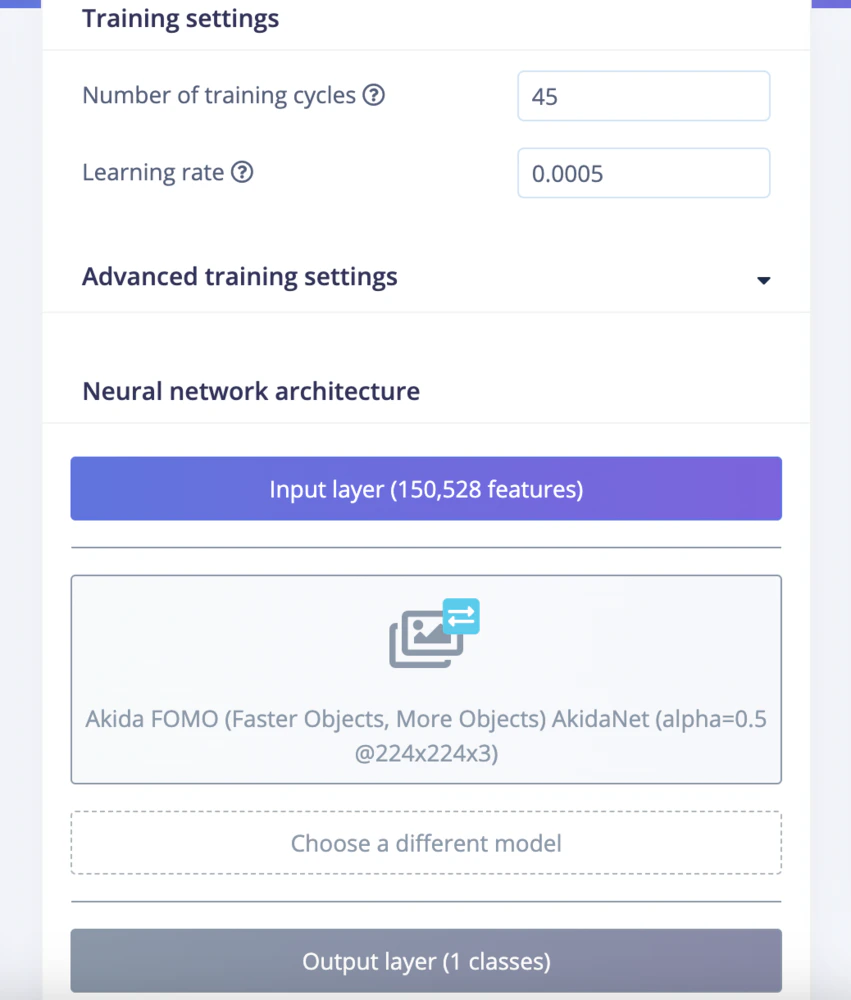
EI_CLASSIFIER_INPUT_WIDTH  = 224
EI_CLASSIFIER_INPUT_HEIGHT = 224
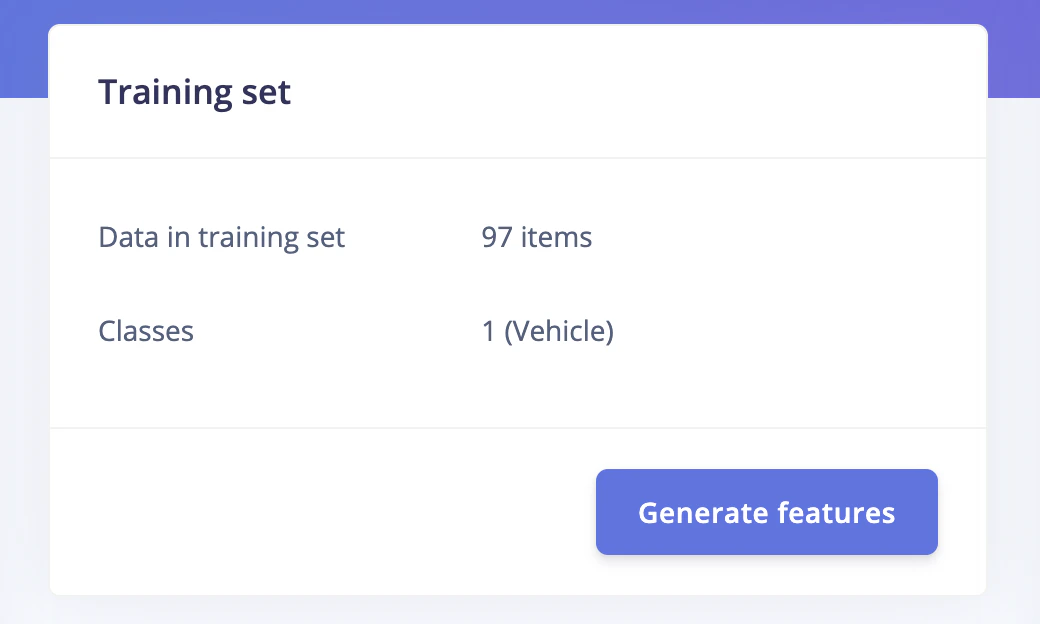
EI_CLASSIFIER_LABEL_COUNT = 1
EI_CLASSIFIER_OBJECT_DETECTION_THRESHOLD = 0.95
categories = ['Vehicle']
inference_speed = 0
power_consumption = 0

def ei_cube_check_overlap(c, x, y, width, height, confidence):
    is_overlapping = not ((c['x'] + c['width'] < x) or (c['y'] + c['height'] < y) or (c['x'] > x + width) or (c['y'] > y + height))

    if not is_overlapping:
         return False
    if x < c['x']:
        c['x'] = x
        c['width'] += c['x'] - x
    if y < c['y']:
        c['y'] = y;
        c['height'] += c['y'] - y;
    if (x + width) > (c['x'] + c['width']):
        c['width'] += (x + width) - (c['x'] + c['width'])
    if (y + height) > (c['y'] + c['height']):
        c['height'] += (y + height) - (c['y'] + c['height'])
    if confidence > c['confidence']:
        c['confidence'] = confidence

    return True

def ei_handle_cube(cubes, x, y, vf, label, detection_threshold):
    if vf < detection_threshold:
        return
    has_overlapping = False
    width = 1
    height = 1
    for c in cubes:
        # not cube for same class? continue
        if c['label'] != label:
             continue
        if ei_cube_check_overlap(c, x, y, width, height, vf):
            has_overlapping = True
            break

    if not has_overlapping:
        cube = {}
        cube['x'] = x
        cube['y'] = y
        cube['width'] = 1
        cube['height'] = 1
        cube['confidence'] = vf
        cube['label'] = label
        cubes.append(cube)

def fill_result_struct_from_cubes(cubes, out_width_factor):
    result = {}
    bbs = [];
    results = [];
    added_boxes_count = 0;

    for sc in cubes:
        has_overlapping = False;
        for c in bbs:
            # not cube for same class? continue
            if c['label'] != sc['label']:
                continue
            if ei_cube_check_overlap(c, sc['x'], sc['y'], sc['width'], sc['height'], sc['confidence']):
                has_overlapping = True
                break

        if has_overlapping:
            continue

        bbs.append(sc)
        results.append({
            'label'  : sc['label'],
            'x'      : int(sc['x'] * out_width_factor),
            'y'      : int(sc['y'] * out_width_factor),
            'width'  : int(sc['width'] * out_width_factor),
            'height' : int(sc['height'] * out_width_factor),
            'value'  : sc['confidence']
        })
        added_boxes_count += 1
        
    result['bounding_boxes'] = results
    result['bounding_boxes_count'] = len(results)
    return result

def fill_result_struct_f32_fomo(data, out_width, out_height):
    cubes = []
    out_width_factor = EI_CLASSIFIER_INPUT_WIDTH / out_width;
    for y in range(out_width):
        for x in range(out_height):
            for ix in range(1, EI_CLASSIFIER_LABEL_COUNT + 1):
                vf = data[y][x][ix];
                ei_handle_cube(cubes, x, y, vf, categories[ix - 1], EI_CLASSIFIER_OBJECT_DETECTION_THRESHOLD);

    result = fill_result_struct_from_cubes(cubes, out_width_factor)
    return result

def capture(video_file, queueIn):
    cap = cv2.VideoCapture(video_file)
    fps = cap.get(cv2.CAP_PROP_FPS)
    num_frames = cap.get(cv2.CAP_PROP_FRAME_COUNT)
    resize_dim = (EI_CLASSIFIER_INPUT_WIDTH, EI_CLASSIFIER_INPUT_HEIGHT)
    if not cap.isOpened():
        print("File not opened")
        sys.exit(1)

    while True:
        ret, frame = cap.read()
        if ret:
            #cropped_img = frame[0:720, 280:280+720]
            #resized_img = cv2.resize(frame, resize_dim, interpolation = cv2.INTER_AREA)
            resized_img = cv2.resize(frame, resize_dim)
            img = cv2.cvtColor(resized_img, cv2.COLOR_BGR2RGB)
            input_data = np.expand_dims(img, axis=0)
            if not queueIn.full():
                queueIn.put((frame, input_data))
        else:
            return
     
def inferencing(model_file, queueIn, queueOut):
    akida_model = akida.Model(model_file)
    devices = akida.devices()
    print(f'Available devices: {[dev.desc for dev in devices]}')
    device = devices[0]
    device.soc.power_measurement_enabled = True
    akida_model.map(device)
    akida_model.summary()
    i_h, i_w, i_c = akida_model.input_shape
    o_h, o_w, o_c = akida_model.output_shape
    scale_x = int(i_w/o_w)
    scale_y = int(i_h/o_h)
    scale_out_x = 1280/EI_CLASSIFIER_INPUT_WIDTH
    scale_out_y = 1280/EI_CLASSIFIER_INPUT_HEIGHT

    global inference_speed
    global power_consumption

    while True:
        if queueIn.empty():
            #print("queue empty, wait a while")
            time.sleep(0.01)
            continue
        img, input_data = queueIn.get()

        start_time = time.perf_counter()
        logits = akida_model.predict(input_data)
        end_time = time.perf_counter()
        inference_speed = (end_time - start_time) * 1000

        pred = softmax(logits, axis=-1).squeeze()

        floor_power = device.soc.power_meter.floor
        power_events = device.soc.power_meter.events()
        active_power = 0
        for event in power_events:
            active_power += event.power

        power_consumption = f'{(active_power/len(power_events)) - floor_power : 0.2f}'
        #print(akida_model.statistics)

        result = fill_result_struct_f32_fomo(pred, int(EI_CLASSIFIER_INPUT_WIDTH/8), int(EI_CLASSIFIER_INPUT_HEIGHT/8))

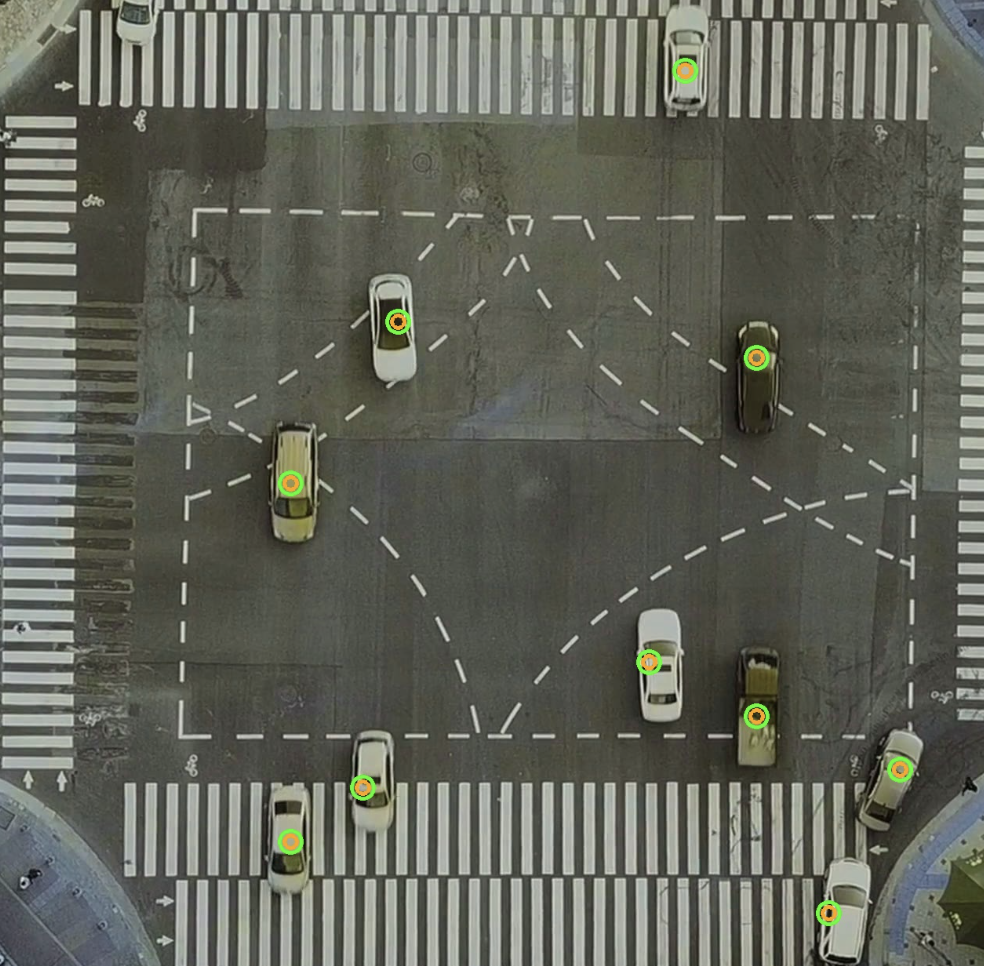
        for bb in result['bounding_boxes']:
            img = cv2.circle(img, (int((bb['x'] + int(bb['width']/2)) * scale_out_x), int((bb['y'] + int(bb['height']/2)) * scale_out_y)), 14, (57, 255, 20), 3)
            img = cv2.circle(img, (int((bb['x'] + int(bb['width']/2)) * scale_out_x), int((bb['y'] +  int(bb['height']/2)) * scale_out_y)), 8, (255, 165, 0), 3)

        img = cv2.cvtColor(img, cv2.COLOR_RGB2BGR)

        if not queueOut.full():
            queueOut.put(img)
        
def gen_frames():
    while True:
        if queueOut.empty():
            time.sleep(0.01)
            continue
        img = queueOut.get()
        ret, buffer = cv2.imencode('.jpg', img)
        yield (b'--frame\r\n'
                b'Content-Type: image/jpeg\r\n\r\n' + buffer.tobytes() + b'\r\n')

def get_inference_speed():
    while True:
        yield f"data:{inference_speed:.2f}\n\n"
        time.sleep(0.1)

def get_power_consumption():
    while True:
        yield "data:" + str(power_consumption) + "\n\n"
        time.sleep(0.1)

@app.route('/video_feed')
def video_feed():
    #Video streaming route. Put this in the src attribute of an img tag
    return Response(gen_frames(), mimetype='multipart/x-mixed-replace; boundary=frame')

@app.route('/model_inference_speed')
def model_inference_speed():
        return Response(get_inference_speed(), mimetype= 'text/event-stream')

@app.route('/model_power_consumption')
def model_power_consumption():
        return Response(get_power_consumption(), mimetype= 'text/event-stream')

@app.route('/')
def index():
    return render_template('index.html')

if __name__ == '__main__':
    video_file = './video/aerial_1280_1280.avi'
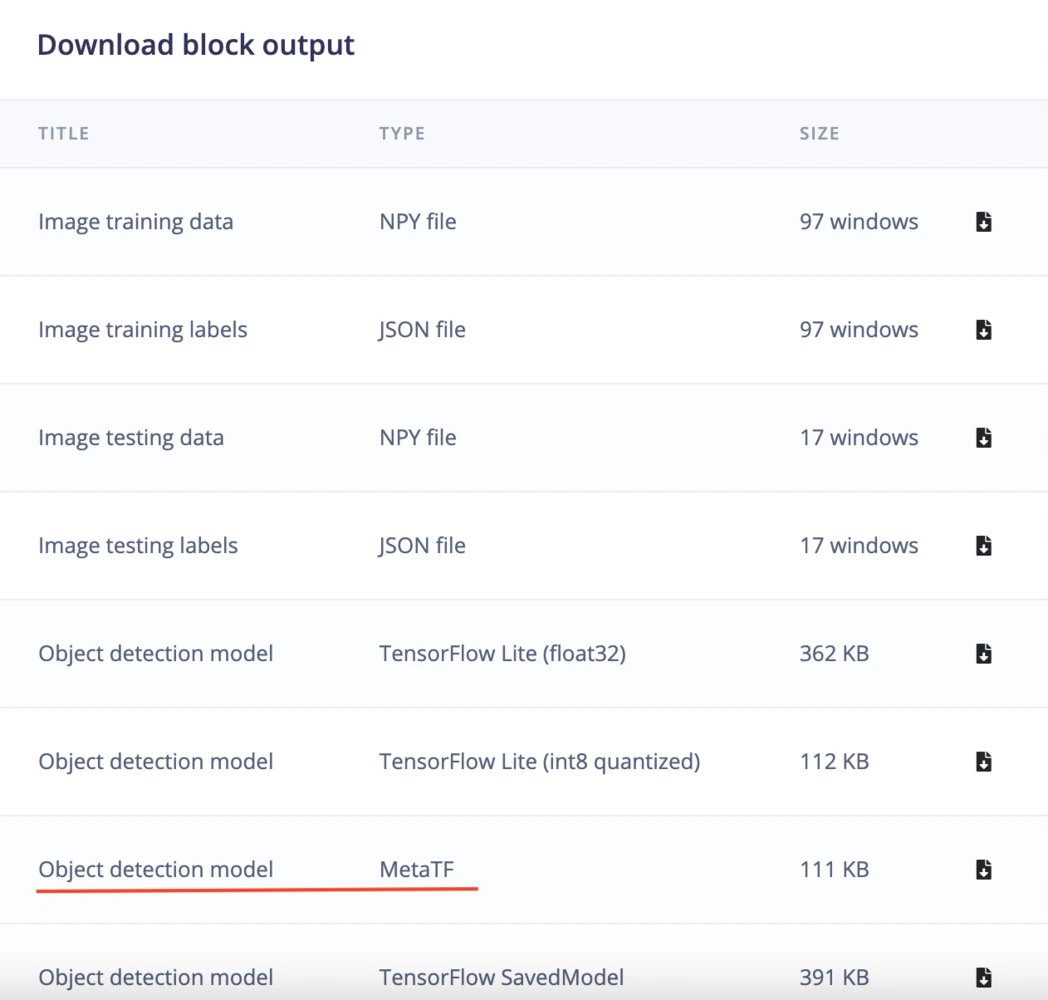
    model_file = './model/ei-object-detection-metatf-model.fbz '

    queueIn  = Queue(maxsize = 24)
    queueOut = Queue(maxsize = 24)

    t1 = threading.Thread(target=capture, args=(video_file, queueIn))
    t1.start()
    t2 = threading.Thread(target=inferencing, args=(model_file, queueIn, queueOut))
    t2.start()
    app.run(host = '0.0.0.0', port = 8080)
    t1.join()
    t2.join()

Run Inferencing

To run the application, login to the Akida development kit and execute the commands below.

$ git clone https://github.com/metanav/vehicle_detection_brainchip_edge_impulse.git
$ cd vehicle_detection_brainchip_edge_impulse
$ python3 main.py

The inferencing results can be accessed at http://:8080 using a web browser. The application also displays the model summary mapped on the Akida PCIe neural processor on the console.

Available devices: ['PCIe/NSoC_v2/0']
                    Model Summary                    
_____________________________________________________
Input shape    Output shape  Sequences  Layers  NPs
=====================================================
[224, 224, 3]  [28, 28, 2]   1          8       21 
_____________________________________________________

________________________________________________________________
Layer (type)             Output shape    Kernel shape      NPs

====== HW/conv_0-conv2d_1 (Hardware) - size: 261248 bytes ======

conv_0 (InputConv.)      [112, 112, 16]  (3, 3, 3, 16)     N/A
________________________________________________________________
conv_1 (Conv.)           [112, 112, 32]  (3, 3, 16, 32)    4  
________________________________________________________________
conv_2 (Conv.)           [56, 56, 64]    (3, 3, 32, 64)    6  
________________________________________________________________
conv_3 (Conv.)           [56, 56, 64]    (3, 3, 64, 64)    3  
________________________________________________________________
separable_4 (Sep.Conv.)  [28, 28, 128]   (3, 3, 64, 1)     3  
________________________________________________________________
                                         (1, 1, 64, 128)      
________________________________________________________________
separable_5 (Sep.Conv.)  [28, 28, 128]   (3, 3, 128, 1)    2  
________________________________________________________________
                                         (1, 1, 128, 128)     
________________________________________________________________
conv2d (Conv.)           [28, 28, 32]    (1, 1, 128, 32)   2  
________________________________________________________________
conv2d_1 (Conv.)         [28, 28, 2]     (1, 1, 32, 2)     1  
________________________________________________________________

Notice there is no Softmax layer at the end of the model. That layer has been removed during model conversion to run on the Akida processor. The Softmax operation is performed in the application code, rather than in the model..

Demo

The video used for the demonstration runs at a framerate of 24 fps, and the inferencing takes approximately 40ms per frame, resulting in real-time inferencing.

Conclusion

This project highlights the impressive abilities of the Akida PCIe board. Boasting low power consumption, it could be used as a highly effective device for real-time object detection in various industries for numerous use cases.

https://studio.edgeimpulse.com/public/222419/latest
Akida Development Kit
Hardware Kit
Hardware Unassembled
Hardware Closeup
New Project
Data Acquisition
Labelling
Impulse Design
Image DSP Block
Grid
Confusion Matrices
Block Output
generate_features
object_detection
model_testing
cover