import sys
import time
import cv2
import numpy as np
import threading
import queue
import logging
import matplotlib.pyplot as plt
import tflite_runtime.interpreter as tflite
from matplotlib import cm
from timeit import default_timer as timer
def display(queueOut):
logging.info("display thread")
pipeline = 'appsrc ! video/x-raw,width=480,height=480 ! queue ! kmssink sync=False max-lateness=5000000 qos=True processing-deadline=15000000 driver-name=tidss connector-id=48 plane-id=49'
videoWriter = cv2.VideoWriter(pipeline, cv2.CAP_GSTREAMER, 0, 30, (480, 480), True)
if not videoWriter.isOpened():
logging.error("Cannot open video writer")
sys.exit(-1)
while True:
if queueOut.empty():
time.sleep(0.1)
continue
img = queueOut.get()
videoWriter.write(img)
if __name__ == '__main__':
log_fmt = "%(asctime)s: %(message)s"
logging.basicConfig(format=log_fmt, level=logging.INFO, datefmt="%H:%M:%S")
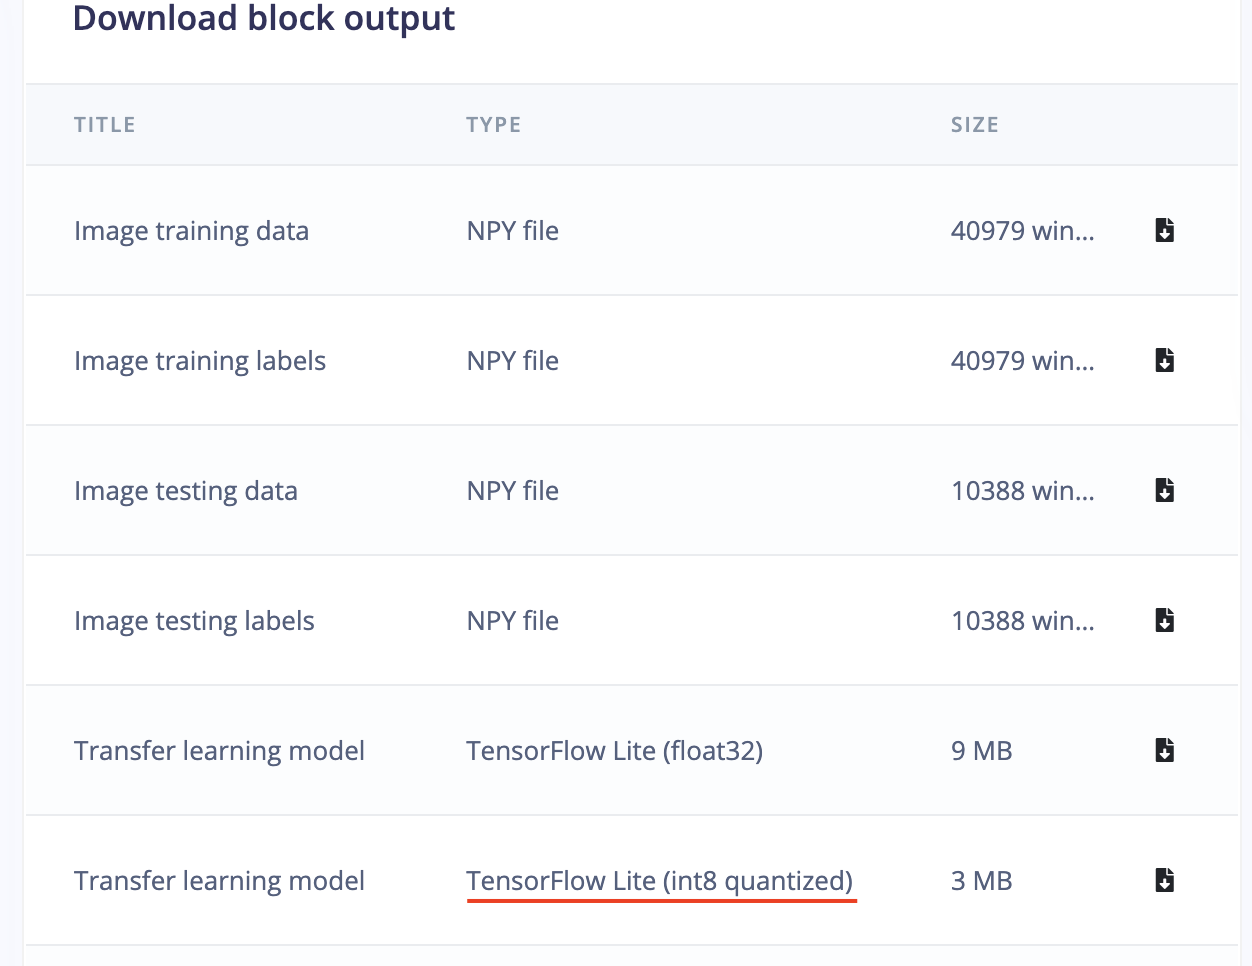
tflite_model_path = './tflite_model/quantized-model.lite'
artifacts_path = './custom-artifacts/tflite'
tidl_delegate = [tflite.load_delegate('libtidl_tfl_delegate.so', {'artifacts_folder': artifacts_path})]
interpreter = tflite.Interpreter(model_path=tflite_model_path, experimental_delegates=tidl_delegate)
interpreter.allocate_tensors()
input_details = interpreter.get_input_details()
output_details = interpreter.get_output_details()
# NxHxWxC, H:1, W:2
height = input_details[0]['shape'][1]
width = input_details[0]['shape'][2]
input_scale, input_zero_point = input_details[0]['quantization']
output_0_scale, output_0_zero_point = output_details[0]['quantization']
output_1_scale, output_1_zero_point = output_details[1]['quantization']
videoCapture = cv2.VideoCapture(2)
videoCapture.set(cv2.CAP_PROP_FRAME_WIDTH, 640)
videoCapture.set(cv2.CAP_PROP_FRAME_HEIGHT, 480)
if not videoCapture.isOpened():
logging.error("Cannot open camera")
sys.exit(-1)
queueOut = queue.Queue(maxsize=2)
thread = threading.Thread(target=display, args=(queueOut,), daemon=True)
thread.start()
while True:
try:
success, frame = videoCapture.read(2)
if not success:
raise RuntimeError('Failed to get frame!')
start_time = timer()
img = cv2.cvtColor(frame, cv2.COLOR_BGR2RGB)
img = img[0:0+480, 80:80+480]
img = cv2.resize(img, (width, height))
img = img / 255.0
img = img.astype(np.float32)
img_scaled = (img / input_scale) + input_zero_point
input_data = np.expand_dims(img_scaled, axis=0).astype(input_details[0]["dtype"])
interpreter.set_tensor(input_details[0]['index'], input_data)
interpreter.invoke()
output_0_tensor = interpreter.tensor(output_details[0]['index'])
output_1_tensor = interpreter.tensor(output_details[1]['index'])
output_1 = output_1_scale * ((output_1_tensor()).astype(np.float32) - output_1_zero_point)
pred_class = np.argmax(np.squeeze(output_1))
pred_score = np.squeeze(output_1)[pred_class]
label = 'Unknown'
if pred_score > 0.9 and pred_class == 1:
label = 'Crack'
elif pred_class == 0:
label = 'No Crack'
logging.info(label)
if pred_class == 1:
dp_out = output_0_scale * (np.squeeze(output_0_tensor())[pred_class].astype(np.float32) - output_0_zero_point)
heatmap = None
heatmap = cv2.normalize(dp_out, heatmap, alpha=0, beta=255, norm_type=cv2.NORM_MINMAX, dtype=cv2.CV_8U)
colormap = plt.get_cmap('jet')
img = cv2.addWeighted(img, 1.0, colormap(heatmap).astype(np.float32)[:,:,:3], 0.4, 0)
final_img = img * 255.0
final_img = final_img.astype(np.uint8)
final_img = cv2.resize(final_img, (480, 480), interpolation=cv2.INTER_CUBIC)
font = cv2.FONT_HERSHEY_SIMPLEX
color = (0, 255, 0)
final_img = cv2.putText(final_img, f'{label} ({pred_score*100:0.1f}%)', (10, 40), font, 1, color, 3, cv2.LINE_AA)
final_img = cv2.cvtColor(final_img, cv2.COLOR_RGB2BGR)
logging.info(f'{((timer() - start_time) * 1000):0.1f} ms.')
if not queueOut.full():
queueOut.put(final_img)
except Exception as inst:
logging.error("Exception", inst)
videoCapture.release()
break
thread.join()