Introduction
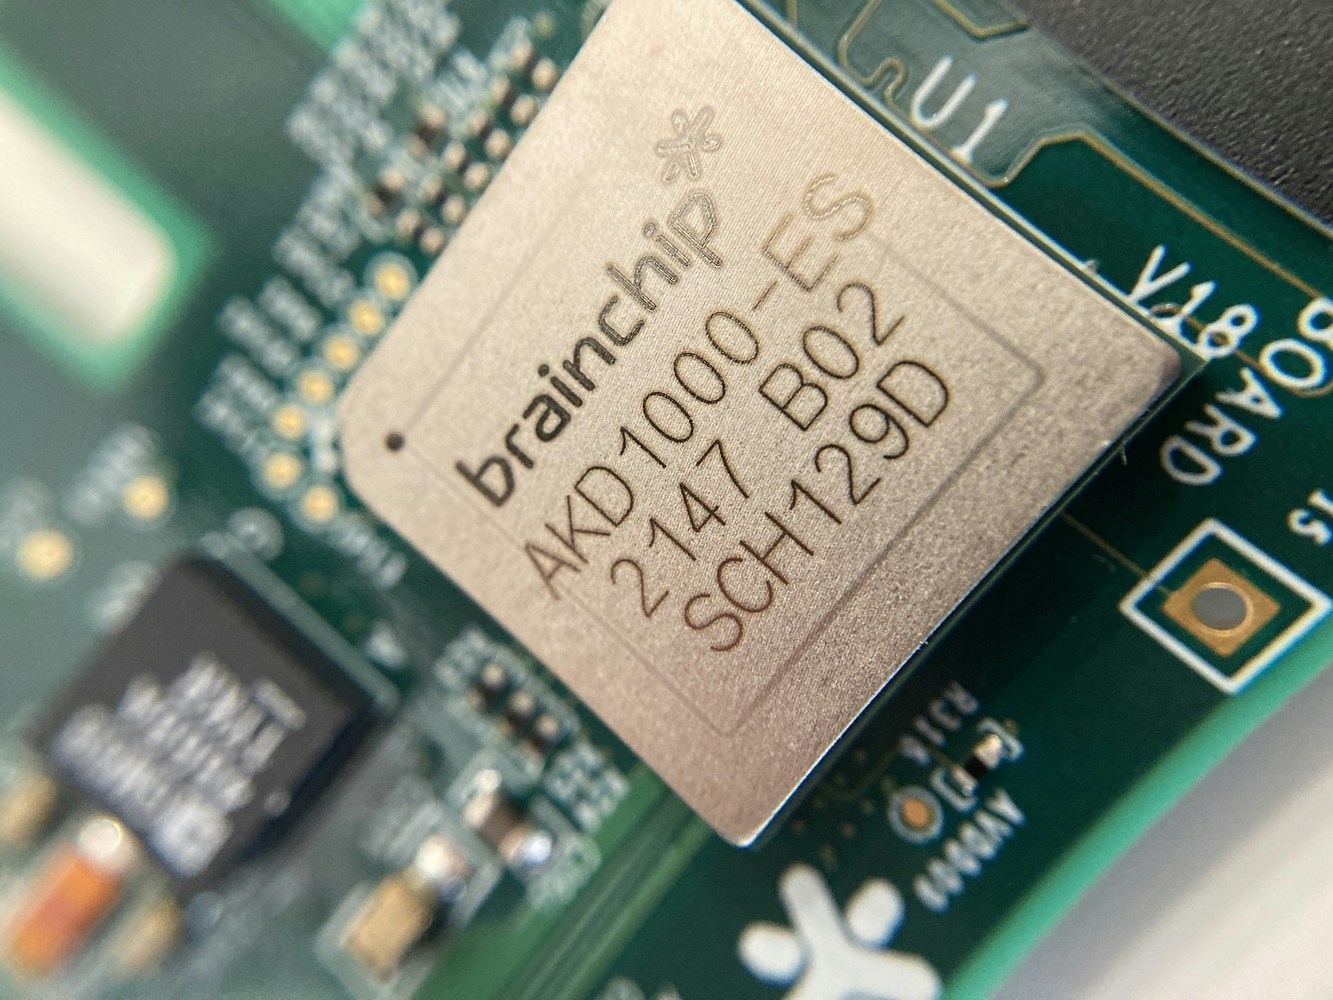
Over the past several years, as hardware has improved and machine learning models have gotten more efficient, many AI workloads have been transitioned from the cloud to the edge of the network, running locally on devices that were previously not able to perform inferencing tasks. Fast CPU’s and GPU’s, more memory, and better connectivity have helped, but a very large impact has come from dedicated AI Accelerators that offer high performance inference, in small, low-power form-factors. The Brainchip Akida AKD1000 is one such example, with the ability to speed up sensor, audio, or vision tasks such as image classification or object detection significantly over standard CPU-based inferencing, while using only a few milliwatts of power. In this project we’ll use the Brainchip Akida Developer Kit, which comes in a ready-to-use system consisting of an x86 or Arm-based platform, plus an Akida AKD1000 NPU on a small PCIe add-on card.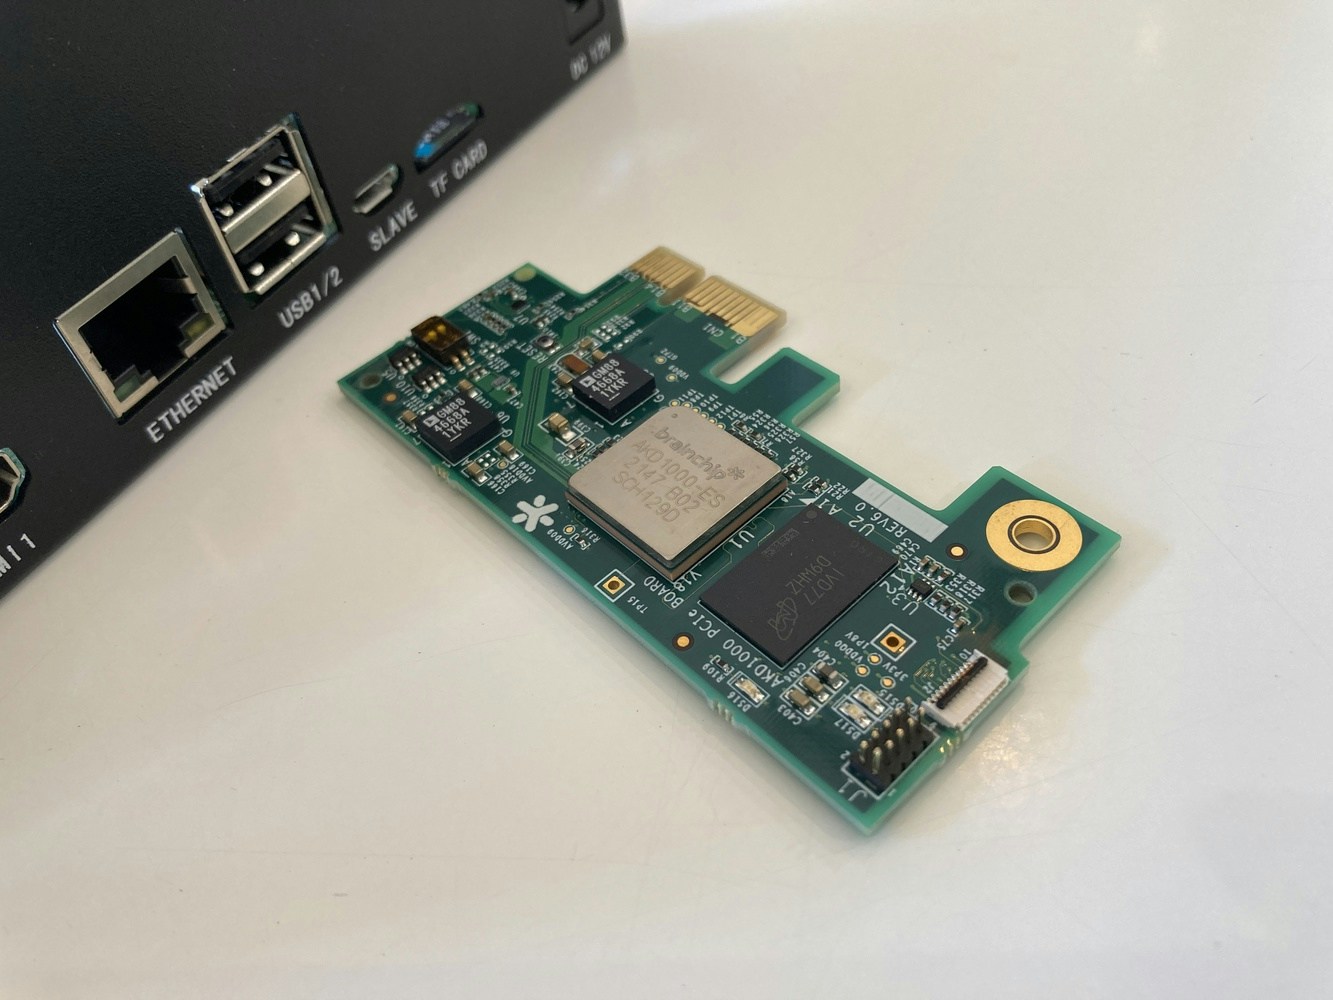
Improving Medical Processes
Artificial Intelligence may never be able to fully replace a doctor, but it can certainly help supplement their work, speed up diagnostic processes, or offer data-driven analyses to assist with decision making. This project will explore the capability of the Akida processor to identify pneumonia in an x-ray image, along with some potential next steps and description of how that can be leveraged in the real-world. We’ll use the Akida Developer Kit, Edge Impulse, a curated dataset from Kaggle, and some basic utilities to evaluate performance. The standard Edge Impulse workflow will be used, which is well-documented here.Dataset Collection
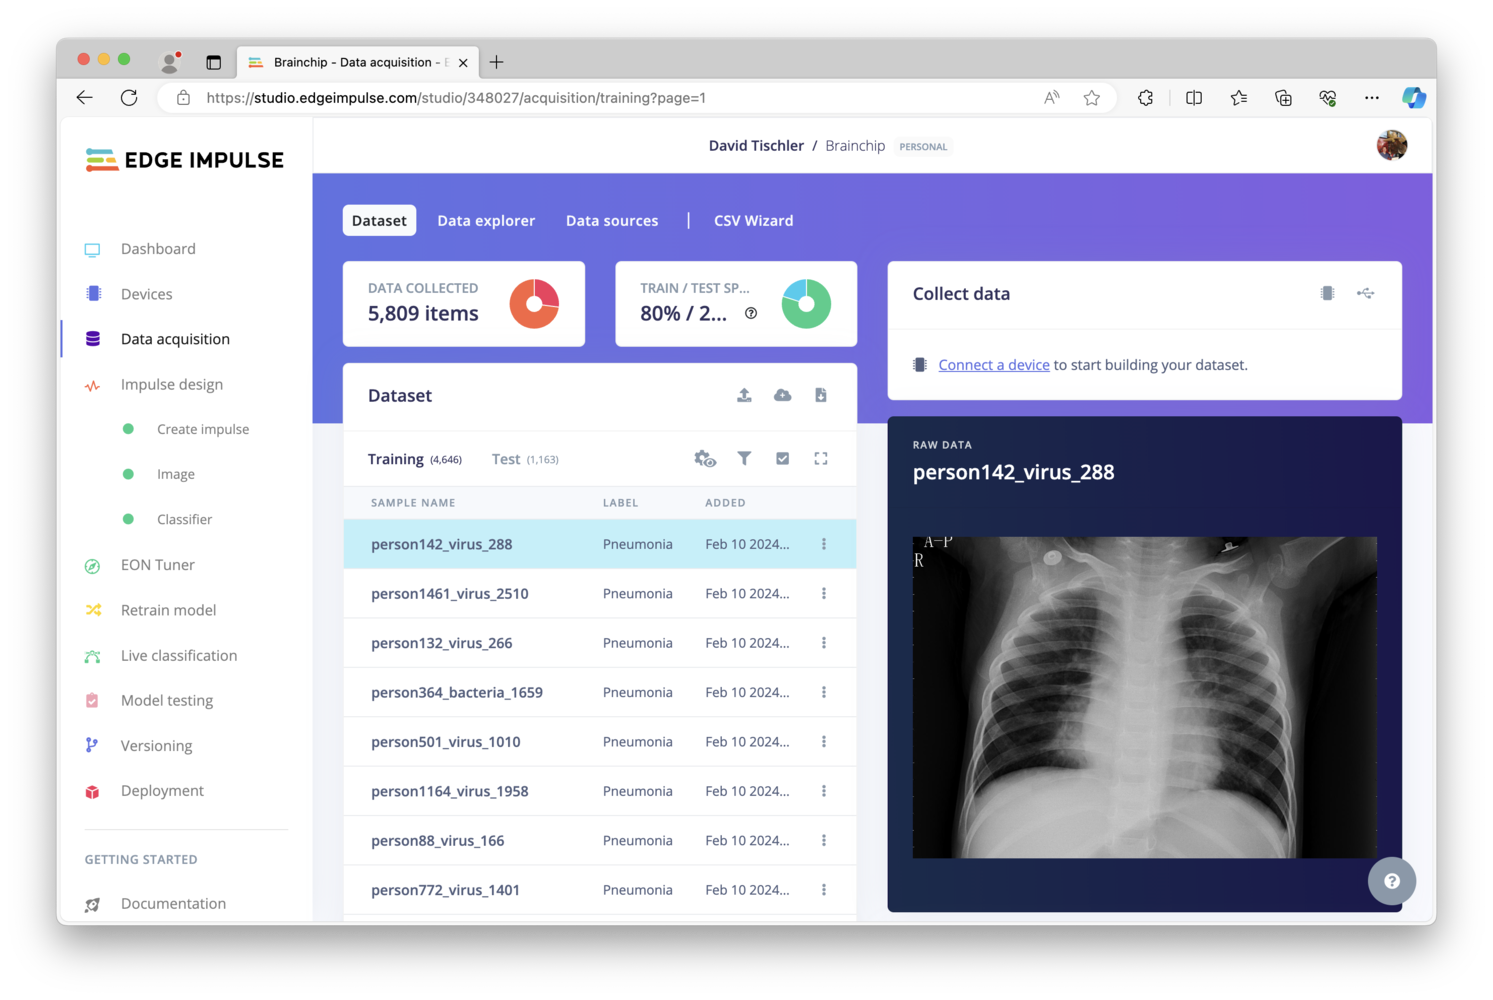
The first step to consider for a machine learning project is the dataset. This could be collected yourself, such as most sensor projects, or you can use an existing dataset if there is one that meets your particular needs. In this case, as we are interested in evaluating the Akida for x-ray classification, we can use the Chest X-Ray Images (Pneumonia) dataset provided by Paul Mooney on Kaggle. This dataset consists of 5,863 images (x-rays) of patients who were diagnosed with pneumonia, as well as those who did not have pneumonia (i.e., “normal”). You can download the dataset, then unzip it, to find Test, Train, and Validation folders, subdivided into “pneumonia” and “normal” folders for each. Make a new project in Edge Impulse, click on Data Acquisition, and then upload the Test and Train folders for each Class, making sure you select “Automatically split between training and testing” and also provide the correct Label for each folder condition.
Building a Model
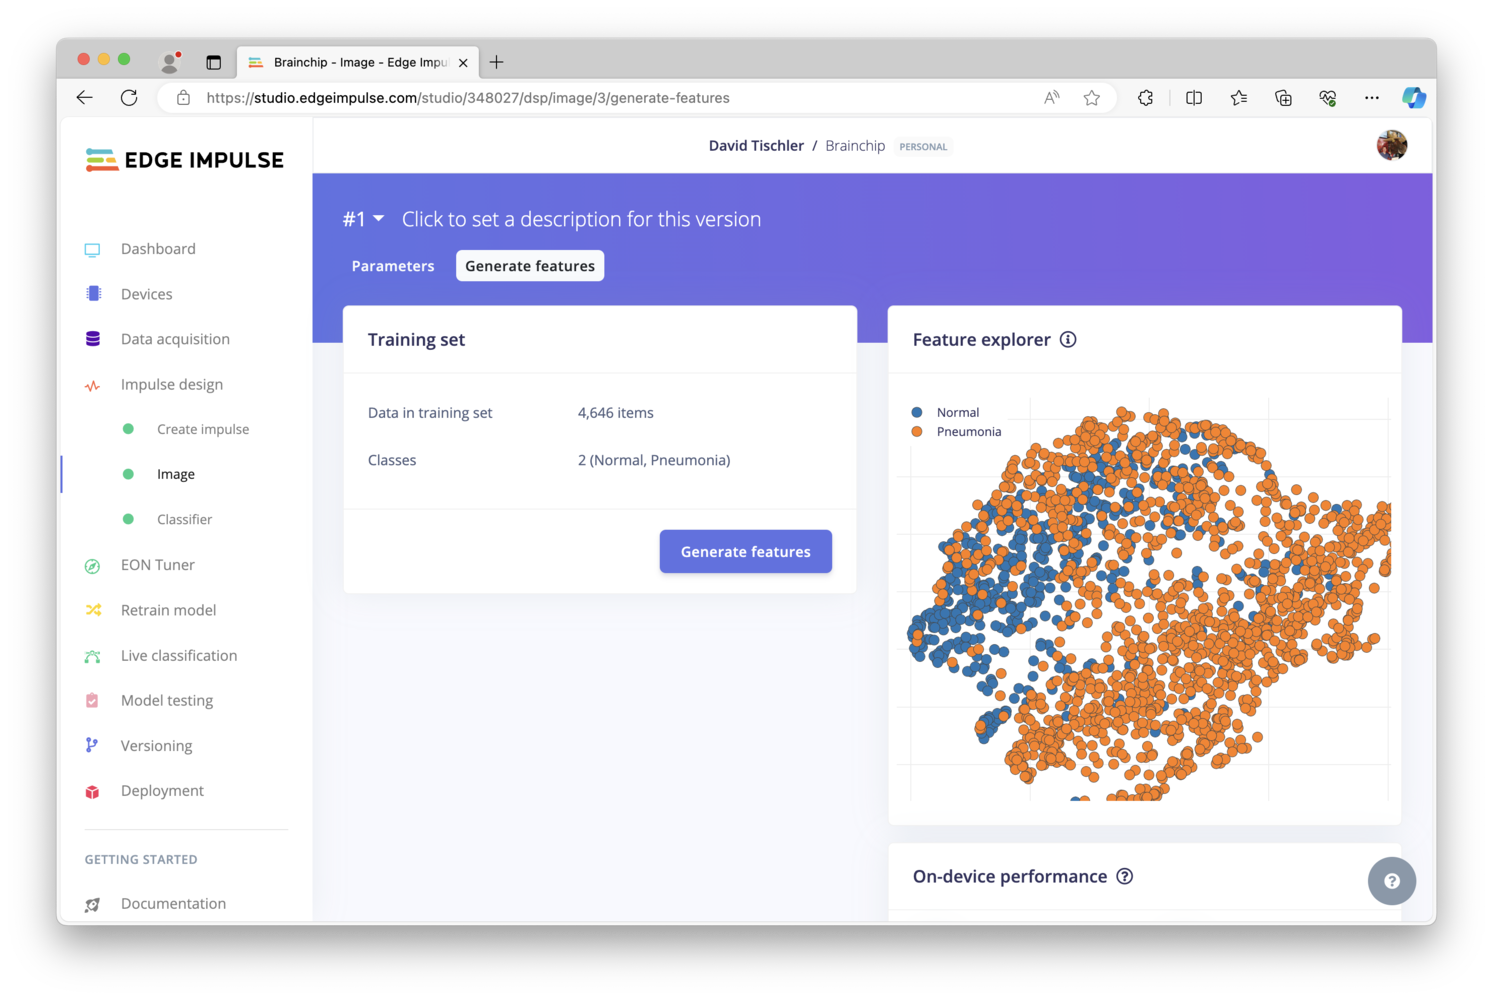
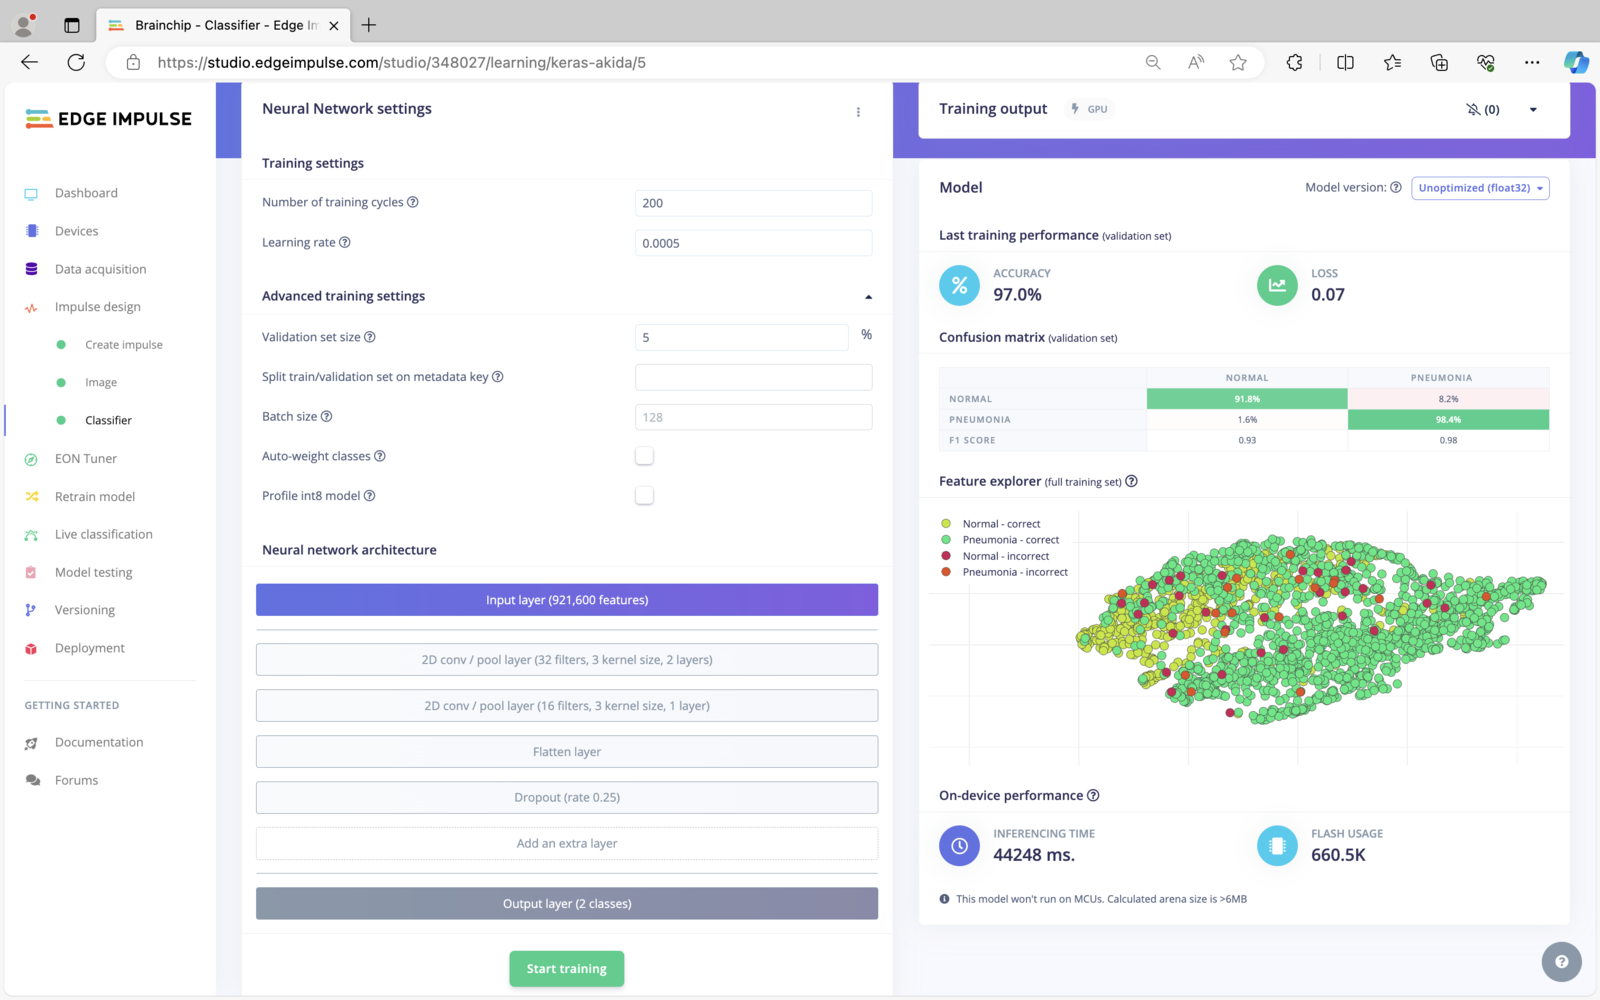
To begin the process of building a classification model, click on Impulse Design on the left, and set the image dimensions in the Image data block. I have chosen 640x480 as a starting point, though we could possible go a bit higher depending on if the model accuracy is too low once we begin testing. Next, add an Image Processing block, then a Classification - BrainChip Akida Learning block. Then click Save Impulse.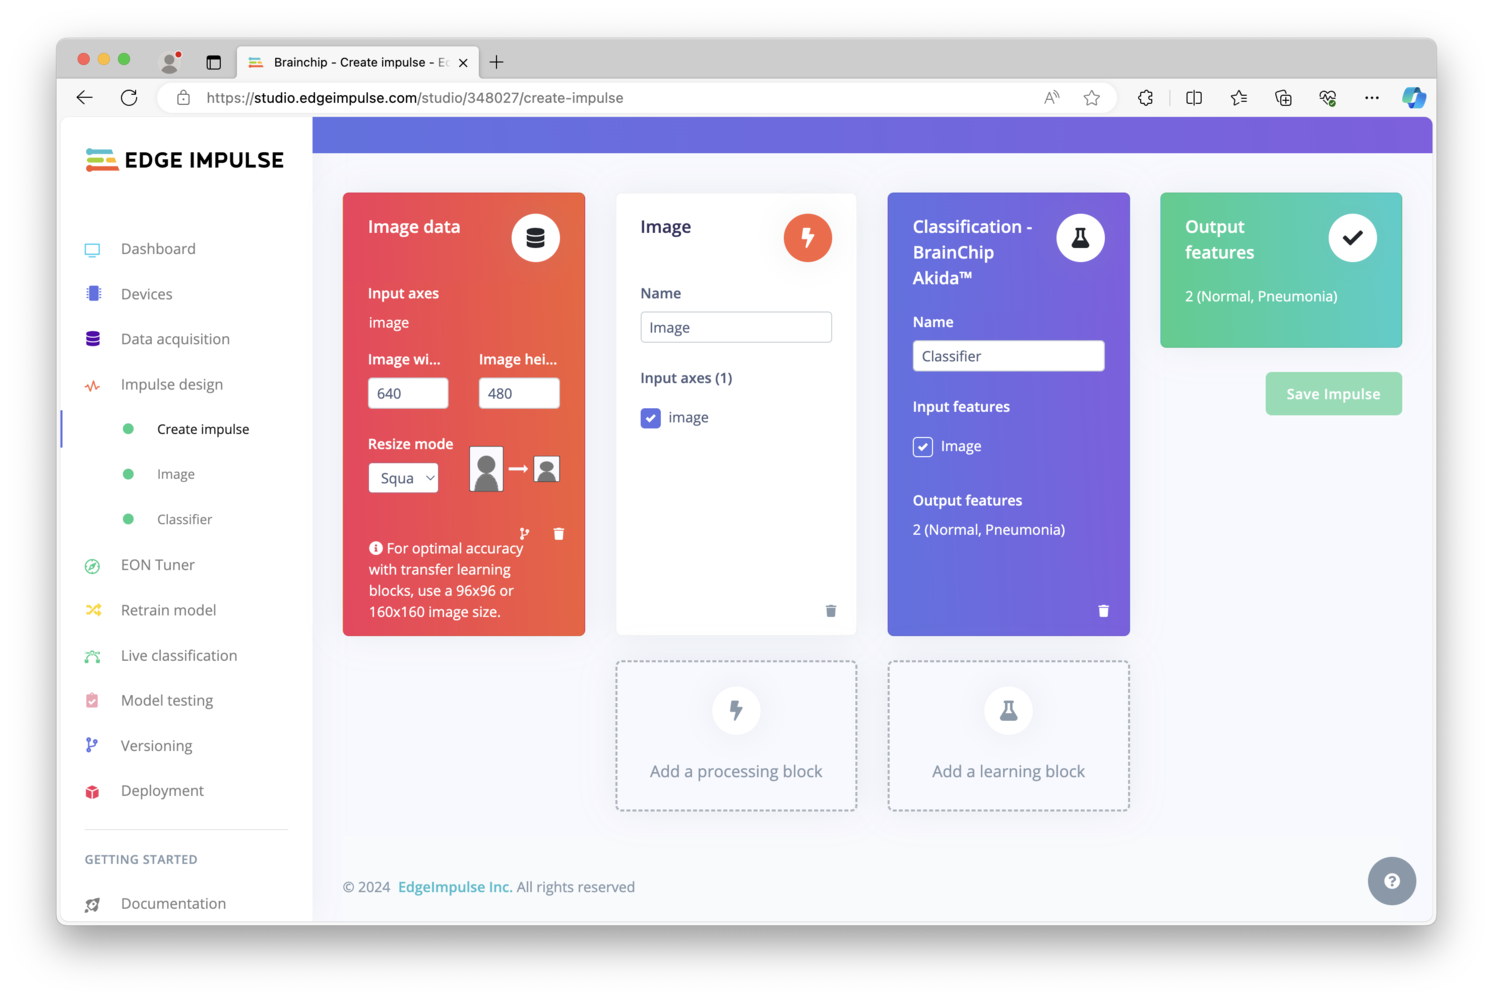
Deploying to the Developer Kit
Now it’s time to setup the Akida Developer Kit. There is an included SD Card, ready to use out-of-the-box with Brainchip’s model zoo and sample applications. This makes it quick and easy to evaluate the Akida, and begin using the device. But as we’re going to be using Edge Impulse in this tutorial, I’ve instead flashed a new SD Card with Ubuntu 20.04.5 LTS 64-bit by using the Raspberry Pi Imager application. I also used the “Customize” feature of the application to add a username and password, as well as local WiFi credentials, though you could just as easily plug in an ethernet cable for connectivity. Once booted up and on the network, the Akida Developer Kit is similar to any other Raspberry Pi in how you can interact with it. You can attach a keyboard, mouse, and HDMI monitor, or in my case I simply accessed the device over SSH.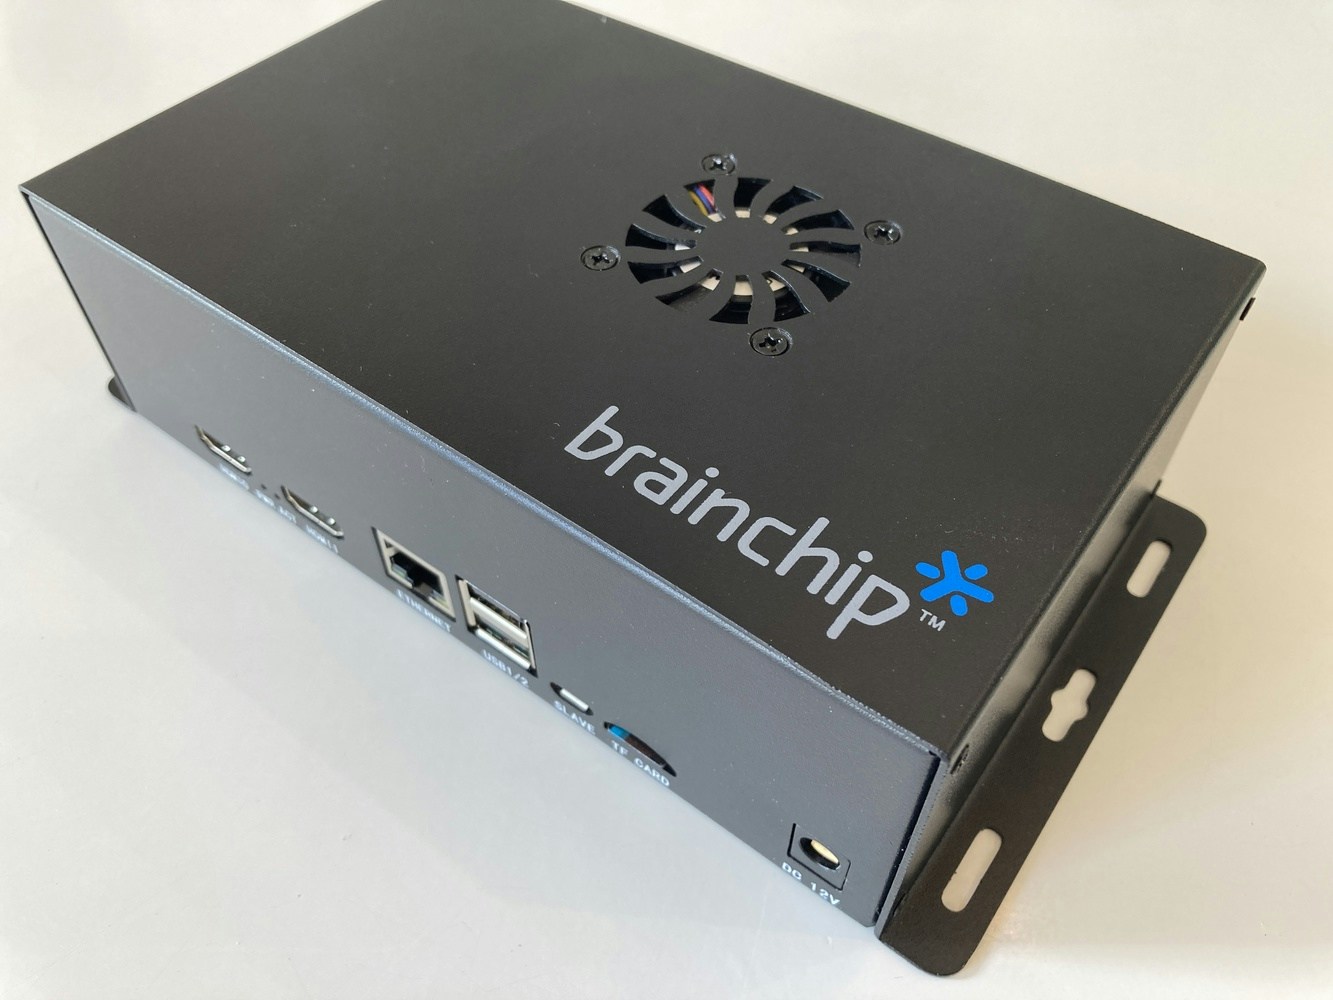
Note: Be sure to replace the username in Step 8, with your own username.If successful, the
akida devices command should return:
Inference Evaluation
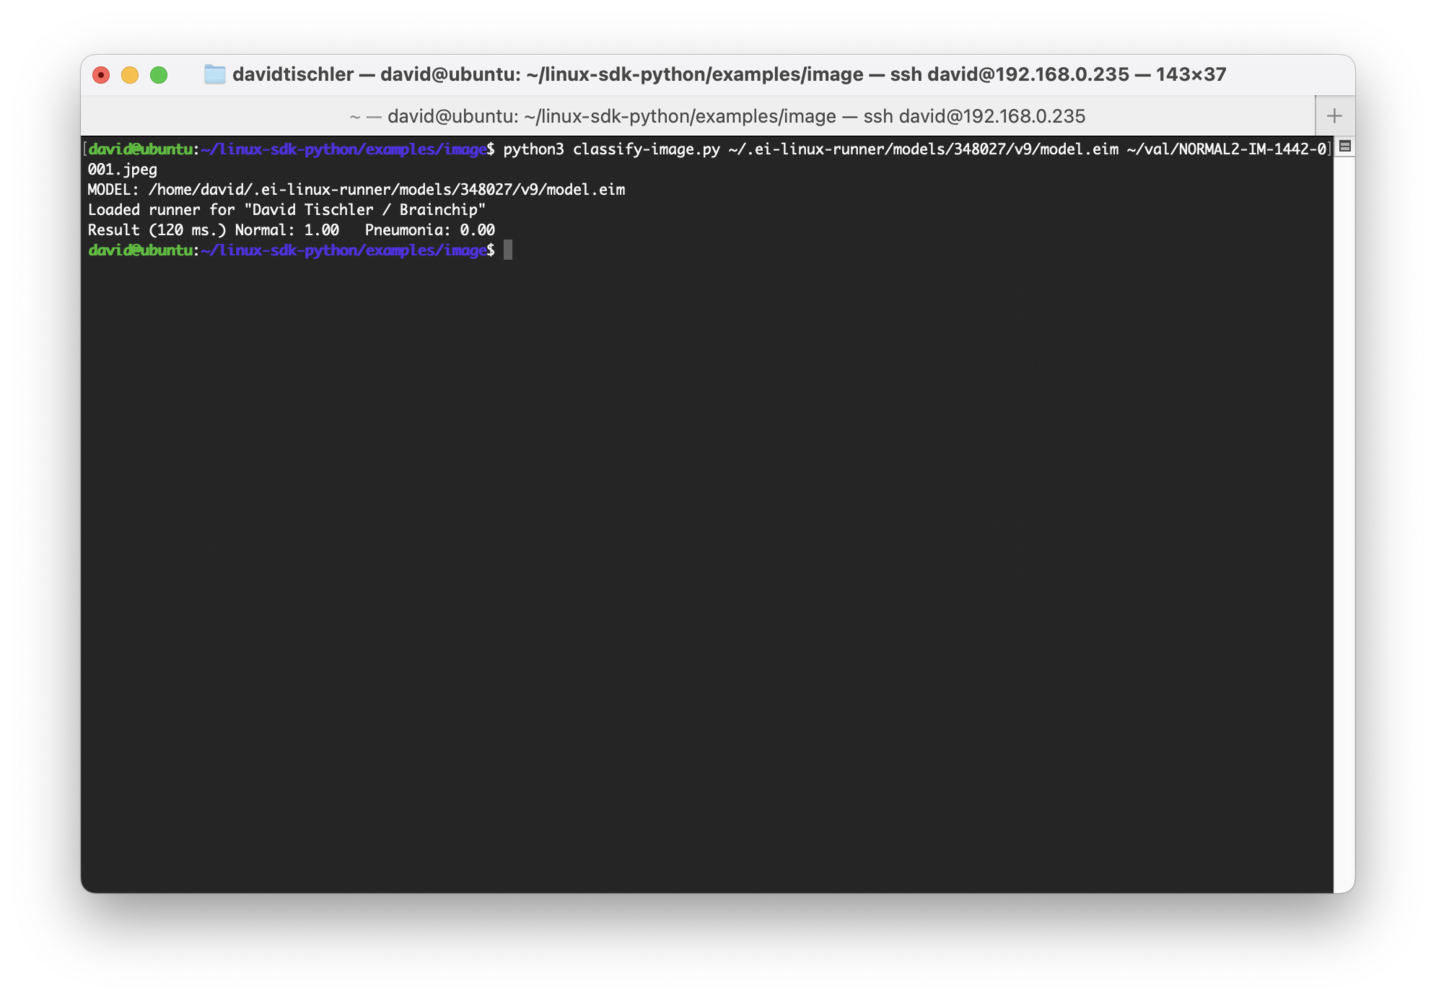
Now that the Akida Developer Kit is setup, we can run our model and evaluate the results. We’ll use two distinct methods to test out the Akida performance in this tutorial, though other methods or scenarios could also exist. The first method we will use is the Edge Impulse Linux SDK, which includes a sample python script that takes a model file and an image as inputs, run inferences on the given image, and then displays the output results on the command line. The second method is to use a USB Webcam attached to the Akida Developer Kit, capture the live video feed, and inference what is seen through the camera. If the images are displayed on a monitor, the brightness of the screen, resolution, or light in the room could impact the overall accuracy or ability of the model to make predictions. Thus is likely a less ideal method for this use-case, but we’ll document it as it could serve useful in other scenarios beyond x-ray classification.Method 1 - Linux SDK Python Inferencing
Earlier, when we unzipped the downloaded dataset from Kaggle, there were three folders inside it: Train, Test, and Val. We uploaded the Test and Train folders to Edge Impulse, but the Val folder was not uploaded. Instead, we can now place those Validation images on a USB drive and copy them over to the Akida Developer Box (or use thescp command, FTP, etc.) in order to evaluate how our model performs on the hardware.
In a terminal, we’ll continue where we left off above. With the images copied over to a USB stick and then inserted into the Akida Developer Kit, the following series of commands will copy the images to the device, and use the example python from the Linux SDK to run inference:
Note: Once again, the username needs to be substituted with your own. The project number and version number can be obtained by simplyThels’ing themodelsdirectory.
edge-impulse-linux-runner command in Step 4 above is used to connect the Akida Developer Kit to Edge Impulse, login with your credentials, select a project, and then download your model to the device. Once that is complete, inference will attempt to begin, but you can cancel the running process with Control+C to exit the process. The model is downloaded, which is what we are interested in. Continuing on with Step 5 and Step 6 will run the inference and display the results, time it took to process, and power consumption. You can iterate through all of the images in the validation folder you created (which should contain some Normal and some Pneumonia images.)
Method 2 - USB Webcam Inferencing
As mentioned above, the second methodology we’ll explore is live inference from an attached USB Webcam, though this does introduce a set of variables that may impact accuracy for our selected use-case of x-ray classification. Other use-cases may not have these variables, so we’ll document the method as it could be helpful for other projects. In this situation, we’ll open up those same Validation images on a separate laptop or PC, then point the webcam that is hooked up to the Akida Developer Kit at the monitor showing he x-ray image. On the Akida Developer Kit, launch the application by enteringedge-impulse-linux-runner on the command line.
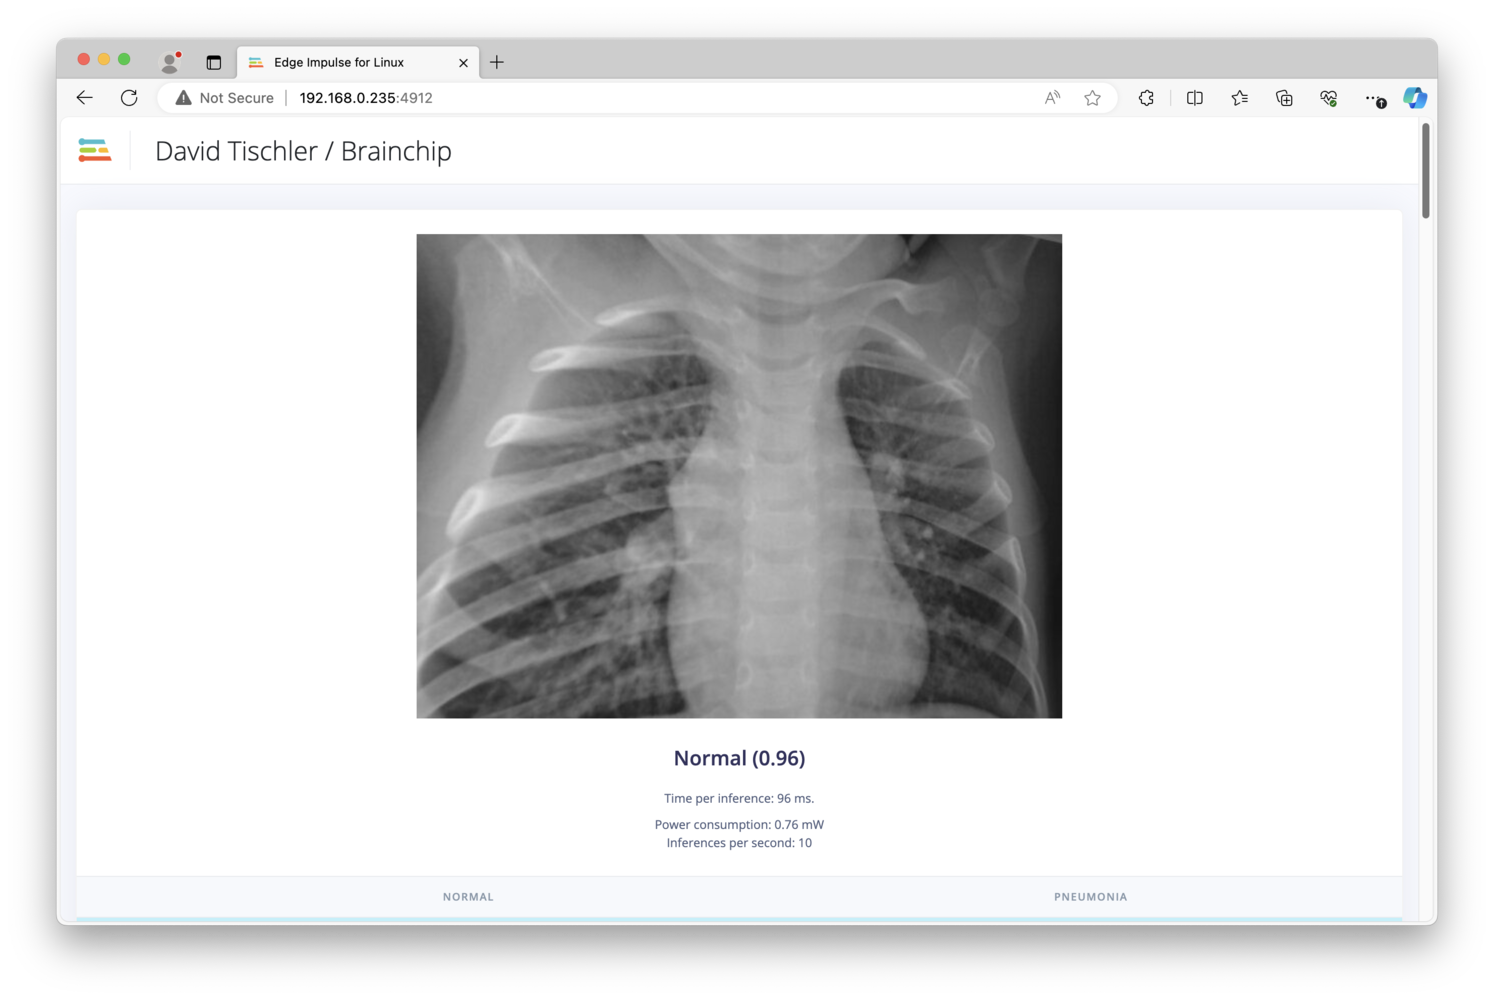
Inference will start running continuously, printing out results to the console. An extra feature of the Linux Runner is that it also starts an HTTP service, which can be accessed at http://<IP-address-of-the-device>:4912 (the IP will be displayed in the text that is printed out as the application begins, or just run ip a to find it).
Then in a browser on the PC or laptop, open up that URL and you will see a view from the camera, and its inference results. You might need to arrange your windows or move the camera so that it is only seeing the x-ray, otherwise classification will not work.
However, as identified earlier, this method may not be as reliable for the x-ray classification use-case, due to lighting conditions of the room, brightness and contrast of the monitor, quality of the USB Webcam, resolution and size of the monitor, etc. It is worth exploring though, as many vision projects are excellent candidates for live inferencing with a camera and the Akida NPU.