Introduction
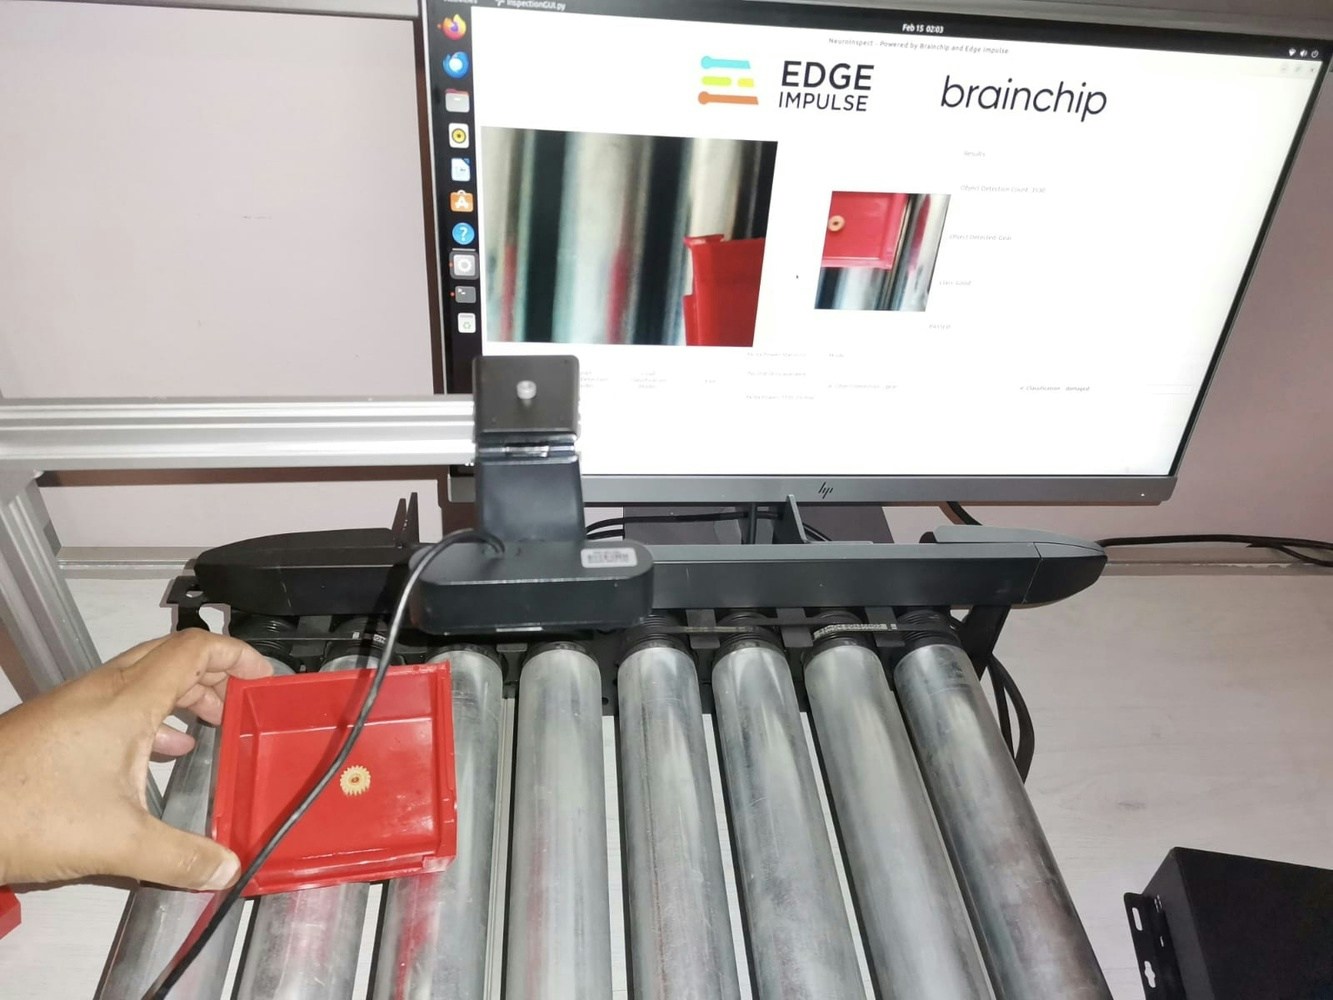
In the ever-evolving landscape of modern manufacturing, the efficiency and accuracy of production lines are paramount. The meticulous inspection of products at various stages ensures not only the adherence to quality standards but also the optimization of resources. In this dynamic scenario, the integration of cutting-edge technologies such as computer vision and artificial intelligence has emerged as a game-changer. Initially, machine vision systems relied on basic image processing techniques and rule-based algorithms. These early systems were capable of performing relatively simple tasks, such as inspecting products for basic defects or checking for the presence of specific features. These systems required cameras with high-cost Industrial PC’s to perform CPU-based processing that was expensive and power hungry, while offering limited performance. Today the trend has shifted towards using Deep Learning, specifically Convolutional Neural Networks on Graphics Processing Units and specialized CNN hardware accelerators. However, the solutions on the market are still relatively costly and power hungry. Cameras and IPC’s are available with integrated acceleration built-in for industrial use cases, but are very expensive. Neuromorphic processing, inspired by the human brain, diverges from traditional computing with its parallel, adaptive features like Spiking Neural Networks, parallel processing, event-driven computation, and synaptic plasticity. This disruptive technology holds promise for energy-efficient, brain-like information processing, particularly in tasks like pattern recognition and sensory processing. This makes Neuromorphic computing ideal for use in Industrial inspection systems where it can provide real-time insights into product quality. The benefits include reduced costs, improved performance, and being able to adapt the system at the edge to new use-cases. Brainchip Akida represents the state of the art in production-ready Neuromorphic computing, ideally suited to edge use-cases. We will be demonstrating the power of the Brainchip Akida in an industrial setting in this guide as part of a standalone inspection system that can be setup along a production line. The Akida processor is available on a PCIe card form-factor for integration into your own hardware, or ships as either an Intel or Arm-based developer kit. For the purpose of this project our focus is on the Arm-based developer kit, which consists of a Raspberry Pi Compute Module 4 mounted on a Raspberry PI Compute Module 4 IO board, enclosed in a metal housing. Many users coming from an Industrial environment have limited experience when it comes to AI and Deep Learning, which can seem daunting. There are very expensive platforms and solutions that help simplify the process, but none can match the ease of use and rapid performance of using Edge Impulse for the AI component of your project.Industrial Inspection Use Case
A typical scenario in an industrial manufacturing plant is defect detection. This can be applied to a range of different product types, but essentially the requirement is always to determine which products to reject, out of a set of products that are often moving along some kind of materials handling equipment such as a conveyor. To achieve this, classic machine vision techniques using old camera systems running CPU algorithms often included detecting a Region of Interest (ROI) and then focusing on that area, while using tools such as edge and blob detection to find anomalies.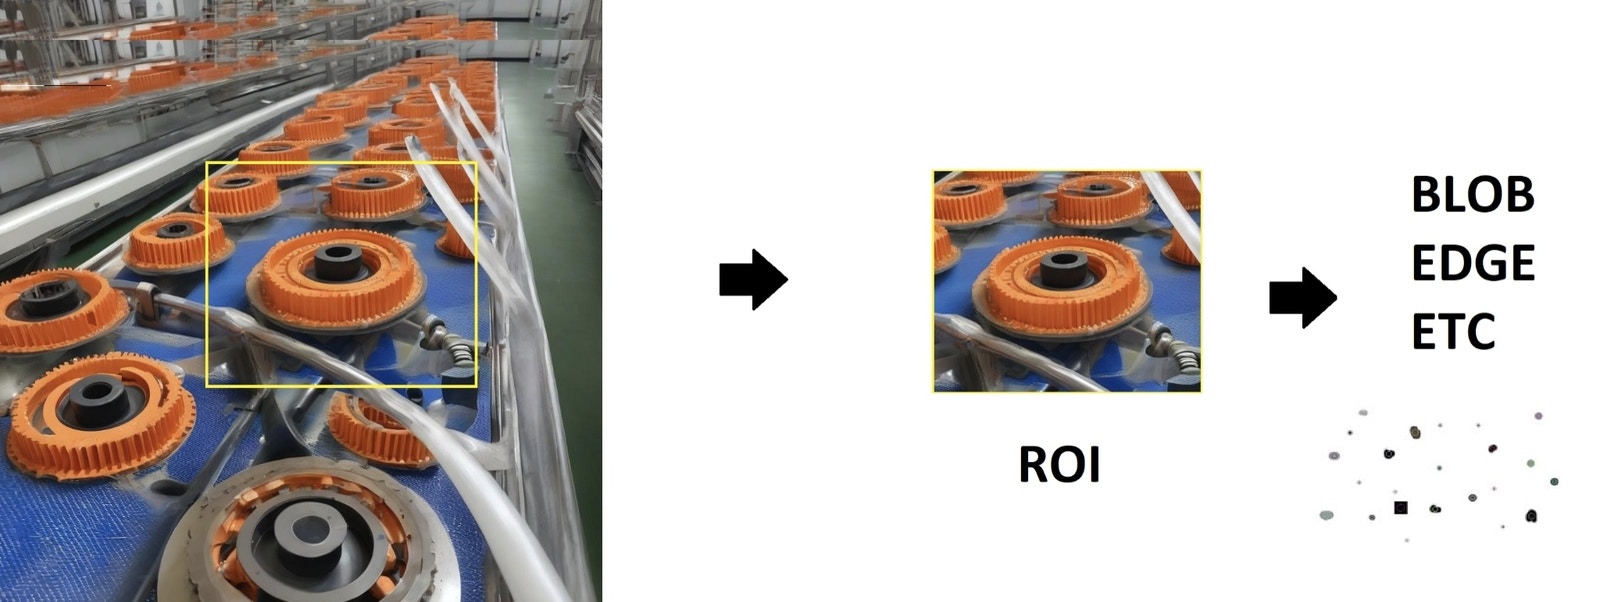
Setting up the Brainchip Akida Developer Kit
Step 1: Flash Ubuntu OS image
You need to install the Raspberry Pi Imager V1.8.5 or higher, and have a spare SD Card ready. An SD card with a minimum size of 16Gb is required. When selecting the OS, instead of choosing Raspberry Pi OS, a desktop version of Ubuntu needs to be installed.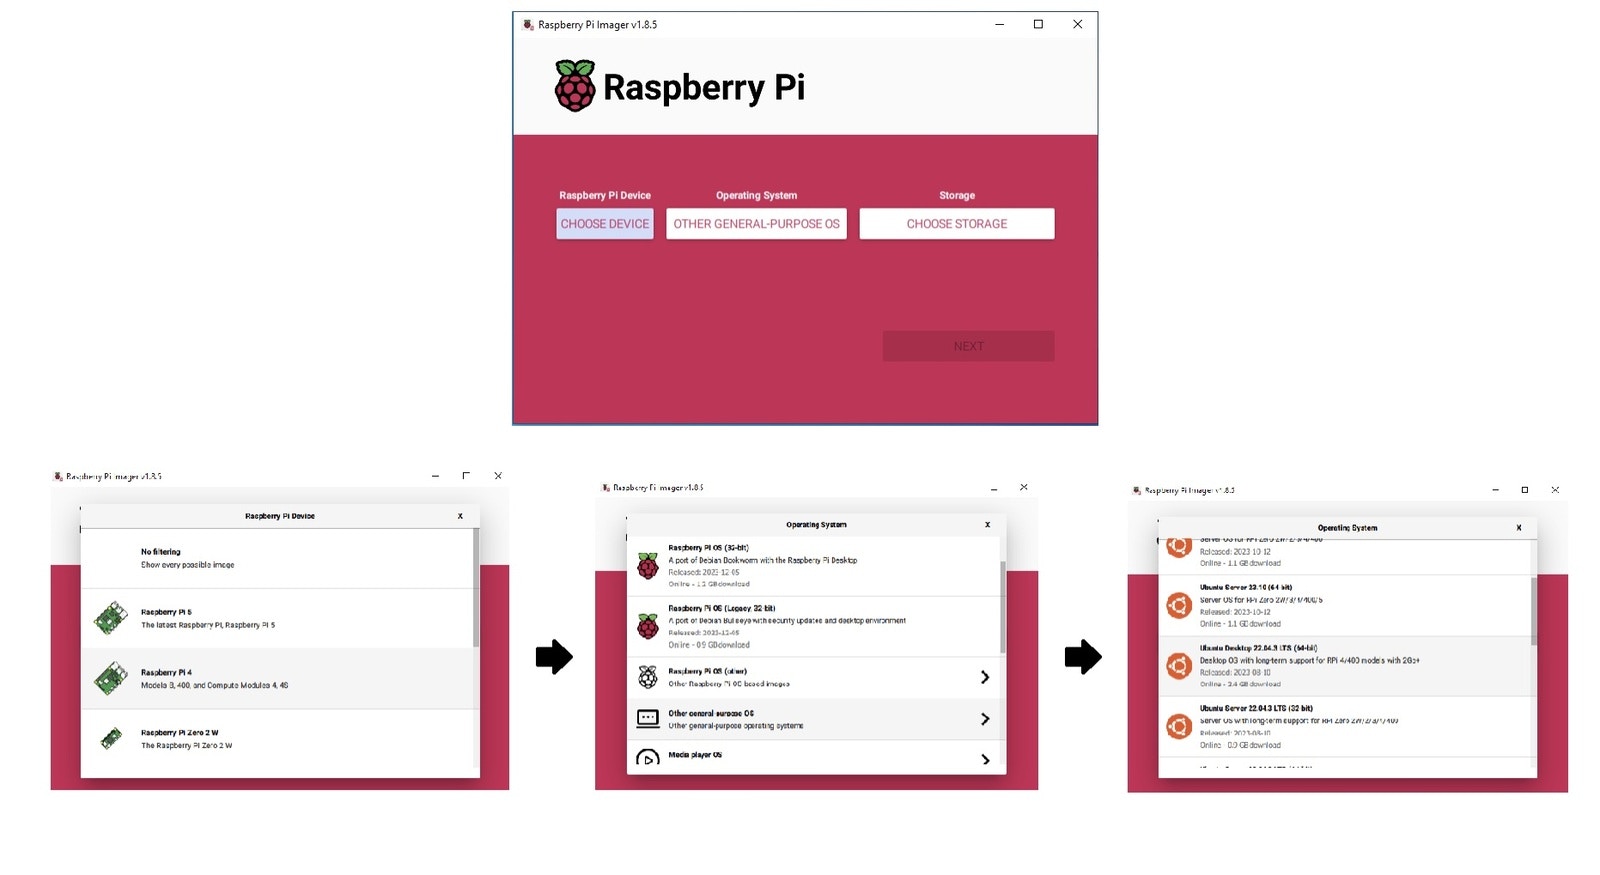
Step 2: Install Dependencies on the Device
Once ready, the SD card needs to be inserted into the Brainchip unit, which must be connected to a display via the HDMI port, and the keyboard and mouse attached via USB. Note due to the fact that the Raspberry Pi IO board only exposes 2 USB ports, it is recommended to use a wireless keyboard and trackpad combo via a dongle connected to a single port. This frees up the other USB port for use with a USB Webcam later. You can also use a USB hub to increase the number of USB ports available if needed. When booting up the Ubuntu OS installation for the first time, you will need to follow the prompts to set the time zone and create an initial user. Once you are able to open a command prompt, the following dependencies need to be installed:- Python 3.8 to 3.11: There should already be a suitable version of Python installed by default in Ubuntu 22.04.3 LTS.
- Tensorflow CPU: Follow the instructions here https://www.tensorflow.org/install/pip to install TensorFlow, but make sure to do a CPU installation.
- Akida Execution Engine: This component of the MetaTF framework provides access to the Akida hardware, or a software simulator if you don’t have hardware present. It also provides a Keras-like API via Python for programmatic access to the Akida Hardware.
- Akida PCIe Driver: Lastly the Akida PCIe driver is required, to ensure that the Akida Execution Engine can directly access the Akida co-processor.
pip from the command line on the device (you can do this via SSH as well):
pip as well, as it is offered as a Python package:
build-essentials and linux-headers packages need to be installed on the system first, and then the Akida driver can be downloaded from the Brainchip GitHub repository via the command line:
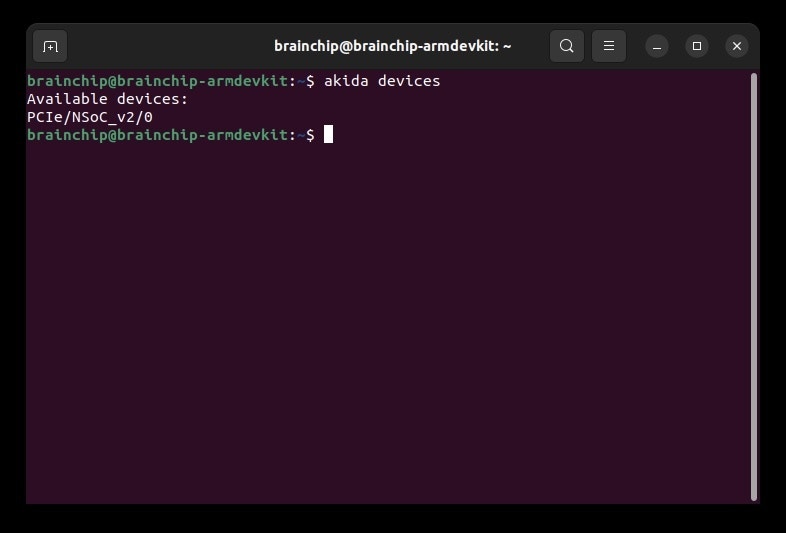
akida command is used as follows:
akida command is available as a result of the installation of the Akida package earlier.

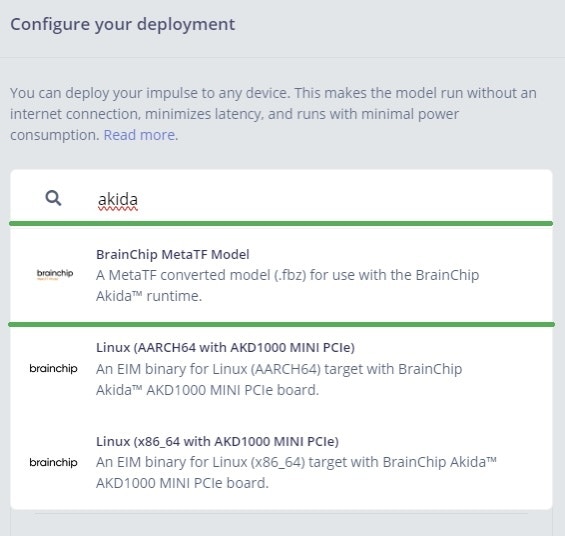
.fbz format that can be loaded or mapped directly onto the Akida NSoC at runtime.
Edge Impulse and Brainchip
For an industrial automation engineer, or anyone not familiar with deep learning, this can seem daunting and slows down the efficacy of deploying AI-based inspection systems. The fastest path to market in the past has been expensive proprietary camera hardware and software solutions that abstract the process with complicated licensing, and limited access to the underlying platform. However, the Brainchip Akida acts as a co-processor, enabling you to use your existing x86 or Arm-based platform to have full freedom on your final application. From the software perspective, Edge Impulse eliminates that complexity and cost and provides a solution that offers a flexible way to collect data using the Brainchip hardware, or any other device with a camera, even your mobile phone. The process of building the ML model is intuitive and straight-forward, and thanks to Edge Impulse’s built in support for the Akida AKD1000, Edge Impulse generates a model that is optimized and performs the Akida workflow for you automatically in the background, with the result being either a.fbz model or Edge Impulse’s extremely useful .eim executable model format.
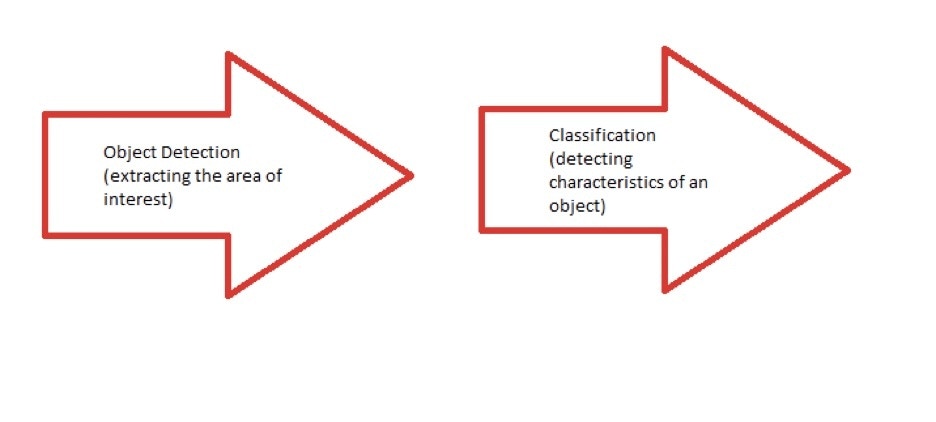
For the purposes of an inspection system, two distinct models need to be built:
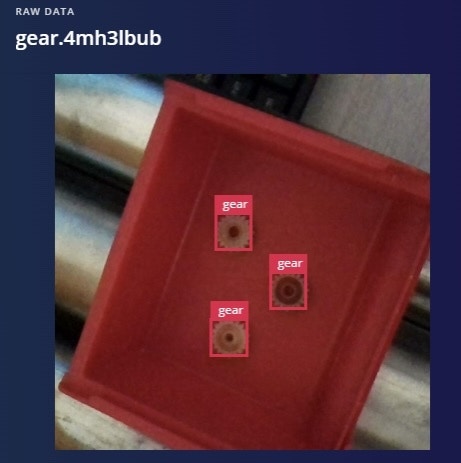
Object Detection (FOMO) - Edge Impulse’s Faster Objects More Objects model architecture has been ported to work on the AKD1000. This model works well at fixed depths, which makes it ideal for inspection applications.
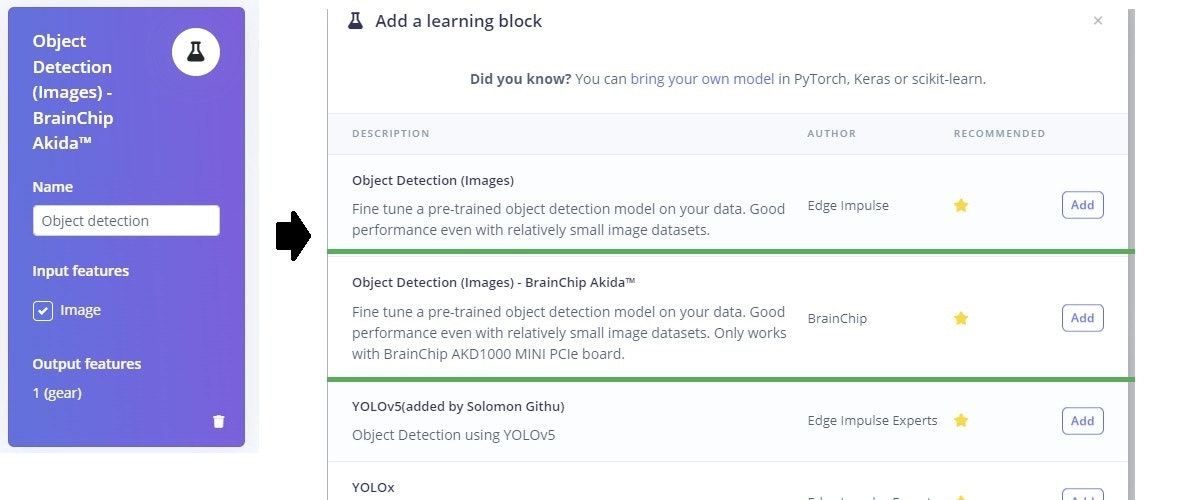
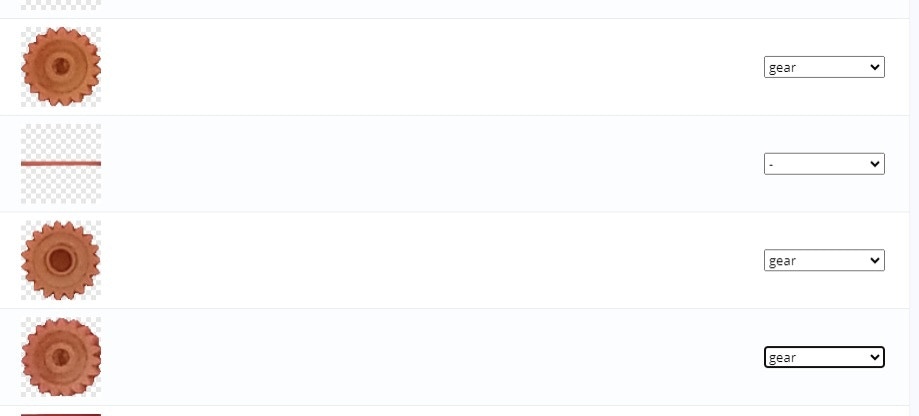
Auto Labeling Data - Object Detection
Users with an Enterprise Account can make use of the “Auto Labeler” feature, which saves significant time when labeling object detection data sets:
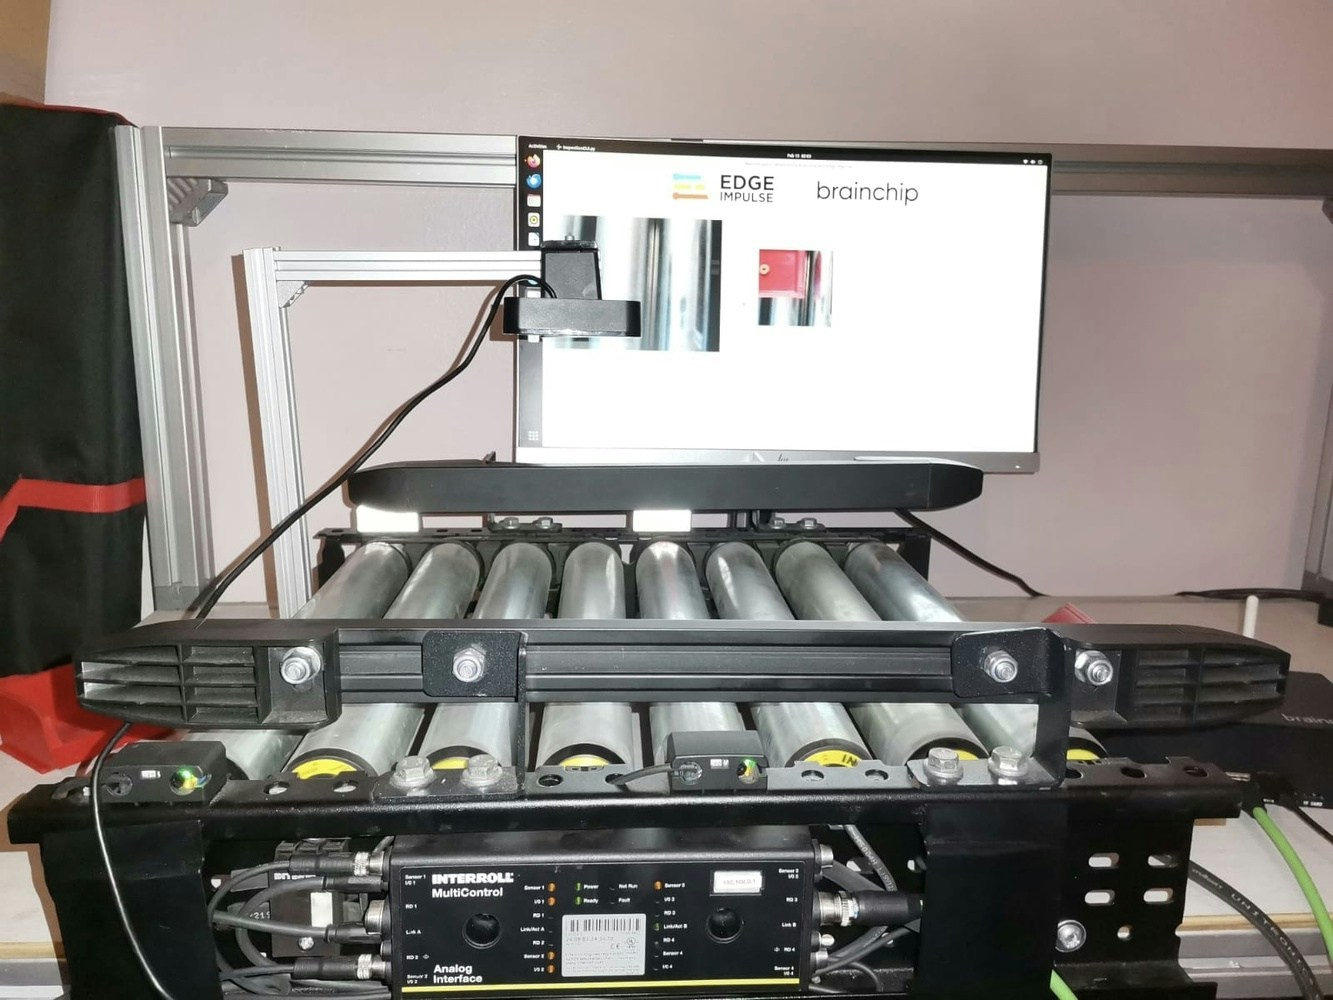
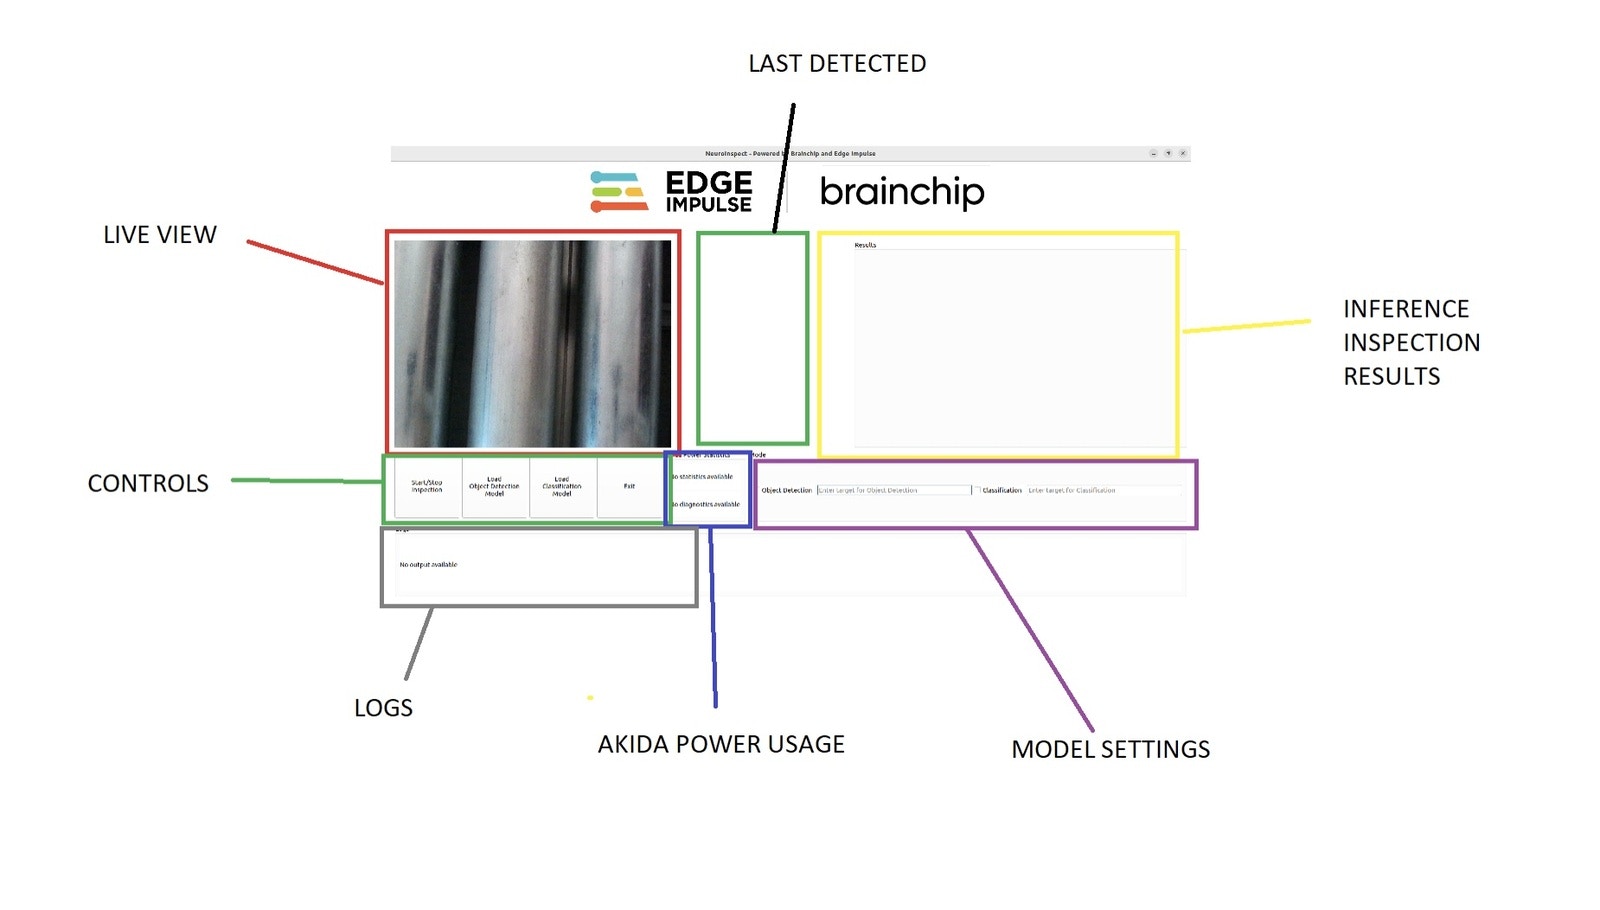
Inspection System
To create an inspection system, a local GUI client based on Qt is used, written in Python. Thanks to the native acceleration provided by Akida, using Python does not affect performance as all ML inference takes place in hardware in the neuromorphic SoC. Dependencies need to be installed for the app, including OpenCV and PyQt5 which are installed with the following commands: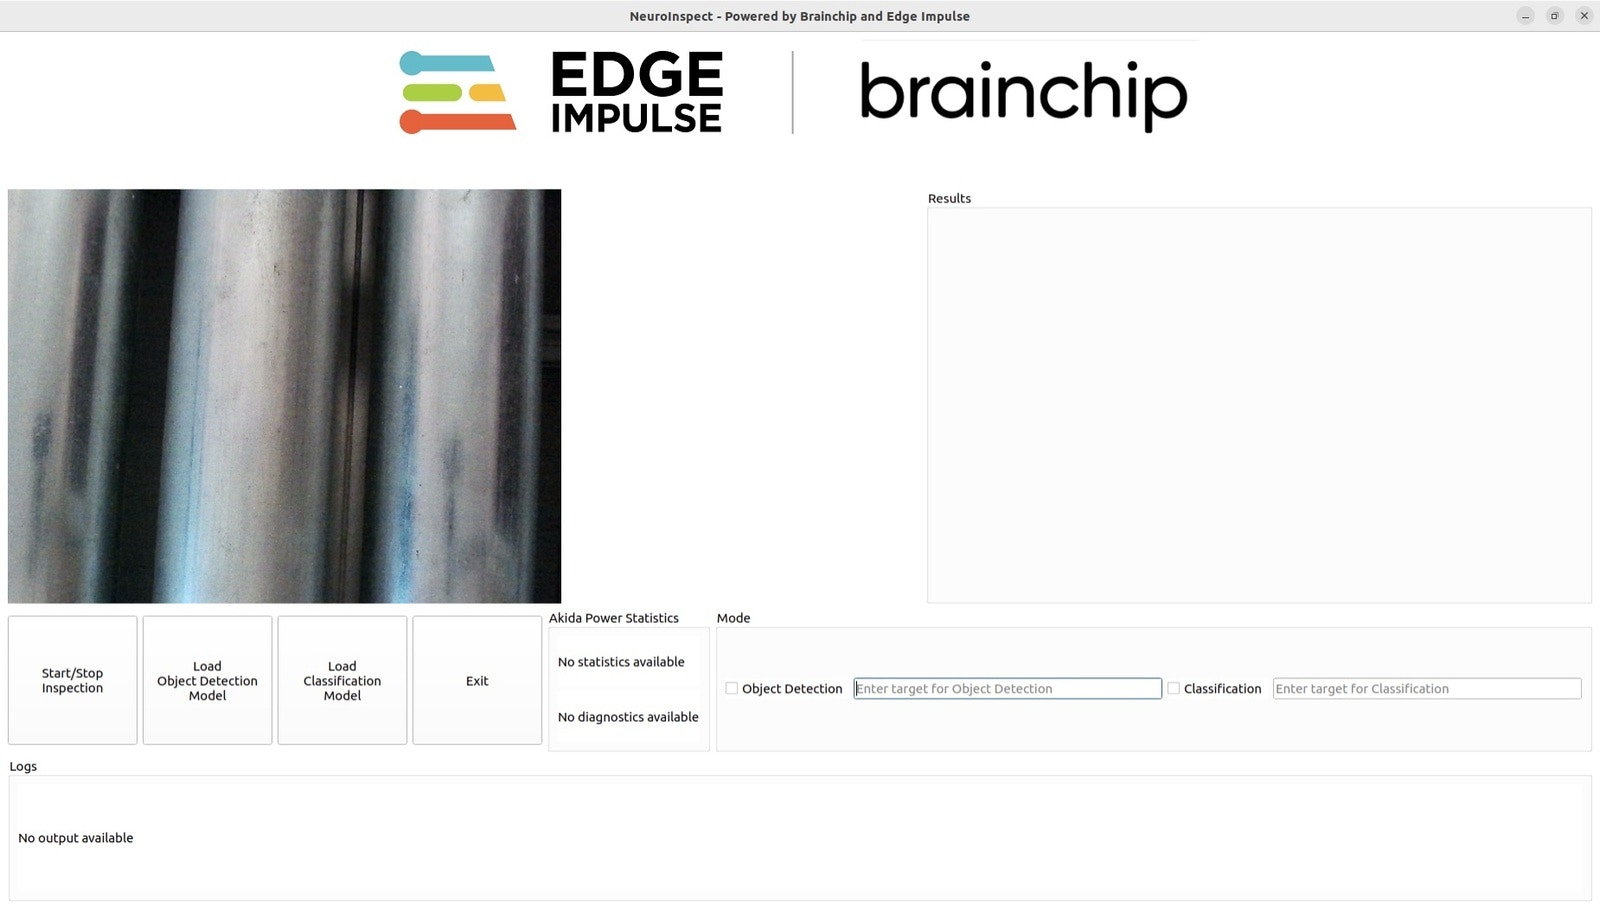
.fbz files deployed from the Edge Impulse Studio.
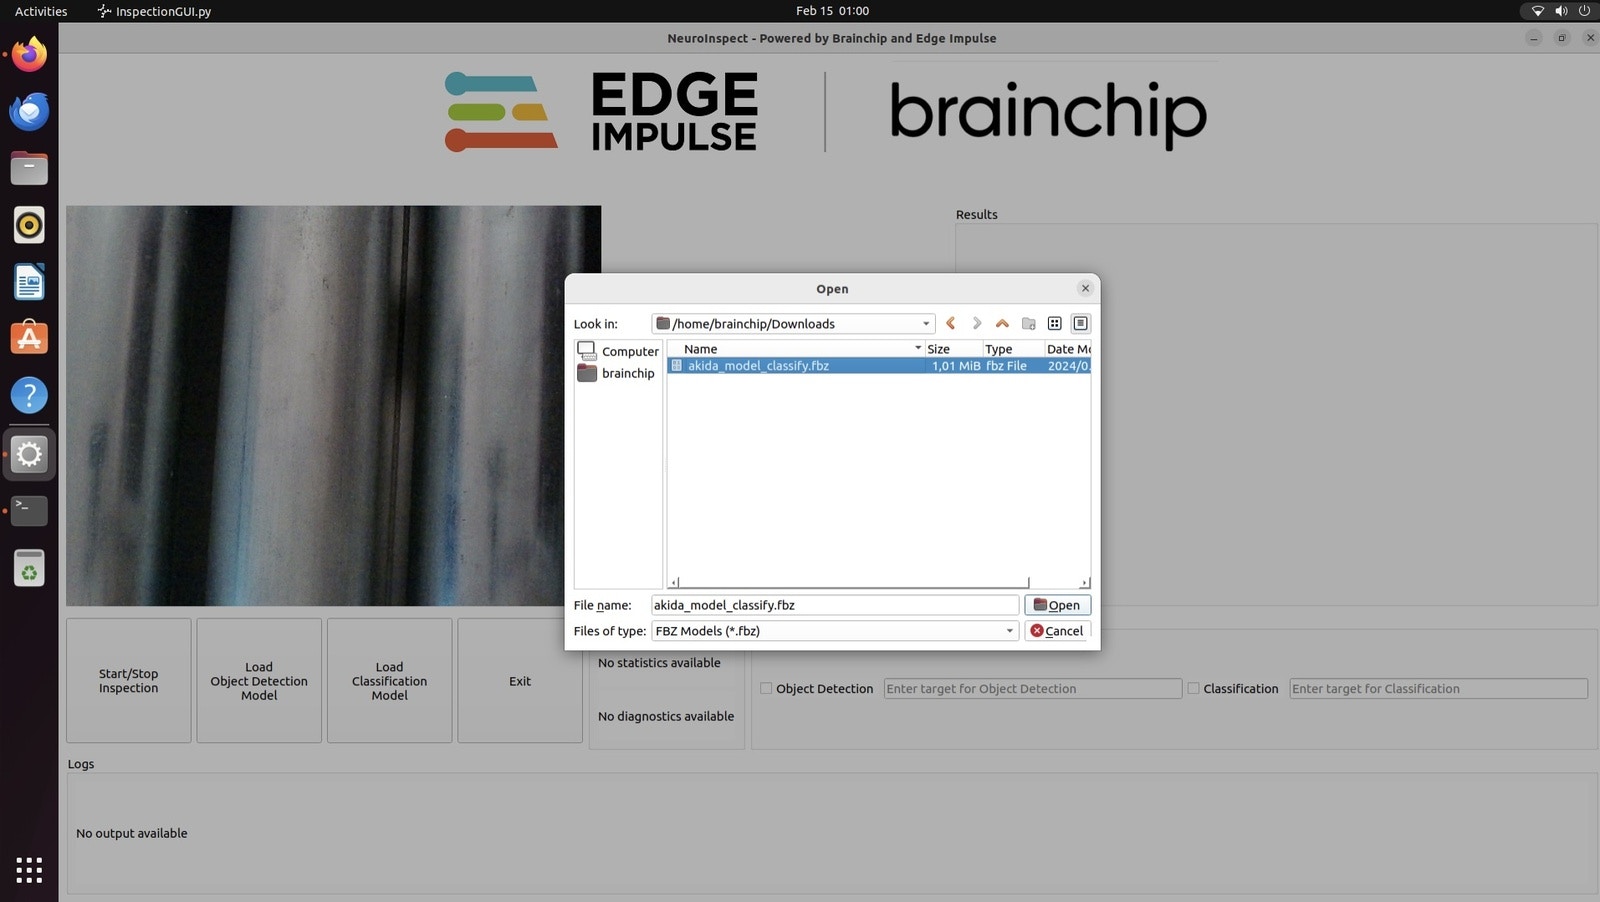
.fbz file by creating an instance of the model class and passing the file name as a parameter.
The Akida ADK1000 uses a process called mapping to load models into the NSoC. This is done by calling the “map member” function of the model class and specifying the device, which is essentially using the returned device shown earlier. What is useful is the ability to map models on the fly, and this is what is being done in the above application.
Application Functionality
When the “Start Inspection” mode is selected, first the Object Detection model is loaded to detect and localize the part on the conveyor. Next, the Classifier model is loaded and run on the result of the localized area. The Object Detector and Classifier run in a pipeline, which is a common machine learning design pattern. The app is shown running live below: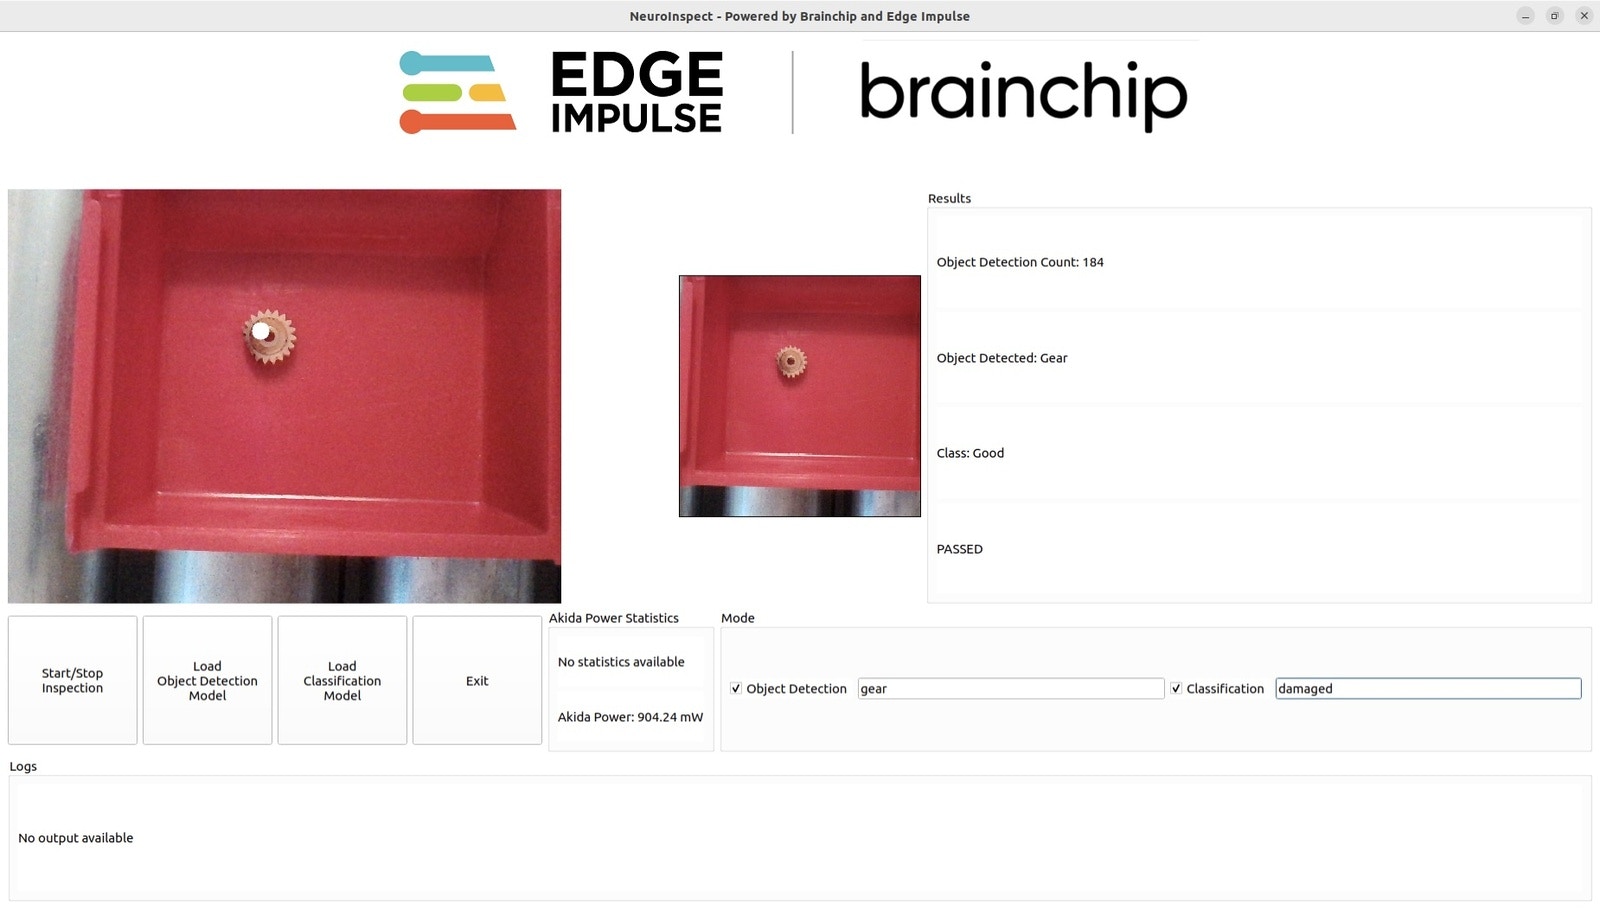
- Object Detection - https://studio.edgeimpulse.com/studio/349843
- Classification - https://studio.edgeimpulse.com/studio/349858