LogoLogo
HomeDocsAPI & SDKsProjectsForumStudio
  • Welcome
    • Featured Machine Learning Projects
      • Getting Started with the Edge Impulse Nvidia TAO Pipeline - Renesas EK-RA8D1
      • Smart City Traffic Analysis - NVIDIA TAO + Jetson Orin Nano
      • ROS 2 Pick and Place System - Arduino Braccio++ Robotic Arm and Luxonis OAK-D
      • Optimize a cloud-based Visual Anomaly Detection Model for Edge Deployments
      • Rooftop Ice Detection with Things Network Visualization - Nvidia Omniverse Replicator
      • Surgery Inventory Object Detection - Synthetic Data - Nvidia Omniverse Replicator
      • NVIDIA Omniverse - Synthetic Data Generation For Edge Impulse Projects
      • Community Guide – Using Edge Impulse with Nvidia DeepStream
      • Computer Vision Object Counting - Avnet RZBoard V2L
      • Gesture Appliances Control with Pose Detection - BrainChip AKD1000
      • Counting for Inspection and Quality Control - Nvidia Jetson Nano (TensorRT)
      • High-resolution, High-speed Object Counting - Nvidia Jetson Nano (TensorRT)
    • Prototype and Concept Projects
      • Renesas CK-RA6M5 Cloud Kit - Getting Started with Machine Learning
      • TI CC1352P Launchpad - Getting Started with Machine Learning
      • OpenMV Cam RT1062 - Getting Started with Machine Learning
      • Getting Started with Edge Impulse Experiments
  • Computer Vision Projects
    • Workplace Organizer - Nvidia Jetson Nano
    • Recyclable Materials Sorter - Nvidia Jetson Nano
    • Analog Meter Reading - Arduino Nicla Vision
    • Creating Synthetic Data with Nvidia Omniverse Replicator
    • SonicSight AR - Sound Classification with Feedback on an Augmented Reality Display
    • Traffic Monitoring - Brainchip Akida
    • Multi-camera Video Stream Inference - Brainchip Akida
    • Industrial Inspection Line - Brainchip Akida
    • X-Ray Classification and Analysis - Brainchip Akida
    • Inventory Stock Tracker - FOMO - BrainChip Akida
    • Container Counting - Arduino Nicla Vision
    • Smart Smoke Alarm - Arduino Nano 33
    • Shield Bot Autonomous Security Robot
    • Cyclist Blind Spot Detection - Himax WE-I Plus
    • IV Drip Fluid-Level Monitoring - Arduino Portenta H7
    • Worker PPE Safety Monitoring - Nvidia Jetson Nano
    • Delivered Package Detection - ESP-EYE
    • Bean Leaf Disease Classification - Sony Spresense
    • Oil Tank Measurement Using Computer Vision - Sony Spresense
    • Object Counting for Smart Industries - Raspberry Pi
    • Smart Cashier with FOMO - Raspberry Pi
    • PCB Defect Detection with Computer Vision - Raspberry Pi
    • Bicycle Counting - Sony Spresense
    • Counting Eggs with Computer Vision - OpenMV Cam H7
    • Elevator Passenger Counting - Arduino Nicla Vision
    • ESD Protection using Computer Vision - Seeed ReComputer
    • Solar Panel Defect Detection - Arduino Portenta H7
    • Label Defect Detection - Raspberry Pi
    • Dials and Knob Monitoring with Computer Vision - Raspberry Pi
    • Digital Character Recognition on Electric Meter System - OpenMV Cam H7
    • Corrosion Detection with Computer Vision - Seeed reTerminal
    • Inventory Management with Computer Vision - Raspberry Pi
    • Monitoring Retail Checkout Lines with Computer Vision - Renesas RZ/V2L
    • Counting Retail Inventory with Computer Vision - Renesas RZ/V2L
    • Pose Detection - Renesas RZ/V2L
    • Product Quality Inspection - Renesas RZ/V2L
    • Smart Grocery Cart Using Computer Vision - OpenMV Cam H7
    • Driver Drowsiness Detection With FOMO - Arduino Nicla Vision
    • Gastroscopic Image Processing - OpenMV Cam H7
    • Pharmaceutical Pill Quality Control and Defect Detection
    • Deter Shoplifting with Computer Vision - Texas Instruments TDA4VM
    • Smart Factory Prototype - Texas Instruments TDA4VM
    • Correct Posture Detection and Enforcement - Texas Instruments TDA4VM
    • Visual Anomaly Detection with FOMO-AD - Texas Instruments TDA4VM
    • Surface Crack Detection and Localization - Texas Instruments TDA4VM
    • Surface Crack Detection - Seeed reTerminal
    • Retail Image Classification - Nvidia Jetson Nano
    • SiLabs xG24 Plus Arducam - Sorting Objects with Computer Vision and Robotics - Part 1
    • SiLabs xG24 Plus Arducam - Sorting Objects with Computer Vision and Robotics - Part 2
    • Object Detection and Visualization - Seeed Grove Vision AI Module
    • Bike Rearview Radar - Raspberry Pi
    • Build a Self-Driving RC Vehicle - Arduino Portenta H7 and Computer Vision
    • "Bring Your Own Model" Image Classifier for Wound Identification
    • Acute Lymphoblastic Leukemia Classifier - Nvidia Jetson Nano
    • Hardhat Detection in Industrial Settings - Alif Ensemble E7
    • Motorcycle Helmet Identification and Traffic Light Control - Texas Instruments AM62A
    • Import a Pretrained Model with "Bring Your Own Model" - Texas Instruments AM62A
    • Product Inspection with Visual Anomaly Detection - FOMO-AD - Sony Spresense
    • Visual Anomaly Detection in Fabric using FOMO-AD - Raspberry Pi 5
    • Car Detection and Tracking System for Toll Plazas - Raspberry Pi AI Kit
    • Visual Anomaly Detection - Seeed Grove Vision AI Module V2
    • Object Counting with FOMO - OpenMV Cam RT1062
    • Visitor Heatmap with FOMO Object Detection - Jetson Orin Nano
    • Vehicle Security Camera - Arduino Portenta H7
  • Audio Projects
    • Occupancy Sensing - SiLabs xG24
    • Smart Appliance Control Using Voice Commands - Nordic Thingy:53
    • Glass Window Break Detection - Nordic Thingy:53
    • Illegal Logging Detection - Nordic Thingy:53
    • Illegal Logging Detection - Syntiant TinyML
    • Wearable Cough Sensor and Monitoring - Arduino Nano 33 BLE Sense
    • Collect Data for Keyword Spotting - Raspberry Pi Pico
    • Voice-Activated LED Strip - Raspberry Pi Pico
    • Snoring Detection on a Smart Phone
    • Gunshot Audio Classification - Arduino Nano 33 + Portenta H7
    • AI-Powered Patient Assistance - Arduino Nano 33 BLE Sense
    • Acoustic Pipe Leakage Detection - Arduino Portenta H7
    • Location Identification using Sound - Syntiant TinyML
    • Environmental Noise Classification - Nordic Thingy:53
    • Running Faucet Detection - Seeed XIAO Sense + Blues Cellular
    • Vandalism Detection via Audio Classification - Arduino Nano 33 BLE Sense
    • Predictive Maintenance Using Audio Classification - Arduino Nano 33 BLE Sense
    • Porting an Audio Project from the SiLabs Thunderboard Sense 2 to xG24
    • Environmental Audio Monitoring Wearable - Syntiant TinyML - Part 1
    • Environmental Audio Monitoring Wearable - Syntiant TinyML - Part 2
    • Keyword Spotting - Nordic Thingy:53
    • Detecting Worker Accidents with Audio Classification - Syntiant TinyML
    • Snoring Detection with Syntiant NDP120 Neural Decision Processor - Arduino Nicla Voice
    • Recognize Voice Commands with the Particle Photon 2
    • Voice Controlled Power Plug with Syntiant NDP120 (Nicla Voice)
    • Determining Compressor State with Audio Classification - Avnet RaSynBoard
    • Developing a Voice-Activated Product with Edge Impulse's Synthetic Data Pipeline
    • Enhancing Worker Safety using Synthetic Audio to Create a Dog Bark Classifier
  • Predictive Maintenance and Defect Detection Projects
    • Predictive Maintenance - Nordic Thingy:91
    • Brushless DC Motor Anomaly Detection
    • Industrial Compressor Predictive Maintenance - Nordic Thingy:53
    • Anticipate Power Outages with Machine Learning - Arduino Nano 33 BLE Sense
    • Faulty Lithium-Ion Cell Identification in Battery Packs - Seeed Wio Terminal
    • Weight Scale Predictive Maintenance - Arduino Nano 33 BLE Sense
    • Fluid Leak Detection With a Flowmeter and AI - Seeed Wio Terminal
    • Pipeline Clog Detection with a Flowmeter and AI - Seeed Wio Terminal
    • Refrigerator Predictive Maintenance - Arduino Nano 33 BLE Sense
    • Motor Pump Predictive Maintenance - Infineon PSoC 6 WiFi-BT Pioneer Kit + CN0549
    • BrickML Demo Project - 3D Printer Anomaly Detection
    • Condition Monitoring - Syntiant TinyML Board
    • Predictive Maintenance - Commercial Printer - Sony Spresense + CommonSense
    • Vibration Classification with BrainChip's Akida
    • AI-driven Audio and Thermal HVAC Monitoring - SeeedStudio XIAO ESP32
  • Accelerometer and Activity Projects
    • Arduino x K-Way - Outdoor Activity Tracker
    • Arduino x K-Way - Gesture Recognition for Hiking
    • Arduino x K-Way - TinyML Fall Detection
    • Posture Detection for Worker Safety - SiLabs Thunderboard Sense 2
    • Hand Gesture Recognition - OpenMV Cam H7
    • Arduin-Row, a TinyML Rowing Machine Coach - Arduino Nicla Sense ME
    • Fall Detection using a Transformer Model – Arduino Giga R1 WiFi
    • Bluetooth Fall Detection - Arduino Nano 33 BLE Sense
    • Monitor Packages During Transit with AI - Arduino Nano 33 BLE Sense
    • Smart Baby Swing - Arduino Portenta H7
    • Warehouse Shipment Monitoring - SiLabs Thunderboard Sense 2
    • Gesture Recognition - Bangle.js Smartwatch
    • Gesture Recognition for Patient Communication - SiLabs Thunderboard Sense 2
    • Hospital Bed Occupancy Detection - Arduino Nano 33 BLE Sense
    • Porting a Posture Detection Project from the SiLabs Thunderboard Sense 2 to xG24
    • Porting a Gesture Recognition Project from the SiLabs Thunderboard Sense 2 to xG24
    • Continuous Gait Monitor (Anomaly Detection) - Nordic Thingy:53
    • Classifying Exercise Activities on a BangleJS Smartwatch
  • Air Quality and Environmental Projects
    • Arduino x K-Way - Environmental Asthma Risk Assessment
    • Gas Detection in the Oil and Gas Industry - Nordic Thingy:91
    • Smart HVAC System with a Sony Spresense
    • Smart HVAC System with an Arduino Nicla Vision
    • Indoor CO2 Level Estimation - Arduino Portenta H7
    • Harmful Gases Detection - Arduino Nano 33 BLE Sense
    • Fire Detection Using Sensor Fusion and TinyML - Arduino Nano 33 BLE Sense
    • AI-Assisted Monitoring of Dairy Manufacturing Conditions - Seeed XIAO ESP32C3
    • AI-Assisted Air Quality Monitoring - DFRobot Firebeetle ESP32
    • Air Quality Monitoring with Sipeed Longan Nano - RISC-V Gigadevice
    • Methane Monitoring in Mines - Silabs xG24 Dev Kit
    • Smart Building Ventilation with Environmental Sensor Fusion
    • Sensor Data Fusion with Spresense and CommonSense
    • Water Pollution Detection - Arduino Nano ESP32 + Ultrasonic Scan
    • Fire Detection Using Sensor Fusion - Arduino Nano 33 BLE Sense
  • Novel Sensor Projects
    • 8x8 ToF Gesture Classification - Arduino RP2040 Connect
    • Food Irradiation Dose Detection - DFRobot Beetle ESP32C3
    • Applying EEG Data to Machine Learning, Part 1
    • Applying EEG Data to Machine Learning, Part 2
    • Applying EEG Data to Machine Learning, Part 3
    • Liquid Classification with TinyML - Seeed Wio Terminal + TDS Sensor
    • AI-Assisted Pipeline Diagnostics and Inspection with mmWave Radar
    • Soil Quality Detection Using AI and LoRaWAN - Seeed Sensecap A1101
    • Smart Diaper Prototype - Arduino Nicla Sense ME
    • DIY Smart Glove with Flex Sensors
    • EdgeML Energy Monitoring - Particle Photon 2
    • Wearable for Monitoring Worker Stress using HR/HRV DSP Block - Arduino Portenta
  • Software Integration Demos
    • Azure Machine Learning with Kubernetes Compute and Edge Impulse
    • ROS2 + Edge Impulse, Part 1: Pub/Sub Node in Python
    • ROS2 + Edge Impulse, Part 2: MicroROS
    • Using Hugging Face Datasets in Edge Impulse
    • Using Hugging Face Image Classification Datasets with Edge Impulse
    • Edge Impulse API Usage Sample Application - Jetson Nano Trainer
    • MLOps with Edge Impulse and Azure IoT Edge
    • A Federated Approach to Train and Deploy Machine Learning Models
    • DIY Model Weight Update for Continuous AI Deployments
    • Automate the CI/CD Pipeline of your Models with Edge Impulse and GitHub Actions
    • Deploying Edge Impulse Models on ZEDEDA Cloud Devices
Powered by GitBook
On this page
  • Introduction
  • Train First Iteration of a Model
  • Patch the Model with OTA Routines
  • Train a New Model
  • Convert Model to OTA Binary Format
  • Caveats
  • Conclusion

Was this helpful?

Edit on GitHub
Export as PDF
  1. Software Integration Demos

DIY Model Weight Update for Continuous AI Deployments

An easy do-it-yourself approach to updating an ML model running on a microcontroller.

PreviousA Federated Approach to Train and Deploy Machine Learning ModelsNextAutomate the CI/CD Pipeline of your Models with Edge Impulse and GitHub Actions

Last updated 6 months ago

Was this helpful?

Created By: Simone Salerno

Public Project Link:

GitHub Repo:

Introduction

Continuous deployment in the context of the software development lifecycle refers to the practice of periodically updating your source code, and shipping the latest release to your users without service interruption.

In the context of machine learning, this same concept extends (and is more often put in practice) to the model and its weights. Your first iteration of a model is, actually, the best iteration so far, in the sense that it achieved the best metric (e.g. accuracy) on the data you had available at the time of training.

After this first deployment however, you should be monitoring your model's performance in the field, and keep track of how well it performs on new, unseen data. It is usually the case that model performance degrades over time (so called "model drift") and you need to update the model to remediate this degradation.

This article will show you how you can perform over-the-air (OTA) updates to an Edge Impulse model's weights deployed on a microcontroller in a vendor-agnostic way. You can swap the model weights by loading them from the internet, or from an SD card, or any other storage medium you prefer. The key concepts are that:

  1. you'll only update the model's weights, not the entire board firmware (as opposed to most vendor-specific OTA strategies)

  2. the process works with any board

Disclaimer

This is a DIY (Do It Yourself) technique, not officially supported by Edge Impulse. For this reason, we'll need to patch the generated Arduino library to include the OTA code. Future breaking changes in the Edge Impulse API could break this method. For this reason, source code is released publicly so that you can adjust to your specific needs, if required.

Here's the roadmap for the rest of the article that highlights the steps required to make the entire process work:

  1. Train a model on Edge Impulse as usual and export as "genuine" Arduino library

  2. Patch the library to include the OTA mechanism and deploy the patched version to your board

  3. Collect more data, fine tune parameters, improve labelling to generate a better model (not included in this article, specific for your project)

  4. Export the updated "genuine" model and convert it into an OTA binary payload

  5. Trigger the update process from the board (by periodically pinging a server for updates, by user interaction, etc.)

Train First Iteration of a Model

This part is project-specific. I assume you already have a model in Edge Impulse that you want to deploy to your microcontroller. It can be of any type (audio, image, sensor), it makes no difference from the OTA perspective. If you want to clearly see the weights' swapping happening, I suggest you create a bad version of your model which achieves 0% accuracy (e.g. by training the model for just 1 epoch). Then go to the Deployment page and export the model as an Arduino library zip.

Patch the Model with OTA Routines

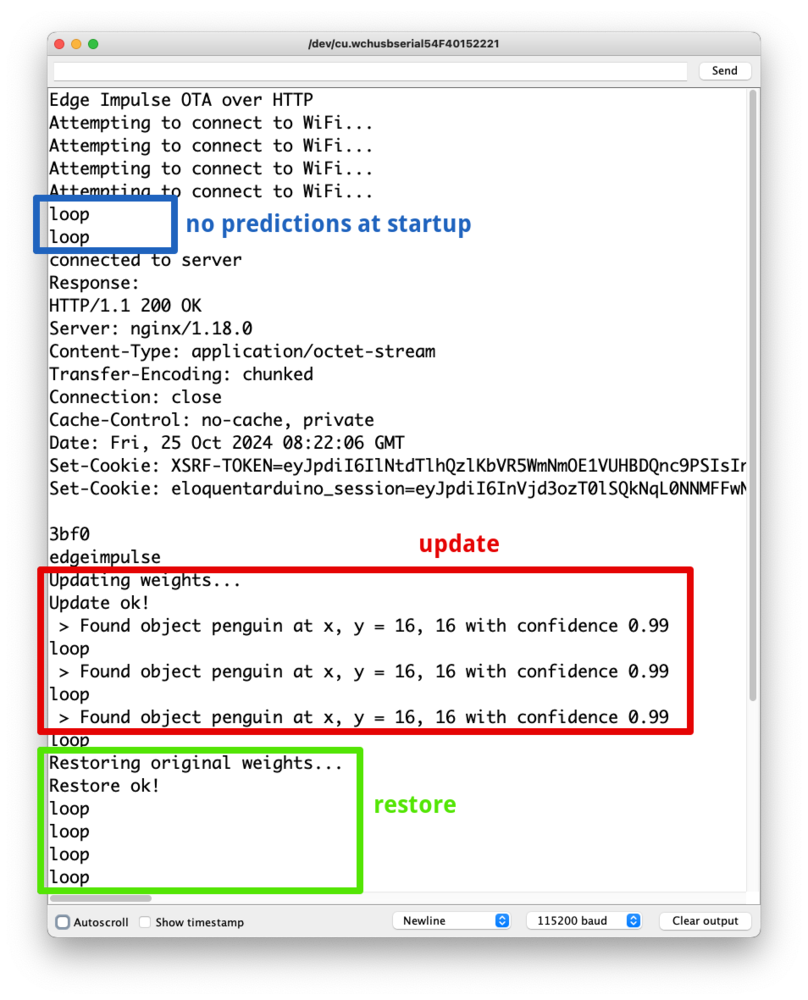
The patched library is the one that needs to be deployed on your board. Here's an example sketch that runs the FOMO model on a static sample (containing a penguin). When running, you should only see the message "loop", indicating that no object has been detected.

/**
 * Edge Impulse OTA updates.
 * Open the Serial Monitor and enter "ota"
 * to perform the update.
 * Enter "restore" to restore the original weights.
 * 
 * This project ships with a "dumb" model (default)
 * which can't predict anything. When you enter "ota",
 * a "smart" model is loaded and you will see it detects
 * the penguin in the input data.
 * 
 * When you enter "restore", the dumb model is loaded back
 * and the models makes no more predictions.
 */

#define WIFI_SSID "SSID"
#define WIFI_PASS "PASSWORD"
#define EI_API_KEY "ei_59e01e8cdef245c00a1e5f654f978f806ecebe5f2c58d68b"
#define EI_PROJECT_ID "508852"
#define OTA_SERVER "eloquentarduino.com"
#define OTA_PATH "/edgeimpulse-ota/serve/" EI_API_KEY "/" EI_PROJECT_ID ".bin"

#include <WiFi.h>
#include <fomo-dumb_inferencing.h>


signal_t input;
ei_impulse_result_t result;
WiFiClient http;

float penguin[] = {0x4c584d, 0x4c5750 ... 0x90f0d, 0x90f0d};


bool makeRequest();
void updateWeights(Stream& updateSource);
void restoreWeights();


void setup() {
  Serial.begin(115200);
  while (!Serial);
  delay(3000);
  Serial.println("Edge Impulse OTA over HTTP");

  // connect to WiFi
  WiFi.begin(WIFI_SSID, WIFI_PASS);
  
  while (WiFi.status() != WL_CONNECTED) {
    Serial.println("Attempting to connect to WiFi...");
    delay(2000);
  }
}


void loop() {  
  Serial.println("loop");
  String userInput = Serial.available() ? Serial.readStringUntil('\n') : "";


  // update / restore weights from user input
  if (userInput.startsWith("ota")) {
    if (makeRequest())
      updateWeights(http);
  }

  if (userInput.startsWith("restore")) {
    restoreWeights();
  }


  // run impulse
  if (numpy::signal_from_buffer(penguin, EI_CLASSIFIER_DSP_INPUT_FRAME_SIZE, &input) != 0) {
    Serial.println("numpy::signal_from_buffer failed");
    return;
  }

  if (run_classifier(&input, &result, false) != 0) {
    Serial.println("run_classifier failed");
    return;
  }


  // print results
  for (size_t ix = 0; ix < result.bounding_boxes_count; ix++) {
    auto bb = result.bounding_boxes[ix];

    if (bb.value > 0) {
        Serial.print(" > Found object ");
        Serial.print(bb.label);
        Serial.print(" at x, y = ");
        Serial.print(bb.x);
        Serial.print(", ");
        Serial.print(bb.y);
        Serial.print(" with confidence ");
        Serial.println(bb.value);
    }
  }

  delay(1000);
}


bool makeRequest() {
  // flush request, if necessary
  while (http.connected() && http.available())
    http.read();
    
  //http.stop();
  
  if (http.connect(OTA_SERVER, 80)) {
    Serial.println("connected to server");
    // Make a HTTP request:
    http.print("GET ");
    http.print(OTA_PATH);
    http.println(" HTTP/1.1");
    http.print("Host: ");
    http.println(OTA_SERVER);
    http.println("User-Agent: Arduino");
    http.println("Connection: close");
    http.println();
    delay(3000);

    size_t timeout = millis() + 10000L;
    String response("");

    while (millis() < timeout) {
      if (http.available()) {
        response += (char) http.read();

        // detect start of body
        if (response.endsWith("edgeimpulse")) {
          Serial.println("Response:");
          Serial.println(response);
          
          return true;
        }
      }
    }

    Serial.println("Got response, but cannot detect body");
    return false;
  }
  else {
    Serial.println("Can't connect to OTA server");
    return false;
  }
}


void updateWeights(Stream& updateSource) {
  Serial.println("Updating weights...");
  String updateError = ei_update_weights(updateSource);

  if (updateError != "") {
    Serial.print("Update error: ");
    Serial.println(updateError);
    restoreWeights();
  }
  else {
    Serial.println("Update ok!");
  }
}


void restoreWeights() {
  Serial.println("Restoring original weights...");

  String restoreError = ei_restore_weights();

  if (restoreError != "") {
    Serial.print("Restore error: ");
    Serial.println(restoreError);
  }
  else {
    Serial.println("Restore ok!");
  }
}

The example sketch triggers the model's update when you enter ota into the serial monitor. It is up to you to replace this part with your custom logic. The new model is fetched from the internet in this case, but you can load the binary data from any instance of Arduino's stream class.

The public endpoint at eloquentarduino.com prepends the string edgeimpulse to the OTA payload so that you can easily seek the request at the correct position. The ei_update_weights will start reading the stream from its current position, so be sure you seek it correctly in case you are going to adapt this sketch to your own needs!

Train a New Model

In a real world scenario, after some time you may have collected more data, or improved the label quality, or trained the model for more epochs. No matter how, you have generated an improved version of your model.

What is mandatory here is that the architecture of the model must stay the same!. Let's take the case of a FOMO model, for instance. If your original model is trained on 96x96 pixel, grayscale images using MobileNetV2 0.1, the improved model cannot be trained on 128x128 pixel images, or in RGB mode, or with MobileNetV2 0.3. Since we're only updating the weights, we require that their type, number and layout exactly match the original ones.

If you need to make changes to the model's architecture, you'll need to go through your vendor-specific full-firmware OTA update process instead.

Convert Model to OTA Binary Format

As a convenience for you, I made a public API endpoint available for free that leverages the Edge Impulse API to serve the model's latest version binary data available at https://eloquentarduino.com/edgeimpulse-ota/serve/&lt;api-key&gt;/&lt;project-id&gt;.bin.

To generate an API key, head to the Project Dashboard in the Studio and navigate to the Keys tab at the top, then click Add a new api key in the right corner. A read-only key will suffice for the purpose.

To get the Project ID, inspect the URL: it will look like https://studio.edgeimpulse.com/studio/123456: those digits are the ID you need.

Since the whole point of OTA updates is to not physically touch the device after deployment, the SD card approach has an interesting collateral use case that is model swapping. You can pre-load multiple models into your SD card and allow the user to choose which one they want. Working with a camera, for example, you can ask the user if they want to recognize dogs, or cats, or penguins... Working with audio, the user could choose their preferred wake word from many available, or swap between voice commands for home automation (e.g. light on, light off) vs media control (e.g. play, pause, next), which would be too many to predict accurately for a single model.

Caveats

Edge Impulse model weights are declared as constant, by default. This means they can't be updated later, on the fly. To overcome this limitation, the edgeimpulse_ota library strips the const modifier and makes them editable. The downside of this process is that now those weights will be stored in the RAM instead of the FLASH memory, and RAM is usually more limited.

Then, there exists an ei_restore_weights() function that allows you to restore the original weights if something goes wrong during the update process (e.g. corrupted OTA payload, or broken internet connection). This is not called by default because it essentially doubles the memory needed to store a model. Given the update payload is read as a unidirectional stream and that the weights are updated inplace, there's no mechanism to selectively revert the weights. Hence, we need to store a full copy of the original weights that won't be altered.

Conclusion

Now you have all the pieces required to perform model weights updates over-the-air for your project:

  • a method to patch a genuine Edge Impulse library that allows for weights' replacement

  • a method to convert an Edge Impulse model's weights into OTA format

I created a Public Project available for you to follow along at . It is a FOMO classifier that recognizes a penguin toy from camera frames. The project has two versions: "bad" is a (deliberately) low accuracy model trained for 1 epoch which can't recognize anything. A second model named "smart" is trained for 50 epochs and has a pretty high accuracy. We will confirm that our OTA process is working by observing our bad model failing on a frame containing a penguin, then being replaced by the smart one that correctly locates the object.

As stated earlier, the genuine Edge Impulse generated library doesn't support model weight updates natively for microcontrollers. So we need to patch its source code. I created a Python package called edgeimpulse_ota that does the job for you, so this part is completely automated. You can refer to the for the code.

The sketch is available on .

Now that we have a new model, we have to convert it into a format suitable for OTA update. Edge Impulse export options always include the full TensorFlow runtime + Edge Impulse SDK source code to make it self-contained for the target environment. In our case though, the SDK and any additional support code is already flashed on the board: we're only interested in the new weights. Again, we'll leverage the edgeimpulse_ota Python package to do the conversion for us. Refer to the for the code. You will produce a .bin file that can be read by the Arduino OTA code to update the model's weights on the fly. How you will serve this file is up to you. The 2 most common use cases are by hosting it on a web server accessible at, for example http://your-domain.com/ei-ota.bin, or saving it to an SD card accessible from the microcontroller.

How and when you will improve the model or trigger the update is up to you, and depends on your specific deployment environment. You may have an MLOps pipeline already created that captures data from the field, you can collect more data yourself, or you may even leverage . No matter how, you can now have a feedback loop to continuously improve your model's performance.

https://studio.edgeimpulse.com/public/508852/latest
https://github.com/eloquentarduino/python-edgeimpulse-ota/blob/main/examples/ei_model_ota
https://studio.edgeimpulse.com/public/508852/latest
Colab Notebook
GitHub
Colab Notebook here
synthetic data