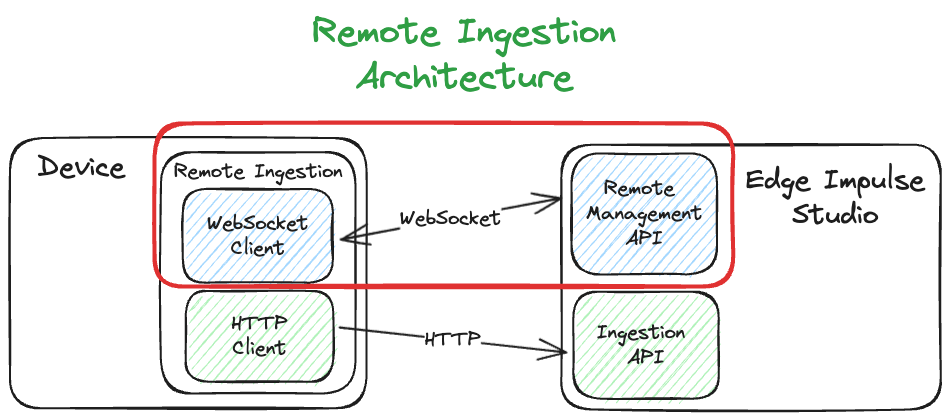
Connecting
To connect, open a websocket connection to either:Typical flow
The diagram below shows a typical full session of the remote ingestion process that involves both remote management and ingestion services.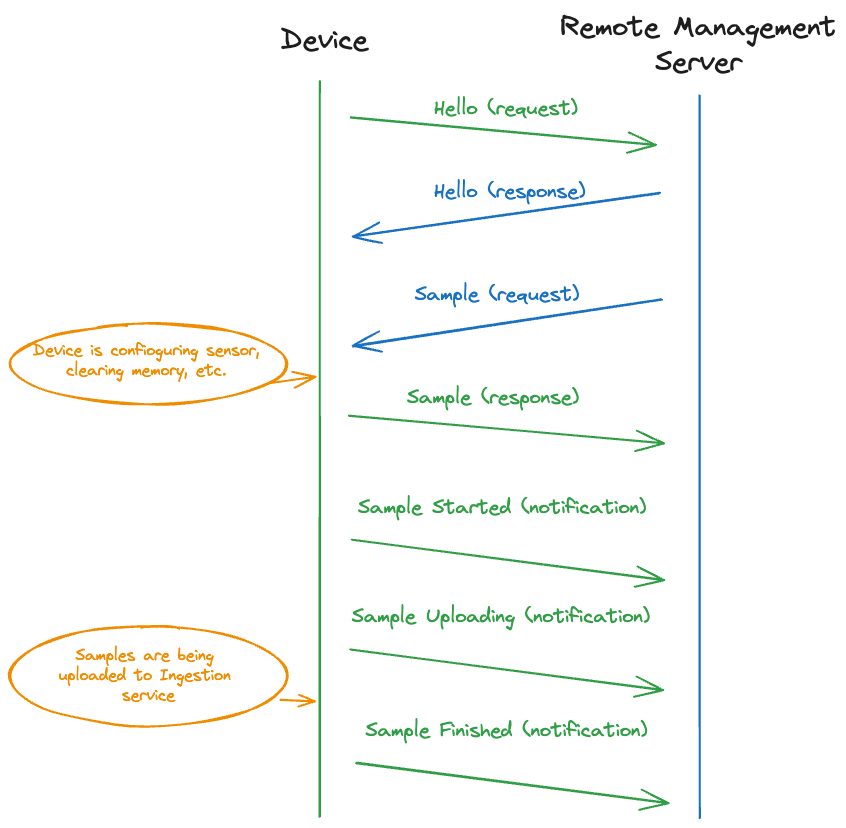
Protocol
After opening the WebSocket connection, thedevice initiates the communication by sending the Hello message.
Messages can be encoded as JSON or CBOR. The format of the Hello message sent by the device determines the encoding of the messages for the rest of the session.
Hello (request)
This is always the first message in the session. Only the device can send this message. The server will respond with the Hello response.
Hello (response)
This is the response to the Hello request sent by the device. Only the server can send this message.
Sample (request)
When a user requests sampling through the Studio, the following message is sent to the device. The device needs to perform a handshake with the hello message first. This message can be sent by the server only.
Sample (response)
This is the response to the Sample request sent by the Studio. The device needs to send this response. Set the sample field to true if the sampling can start, or to false if the sampling cannot start. This can be sent multiple times, for example first send true to confirm that the device is ready to sample, and then send false if some error occurs.
Sample started (notification)
When the sampling starts, send the following message to the Studio. This is a notification, so no response is expected from Studio. This notification is required otherwise, the Studio will report an error to the user.
Sample processing (notification)
If the device is done sampling but is still processing the sample before uploading, such as a device preprocessing audio or signing the file. Send the following message to indicate that the device is processing. This notification is optional.
Sample reading (notification)
If the device is not connected directly to the internet, the daemon needs to pull the data from the device over serial, which could be slow for large files. Send the following message to indicate that this process started, and how far the process is along. You can send this message multiple times, and the percentage will be updated in the Studio. This message is optional.
Sample uploading (notification)
Send this message before sending samples to the ingestion service. This message is used to update the UI in the Studio. This message is required.
Sample finished (notification)
Send this notification after sampling is completed and the file is uploaded. This notification is required.
Start snapshot (request)
If the user selects the camera as a sensor on the ingestion page, the following request is sent to the device to start streaming snapshots. This request is optional, and the device does not have to send the response.
Stop snapshot (request)
When snapshot streaming should stop, the following message is sent to the device. This request is optional, and the device does not have to send the response.
Snapshot frame (notification)
To send a snapshot from the device, send the following message. The snapshotFrame is a base64 encoded JPG file.
You don’t have to send this message too often, 5 times a second is plenty for most use cases.
Version history
This lists changes in the remote management protocol.- v2 - Changed the type of sensors from a string to a complex type describing frequencies and maximum sample length.
- For devices still registering with version 1 a default max. sample length of 60 seconds will be set, and a default frequency of 100Hz.
- If a v1 device registers with the sensor name “Built-in accelerometer” the default sample length will be 300 seconds, and the frequencies will be 62.5Hz and 100Hz.
- If a v1 device registers with the sensor name “Built-in microphone” a default frequency of 16KHz will be set.
- v3 - Add progress percentages for
sampleReadingand commands for snapshot streaming. For v2 devices, the progress percentage is ignored, andsupportsSnapshotStreamingis set tofalse.