Instance Segmentation on Edge Impulse with a Two-Stage Model Cascade
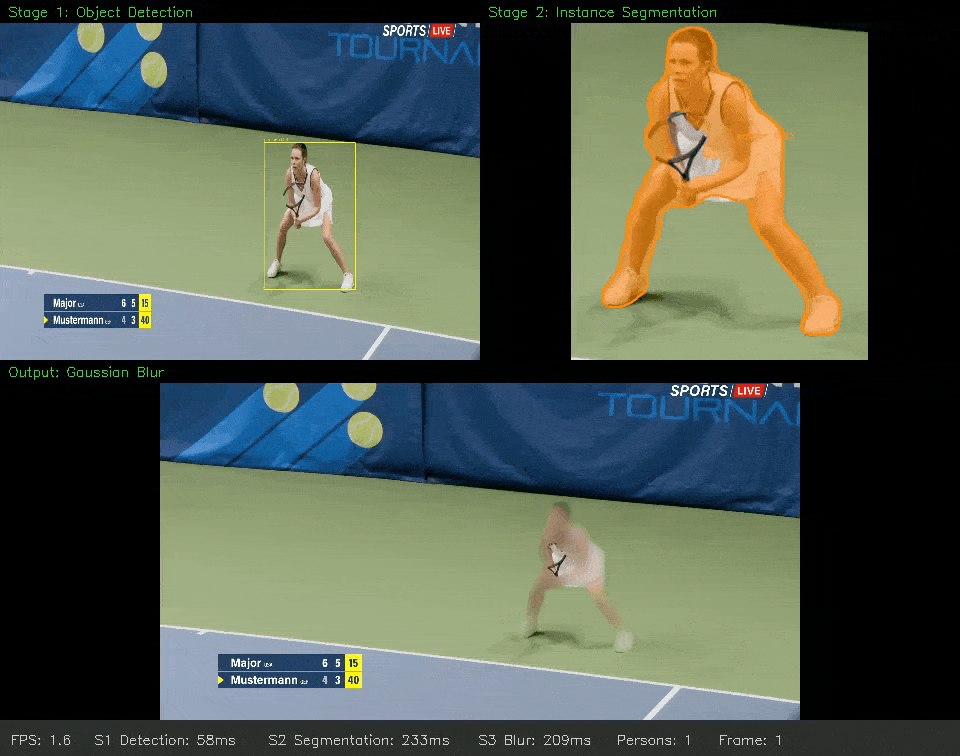
Build a vision pipeline that detects people, segments each one with a pixel-accurate mask, and blurs them for privacy. It runs through the Edge Impulse Linux runtime and is deployed on the Qualcomm Dragonwing QCS6490 (Thundercomm Rubik Pi 3). Created by: Samuel AlexanderObject Detection (stage 1) EI project: https://studio.edgeimpulse.com/public/717280/live
Instance Segmentation (stage 2) EI project: https://studio.edgeimpulse.com/public/951718/live
GitHub repository: https://github.com/SamuelAlexander/instance-seg-byom-freeform-person-blur

Introduction
Computer vision tasks sit on a ladder of increasing detail. Image classification gives a single label for a whole frame. Object detection draws a bounding box around each object. Instance segmentation goes one step further and outlines every object pixel by pixel, producing a separate mask for each instance. That extra precision is what lets you lift a single person cleanly out of a scene, trace an irregular part on a conveyor, or measure an object’s true shape instead of a rectangle around it. Edge Impulse ships classification and object detection as built-in learning blocks, but not instance segmentation. This guide adds it by combining two techniques:- Model cascading chains two models so each does what it is best at. A small, fast detector runs first, and a heavier segmentation model runs only when the detector finds something worth segmenting. Each model stays simple to train and deploy, and you spend compute where it matters.
- BYOM Freeform (“Bring Your Own Model”) lets you upload any ONNX model to Edge Impulse and have the runtime hand back its raw output tensors untouched. This is the escape hatch for deploying architectures Edge Impulse does not parse natively, such as YOLO-seg, where you do the post-processing yourself.
.eim files, the same code runs on any Edge Impulse Linux target.
What you’ll learn
- chain two models into a detection-then-segmentation cascade
- deploy a YOLO11-seg model on Edge Impulse using the Freeform output type
- turn raw segmentation tensors into instance masks with a small post-processor
- build a privacy person-blur application on top of those masks
- run the whole pipeline live on a Qualcomm QCS6490 board
Note: An Edge Impulse.eimfollows the Edge Impulse for Linux protocol, so the code in this repository runs unchanged on any supported target: a Raspberry Pi 5, other Qualcomm Dragonwing boards, or a macOS laptop for development. This guide targets the QCS6490. For another board, rebuild the.eimfor that target and keep everything else the same.
Prerequisites
Hardware
Software
- An Edge Impulse account.
- Python 3.10+ with the runtime and OpenCV:
pip install "edge_impulse_linux>=1.2.2" opencv-python numpy - Ultralytics for the one-time ONNX export:
pip install ultralytics
Important: Useedge_impulse_linuxversion 1.2.2 or newer. Recent.eimbuilds return large Freeform outputs over shared memory, and older SDKs cannot read them back, so Stage 2 returns the string"shm"instead of tensors. More on this under Stage 2.
Source code
The full project source is available at: https://github.com/SamuelAlexander/instance-seg-byom-freeform-person-blurHow the cascade works
A model cascade splits the work across two models so each one stays simple: Stage 1 is a fast detector that answers where the objects are. Stage 2 is the heavier segmentation model that produces the masks, and it only needs to run when Stage 1 finds something. Splitting the job this way keeps each model easy to deploy, runs the expensive model selectively, and lets you replace either stage without touching the rest of the pipeline.Project structure
models/ folder ships each .eim for two platforms: *-aarch64.eim for the Rubik Pi 3, and *-macos-arm64.eim for local development on Apple Silicon. See models/README.md for how to rebuild them.
Set up the Rubik Pi 3
The Rubik Pi 3 is built around the Qualcomm Dragonwing QCS6490, an edge-AI SoC that combines an octa-core Kryo CPU, an Adreno GPU, and a Hexagon NPU (around 12 TOPS). That kind of on-device compute makes running a vision cascade like this at the edge practical. It runs a standard Ubuntu image, so getting it ready is quick. This section is intentionally brief; follow the linked guides for the full detail.- Flash and boot the board, then connect it to your network. See the Edge Impulse Rubik Pi 3 page for board setup and supported deployment targets.
-
Install the Edge Impulse Linux runtime and the Python dependencies. The runtime is what executes the
.eimfiles; see Edge Impulse for Linux for details. -
Copy this repository to the board (clone it, or
scpthe folder over) and make the models executable:
*-macos-arm64.eim.
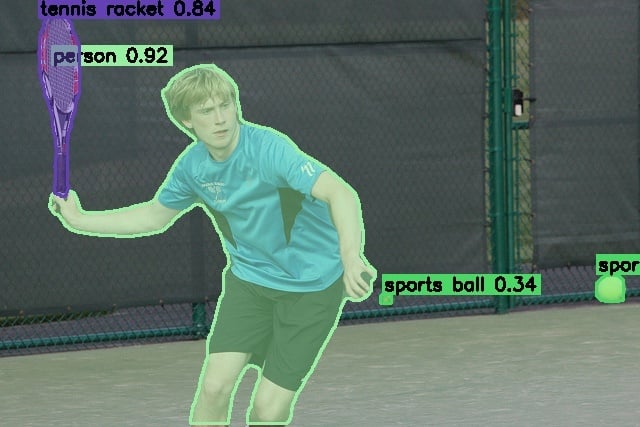
Stage 1: object detection
Stage 1 finds people and their bounding boxes on each frame. There are two ways to get a detector for it. Option A: train your own in Edge Impulse Studio. Collect and label images, then train an object-detection model. Make sure one of your object classes isperson, since the rest of the pipeline keys off that label. This is the standard Edge Impulse flow from data to .eim; see the object detection documentation to learn more.
Option B: reuse a pretrained detector (what this guide does). Running the full training pipeline is unnecessary when a well-tested model already fits. I used YOLOX-Nano because it is already trained on the COCO dataset, which includes a person class, and it performs really well. So rather than collecting data and training from scratch, I picked this model to use directly: I uploaded the pretrained YOLOX-Nano to Edge Impulse via BYOM and used Studio only to build the .eim deployment download. Because it is uploaded with a known output type (the YOLO parser), Edge Impulse returns parsed bounding boxes directly, which is the contrast with Stage 2’s Freeform output.
Either way, any detector that recognizes your target class drops in without changing the rest of the cascade.
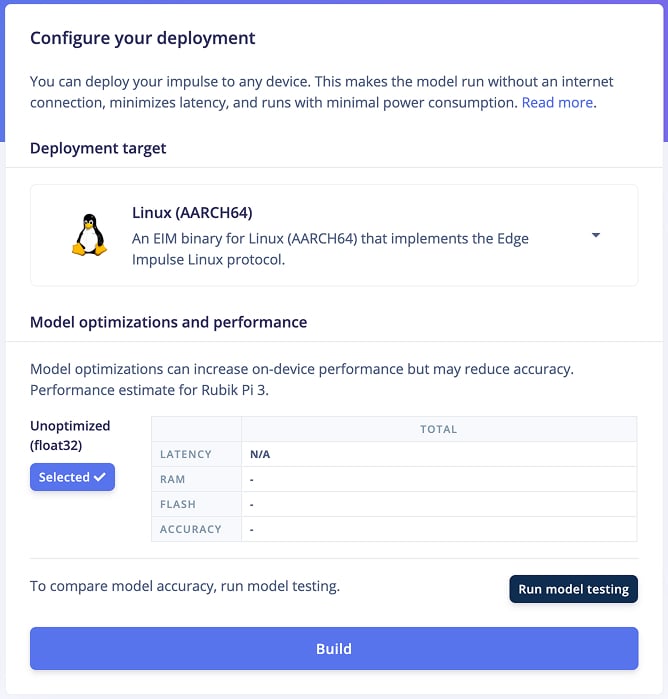
The fastest path is to use my detector directly: open my public Edge Impulse project, clone it into your account, and build the .eim from Deployment > Linux (AARCH64) > Build. There is no need to source or upload a model yourself; the underlying detector is YOLOX. Put the downloaded .eim in models/. To check the input size and labels:
Stage 2: instance segmentation with BYOM Freeform
This is where instance segmentation gets onto Edge Impulse. BYOM (Bring Your Own Model) lets you upload any ONNX model, and the Freeform output type tells the runtime to pass every raw output tensor straight through without parsing. You handle the post-processing, which is what makes a non-native architecture like YOLO-seg deployable. As with Stage 1, the fastest path is to use my model directly: open my Edge Impulse project, clone it into your account, and build the.eim from the Deployment tab. That lets you skip the export and upload steps below. The rest of this section shows how to build it from scratch, which is the path to take if you want to train on your own data.
The model
A pretrained YOLO11n-seg network. It produces two output tensors:
The mask for a detection is its 32 coefficients multiplied by the 32 prototypes, passed through a sigmoid, then cropped to its box.
Export to ONNX
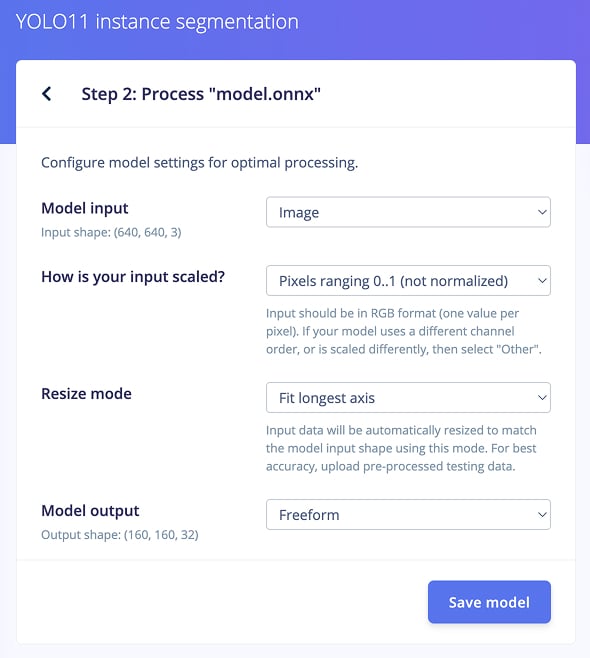
The export uses Ultralytics:Upload as BYOM Freeform
- Go to Upload your model (BYOM) and upload
yolo11n-seg.onnx. - Set the model output type to Freeform, input to 640x640, 3 channels, scaling
0..1. - Build from Deployment > Linux (AARCH64) and place the
.eiminmodels/.
Working with the raw output
Freeform gives you tensors and nothing else. Four things trip people up, and getting any of them wrong shows up as empty masks or a mask that fills the whole frame.Pack RGB into one float per pixel
The Linux runner expects onefloat32 per pixel, with the R, G and B values packed into the integer bits rather than three separate values:
Match output tensors by size, not index
Freeform does not guarantee tensor order, so identify each one by its element count:Transpose prototype masks from NHWC to NCHW
The prototypes come back flattened in NHWC order, so reshape and transpose before using them:Large Freeform outputs arrive over shared memory
To avoid serializing megabytes of JSON, recent.eim builds write large Freeform outputs into POSIX shared memory and return the marker string "shm". Version 1.2.2 of edge_impulse_linux reads those segments and substitutes the real tensors for you. An older SDK leaves you with "shm", so upgrade the package and no code change is needed.
Post-processing
postprocess.py turns the two tensors into instance masks. It parses the detections, applies a confidence threshold and non-maximum suppression, builds each mask from the coefficients and prototypes, and resizes to the original frame:
Running the cascade
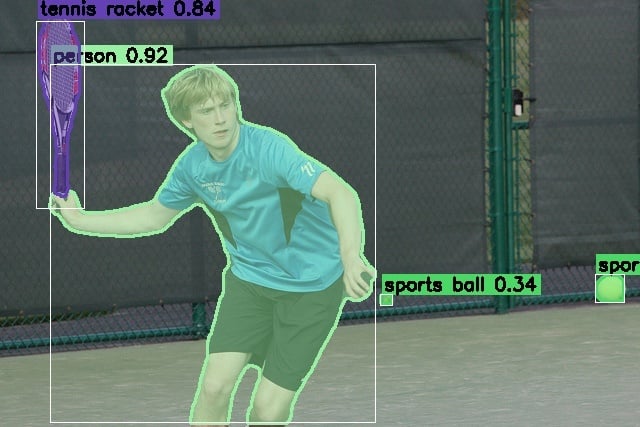
cascade/cascade_inference.py runs both stages on one image and merges them, matching Stage 1 boxes to Stage 2 masks by IoU so the detections and masks line up:
Note: Developing on macOS, swap the*-aarch64.eimfiles for the bundled*-macos-arm64.eimand the commands are identical. If macOS reports an.eimas damaged, clear the quarantine flag:xattr -d com.apple.quarantine <file>.
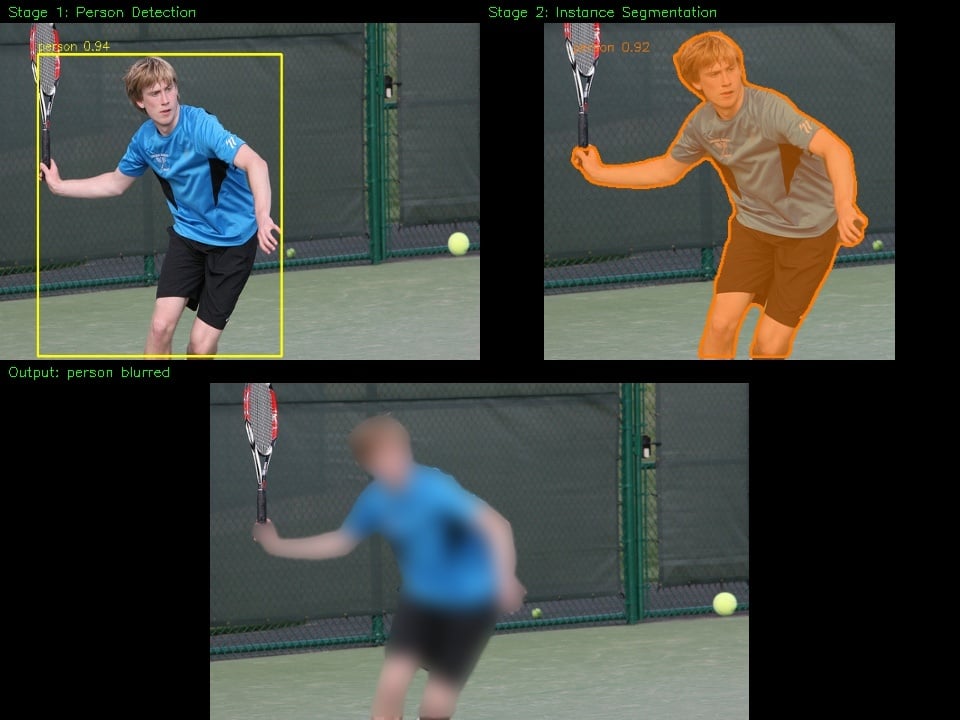
Person-blur application
cascade/person_blur.py uses the cascade to anonymize people. A bounding-box blur covers a rectangle and takes the background with it. An instance mask follows the body outline, so the blur lands on the person and nothing else.
--blur-passes) anonymizes faces and clothing:
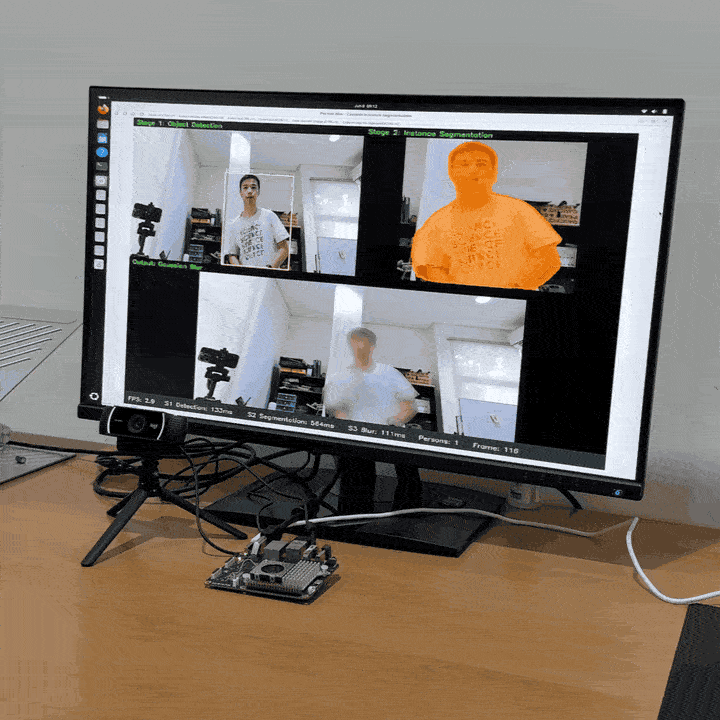
Live webcam demo
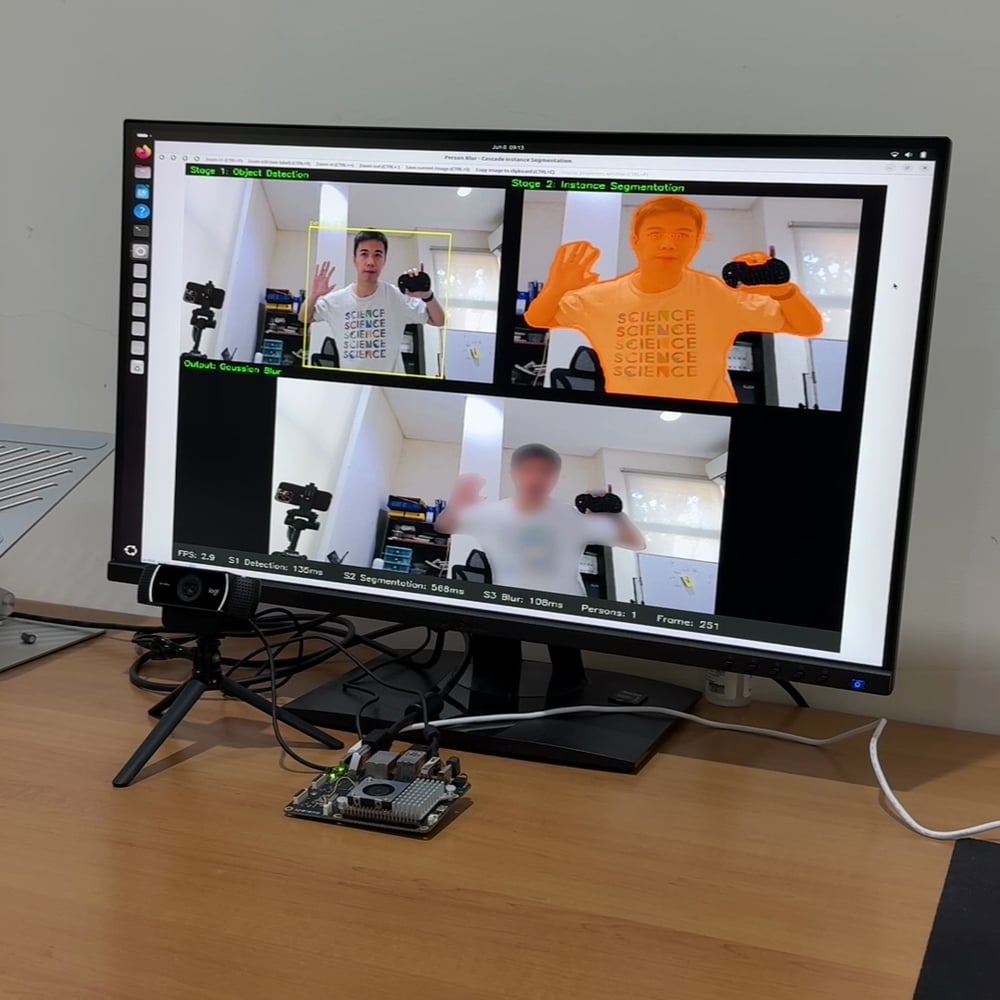
--video flag. The preview window opens on the board’s display, so launch it from a terminal on the board itself:
q or close the window to quit. Two flags trade quality for speed in live mode: --skip N runs Stage 2 (the heavy model) only every Nth frame and reuses the mask in between, while --blur-passes sets the blur strength. Raise --skip or lower --blur-passes for a smoother feed.
Note: On a Wayland desktop (the Rubik Pi 3’s default), set QT_QPA_PLATFORM=xcb as shown, or the OpenCV/Qt window may come up as a small black box.
For a recording of this running live on the board, see the live demo above.
A note on hardware acceleration
The QCS6490 has a Hexagon NPU, which Edge Impulse can target with the Linux (AARCH64 with Qualcomm QNN) deployment option. The NPU accelerates int8-quantized models and suits the detection and classification style of model well. The cascade in this guide runs on the CPU, which keeps it simple and portable across every Edge Impulse Linux target. Quantizing the Freeform segmentation model for the NPU is a worthwhile follow-up on its own, since its multi-tensor output makes int8 quantization model-specific work. Treat it as a next step once the CPU pipeline is running.Troubleshooting
Conclusion
This guide brought instance segmentation to Edge Impulse without a native learning block by pairing two ideas: a two-stage model cascade and BYOM Freeform. A fast detector locates people, a YOLO11n-seg model produces pixel-accurate masks, and a small post-processor turns the raw Freeform tensors into instances that drive a privacy person-blur application. Because every stage runs through the Edge Impulse Linux runtime as an.eim, the same pipeline that runs on the Qualcomm QCS6490 runs unchanged on any supported target, from a Raspberry Pi 5 to a development laptop. From here you can train Stage 2 on your own segmentation data, build other mask-driven applications such as background replacement or selective effects, or explore int8 deployment of a detection-style model on the QCS6490’s Hexagon NPU.