
Documentation Index

Fetch the complete documentation index at: https://docs.edgeimpulse.com/llms.txt

Use this file to discover all available pages before exploring further.

Created By: Roni Bandini Public Project Link: https://studio.edgeimpulse.com/studio/937618 GitHub Repo: https://github.com/ronibandini/Multilayer-AI-Agent-Drone-Detection
In the influential cyberpunk novel Neuromancer (1984), William Gibson saw a future where digital intelligence and remote control would define how power and information moved through society. Among the technologies he anticipated were small flying machines capable of observation, tracking, and coercion—concepts that closely resemble modern drones. Four decades later, affordable unmanned aerial vehicles (UAVs) have become a reality, bringing both useful applications and new security challenges. The widespread adoption of consumer drones, driven by lower costs and increasingly sophisticated capabilities, has created new forms of misuse that require affordable and intelligent detection systems. Potential scenarios include surveillance prior to robberies, privacy invasion, unauthorized operation in restricted areas, violations of no-fly zones, and reconnaissance activities. This project proposes a portable AI-based drone detection system that combines multiple sensing layers: audio analysis, computer vision, and, in the future, radio-frequency analysis. 
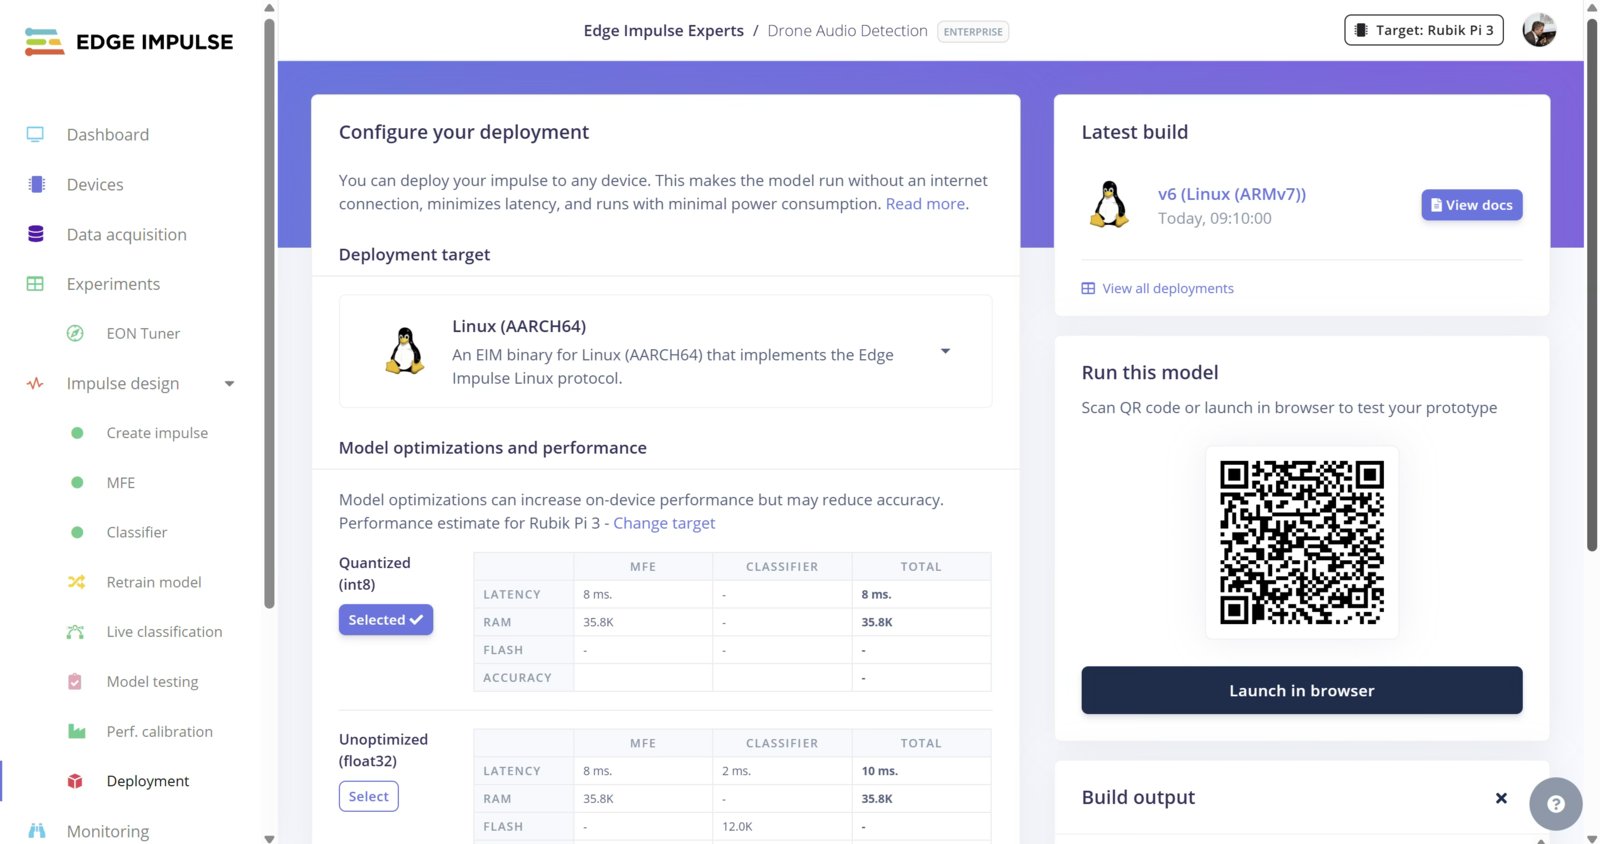
The first layer uses Edge Impulse to train an embedded audio classification model capable of recognizing the characteristic acoustic signature of drone motors. The trained model runs locally on a Rubik Pi 3 connected to a microphone and a camera. 
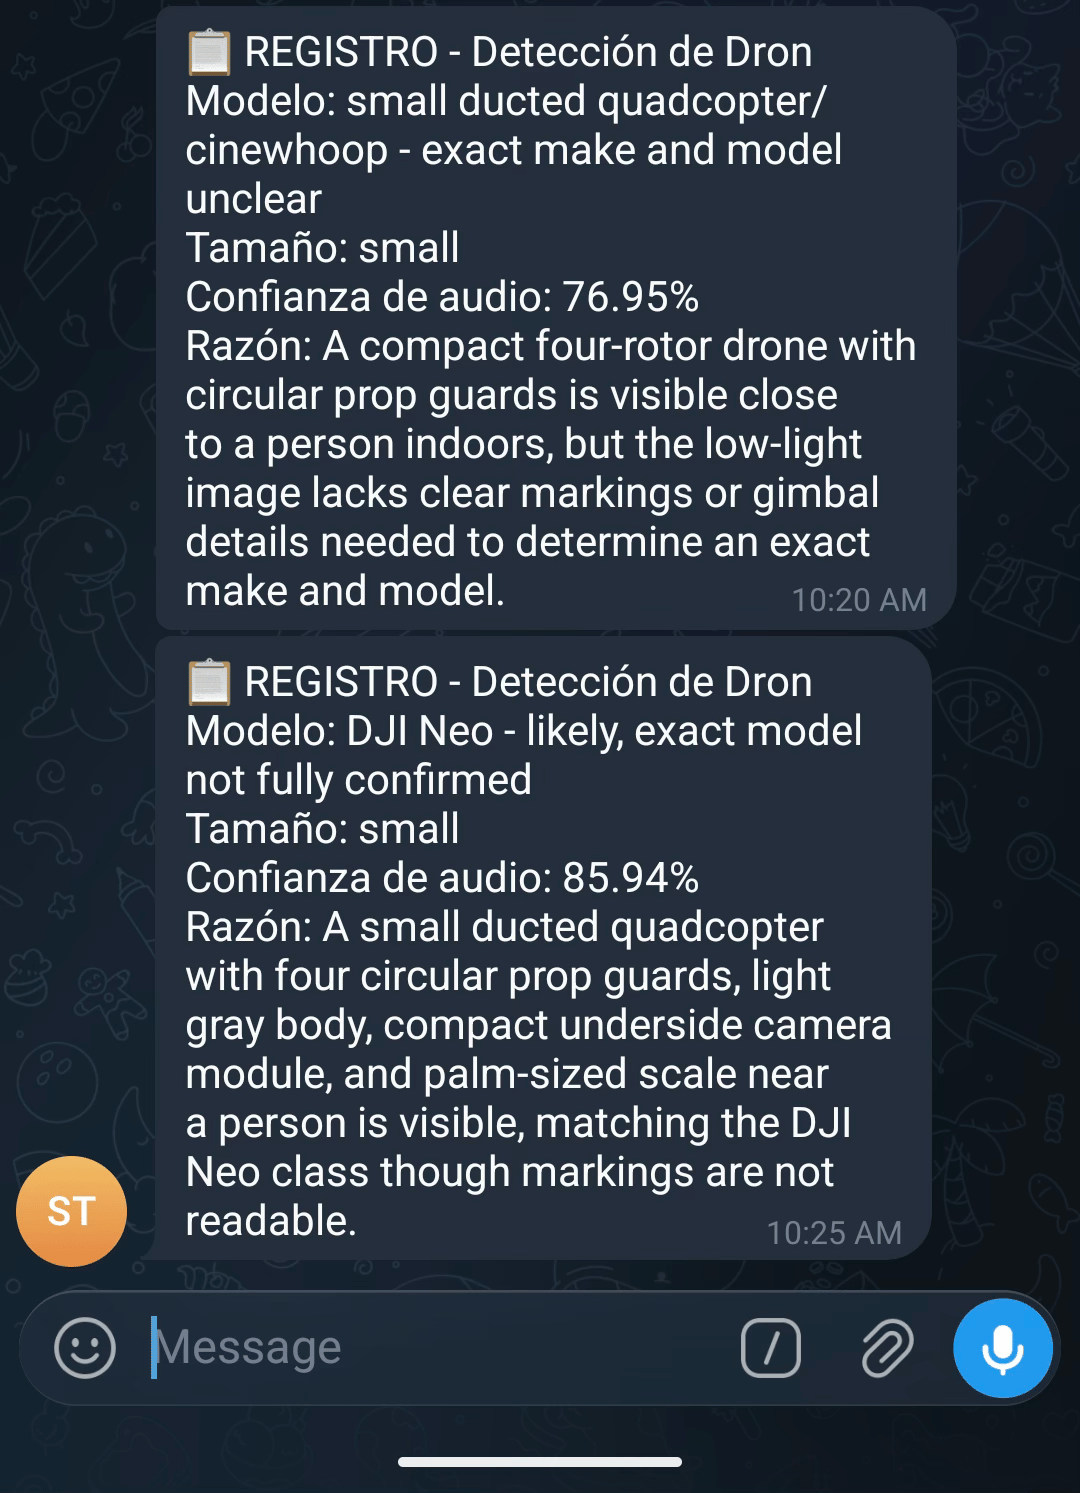
When the audio model detects a potential drone with sufficient confidence, the system invokes a local instance of OpenClaw, combining the audio confidence score with an image captured by the camera. OpenClaw multimodal evaluation flow from audio trigger to visual verification Using a combination of Large Language Models (LLMs) and Vision Language Models (VLMs), OpenClaw evaluates the evidence and determines the appropriate response. Possible actions include:
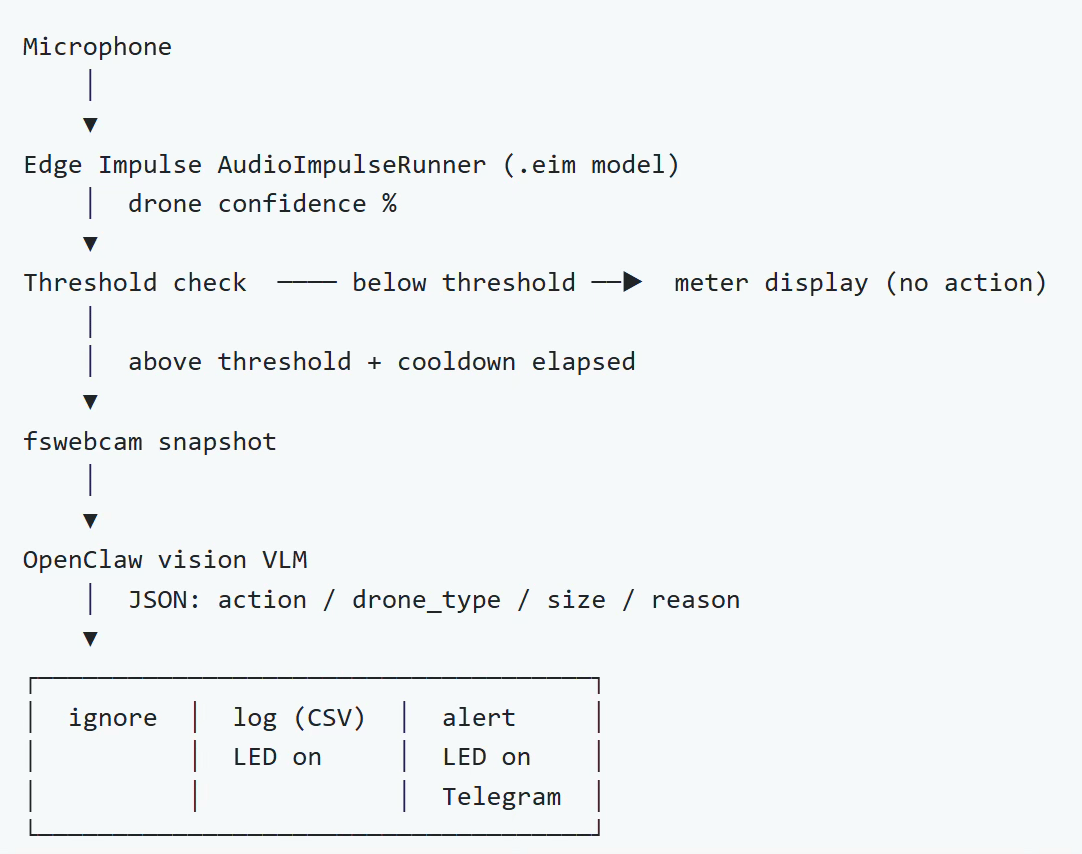
  • Ignoring false positives
  • Logging drone detection and evidence
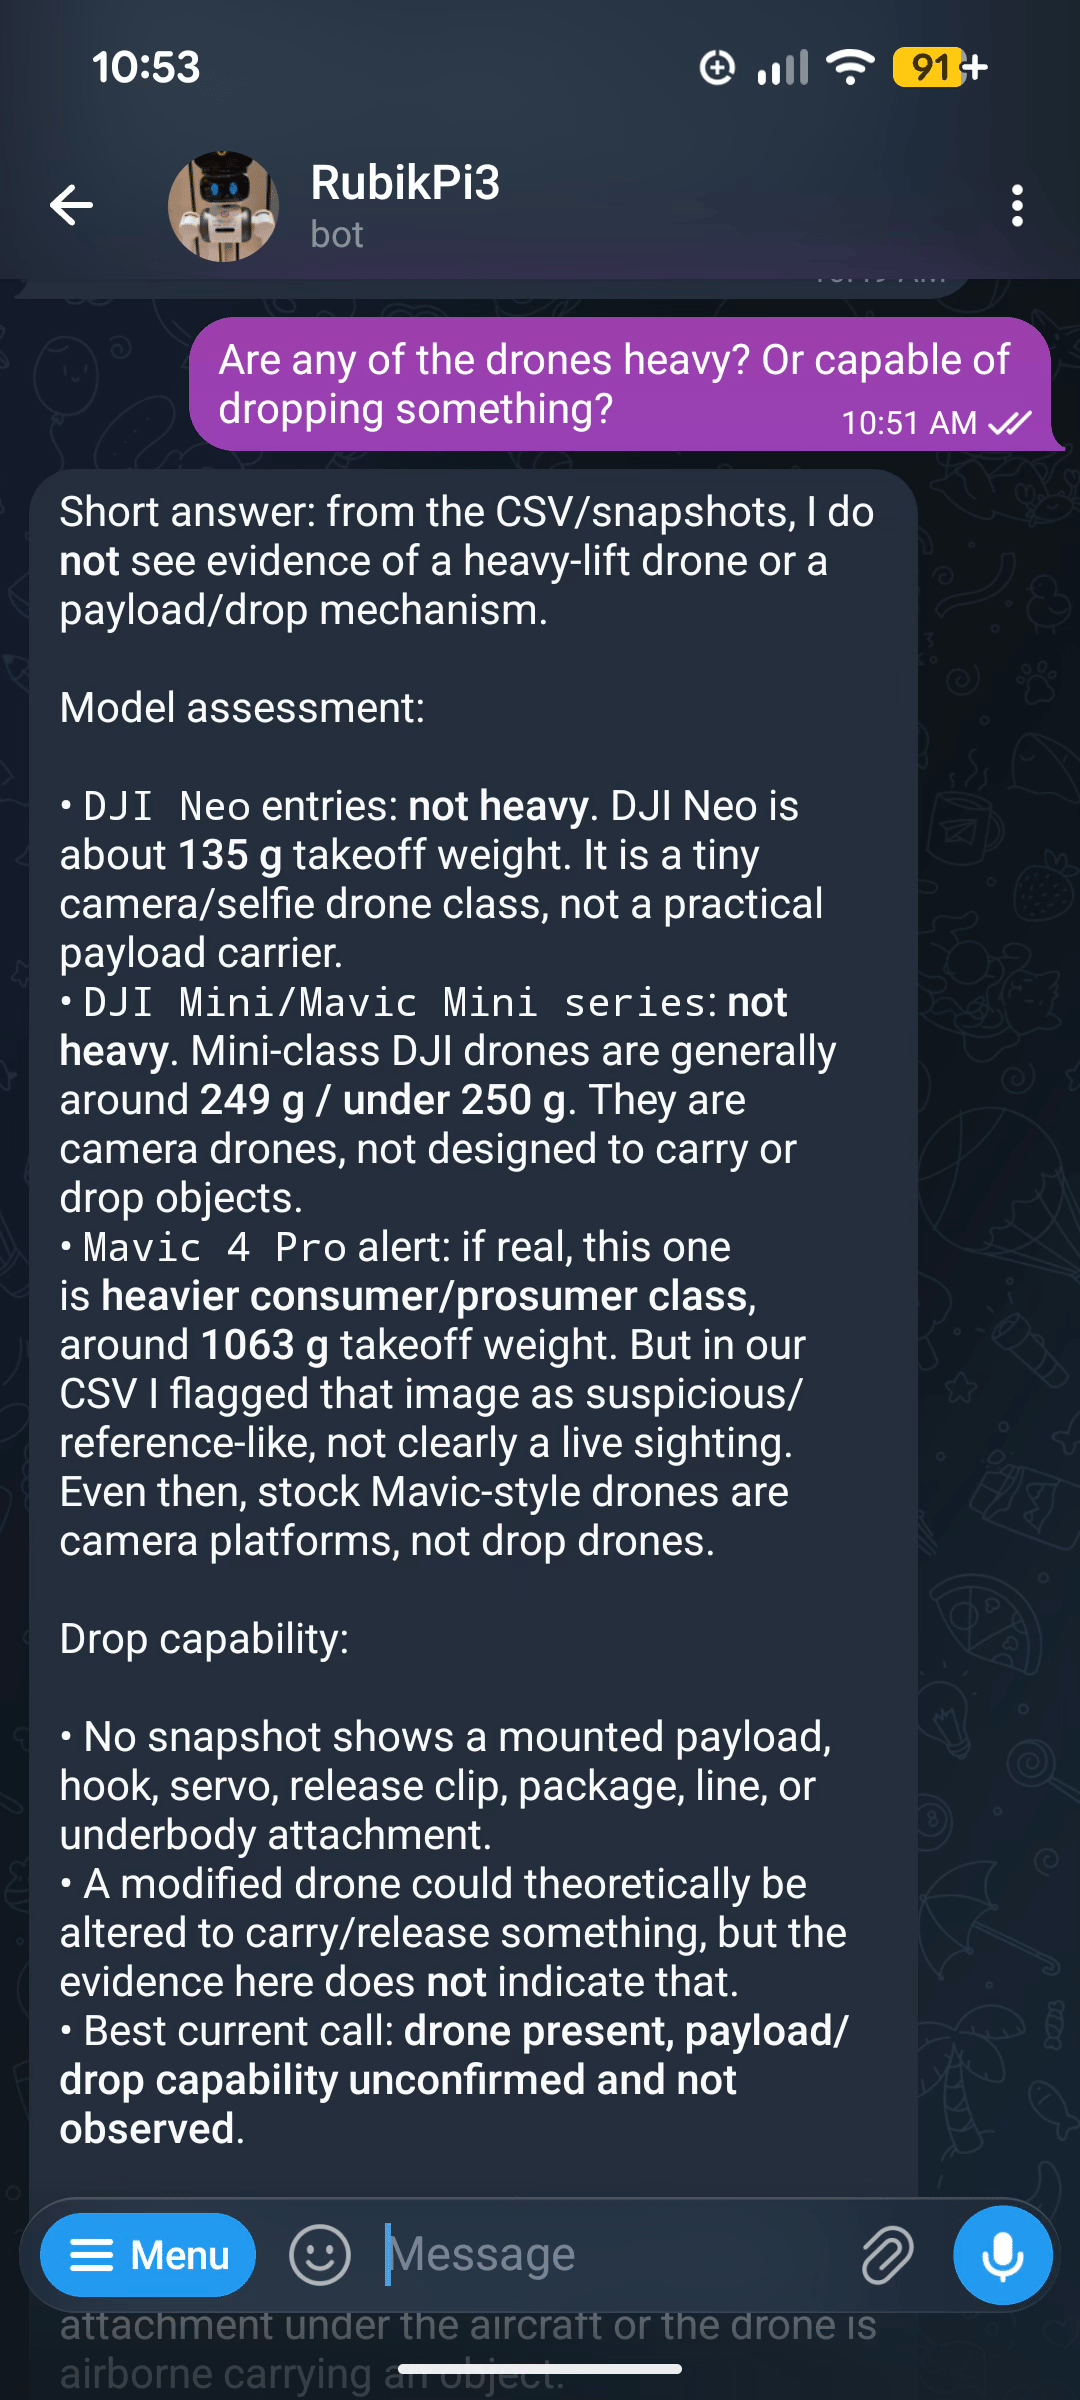
  • Sending notifications
  • Activating relays, alarms, or other external systems
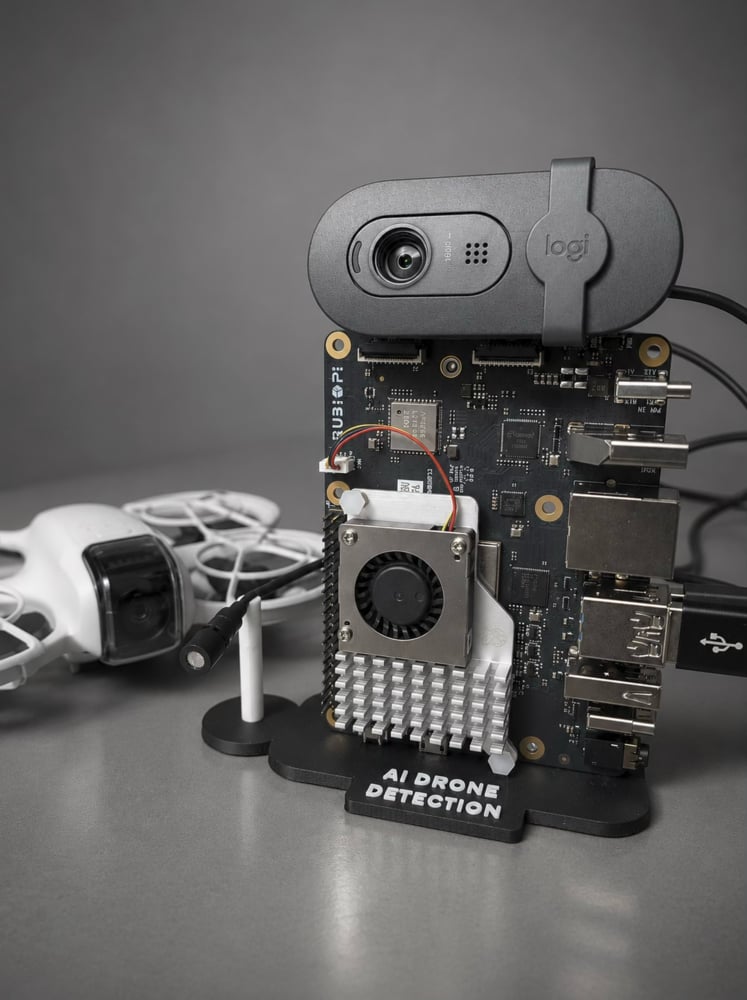
This creates a multilayer AI agent capable of reasoning over information from different sensor modalities before taking action.
Multilayer drone detection architecture overview

Hardware

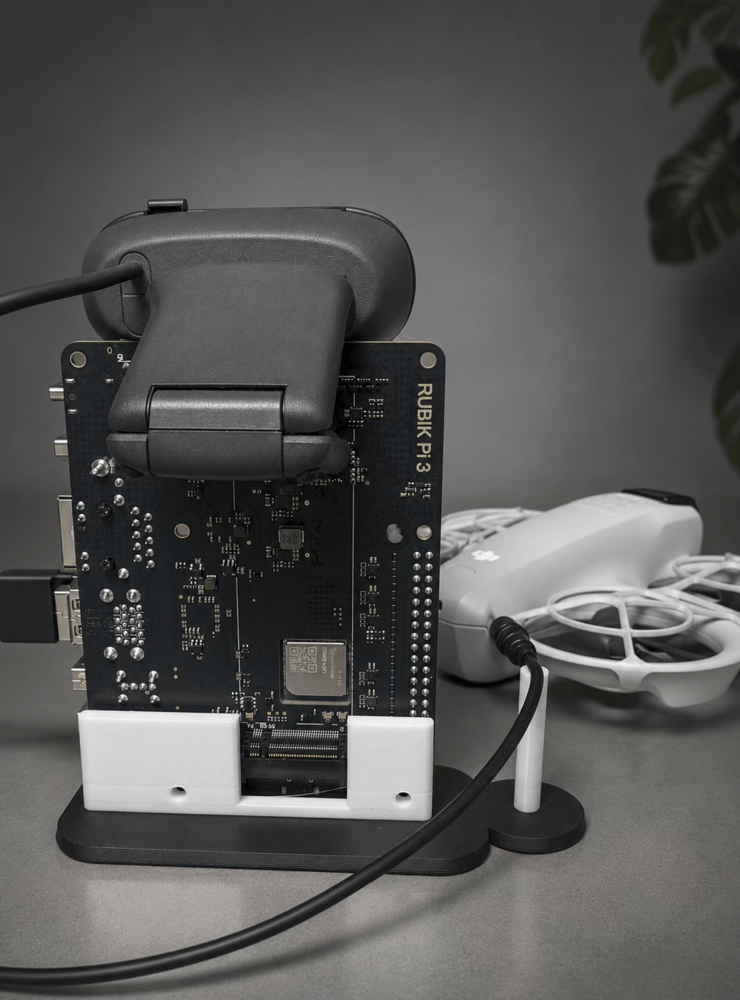
This project was built around the Rubik Pi 3. The Rubik Pi 3 is a powerful, lightweight development board based on the Qualcomm Dragonwing™ QCS6490 platform. It is notable for being one of the first Raspberry Pi-style boards designed around a Qualcomm AI platform, bringing high-performance edge AI capabilities to a developer-friendly form factor.

Key Specifications

  • Platform: Qualcomm Dragonwing QCS6490
  • Dimensions: 100 mm × 75 mm
  • AI Performance: Up to 12 TOPS via the integrated Hexagon NPU
  • GPU: Adreno 643
  • RAM: 8 GB LPDDR4x
  • Storage: 128 GB UFS 2.2
The Rubik Pi 3 supports multiple operating systems, including Qualcomm Linux, Android, Ubuntu, and Debian, making it suitable for AI, IoT, robotics, and industrial applications.

Complete Parts List

  • Thundercomm Rubik Pi 3
  • Active cooler
  • USB-C Power Delivery supply (12 V, 3 A)
  • USB microphone (or a USB sound console with a MIC)
  • USB webcam
  • Ethernet cable
  • Optional 3D-printed stand

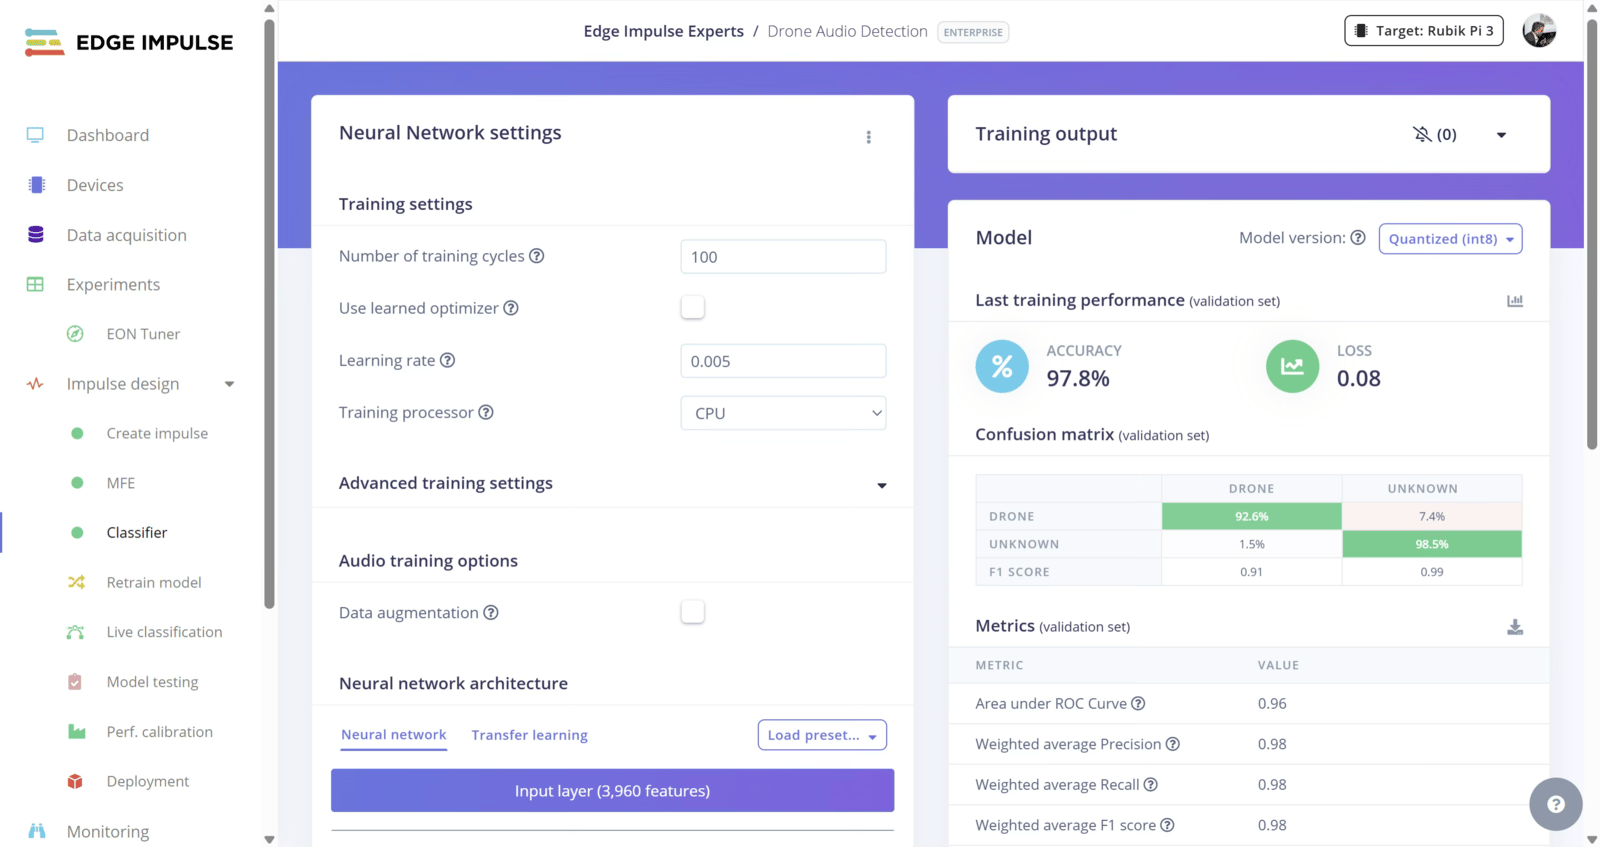
Audio Model Training with Edge Impulse

Although I could have recorded sounds from different drone models and built a custom dataset, the machine learning community has produced several publicly available datasets that significantly accelerate development. For this project, I used a drone audio dataset shared by the community. The dataset contains recordings labeled as drone and non-drone sounds, providing a solid foundation for supervised classification. I also added additional samples for both the drone and unknown classes. Edge Impulse drone audio dataset with labeled classes I uploaded the audio samples to Edge Impulse and configured the project with the following settings:
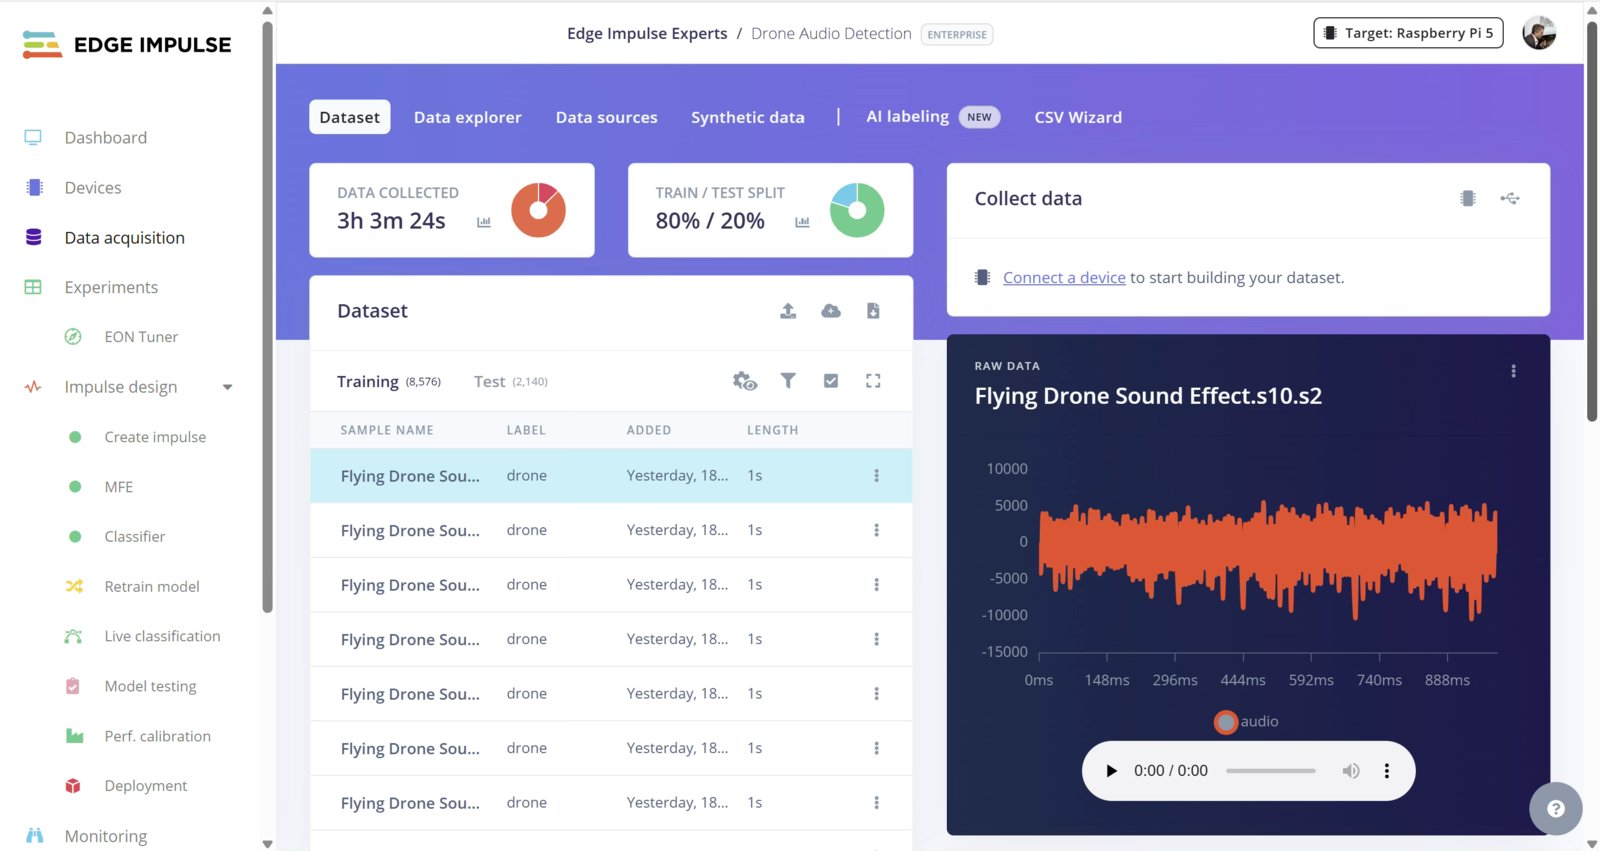
  • Training/testing split: 80% / 20%
  • Input type: Time Series Data
  • Feature extraction: MFE (Mel-Frequency Energy)
  • Learning block: Classification Edge Impulse impulse design settings for audio classification After training and validating the model, I went to the Deployment section and downloaded the Linux Aarch 64 quantized version. A quantized model will use an internal int8 numeric representation rather than float32, which can result in reduced memory usage and faster computation on many targets. Linux AArch64 quantized model selected in Edge Impulse deployment For anyone who wants to reproduce the project quickly, you can clone the entire EI project here https://studio.edgeimpulse.com/studio/937618

Rubik Pi 3 Setup

Rubik Pi 3 hardware setup with microphone webcam and power I connected the power supply, USB microphone, USB webcam, and Ethernet cable to the Rubik Pi 3. After connecting the board to my router, I checked the assigned IP address and connected through SSH using PuTTY. The default Ubuntu credentials were: user: ubuntu pass: ubuntu This project was developed using Canonical Ubuntu. Qualcomm Linux images may use different default credentials such as root / rubikpi. Next, I installed Edge Impulse and the required dependencies:
sudo apt update
sudo apt-get install libportaudio2 libportaudiocpp0 portaudio19-dev --break-system-packages
pip3 install edge_impulse_linux -i https://pypi.python.org/simple --break-system-packages
sudo apt install python3-pyaudio
pip3 install "opencv-python>=4.5.1.48,<5" --break-system-packages
sudo apt install selinux-utils
sudo apt install fswebcam -y
sudo apt install -y sox libsox-fmt-all

Camera Setup

To verify that the webcam was correctly detected, I executed:
lsusb
To verify that the device was registered as a video node:
ls /dev/video*
To test image capture:
fswebcam -d /dev/video0 -r 1280x720 --no-banner test.jpg

Microphone Setup

To adjust microphone gain and input levels, I used:
alsamixer
Then F6 to select the source and increase the volume with +

OpenClaw Installation

I installed OpenClaw using:
curl -fsSL https://openclaw.ai/install.sh | bash
Then I added the installation directory to my PATH:
npm config set prefix "$HOME/.npm-global"
echo 'export PATH="$HOME/.npm-global/bin:$PATH"' >> ~/.bashrc
source ~/.bashrc
During the OpenClaw onboarding process I selected OpenAI ChatGPT/Codex as the model, although Gemini, Claude, and many other providers are also supported. I also configured Telegram channel by providing the token and then pairing with:
openclaw pairing approve telegram XXXXX

Code Settings

The following settings can be adjusted in drone.py before placing the file into the Rubik Pi.
# --- Configuration Settings ---
confidenceThreshold = 75.0       # Minimum audio confidence percentage to trigger visual check
visualCooldownSeconds = 60       # Minimum seconds to wait between consecutive camera captures
gpioPin = 571                    # GPIO pin number for physical LED alert on Rubik Pi 3
ledOnTime = 3                    # Number of seconds the LED remains turned on

# --- Telegram Bot Config ---
telegramToken = ""               # Put your Telegram Bot token here
telegramChatId = ""              # Destination chat or channel ID

# --- OpenClaw and Camera Config ---
openClawAgent = "main"           # Target agent name in OpenClaw config
webcamDevice = "/dev/video0"     # OS file path of the USB webcam device
csvLogPath = "drone.csv"         # Local CSV file to write detections history

How to get a Telegram token

Open Telegram and search for @BotFather (ensure it has the blue verified checkmark). Start a chat and send the command: /newbot. Follow instructions to give your bot a name. Create a username for the bot ending in “bot” (e.g., MyTest_bot). Copy the API Token provided in the message “Use this token to access the HTTP API..”

3d printed case

I have designed a simple stand for the board and the mic. Download from https://cults3d.com/en/3d-model/gadget/ai-drone-detection-with-rubik-pi-3 and print with PLA, no support.
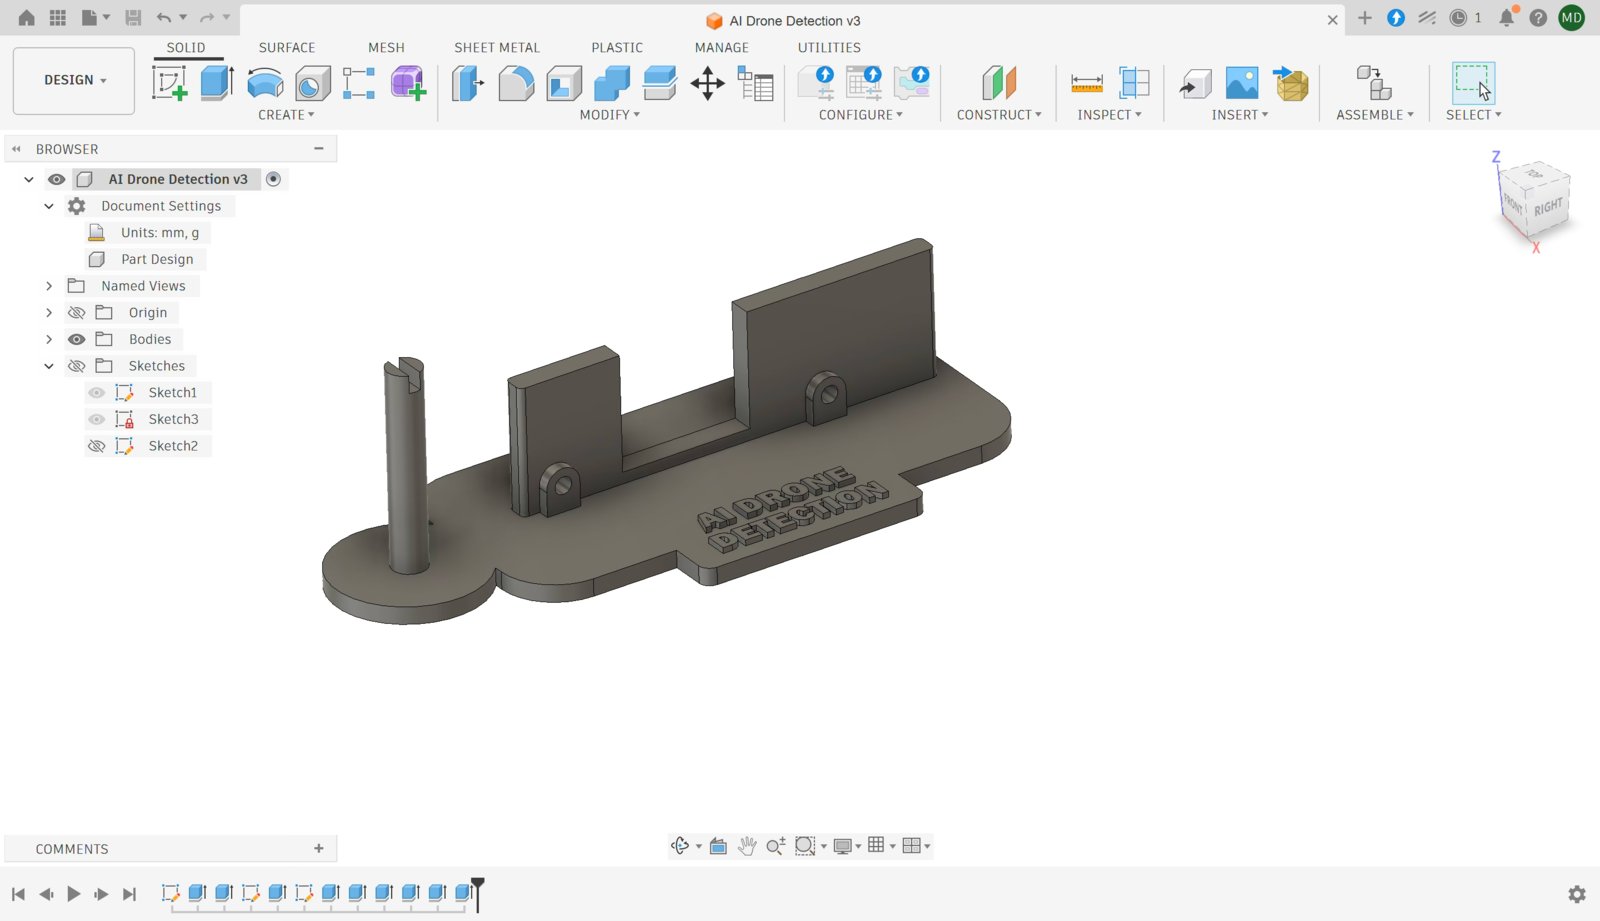
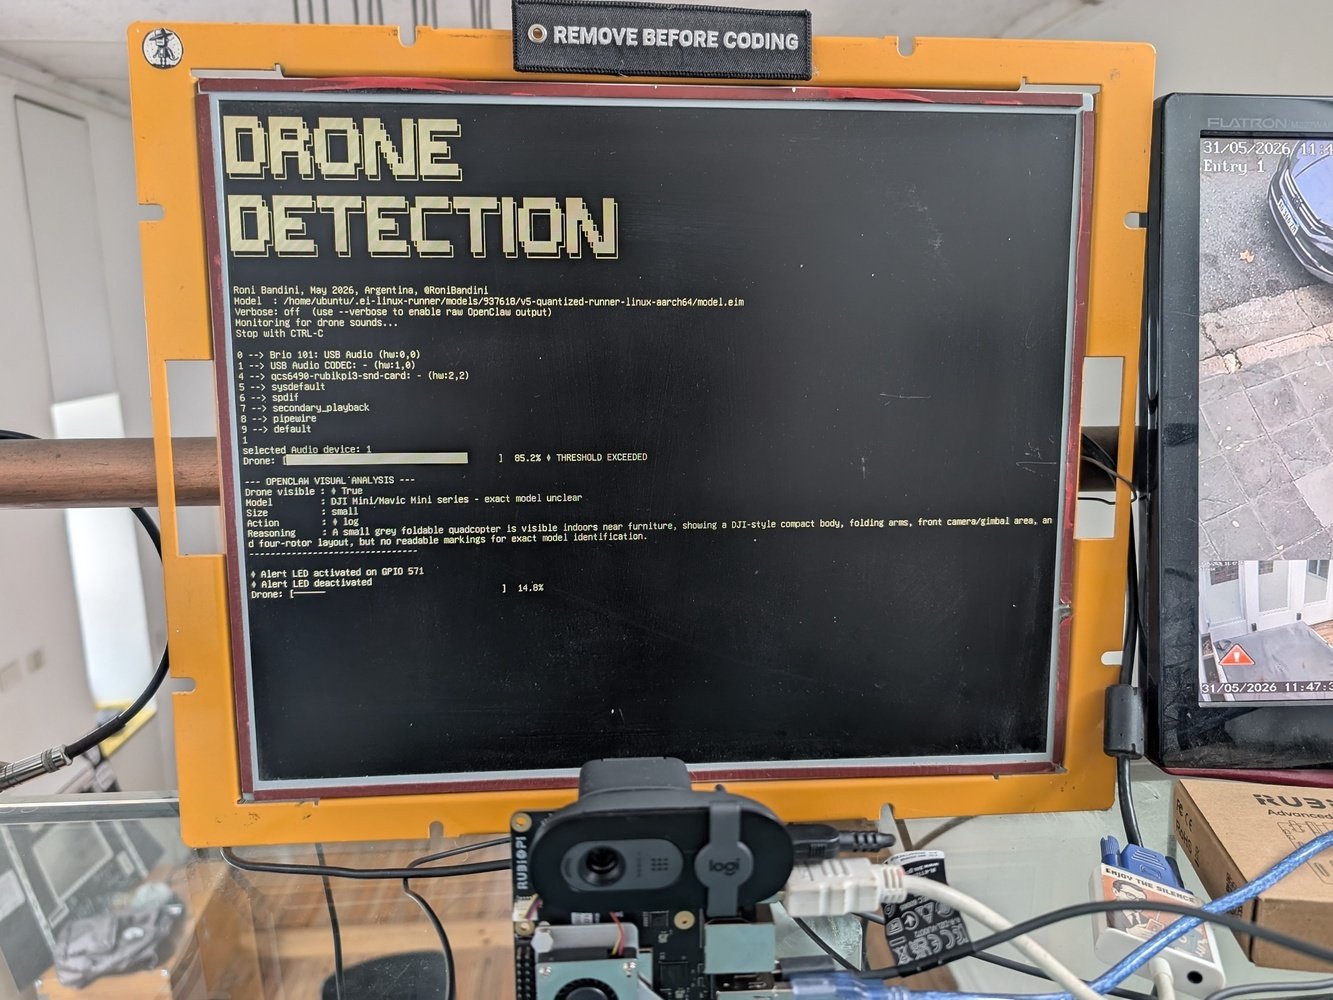
 3D printed stand for Rubik Pi 3 and microphone mount

Operation

I copied the drone.py script and the model.eim to Rubik Pi 3 and I started the system with:
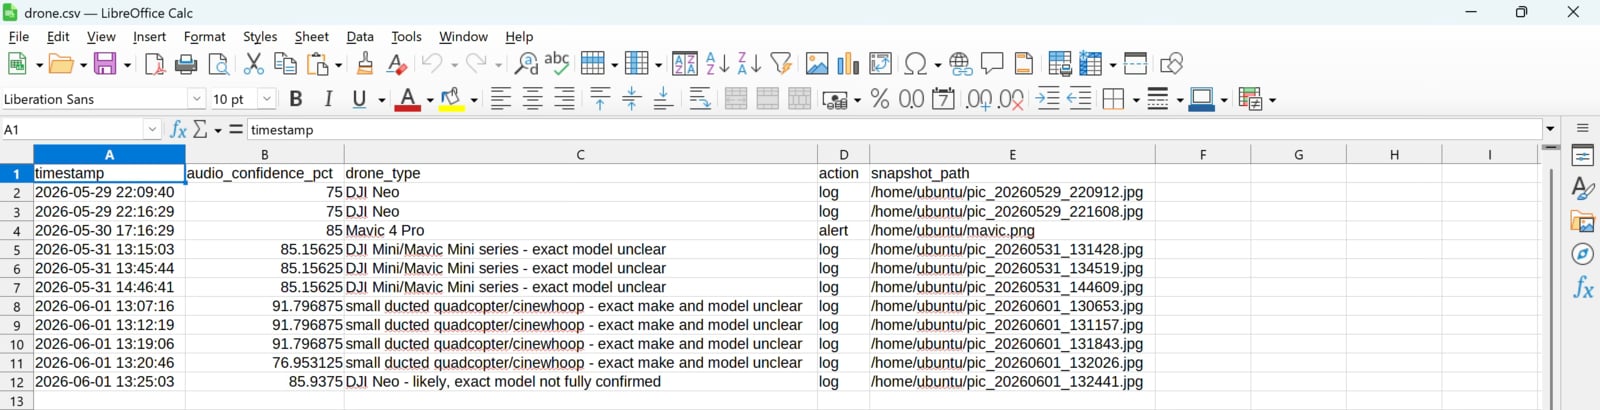
python3 drone.py /path/to/model.eim 2>/dev/null
Runtime console output while running drone detection script Whenever the audio classifier detects a drone above the configured confidence threshold, the system captures an image using the USB webcam and invokes OpenClaw with both the audio confidence score and the image. OpenClaw is responsible for determining whether a drone is actually present, identifying its type when possible, and selecting one of three actions:
  • Ignore
  • Log
  • Alert OpenClaw action decision output showing ignore log and alert outcomes
For logged events, the system creates or updates a local drone.csv file. For alert events, the system sends a Telegram notification and activates a GPIO output. During testing I used this GPIO to drive an LED, but it could just as easily activate a siren, relay, warning light, automatic curtain, or any other external device. Telegram alert screenshot sent after confirmed drone detection

OpenClaw capabilities

OpenClaw chat interface summarizing historical drone detections Because OpenClaw runs locally on the Rubik Pi 3, I can also interact directly with the agent to request additional information, review historical detections, or perform further analysis on collected data. For example, I queried the agent about previous detections and used it to summarize activity observed by the system.

Radio Frequency Analysis

Audio and visual detection methods have inherent range limitations. A drone may be too far away to be heard or seen clearly. A third sensing layer can extend detection range considerably: radio-frequency (RF) analysis. Most consumer drones continuously exchange telemetry, control, and video data over radio links, typically in the 2.4 GHz and 5.8 GHz bands. Monitoring these frequencies can reveal drone activity long before the aircraft becomes visible or audible. Unlike audio and vision analysis, RF detection requires specialized hardware. Devices such as the TinySA Ultra+ can capture and analyze radio spectrum activity in real time. Traditional RF drone detection systems often rely on heuristics and manually crafted rules. While useful, these approaches frequently struggle with noisy environments and changing signal conditions. Machine learning provides a more robust alternative. The process is conceptually similar to audio classification:
  1. Divide the target frequency range into segments.
  2. Record signal power levels across those segments.
  3. Label the captured samples.
  4. Train a classification model.
  5. Deploy the model for real-time inference.
Using directional antennas and RF analysis, it is possible to detect drones at significantly greater distances than audio or visual methods alone.

Final Notes

Whether or not we have fully reached the future envisioned by William Gibson, drones are becoming cheaper, more capable, and more ubiquitous every year. They are now an essential component of modern warfare, industrial inspection, logistics, surveillance, and, unfortunately, privacy intrusion. At the same time, advances in edge AI make it possible to build sophisticated detection systems using affordable, off-the-shelf hardware. By combining Edge Machine Learning, multimodal sensing, and agentic AI systems such as OpenClaw, it is possible to create affordable and portable systems capable of detecting, identifying, and responding to drone activity autonomously.

Video

https://youtube.com/shorts/9cenPzFM9yU

Contact

Roni Bandini https://www.linkedin.com/in/ronibandini/

Links

Github https://github.com/ronibandini/Multilayer-AI-Agent-Drone-Detection 3d Base https://cults3d.com/en/3d-model/gadget/ai-drone-detection-with-rubik-pi-3 Rubik Pi 3 https://www.thundercomm.com/product/rubik-pi Edge Impulse Python SDK https://docs.edgeimpulse.com/tools/libraries/sdks/studio/python Neuromancer https://amzn.to/4vhS2Eo