In this tutorial, you’ll use machine learning to build a system that can recognize audible events, particularly your voice through audio classification. The system you create will resemble giving audio commands to control a remote control (RC) car such as ‘go’ and ‘stop’, even in the presence of other background noise or background chatter. For the best user experience please use the Chrome browser.You’ll learn how to collect audio data from the microphone, use signal processing to extract the most important information, and train a deep neural network that can tell you whether your keyword was heard in a given clip of audio. Finally, you’ll deploy the system to your Syntiant TinyML Board and evaluate how well it works.At the end of this tutorial, you’ll have a firm understanding of how to classify audio using Edge Impulse for Syntiant hardware.
Skip straight to the project
Skip the setup: clone a ready-to-use Edge Impulse project with the dataset, impulse, and trained model.
Before starting the tutorialAfter signing up for a free Edge Impulse account, clone the finished project, including all training data, signal processing and machine learning blocks here: Tutorial: Syntiant-RC. At the end of the process you will have the full project that comes pre-loaded with approx. 2.5 hours of training data.The features have been generated for the Syntiant TinyML board. To use it for the Arduino Nicla Voice, just set the Features extractor to log-bin in the Syntiant DSP block and retrain your impulse.
Production ready systemsWhile the example Syntiant-RC tutorial project provides good performance, it is not intended to be production ready and is designed to maximize the out-of-box user experience. It is in essence a training vehicle for users of both Edge Impulse and Syntiant to understand the entire workflow. Production ready systems need to have a much more robust training data set to further reduce the likelihood of false positive and negatives.
The Syntiant TinyML Board shows up as USB microphone once plugged in, and Edge Impulse can use this interface to record audio directly. For the Arduino Nicla Voice, run the edge-impulse-daemon CLI command to start collecting data.
Device compatibilityEdge Impulse can ingest data from any device - including embedded devices that you already have in production. See the documentation for the Ingestion API for more information.
In this tutorial we want to build a system that recognizes keywords that resemble giving commands to a remote control car such as ‘go’ and ‘stop’. Although the aforementioned public project comes pre-loaded with approx. 2.5 hours of training data, in order to add additional audio samples including your own, we’ll show you how you can record audio samples directly from the board.
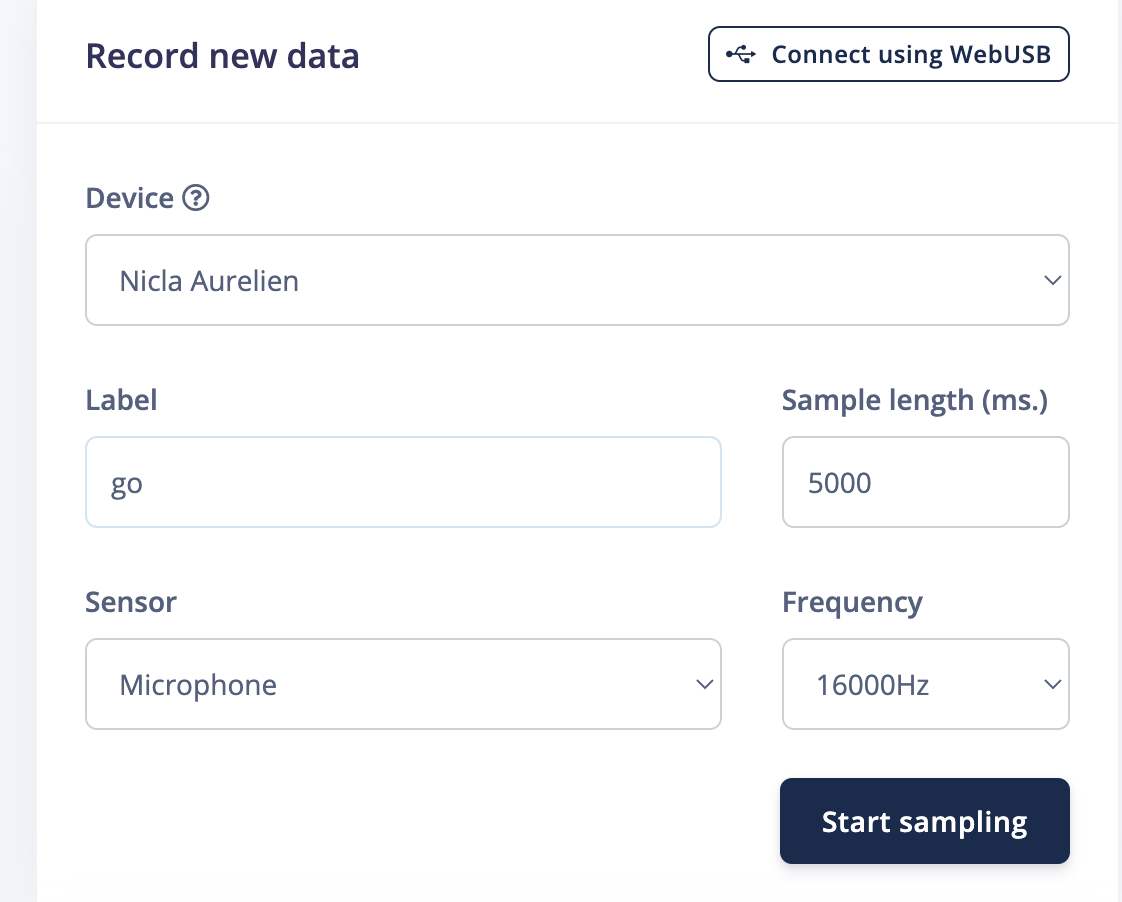
To collect your own voice samples, ensure you have selected your system’s microphone interface as the “Arduino MKRZero”. Then, go to Devices -> Connect a new device, and choose the option of “Use Your Computer” and allow access to your microphone.
Set your keyword as the label and set your sample length to 10s. Then click Start Recording and start saying your keyword over and over again (with a slight pause in between each utterance).
Audio Data Collection Interface
Note: You can use your Mobile phone as a sensor as well.
Afterwards you have a file like this, clearly showing your keywords, separated by some noise. The new data sample will show up in the appropriate Training or Test data bucket.
10 seconds of 'Go' keyword
This data is not suitable for Machine Learning yet though. You will need to cut out the parts where you say your keyword. This is important because you only want the actual keyword to be labeled as such, and not accidentally labeled as noise, or incomplete parts of the utterance. Fortunately the Edge Impulse Studio can do this for you. Click ⋮ next to your sample, and select Split sample.
'Split sample' automatically cuts out the interesting parts of an audio file.
If you have a short keyword, enable Shift samples to randomly shift the sample around in the window, and then click Split. You now have individual 1s. long samples in your dataset. Perfect!
Run the edge-impulse-daemon CLI command and select the project to connect to. Once your board is connected, you can start collecting data from the Data Acquisition page:
About this sectionThis section goes through general guidance for collecting your audio data from scratch and not all steps are required for the out-of-box experience workflow, other than adding your own voice samples. Read on to understand more detail about how the dataset was constructed.
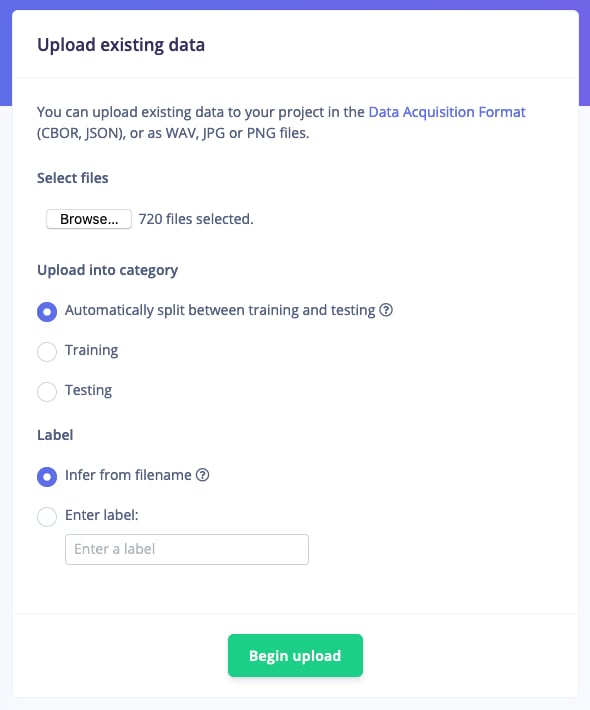
Now that you know how to collect keyword data let’s consider other data we need to collect. In addition to your keyword we’ll also need audio that is not your keyword. Like background noise, the TV playing, and humans saying other words, all of which go into the openset class. This class is labeled as and will be referred to as ‘z_openset’ from here on out. This is required because a machine learning model has no idea about right and wrong (unless those are your keywords), but only learns from the data you feed into it. The more varied your data is, the better your model will work.For each of your classes (in this case ‘go’, ‘stop’, and ‘z_openset’) you want to capture an even amount of data (balanced datasets work better) - and for a decent keyword spotting model you’ll want at the VERY minimum 10 minutes in each class if you’re building your dataset from scratch. For the Syntiant-RC project we’ve used a subset of the ‘Google 30’ speech command set for ‘go’ and ‘stop’.To make this model more responsive to your own voice, do this in the same manner as above. One way of doing this would be to collect 10 seconds clips, then automatically split this data. Make sure to capture wide variations of the keyword and cover high and low pitches.To add additional data to the ‘z_openset’ dataset label you can either collect this yourself, or make your life a bit easier by using dataset of both ‘noise’ (all kinds of background noise) and ‘unknown’ (random words) data that we built for you here: Keyword Spotting Dataset. In the Syntiant-RC project we used short 1 second clips of NPR radio recordings. We consider the ‘z_openset’ a ‘negative’ class since it does not contain any of the keywords that are of interest such as ‘go’ and ‘stop’ (which are considered ‘positive’ classes).This is entirely optional, but to import this data, go to Data acquisition, click the Upload icon, and select a number of ‘noise’ or ‘unknown’ samples (there’s 25 minutes of each class, but you can select less files if you want), and clicking Begin upload. The data is automatically labeled and added to your project. Make sure you label them ‘z_openset’ before uploading so that they go into the pre-existing ‘z_openset’ category.
Importing other 'z_openset' data into your project
If you’ve collected all your training data through the ‘Record new data’ widget you’ll have all your keywords in the ‘Training’ dataset. This is not great, because you want to keep 20% of your data separate to validate the machine learning model. To mitigate this you can go to Dashboard and select Rebalance dataset. This will automatically split your data between a training class (80%) and a testing class (20%). Afterwards you should see something like this:
Training data, showing an even split between the three classes
Testing data, also showing an even split between the three classes
Next stepsIn the next steps we walk you through in detail how the Syntiant signal processing and neural network blocks were configured. If you imported the project, these are already pre-configured for you so you can just read on to understand more details.
With the data set in place you can design an impulse. An impulse takes the raw data, slices it up in smaller windows, uses signal processing blocks to extract features, and then uses a learning block to classify new data. Signal processing blocks always return the same values for the same input and are used to make raw data easier to process, while learning blocks learn from past experiences.For this tutorial we’ll use the “Syntiant” signal processing block. The Syntiant processing block is similar to the Audio MFE block, but using a log-MEL scale plus other transformations specific to the Syntiant audio front-end.We’ll then pass this simplified audio data into a Neural Network block, which will learn to distinguish between the three classes of audio.In the Studio, go to the Create impulse tab, add a Time series data, an Audio (Syntiant) and a Neural Network (Keras) block. Set the window size to 968 ms and the window increase to 484 ms (we’ll explain why later), verify that sampling frequency is set to 16000 Hz and click Save Impulse.
Impulse design for speech recognition with Syntiant
Now that we’ve assembled the building blocks of our Impulse, we can configure each individual part. Click on the Syntiant tab in the left hand navigation menu. You’ll see a page that looks like this:
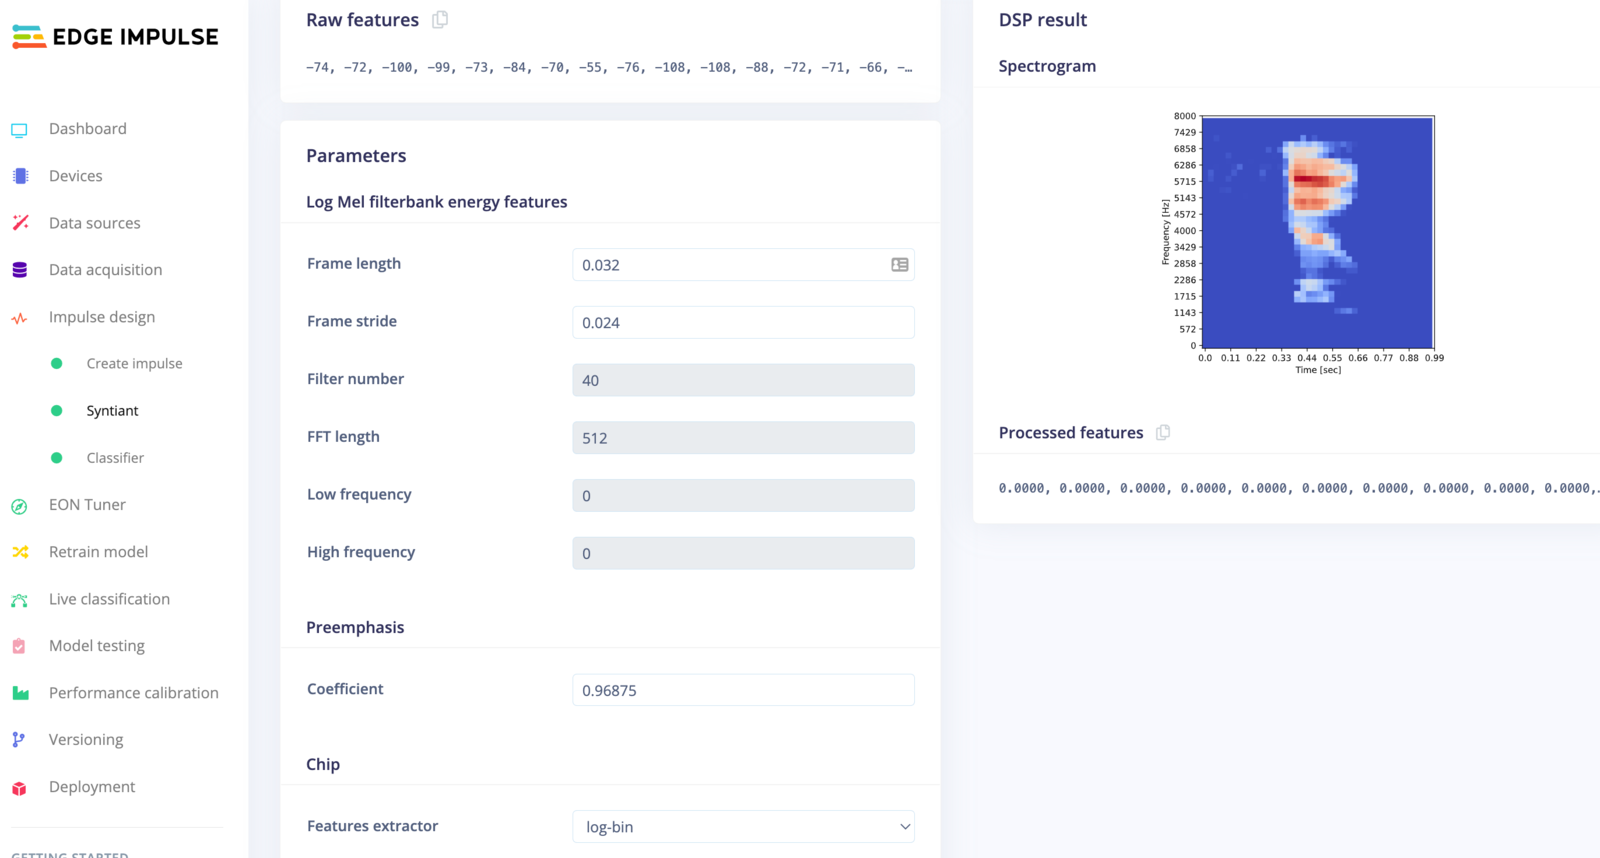
Syntiant processing block configuration
This page allows you to configure some parameters of the Syntiant block, and lets you preview how the data will be transformed. The right of the page shows a visualization of the Syntiant’s output for a piece of audio. The Syntiant processing block extracts speech features using filterbanks. To get a better understanding of parameters, have a look at the Audio MFE documentation.Features generated by the Syntiant DSP block are slightly different between the TinyML and Nicla Voice. Set the features extractor to:
gpu/NDP101 for Syntiant TinyML
log-bin/NDP120 for Nicla Voice
Syntiant block parametersThe number of generated features has to be 1,600, which corresponds to the Syntiant Neural Network input layer. To generate 1,600 features, you have to verify the following equation: window size = 1000 x (39 x frame stride + frame length). For our example: window size = 968 ms = 1000 x (39 x 0.024 + 0.032).
In the spectrogram the vertical axis represents the frequencies (the number of frequency bands is controlled by ‘Number of coefficients’ parameter), and the horizontal axis represents time (controlled by ‘frame stride’ and ‘frame length’). The patterns visible in a spectrogram contain information about what type of sound it represents. For example, the spectrogram in this image shows “Go”:
Spectrogram for 'Go'
These differences are not necessarily easy for a person to describe, but fortunately they are enough for a neural network to learn to identify.It’s interesting to explore your data and look at the types of spectrograms it results in. You can use the dropdown box near the top right of the page to choose between different audio samples to visualize, or play with the parameters to see how the spectrogram changes.
The spectrograms generated by the Syntiant block will be passed into a neural network architecture that is particularly good at learning to recognize patterns in this type of tabular data. Before training our neural network, we’ll need to generate Syntiant blocks for all of our windows of audio. To do this, click the Generate features button at the top of the page, then click the green Generate features button. This will take a minute or so to complete.Afterwards you’re presented with one of the most useful features in Edge Impulse: the feature explorer. This is a 3D representation showing your complete dataset, with each data-item color-coded to its respective label. You can zoom in to every item, find anomalies (an item that’s in a wrong cluster), and click on items to listen to the sample. This is a great way to check whether your dataset contains wrong items, and to validate whether your dataset is suitable for ML (it should separate nicely).
With all data processed it’s time to start training a neural network. Neural networks are algorithms, modeled loosely after the human brain, that can learn to recognize patterns that appear in their training data. The network that we’re training here will take the processing block features as an input, and try to map this to one of the three classes: ‘go’, ‘stop’, or ‘z_openset’.Click on NN Classifier in the left hand menu. You’ll see the following page:
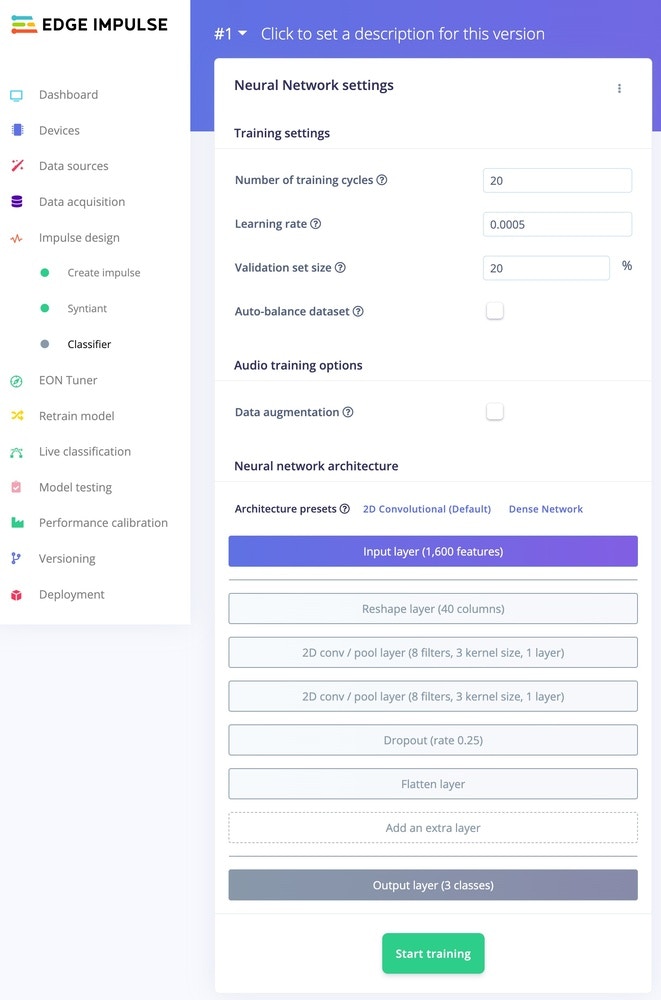
Syntiant NN Configuration
Neural Network architecturesSyntiant TinyML only supports a Dense architecture. The Arduino Nicla Voice also supports Convolutional models and it is selected by default.
With everything in place, click Start training. You’ll see a lot of text flying past in the Training output panel, which you can ignore for now. Training will take a few minutes. When it’s complete, you’ll see the Last training performance panel appear at the bottom of the page:
Training performance
Congratulations, you’ve trained a neural network with Edge Impulse and ready to deploy on your hardware! But what do all these numbers mean?At the start of training, 20% of the training data is set aside for validation. This means that instead of being used to train the model, it is used to evaluate how the model is performing. The Last training performance panel displays the results of this validation, providing some vital information about your model and how well it is working. Bear in mind that your exact numbers may differ from the ones in this tutorial.On the left hand side of the panel, Accuracy refers to the percentage of windows of audio that were correctly classified. The higher number the better, although an accuracy approaching 100% is unlikely, and is often a sign that your model has overfit the training data. You will find out whether this is true in the next stage, during model testing. For many applications, an accuracy above 85% can be considered very good.The Confusion matrix is a table showing the balance of correctly versus incorrectly classified windows. To understand it, compare the values in each row. For example, in the above screenshot, 98.8% of the ‘go’ audio windows were classified as ‘go’, while 1.8% of them were classified to be in the ‘stop’. This appears to be a great result.
The performance numbers in the previous step show that our model is working well on its training data, but it’s extremely important that we test the model on new, unseen data before deploying it in the real world. This will help us ensure the model has not learned to overfit the training data, which is a common occurrence.Fortunately we’ve put aside 20% of our data already in the ‘Test set’ (see Data acquisition). This is data that the model has never seen before, and we can use this to validate whether our model actually works on unseen data. To run your model against the test set, head to Model testing, and click Classify all.
To drill down into a misclassified sample, click the three dots (⋮) next to a sample and select Show classification. You’re then transported to the classification view, which lets you inspect the sample, and compare the sample to your training data. This way you can inspect whether this was actually a classification failure, or whether your data was incorrectly labeled. From here you can either update the label (when the label was wrong), or move the item to the training set to refine your model.
Misclassifications and uncertain resultsIt’s inevitable that even a well-trained machine learning model will sometimes misclassify its inputs. When you integrate a model into your application, you should take into account that it will not always give you the correct answer.For example, if you are classifying audio, you might want to classify several windows of data and average the results. This will give you better overall accuracy than assuming that every individual result is correct.
With the impulse designed, trained and verified you can deploy this model back to your device. This makes the model run without an internet connection, minimizes latency, and runs with minimum power consumption.To export your model, click on Deployment in the menu. Then under ‘Build firmware’ select the Syntiant TinyML or Arduino Nicla Voice.The final step before building the firmware is to configure the posterior handler parameters of the Syntiant chip.
Pre-configured posterior parametersFor the Syntiant-RC project, we’ve already pre-configured the posterior parameters so you can just go to the ‘Build’ output step. We recommend skipping to Step 9, but read on for more details about the process of posterior search.
Optimizing posterior parameters
Those parameters are used to tune the precision and recall of the neural network activations, to minimize False Rejection Rate and False Activation Rate. You can manually edit those parameters in JSON format or use the Find posterior parameters to search for the best values:
Select the classes you want to detect (the z_openset class should be omitted except for testing purpose)
Select a calibration dataset: either no calibration (recommended for TinyML/NDP101), the reference dataset with common english words from a radio program, or your own calibration dataset.
This calibration dataset is made of 2 files: an audio wav file and a csv file which contains the audio transcript of this program. This audio transcript should ideally have the classes you want to detect. For example you can imagine the following csv file: go,stop,this,is,an,example,transcript,for,optimizing,the,posterior,parameters,,,it,will,optimize,activations,for,the,go,stop,keywords,You can also simplify the csv file and include only the keywords/classes you are interested in optimizing. For instance, if your audio wav files contains only 2 occurrences of ‘go’ and ‘stop’: go,stop,go,stop,
Tuning the audio gain for the Syntiant TinyMLAfter generating the posterior parameters, you can change the Syntiant TinyML audio gain by editing the “audio_pdm_gain” value at the end of the JSON file. Default value is set to 12 dB.
Once optimized parameters have been found, you can click Build. This will build a Syntiant package that will run on your development board. After building is completed you’ll get prompted to download a zipfile. Save this on your computer. A pop-up video will show how the download process works.After unzipping the downloaded file, run the appropriate flashing script for your operating system, to flash the Syntiant TinyML Board with the Syntiant-RC model and associated firmware. You might see a Microsoft Defender screen pop up when the script is run on Windows 10. It’s safe to proceed so select ‘More info’ and continue.
Run the edge-impulse-run-impulse CLI command in your terminal:
Edge Impulse impulse runner v1.16.0[SER] Connecting to /dev/tty.usbmodem2CE0169C2[SER] Serial is connected, trying to read config...[SER] Unhandled configuration option management ws //remote-mgmt.edgeimpulse.com[SER] Retrieved configuration[SER] Device is running AT command version 1.7.0[SER] Started inferencing, press CTRL+C to stop...AT+RUNIMPULSEInferencing settings: Interval: 0.0625 ms. Frame size: 15488 Sample length: 968 ms. No. of classes: 3Classes: go stop z_openset> Match: NN0:goMatch: NN0:stopMatch: NN0:stop
You can also connect to the board’s newly flashed firmware over serial as an alternative. Open a terminal and connect using the appropriate COM port with 115200 8-N-1 settings.
Congratulations! Now that you’ve trained and deployed your model you can go further and build your own custom firmware, see Run on Syntiant TinyML Board.Or if you’re interested in more, see our tutorial on Motion Recognition - Syntiant TinyML.We can’t wait to see what you’ll build! 🚀
Was this page helpful?
{"docsConfig":{"theme":"aspen","$schema":"https://mintlify.com/docs.json","name":"Edge Impulse Documentation","description":"Where you can find all the Edge Impulse documentation, and more!","colors":{"primary":"#5f76db","light":"#5f76db","dark":"#182896"},"logo":{"light":"https://mintcdn.com/edgeimpulse/-Yjt9HB8VCOXQC8H/.assets/logos/ei-logo-light.svg?fit=max\u0026auto=format\u0026n=-Yjt9HB8VCOXQC8H\u0026q=85\u0026s=a26ac03680700105c38fa0507df4fee2","dark":"https://mintcdn.com/edgeimpulse/K7zNEaqi2bZnNjVz/.assets/logos/ei-logo-dark.svg?fit=max\u0026auto=format\u0026n=K7zNEaqi2bZnNjVz\u0026q=85\u0026s=6c5887f8e79896f1ca3c3a63d5477761"},"favicon":"https://mintcdn.com/edgeimpulse/HzwDHenmvHu0xumg/.assets/favicon.svg?fit=max\u0026auto=format\u0026n=HzwDHenmvHu0xumg\u0026q=85\u0026s=5d3672f264e068f096f0ccfeff030489","appearance":{"default":"light"},"navbar":{"links":[{"href":"https://edgeimpulse.com/","label":"Website"},{"href":"https://studio.edgeimpulse.com","label":"Login"}],"primary":{"type":"button","label":"Sign up","href":"https://edgeimpulse.com/signup"}},"footer":{"socials":{"linkedin":"https://linkedin.com/company/edgeimpulse","youtube":"https://www.youtube.com/@EdgeImpulse","x":"https://x.com/edgeimpulse"},"links":[{"header":"Policies","items":[{"label":"Responsible AI","href":"https://www.qualcomm.com/site/responsible-ai-license"},{"label":"Privacy","href":"https://www.edgeimpulse.com/legal/privacy-policy"},{"label":"Cookies","href":"https://www.qualcomm.com/site/privacy/cookies"}]},{"header":"Legal","items":[{"label":"Terms of Use","href":"https://www.qualcomm.com/site/terms-of-use"},{"label":"Accessibility","href":"https://www.qualcomm.com/accessibility"}]}]},"seo":{"metatags":{"canonical":"https://docs.edgeimpulse.com"}},"icons":{"library":"fontawesome"},"styling":{"eyebrows":"breadcrumbs","codeblocks":"system","latex":true},"contextual":{"options":["copy","view","assistant"],"display":"header"},"navigation":{"global":{"anchors":[{"anchor":"Forum","icon":"discourse","href":"https://forum.edgeimpulse.com"},{"anchor":"Discord","icon":"discord","href":"https://discord.gg/edgeimpulse"},{"anchor":"GitHub","icon":"github","href":"https://github.com/edgeimpulse"}]},"pages":[]}},"deployment":{"deploymentMetadataValue":{"subdomain":"edgeimpulse","hasAudioNarration":false,"actualSubdomain":"edgeimpulse","customDomains":["docs.edgeimpulse.com"],"gitSource":{"type":"github","owner":"edgeimpulse","repo":"documentation","deployBranch":"main","contentDirectory":"","isPrivate":true,"mountPath":"","label":""},"chroma":{"liveDeploymentHistoryId":"6ae2931d32d9b4ba8a7f5edf","collectionId":"0a3eb521-9a93-4591-9452-c58dcc143c16","schemaVersion":"v3","latestBuiltDeploymentHistoryId":"6ae2931d32d9b4ba8a7f5edf"},"feedback":{"thumbs":true},"entitlements":{"AI_CHAT":{"status":"ENABLED"},"REMOVE_BRANDING":{"status":"ENABLED"},"CONTEXTUAL_FEEDBACK":{"status":"ENABLED"},"CODE_SNIPPET_FEEDBACK":{"status":"ENABLED"},"WEB_MCP":{"status":"ENABLED"},"NARRATION":{"status":"ENABLED"}},"buildId":"6ae2931d32d9b4ba8a7f5edf","clientVersion":"0.0.4044","searchFilterCounts":[{"language":"default","tag":"Tools","count":1305},{"language":"default","tag":"LIBRARIES","count":1279},{"language":"default","tag":"Studio Python API bindings","count":1245},{"language":"default","tag":"edgeimpulse-api","count":1244},{"language":"default","tag":"models","count":1211},{"language":"default","tag":"APIs","count":563},{"language":"default","tag":"STUDIO API ENDPOINTS","count":555},{"language":"default","tag":"Projects","count":272},{"language":"default","tag":"EXPERT NETWORK","count":211},{"language":"default","tag":"Hardware","count":123}]},"assistantConfig":{"enableStarterQuestions":true,"enableContextualStarterQuestions":true},"basePath":"","hasChatPermissions":false,"hasWebMcpPermissions":true,"toggles":[],"googleFontsInlined":false},"customCss":[{"filePath":".styles/styles.css","content":".cookie-settings-button{color:rgb(var(--gray-800))!important;background-color:rgb(var(--gray-950)/.03)!important;border-radius:var(--rounded-xl, .75rem);font-size:.875rem!important;line-height:1.25rem!important;width:fit-content!important;align-self:flex-end!important;margin-left:auto!important}.cookie-settings-button:hover{background-color:rgb(var(--gray-950)/.1)!important}"}],"page":{"pagePath":"tutorials/hardware/syntiant-ndp-keyword-spotting","slug":"/tutorials/hardware/syntiant-ndp-keyword-spotting","pageMetadata":{"title":"Syntiant NDPs - keyword spotting","description":"Build a keyword spotting model and deploy it to Syntiant TinyML, Arduino Nicla Voice, or Avnet RASynBoard using Edge Impulse.","href":"/tutorials/hardware/syntiant-ndp-keyword-spotting"},"description":{"compiledSource":"\"use strict\";\nconst {jsx: _jsx} = arguments[0];\nconst {useMDXComponents: _provideComponents} = arguments[0];\nfunction _createMdxContent(props) {\n const _components = {\n p: \"p\",\n ..._provideComponents(),\n ...props.components\n };\n return _jsx(_components.p, {\n children: \"Build a keyword spotting model and deploy it to Syntiant TinyML, Arduino Nicla Voice, or Avnet RASynBoard using Edge Impulse.\"\n });\n}\nfunction MDXContent(props = {}) {\n const {wrapper: MDXLayout} = {\n ..._provideComponents(),\n ...props.components\n };\n return MDXLayout ? _jsx(MDXLayout, {\n ...props,\n children: _jsx(_createMdxContent, {\n ...props\n })\n }) : _createMdxContent(props);\n}\nreturn {\n default: MDXContent\n};\n","frontmatter":{},"scope":{}},"pageType":"default","mdx":{"mdxSource":{"compiledSource":"\"use strict\";const{Fragment:_Fragment,jsx:_jsx,jsxs:_jsxs}=arguments[0];const{useMDXComponents:_provideComponents}=arguments[0];const CardOpenStudioTutorial=({href})=>{const{Card}=_provideComponents()||{};if(!Card)_missingMdxReference(`Card`,true);return _jsx(Card,{title:`Skip straight to the project`,icon:`forward`,href,children:`Skip the setup: clone a ready-to-use Edge Impulse project with the dataset, impulse, and trained model.`})};function _createMdxContent(props){const _components={a:`a`,blockquote:`blockquote`,code:`code`,em:`em`,li:`li`,p:`p`,pre:`pre`,span:`span`,strong:`strong`,ul:`ul`,..._provideComponents(),...props.components},{CodeBlock,Frame,Heading,Info,OptimizedFrame,OptimizedImage,Warning,_MdxComponentBoundary}=_components;if(!CodeBlock)_missingMdxReference(`CodeBlock`,true);if(!Frame)_missingMdxReference(`Frame`,true);if(!Heading)_missingMdxReference(`Heading`,true);if(!Info)_missingMdxReference(`Info`,true);if(!OptimizedFrame)_missingMdxReference(`OptimizedFrame`,true);if(!OptimizedImage)_missingMdxReference(`OptimizedImage`,true);if(!Warning)_missingMdxReference(`Warning`,true);if(!_MdxComponentBoundary)_missingMdxReference(`_MdxComponentBoundary`,true);return _jsxs(_Fragment,{children:[_jsxs(Info,{children:[_jsx(_components.p,{children:_jsx(_components.strong,{children:`Keyword spotting`})}),_jsxs(_components.p,{children:[`This tutorial is for the `,_jsx(_components.a,{href:`/hardware/boards/syntiant-tinyml-board`,children:`Syntiant TinyML`}),`, `,_jsx(_components.a,{href:`/hardware/boards/arduino-nicla-voice`,children:`Arduino Nicla Voice`}),`, and the `,_jsx(_components.a,{href:`/hardware/boards/avnet-rasynboard`,children:`Avnet RASynBoard (Renesas RA6 and Syntiant NDP 120)`}),`. For other development boards, you can follow the standard `,_jsx(_components.a,{href:`/tutorials/end-to-end/keyword-spotting`,children:`Keyword spotting`}),` tutorial`]})]}),`\n`,_jsxs(_components.p,{children:[`In this tutorial, you’ll use machine learning to build a system that can recognize audible events, particularly your voice through `,_jsx(_components.em,{children:`audio classification`}),`. The system you create will resemble giving audio commands to control a remote control (RC) car such as ‘go’ and ‘stop’, even in the presence of other background noise or background chatter. `,_jsx(_components.strong,{children:`For the best user experience please use the Chrome browser.`})]}),`\n`,_jsx(_components.p,{children:`You’ll learn how to collect audio data from the microphone, use signal processing to extract the most important information, and train a deep neural network that can tell you whether your keyword was heard in a given clip of audio. Finally, you’ll deploy the system to your Syntiant TinyML Board and evaluate how well it works.`}),`\n`,_jsx(_components.p,{children:`At the end of this tutorial, you’ll have a firm understanding of how to classify audio using Edge Impulse for Syntiant hardware.`}),`\n`,_jsx(_MdxComponentBoundary,{name:`CardOpenStudioTutorial`,children:_jsx(CardOpenStudioTutorial,{href:`https://studio.edgeimpulse.com/public/42868/latest`})}),`\n`,_jsxs(Info,{children:[_jsx(_components.p,{children:_jsx(_components.strong,{children:`Before starting the tutorial`})}),_jsxs(_components.p,{children:[`After signing up for a free Edge Impulse account, clone the finished project, including all training data, signal processing and machine learning blocks here: `,_jsx(_components.a,{href:`https://studio.edgeimpulse.com/public/42868/latest`,children:`Tutorial: Syntiant-RC`}),`. At the end of the process you will have the full project that comes pre-loaded with approx. 2.5 hours of training data.`]}),_jsxs(_components.p,{children:[`The features have been generated for the Syntiant TinyML board. To use it for the Arduino Nicla Voice, just set the `,_jsx(_components.code,{children:`Features extractor`}),` to `,_jsx(_components.code,{children:`log-bin`}),` in the Syntiant DSP block and retrain your impulse.`]})]}),`\n`,_jsxs(Warning,{children:[_jsx(_components.p,{children:_jsx(_components.strong,{children:`Production ready systems`})}),_jsx(_components.p,{children:`While the example Syntiant-RC tutorial project provides good performance, it is not intended to be production ready and is designed to maximize the out-of-box user experience. It is in essence a training vehicle for users of both Edge Impulse and Syntiant to understand the entire workflow. Production ready systems need to have a much more robust training data set to further reduce the likelihood of false positive and negatives.`})]}),`\n`,_jsx(Heading,{level:`3`,id:`1-prerequisites`,children:`1. Prerequisites`}),`\n`,_jsx(_components.p,{children:`For this tutorial you’ll one of the following boards`}),`\n`,_jsxs(_components.ul,{children:[`\n`,_jsx(_components.li,{children:_jsx(_components.a,{href:`/hardware/boards/syntiant-tinyml-board`,children:`Syntiant TinyML Board`})}),`\n`,_jsx(_components.li,{children:_jsx(_components.a,{href:`/hardware/boards/arduino-nicla-voice`,children:`Arduino Nicla Voice`})}),`\n`,_jsx(_components.li,{children:_jsx(_components.a,{href:`/hardware/boards/avnet-rasynboard`,children:`Avnet RASynBoard (Renesas RA6 and Syntiant NDP 120)`})}),`\n`]}),`\n`,_jsxs(_components.p,{children:[`The Syntiant TinyML Board shows up as USB microphone once plugged in, and Edge Impulse can use this interface to record audio directly. For the Arduino Nicla Voice, run the `,_jsx(_components.code,{children:`edge-impulse-daemon`}),` CLI command to start collecting data.`]}),`\n`,_jsxs(Info,{children:[_jsx(_components.p,{children:_jsx(_components.strong,{children:`Device compatibility`})}),_jsxs(_components.p,{children:[`Edge Impulse can ingest data from any device - including embedded devices that you already have in production. See the documentation for the `,_jsx(_components.a,{href:`/apis/ingestion`,children:`Ingestion API`}),` for more information.`]})]}),`\n`,_jsx(Heading,{level:`3`,id:`2-collecting-your-own-voice-samples`,children:`2. Collecting your own voice samples`}),`\n`,_jsx(_components.p,{children:`In this tutorial we want to build a system that recognizes keywords that resemble giving commands to a remote control car such as ‘go’ and ‘stop’. Although the aforementioned public project comes pre-loaded with approx. 2.5 hours of training data, in order to add additional audio samples including your own, we’ll show you how you can record audio samples directly from the board.`}),`\n`,_jsx(Heading,{level:`4`,id:`2-1-for-the-syntiant-tinyml`,children:`2.1 For the Syntiant TinyML`}),`\n`,_jsxs(_components.p,{children:[`To collect your own voice samples, ensure you have selected your system’s microphone interface as the “Arduino MKRZero”. Then, go to `,_jsx(_components.strong,{children:`Devices`}),` -> `,_jsx(_components.strong,{children:`Connect a new device`}),`, and choose the option of “Use Your Computer” and allow access to your microphone.`]}),`\n`,_jsx(Frame,{children:_jsx(OptimizedImage,{src:`https://mintcdn.com/edgeimpulse/32tDBbV40V8ujPGF/.assets/images/connect-a-new-device-dialog-with-use-your-computer.png?fit=max\u0026auto=format\u0026n=32tDBbV40V8ujPGF\u0026q=85\u0026s=0e063776c876f8d2de0f3e9c28a5536e`,alt:`Connect a new device dialog with Use your computer selected for microphone capture`,\"data-og-width\":`802`,width:`802`,\"data-og-height\":`458`,height:`458`,\"data-path\":`.assets/images/connect-a-new-device-dialog-with-use-your-computer.png`,\"data-optimize\":`true`,\"data-opv\":`3`,srcset:`https://mintcdn.com/edgeimpulse/32tDBbV40V8ujPGF/.assets/images/connect-a-new-device-dialog-with-use-your-computer.png?w=280\u0026fit=max\u0026auto=format\u0026n=32tDBbV40V8ujPGF\u0026q=85\u0026s=f4d09aef47d2facc5f9f51d3607a77f3 280w, https://mintcdn.com/edgeimpulse/32tDBbV40V8ujPGF/.assets/images/connect-a-new-device-dialog-with-use-your-computer.png?w=560\u0026fit=max\u0026auto=format\u0026n=32tDBbV40V8ujPGF\u0026q=85\u0026s=86690cf9dd35ce3d54d97dc6bbf8d098 560w, https://mintcdn.com/edgeimpulse/32tDBbV40V8ujPGF/.assets/images/connect-a-new-device-dialog-with-use-your-computer.png?w=840\u0026fit=max\u0026auto=format\u0026n=32tDBbV40V8ujPGF\u0026q=85\u0026s=4d8aff603ae25d356462acd80159bd41 840w, https://mintcdn.com/edgeimpulse/32tDBbV40V8ujPGF/.assets/images/connect-a-new-device-dialog-with-use-your-computer.png?w=1100\u0026fit=max\u0026auto=format\u0026n=32tDBbV40V8ujPGF\u0026q=85\u0026s=a3a405312df2bd1d87b1d1169b186cc9 1100w, https://mintcdn.com/edgeimpulse/32tDBbV40V8ujPGF/.assets/images/connect-a-new-device-dialog-with-use-your-computer.png?w=1650\u0026fit=max\u0026auto=format\u0026n=32tDBbV40V8ujPGF\u0026q=85\u0026s=133030c854014b12f3cbe19229382a6a 1650w, https://mintcdn.com/edgeimpulse/32tDBbV40V8ujPGF/.assets/images/connect-a-new-device-dialog-with-use-your-computer.png?w=2500\u0026fit=max\u0026auto=format\u0026n=32tDBbV40V8ujPGF\u0026q=85\u0026s=bdf1e24f3c6bfe0e13ffa03859ff54e3 2500w`})}),`\n`,_jsxs(_components.p,{children:[`Set your keyword as the label and set your sample length to 10s. Then click `,_jsx(_components.strong,{children:`Start Recording`}),` and start saying your keyword over and over again (with a slight pause in between each utterance).`]}),`\n`,_jsx(Frame,{caption:`Audio Data Collection Interface`,children:_jsx(OptimizedImage,{src:`https://mintcdn.com/edgeimpulse/6fC4I05vo7YjCpKK/.assets/images/data-acquisition-recording-form-for-capturing-a.png?fit=max\u0026auto=format\u0026n=6fC4I05vo7YjCpKK\u0026q=85\u0026s=ed38e6fef6768221d17ac8b025353f61`,alt:`Data acquisition recording form for capturing a spoken keyword`,\"data-og-width\":`1076`,width:`1076`,\"data-og-height\":`612`,height:`612`,\"data-path\":`.assets/images/data-acquisition-recording-form-for-capturing-a.png`,\"data-optimize\":`true`,\"data-opv\":`3`,srcset:`https://mintcdn.com/edgeimpulse/6fC4I05vo7YjCpKK/.assets/images/data-acquisition-recording-form-for-capturing-a.png?w=280\u0026fit=max\u0026auto=format\u0026n=6fC4I05vo7YjCpKK\u0026q=85\u0026s=33b414ac9bc5091dcdc2a617476f8a81 280w, https://mintcdn.com/edgeimpulse/6fC4I05vo7YjCpKK/.assets/images/data-acquisition-recording-form-for-capturing-a.png?w=560\u0026fit=max\u0026auto=format\u0026n=6fC4I05vo7YjCpKK\u0026q=85\u0026s=b41763eaf1377277422746a9cefd203d 560w, https://mintcdn.com/edgeimpulse/6fC4I05vo7YjCpKK/.assets/images/data-acquisition-recording-form-for-capturing-a.png?w=840\u0026fit=max\u0026auto=format\u0026n=6fC4I05vo7YjCpKK\u0026q=85\u0026s=da77dd8ae7da9ded02e849bfe181a763 840w, https://mintcdn.com/edgeimpulse/6fC4I05vo7YjCpKK/.assets/images/data-acquisition-recording-form-for-capturing-a.png?w=1100\u0026fit=max\u0026auto=format\u0026n=6fC4I05vo7YjCpKK\u0026q=85\u0026s=0d4253c3e40b43c63fdc010872633cbc 1100w, https://mintcdn.com/edgeimpulse/6fC4I05vo7YjCpKK/.assets/images/data-acquisition-recording-form-for-capturing-a.png?w=1650\u0026fit=max\u0026auto=format\u0026n=6fC4I05vo7YjCpKK\u0026q=85\u0026s=7c38ccd260746a432dff8bb2cdeb25f8 1650w, https://mintcdn.com/edgeimpulse/6fC4I05vo7YjCpKK/.assets/images/data-acquisition-recording-form-for-capturing-a.png?w=2500\u0026fit=max\u0026auto=format\u0026n=6fC4I05vo7YjCpKK\u0026q=85\u0026s=7d2950ba1b061241b7cd6e0719aada83 2500w`})}),`\n`,_jsx(OptimizedFrame,{src:`https://www.youtube-nocookie.com/embed/cubI6IPKtiE`,title:`YouTube video player`,className:`mint-w-full mint-aspect-video mint-rounded-xl`,frameborder:`0`,allowFullScreen:true}),`\n`,_jsxs(_components.blockquote,{children:[`\n`,_jsxs(_components.p,{children:[_jsx(_components.strong,{children:`Note:`}),` You can use your `,_jsx(_components.a,{href:`/hardware/devices/mobile-phone`,children:`Mobile phone`}),` as a sensor as well.`]}),`\n`]}),`\n`,_jsx(_components.p,{children:`Afterwards you have a file like this, clearly showing your keywords, separated by some noise. The new data sample will show up in the appropriate Training or Test data bucket.`}),`\n`,_jsx(Frame,{caption:`10 seconds of 'Go' keyword`,children:_jsx(OptimizedImage,{src:`https://mintcdn.com/edgeimpulse/dgosvhjt4xFcELFr/.assets/images/waveform-view-for-a-ten-second-go-keyword-sample.png?fit=max\u0026auto=format\u0026n=dgosvhjt4xFcELFr\u0026q=85\u0026s=bbc3032771e535f384d400f893bd460d`,alt:`Waveform view for a ten-second Go keyword sample`,\"data-og-width\":`1186`,width:`1186`,\"data-og-height\":`978`,height:`978`,\"data-path\":`.assets/images/waveform-view-for-a-ten-second-go-keyword-sample.png`,\"data-optimize\":`true`,\"data-opv\":`3`,srcset:`https://mintcdn.com/edgeimpulse/dgosvhjt4xFcELFr/.assets/images/waveform-view-for-a-ten-second-go-keyword-sample.png?w=280\u0026fit=max\u0026auto=format\u0026n=dgosvhjt4xFcELFr\u0026q=85\u0026s=4ce97630e89660700eff4dbf62f45089 280w, https://mintcdn.com/edgeimpulse/dgosvhjt4xFcELFr/.assets/images/waveform-view-for-a-ten-second-go-keyword-sample.png?w=560\u0026fit=max\u0026auto=format\u0026n=dgosvhjt4xFcELFr\u0026q=85\u0026s=80942f576070ea9ea3fa9e3e056bc968 560w, https://mintcdn.com/edgeimpulse/dgosvhjt4xFcELFr/.assets/images/waveform-view-for-a-ten-second-go-keyword-sample.png?w=840\u0026fit=max\u0026auto=format\u0026n=dgosvhjt4xFcELFr\u0026q=85\u0026s=a44c447298d2896ae8a5c136a6389a1f 840w, https://mintcdn.com/edgeimpulse/dgosvhjt4xFcELFr/.assets/images/waveform-view-for-a-ten-second-go-keyword-sample.png?w=1100\u0026fit=max\u0026auto=format\u0026n=dgosvhjt4xFcELFr\u0026q=85\u0026s=c37a2c74d3f142e4e263784db2dcb641 1100w, https://mintcdn.com/edgeimpulse/dgosvhjt4xFcELFr/.assets/images/waveform-view-for-a-ten-second-go-keyword-sample.png?w=1650\u0026fit=max\u0026auto=format\u0026n=dgosvhjt4xFcELFr\u0026q=85\u0026s=823ae9d5d98bc90c4193fbe59b9962c4 1650w, https://mintcdn.com/edgeimpulse/dgosvhjt4xFcELFr/.assets/images/waveform-view-for-a-ten-second-go-keyword-sample.png?w=2500\u0026fit=max\u0026auto=format\u0026n=dgosvhjt4xFcELFr\u0026q=85\u0026s=9830d5bf99130494d8fc8bc36b92ac8d 2500w`})}),`\n`,_jsxs(_components.p,{children:[`This data is not suitable for Machine Learning yet though. You will need to cut out the parts where you say your keyword. This is important because you only want the actual keyword to be labeled as such, and not accidentally labeled as noise, or incomplete parts of the utterance. Fortunately the Edge Impulse Studio can do this for you. Click `,_jsx(_components.code,{children:`⋮`}),` next to your sample, and select `,_jsx(_components.strong,{children:`Split sample`}),`.`]}),`\n`,_jsx(Frame,{caption:`'Split sample' automatically cuts out the interesting parts of an audio file.`,children:_jsx(OptimizedImage,{src:`https://mintcdn.com/edgeimpulse/D6ot6KswqYvXnK8b/.assets/images/split-sample-tool-with-detected-keyword-segments.png?fit=max\u0026auto=format\u0026n=D6ot6KswqYvXnK8b\u0026q=85\u0026s=4b623163ecd3df8fe993a9401e41475a`,alt:`Split sample tool with detected keyword segments highlighted`,\"data-og-width\":`1600`,width:`1600`,\"data-og-height\":`882`,height:`882`,\"data-path\":`.assets/images/split-sample-tool-with-detected-keyword-segments.png`,\"data-optimize\":`true`,\"data-opv\":`3`,srcset:`https://mintcdn.com/edgeimpulse/D6ot6KswqYvXnK8b/.assets/images/split-sample-tool-with-detected-keyword-segments.png?w=280\u0026fit=max\u0026auto=format\u0026n=D6ot6KswqYvXnK8b\u0026q=85\u0026s=460be274aea7404db8194617d6e5ad25 280w, https://mintcdn.com/edgeimpulse/D6ot6KswqYvXnK8b/.assets/images/split-sample-tool-with-detected-keyword-segments.png?w=560\u0026fit=max\u0026auto=format\u0026n=D6ot6KswqYvXnK8b\u0026q=85\u0026s=61c806c023fdbf0abed56ebd1d928503 560w, https://mintcdn.com/edgeimpulse/D6ot6KswqYvXnK8b/.assets/images/split-sample-tool-with-detected-keyword-segments.png?w=840\u0026fit=max\u0026auto=format\u0026n=D6ot6KswqYvXnK8b\u0026q=85\u0026s=e3633de4e5f3c831f7811e3605ea419f 840w, https://mintcdn.com/edgeimpulse/D6ot6KswqYvXnK8b/.assets/images/split-sample-tool-with-detected-keyword-segments.png?w=1100\u0026fit=max\u0026auto=format\u0026n=D6ot6KswqYvXnK8b\u0026q=85\u0026s=fc98b53e0d940b743341728190fce0cc 1100w, https://mintcdn.com/edgeimpulse/D6ot6KswqYvXnK8b/.assets/images/split-sample-tool-with-detected-keyword-segments.png?w=1650\u0026fit=max\u0026auto=format\u0026n=D6ot6KswqYvXnK8b\u0026q=85\u0026s=e5850ec4d1cef60a57d1a83c406e9dd2 1650w, https://mintcdn.com/edgeimpulse/D6ot6KswqYvXnK8b/.assets/images/split-sample-tool-with-detected-keyword-segments.png?w=2500\u0026fit=max\u0026auto=format\u0026n=D6ot6KswqYvXnK8b\u0026q=85\u0026s=3708e552af6995225eacd97960353c70 2500w`})}),`\n`,_jsxs(_components.p,{children:[`If you have a short keyword, enable `,_jsx(_components.em,{children:`Shift samples`}),` to randomly shift the sample around in the window, and then click `,_jsx(_components.strong,{children:`Split`}),`. You now have individual 1s. long samples in your dataset. Perfect!`]}),`\n`,_jsx(Heading,{level:`4`,id:`2-2-for-the-arduino-nicla-voice`,children:`2.2 For the Arduino Nicla Voice`}),`\n`,_jsxs(_components.p,{children:[`Run the `,_jsx(_components.code,{children:`edge-impulse-daemon`}),` CLI command and select the project to connect to. Once your board is connected, you can start collecting data from the Data Acquisition page:`]}),`\n`,_jsx(Frame,{caption:`Capture data with Nicla Voice`,children:_jsx(OptimizedImage,{src:`https://mintcdn.com/edgeimpulse/ZTVcrLfO8Bn7QR9I/.assets/images/nicla-voice-capture.png?fit=max\u0026auto=format\u0026n=ZTVcrLfO8Bn7QR9I\u0026q=85\u0026s=47327c9317e0643c2a37aadb1f3f8903`,alt:`Data acquisition page recording audio with the Arduino Nicla Voice`,\"data-og-width\":`1122`,width:`1122`,\"data-og-height\":`902`,height:`902`,\"data-path\":`.assets/images/nicla-voice-capture.png`,\"data-optimize\":`true`,\"data-opv\":`3`,srcset:`https://mintcdn.com/edgeimpulse/ZTVcrLfO8Bn7QR9I/.assets/images/nicla-voice-capture.png?w=280\u0026fit=max\u0026auto=format\u0026n=ZTVcrLfO8Bn7QR9I\u0026q=85\u0026s=c53a750462583a5e8a3c06e45e8b0cfd 280w, https://mintcdn.com/edgeimpulse/ZTVcrLfO8Bn7QR9I/.assets/images/nicla-voice-capture.png?w=560\u0026fit=max\u0026auto=format\u0026n=ZTVcrLfO8Bn7QR9I\u0026q=85\u0026s=05fa54294e042fbaf899b7b8df6e6a39 560w, https://mintcdn.com/edgeimpulse/ZTVcrLfO8Bn7QR9I/.assets/images/nicla-voice-capture.png?w=840\u0026fit=max\u0026auto=format\u0026n=ZTVcrLfO8Bn7QR9I\u0026q=85\u0026s=112478fc8f50537bacd67d2a40e1b88b 840w, https://mintcdn.com/edgeimpulse/ZTVcrLfO8Bn7QR9I/.assets/images/nicla-voice-capture.png?w=1100\u0026fit=max\u0026auto=format\u0026n=ZTVcrLfO8Bn7QR9I\u0026q=85\u0026s=904a628a3f665d0c28ef756fefd674f0 1100w, https://mintcdn.com/edgeimpulse/ZTVcrLfO8Bn7QR9I/.assets/images/nicla-voice-capture.png?w=1650\u0026fit=max\u0026auto=format\u0026n=ZTVcrLfO8Bn7QR9I\u0026q=85\u0026s=dbf28b503bd50de72a525ca423e11da7 1650w, https://mintcdn.com/edgeimpulse/ZTVcrLfO8Bn7QR9I/.assets/images/nicla-voice-capture.png?w=2500\u0026fit=max\u0026auto=format\u0026n=ZTVcrLfO8Bn7QR9I\u0026q=85\u0026s=f0f41081cf8eab84148f4099fcea93de 2500w`})}),`\n`,_jsx(Heading,{level:`3`,id:`3-understanding-how-to-construct-your-dataset`,children:`3. Understanding how to construct your dataset`}),`\n`,_jsxs(Info,{children:[_jsx(_components.p,{children:_jsx(_components.strong,{children:`About this section`})}),_jsx(_components.p,{children:`This section goes through general guidance for collecting your audio data from scratch and not all steps are required for the out-of-box experience workflow, other than adding your own voice samples. Read on to understand more detail about how the dataset was constructed.`})]}),`\n`,_jsxs(_components.p,{children:[`Now that you know how to collect keyword data let’s consider other data we need to collect. In addition to your keyword we’ll also need audio that is `,_jsx(_components.em,{children:`not`}),` your keyword. Like background noise, the TV playing, and humans saying other words, all of which go into the openset class. This class is labeled as and will be referred to as ‘z_openset’ from here on out. This is required because a machine learning model has no idea about right and wrong (unless those are your keywords), but only learns from the data you feed into it. The more varied your data is, the better your model will work.`]}),`\n`,_jsx(_components.p,{children:`For each of your classes (in this case ‘go’, ‘stop’, and ‘z_openset’) you want to capture an even amount of data (balanced datasets work better) - and for a decent keyword spotting model you’ll want at the VERY minimum 10 minutes in each class if you’re building your dataset from scratch. For the Syntiant-RC project we’ve used a subset of the ‘Google 30’ speech command set for ‘go’ and ‘stop’.`}),`\n`,_jsx(_components.p,{children:`To make this model more responsive to your own voice, do this in the same manner as above. One way of doing this would be to collect 10 seconds clips, then automatically split this data. Make sure to capture wide variations of the keyword and cover high and low pitches.`}),`\n`,_jsxs(_components.p,{children:[`To add additional data to the ‘z_openset’ dataset label you can either collect this yourself, or make your life a bit easier by using dataset of both ‘noise’ (all kinds of background noise) and ‘unknown’ (random words) data that we built for you here: `,_jsx(_components.a,{href:`/datasets/audio/keyword-spotting`,children:`Keyword Spotting Dataset`}),`. In the Syntiant-RC project we used short 1 second clips of NPR radio recordings. We consider the ‘z_openset’ a ‘negative’ class since it does not contain any of the keywords that are of interest such as ‘go’ and ‘stop’ (which are considered ‘positive’ classes).`]}),`\n`,_jsxs(_components.p,{children:[`This is entirely optional, but to import this data, go to `,_jsx(_components.strong,{children:`Data acquisition`}),`, click the `,_jsx(_components.em,{children:`Upload`}),` icon, and select a number of ‘noise’ or ‘unknown’ samples (there’s 25 minutes of each class, but you can select less files if you want), and clicking `,_jsx(_components.strong,{children:`Begin upload`}),`. The data is automatically labeled and added to your project. `,_jsx(_components.strong,{children:`Make sure you label them ‘z_openset’ before uploading so that they go into the pre-existing ‘z_openset’ category.`})]}),`\n`,_jsx(Frame,{caption:`Importing other 'z\\\\_openset' data into your project`,children:_jsx(OptimizedImage,{src:`https://mintcdn.com/edgeimpulse/JgXbtJL76vIg-e6S/.assets/images/upload-data-dialog-importing-noise-and-unknown-audio.png?fit=max\u0026auto=format\u0026n=JgXbtJL76vIg-e6S\u0026q=85\u0026s=d37b2f467c964dd5e2d7e35ef5ba2423`,alt:`Upload data dialog importing open-set audio samples`,\"data-og-width\":`590`,width:`590`,\"data-og-height\":`710`,height:`710`,\"data-path\":`.assets/images/upload-data-dialog-importing-noise-and-unknown-audio.png`,\"data-optimize\":`true`,\"data-opv\":`3`,srcset:`https://mintcdn.com/edgeimpulse/JgXbtJL76vIg-e6S/.assets/images/upload-data-dialog-importing-noise-and-unknown-audio.png?w=280\u0026fit=max\u0026auto=format\u0026n=JgXbtJL76vIg-e6S\u0026q=85\u0026s=7032a90accc4dbd426d8b38f435fc4b1 280w, https://mintcdn.com/edgeimpulse/JgXbtJL76vIg-e6S/.assets/images/upload-data-dialog-importing-noise-and-unknown-audio.png?w=560\u0026fit=max\u0026auto=format\u0026n=JgXbtJL76vIg-e6S\u0026q=85\u0026s=eced15b49f5f935b1f33d5ff13289803 560w, https://mintcdn.com/edgeimpulse/JgXbtJL76vIg-e6S/.assets/images/upload-data-dialog-importing-noise-and-unknown-audio.png?w=840\u0026fit=max\u0026auto=format\u0026n=JgXbtJL76vIg-e6S\u0026q=85\u0026s=7b9ccc66b9c20b9eace992a890e90fa9 840w, https://mintcdn.com/edgeimpulse/JgXbtJL76vIg-e6S/.assets/images/upload-data-dialog-importing-noise-and-unknown-audio.png?w=1100\u0026fit=max\u0026auto=format\u0026n=JgXbtJL76vIg-e6S\u0026q=85\u0026s=1686bb5377ffdcb2b11444fe2888fa3b 1100w, https://mintcdn.com/edgeimpulse/JgXbtJL76vIg-e6S/.assets/images/upload-data-dialog-importing-noise-and-unknown-audio.png?w=1650\u0026fit=max\u0026auto=format\u0026n=JgXbtJL76vIg-e6S\u0026q=85\u0026s=f618f9cf6dab763953d679141b814f01 1650w, https://mintcdn.com/edgeimpulse/JgXbtJL76vIg-e6S/.assets/images/upload-data-dialog-importing-noise-and-unknown-audio.png?w=2500\u0026fit=max\u0026auto=format\u0026n=JgXbtJL76vIg-e6S\u0026q=85\u0026s=ec61db20a6041a577ea4c8a70ab2e2d9 2500w`})}),`\n`,_jsx(Heading,{level:`4`,id:`rebalancing-your-dataset`,children:`Rebalancing your dataset`}),`\n`,_jsxs(_components.p,{children:[`If you’ve collected all your training data through the ‘Record new data’ widget you’ll have all your keywords in the ‘Training’ dataset. This is not great, because you want to keep 20% of your data separate to validate the machine learning model. To mitigate this you can go to `,_jsx(_components.strong,{children:`Dashboard`}),` and select `,_jsx(_components.strong,{children:`Rebalance dataset`}),`. This will automatically split your data between a training class (80%) and a testing class (20%). Afterwards you should see something like this:`]}),`\n`,_jsx(Frame,{caption:`Training data, showing an even split between the three classes`,children:_jsx(OptimizedImage,{src:`https://mintcdn.com/edgeimpulse/JgXbtJL76vIg-e6S/.assets/images/training-set-view-with-balanced-go-stop-and-open-set.png?fit=max\u0026auto=format\u0026n=JgXbtJL76vIg-e6S\u0026q=85\u0026s=2080c29476c271cf0ab4c2243ddf314e`,alt:`Training set view with balanced Go, Stop, and open-set classes`,\"data-og-width\":`586`,width:`586`,\"data-og-height\":`300`,height:`300`,\"data-path\":`.assets/images/training-set-view-with-balanced-go-stop-and-open-set.png`,\"data-optimize\":`true`,\"data-opv\":`3`,srcset:`https://mintcdn.com/edgeimpulse/JgXbtJL76vIg-e6S/.assets/images/training-set-view-with-balanced-go-stop-and-open-set.png?w=280\u0026fit=max\u0026auto=format\u0026n=JgXbtJL76vIg-e6S\u0026q=85\u0026s=7680a57700b12eeb3914b2131fca19cc 280w, https://mintcdn.com/edgeimpulse/JgXbtJL76vIg-e6S/.assets/images/training-set-view-with-balanced-go-stop-and-open-set.png?w=560\u0026fit=max\u0026auto=format\u0026n=JgXbtJL76vIg-e6S\u0026q=85\u0026s=567d55a3e84119b13c07890c1a104ccd 560w, https://mintcdn.com/edgeimpulse/JgXbtJL76vIg-e6S/.assets/images/training-set-view-with-balanced-go-stop-and-open-set.png?w=840\u0026fit=max\u0026auto=format\u0026n=JgXbtJL76vIg-e6S\u0026q=85\u0026s=1b7e18c13ea46ae9ebb7fe89446c0498 840w, https://mintcdn.com/edgeimpulse/JgXbtJL76vIg-e6S/.assets/images/training-set-view-with-balanced-go-stop-and-open-set.png?w=1100\u0026fit=max\u0026auto=format\u0026n=JgXbtJL76vIg-e6S\u0026q=85\u0026s=5b14f1ba1cf1c44b3f20b281caea12ac 1100w, https://mintcdn.com/edgeimpulse/JgXbtJL76vIg-e6S/.assets/images/training-set-view-with-balanced-go-stop-and-open-set.png?w=1650\u0026fit=max\u0026auto=format\u0026n=JgXbtJL76vIg-e6S\u0026q=85\u0026s=5f71db984ce039684b477d76c677e7d4 1650w, https://mintcdn.com/edgeimpulse/JgXbtJL76vIg-e6S/.assets/images/training-set-view-with-balanced-go-stop-and-open-set.png?w=2500\u0026fit=max\u0026auto=format\u0026n=JgXbtJL76vIg-e6S\u0026q=85\u0026s=40298fbb8055e408e24c7f770a20787e 2500w`})}),`\n`,_jsx(`br`,{}),`\n`,_jsx(Frame,{caption:`Testing data, also showing an even split between the three classes`,children:_jsx(OptimizedImage,{src:`https://mintcdn.com/edgeimpulse/jROO7bXowE_Ie1tJ/.assets/images/test-set-view-with-balanced-keyword-spotting-classes.png?fit=max\u0026auto=format\u0026n=jROO7bXowE_Ie1tJ\u0026q=85\u0026s=33c296bc069a14e5e9d2be04b0fe63c8`,alt:`Test set view with balanced keyword spotting classes`,\"data-og-width\":`586`,width:`586`,\"data-og-height\":`300`,height:`300`,\"data-path\":`.assets/images/test-set-view-with-balanced-keyword-spotting-classes.png`,\"data-optimize\":`true`,\"data-opv\":`3`,srcset:`https://mintcdn.com/edgeimpulse/jROO7bXowE_Ie1tJ/.assets/images/test-set-view-with-balanced-keyword-spotting-classes.png?w=280\u0026fit=max\u0026auto=format\u0026n=jROO7bXowE_Ie1tJ\u0026q=85\u0026s=9d30645130f88d79a64c54aca7719ab0 280w, https://mintcdn.com/edgeimpulse/jROO7bXowE_Ie1tJ/.assets/images/test-set-view-with-balanced-keyword-spotting-classes.png?w=560\u0026fit=max\u0026auto=format\u0026n=jROO7bXowE_Ie1tJ\u0026q=85\u0026s=ba8a6df70d387c65d6d28fdd8120b826 560w, https://mintcdn.com/edgeimpulse/jROO7bXowE_Ie1tJ/.assets/images/test-set-view-with-balanced-keyword-spotting-classes.png?w=840\u0026fit=max\u0026auto=format\u0026n=jROO7bXowE_Ie1tJ\u0026q=85\u0026s=9d8001366c66bf34ee588dcf8a1bcf1a 840w, https://mintcdn.com/edgeimpulse/jROO7bXowE_Ie1tJ/.assets/images/test-set-view-with-balanced-keyword-spotting-classes.png?w=1100\u0026fit=max\u0026auto=format\u0026n=jROO7bXowE_Ie1tJ\u0026q=85\u0026s=bb7a191115c2594e5ec3f375c6f89d3a 1100w, https://mintcdn.com/edgeimpulse/jROO7bXowE_Ie1tJ/.assets/images/test-set-view-with-balanced-keyword-spotting-classes.png?w=1650\u0026fit=max\u0026auto=format\u0026n=jROO7bXowE_Ie1tJ\u0026q=85\u0026s=a034f8e7186fe5419306ade666e132c0 1650w, https://mintcdn.com/edgeimpulse/jROO7bXowE_Ie1tJ/.assets/images/test-set-view-with-balanced-keyword-spotting-classes.png?w=2500\u0026fit=max\u0026auto=format\u0026n=jROO7bXowE_Ie1tJ\u0026q=85\u0026s=adb219d956bf06ee1c6bb8a0f2b48a4f 2500w`})}),`\n`,_jsxs(Info,{children:[_jsx(_components.p,{children:_jsx(_components.strong,{children:`Next steps`})}),_jsx(_components.p,{children:`In the next steps we walk you through in detail how the Syntiant signal processing and neural network blocks were configured. If you imported the project, these are already pre-configured for you so you can just read on to understand more details.`})]}),`\n`,_jsx(Heading,{level:`3`,id:`4-designing-your-impulse`,children:`4. Designing your impulse`}),`\n`,_jsx(_components.p,{children:`With the data set in place you can design an impulse. An impulse takes the raw data, slices it up in smaller windows, uses signal processing blocks to extract features, and then uses a learning block to classify new data. Signal processing blocks always return the same values for the same input and are used to make raw data easier to process, while learning blocks learn from past experiences.`}),`\n`,_jsxs(_components.p,{children:[`For this tutorial we’ll use the “Syntiant” signal processing block. The Syntiant processing block is similar to the `,_jsx(_components.a,{href:`/studio/projects/processing-blocks/blocks/audio-mfe`,children:`Audio MFE`}),` block, but using a log-MEL scale plus other transformations specific to the Syntiant audio front-end.`]}),`\n`,_jsx(_components.p,{children:`We’ll then pass this simplified audio data into a Neural Network block, which will learn to distinguish between the three classes of audio.`}),`\n`,_jsxs(_components.p,{children:[`In the Studio, go to the `,_jsx(_components.strong,{children:`Create impulse`}),` tab, add a `,_jsx(_components.em,{children:`Time series data`}),`, an `,_jsx(_components.em,{children:`Audio (Syntiant)`}),` and a `,_jsx(_components.em,{children:`Neural Network (Keras)`}),` block. Set the window size to 968 ms and the window increase to 484 ms (we’ll explain why later), verify that sampling frequency is set to 16000 Hz and click `,_jsx(_components.strong,{children:`Save Impulse`}),`.`]}),`\n`,_jsx(Frame,{caption:`Impulse design for speech recognition with Syntiant`,children:_jsx(OptimizedImage,{src:`https://mintcdn.com/edgeimpulse/3StgJ7NkW4vSOuoq/.assets/images/create-impulse-page-for-syntiant-keyword-spotting.png?fit=max\u0026auto=format\u0026n=3StgJ7NkW4vSOuoq\u0026q=85\u0026s=7f99465601221be62c9880a0b005bb54`,alt:`Create impulse page for Syntiant keyword spotting`,\"data-og-width\":`1600`,width:`1600`,\"data-og-height\":`802`,height:`802`,\"data-path\":`.assets/images/create-impulse-page-for-syntiant-keyword-spotting.png`,\"data-optimize\":`true`,\"data-opv\":`3`,srcset:`https://mintcdn.com/edgeimpulse/3StgJ7NkW4vSOuoq/.assets/images/create-impulse-page-for-syntiant-keyword-spotting.png?w=280\u0026fit=max\u0026auto=format\u0026n=3StgJ7NkW4vSOuoq\u0026q=85\u0026s=3d02b93ea287b7a090939a2fcf4b38a9 280w, https://mintcdn.com/edgeimpulse/3StgJ7NkW4vSOuoq/.assets/images/create-impulse-page-for-syntiant-keyword-spotting.png?w=560\u0026fit=max\u0026auto=format\u0026n=3StgJ7NkW4vSOuoq\u0026q=85\u0026s=fbc59952fabe35f894d7f0dbfaf1ab6f 560w, https://mintcdn.com/edgeimpulse/3StgJ7NkW4vSOuoq/.assets/images/create-impulse-page-for-syntiant-keyword-spotting.png?w=840\u0026fit=max\u0026auto=format\u0026n=3StgJ7NkW4vSOuoq\u0026q=85\u0026s=60d9f1f6c10e75fcce850af111b9c8b2 840w, https://mintcdn.com/edgeimpulse/3StgJ7NkW4vSOuoq/.assets/images/create-impulse-page-for-syntiant-keyword-spotting.png?w=1100\u0026fit=max\u0026auto=format\u0026n=3StgJ7NkW4vSOuoq\u0026q=85\u0026s=9201091fdec9d868f359f99e69ab5e7d 1100w, https://mintcdn.com/edgeimpulse/3StgJ7NkW4vSOuoq/.assets/images/create-impulse-page-for-syntiant-keyword-spotting.png?w=1650\u0026fit=max\u0026auto=format\u0026n=3StgJ7NkW4vSOuoq\u0026q=85\u0026s=ce27934721d7e20d85ef6d37a7d3b1ae 1650w, https://mintcdn.com/edgeimpulse/3StgJ7NkW4vSOuoq/.assets/images/create-impulse-page-for-syntiant-keyword-spotting.png?w=2500\u0026fit=max\u0026auto=format\u0026n=3StgJ7NkW4vSOuoq\u0026q=85\u0026s=7348cd34f8961e6f3e936f6436a9bc38 2500w`})}),`\n`,_jsx(Heading,{level:`3`,id:`5-configure-the-syntiant-block`,children:`5. Configure the Syntiant block`}),`\n`,_jsxs(_components.p,{children:[`Now that we’ve assembled the building blocks of our Impulse, we can configure each individual part. Click on the `,_jsx(_components.strong,{children:`Syntiant`}),` tab in the left hand navigation menu. You’ll see a page that looks like this:`]}),`\n`,_jsx(Frame,{caption:`Syntiant processing block configuration`,children:_jsx(OptimizedImage,{src:`https://mintcdn.com/edgeimpulse/kO1SQOWn4i-BYeHy/.assets/images/syntiant-dsp.png?fit=max\u0026auto=format\u0026n=kO1SQOWn4i-BYeHy\u0026q=85\u0026s=47a1fd3260a953ef08f293db4f45fc69`,alt:`Syntiant processing block configuration for audio features`,\"data-og-width\":`1600`,width:`1600`,\"data-og-height\":`858`,height:`858`,\"data-path\":`.assets/images/syntiant-dsp.png`,\"data-optimize\":`true`,\"data-opv\":`3`,srcset:`https://mintcdn.com/edgeimpulse/kO1SQOWn4i-BYeHy/.assets/images/syntiant-dsp.png?w=280\u0026fit=max\u0026auto=format\u0026n=kO1SQOWn4i-BYeHy\u0026q=85\u0026s=8ef0629802f35155f7844f45fa326476 280w, https://mintcdn.com/edgeimpulse/kO1SQOWn4i-BYeHy/.assets/images/syntiant-dsp.png?w=560\u0026fit=max\u0026auto=format\u0026n=kO1SQOWn4i-BYeHy\u0026q=85\u0026s=27fe8aaa2259b619964e6ffbef602447 560w, https://mintcdn.com/edgeimpulse/kO1SQOWn4i-BYeHy/.assets/images/syntiant-dsp.png?w=840\u0026fit=max\u0026auto=format\u0026n=kO1SQOWn4i-BYeHy\u0026q=85\u0026s=da5068b2ec16cc3c2d66dfc09e3fd7fd 840w, https://mintcdn.com/edgeimpulse/kO1SQOWn4i-BYeHy/.assets/images/syntiant-dsp.png?w=1100\u0026fit=max\u0026auto=format\u0026n=kO1SQOWn4i-BYeHy\u0026q=85\u0026s=d71f7b987830fc60f045ea3dfe72e867 1100w, https://mintcdn.com/edgeimpulse/kO1SQOWn4i-BYeHy/.assets/images/syntiant-dsp.png?w=1650\u0026fit=max\u0026auto=format\u0026n=kO1SQOWn4i-BYeHy\u0026q=85\u0026s=b363d206cbd8801238070d455d829b0a 1650w, https://mintcdn.com/edgeimpulse/kO1SQOWn4i-BYeHy/.assets/images/syntiant-dsp.png?w=2500\u0026fit=max\u0026auto=format\u0026n=kO1SQOWn4i-BYeHy\u0026q=85\u0026s=532d1e153857cfedcf22846073079db4 2500w`})}),`\n`,_jsxs(_components.p,{children:[`This page allows you to configure some parameters of the Syntiant block, and lets you preview how the data will be transformed. The right of the page shows a visualization of the Syntiant’s output for a piece of audio. The Syntiant processing block extracts speech features using filterbanks. To get a better understanding of parameters, have a look at the `,_jsx(_components.a,{href:`/studio/projects/processing-blocks/blocks/audio-mfe`,children:`Audio MFE`}),` documentation.`]}),`\n`,_jsxs(_components.p,{children:[`Features generated by the Syntiant DSP block are slightly different between the TinyML and Nicla Voice. Set the `,_jsx(_components.code,{children:`features extractor`}),` to:`]}),`\n`,_jsxs(_components.ul,{children:[`\n`,_jsxs(_components.li,{children:[_jsx(_components.em,{children:`gpu/NDP101`}),` for Syntiant TinyML`]}),`\n`,_jsxs(_components.li,{children:[_jsx(_components.em,{children:`log-bin/NDP120`}),` for Nicla Voice`]}),`\n`]}),`\n`,_jsxs(Info,{children:[_jsx(_components.p,{children:_jsx(_components.strong,{children:`Syntiant block parameters`})}),_jsx(_components.p,{children:`The number of generated features has to be 1,600, which corresponds to the Syntiant Neural Network input layer. To generate 1,600 features, you have to verify the following equation: window size = 1000 x (39 x frame stride + frame length). For our example: window size = 968 ms = 1000 x (39 x 0.024 + 0.032).`})]}),`\n`,_jsx(_components.p,{children:`In the spectrogram the vertical axis represents the frequencies (the number of frequency bands is controlled by ‘Number of coefficients’ parameter), and the horizontal axis represents time (controlled by ‘frame stride’ and ‘frame length’). The patterns visible in a spectrogram contain information about what type of sound it represents. For example, the spectrogram in this image shows “Go”:`}),`\n`,_jsx(Frame,{caption:`Spectrogram for 'Go'`,children:_jsx(OptimizedImage,{src:`https://mintcdn.com/edgeimpulse/D6ot6KswqYvXnK8b/.assets/images/spectrogram-view-for-a-go-keyword-audio-sample.jpg?fit=max\u0026auto=format\u0026n=D6ot6KswqYvXnK8b\u0026q=85\u0026s=e75f2cf29bc685187a7d7a9eec3e4de2`,alt:`Spectrogram view for a Go keyword audio sample`,\"data-og-width\":`271`,width:`271`,\"data-og-height\":`274`,height:`274`,\"data-path\":`.assets/images/spectrogram-view-for-a-go-keyword-audio-sample.jpg`,\"data-optimize\":`true`,\"data-opv\":`3`,srcset:`https://mintcdn.com/edgeimpulse/D6ot6KswqYvXnK8b/.assets/images/spectrogram-view-for-a-go-keyword-audio-sample.jpg?w=280\u0026fit=max\u0026auto=format\u0026n=D6ot6KswqYvXnK8b\u0026q=85\u0026s=75136296e5a7161b4172c12b817719a8 280w, https://mintcdn.com/edgeimpulse/D6ot6KswqYvXnK8b/.assets/images/spectrogram-view-for-a-go-keyword-audio-sample.jpg?w=560\u0026fit=max\u0026auto=format\u0026n=D6ot6KswqYvXnK8b\u0026q=85\u0026s=ebbaf5d85238a4c29fcb1673d8d9c0ed 560w, https://mintcdn.com/edgeimpulse/D6ot6KswqYvXnK8b/.assets/images/spectrogram-view-for-a-go-keyword-audio-sample.jpg?w=840\u0026fit=max\u0026auto=format\u0026n=D6ot6KswqYvXnK8b\u0026q=85\u0026s=4d60268046b317c636f8153f01166568 840w, https://mintcdn.com/edgeimpulse/D6ot6KswqYvXnK8b/.assets/images/spectrogram-view-for-a-go-keyword-audio-sample.jpg?w=1100\u0026fit=max\u0026auto=format\u0026n=D6ot6KswqYvXnK8b\u0026q=85\u0026s=40737ceac69ceac29a44c64394e8d006 1100w, https://mintcdn.com/edgeimpulse/D6ot6KswqYvXnK8b/.assets/images/spectrogram-view-for-a-go-keyword-audio-sample.jpg?w=1650\u0026fit=max\u0026auto=format\u0026n=D6ot6KswqYvXnK8b\u0026q=85\u0026s=0ea9610277402b06397b40afb3088c9b 1650w, https://mintcdn.com/edgeimpulse/D6ot6KswqYvXnK8b/.assets/images/spectrogram-view-for-a-go-keyword-audio-sample.jpg?w=2500\u0026fit=max\u0026auto=format\u0026n=D6ot6KswqYvXnK8b\u0026q=85\u0026s=65da2f2343dc71d776acefe85016f7ca 2500w`})}),`\n`,_jsx(_components.p,{children:`These differences are not necessarily easy for a person to describe, but fortunately they are enough for a neural network to learn to identify.`}),`\n`,_jsx(_components.p,{children:`It’s interesting to explore your data and look at the types of spectrograms it results in. You can use the dropdown box near the top right of the page to choose between different audio samples to visualize, or play with the parameters to see how the spectrogram changes.`}),`\n`,_jsx(Heading,{level:`4`,id:`feature-explorer`,children:`Feature explorer`}),`\n`,_jsxs(_components.p,{children:[`The spectrograms generated by the Syntiant block will be passed into a neural network architecture that is particularly good at learning to recognize patterns in this type of tabular data. Before training our neural network, we’ll need to generate Syntiant blocks for all of our windows of audio. To do this, click the `,_jsx(_components.strong,{children:`Generate features`}),` button at the top of the page, then click the green `,_jsx(_components.strong,{children:`Generate features`}),` button. This will take a minute or so to complete.`]}),`\n`,_jsx(_components.p,{children:`Afterwards you’re presented with one of the most useful features in Edge Impulse: the feature explorer. This is a 3D representation showing your complete dataset, with each data-item color-coded to its respective label. You can zoom in to every item, find anomalies (an item that’s in a wrong cluster), and click on items to listen to the sample. This is a great way to check whether your dataset contains wrong items, and to validate whether your dataset is suitable for ML (it should separate nicely).`}),`\n`,_jsx(Frame,{caption:`Feature explorer view`,children:_jsx(OptimizedImage,{src:`https://mintcdn.com/edgeimpulse/f3SBn6xE6_wUITpZ/.assets/images/feature-explorer-separating-keyword-audio-clusters.png?fit=max\u0026auto=format\u0026n=f3SBn6xE6_wUITpZ\u0026q=85\u0026s=48a19b4921d5e72cfc77d189e4c5ffc8`,alt:`Feature explorer separating keyword audio clusters`,\"data-og-width\":`586`,width:`586`,\"data-og-height\":`568`,height:`568`,\"data-path\":`.assets/images/feature-explorer-separating-keyword-audio-clusters.png`,\"data-optimize\":`true`,\"data-opv\":`3`,srcset:`https://mintcdn.com/edgeimpulse/f3SBn6xE6_wUITpZ/.assets/images/feature-explorer-separating-keyword-audio-clusters.png?w=280\u0026fit=max\u0026auto=format\u0026n=f3SBn6xE6_wUITpZ\u0026q=85\u0026s=45451390c77bb496dde4c2a98dc98739 280w, https://mintcdn.com/edgeimpulse/f3SBn6xE6_wUITpZ/.assets/images/feature-explorer-separating-keyword-audio-clusters.png?w=560\u0026fit=max\u0026auto=format\u0026n=f3SBn6xE6_wUITpZ\u0026q=85\u0026s=d843f8f95e2134dbb608d7e1c44b9837 560w, https://mintcdn.com/edgeimpulse/f3SBn6xE6_wUITpZ/.assets/images/feature-explorer-separating-keyword-audio-clusters.png?w=840\u0026fit=max\u0026auto=format\u0026n=f3SBn6xE6_wUITpZ\u0026q=85\u0026s=8dd798c907b1e6fdb0d84f917a50b581 840w, https://mintcdn.com/edgeimpulse/f3SBn6xE6_wUITpZ/.assets/images/feature-explorer-separating-keyword-audio-clusters.png?w=1100\u0026fit=max\u0026auto=format\u0026n=f3SBn6xE6_wUITpZ\u0026q=85\u0026s=be1d4f02607a7f516a0a5b80e480895a 1100w, https://mintcdn.com/edgeimpulse/f3SBn6xE6_wUITpZ/.assets/images/feature-explorer-separating-keyword-audio-clusters.png?w=1650\u0026fit=max\u0026auto=format\u0026n=f3SBn6xE6_wUITpZ\u0026q=85\u0026s=72d1359b899616e19b3ae79bf9144076 1650w, https://mintcdn.com/edgeimpulse/f3SBn6xE6_wUITpZ/.assets/images/feature-explorer-separating-keyword-audio-clusters.png?w=2500\u0026fit=max\u0026auto=format\u0026n=f3SBn6xE6_wUITpZ\u0026q=85\u0026s=a5e6aca1c9fae33cceb18ffa149485e4 2500w`})}),`\n`,_jsx(Heading,{level:`3`,id:`6-configure-the-neural-network`,children:`6. Configure the neural network`}),`\n`,_jsx(_components.p,{children:`With all data processed it’s time to start training a neural network. Neural networks are algorithms, modeled loosely after the human brain, that can learn to recognize patterns that appear in their training data. The network that we’re training here will take the processing block features as an input, and try to map this to one of the three classes: ‘go’, ‘stop’, or ‘z_openset’.`}),`\n`,_jsxs(_components.p,{children:[`Click on `,_jsx(_components.strong,{children:`NN Classifier`}),` in the left hand menu. You’ll see the following page:`]}),`\n`,_jsx(Frame,{caption:`Syntiant NN Configuration`,children:_jsx(OptimizedImage,{src:`https://mintcdn.com/edgeimpulse/b53JLZcI-O3Jueox/.assets/images/syntiant-nn.jpg?fit=max\u0026auto=format\u0026n=b53JLZcI-O3Jueox\u0026q=85\u0026s=cf5d11640c64ab7e11047d07a94d502a`,alt:`Syntiant neural network settings for keyword spotting`,\"data-og-width\":`661`,width:`661`,\"data-og-height\":`1000`,height:`1000`,\"data-path\":`.assets/images/syntiant-nn.jpg`,\"data-optimize\":`true`,\"data-opv\":`3`,srcset:`https://mintcdn.com/edgeimpulse/b53JLZcI-O3Jueox/.assets/images/syntiant-nn.jpg?w=280\u0026fit=max\u0026auto=format\u0026n=b53JLZcI-O3Jueox\u0026q=85\u0026s=8df9db683154e9b7f147756725f5e1e4 280w, https://mintcdn.com/edgeimpulse/b53JLZcI-O3Jueox/.assets/images/syntiant-nn.jpg?w=560\u0026fit=max\u0026auto=format\u0026n=b53JLZcI-O3Jueox\u0026q=85\u0026s=962c5ac48659813428d0362670e5cb5b 560w, https://mintcdn.com/edgeimpulse/b53JLZcI-O3Jueox/.assets/images/syntiant-nn.jpg?w=840\u0026fit=max\u0026auto=format\u0026n=b53JLZcI-O3Jueox\u0026q=85\u0026s=38d93d74814cf185731a8748bf0a24e1 840w, https://mintcdn.com/edgeimpulse/b53JLZcI-O3Jueox/.assets/images/syntiant-nn.jpg?w=1100\u0026fit=max\u0026auto=format\u0026n=b53JLZcI-O3Jueox\u0026q=85\u0026s=1f5b3d87379fa15ef16375cc9420b909 1100w, https://mintcdn.com/edgeimpulse/b53JLZcI-O3Jueox/.assets/images/syntiant-nn.jpg?w=1650\u0026fit=max\u0026auto=format\u0026n=b53JLZcI-O3Jueox\u0026q=85\u0026s=1a31582a507a57c4880fce7ecca0cdf7 1650w, https://mintcdn.com/edgeimpulse/b53JLZcI-O3Jueox/.assets/images/syntiant-nn.jpg?w=2500\u0026fit=max\u0026auto=format\u0026n=b53JLZcI-O3Jueox\u0026q=85\u0026s=0402e23f20a217db7e052966f8f26e18 2500w`})}),`\n`,_jsxs(Info,{children:[_jsx(_components.p,{children:_jsx(_components.strong,{children:`Neural Network architectures`})}),_jsx(_components.p,{children:`Syntiant TinyML only supports a Dense architecture. The Arduino Nicla Voice also supports Convolutional models and it is selected by default.`})]}),`\n`,_jsxs(_components.p,{children:[`With everything in place, click `,_jsx(_components.strong,{children:`Start training`}),`. You’ll see a lot of text flying past in the `,_jsx(_components.em,{children:`Training output`}),` panel, which you can ignore for now. Training will take a few minutes. When it’s complete, you’ll see the `,_jsx(_components.em,{children:`Last training performance`}),` panel appear at the bottom of the page:`]}),`\n`,_jsx(Frame,{caption:`Training performance`,children:_jsx(OptimizedImage,{src:`https://mintcdn.com/edgeimpulse/JgXbtJL76vIg-e6S/.assets/images/training-results-for-the-syntiant-keyword-spotting.png?fit=max\u0026auto=format\u0026n=JgXbtJL76vIg-e6S\u0026q=85\u0026s=79da0cd26515f0c0a14de302240b55fa`,alt:`Training results for the Syntiant keyword spotting model`,\"data-og-width\":`612`,width:`612`,\"data-og-height\":`782`,height:`782`,\"data-path\":`.assets/images/training-results-for-the-syntiant-keyword-spotting.png`,\"data-optimize\":`true`,\"data-opv\":`3`,srcset:`https://mintcdn.com/edgeimpulse/JgXbtJL76vIg-e6S/.assets/images/training-results-for-the-syntiant-keyword-spotting.png?w=280\u0026fit=max\u0026auto=format\u0026n=JgXbtJL76vIg-e6S\u0026q=85\u0026s=1cfb070ed0eb9f16b2cf2207a1ae9392 280w, https://mintcdn.com/edgeimpulse/JgXbtJL76vIg-e6S/.assets/images/training-results-for-the-syntiant-keyword-spotting.png?w=560\u0026fit=max\u0026auto=format\u0026n=JgXbtJL76vIg-e6S\u0026q=85\u0026s=c354940ce526d210d6b2c17aca2812bc 560w, https://mintcdn.com/edgeimpulse/JgXbtJL76vIg-e6S/.assets/images/training-results-for-the-syntiant-keyword-spotting.png?w=840\u0026fit=max\u0026auto=format\u0026n=JgXbtJL76vIg-e6S\u0026q=85\u0026s=3b51d63751d2cd0607ecfca886a8ca91 840w, https://mintcdn.com/edgeimpulse/JgXbtJL76vIg-e6S/.assets/images/training-results-for-the-syntiant-keyword-spotting.png?w=1100\u0026fit=max\u0026auto=format\u0026n=JgXbtJL76vIg-e6S\u0026q=85\u0026s=27ade6d3bfb5fe2687baec4e7443c4e4 1100w, https://mintcdn.com/edgeimpulse/JgXbtJL76vIg-e6S/.assets/images/training-results-for-the-syntiant-keyword-spotting.png?w=1650\u0026fit=max\u0026auto=format\u0026n=JgXbtJL76vIg-e6S\u0026q=85\u0026s=244d7efbcad476a7019383aace1984d7 1650w, https://mintcdn.com/edgeimpulse/JgXbtJL76vIg-e6S/.assets/images/training-results-for-the-syntiant-keyword-spotting.png?w=2500\u0026fit=max\u0026auto=format\u0026n=JgXbtJL76vIg-e6S\u0026q=85\u0026s=502fc30d90c07c8886be83e039593239 2500w`})}),`\n`,_jsx(_components.p,{children:`Congratulations, you’ve trained a neural network with Edge Impulse and ready to deploy on your hardware! But what do all these numbers mean?`}),`\n`,_jsxs(_components.p,{children:[`At the start of training, 20% of the training data is set aside for `,_jsx(_components.em,{children:`validation`}),`. This means that instead of being used to train the model, it is used to evaluate how the model is performing. The `,_jsx(_components.em,{children:`Last training performance`}),` panel displays the results of this validation, providing some vital information about your model and how well it is working. Bear in mind that your exact numbers may differ from the ones in this tutorial.`]}),`\n`,_jsxs(_components.p,{children:[`On the left hand side of the panel, `,_jsx(_components.em,{children:`Accuracy`}),` refers to the percentage of windows of audio that were correctly classified. The higher number the better, although an accuracy approaching 100% is unlikely, and is often a sign that your model has `,_jsx(_components.em,{children:`overfit`}),` the training data. You will find out whether this is true in the next stage, during model testing. For many applications, an accuracy above 85% can be considered very good.`]}),`\n`,_jsxs(_components.p,{children:[`The `,_jsx(_components.em,{children:`Confusion matrix`}),` is a table showing the balance of correctly versus incorrectly classified windows. To understand it, compare the values in each row. For example, in the above screenshot, 98.8% of the `,_jsx(_components.em,{children:`‘go’`}),` audio windows were classified as `,_jsx(_components.em,{children:`‘go’`}),`, while 1.8% of them were classified to be in the ‘stop’. This appears to be a great result.`]}),`\n`,_jsx(Heading,{level:`3`,id:`7-classifying-new-data`,children:`7. Classifying new data`}),`\n`,_jsx(_components.p,{children:`The performance numbers in the previous step show that our model is working well on its training data, but it’s extremely important that we test the model on new, unseen data before deploying it in the real world. This will help us ensure the model has not learned to overfit the training data, which is a common occurrence.`}),`\n`,_jsxs(_components.p,{children:[`Fortunately we’ve put aside 20% of our data already in the ‘Test set’ (see `,_jsx(_components.strong,{children:`Data acquisition`}),`). This is data that the model has never seen before, and we can use this to validate whether our model actually works on unseen data. To run your model against the test set, head to `,_jsx(_components.strong,{children:`Model testing`}),`, and click `,_jsx(_components.strong,{children:`Classify all`}),`.`]}),`\n`,_jsx(Frame,{children:_jsx(OptimizedImage,{src:`https://mintcdn.com/edgeimpulse/X7013OZmlLuzfpnk/.assets/images/model-testing-results-for-the-held-out-keyword-audio.png?fit=max\u0026auto=format\u0026n=X7013OZmlLuzfpnk\u0026q=85\u0026s=40488f4f1eb7f2c6ada861808c24d980`,alt:`Model testing results for the held-out keyword audio samples`,\"data-og-width\":`868`,width:`868`,\"data-og-height\":`854`,height:`854`,\"data-path\":`.assets/images/model-testing-results-for-the-held-out-keyword-audio.png`,\"data-optimize\":`true`,\"data-opv\":`3`,srcset:`https://mintcdn.com/edgeimpulse/X7013OZmlLuzfpnk/.assets/images/model-testing-results-for-the-held-out-keyword-audio.png?w=280\u0026fit=max\u0026auto=format\u0026n=X7013OZmlLuzfpnk\u0026q=85\u0026s=b2524e3cfe356000e749a5fcdeefc8b5 280w, https://mintcdn.com/edgeimpulse/X7013OZmlLuzfpnk/.assets/images/model-testing-results-for-the-held-out-keyword-audio.png?w=560\u0026fit=max\u0026auto=format\u0026n=X7013OZmlLuzfpnk\u0026q=85\u0026s=025ba95cb29301976158a770d0c34a8c 560w, https://mintcdn.com/edgeimpulse/X7013OZmlLuzfpnk/.assets/images/model-testing-results-for-the-held-out-keyword-audio.png?w=840\u0026fit=max\u0026auto=format\u0026n=X7013OZmlLuzfpnk\u0026q=85\u0026s=bdb2bdb047bb610f65ae73b6945707ad 840w, https://mintcdn.com/edgeimpulse/X7013OZmlLuzfpnk/.assets/images/model-testing-results-for-the-held-out-keyword-audio.png?w=1100\u0026fit=max\u0026auto=format\u0026n=X7013OZmlLuzfpnk\u0026q=85\u0026s=f07283274d8ee984e1872c0514a11a3d 1100w, https://mintcdn.com/edgeimpulse/X7013OZmlLuzfpnk/.assets/images/model-testing-results-for-the-held-out-keyword-audio.png?w=1650\u0026fit=max\u0026auto=format\u0026n=X7013OZmlLuzfpnk\u0026q=85\u0026s=3d0ff70749c92ec9515d52c5e1d04da2 1650w, https://mintcdn.com/edgeimpulse/X7013OZmlLuzfpnk/.assets/images/model-testing-results-for-the-held-out-keyword-audio.png?w=2500\u0026fit=max\u0026auto=format\u0026n=X7013OZmlLuzfpnk\u0026q=85\u0026s=338d422e027f9b7a455d1fe301df8f2c 2500w`})}),`\n`,_jsxs(_components.p,{children:[`To drill down into a misclassified sample, click the three dots (`,_jsx(_components.code,{children:`⋮`}),`) next to a sample and select `,_jsx(_components.strong,{children:`Show classification`}),`. You’re then transported to the classification view, which lets you inspect the sample, and compare the sample to your training data. This way you can inspect whether this was actually a classification failure, or whether your data was incorrectly labeled. From here you can either update the label (when the label was wrong), or move the item to the training set to refine your model.`]}),`\n`,_jsxs(Warning,{children:[_jsx(_components.p,{children:_jsx(_components.strong,{children:`Misclassifications and uncertain results`})}),_jsx(_components.p,{children:`It’s inevitable that even a well-trained machine learning model will sometimes misclassify its inputs. When you integrate a model into your application, you should take into account that it will not always give you the correct answer.`}),_jsx(_components.p,{children:`For example, if you are classifying audio, you might want to classify several windows of data and average the results. This will give you better overall accuracy than assuming that every individual result is correct.`})]}),`\n`,_jsx(Heading,{level:`3`,id:`8-deploying-to-your-device`,children:`8. Deploying to your device`}),`\n`,_jsx(_components.p,{children:`With the impulse designed, trained and verified you can deploy this model back to your device. This makes the model run without an internet connection, minimizes latency, and runs with minimum power consumption.`}),`\n`,_jsxs(_components.p,{children:[`To export your model, click on `,_jsx(_components.strong,{children:`Deployment`}),` in the menu. Then under ‘Build firmware’ select the Syntiant TinyML or Arduino Nicla Voice.`]}),`\n`,_jsxs(_components.p,{children:[`The final step before building the firmware is to configure the `,_jsx(_components.em,{children:`posterior handler parameters`}),` of the Syntiant chip.`]}),`\n`,_jsxs(Info,{children:[_jsx(_components.p,{children:_jsx(_components.strong,{children:`Pre-configured posterior parameters`})}),_jsx(_components.p,{children:`For the Syntiant-RC project, we’ve already pre-configured the posterior parameters so you can just go to the ‘Build’ output step. We recommend skipping to Step 9, but read on for more details about the process of posterior search.`})]}),`\n`,_jsx(Frame,{caption:`Optimizing posterior parameters`,children:_jsx(OptimizedImage,{src:`https://mintcdn.com/edgeimpulse/91_6V_lveG7VPlUB/.assets/images/posterior-parameter-optimization-panel-for-syntiant.png?fit=max\u0026auto=format\u0026n=91_6V_lveG7VPlUB\u0026q=85\u0026s=caf6c058af56839b861f04fe826da3a2`,alt:`Posterior parameter optimization panel for Syntiant deployment`,\"data-og-width\":`901`,width:`901`,\"data-og-height\":`1000`,height:`1000`,\"data-path\":`.assets/images/posterior-parameter-optimization-panel-for-syntiant.png`,\"data-optimize\":`true`,\"data-opv\":`3`,srcset:`https://mintcdn.com/edgeimpulse/91_6V_lveG7VPlUB/.assets/images/posterior-parameter-optimization-panel-for-syntiant.png?w=280\u0026fit=max\u0026auto=format\u0026n=91_6V_lveG7VPlUB\u0026q=85\u0026s=1ca1e78d10275036fd3f8543031b536e 280w, https://mintcdn.com/edgeimpulse/91_6V_lveG7VPlUB/.assets/images/posterior-parameter-optimization-panel-for-syntiant.png?w=560\u0026fit=max\u0026auto=format\u0026n=91_6V_lveG7VPlUB\u0026q=85\u0026s=0f0fed0bebe7341150b7ed047039797d 560w, https://mintcdn.com/edgeimpulse/91_6V_lveG7VPlUB/.assets/images/posterior-parameter-optimization-panel-for-syntiant.png?w=840\u0026fit=max\u0026auto=format\u0026n=91_6V_lveG7VPlUB\u0026q=85\u0026s=b384e8a4024dc4d44a8d987f95f3ed1c 840w, https://mintcdn.com/edgeimpulse/91_6V_lveG7VPlUB/.assets/images/posterior-parameter-optimization-panel-for-syntiant.png?w=1100\u0026fit=max\u0026auto=format\u0026n=91_6V_lveG7VPlUB\u0026q=85\u0026s=62f72a3189792b7ef2c98460e4c27b5b 1100w, https://mintcdn.com/edgeimpulse/91_6V_lveG7VPlUB/.assets/images/posterior-parameter-optimization-panel-for-syntiant.png?w=1650\u0026fit=max\u0026auto=format\u0026n=91_6V_lveG7VPlUB\u0026q=85\u0026s=88057553532aa4b7ec3e081a1c1cebbd 1650w, https://mintcdn.com/edgeimpulse/91_6V_lveG7VPlUB/.assets/images/posterior-parameter-optimization-panel-for-syntiant.png?w=2500\u0026fit=max\u0026auto=format\u0026n=91_6V_lveG7VPlUB\u0026q=85\u0026s=d1668bc242ed95f445c28bf01b998e92 2500w`})}),`\n`,_jsxs(_components.p,{children:[`Those parameters are used to tune the precision and recall of the neural network activations, to minimize False Rejection Rate and False Activation Rate. You can manually edit those parameters in JSON format or use the `,_jsx(_components.em,{children:`Find posterior parameters`}),` to search for the best values:`]}),`\n`,_jsxs(_components.ul,{children:[`\n`,_jsx(_components.li,{children:`Select the classes you want to detect (the z_openset class should be omitted except for testing purpose)`}),`\n`,_jsxs(_components.li,{children:[`Select a calibration dataset: either no calibration (`,_jsx(_components.strong,{children:`recommended for TinyML/NDP101`}),`), the reference dataset with common english words from a radio program, or your own calibration dataset.`]}),`\n`]}),`\n`,_jsxs(_components.p,{children:[`This calibration dataset is made of 2 files: an audio wav file and a csv file which contains the audio transcript of this program. This audio transcript should ideally have the classes you want to detect. For example you can imagine the following csv file: `,_jsx(_components.code,{children:`go,stop,this,is,an,example,transcript,for,optimizing,the,posterior,parameters,,,it,will,optimize,activations,for,the,go,stop,keywords,`})]}),`\n`,_jsxs(_components.p,{children:[`You can also simplify the csv file and include only the keywords/classes you are interested in optimizing. For instance, if your audio wav files contains only 2 occurrences of ‘go’ and ‘stop’: `,_jsx(_components.code,{children:`go,stop,go,stop,`})]}),`\n`,_jsxs(Info,{children:[_jsx(_components.p,{children:_jsx(_components.strong,{children:`Tuning the audio gain for the Syntiant TinyML`})}),_jsx(_components.p,{children:`After generating the posterior parameters, you can change the Syntiant TinyML audio gain by editing the “audio_pdm_gain” value at the end of the JSON file. Default value is set to 12 dB.`})]}),`\n`,_jsx(Heading,{level:`3`,id:`9-flashing-the-device`,children:`9. Flashing the device`}),`\n`,_jsxs(_components.p,{children:[`Once optimized parameters have been found, you can click `,_jsx(_components.strong,{children:`Build`}),`. This will build a Syntiant package that will run on your development board. After building is completed you’ll get prompted to download a zipfile. Save this on your computer. A pop-up video will show how the download process works.`]}),`\n`,_jsx(_components.p,{children:`After unzipping the downloaded file, run the appropriate flashing script for your operating system, to flash the Syntiant TinyML Board with the Syntiant-RC model and associated firmware. You might see a Microsoft Defender screen pop up when the script is run on Windows 10. It’s safe to proceed so select ‘More info’ and continue.`}),`\n`,_jsx(Heading,{level:`3`,id:`10-running-the-model-on-the-device`,children:`10. Running the model on the device`}),`\n`,_jsxs(_components.p,{children:[`Run the `,_jsx(_components.code,{children:`edge-impulse-run-impulse`}),` CLI command in your terminal:`]}),`\n`,_jsx(CodeBlock,{numberOfLines:`21`,language:`text`,children:_jsx(_components.pre,{className:`shiki shiki-themes github-light-default dark-plus`,style:{backgroundColor:`#ffffff`,\"--shiki-dark-bg\":`#0B0C0E`,color:`#1f2328`,\"--shiki-dark\":`#D4D4D4`},language:`text`,children:_jsxs(_components.code,{language:`text`,numberOfLines:`21`,children:[_jsx(_components.span,{className:`line`,children:_jsx(_components.span,{children:`Edge Impulse impulse runner v1.16.0`})}),`\n`,_jsx(_components.span,{className:`line`,children:_jsx(_components.span,{children:`[SER] Connecting to /dev/tty.usbmodem2CE0169C2`})}),`\n`,_jsx(_components.span,{className:`line`,children:_jsx(_components.span,{children:`[SER] Serial is connected, trying to read config...`})}),`\n`,_jsx(_components.span,{className:`line`,children:_jsx(_components.span,{children:`[SER] Unhandled configuration option management ws //remote-mgmt.edgeimpulse.com`})}),`\n`,_jsx(_components.span,{className:`line`,children:_jsx(_components.span,{children:`[SER] Retrieved configuration`})}),`\n`,_jsx(_components.span,{className:`line`,children:_jsx(_components.span,{children:`[SER] Device is running AT command version 1.7.0`})}),`\n`,_jsx(_components.span,{className:`line`,children:_jsx(_components.span,{children:`[SER] Started inferencing, press CTRL+C to stop...`})}),`\n`,_jsx(_components.span,{className:`line`,children:_jsx(_components.span,{children:`AT+RUNIMPULSE`})}),`\n`,_jsx(_components.span,{className:`line`,children:_jsx(_components.span,{children:`Inferencing settings:`})}),`\n`,_jsx(_components.span,{className:`line`,children:_jsx(_components.span,{children:`\tInterval: 0.0625 ms.`})}),`\n`,_jsx(_components.span,{className:`line`,children:_jsx(_components.span,{children:`\tFrame size: 15488`})}),`\n`,_jsx(_components.span,{className:`line`,children:_jsx(_components.span,{children:`\tSample length: 968 ms.`})}),`\n`,_jsx(_components.span,{className:`line`,children:_jsx(_components.span,{children:`\tNo. of classes: 3`})}),`\n`,_jsx(_components.span,{className:`line`,children:_jsx(_components.span,{children:`Classes:`})}),`\n`,_jsx(_components.span,{className:`line`,children:_jsx(_components.span,{children:`\tgo`})}),`\n`,_jsx(_components.span,{className:`line`,children:_jsx(_components.span,{children:`\tstop`})}),`\n`,_jsx(_components.span,{className:`line`,children:_jsx(_components.span,{children:`\tz_openset`})}),`\n`,_jsx(_components.span,{className:`line`,children:_jsx(_components.span,{children:`> Match: NN0:go`})}),`\n`,_jsx(_components.span,{className:`line`,children:_jsx(_components.span,{children:`Match: NN0:stop`})}),`\n`,_jsx(_components.span,{className:`line`,children:_jsx(_components.span,{children:`Match: NN0:stop`})}),`\n`,_jsx(_components.span,{className:`line`,children:_jsx(_components.span,{})})]})})}),`\n`,_jsx(_components.p,{children:`You can also connect to the board’s newly flashed firmware over serial as an alternative. Open a terminal and connect using the appropriate COM port with 115200 8-N-1 settings.`}),`\n`,_jsx(Heading,{level:`3`,id:`11-conclusion`,children:`11. Conclusion`}),`\n`,_jsxs(_components.p,{children:[`Congratulations! Now that you’ve trained and deployed your model you can go further and build your own custom firmware, see `,_jsx(_components.a,{href:`/hardware/deployments/run-cpp-syntiant-tinyml-board`,children:`Run on Syntiant TinyML Board`}),`.`]}),`\n`,_jsxs(_components.p,{children:[`Or if you’re interested in more, see our tutorial on `,_jsx(_components.a,{href:`/tutorials/hardware/syntiant-ndp-motion-recognition`,children:`Motion Recognition - Syntiant TinyML`}),`.`]}),`\n`,_jsx(_components.p,{children:`We can’t wait to see what you’ll build! 🚀`})]})}function MDXContent(props={}){const{wrapper:MDXLayout}={..._provideComponents(),...props.components};return MDXLayout?_jsx(MDXLayout,{...props,children:_jsx(_createMdxContent,{...props})}):_createMdxContent(props)}return{CardOpenStudioTutorial,default:MDXContent};function _missingMdxReference(id,component){throw new Error(`Expected `+(component?`component`:`object`)+\" `\"+id+\"` to be defined: you likely forgot to import, pass, or provide it.\")}","frontmatter":{},"scope":{"codeStyling":"system","config":{},"pageMetadata":{"title":"Syntiant NDPs - keyword spotting","description":"Build a keyword spotting model and deploy it to Syntiant TinyML, Arduino Nicla Voice, or Avnet RASynBoard using Edge Impulse.","href":"/tutorials/hardware/syntiant-ndp-keyword-spotting"}}},"mdxSourceWithNoJs":null},"mdxExtracts":{"tableOfContents":[{"title":"1. Prerequisites","slug":"1-prerequisites","depth":3,"children":[]},{"title":"2. Collecting your own voice samples","slug":"2-collecting-your-own-voice-samples","depth":3,"children":[]},{"title":"2.1 For the Syntiant TinyML","slug":"2-1-for-the-syntiant-tinyml","depth":4,"children":[]},{"title":"2.2 For the Arduino Nicla Voice","slug":"2-2-for-the-arduino-nicla-voice","depth":4,"children":[]},{"title":"3. Understanding how to construct your dataset","slug":"3-understanding-how-to-construct-your-dataset","depth":3,"children":[]},{"title":"Rebalancing your dataset","slug":"rebalancing-your-dataset","depth":4,"children":[]},{"title":"4. Designing your impulse","slug":"4-designing-your-impulse","depth":3,"children":[]},{"title":"5. Configure the Syntiant block","slug":"5-configure-the-syntiant-block","depth":3,"children":[]},{"title":"Feature explorer","slug":"feature-explorer","depth":4,"children":[]},{"title":"6. Configure the neural network","slug":"6-configure-the-neural-network","depth":3,"children":[]},{"title":"7. Classifying new data","slug":"7-classifying-new-data","depth":3,"children":[]},{"title":"8. Deploying to your device","slug":"8-deploying-to-your-device","depth":3,"children":[]},{"title":"9. Flashing the device","slug":"9-flashing-the-device","depth":3,"children":[]},{"title":"10. Running the model on the device","slug":"10-running-the-model-on-the-device","depth":3,"children":[]},{"title":"11. Conclusion","slug":"11-conclusion","depth":3,"children":[]}],"codeExamples":{}},"jsLinks":["/_mintlify/custom/edgeimpulse/3a20e79a9abf6af7/.scripts/adobe-analytics.js"],"dynamicCss":".mint-aspect-video {\n aspect-ratio: 16 / 9\n}\n.mint-w-full {\n width: 100%\n}\n.mint-rounded-xl {\n border-radius: 0.75rem\n}","subdomain":"edgeimpulse","siteName":"Edge Impulse Documentation","title":"Syntiant NDPs - keyword spotting - Edge Impulse Documentation","contextualStarterQuestions":[{"_id":"6ac78de3407b2b5b5aa3bd66","deploymentId":"6888ecea7bd5ed3e5d2f677d","questionText":"What boards does this support?","status":"active","generatedBy":"contextual","path":"tutorials/hardware/syntiant-ndp-keyword-spotting","createdAt":"2026-10-08T12:34:43.481Z","updatedAt":"2026-10-08T12:34:43.481Z","__v":0},{"_id":"6ac78de3407b2b5b5aa3bd67","deploymentId":"6888ecea7bd5ed3e5d2f677d","questionText":"How do I deploy to Syntiant hardware?","status":"active","generatedBy":"contextual","path":"tutorials/hardware/syntiant-ndp-keyword-spotting","createdAt":"2026-10-08T12:34:43.481Z","updatedAt":"2026-10-08T12:34:43.481Z","__v":0},{"_id":"6ac78de3407b2b5b5aa3bd65","deploymentId":"6888ecea7bd5ed3e5d2f677d","questionText":"How do I build a keyword spotting model?","status":"active","generatedBy":"contextual","path":"tutorials/hardware/syntiant-ndp-keyword-spotting","createdAt":"2026-10-08T12:34:43.481Z","updatedAt":"2026-10-08T12:34:43.481Z","__v":0}],"navMaps":{"firstHrefInVersion":{},"firstHrefInLanguage":{}},"lastModified":"2026-09-13T14:39:19.979Z","originalFileLocation":"tutorials/hardware/syntiant-ndp-keyword-spotting.mdx"},"headHtml":"\u003cscript data-mint-head>(function(){var d=document.documentElement,p=null;if(!p){try{p=localStorage.getItem(\"isDarkMode\")}catch(e){}if(p==='true')p='dark';else if(p==='false')p='light';if(p!=='light'\u0026\u0026p!=='dark'\u0026\u0026p!=='system')p=\"light\"}var r=p==='system'?(matchMedia(\"(prefers-color-scheme: dark)\").matches?'dark':'light'):p;d.classList.remove(r==='dark'?'light':'dark');d.classList.add(r);d.setAttribute(\"data-theme-preference\",p)})();\u003c/script>\u003cmeta data-mint-head name=\"description\" content=\"Build a keyword spotting model and deploy it to Syntiant TinyML, Arduino Nicla Voice, or Avnet RASynBoard using Edge Impulse.\">\u003cmeta data-mint-head name=\"application-name\" content=\"Edge Impulse Documentation\">\u003cmeta data-mint-head name=\"generator\" content=\"Mintlify\">\u003clink data-mint-head rel=\"icon\" type=\"image/png\" sizes=\"192x192\" href=\"/mintlify-assets/_mintlify/favicons/edgeimpulse/ZmtueQz3qIhQbHQ2/_generated/favicon/android-chrome-192x192.png\" media=\"(prefers-color-scheme: light)\">\u003clink data-mint-head rel=\"apple-touch-icon\" type=\"image/png\" sizes=\"180x180\" href=\"/mintlify-assets/_mintlify/favicons/edgeimpulse/ZmtueQz3qIhQbHQ2/_generated/favicon/apple-touch-icon.png\">\u003clink data-mint-head rel=\"icon\" type=\"image/png\" sizes=\"16x16\" href=\"/mintlify-assets/_mintlify/favicons/edgeimpulse/ZmtueQz3qIhQbHQ2/_generated/favicon/favicon-16x16.png\" media=\"(prefers-color-scheme: light)\">\u003clink data-mint-head rel=\"icon\" type=\"image/png\" sizes=\"32x32\" href=\"/mintlify-assets/_mintlify/favicons/edgeimpulse/ZmtueQz3qIhQbHQ2/_generated/favicon/favicon-32x32.png\" media=\"(prefers-color-scheme: light)\">\u003clink data-mint-head rel=\"shortcut icon\" type=\"image/x-icon\" href=\"/mintlify-assets/_mintlify/favicons/edgeimpulse/ZmtueQz3qIhQbHQ2/_generated/favicon/favicon.ico\" media=\"(prefers-color-scheme: light)\">\u003clink data-mint-head rel=\"icon\" type=\"image/png\" sizes=\"192x192\" href=\"/mintlify-assets/_mintlify/favicons/edgeimpulse/ZmtueQz3qIhQbHQ2/_generated/favicon-dark/android-chrome-192x192.png\" media=\"(prefers-color-scheme: dark)\">\u003clink data-mint-head rel=\"icon\" type=\"image/png\" sizes=\"16x16\" href=\"/mintlify-assets/_mintlify/favicons/edgeimpulse/ZmtueQz3qIhQbHQ2/_generated/favicon-dark/favicon-16x16.png\" media=\"(prefers-color-scheme: dark)\">\u003clink data-mint-head rel=\"icon\" type=\"image/png\" sizes=\"32x32\" href=\"/mintlify-assets/_mintlify/favicons/edgeimpulse/ZmtueQz3qIhQbHQ2/_generated/favicon-dark/favicon-32x32.png\" media=\"(prefers-color-scheme: dark)\">\u003clink data-mint-head rel=\"shortcut icon\" type=\"image/x-icon\" href=\"/mintlify-assets/_mintlify/favicons/edgeimpulse/ZmtueQz3qIhQbHQ2/_generated/favicon-dark/favicon.ico\" media=\"(prefers-color-scheme: dark)\">\u003cmeta data-mint-head property=\"og:title\" content=\"Syntiant NDPs - keyword spotting - Edge Impulse Documentation\">\u003cmeta data-mint-head property=\"og:description\" content=\"Build a keyword spotting model and deploy it to Syntiant TinyML, Arduino Nicla Voice, or Avnet RASynBoard using Edge Impulse.\">\u003cmeta data-mint-head property=\"og:site_name\" content=\"Edge Impulse Documentation\">\u003cmeta data-mint-head property=\"og:url\" content=\"https://docs.edgeimpulse.com/tutorials/hardware/syntiant-ndp-keyword-spotting\">\u003cmeta data-mint-head property=\"og:type\" content=\"website\">\u003cmeta data-mint-head property=\"og:image\" content=\"https://edgeimpulse.mintlify.app/_mintlify/api/og/v2?division=Hardware+specific\u0026amp;title=Syntiant+NDPs+-+keyword+spotting\u0026amp;description=Build+a+keyword+spotting+model+and+deploy+it+to+Syntiant+TinyML%2C+Arduino+Nicla+Voice%2C+or+Avnet+RASynBoard+using+Edge+Impulse.\u0026amp;theme=c0871bc4d614d2e3b7bd2b2d\u0026amp;signature=42be8225affd03ed15be9090f9312f247985d63365c5038dbcc3db573e8cef65\">\u003cmeta data-mint-head property=\"og:image:width\" content=\"1200\">\u003cmeta data-mint-head property=\"og:image:height\" content=\"630\">\u003cmeta data-mint-head name=\"twitter:card\" content=\"summary_large_image\">\u003cmeta data-mint-head name=\"twitter:title\" content=\"Syntiant NDPs - keyword spotting - Edge Impulse Documentation\">\u003cmeta data-mint-head name=\"twitter:description\" content=\"Build a keyword spotting model and deploy it to Syntiant TinyML, Arduino Nicla Voice, or Avnet RASynBoard using Edge Impulse.\">\u003cmeta data-mint-head name=\"twitter:image\" content=\"https://edgeimpulse.mintlify.app/_mintlify/api/og/v2?division=Hardware+specific\u0026amp;title=Syntiant+NDPs+-+keyword+spotting\u0026amp;description=Build+a+keyword+spotting+model+and+deploy+it+to+Syntiant+TinyML%2C+Arduino+Nicla+Voice%2C+or+Avnet+RASynBoard+using+Edge+Impulse.\u0026amp;theme=c0871bc4d614d2e3b7bd2b2d\u0026amp;signature=42be8225affd03ed15be9090f9312f247985d63365c5038dbcc3db573e8cef65\">\u003cmeta data-mint-head name=\"twitter:image:width\" content=\"1200\">\u003cmeta data-mint-head name=\"twitter:image:height\" content=\"630\">\u003cmeta data-mint-head name=\"msapplication-config\" content=\"/mintlify-assets/_mintlify/favicons/edgeimpulse/ZmtueQz3qIhQbHQ2/_generated/favicon/browserconfig.xml\">\u003cmeta data-mint-head name=\"apple-mobile-web-app-title\" content=\"Edge Impulse Documentation\">\u003cmeta data-mint-head name=\"msapplication-TileColor\" content=\"#5f76db\">\u003clink data-mint-head rel=\"canonical\" href=\"https://docs.edgeimpulse.com/tutorials/hardware/syntiant-ndp-keyword-spotting\">\u003clink data-mint-head rel=\"alternate\" type=\"application/xml\" href=\"/sitemap.xml\">\u003clink data-mint-head rel=\"alternate\" type=\"text/markdown\" href=\"/tutorials/hardware/syntiant-ndp-keyword-spotting.md\">\u003cscript data-mint-head type=\"application/ld+json\">{\"@context\":\"https://schema.org\",\"@graph\":[{\"@type\":\"Organization\",\"@id\":\"https://docs.edgeimpulse.com/#organization\",\"name\":\"Edge Impulse Documentation\",\"url\":\"https://docs.edgeimpulse.com\",\"logo\":{\"@type\":\"ImageObject\",\"url\":\"https://mintcdn.com/edgeimpulse/-Yjt9HB8VCOXQC8H/.assets/logos/ei-logo-light.svg?fit=max\u0026auto=format\u0026n=-Yjt9HB8VCOXQC8H\u0026q=85\u0026s=a26ac03680700105c38fa0507df4fee2\"}},{\"@type\":\"WebSite\",\"@id\":\"https://docs.edgeimpulse.com#website\",\"name\":\"Edge Impulse Documentation\",\"url\":\"https://docs.edgeimpulse.com\",\"publisher\":{\"@id\":\"https://docs.edgeimpulse.com/#organization\"}},{\"@type\":\"WebPage\",\"@id\":\"https://docs.edgeimpulse.com/tutorials/hardware/syntiant-ndp-keyword-spotting#webpage\",\"url\":\"https://docs.edgeimpulse.com/tutorials/hardware/syntiant-ndp-keyword-spotting\",\"name\":\"Syntiant NDPs - keyword spotting\",\"description\":\"Build a keyword spotting model and deploy it to Syntiant TinyML, Arduino Nicla Voice, or Avnet RASynBoard using Edge Impulse.\",\"dateModified\":\"2026-09-13T14:39:19.979Z\",\"isPartOf\":{\"@id\":\"https://docs.edgeimpulse.com#website\"},\"breadcrumb\":{\"@id\":\"https://docs.edgeimpulse.com/tutorials/hardware/syntiant-ndp-keyword-spotting#breadcrumb\"}},{\"@type\":\"BreadcrumbList\",\"@id\":\"https://docs.edgeimpulse.com/tutorials/hardware/syntiant-ndp-keyword-spotting#breadcrumb\",\"itemListElement\":[{\"@type\":\"ListItem\",\"position\":1,\"name\":\"END-TO-END\",\"item\":\"https://docs.edgeimpulse.com/tutorials/end-to-end/overview\"},{\"@type\":\"ListItem\",\"position\":2,\"name\":\"Hardware specific\",\"item\":\"https://docs.edgeimpulse.com/tutorials/hardware/avnet-rasyn-motion-recognition\"},{\"@type\":\"ListItem\",\"position\":3,\"name\":\"Syntiant NDPs - keyword spotting\",\"item\":\"https://docs.edgeimpulse.com/tutorials/hardware/syntiant-ndp-keyword-spotting\"}]},{\"@type\":[\"Article\",\"TechArticle\"],\"@id\":\"https://docs.edgeimpulse.com/tutorials/hardware/syntiant-ndp-keyword-spotting#article\",\"headline\":\"Syntiant NDPs - keyword spotting\",\"name\":\"Syntiant NDPs - keyword spotting\",\"description\":\"Build a keyword spotting model and deploy it to Syntiant TinyML, Arduino Nicla Voice, or Avnet RASynBoard using Edge Impulse.\",\"url\":\"https://docs.edgeimpulse.com/tutorials/hardware/syntiant-ndp-keyword-spotting\",\"mainEntityOfPage\":{\"@id\":\"https://docs.edgeimpulse.com/tutorials/hardware/syntiant-ndp-keyword-spotting#webpage\"},\"dateModified\":\"2026-09-13T14:39:19.979Z\",\"publisher\":{\"@id\":\"https://docs.edgeimpulse.com/#organization\"},\"isPartOf\":{\"@id\":\"https://docs.edgeimpulse.com#website\"}}]}\u003c/script>","siteName":"Edge Impulse Documentation","nav":{"global":{"anchors":[{"anchor":"Forum","icon":"discourse","href":"https://forum.edgeimpulse.com"},{"anchor":"Discord","icon":"discord","href":"https://discord.gg/edgeimpulse"},{"anchor":"GitHub","icon":"github","href":"https://github.com/edgeimpulse"}]},"tabs":[{"tab":"Knowledge","pages":[{"title":"Knowledge","href":""}]},{"tab":"Studio","pages":[{"title":"Studio","href":"/studio"}]},{"tab":"Hardware","pages":[{"title":"Hardware","href":"/hardware"}]},{"tab":"Tools","pages":[{"title":"Tools","href":"/tools"}]},{"tab":"APIs","pages":[{"title":"APIs","href":"/apis"}]},{"tab":"Tutorials","groups":[{"group":"OVERVIEW","icon":"map","pages":[{"title":"Tutorials","href":"/tutorials"}]},{"group":"END-TO-END","icon":"arrows-left-right","pages":[{"title":"End-to-end tutorials","href":"/tutorials/end-to-end/overview"},{"group":"Image","pages":[{"title":"Image classification","href":"/tutorials/end-to-end/image-classification"},{"title":"Object detection with bounding boxes","href":"/tutorials/end-to-end/object-detection-bounding-boxes"},{"title":"Object detection with centroids","href":"/tutorials/end-to-end/object-detection-centroids"},{"title":"Visual anomaly detection","sidebarTitle":"Visual anomaly detection","href":"/tutorials/end-to-end/visual-anomaly-detection"},{"title":"Visual regression","sidebarTitle":"Visual regression","href":"/tutorials/end-to-end/visual-regression"}]},{"group":"Audio","pages":[{"title":"Keyword spotting","href":"/tutorials/end-to-end/keyword-spotting"},{"title":"Sound recognition","href":"/tutorials/end-to-end/sound-recognition"}]},{"group":"Time-series","pages":[{"title":"Motion recognition with anomaly detection","href":"/tutorials/end-to-end/motion-recognition"},{"title":"Environmental sensor fusion","href":"/tutorials/end-to-end/environmental-sensor-fusion"},{"title":"HR/HRV estimation","href":"/tutorials/end-to-end/hr-hrv-estimation"},{"title":"Temperature anomaly detection on Opta PLC","href":"/tutorials/end-to-end/temp-anomaly-detection-opta-plc"},{"title":"OBD Automotive data","href":"/tutorials/end-to-end/obd-automotive-data"}]},{"group":"Hardware specific","pages":[{"title":"Avnet RASynBoard - motion recognition","href":"/tutorials/hardware/avnet-rasyn-motion-recognition"},{"title":"Particle Photon 2 - audio event detection","href":"/tutorials/hardware/particle-photon2-audio-even-detection"},{"title":"Particle Photon 2 and Boron - motion recognition","href":"/tutorials/hardware/particle-photon2-motion-recognition"},{"title":"Renesas RA8D1 - NVIDIA TAO models","href":"/tutorials/hardware/renesas-ra8d1-nvidia-tao"},{"title":"Renesas RZ/V2L - object detection (x2)","href":"/tutorials/hardware/renesas-rzv2l-object-detection-x2"},{"title":"Sony Spresense - image classification","href":"/tutorials/hardware/sony-spresense-image-classification"},{"title":"SiLabs xG24 Dev Kit - object detection","description":"Count people in real time using FOMO object detection on the SiLabs xG24 Dev Kit with AI/ML hardware accelerator.","href":"/tutorials/hardware/silabs-xg24-devkit-object-detection"},{"title":"Syntiant NDPs - keyword spotting","href":"/tutorials/hardware/syntiant-ndp-keyword-spotting"},{"title":"Syntiant NDPs - motion recognition","description":"Recognize circular gestures from IMU data on the Syntiant TinyML Board or Arduino Nicla Voice using Edge Impulse.","href":"/tutorials/hardware/syntiant-ndp-motion-recognition"},{"title":"TI LaunchXL - keyword spotting","href":"/tutorials/hardware/ti-launchxl-keyword-spotting"},{"title":"TI LaunchXL - sound recognition","href":"/tutorials/hardware/ti-launchxl-sound-recognition"}]},{"group":"AI agents","pages":[{"title":"Motion recognition using an agent","href":"/tutorials/end-to-end/motion-recognition-using-agent"}]}]},{"group":"TOPICS","icon":"list","pages":[{"group":"AI agents","pages":[{"title":"Install Agent Skills","href":"/tutorials/topics/ai-agents/create-edge-impulse-skill"},{"title":"Create a companion skill","href":"/tutorials/topics/ai-agents/create-a-companion-skill"},{"title":"Prompt library","href":"/tutorials/topics/ai-agents/prompt-library"}]},{"group":"Data","pages":[{"group":"Ingestion","pages":[{"title":"Collect image data using a mobile phone","href":"/tutorials/topics/data/collect-image-data-phone"},{"title":"Collect image data using Studio","href":"/tutorials/topics/data/collect-image-data-studio"},{"title":"Collect image data using OpenMV Cam H7 Plus","href":"/tutorials/topics/data/collect-image-data-openmv-h7-plus"}]},{"group":"Generation","pages":[{"title":"Generate image data using Dall-E","href":"/tutorials/topics/data/generate-image-data-dall-e"},{"title":"Generate image data using RealVisXL","href":"/tutorials/topics/data/generate-image-data-realvisxl"},{"title":"Generate keyword data using Google TTS","href":"/tutorials/topics/data/generate-keyword-data-google-tts"},{"title":"Generate time-series data using MATLAB","href":"/tutorials/topics/data/generate-time-series-data-matlab"},{"title":"Generate time-series data using PyBullet","href":"/tutorials/topics/data/generate-time-series-data-pybullet"}]},{"group":"Annotation","pages":[{"title":"Label audio data using your existing model","href":"/tutorials/topics/data/label-audio-data-existing-model"},{"title":"Label image data using GPT-4o","href":"/tutorials/topics/data/label-image-data-gpt-4o"}]}]},{"group":"Feature extraction","pages":[{"title":"Build a custom processing block","href":"/tutorials/topics/feature-extraction/build-custom-processing-blocks"},{"title":"Use embeddings for sensor fusion","href":"/tutorials/topics/feature-extraction/use-embeddings-sensor-fusion"}]},{"group":"Machine learning","pages":[{"title":"Classify multiple 2D input features","href":"/tutorials/topics/machine-learning/classify-multiple-2d-features"},{"title":"Deploy pretrained models with freeform outputs","href":"/tutorials/topics/machine-learning/deploy-freeform-model"},{"title":"Use the regression learning block","href":"/tutorials/topics/machine-learning/use-regression-learning-block"},{"title":"Visualize neural networks decisions with Grad-CAM","href":"/tutorials/topics/machine-learning/visualize-neural-netowrks-gradcam"}]},{"group":"Inference","pages":[{"title":"Run multiple impulses (C++)","href":"/tutorials/topics/inference/run-multiple-impulses-cpp"},{"title":"Run on Qualcomm Device Cloud","href":"/tutorials/topics/inference/run-qualcomm-device-cloud"},{"title":"Sample audio continuously","href":"/tutorials/topics/inference/sample-audio-continuously"}]},{"group":"Post-processing","pages":[{"title":"Count objects using FOMO","href":"/tutorials/topics/post-processing/count-objects-fomo"}]},{"group":"Model cascades","pages":[{"title":"Two-stage OCR on Linux devices","sidebarTitle":"Two-stage OCR","href":"/tutorials/topics/model-cascades/ocr"}]},{"group":"Lifecycle management","pages":[{"title":"Acquire and process data using Golioth on AI","href":"/tutorials/topics/lifecycle-management/acquire-process-golioth"},{"title":"Deploy using GitHub Actions","href":"/tutorials/topics/lifecycle-management/deploy-github-actions"},{"group":"Perform OTA model updates","pages":[{"title":"Allxon","href":"/tutorials/topics/lifecycle-management/ota-allxon"},{"title":"Arduino IDE (for ESP32)","href":"/tutorials/topics/lifecycle-management/ota-arduino"},{"title":"Arduino IoT Cloud","href":"/tutorials/topics/lifecycle-management/ota-arduino-iot-cloud"},{"title":"Balena","href":"/tutorials/topics/lifecycle-management/ota-balena"},{"title":"Blues Wireless","href":"/tutorials/topics/lifecycle-management/ota-blues-wireless"},{"title":"C++","href":"/tutorials/topics/lifecycle-management/ota-cpp"},{"title":"Espressif IDF","href":"/tutorials/topics/lifecycle-management/ota-espressif-idf"},{"title":"Nordic Thingy53","href":"/tutorials/topics/lifecycle-management/ota-thingy53"},{"title":"NVIDIA Jetson","href":"/tutorials/topics/lifecycle-management/ota-jetson-nano"},{"title":"Particle Workbench","href":"/tutorials/topics/lifecycle-management/ota-particle-workbench"},{"title":"Particle Webhook","href":"/tutorials/topics/lifecycle-management/ota-particle-webhook"},{"title":"Zephyr on Golioth","href":"/tutorials/topics/lifecycle-management/ota-zephyr-golioth"}]}]},{"group":"Android","pages":[{"title":"Android series overview","href":"/tutorials/topics/android/android-series"},{"title":"Static buffer inference on Android","href":"/tutorials/topics/android/static-buffer-inference"},{"title":"Keyword spotting on Android","href":"/tutorials/topics/android/keyword-spotting"},{"title":"Camera inference on Android","href":"/tutorials/topics/android/camera-inference"},{"title":"Motion inference on Wear OS","href":"/tutorials/topics/android/wearos-motion-inference"},{"title":"QNN hardware acceleration on Android","href":"/tutorials/topics/android/qnn-acceleration"},{"title":"Build a speech-to-image app with QNN on Android","href":"/tutorials/topics/android/qnn-speech-to-image"},{"title":"Android data collector","href":"/tutorials/topics/android/android-data-collector"},{"title":"AR/XR factory floor (Unity + Meta Quest 3)","href":"/tutorials/topics/android/ar-xr-factory-floor"}]},{"group":"Zephyr","pages":[{"title":"Zephyr series overview","href":"/tutorials/topics/zephyr/zephyr-module-series"},{"title":"Porting Zephyr Projects Between Boards","href":"/tutorials/topics/zephyr/porting-between-boards"},{"title":"IMU inference on Zephyr","href":"/tutorials/topics/zephyr/zephyr-module-imu"},{"title":"Microphone Keyword Spotting on Zephyr","href":"/tutorials/topics/zephyr/zephyr-module-microphone-kws"},{"title":"BLE GATT sensor bridge for Edge Impulse","href":"/tutorials/topics/zephyr/zephyr-ble-gatt-client"}]},{"group":"Robotics","pages":[{"title":"Robotics","href":"/tutorials/topics/robotics"},{"title":"Run Edge Impulse object detection with ROS 2","href":"/tutorials/topics/robotics/edgeimpulse-ros2-integration"},{"title":"Run Edge Impulse vision on a JetBot with Rubik Pi","href":"/tutorials/topics/robotics/wheeled-robot-ros2-integration"},{"title":"Run Edge Impulse pick and place with UNO Q Braccio","href":"/tutorials/topics/robotics/robotic-arm-ros2-integration"},{"title":"Build a mobile inspection system with Edge Impulse and ROS 2","href":"/tutorials/topics/robotics/wheeled-inspection-system"}]}]},{"group":"TOOLS","icon":"screwdriver-wrench","pages":[{"group":"APIs","pages":[{"group":"Ingestion","pages":[{"title":"Ingest structured label data","href":"/tutorials/tools/apis/ingestion/ingest-structured-label-data"}]},{"group":"Studio","pages":[{"title":"Collect data from a device","href":"/tutorials/tools/apis/studio/collect-data-device"},{"title":"Customize the EON Tuner","href":"/tutorials/tools/apis/studio/customize-the-eon-tuner"},{"title":"Deploy a model","href":"/tutorials/tools/apis/studio/deploy-model"}]}]},{"group":"Studio Python API bindings","pages":[{"title":"Use the Python API bindings","href":"/tutorials/tools/api-bindings/studio/python/use-python-api-bindings"}]},{"group":"Studio Python SDK","pages":[{"title":"Use the Edge Impulse Python SDK to upload and download data","href":"/tutorials/tools/sdks/studio/python/upload-download-data"},{"title":"Use the Edge Impulse Python SDK to run the EON Tuner","href":"/tutorials/tools/sdks/studio/python/run-eon-tuner"},{"title":"Use the Edge Impulse Python SDK with Hugging Face","href":"/tutorials/tools/sdks/studio/python/use-hugging-face"},{"title":"Use the Edge Impulse Python SDK with SageMaker Studio","href":"/tutorials/tools/sdks/studio/python/use-sagemaker-studio"},{"title":"Use the Edge Impulse Python SDK with TensorFlow and Keras","href":"/tutorials/tools/sdks/studio/python/use-tf-keras"},{"title":"Use the Edge Impulse Python SDK with Weights \u0026 Biases","href":"/tutorials/tools/sdks/studio/python/use-wandb"}]}]},{"group":"Inference libraries","pages":[]},{"group":"INTEGRATIONS","icon":"handshake","pages":[{"title":"AWS IoT Greengrass","href":"/tutorials/integrations/aws-greengrass"},{"title":"Deploy PyTorch models with ExecuTorch","sidebarTitle":"ExecuTorch","href":"/tutorials/integrations/executorch"},{"title":"NVIDIA Omniverse","href":"/tutorials/integrations/nvidia-omniverse"},{"title":"syntheticAIdata Vision Datasets","href":"/tutorials/integrations/syntheticaIdata-vision-datasets"},{"title":"Weights \u0026 Biases","href":"/tutorials/integrations/weights-and-biases"},{"title":"ROS 2 (edgeimpulse_ros)","sidebarTitle":"ROS 2","href":"/tutorials/integrations/ros2"}]}]},{"tab":"Projects","pages":[{"title":"Projects","href":"/projects"}]},{"tab":"Datasets","pages":[{"title":"Datasets","href":"/datasets"}]}]},"basePath":"","title":"Syntiant NDPs - keyword spotting - Edge Impulse Documentation","buildId":"dpl_DeHjVRGfFnhYQwHnfC2pjeXXv8h9","deploymentId":"dpl_DeHjVRGfFnhYQwHnfC2pjeXXv8h9","dynamics":["07c022d89b","a74be98ba7","a9bb46feb3"],"chunks":["Frame-DXXFP6nH.js","DynamicMarkdown-B54_zNBF.js","zoom-image-lightbox-BG6oD64b.js","lightbox-handle-r17bVUz3.js","Markdown-DfhCTwyA.js","clsx-xpJZXxdP.js","lib-DuNMoZ05.js","lib-B8HbPgcC.js","html-void-elements-mCSPHezU.js","dist-BTZUMDnx.js","katex-YMM-FMeD.js","marked.esm-CZWythHk.js","AssistantPageLink-DqdKa2R4.js"]}