- eoinedge/edgeai-docs-qwen2.5-coder-0.5b-lora — Edge Impulse docs and API
- eoinedge/arduino-qwen0.5-lora — Arduino sketches and libraries
Introduction
The earlier guides in this series showed how to load a Qwen1.5 LoRA adapter in Python and query it directly, with or without a FAISS retrieval index. Both approaches are good for scripted question-answering, but they are not a coding assistant — you cannot ask them to read a file, suggest an edit, or build a sketch. This guide sets up OpenCode, an offline terminal-based AI coding assistant, backed by two fine-tunedQwen2.5-Coder-0.5B models served by llama-server. No API keys, no cloud calls, no internet connection required at runtime. Everything runs on the same hardware covered in the previous guides:
- Raspberry Pi 4 / Pi 5 — CPU inference, ~5–15 tok/s on Pi 5
- NVIDIA Jetson Orin / QCS6490 devices — GPU inference via cuBLAS, ~30–80 tok/s
This guide uses GGUF models served by
llama-server — a different runtime from the Python transformers + PEFT approach in the earlier tutorials. The GGUF approach is generally faster for interactive use and does not require PyTorch.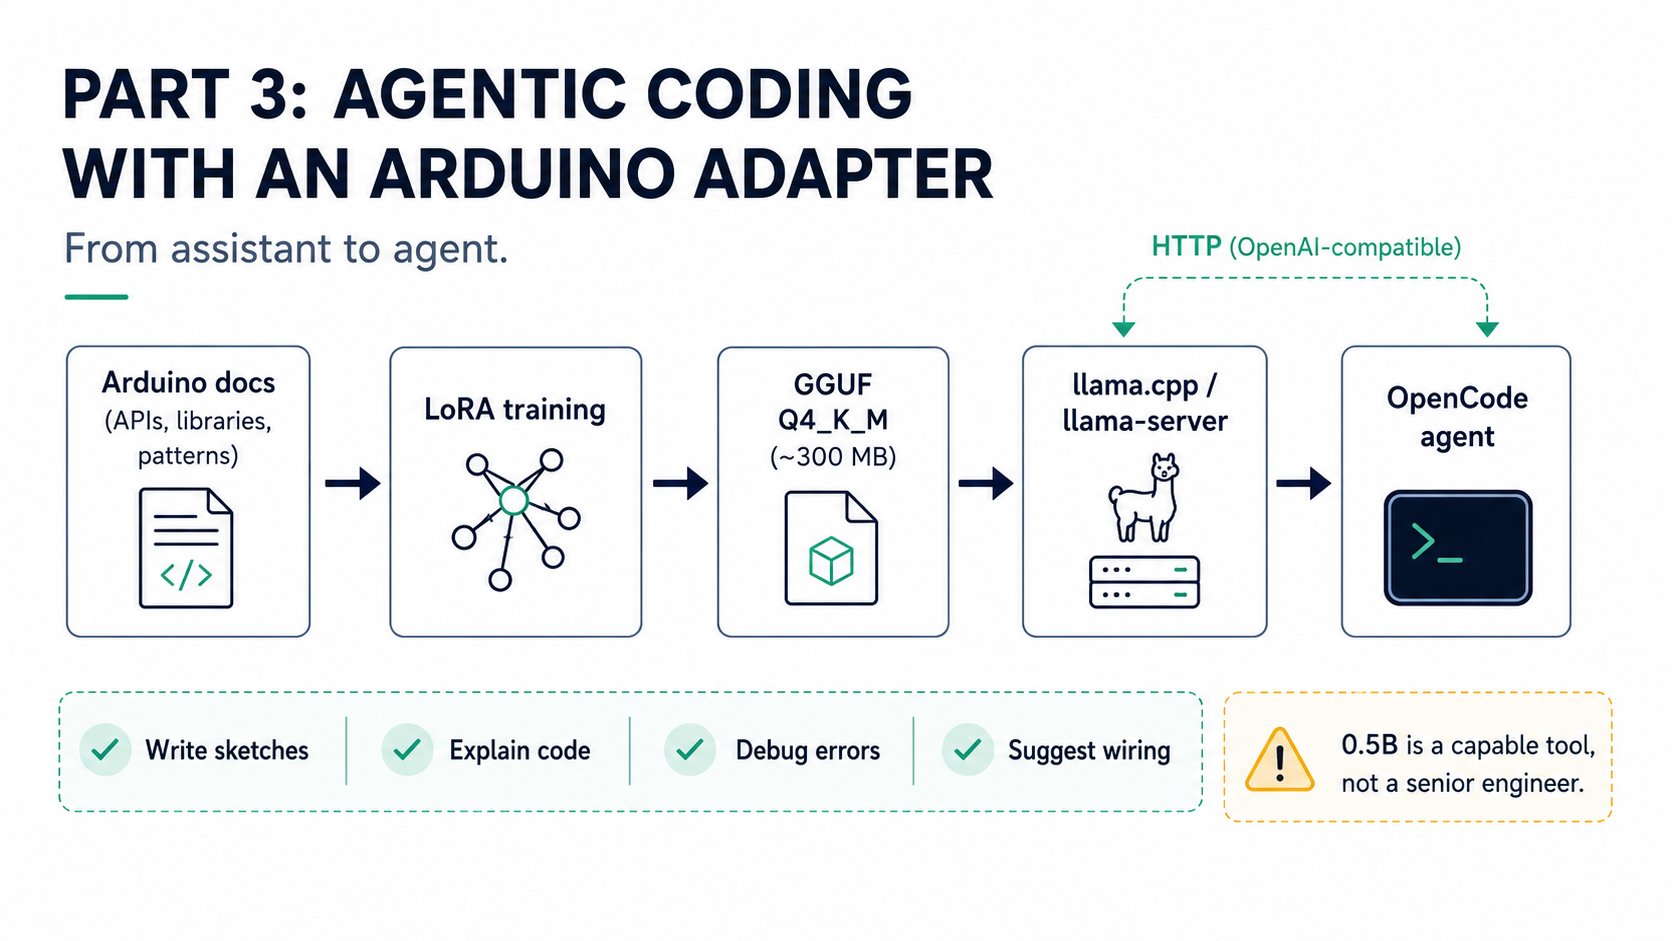
How it works
llama-server exposes an OpenAI-compatible /v1/chat/completions endpoint. opencode.json points OpenCode at that local endpoint using the @ai-sdk/openai-compatible provider. The two agents defined in .opencode/agents/ (edgeai.md and arduino.md) each carry a different system prompt that focuses the model on its specialist domain — switch agents when you switch models.
Prerequisites
- A Raspberry Pi 4 / Pi 5, a Thundercomm Rubik Pi 3, or an NVIDIA Jetson Orin (Nano, NX, AGX) running 64-bit Linux
- ~1 GB free disk space for both GGUF models plus the
llama.cppbuild artefacts git,cmake,build-essential, andwget(the quickstart script installs these)- Node.js 18+ and
npmfor OpenCode (the quickstart script checks and installs if missing) - For Jetson GPU inference: CUDA toolkit installed at
/usr/local/cuda
Quickstart
Clone the repo and run the one-shot setup script:
You can force a platform instead of relying on auto-detection:
If
llama-server is already installed (for example via brew install llama.cpp on macOS), the build step is skipped automatically. The quickstart script checks PATH and common install locations before starting the build.Step 1 — Start the model server
Pick the model that matches the task you are about to work on. Only one model runs at a time; the server starts on port 8081.start-server.sh applies platform-specific settings automatically:
You can override both settings with environment variables if needed:
llama-server:
Step 2 — Open OpenCode
In a second terminal, navigate to theopencode/ directory and start OpenCode:
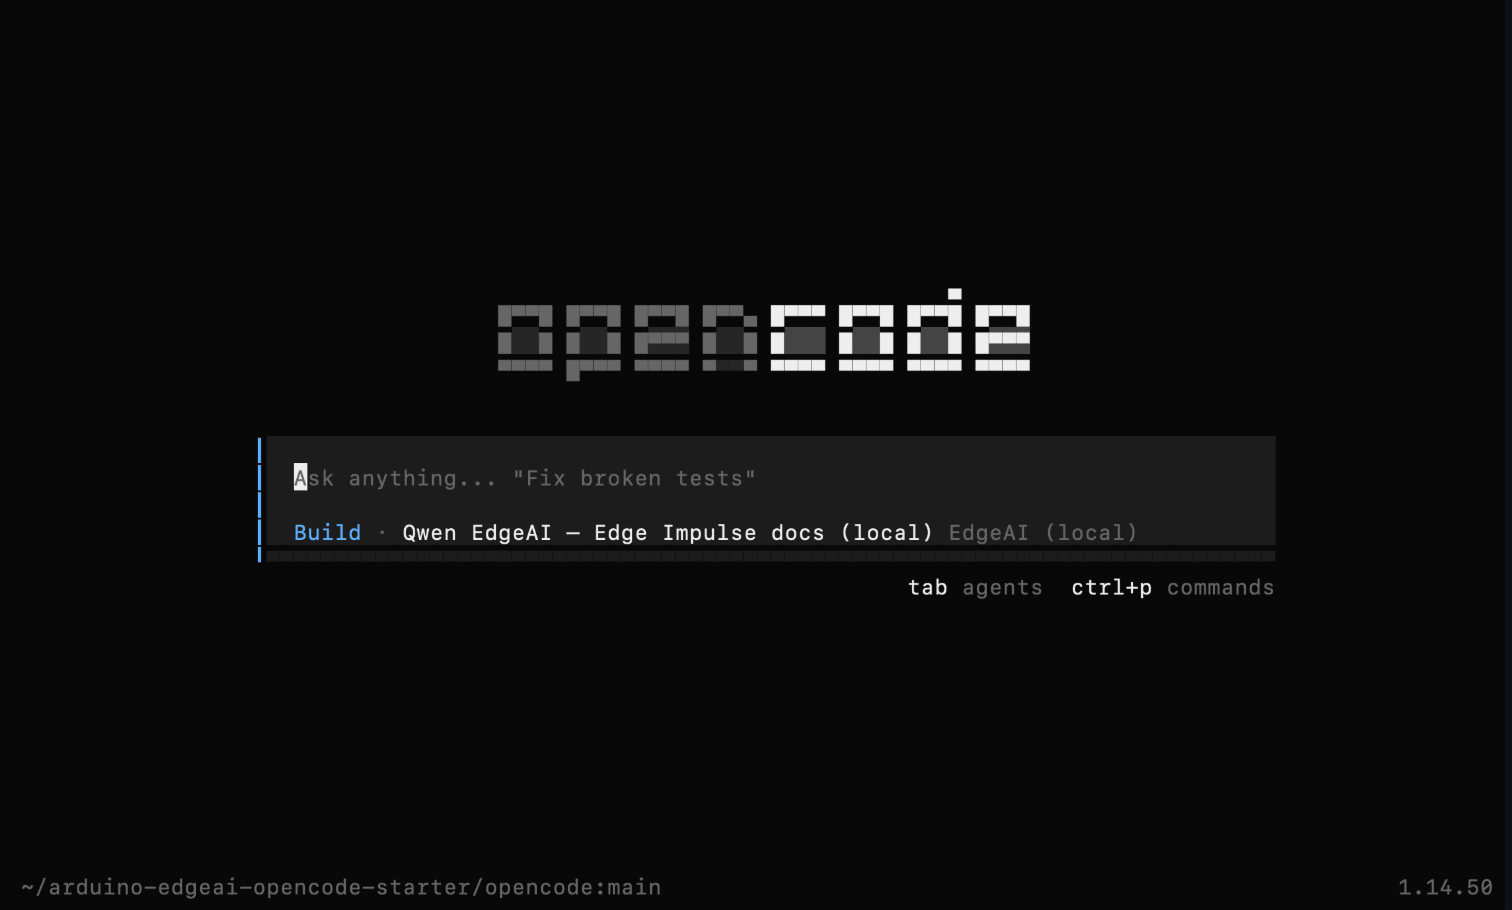
opencode/opencode.json from the current directory on startup. This file declares both local model providers and sets edgeai/qwen-edgeai as the default:
127.0.0.1:8081 — switching the model in OpenCode selects which configured profile to use, but you must also restart start-server.sh with the matching argument to load the correct GGUF.
Step 3 — Select an agent
Inside OpenCode, press/ and type agent to open the agent picker. Two agents are available:
Switch agent and model server together:
How do I export a trained Edge Impulse model as a C++ library?Walk me through the full project workflow from data collection to deploymentHow do I call the Edge Impulse REST API to start a training job?
Read my sketch and add a blinking LED on pin 13Write a sketch for UNO R4 WiFi that reads an accelerometer and prints to SerialValidate the project then build it for arduino:renesas_uno:unor4wifi
Arduino IDE integration with arduino-mcp (optional)
arduino-mcp is an MCP server that gives OpenCode tools to read, write, validate, and build Arduino sketches directly in Arduino IDE 2.0 format. When it is connected, the arduino agent can act on your sketch rather than only describe what to change.
1. Install and start arduino-mcp:
opencode/mcp.json:
arduino-mcp connected, the agent can call tools directly instead of suggesting changes for you to copy-paste:
build requires arduino-cli to be installed and the ARDUINO_FQBN environment variable to be set to your target board. On Pi UNO Q setups running the pi-openclaw-mcp-stack, validate and build are also available via the REST gateway on port 3000.Switching models inside OpenCode
Type/models inside OpenCode to see the configured models and switch between them:
start-server.sh running with the matching argument — OpenCode talks to whatever model llama-server has loaded, regardless of which provider profile is selected in opencode.json.
Best practices
- Switch both the server and the agent at the same time to keep the model and system prompt aligned.
- On a Pi 4 with 4 GB RAM, only one model server should run at a time. Kill the previous server before starting the other.
- Keep prompts focused. The 0.5B models are fast but have a 4096-token context window. For multi-file projects or long code generation tasks, break the work into smaller steps.
- For complex multi-step reasoning (e.g. a full Edge Impulse project from scratch), consider running a 3B+ GGUF model instead. Swap the GGUF path in
start-server.shand update thelimit.contextvalue inopencode.jsonaccordingly. - Validate generated Arduino code in the Serial Monitor or with
arduino-cli compilebefore flashing to hardware.
Related
- Offline SLMs for Edge AI Development — Part 1: Direct Inference with a Qwen LoRA Adapter — Python transformers approach for direct adapter inference
- Offline SLMs for Edge AI Development — Part 2: Retrieval-Augmented Generation with FAISS — adding retrieval-augmented generation to ground answers in live docs
- Related repos: pi-openclaw-mcp-stack · arduino-mcp
Reference
- GitHub:
eoinjordan/arduino-edgeai-opencode-starter - EdgeAI model:
eoinedge/edgeai-docs-qwen2.5-coder-0.5b-lora - Arduino model:
eoinedge/arduino-qwen0.5-lora - Base model:
Qwen/Qwen2.5-Coder-0.5B-Instruct(both adapters) - Quantization: Q4_K_M GGUF via
llama.cpp - Hardware guides: Thundercomm Rubik Pi 3 · Raspberry Pi 5 · Qualcomm RB3 Gen 2 · NVIDIA Jetson Orin