Introduction
The AI revolution, particularly in the domain of large language models (LLMs) at present, is incredibly impressive. However, these models are energy-hungry, which makes it challenging to run them nonstop on smartphones without quickly draining the battery. That’s why smaller, energy-efficient models are critical for real-world applications, especially for systems that need to stay on all the time. As Pete Warden and Daniel Situnayake highlight in TinyML:“Google was running neural networks that were just 14 kilobytes (KB) in size! They needed to be so small because they were running on the digital signal processors (DSPs) present in most Android phones, continuously listening for the ‘OK Google’ wake words…”This kind of breakthrough shows what’s possible when you focus on keeping models small and efficient. In this guide, we’ll follow the same philosophy: you’ll build your own custom wake-word detector that runs directly on your phone, using tools like Edge Impulse, TensorFlow Lite, and Android Studio. The system will be optimized to listen for a trigger phrase like “Neo” with minimal power usage, no cloud calls, no bulky models, just fast, local inference.
Edge AI and Android Integration
Running the model directly on the phone means audio never leaves the device, so privacy stays protected. Latency is low, too. There’s no cloud round‑trip, which means faster reaction times. It’s ideal for a wake‑word experience . And yes, even if you’re offline, you can still trigger the wake word, especially handy in low‑connectivity scenarios like fieldwork. However, the question of bringing custom voice recognition directly onto your Android phone would scare many people. That’s where Edge Impulse and on-device AI shine. In this section, we will answer the following questions:- Why is Edge Impulse a Natural Fit for Mobile Voice Recognition?
- How Edge Impulse Works with Android via TensorFlow Lite?
.tflite model and run inference through the TFLite Interpreter API.
In this guide, we will focus on building in native C++ and include it in our Android application.
Practical Implementation
Now that we’ve covered the why, let’s dive into the how. In this section, you’ll learn how to build your own custom wake word detection system using Edge Impulse and deploy it on an Android device. We’ll walk through every stage, which includes setting up your tools, gathering voice data, training your model, testing, and then, most importantly, deploying it on Android.Setting Up Your Development Environment
First, you need a few tools before you can start building. Head over to Edge Impulse and create a free account. Once you’re in, start a new project: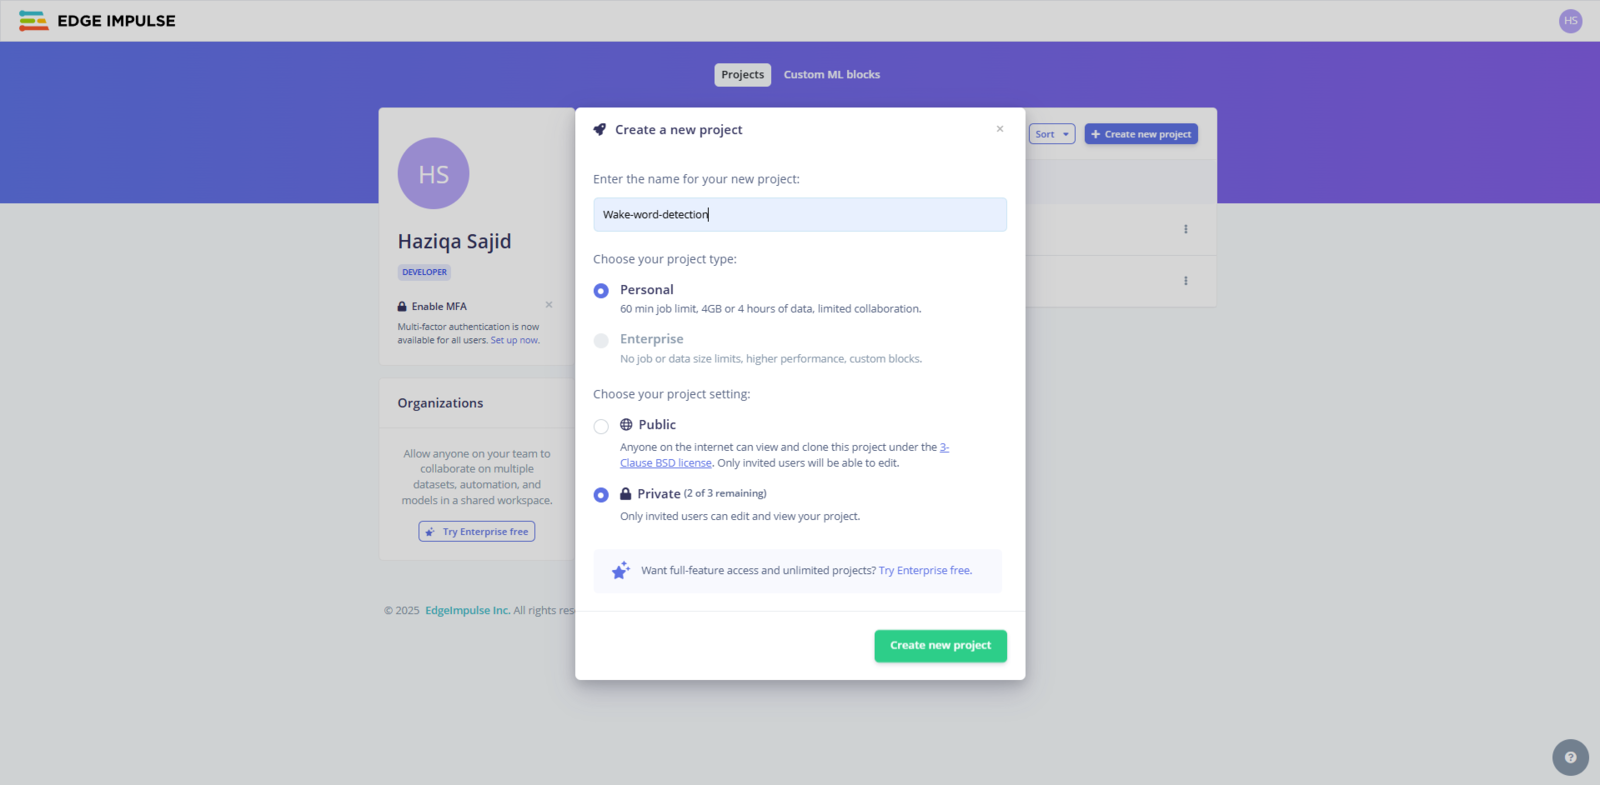
Fig 1: Creating a New Project in Edge Impulse
Fig 2: The SDK Tools Window Showing the NDK Option
Collecting Your Voice Data
The very first step in any machine learning project is collecting data, and Edge Impulse makes this part surprisingly smooth. In the left-hand menu, click on Data Acquisition to get started.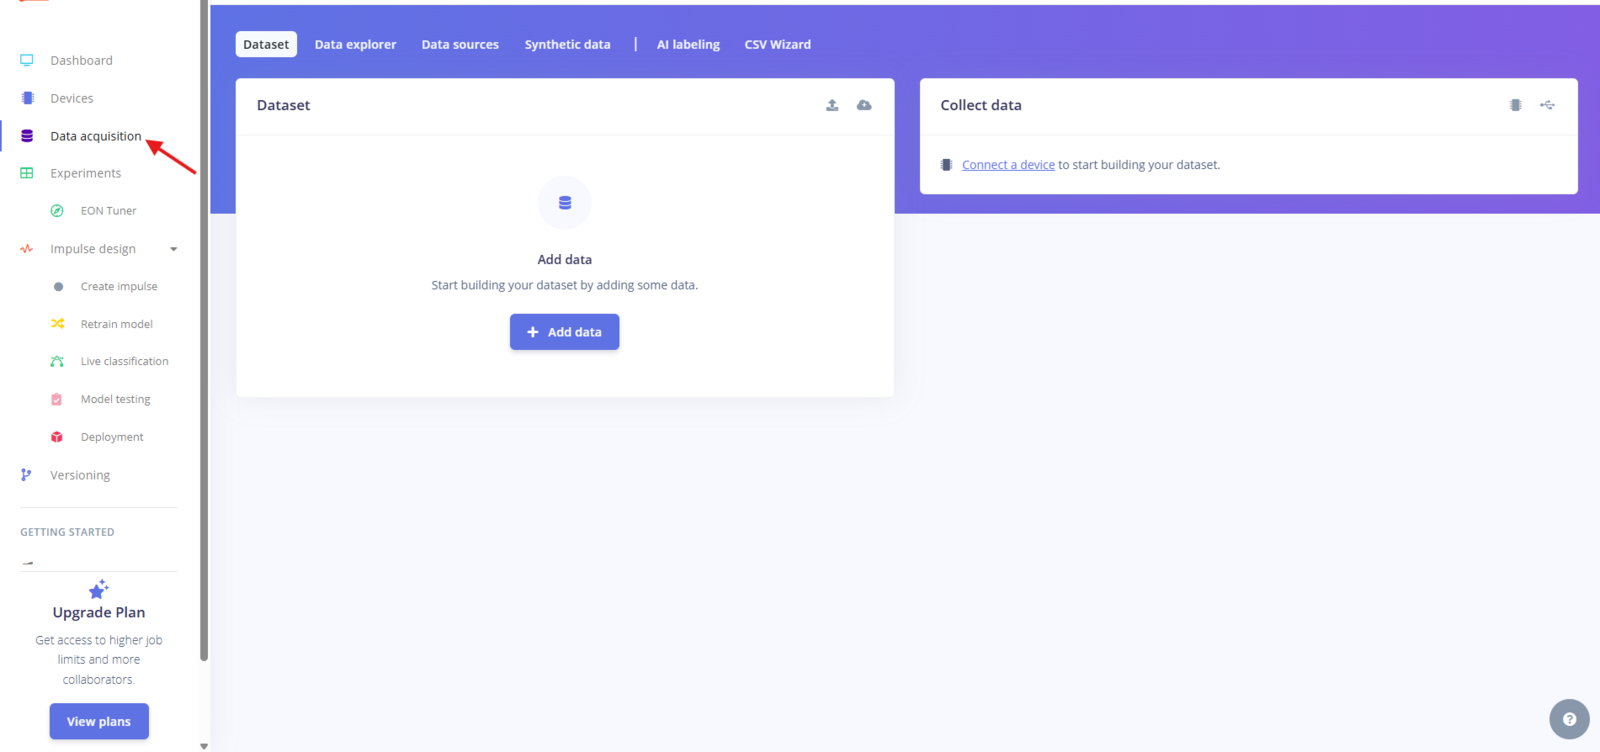
Fig 3: Data Acquisition Page in Edge Impulse
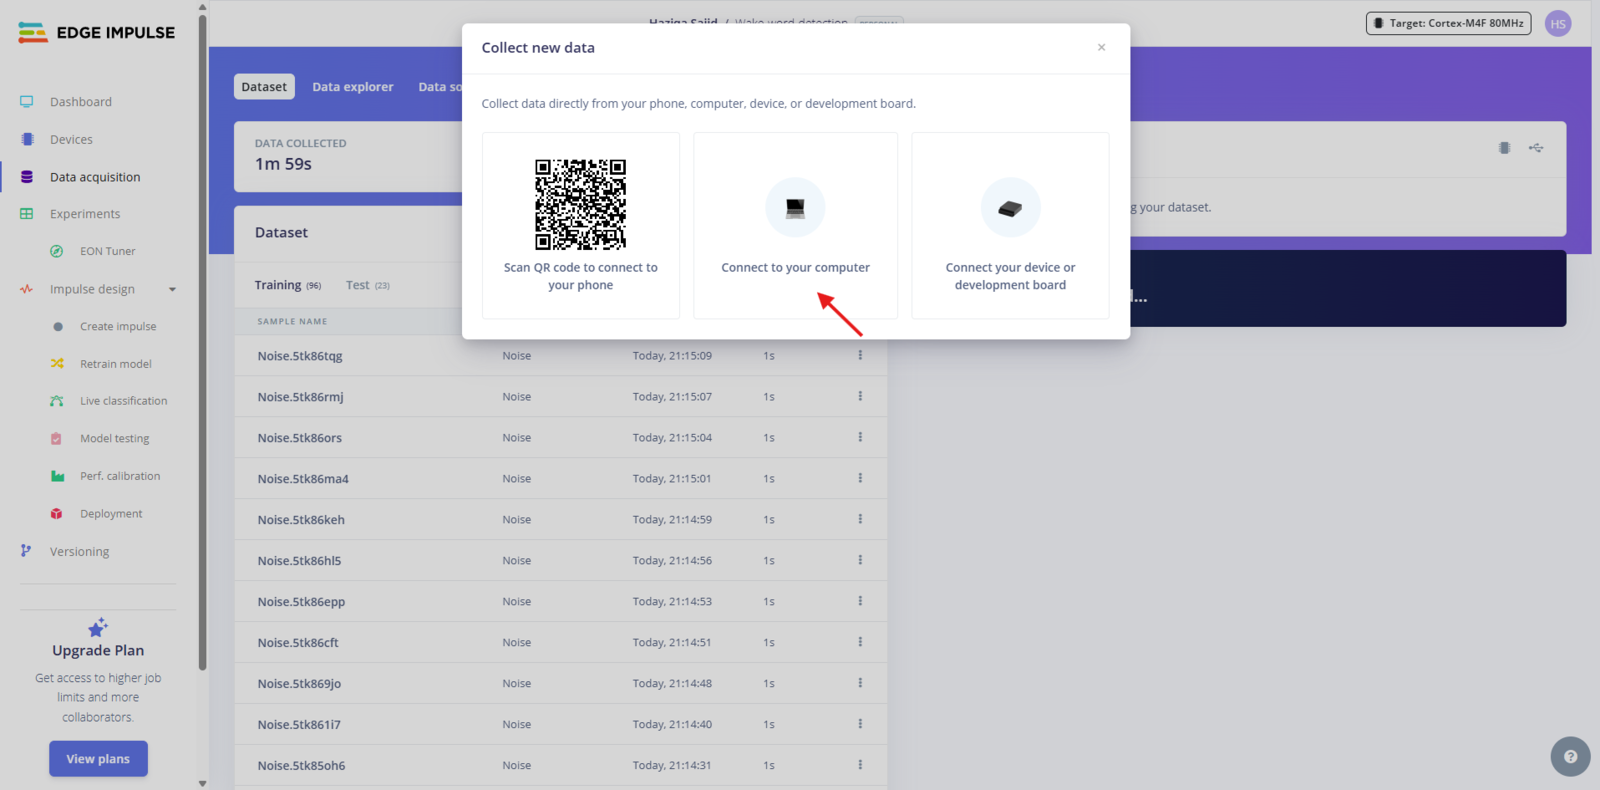
Fig 4: Collecting Data From Your Computer
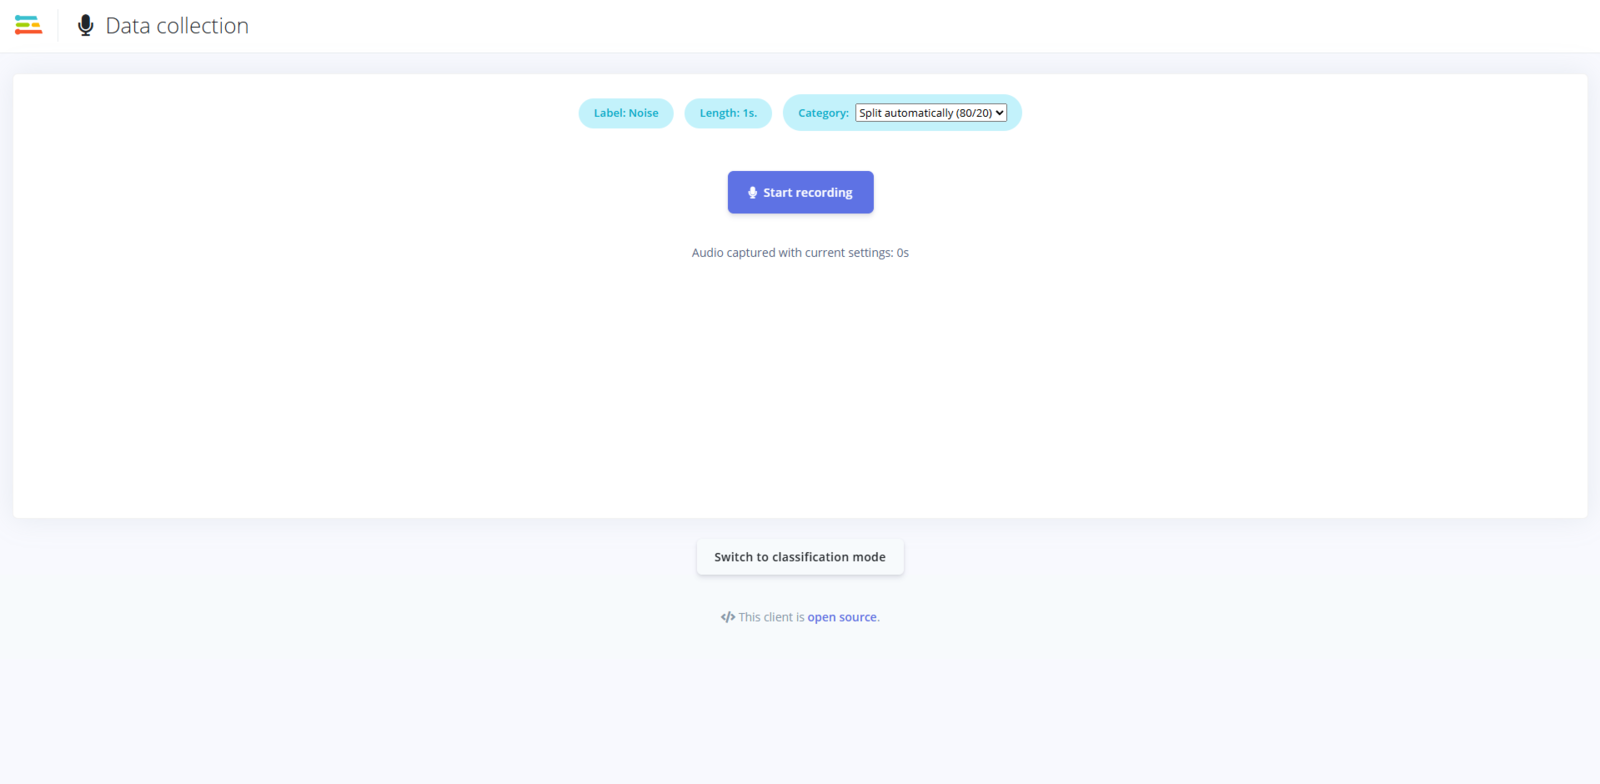
Fig 5: Collecting Data by Recording Audio
Building Your Dataset
Once your samples are uploaded and labeled, Edge Impulse helps you organize them. It automatically splits your dataset into training (80%) and testing (20%). It’s a good default for most use cases.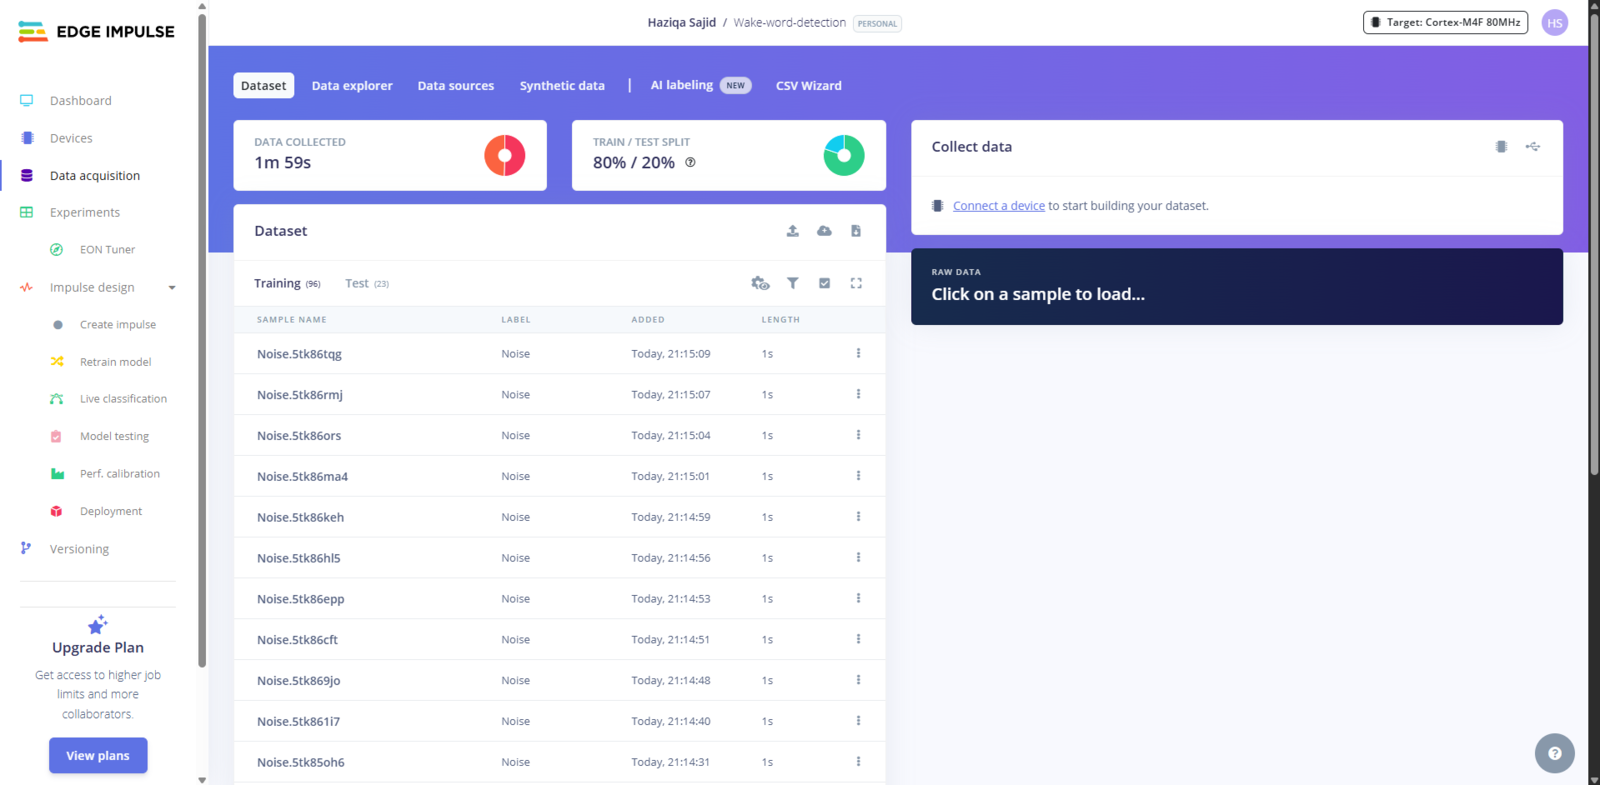
Fig 6: Overview of the Dataset Created
Designing Your Voice Recognition Model
This is where your voice gets transformed into something a machine can understand. When you speak into a microphone, you’re producing raw audio. This can be described as a waveform that looks like a wavy line. While this works fine for humans (and music apps), it’s not ideal for machine learning.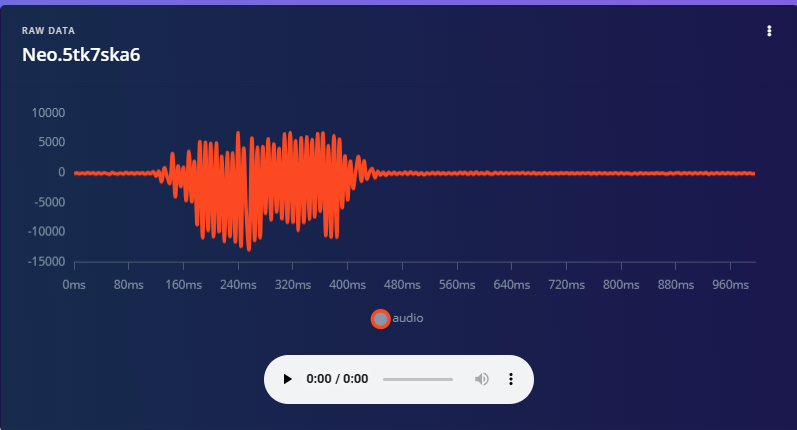
Fig 7: Waveform of the Wake Word
What is MFCC?
MFCC is a classic feature extraction technique for audio. It works by slicing the audio signal into short frames and applying a filter bank that mimics the human ear’s frequency response. Then, transformations turn those filtered signals into something like a frequency “summary.” This gives us a matrix of numbers that highlights which frequencies are active and when. Conversion to MFCC involves a spectrogram as a crucial step. A spectrogram is computed using STFT, which shows how the frequency content of the signal evolves over time. Instead of passing raw waveforms to our model, we pass these compact numerical representations. That makes training faster, improves accuracy, and helps the model focus on the unique characteristics of your voice when saying a specific word.Our Input Configuration
Under the Impulse design tab, drag in an MFCC audio processing block, then a Neural Network block. In our project, here’s how we configured the audio preprocessing: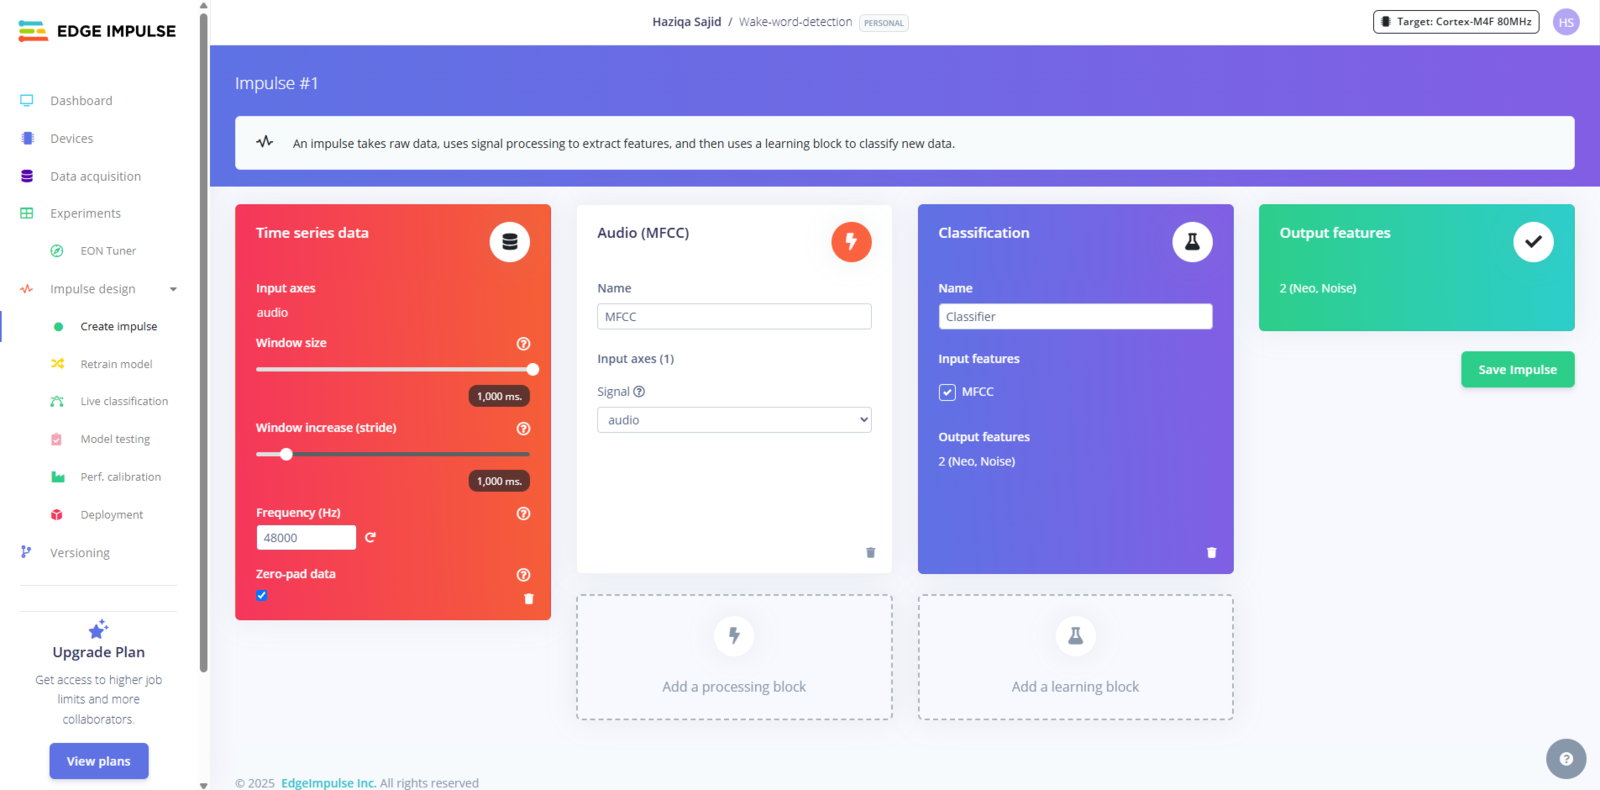
Fig 8: Creating an Impulse
- Window size: Defines the length of each slice of audio the model looks at. One second is a sweet spot for short keywords.
- Window increase (stride): How far we move forward to process the next slice of data. In our setup, there is no overlap. Each one-second slice is treated as a separate unit.
- Frequency: Our audio sample rate, matching the quality of our microphone setup.
- Zero padding: This ensures that all audio slices are the same length, even if the recording was slightly shorter.
MFCC Settings Explained
Here’s a breakdown of the MFCC parameters we used, along with tips in case you want to tune them: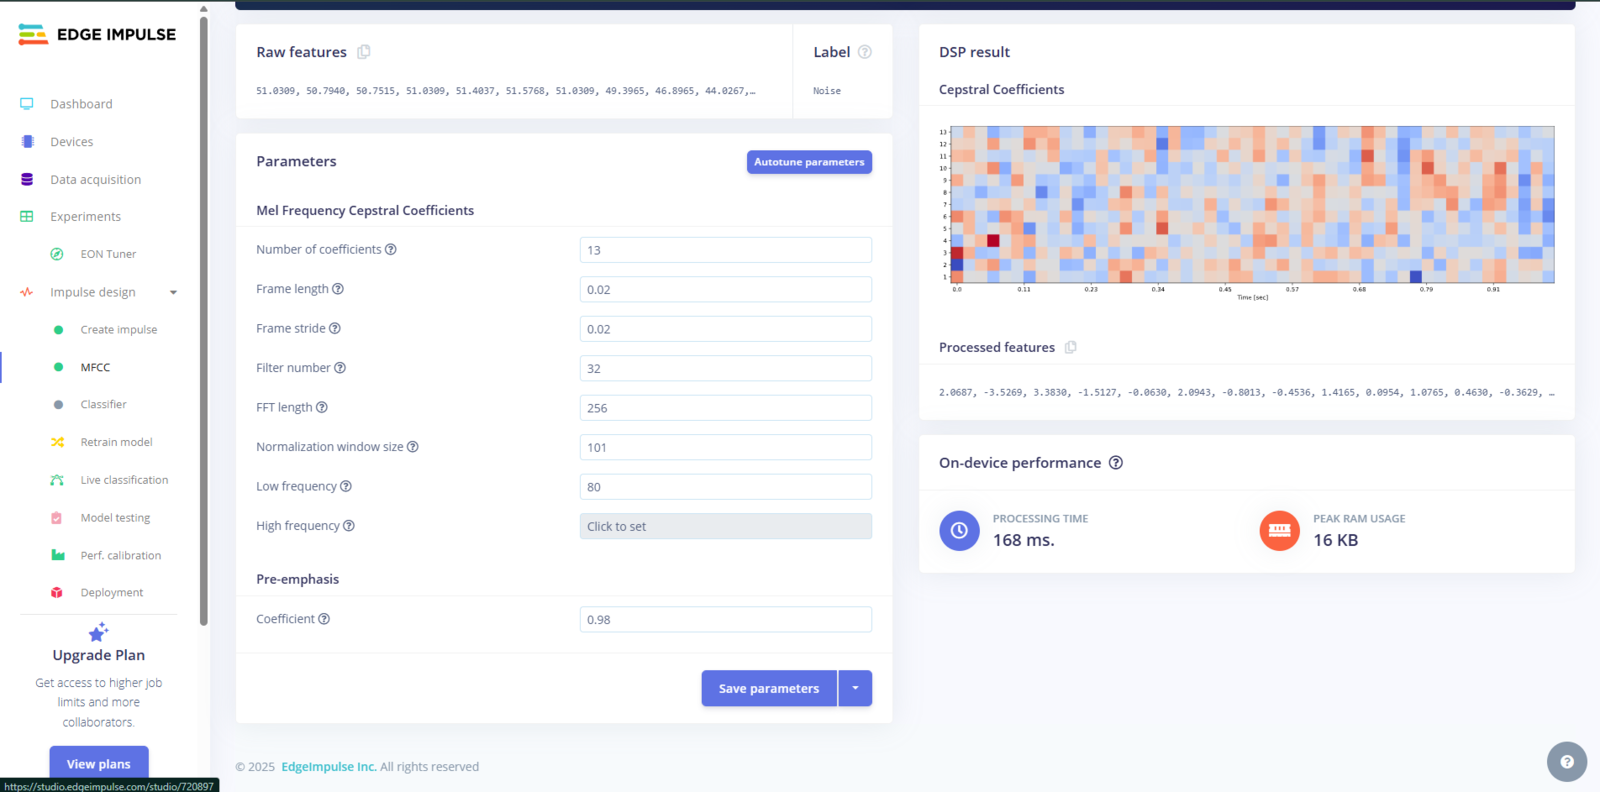
Fig 9: Settings for MFCC
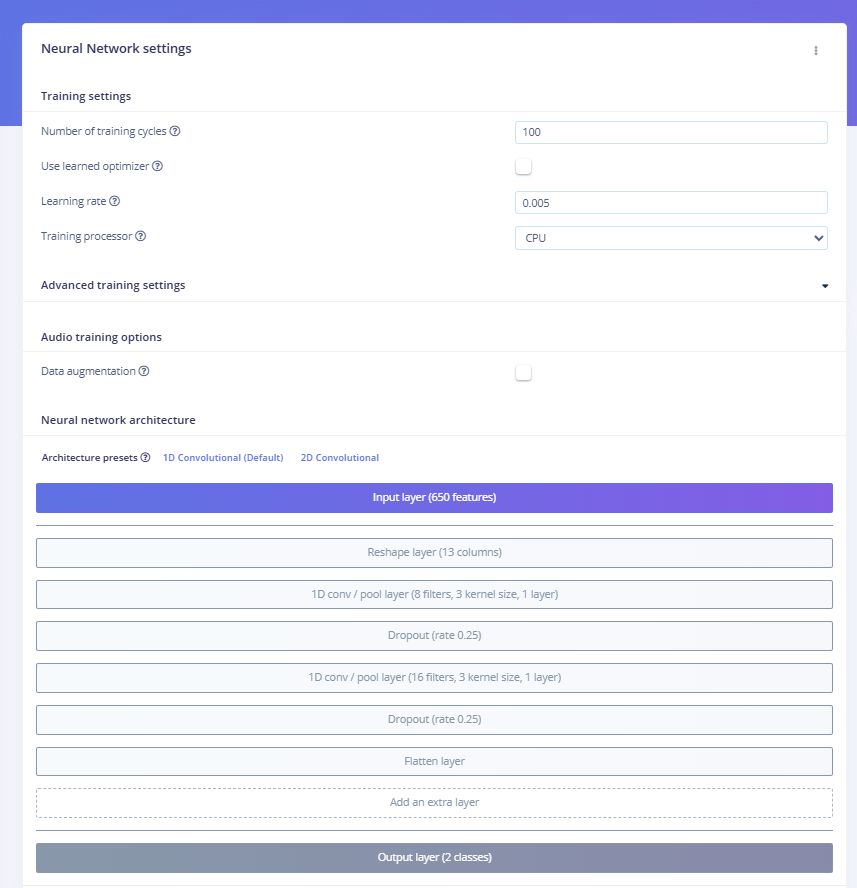
Fig 10: NN Classifier in Edge Impulse
Training and Testing Your Model
After training the model using our small dataset (just a couple of minutes of voice samples), we got the following results: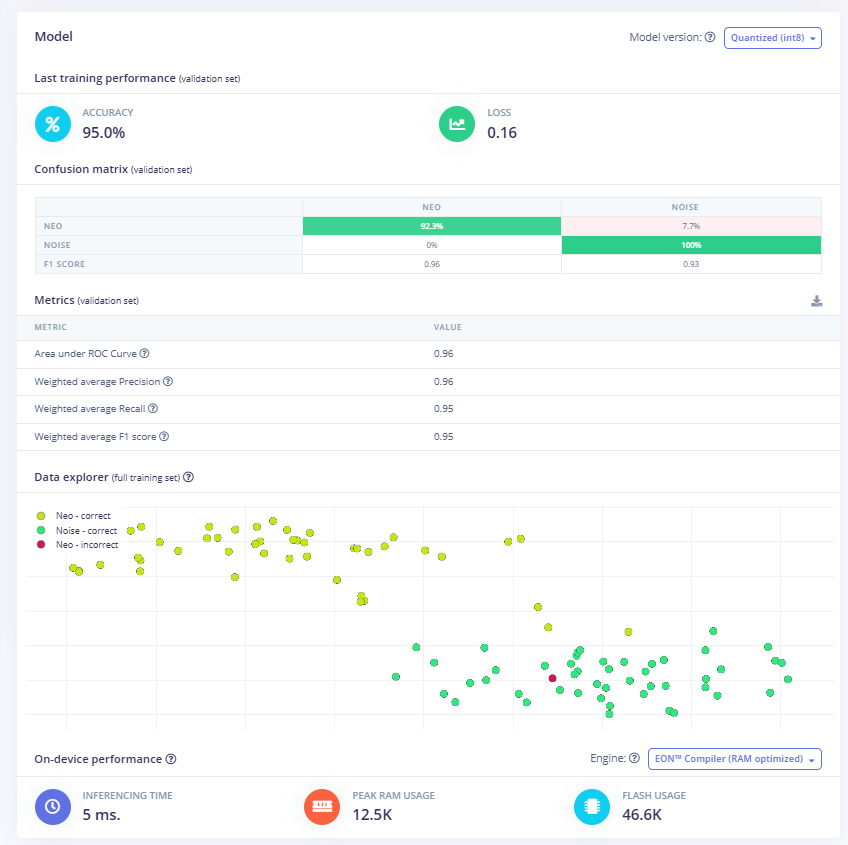
Fig 11: Confusion Matrix of the Model
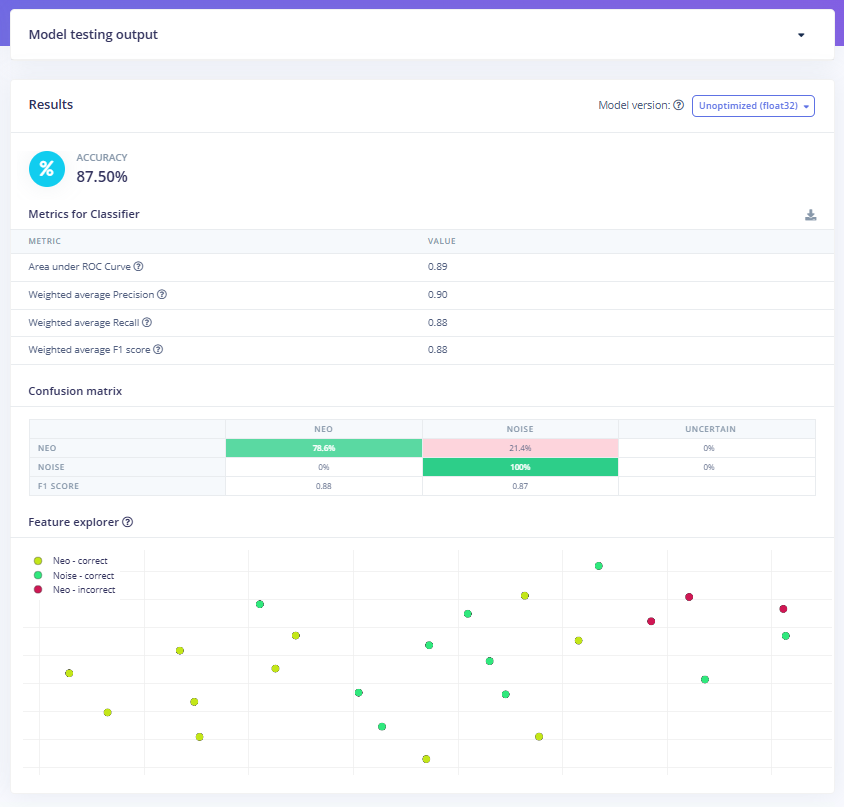
Fig 12: Results of the Model on the Testing Data
Deploying to Your Android Device
Time to get your trained model running on actual hardware. We’ll transform your Edge Impulse model into a working Android app that listens for your custom wake word.Getting Your Model from Edge Impulse
In your Edge Impulse project, head to the Deployment tab and select the C++ library with TensorFlow Lite enabled. This combination gives you the best mobile performance since TensorFlow Lite is built specifically for phones and tablets. In the model optimization section, we can see quantized (int8) and unquantized (float32) options. Quantized models are represented in less precise numbers, such as int8, but provide better performance with some accuracy loss.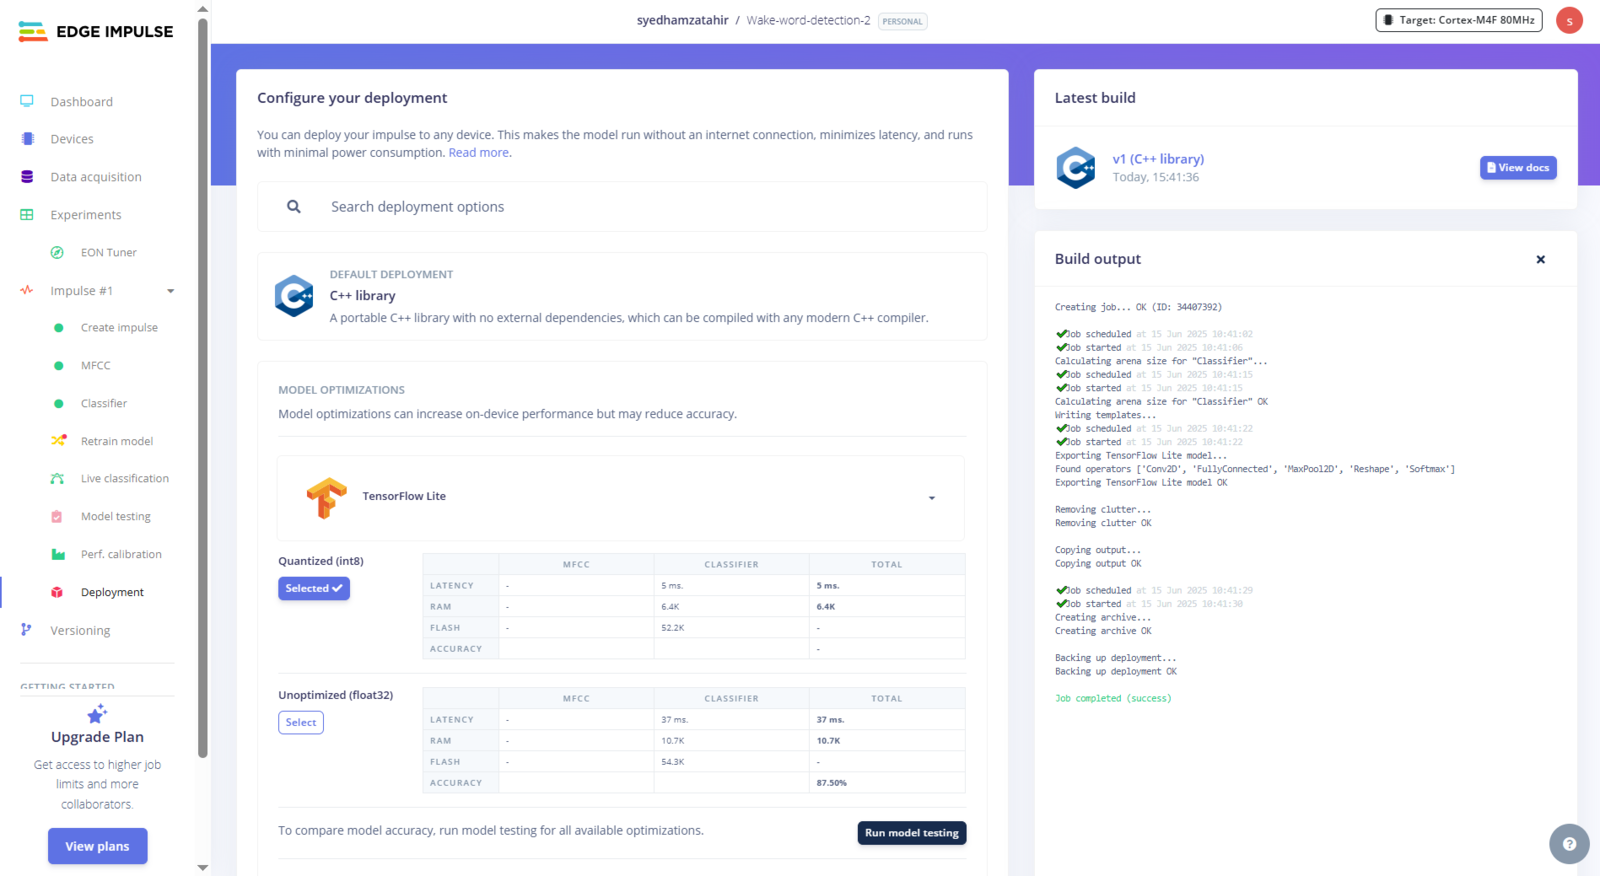
Fig 13: Building C++ library with TensorflowLite Enabled for Optimizations
-
tflite-model contains your neural network converted to TensorFlow Lite format. The
.tflite filesare compressed and optimized versions of your trained model, plus C++ wrapper code that handles loading and running inference. - edge-impulse-sdk is your signal processing toolkit. It includes all the DSP blocks and feature extraction code that convert raw audio into the features your model expects, including MFCC calculators and the core runtime.
- model-parameters holds metadata about your model, including input shapes, output classes, and sampling rates. This ensures your Android app processes audio exactly like your training data.
- CMakeLists.txt is the build configuration, designed for embedded systems. We’ll need to modify this for Android.
Setting Up the Android Project
Create a new Android project in Android Studio using Java. Since your Edge Impulse model is C++ code, you need Android’s NDK to bridge between Java and native code. In your app’ssrc/main directory, create a cpp folder and copy these three directories from your Edge Impulse export:
- tflite-model/
- edge-impulse-sdk/
- model-parameters/
Writing the Android CMakeLists.txt
CMake acts as a translator between your source code and the final compiled library. It figures out which files need to be compiled, in what order, and how they should be linked together. The provided CMakeLists.txt won’t work with Android’s build system. In general, CMake compiles thousands of source files from the Edge Impulse SDK and links your code with TensorFlow Lite and other performance libraries. Here’s our version:CMakeLists.txt, you’d hit hundreds of build errors. The Edge Impulse SDK relies on precise compiler flags, include paths, and libraries like XNNPACK (for faster inference) and Ruy (for optimized matrix operations).
File organization is also critical as CMake needs to locate CMSIS-DSP, Edge Impulse utilities, and TensorFlow Lite components in the right order. For more information, visit the Android inferencing example.
To compile and link your C++ inference code with TensorFlow Lite, we need to install the native TensorFlow Lite C++ static library (libtensorflow-lite.a) for Android ARM64.For that, clone the repo and run the script:
tensorflow-lite directory contains the source code and headers for the TensorFlow Lite runtime. This is essential for running on-device inference.
Building the JNI Bridge
JNI (Java Native Interface) is Android’s way of letting Java code interact with C++ code. Your Android app captures audio and handles the user interface in Java, but your machine learning model runs in C++. JNI creates a bridge between these two environments. Createnative-lib.cpp in your cpp directory. This connects your Java code to the Edge Impulse inference engine:
getModelInfo function helps verify that your model is loaded correctly. The main classifyAudio function takes audio samples from Java, wraps them in Edge Impulse’s signal structure, runs inference, and returns classification probabilities. Edge Impulse uses a callback pattern for audio data rather than direct memory access. This allows efficient streaming and better memory management.
Android Build Configuration
Add NDK support to your app-levelbuild.gradle:
Interface-related Code with Java
This Android app creates a real-time audio classification interface that connects to a native C++ library through JNI (Java Native Interface).Key Imports and JNI Setup
System.loadLibrary("audiospot") loads the compiled native library, and the native method declarations create the bridge to C++ functions that handle the actual ML inference.
Audio Processing and Classification
To capture the audio, the AudioRecord object captures live microphone input at a 48 kHz sample rate (the same frequency as the input size). TheaudioRecord.read() method fills the buffer with raw audio samples from the device microphone.
classifyAudio() method via JNI, receives confidence scores back, and updates the UI based on the detection thresholds. If the confidence exceeds 70% probability, then the wake word will be detected. We can change this threshold according to our use case.