Introduction
Out of millions of images from automated wildlife cameras, most (∼50–70%) contain no animals. Manually sorting this flood of “false positive” frames is a huge bottleneck. Edge AI models running on a device can incorrectly flag frames as “animal” or “no animal” for a variety of reasons, such as vegetation movement, shadows, or blurry motion for wildlife when confidence scores are low. To fix this, we will create an edge intelligence pipeline: first, run a lightweight image classifier on-device using Edge Impulse to generate binary predictions with confidence. Then, feed each prediction, along with its context, into a local LLM. The LLM “reasoning” uses temporal and spatial clues to decide if a detection is likely real. In practice, this triage frames into high-priority (true wildlife), low-priority (doubtful), or auto-reject, vastly reducing manual review effort.Problem Overview
Camera traps are motion- or heat-activated cameras used by biologists to monitor animal populations and behavior. When triggered, they capture image sequences at about one frame per second, but often produce empty frames due to false triggers from wind or ground heat.- High false-positive rate: Camera traps trigger on wind, heat, or moving shadows, so a large majority of images are empty. For example, one survey found ~70% of camera-trap photos contained no animals. Scientists waste many hours scrolling past leaves or grass.
- Limited signals: A raw edge inference score (e.g., “animal” at 67% confidence) isn’t enough. Low-to-medium confidence cases (e.g, distant or partially seen deer) are ambiguous, and simple thresholds can’t distinguish a real animal from, say, rustling bush.
- No context: Pure vision classifiers ignore sequence and location patterns. They don’t know that the same camera just saw an animal 30 seconds ago, or that it’s been triggered every dusk in the past week. These clues could turn a so-so score into a “likely true event” or vice versa.
Architecture
The system uses a two-tier inference architecture that processes images captured by the camera. In the first stage, a lightweight edge model classifies each image as either containing an animal or not. Images with confidence scores near the decision threshold are then passed to a second stage, where an LLM evaluates the detection using contextual information and determines whether it represents a genuine animal event or a false positive.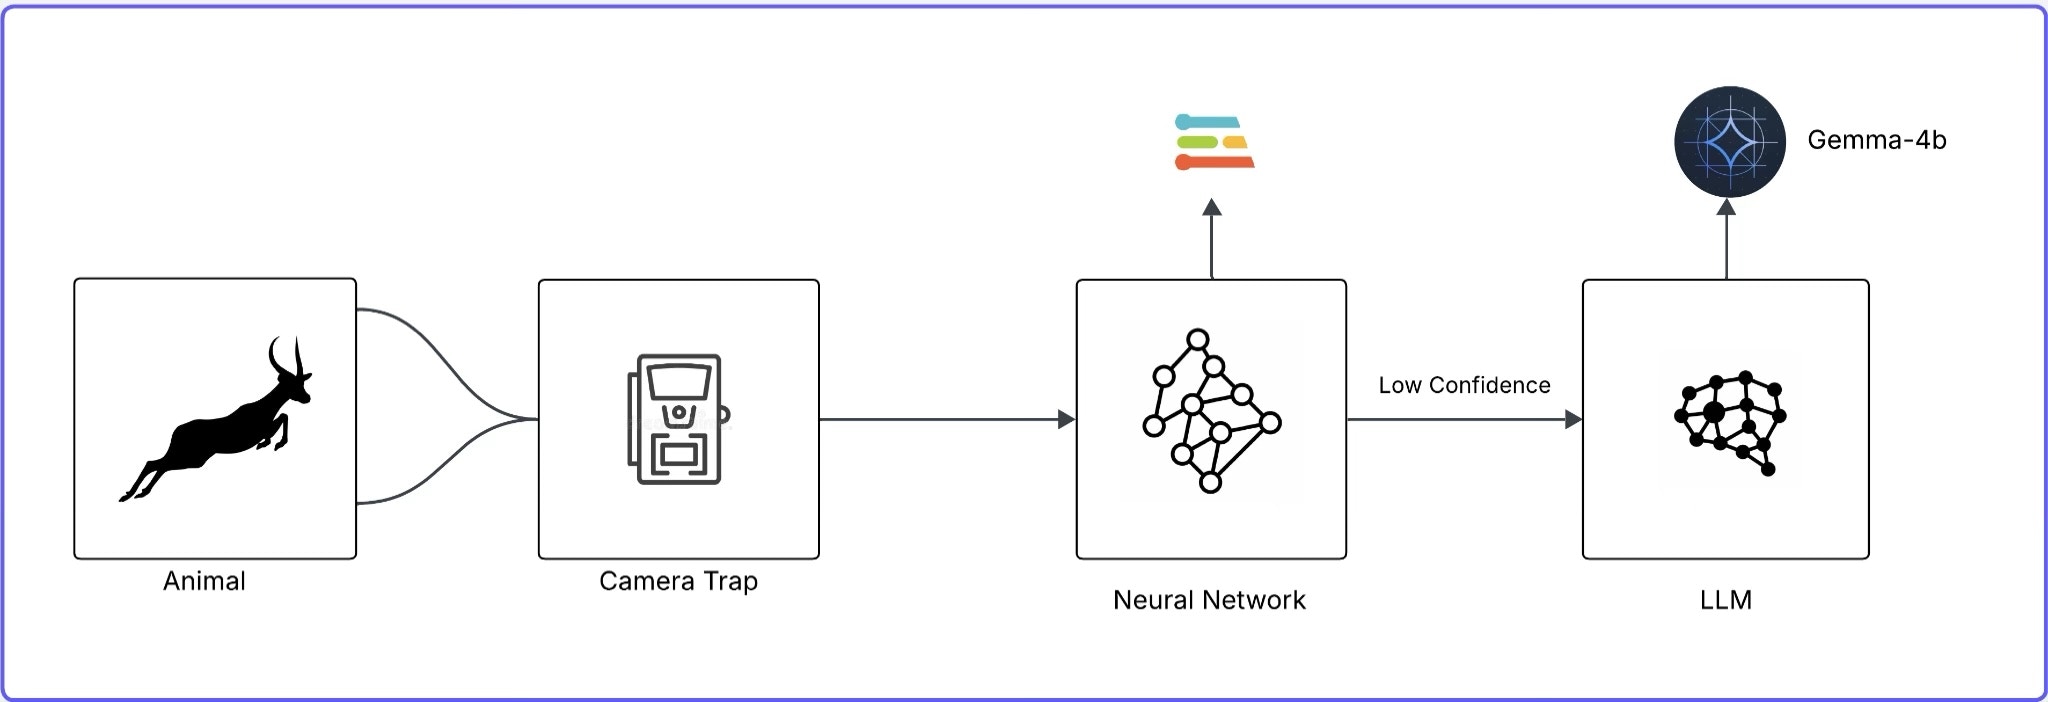
Architecture of a Two-Tier Inference System for Image Classification
- Dataset: We use the WCS Camera Traps dataset (∼1.4M images, 675 species, 12 countries). It includes every image’s timestamp, camera ID/location, and (for many) species labels. Roughly half the images are empty, providing abundant negative examples. This rich metadata lets us simulate and test our pipeline logic on real-world data.
- Edge Inference Layer: We train a simple binary classifier (animal vs. no-animal) using Edge Impulse. In practice, this runs on the Pi to flag images. For this article, we simulate its outputs: each image gets a “predicted class” and a confidence score. In a real setup, you’d deploy the model to your camera hardware or edge device.
- LLM Interpretation: We run a local LLM (Gemma 3 4B via Ollama) on the same device. Gemma is multimodal and supports long context. For each detection, we send a prompt combining the model’s label/confidence and the image’s metadata (time, camera, recent history). Gemma3 then reasons about it – e.g., if the prediction is uncertain and no animal was seen nearby in time, it may label it a false trigger; if confidence is high and similar frames triggered recently, it flags a genuine event. Using an LLM like this adds temporal/spatial intelligence that fixed ML models lack.
Implementation
This section is divided into two parts. The first part is relevant to the simple classifier model using Edge Impulse. Let’s start with the setup:Edge Impulse Project Setup
First, create a new Edge Impulse project in the Edge Impulse Studio. Log in to Edge Impulse Studio and make a new project: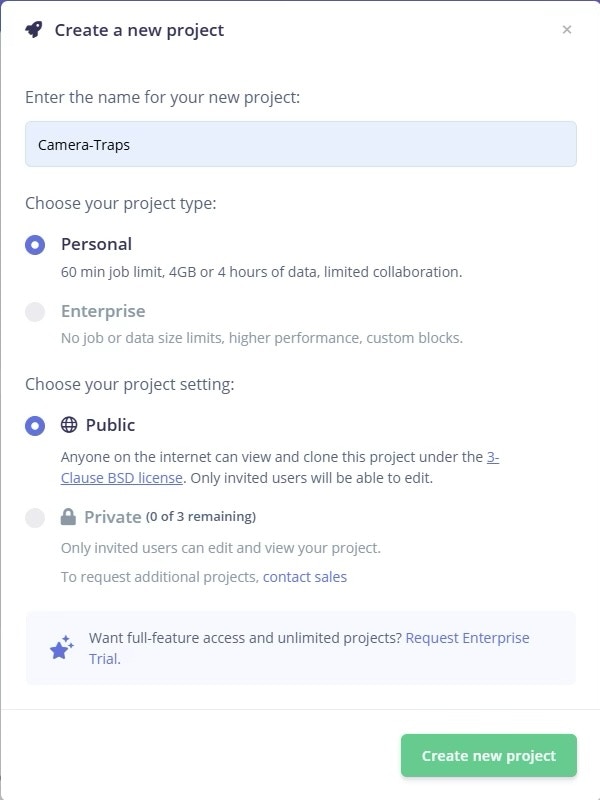
Creating a New Project in Edge Impulse
Building Your Camera Trap Image Dataset
The WCS Camera Traps dataset contains images captured by motion-triggered wildlife cameras, including both true animal detections and a large number of empty or false-trigger frames. For this work, we use the Hugging Face–hosted LILA Camera Traps dataset, which provides structured annotations and direct image URLs, avoiding manual JSON parsing. The dataset is loaded using thedatasets library with the Caltech Camera Traps configuration. Here’s the code snippet:
- image: URL of the camera trap image
- annotations.taxonomy: A taxonomy dictionary describing biological classification
- seq_id / frame_num: Sequence and temporal metadata (not used at this stage)
- No-animal: All taxonomy fields are
None - Animal: At least one taxonomy field is populated
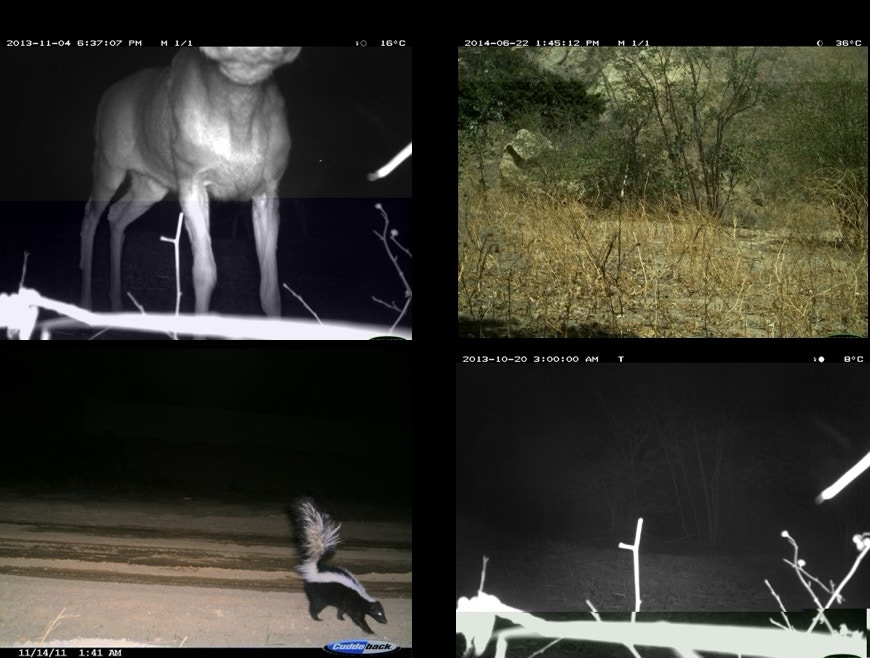
The left column shows images of animals, while the right column shows images of non-animals.

Uploading the Dataset on Edge Impulse
Image Processing Pipeline Design
Once the dataset is prepared and labeled, the next step is to design the Impulse using the Impulse Design tab. Here’s how our design looks: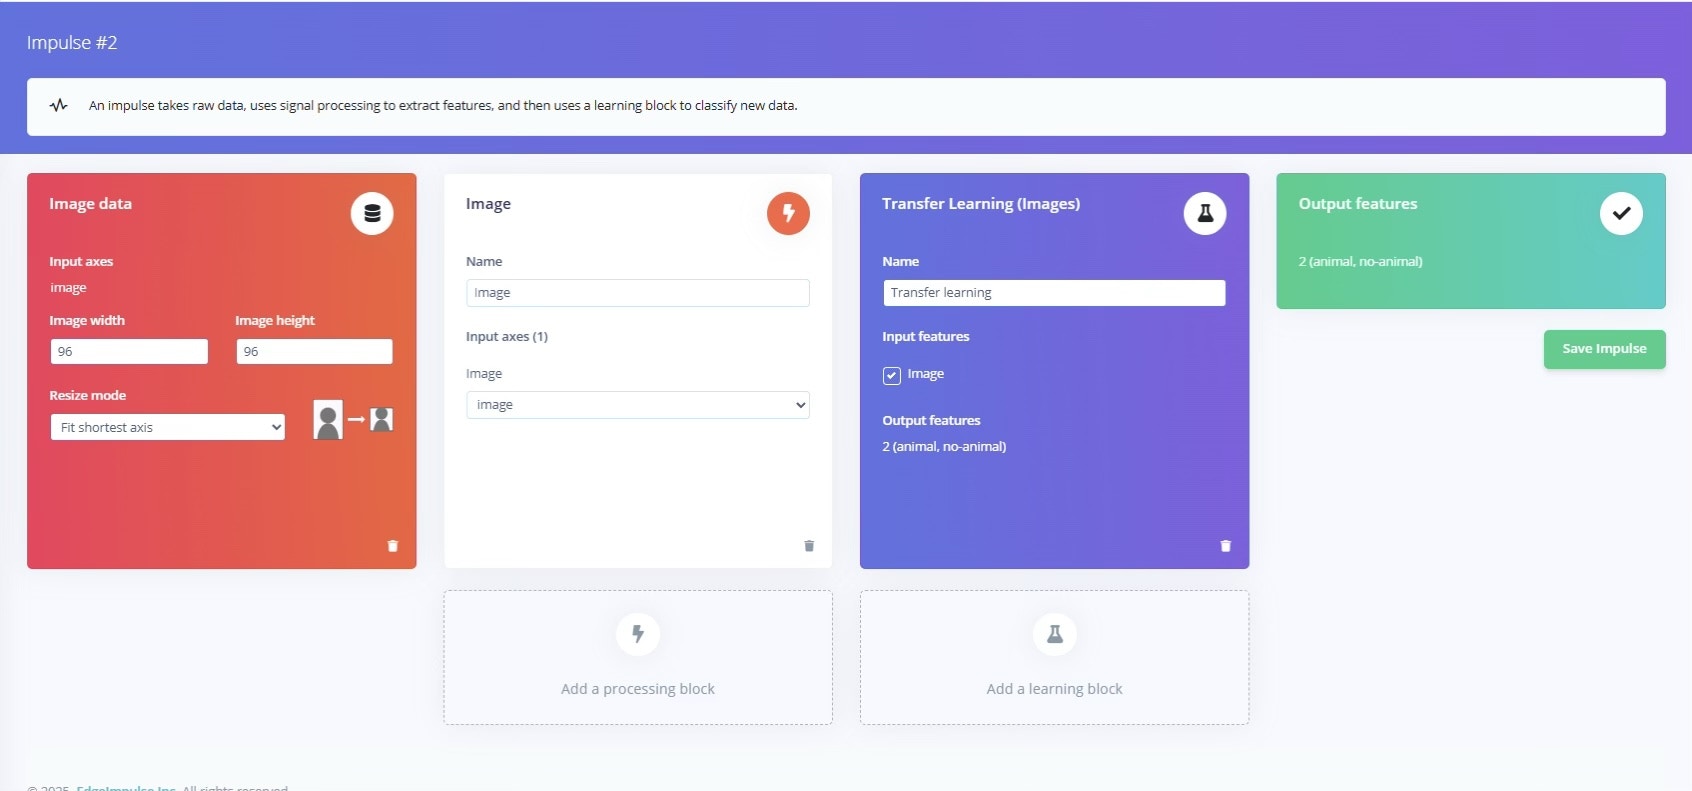
The Image Processing and Classification Impulse Design
- Processing block: Configure the input dimensions to balance accuracy and speed: for a Raspberry Pi, 96×96 or 128×128 pixels is a good start. Choose RGB color unless you find that grayscale actually helps by reducing background color noise.
- Configuration: Click on the Images block and check the raw input vs. the processed output. You can toggle between RGB and grayscale to compare. In our case, we left color depth at RGB and clicked Save parameters.
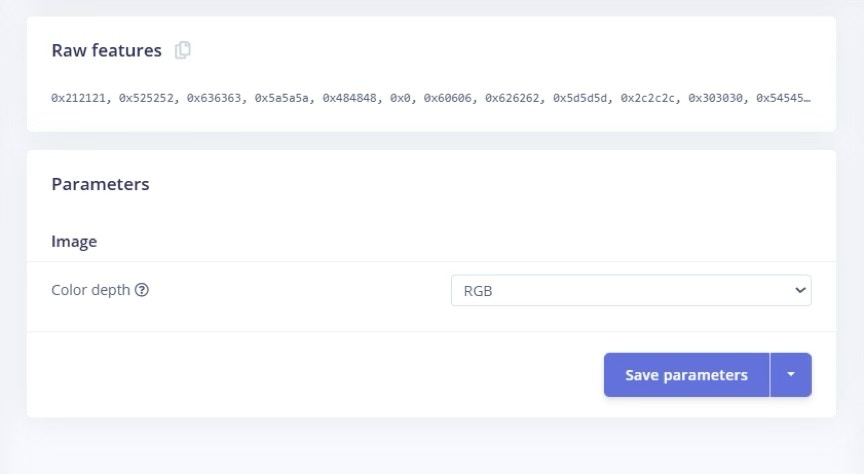
Configuring the Color Depth and Saving Parameters
- Normalization: The Images block automatically normalizes pixel values (0–1) and resizes the images. You generally don’t need custom code here; Edge Impulse handles it.
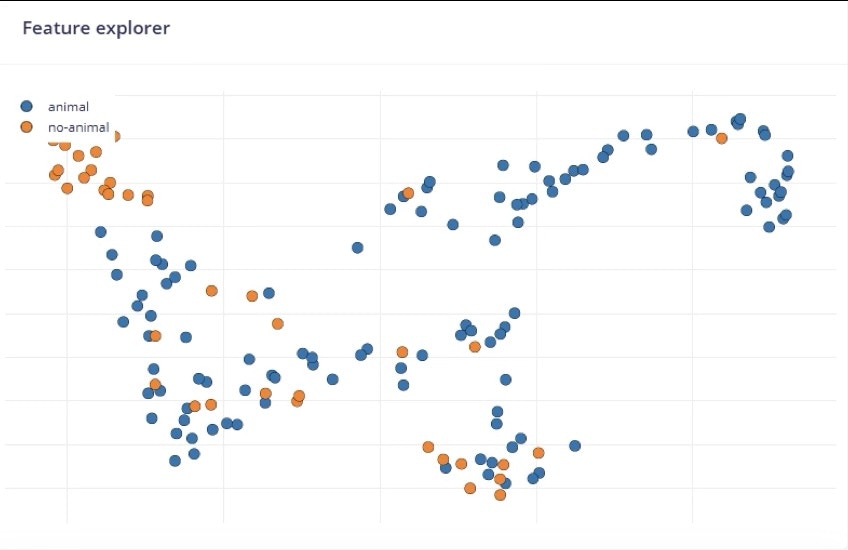
Feature Explorer on the Animal vs Not-Animal Dataset
Neural Network Training and Optimization
After generating the features of the images, we will now train the classifier. Here are the steps: Choose a model: We used transfer learning on MobileNetV2 with a lightweight CNN suited for edge devices. Edge Impulse makes this easy with its Transfer Learning (Images) block. These models are already trained on general images, so we only retrain the last layers on “animal vs. not animal.” Training parameters: In Edge Impulse’s Transfer Learning settings, set a reasonable number of epochs (e.g., 50 cycles) and a learning rate around 0.0005. You can enable Data augmentation here to help generalize the dataset if needed. Monitor the training accuracy vs. validation accuracy; if the model quickly overfits (train >> val), try fewer epochs or stronger augmentation. Evaluate performance: After training, Edge Impulse shows the final accuracy and a confusion matrix.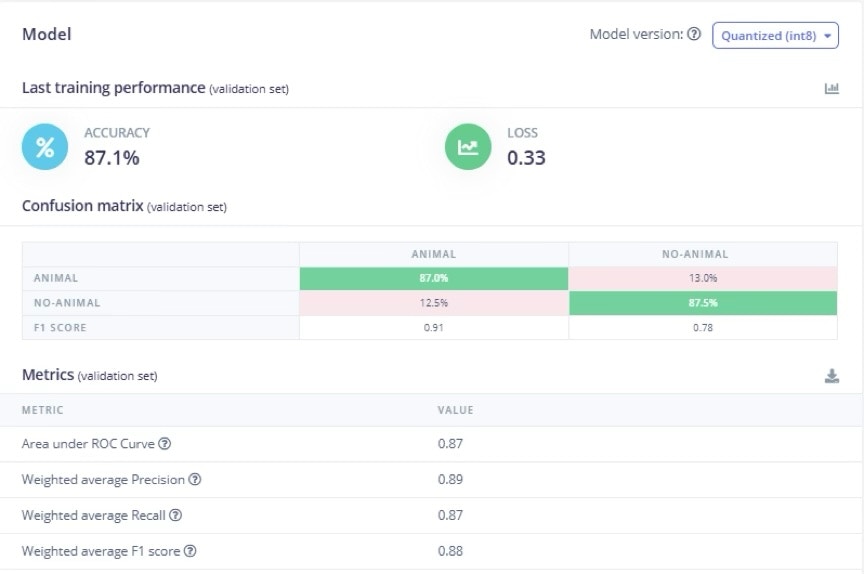
Results & Confusion Matrix of the Model on the Validation Set
Model Testing and Validation
This is sort of the final test of the model. The test is on the hold-out Testing set. Use Edge Impulse’s built-in testing tools to run the trained model on all your test images. It will display overall accuracy and per-class error rates. Focus on the false-positive rate: what percentage of empty frames are still wrongly flagged as “animal”? A high false-positive rate means too much manual review, so our goal is to minimize it, even if it costs a few more false negatives. Here are some tips and features of Edge Impulse to help improve your score: Cross-condition checks: If you have data from different cameras or times, test on those. For instance, take a batch of images from a forest site in the rainy season (the WCS Camera Trap dataset has a lot of images) and see how the model performs. This checks generalization. Metrics report: Record key metrics (precision, recall) for both classes. Edge Impulse provides them in the UI. You might export these or take screenshots of the confusion matrix. This report establishes a baseline. Iterate if needed: If the model misses too many animals or flags too many blanks, go back and improve data/augmentation. For example, increase the animal confidence threshold to reduce false alarms. Retrain and retest until you’re satisfied that the on-device model is reasonably solid. After this step, you will have a simple classification model ready to be deployed on a Raspberry Pi.Deployment to Raspberry Pi
For deployment, go to Edge Impulse Studio, go to Deployment → Linux AARCH64. Build the “Impulse” for Linux; it will generate a downloadable.eim file containing your model.
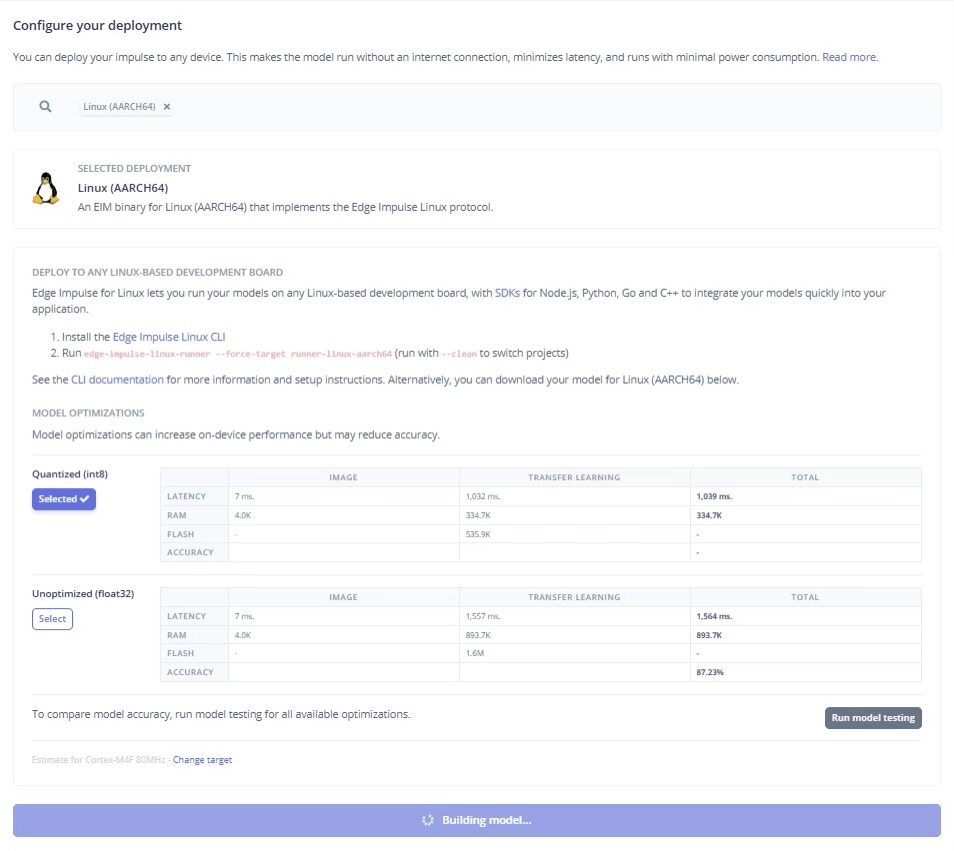
Deployment of the Model by Building it for Linux(AARCH64)
Setting up the LLM
Ensure the Raspberry Pi has Python 3.9+ installed. Install Ollama (a local LLM runner) by running their install script:ollama command-line tool and background service. For the model, pull or run the quantized Gemma 4B model. For instance:
requests to talk to Ollama’s local API, and pandas to handle the metadata.
At this point, the Pi has the LLM ready to serve. Ollama runs an HTTP API on localhost (port 11434 by default) that mimics OpenAI’s Chat API. This lets us do prompt-driven tasks on-device with privacy and no internet connection. In summary, we have a local ML model (Edge Impulse) producing outputs, and a local LLM (Gemma) ready to process text prompts – all offline.
Running the Two-Tier Edge–LLM Inference Pipeline
Once the Edge Impulse model is trained and downloaded, inference runs entirely on a Linux device such as a Raspberry Pi using the Edge Impulse Linux Python SDK. The edge model performs fast animal detection, and only uncertain predictions are forwarded to a local LLM running via Ollama.Set up for Linux Python SDK
Some libraries required by the SDK (e.g., for audio or cameras) need native Linux packages first. On the Raspberry Pi:edge-impulse-linux:
.eim model in Python. To download the .eim onto your Pi, run the following on the CLI if you did not already do so earlier in this tutorial:
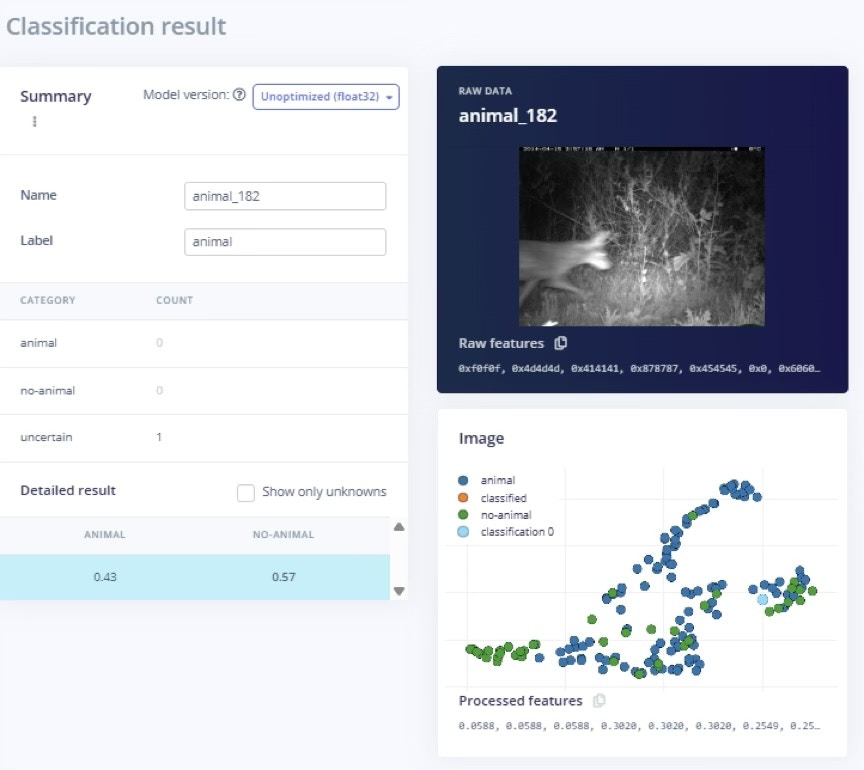
False Positive Classification of the Animal