

Knowledge requiredThis guide assumes you have some familiarity with C and the GNU Make build system. We will demonstrate how to run an impulse (e.g. inference) on Linux, macOS, or Windows using a C program and Make. We want to give you a starting point for porting the C++ library to your own build system.
Prerequisites
You will need a C compiler, a C++ compiler, and Make installed on your computer.Linux
Install gcc, g++, and GNU Make. If you are using a Debian-based system, this can be done with:macOS
Install LLVM and GNU Make. If you are using Homebrew, you can run the following commands:Windows
Install MinGW-w64, which comes with GNU Make and the necessary compilers. You will need to add the mingw64\bin folder to your Path.Download the C++ Library from Edge Impulse
You are welcome to download a C++ library from your own project, but you can also follow along using this public project. If you use the public project, you will need to click Clone this project in the upper-right corner to clone the project to your own account. Head to the Deployment page for your project. Select C++ library. Scroll down, and click Build. Note that you must have a fully trained model in order to download any of the deployment options.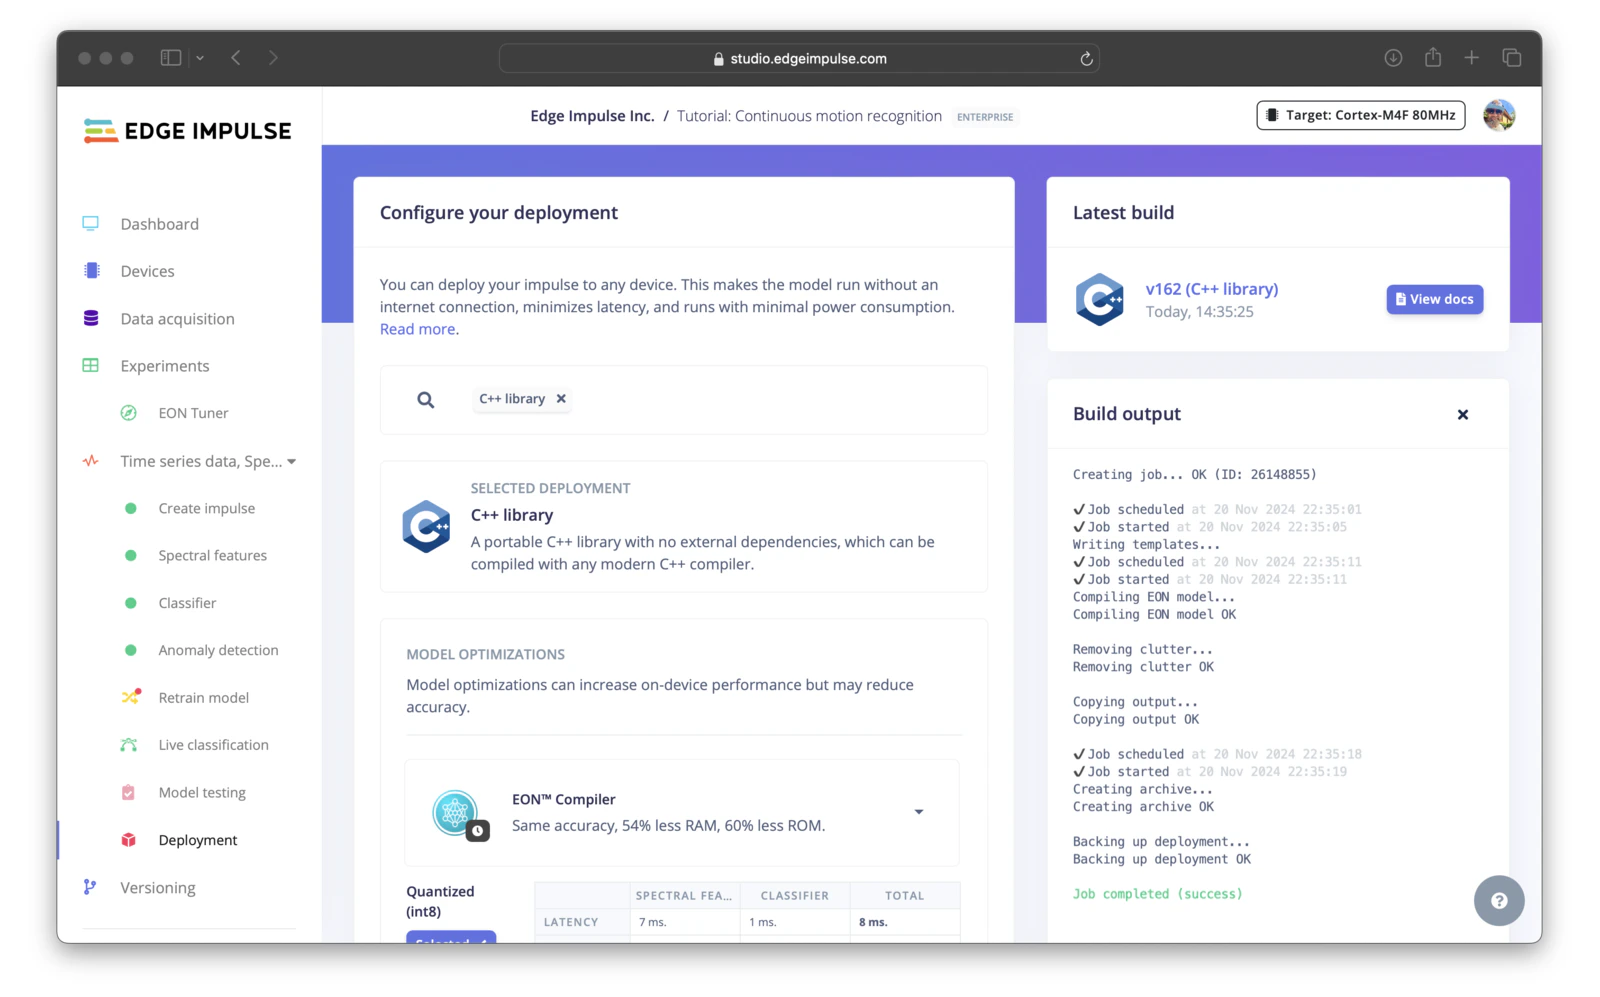
Studio deployment page with C++ library selected
Create a Project
The easiest way to test the impulse library is to use raw features from one of your test set samples. When you run your program, it should print out the class probabilities that match those of the test sample in the Studio. Create a directory to hold your project (e.g. my-motion). Unzip the C++ library file into the project directory. Your directory structure should look like the following:Explanation of C++ Library
The CMakeLists.txt file is used as part of the CMake build system generation process. We won’t use CMake in this demonstration, but see here for such an example. edge-impulse-sdk/ contains the full software development kit (SDK) required to run your impulse along with various optimizations (e.g. ARM’s CMSIS) for supported platforms. edge-impulse-sdk/classifier/ei_run_classifier.h contains the important public functions that you will want to call. Of the functions listed in that file, you will likely only need a few:- run_classifier() - Basic inference: we pass it the raw features and it returns the classification results.
- run_classifier_init() - Initializes necessary static variables prior to running continuous inference. You must call this function prior to calling
run_classifier_continuous() - run_classifier_continuous() - Retains a sliding window of features so that inference may be performed on a continuous stream of data. We will not explore this option in this tutorial.
run_classifier() and run_classifier_continuous() expect raw data to be passed in through a signal_t struct. The definition of signal_t can be found in edge-impulse-sdk/dsp/numpy_types.h. This struct has two properties:
total_length- total number of values, which should be equal toEI_CLASSIFIER_DSP_INPUT_FRAME_SIZE(from model-parameters/model_metadata.h). For example, if you have an accelerometer with 3 axes sampling at 100 Hz for 2 seconds,total_lengthwould be 600.get_data- a callback function that retrieves slices of data as required by the preprocessing (DSP) step. Some DSP algorithms (e.g. computing MFCCs for keyword spotting) page raw features in one slice at a time to save memory. This function allows you to store the raw data in other locations (e.g. internal RAM, external RAM, flash) and page it in when required. We will show how to configure this callback function later in the tutorial.
numpy::signal_from_buffer() (found in edge-impulse-sdk/dsp/numpy.h) to construct the signal_t for you.
model-parameters/ contains the settings for preprocessing your data (in dsp_blocks.h) and for running the trained machine learning model. In that directory, model_metadata.h defines the many settings needed by the impulse. In particular, you’ll probably care about the following:
EI_CLASSIFIER_DSP_INPUT_FRAME_SIZE- Number of raw elements in the array expected by the pre-processor inputEI_CLASSIFIER_FREQUENCY- Sampling frequency of the sensorEI_CLASSIFIER_LABEL_COUNT- Number of classifier labels
ei_classifier_inferencing_categories[] if you need the labels for your categories in string form.
tflite-model/ contains the actual trained model stored in an array. You should not need to access any of the variables or functions in these files, as inference is handled by the impulse library.
Signal Structure
Raw data data being passed torun_classifier() or run_classifier_continuous() is known as a “signal” and is passed in through a signal_t struct. Signals are always a flat buffer, so you must flatten any sensor data to a 1-dimensional array.
Time-series data with multiple axes are flattened so that the value from each axis is listed from each time step before moving on to the next time step. For example, here is how sensor data with 3 axes would be flattened:
Resizing imagesWe always recommend that you configure your camera driver to output images in the correct size (the input size chosen in Studio) for best performance. However, if for debug or other reasons you have a larger frame than you want to run inference on, you can use this function from the edge-impulse-sdk to resize. It can operate in place, as in this example, but you must be mindful of the buffer size. In the case of using “fit longest” mode in the Create Impulse view from Edge Impulse Studio, the resized buffer can actually be larger than the input buffer (because of the letterboxing resizing method). The constant parameters are all pulled from the already included edge-impulse-sdk header file, that are set by Studio when you export your project.See this example repo for more details.
Static Allocation
By default, the trained model resides mostly in ROM and is only pulled into RAM as needed. You can force a static allocation of the model by defining:run_impulse. If you want to adjust the size of the buffer that is used to read from the signal in this case, you can set EI_DSP_IMAGE_BUFFER_STATIC_SIZE, which also allocates the buffer statically. For example, you might set:
Create an Application
Open main.cpp in your editor of choice. Paste in the following code: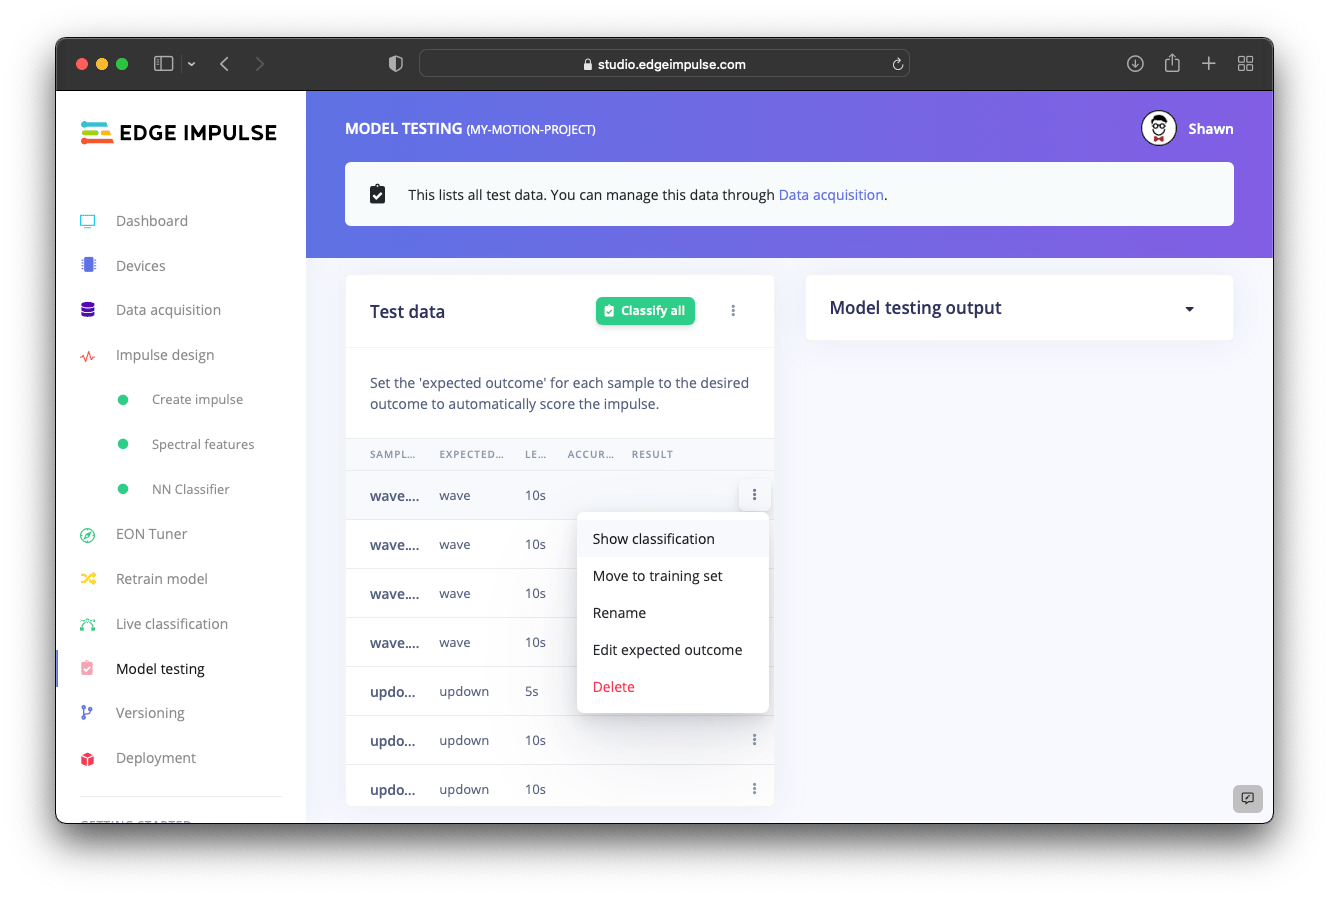
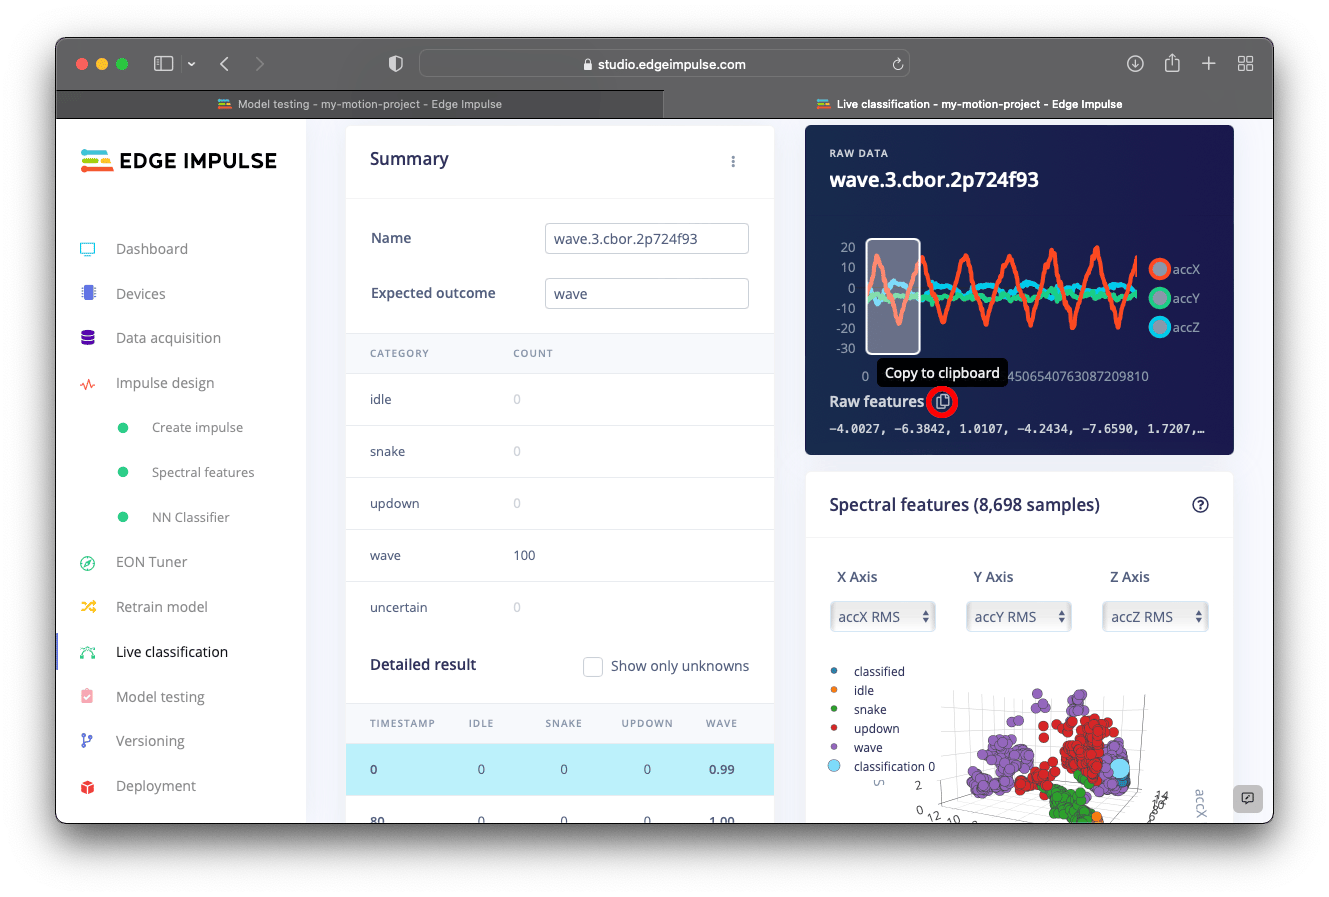
input_buf array. Note that this buffer is constant for this particular program. However, it demonstrates how you can fill an array with floating point values from a sensor to pass to the impulse SDK library.
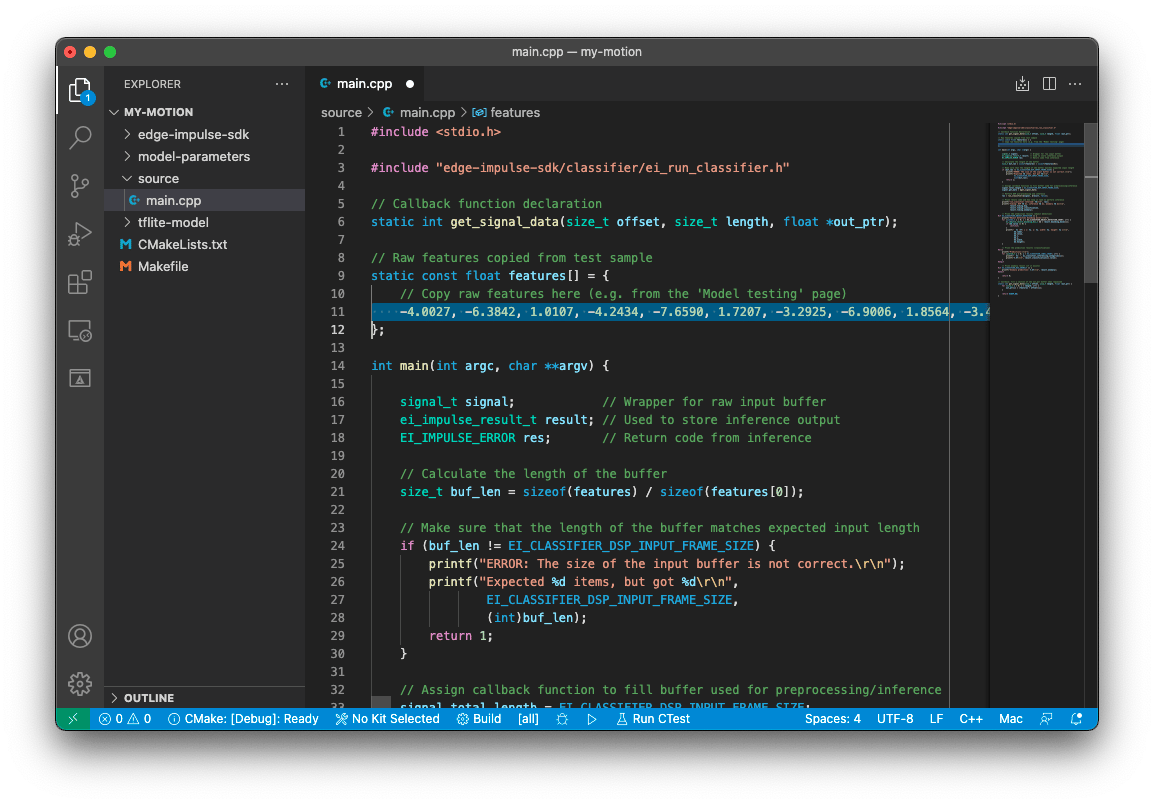
features[] array with values from a connected sensor.
Important! Make sure that the length of the array matches the expected length for the preprocessing block in the impulse library. This value is given by EI_CLASSIFIER_DSP_INPUT_FRAME_SIZE (which is 200 values * 3 axes = 600 total values for the given window in our case). Also note how the values are stored: {x0, y0, z0, x1, y1, z1, ...}. You will need to construct a similar array if you are sampling live data from a sensor.
Save your main.cpp.
Explanation of Main Application
Before moving on to the Makefile, let’s take a look at the important code sections in our application. To use the C++ library, we really only need to include one header file to use the impulse SDK:ei_run_classifier.h file includes any other files we might need from the library and gives us access to the necessary functions.
The run_classifier() function expects a signal_t struct as an input. So, we set the members here:
signal.total_length is the number of array elements in the input buffer. For our case, it should match the expected total number of elements (EI_CLASSIFIER_DSP_INPUT_FRAME_SIZE).
signal.get_data must be set to a callback function. run_classifier() will use this callback function to grab data from our buffer as needed. It is up to you to create this function. Let’s take a look at the simplest form of this callback:
offset and length will be for any given call, but we must be ready with valid data. We do know that this function will not attempt to index beyond the provided signal.total_length amount.
The callback structure is used here so that data can be paged in from any location (e.g. RAM or ROM), which means we don’t necessarily need to save the entire sample in RAM. This process helps save precious RAM space on resource-constrained devices.
With our signal_t struct configured, we can call our inference function:
run_classifier() will perform any necessary preprocessing steps (such as computing the power spectral density) prior to running inference. The inference results are stored in the second argument (of type ei_impulse_result_t). The third parameter is debug, which is used to print out internal states of the preprocessing and inference steps. We leave debugging disabled in this example. The function should return a value equal to EI_IMPULSE_OK if everything ran without error.
We print out the time it took (in milliseconds) to perform preprocessing (“dsp”), classification, and any anomaly detection we had enabled:
result.classification[i].value where i is the index of our label. Labels are stored in alphabetical order in ei_classifier_inferencing_categories[]. Each prediction value must be between 0.0 and 1.0. Additionally, thanks to the softmax function at the end of our neural network, all of the predictions should add up to 1.0.
If your model has anomaly detection enabled, EI_CLASSIFIER_HAS_ANOMALY will be set to 1. We can access the anomaly value via result.anomaly. Additionally, if you are using an object detection impulse, EI_CLASSIFIER_OBJECT_DETECTION will be set to 1, and bounding box information will be an array stored in result.bounding_boxes[].
Functions That Require Definition
The C++ Inference SDK library relies on several functions to allocate memory, delay the processor, read current execution time, and print out debugging information. The SDK library provides the necessary declarations in edge-impulse-sdk/porting/ei_classifier_porting.h. Throughout the library, you will find these functions being called. However, no definitions are provided because every platform is different in how these functions are implemented. For example, you may want to print debugging information to a console (stdout) or over a UART serial port. By default, Edge Impulse defines these functions for several popular platforms and operating systems, which you can see here. In the example throughout this guide, we include the definitions for POSIX and MinGW (refer to the Makefile section to see how these definitions are included in the build process). If you were to try to build this project for another platform (e.g. a microcontroller), the process would fail, as you are missing these definitions. If your platform is supported by the Edge Impulse C++ Inference SDK, you may include that folder in your C++ sources. A Makefile example of including support for TI implementations might be:- ei_calloc()
- ei_free()
- ei_malloc()
- ei_printf()
- ei_printf_float()
- ei_read_timer_ms()
- ei_read_timer_us()
- ei_sleep()
Create a Makefile
Due to the number of files we must include from the library, it can be quite difficult to call the compiler and linker manually. As a result, we will use a Makefile script and the Make tool to compile all the necessary source code, link the object files, and generate a single executable file for us. Copy the following into your Makefile:Explanation of the Makefile
We’ll look at the important lines in our example Makefile. If you are not familiar with Make, we recommend taking a look at this guide. It will walk you through the basics of creating a Makefile and what many of the commands do. Near the top, we define where the compiler(s) can find the necessary header files:-I flag to the directory that holds edge-impulse-sdk/, model-parameters/, and tflite-model/ so that the build system can find the required header files. If you unzipped your C++ library into a lib/ folder, for example, this flag should be -Ilib/.
We then define a number of compiler flags that are set by both the C and the C++ compiler. What each of these do has been commented in the script:
edge-impulse-sdk/porting/posix/*.c* and edge-impulse-sdk/porting/mingw32/*.c* point to C++ files that provide implementations for the Functions That Require Definition. If you are using something other than a POSIX-based system or MinGW, you will want to change these files to one of the other supported platforms or to your own custom definitions for those functions.
Note the directory locations given in these lists. Many IDEs will ask you for the location of source files to include in the build process. You will want to include these directories (such as edge-impulse-sdk/CMSIS/DSP/Source/TransformFunctions/, etc.).
If you unzipped the C++ library into a different location (e.g. into a separate lib/ directory), then all of these source locations should be updated to reflect that. For example, tflite-model/*.cpp would become lib/tflite-model/*.cpp.
To use pure C++ for inference on almost any target with the SDK library, we can use LiteRT (previously Tensorflow Lite) for Microcontrollers (TFLM). TFLM comes bundled with the downloaded library. All we need to do is include it. Once again, note the compiler flag and source files that are added to the lists:
Build and Run
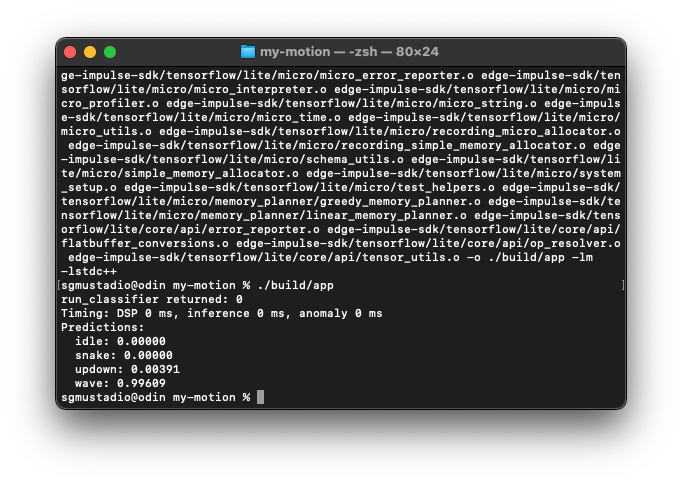
At this point, you’re ready to build your application and run it! Open a terminal (MinGW Shell, if you’re on Windows), navigate to your project directory, and run themake command. You can use the -j [jobs] command to have Make use multiple threads to speed up the build process (especially if you have multiple cores in your CPU):
build/app.exe on Windows.
Take a look at the output predictions–they should match the predictions we saw earlier in the Edge Impulse Studio!
Going Further
This guide should hopefully act as a starting point to use your trained machine learning models on a wide range of platforms (as long as you have access to C and C++ compilers). The easiest method of running live inference is to fillfeatures[] with your raw sensor data, ensure it’s the correct length and format (e.g. float), and call run_classifier(). However, we did not cover use cases where you might need to run inference on a sliding window of data. Instead of retaining a large window in memory and calling run_classifier() for each new slice of data (which will re-compute features for the whole window), you can use run_classifier_continuous(). This function will remember features from one call to the next so you just need to provide the new data. See this tutorial for a demonstration on how to run your impulse continuously.
We recognize that the embedded world is full of different build systems and IDEs. While we can’t support every single IDE, we hope that this guide showed how to include the required header and source files to build your project. Additionally, here are some IDE-specific guides for popular platforms to help you run your impulse locally.