ESP32 compatibilityESP32 sketches are tested with 2.0.4 ESP32 Arduino Core
https://github.com/espressif/arduino-esp32/releases/tag/2.0.4
Knowledge requiredThis tutorial assumes that you’re familiar with the Arduino IDE, and that you’re comfortable building Arduino sketches. If you’re unfamiliar with these tools you can build binaries directly for your development board from the Deployment page in the studio.
Prerequisites
Make sure you followed one of the following tutorials, and have a trained impulse:- Recognizing sounds from audio.
- Keyword spotting.
- Image classification.
- Building a continuous motion recognition system (only for boards with built-in IMU sensor).
- FOMO: Object detection for constrained devices.
Download the Arduino Library
Head over to your Edge Impulse project, and go to Deployment. From here you can create the full library which contains the impulse and all external required libraries. Select Arduino library and click Build to create the library. This will download the arduino-compatible.zip file:
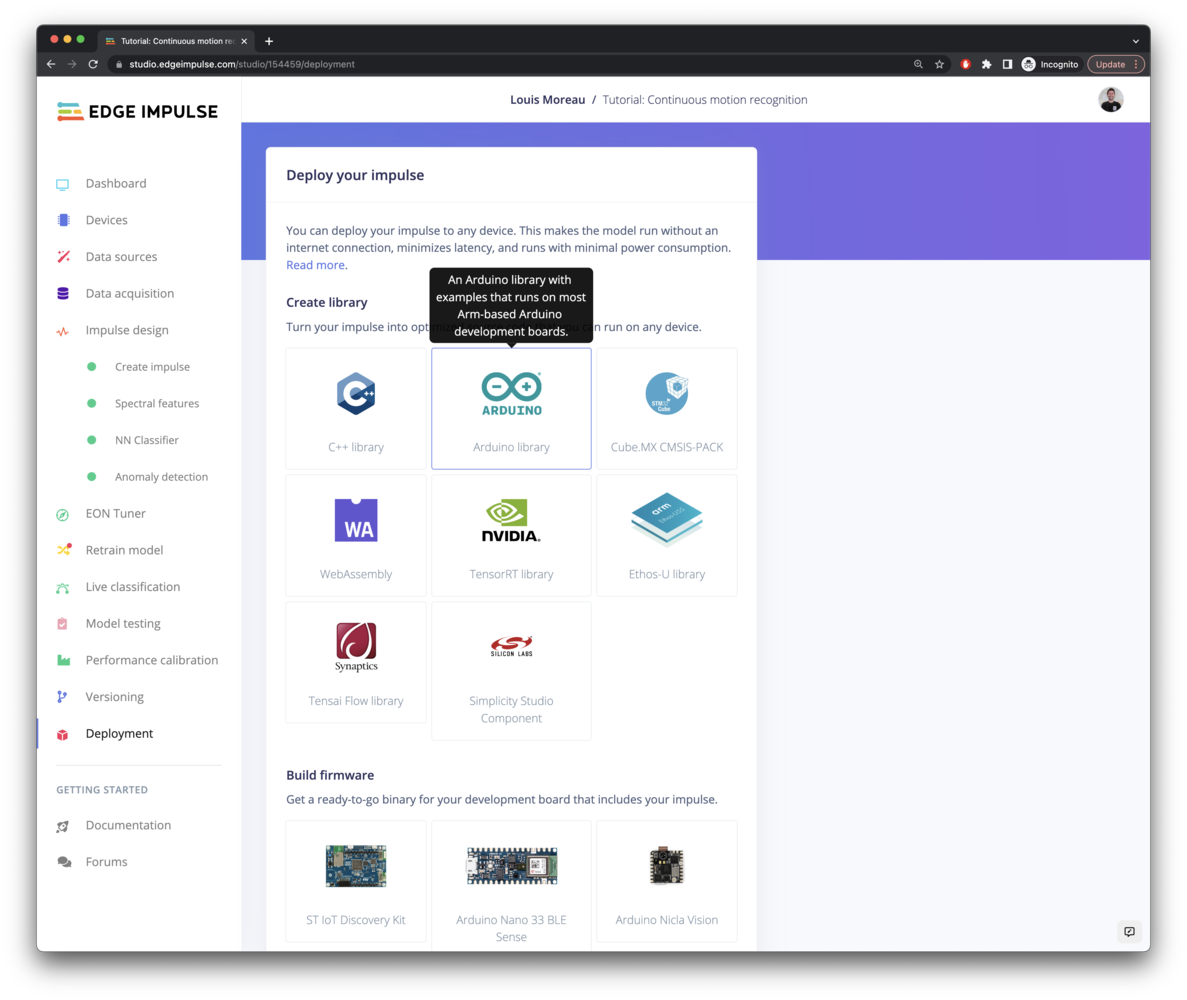
Download Arduino library
Test your impulse the “static buffer” example
Before starting to write code with your custom logic, make sure your impulse runs as expected on your board. This will ensure that you can compile the generated Arduino library containing your impulse and that the inference results are correct. To do so, add the library and open an example, open the Arduino IDE and:-
Choose Sketch > Include Library > Add .ZIP library….
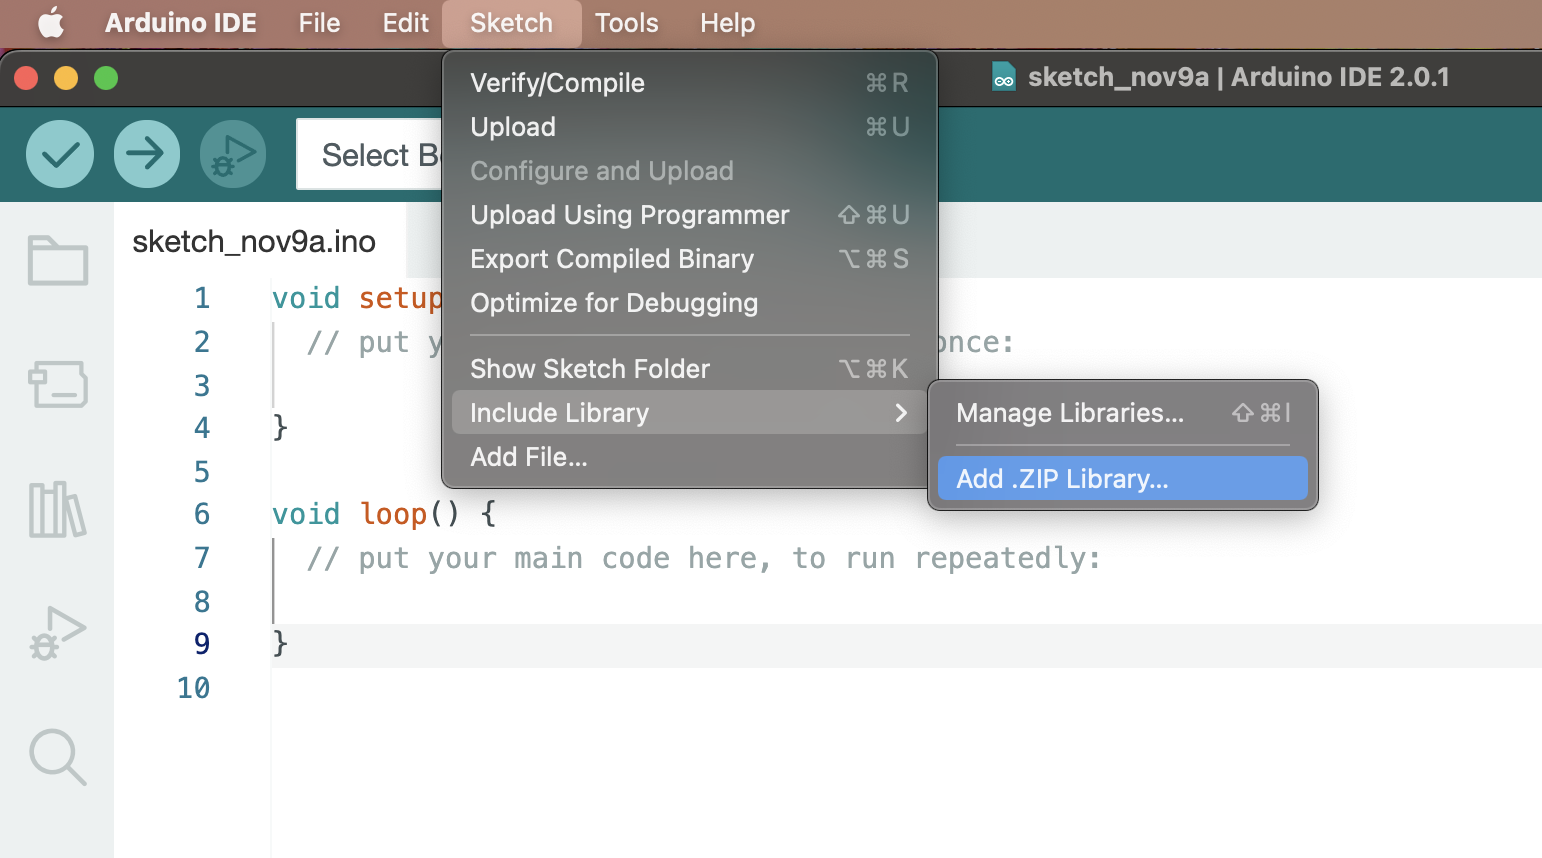
Include .zip library
-
Select the ZIP file, and then click the Choose button.
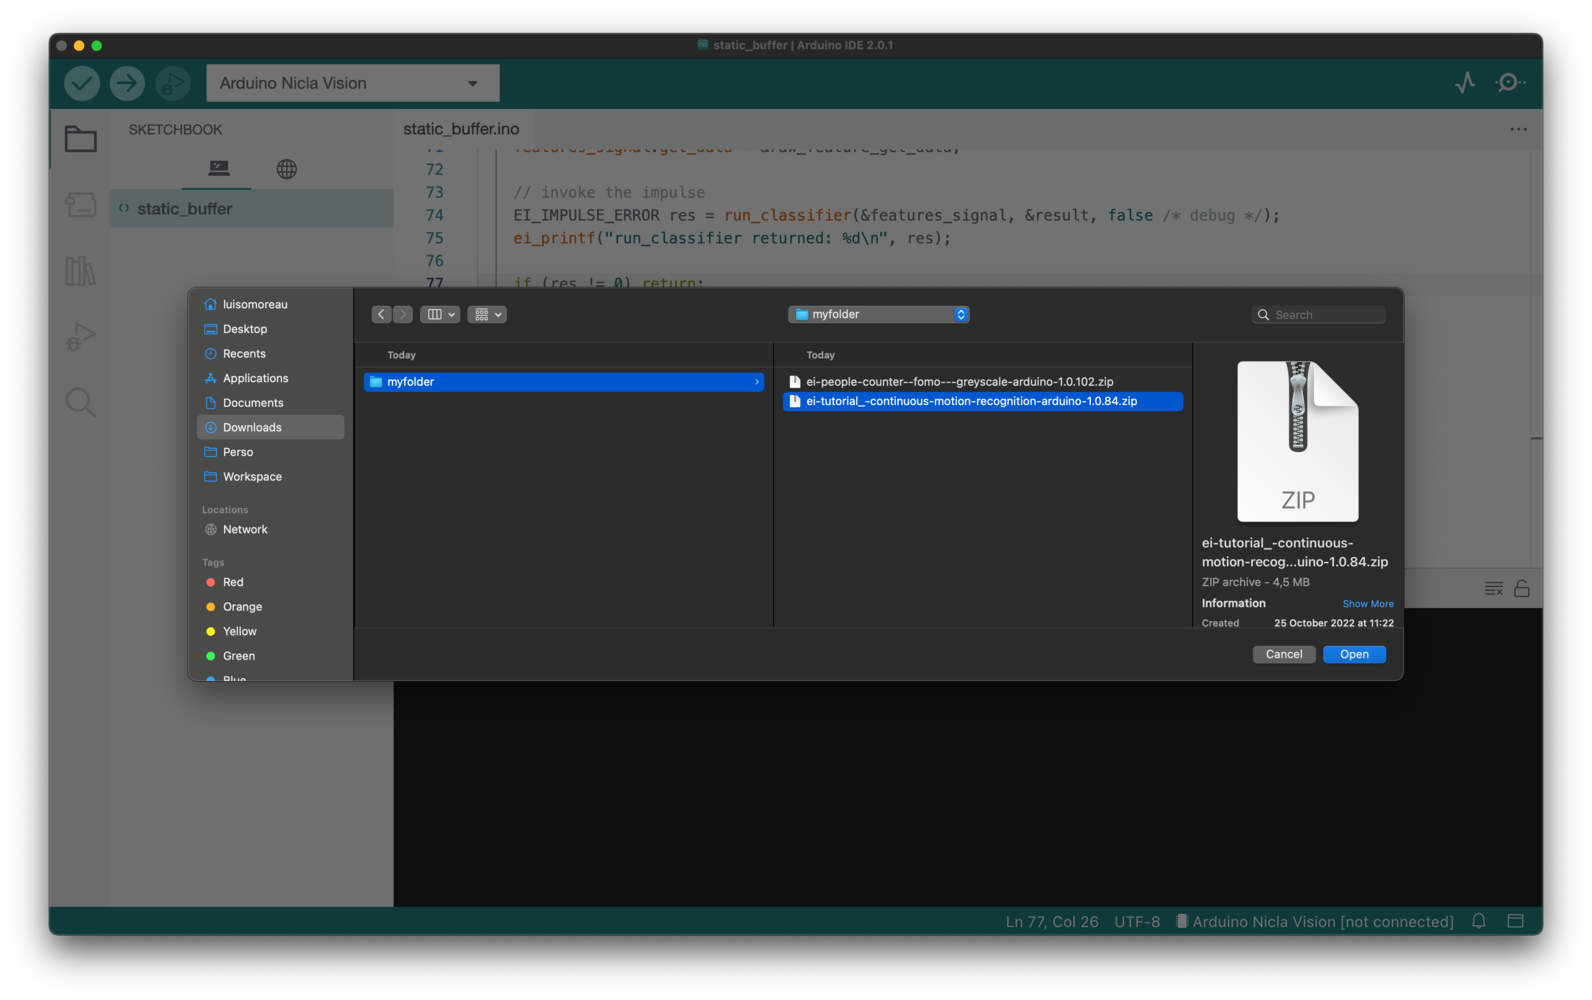
Choose folder
-
Then, load an example by going to File > Examples > Your project name - Edge Impulse > static_buffer > static_buffer.
In some configurations, it can be needed to restart Arduino IDE to see the examples.
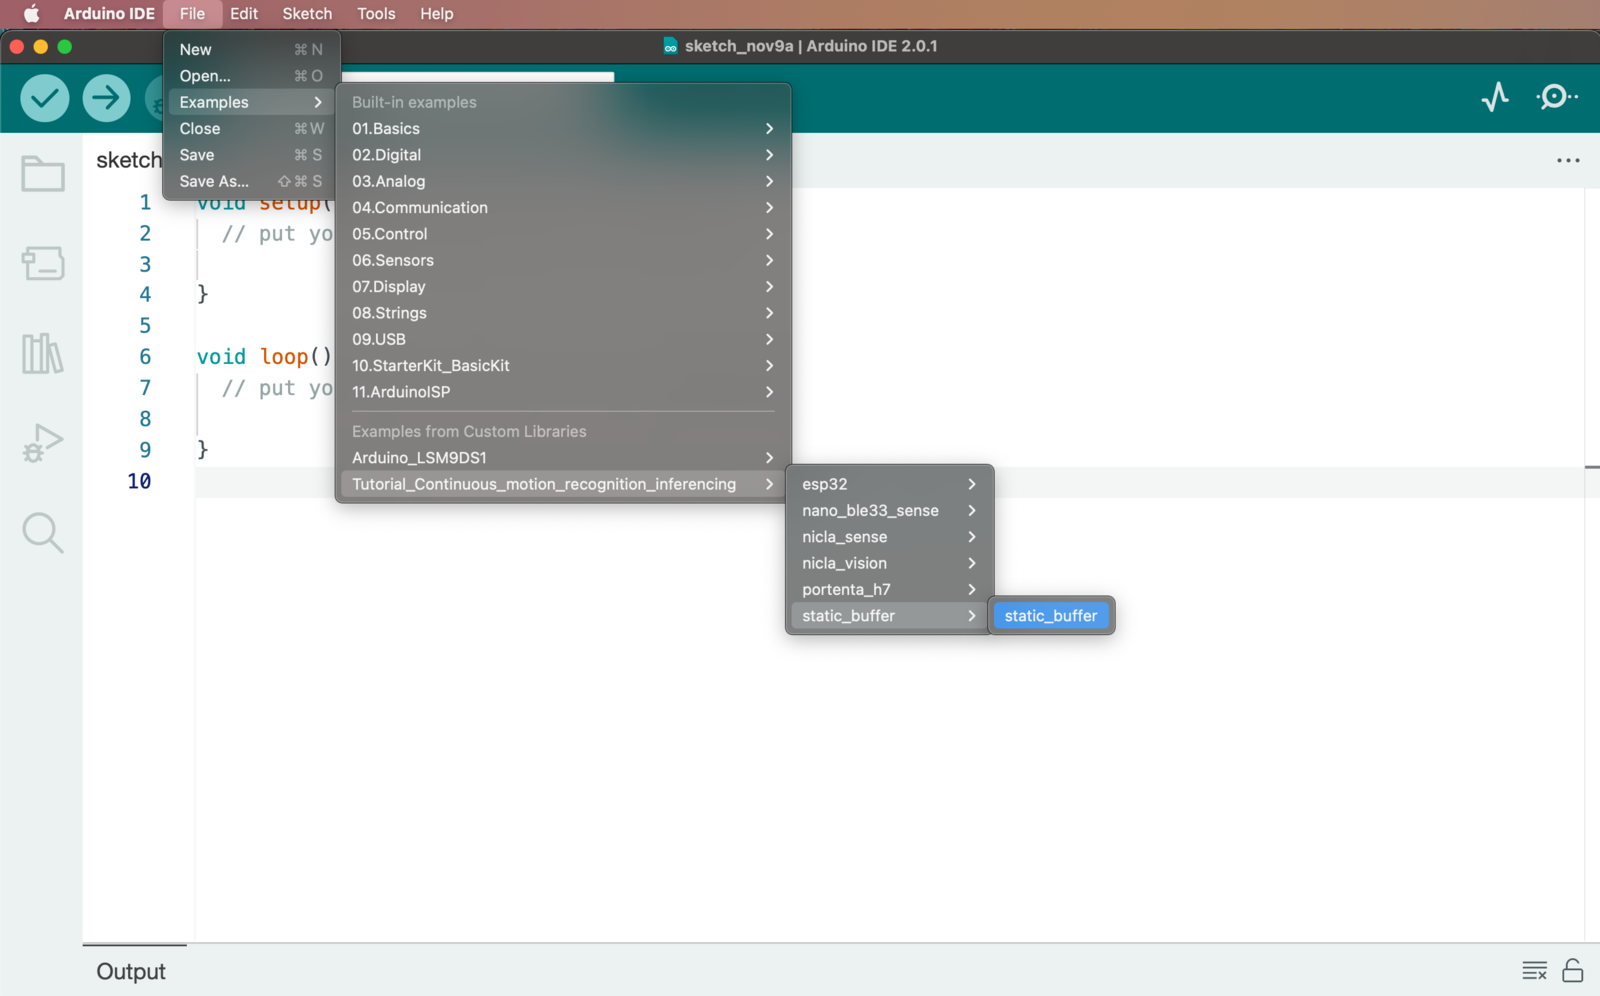
Select example
-
Voila. You now have an example application that loads your impulse.
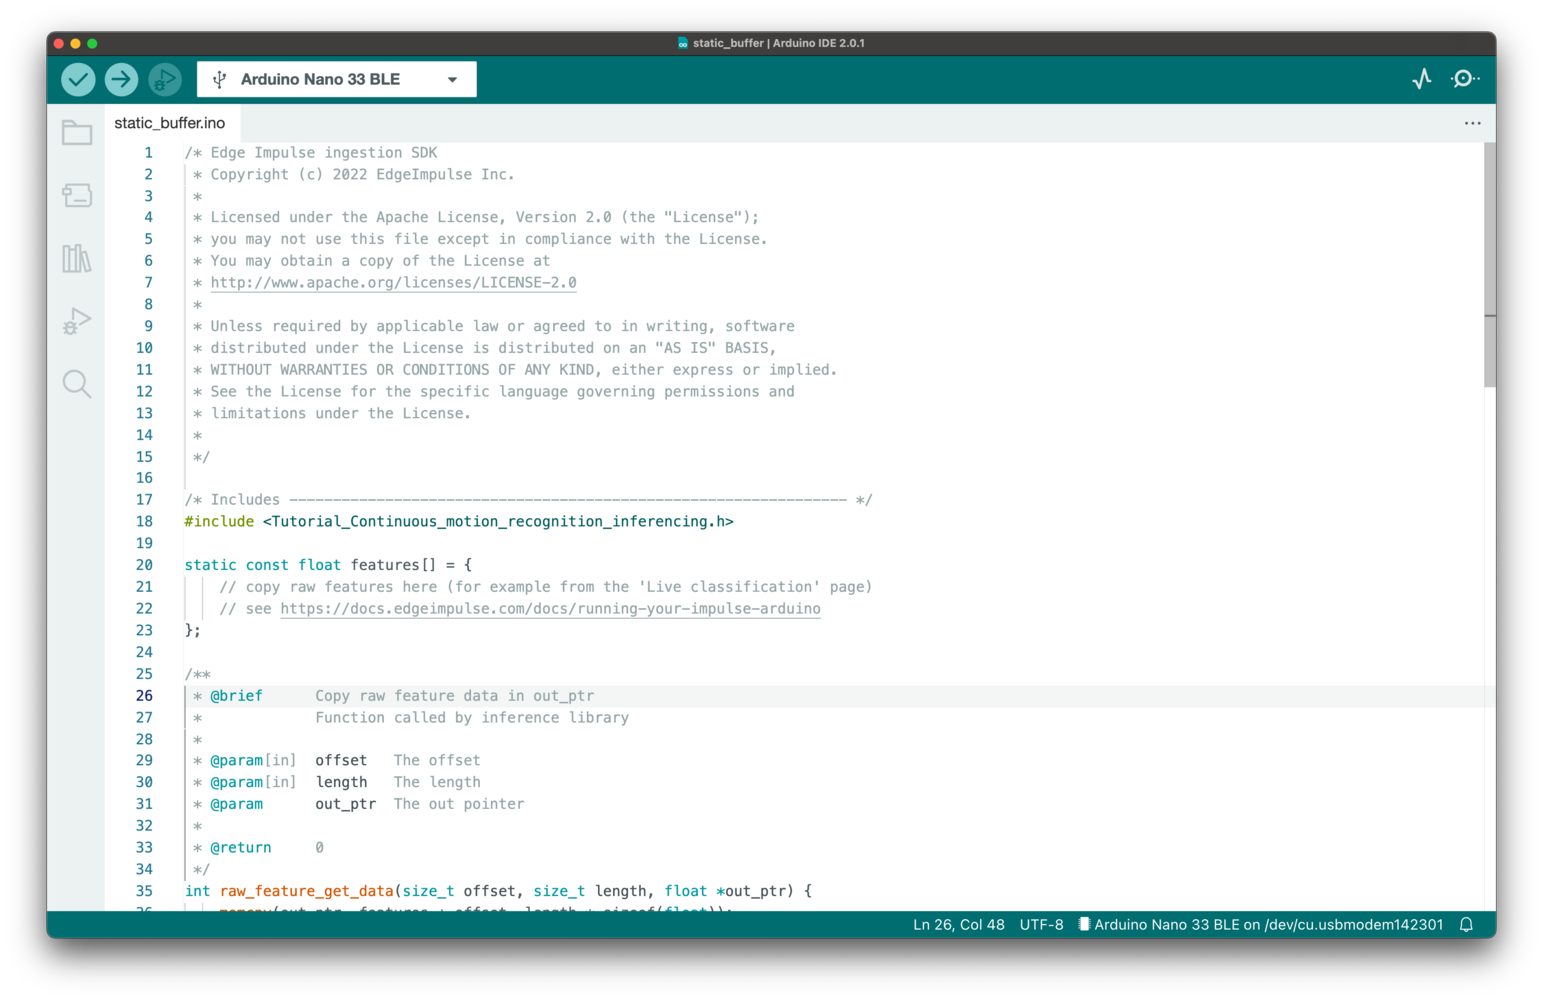
Sketch example
Running the impulse
With the project ready it’s time to verify that the application works. Head back to the studio and click on Live classification. Then load a validation sample, and click on a row under ‘Detailed result’.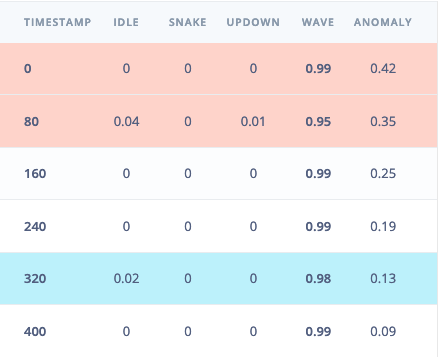
Selecting the row with timestamp '320' under 'Detailed result'.
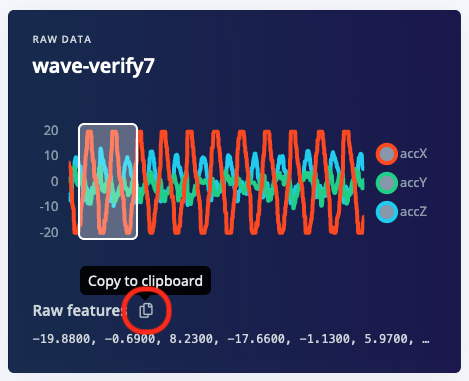
Copying the raw features.
static const float features[] definition, for example:

Copying the raw features
Seeing the output
To see the output of the impulse, open the serial monitor from the Arduino IDE via Tools > Serial monitor, and selecting baud rate 115,200. This will run the signal processing pipeline, and then classify the output:Connecting sensors?
A demonstration on how to plug sensor values into the classifier can be found here: Data forwarder - classifying data (Arduino).Boards manager
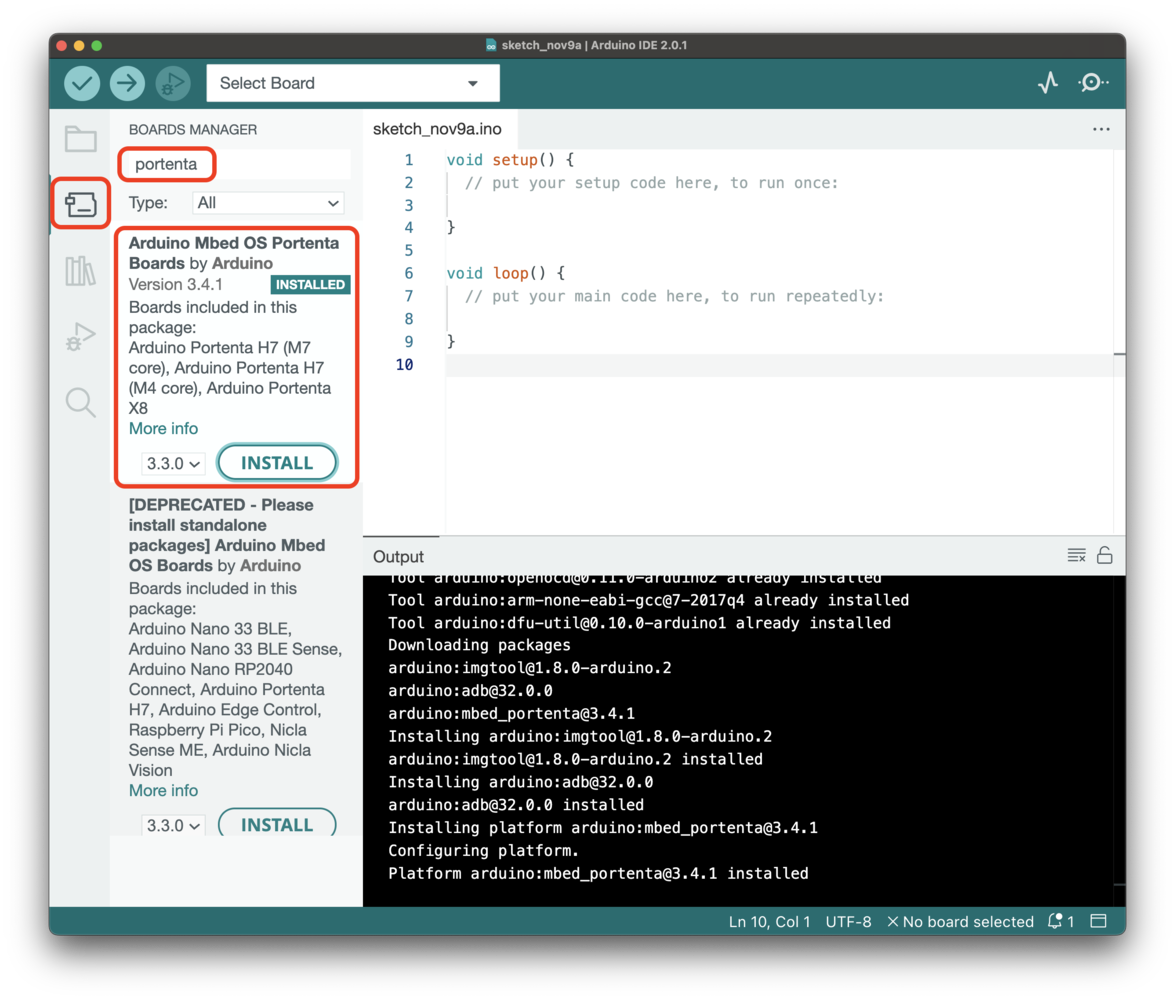
We also provide examples for all the officially supported targets that include sampling the raw features from the onboard sensors. To use them, make sure to install the right development board underTools->Boards->Boards Manager. We officially support:
- the Arduino Nano 33 BLE Sense,
- the Arduino Portenta H7 + Vision shield,
- the Arduino Nicla Vision,
- the Arduino Nicla Sense ME
- the Espressif ESP-EYE (ESP32).
-
Arduino Nano 33 BLE Sense
For the Arduino Nano 33 BLE Sense, install the following board:

-
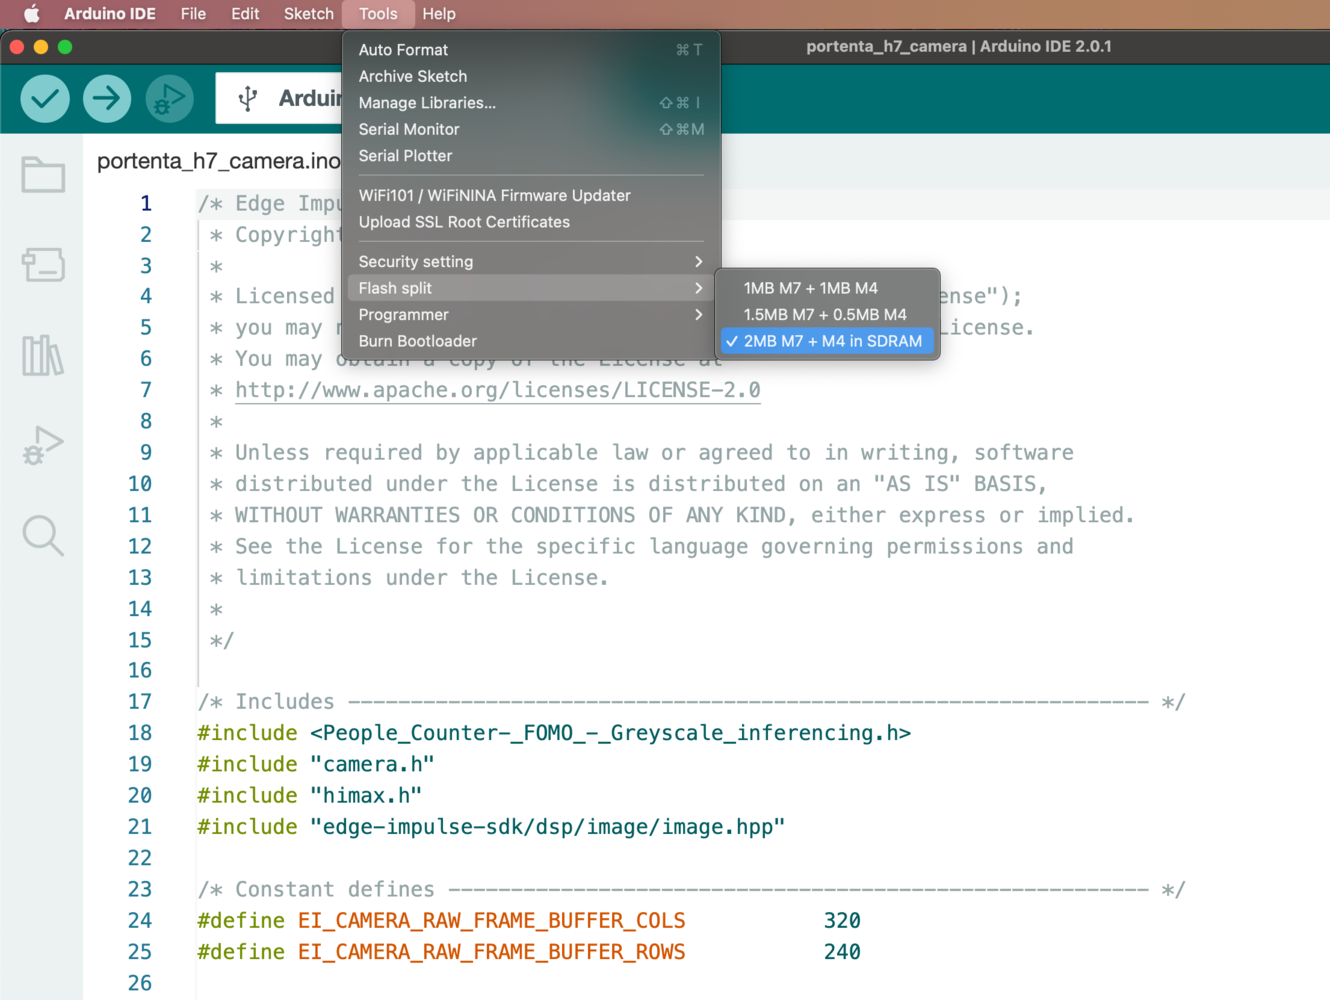
Arduino Portenta H7
For the Arduino Portenta H7, make sure to install the Arduino Mbed OS Portenta Boards v2.8.0 and to select the Arduino Portenta H7 (M7 core) board and the Flash Split 2 MB M7 + M4 in SDRAM:
-
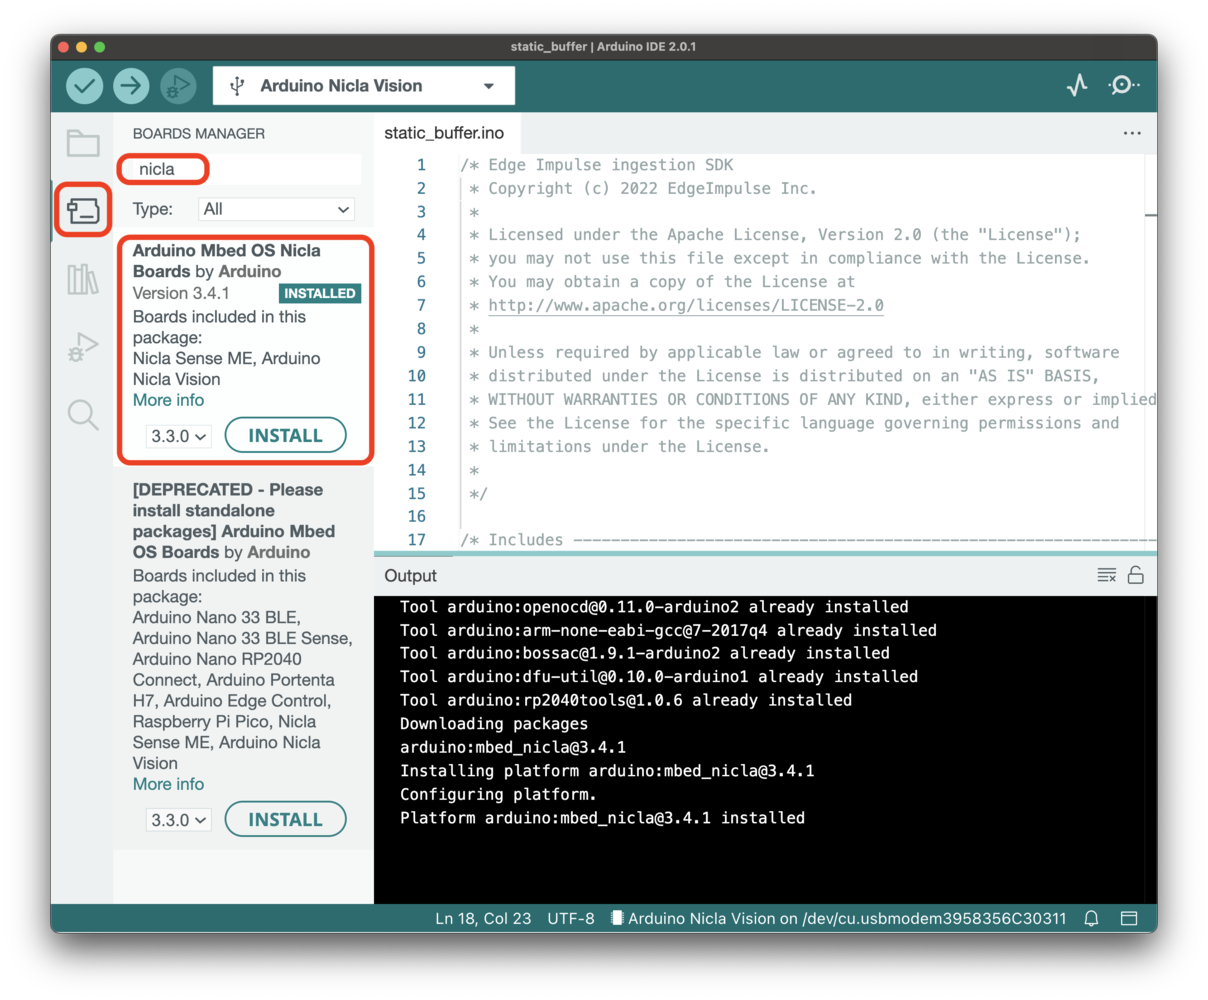
Arduino Nicla boards
For the Arduino Nicla Vision and the Arduino Nicla Sense ME, install the following board:
-
Espressif ESP32
For the ESP32 boards, we officially support the ESP-EYE. Other boards have been tested such as the ESP32-CAM AI Thinker. To install ESP32 boards, go to Arduino->Preferences and add the following link to the additional boards manager URLs:
https://raw.githubusercontent.com/espressif/arduino-esp32/gh-pages/package_esp32_index.json. Then install the ESP32 boards from the board manager menu.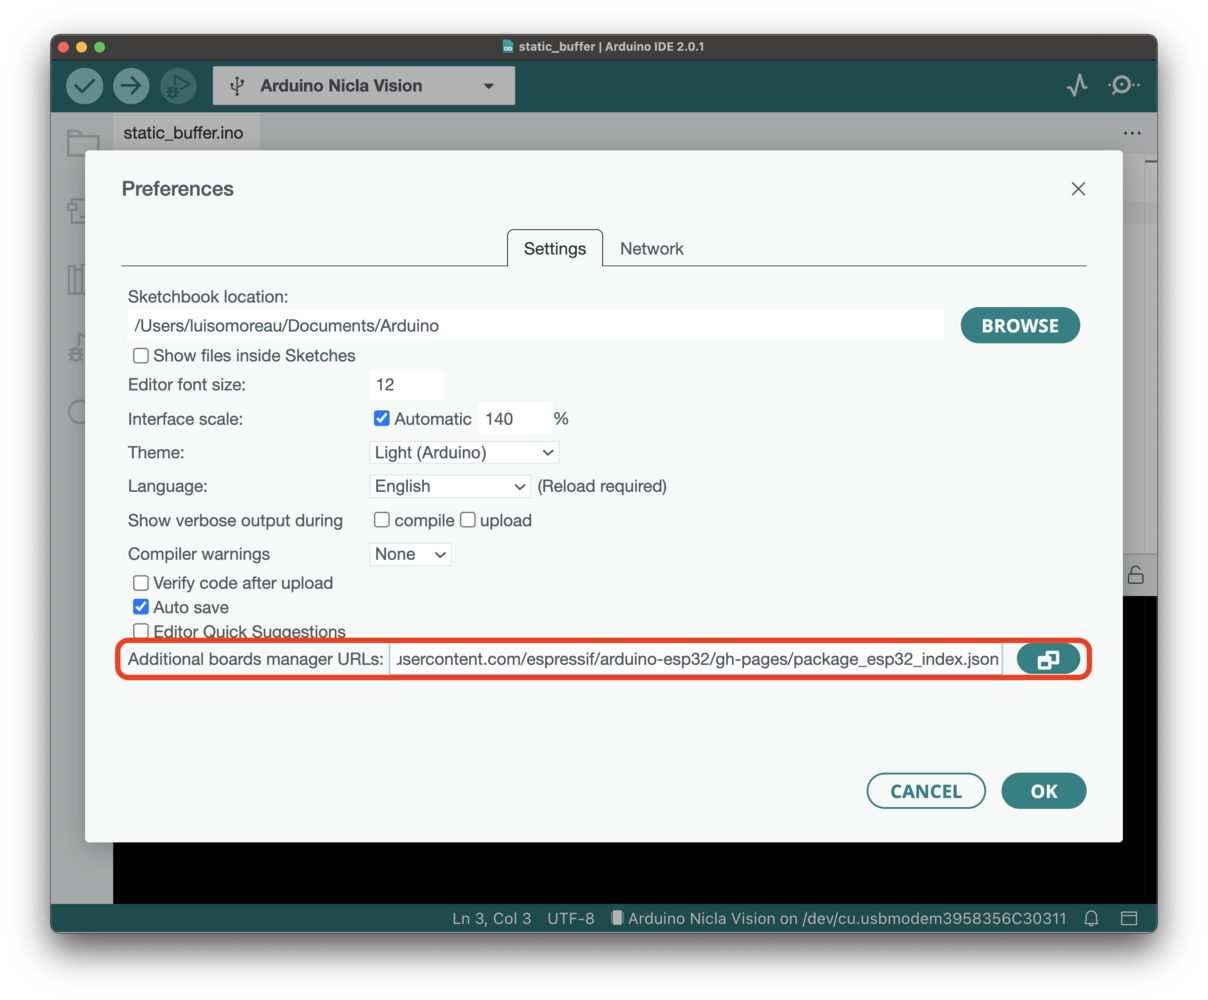
Link ESP32 boards resources
Make sure to enable PSRAM if you need to run image-based models (image classification or FOMO). The following settings should work with the ESP-EYE and the ESP32-CAM AI-Thinker: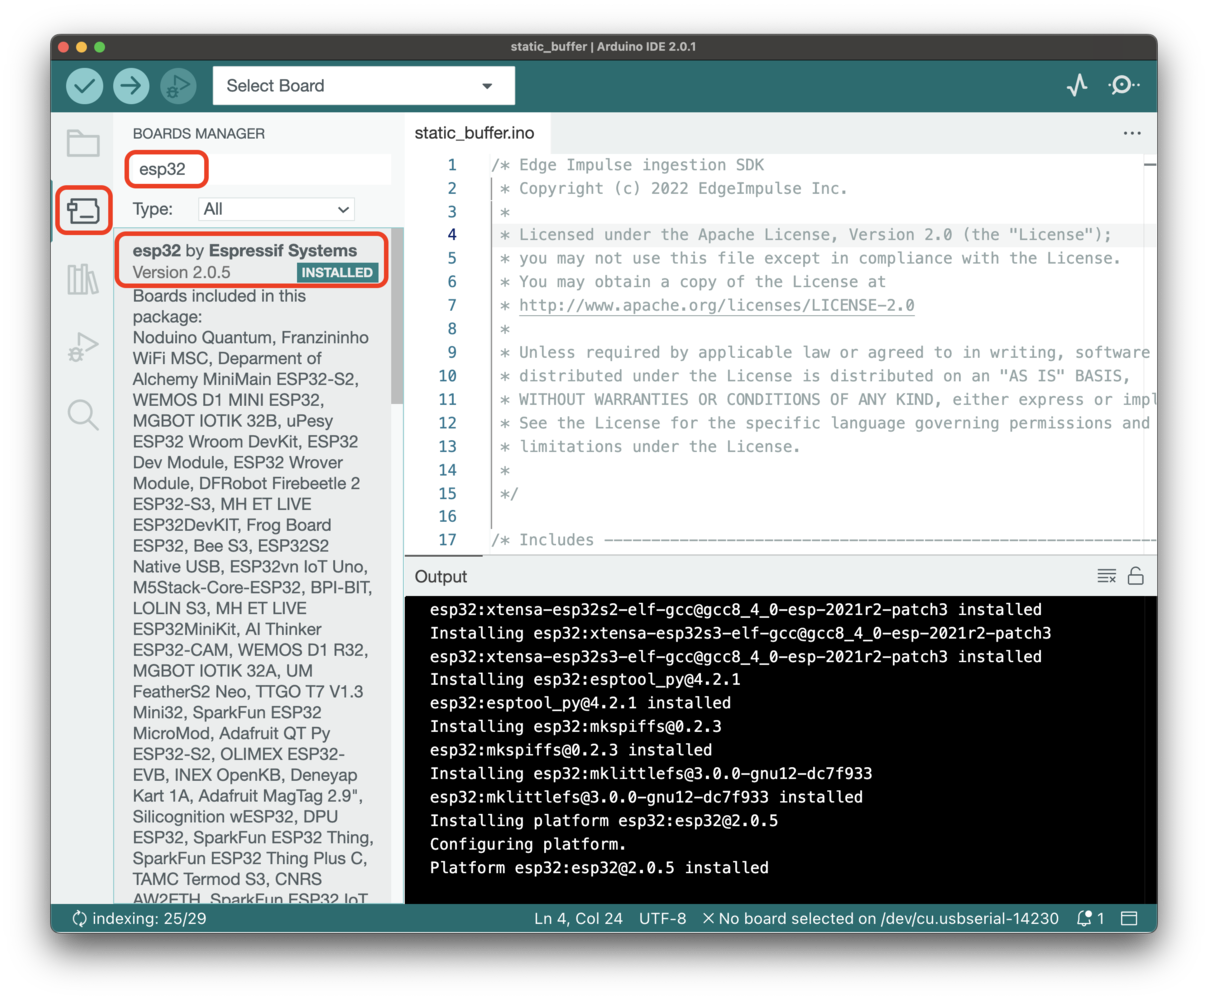
Add espressif ESP32 boards
- Board Selection: ESP32 Dev Module
- PSRAM: Enabled
- Upload Speed: 115200
By default, the esp32-camera sketch is configured to work with the ESP-EYE. To change the camera model replace:
ESP32 board settings
byYou can find other camera model pin definitions here.
Troubleshooting
Error: ‘ei_run_impulse’ was not declared in this scope
If you see the following error:Multiple libraries were found for …
Exported libraries are automatically versioned, but it’s possible that the Arduino IDE gets confused on which version to use leading to an error like:Multiple libraries were found for .... You can delete old versions of the libraries to mitigate this. The libraries are located at:
- Windows:
My Documents > Arduino > libraries - macOS:
~/Documents/Arduino/libraries/ - Linux:
~/sketchbook/libraries
No such file or directory: include <arm_math.h>
macro “min” passed 3 arguments, but takes just 2
If you’re compiling on a SAMD21-based target, you’ll see the above error. This is a known bug in the Arduino core for the SAMD21. If you apply the following patch the issue will go away.error: ‘va_start’ was not declared in this scope
This error can be seen while compiling for a SAMD21-based target. You will need to add the standard library in your sketch:Empty array when printing results
If the predictions are not properly printed, e.g.:Slow DSP operations
Where possible the signal processing code utilizes the vector extensions on your platform, but these are not enabled on all platforms. If these are not enabled we fall back to a software implementation which is slower. We don’t enable these on all platforms because the wide variety of platform and core versions Arduino supports, but you can see enable them for your platform by adding the following code on the first line of your sketch, before any includes (only works on Arm cores):src/edge-impulse-sdk/dsp/config.hpp file in the library and add, before #ifndef EIDSP_USE_CMSIS_DSP:
Code compiling fails under Windows OS
- mbed platform.local.txt. Copy this file under the Arduino mbed directory, i.e:
C:\Users\MYUSER\AppData\Local\Arduino15\packages\arduino\hardware\mbed\1.1.4\orC:\Users\MYUSER\AppData\Local\Arduino15\packages\arduino\hardware\mbed_nano\2.1.0\ - SAMD21 platform.local.txt. Copy this file under the Arduino SAMD directory, i.e:
C:\Users\MYUSER\AppData\Local\Arduino15\packages\arduino\hardware\samd\1.8.9\ - SAMD51 (Adafruit) platform.local.txt. Copy this file under the Arduino Adafruit SAMD directory, i.e:
C:\Users\MYUSER\AppData\Local\Arduino15\packages\adafruit\hardware\samd\1.6.3\ - ESP32 platform.local.txt. Copy this file under the Arduino ESP32 directory, i.e:
C:\Users\MYUSER\AppData\Local\Arduino15\packages\esp32\hardware\esp32\1.0.4\ - STM32 platform.local.txt. Copy this file under the Arduino STM32 directory, i.e:
C:\Users\MYUSER\AppData\Local\Arduino15\packages\esp32\hardware\stm32\1.9.0\
Failed to connect to COM3 (Arduino Portenta H7)
No DFU capable USB device available (Arduino Portenta H7)
Nicla sensors don’t match the sensors required in the model (Nicla Sense ME)
eiSensors nicla_sensors[] (near line 70) in the sketch example to add your custom names. e.g.: