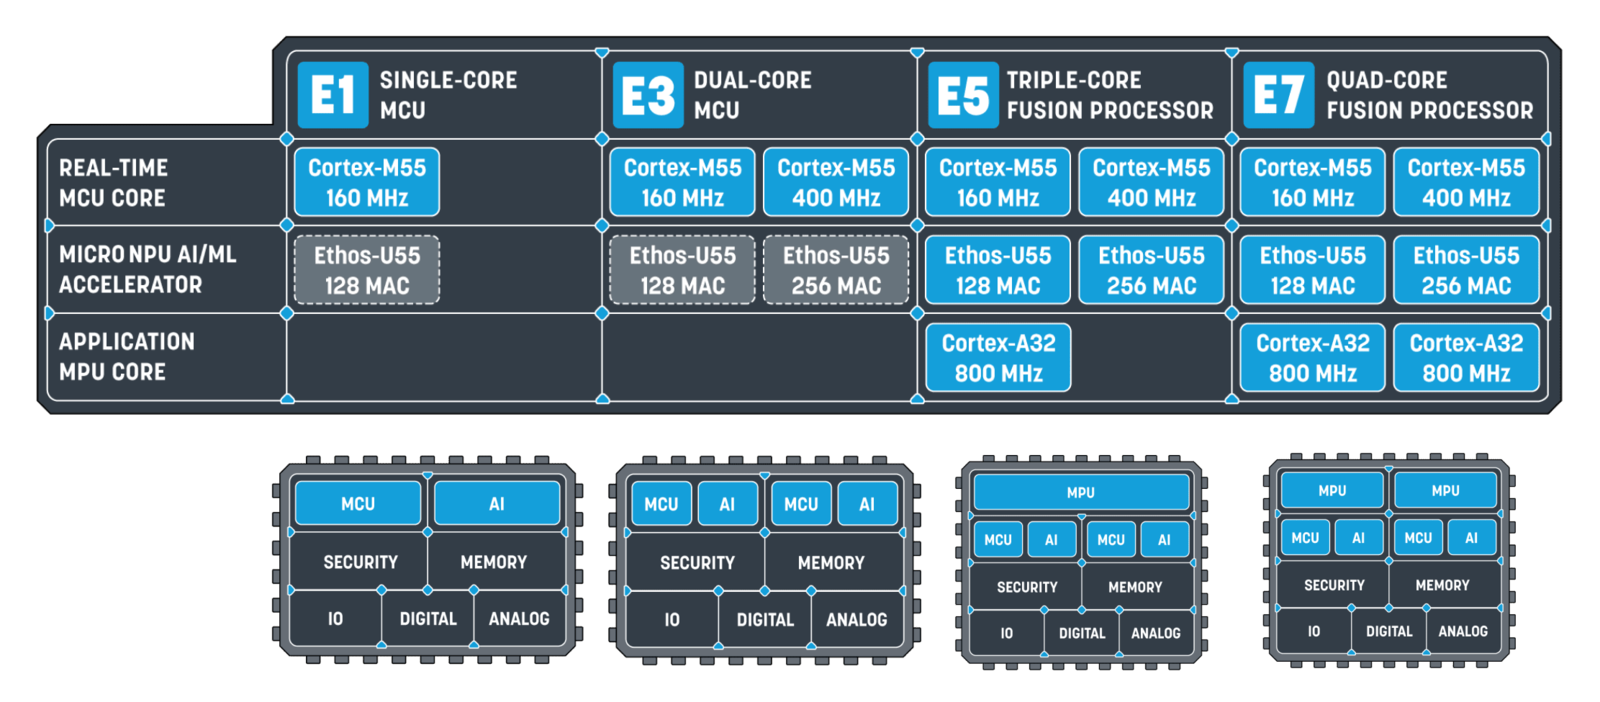
Alif Ensemble Group
Deployment options
Alif AI/ML Kit Gen2 HE core
Alif AI/ML Kit Gen2 HE core
A binary containing both the Edge Impulse data acquisition client and your full impulse.
Alif AI/ML Kit Gen2 HP core
Alif AI/ML Kit Gen2 HP core
A binary containing both the Edge Impulse data acquisition client and your full impulse.
Alif AI/ML Kit Gen2 HP core - tensor arena statically allocated to SRAM
Alif AI/ML Kit Gen2 HP core - tensor arena statically allocated to SRAM
A binary containing both the Edge Impulse data acquisition client and your full impulse.
Alif Dev Kit Gen2 HE core
Alif Dev Kit Gen2 HE core
A binary containing both the Edge Impulse data acquisition client and your full impulse.
Alif Dev Kit Gen2 HP core
Alif Dev Kit Gen2 HP core
A binary containing both the Edge Impulse data acquisition client and your full impulse.
Alif Dev Kit Gen2 HP core - tensor arena statically allocated to SRAM
Alif Dev Kit Gen2 HP core - tensor arena statically allocated to SRAM
A binary containing both the Edge Impulse data acquisition client and your full impulse.
Ethos-U55-128 Open CMSIS Pack
Ethos-U55-128 Open CMSIS Pack
A C++ library in Open CMSIS pack format with for devices with an Ethos-U55-128 NPU, High End Embedded with shared SRAM. For example: Alif E7 RTSS-HE.
Ethos-U55-256 Open CMSIS Pack
Ethos-U55-256 Open CMSIS Pack
A C++ library in Open CMSIS pack format with for devices with an Ethos-U55-256 NPU, High End Embedded with shared SRAM. For example: Alif E7 RTSS-HP.
Installing dependencies
To set this device up in Edge Impulse, you will need to install the following software:- Edge Impulse CLI.
- The latest
Alif Security Toolkit:
- Navigate to the Alif Semiconductor Kit documentation page (you will need to register to create an account with Alif, or log in to your existing Alif account). and download the latest App Security Toolkit (tested with version 0.56.0) for windows or linux.
- Extract the archive, and read through the included
Security Toolkit Quick Start Guideto finalize the installation - IMPORTANT: Set an environmental variable called
SETOOLS_ROOTto the Security Toolkit root path. This is used by Edge Impulse scripts when flashing the Alif development kits. Example instructions for Linux, Windows, MacOS.
- (Optional) Docker Desktop:
- If you are using MacOS, we recommended installing Docker Desktop in order to use the Alif Security Toolkit for programming.
Connecting to Edge Impulse
Once you have installed it’s time to connect the development board to Edge Impulse.Configuring your hardware
To interface the Alif Ensemble AppKit or Development Kit, you’ll need to connect your device to the USB port labelPRG USB.
Flashing the default firmware to the device
You can program and use serial port of the device if you adjust jumper J15 to connect pins 1-3 and 2-4.
There will be two serial ports enumerated. The first port is used for programming, the second for serial communication.
Inspect
isp_config_data.cfg in the Security Toolkit directory to ensure the COM port is set correctly to the device attached to your computer.
There will be two serial ports enumerated. The first port is used for programming, the second for serial communication.- Download the latest Edge Impulse firmware binary and unzip the file.
-
Open a terminal in the unzipped folder and run the following commands. Use the
HE,HP, orHP_SRAMparameter that matches the deployment chosen from the Edge Impulse project. That is, if you Deployed for HP_SRAM please use theHP_SRAMparameters.
MacOS or Linux
Windows
Running the Edge Impulse CLI
To use the device serial port, set the jumper accordingly: for the DevKit use J26, and for the AppKit use J15, connecting pins 1-3 and 2-4.
Edge Impulse CLI installed earlier. To test the CLI for the first time, either:
Create a new project from the Edge Impulse project dashboard
OR
Clone an existing Edge Impulse public project, like this Face Detection Demo. Click the link and then press Clone at the top right of the public project.
Then, from a command prompt or terminal on your computer, run:
Device choiceYou may see two
FTDI or CYPRESS serial ports enumerated for devices. If so, select the second entry in the list, which generally is the serial data connection to the Ensemble device. Ensure that the jumpers are correctly oriented for serial communication.Enter to select your project.
Verifying that the device is connected
That’s all! Your device is now connected to Edge Impulse. To verify this, go to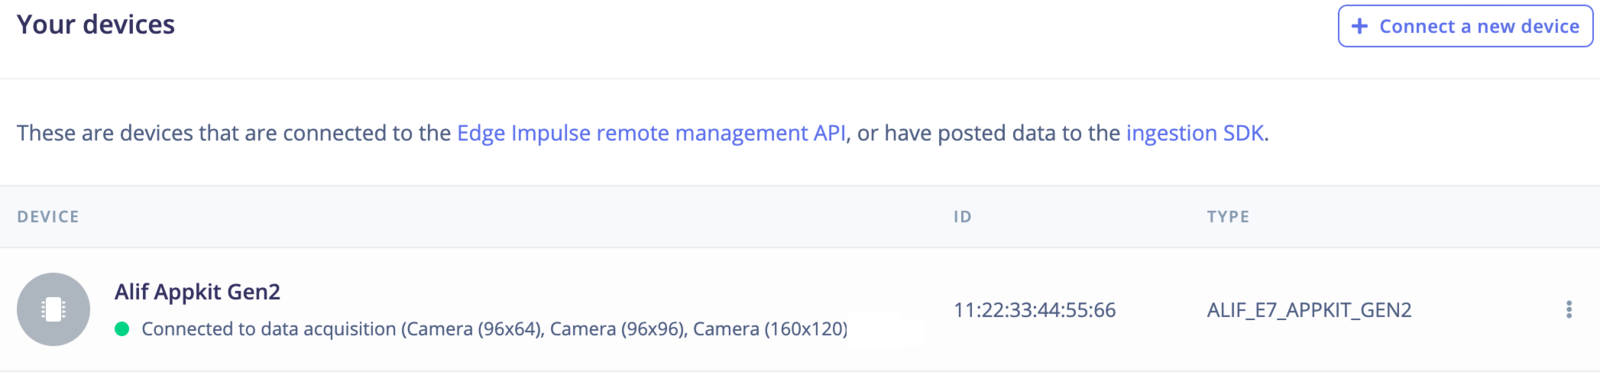
Device connected to Edge Impulse
Next steps: building a machine learning model
With everything set up you can now build your first machine learning model with these tutorials. This will walk you through the process of collecting data and training a new ML model:- Image classification - Image Classification Tutorial
- Object Detection End-to-End Tutorial
- Object detection with centroids (FOMO)
- Building a continuous motion recognition system
- Recognizing sounds from audio
- Keyword spotting