Custom learning blocks are available for all usersUnlike other custom blocks, which are only available to customers on the Enterprise plan, custom learning blocks are available to all users of the platform. If you are an enterprise customer, your custom learning blocks will be available in your organization. If you are not an enterprise customer, your custom learning blocks will be available in your developer profile.
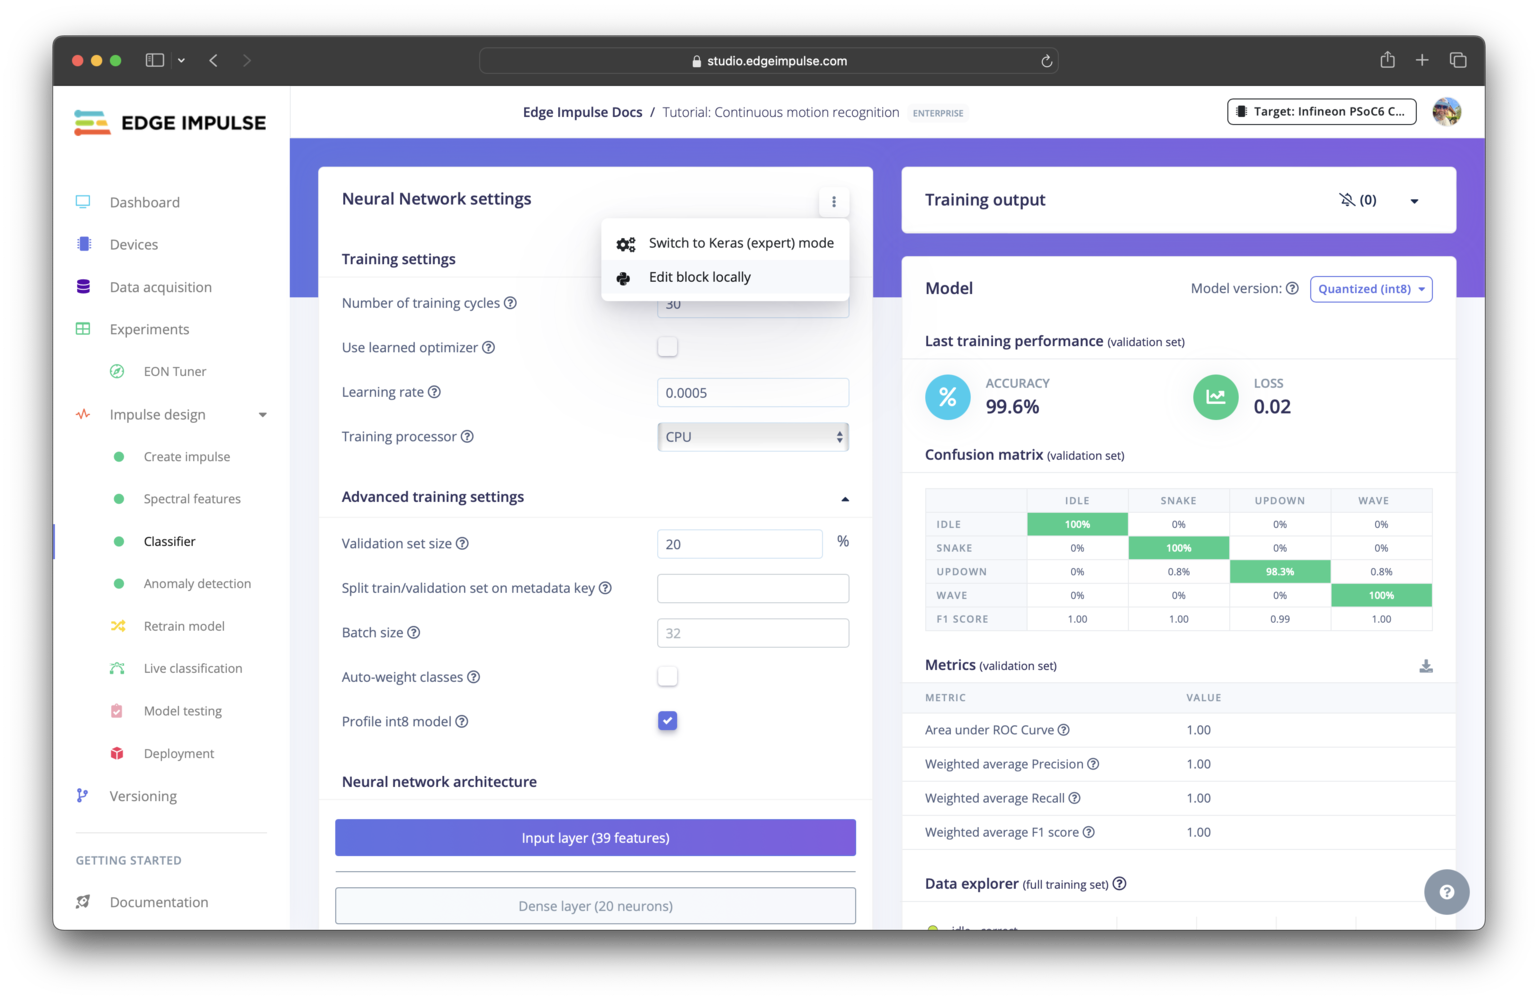
Expert modeIf you only want to make small modifications to the neural network architecture or loss function, you can instead use expert mode directly in Studio, eliminating the need to create a custom learning blocks. Go to any learning block settings page, select the three dots, and select Switch to Keras (expert) mode.
Block structure
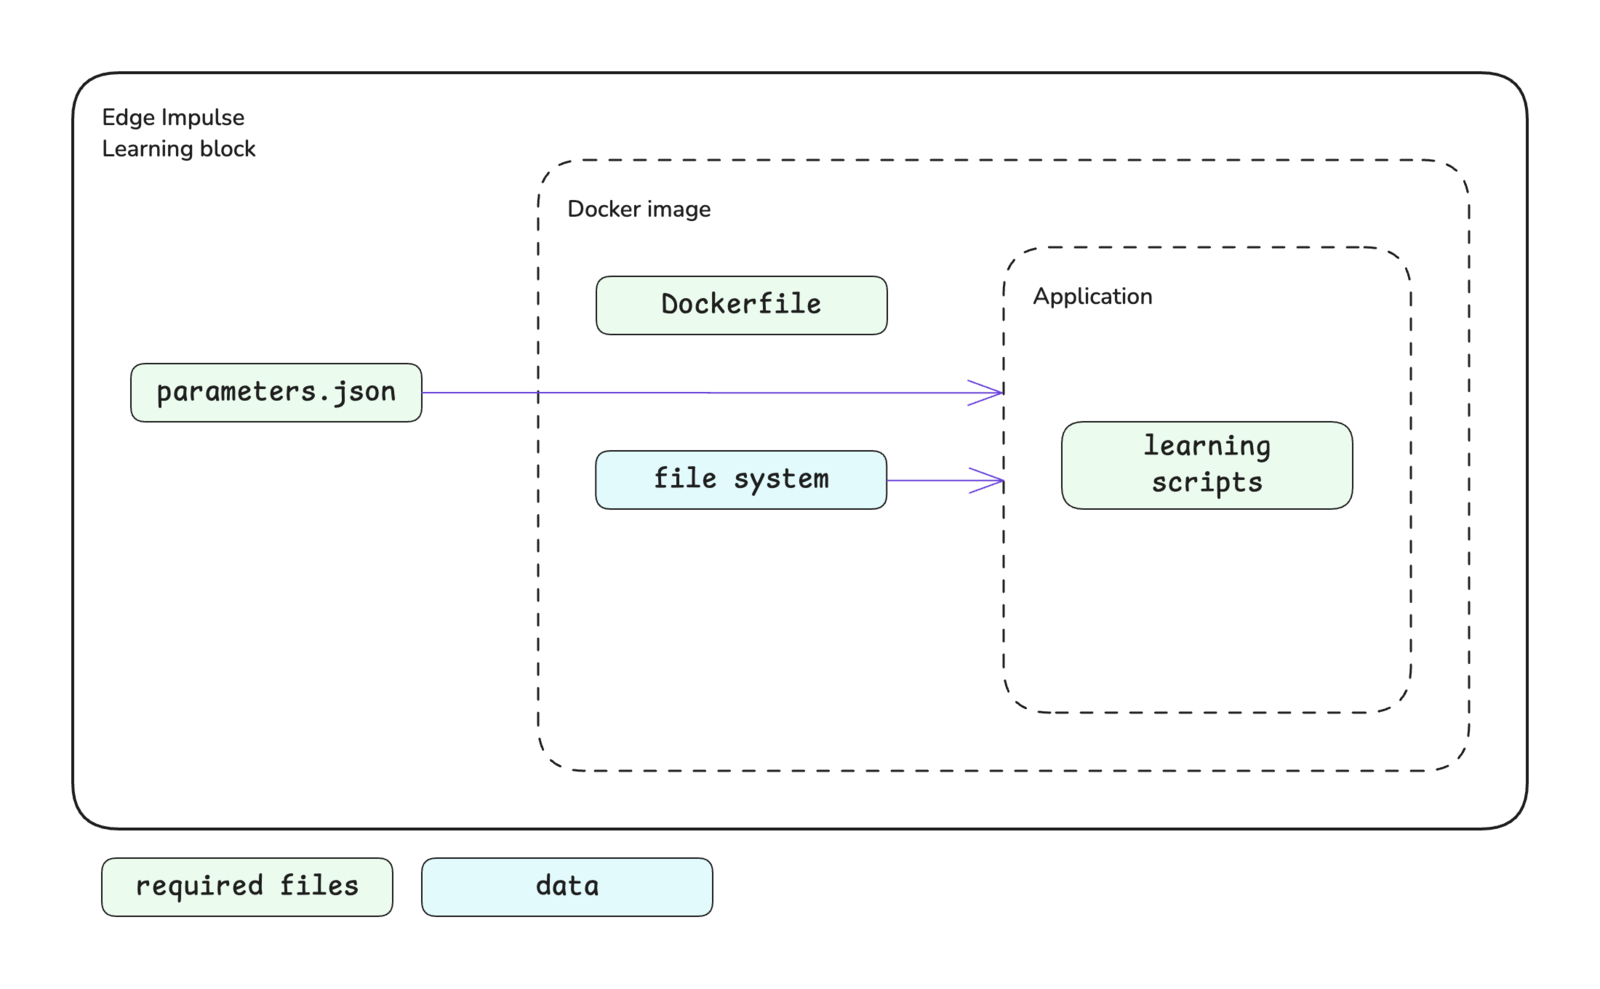
The learning block structure is shown below. Please see the custom blocks overview page for more details.
Block interface
The sections below define the required and optional inputs and the expected outputs for custom learning blocks.Inputs
Learning blocks have access to command line arguments and training data.Command line arguments
The parameters defined in yourparameters.json file will be passed as command line arguments to the script you defined in your Dockerfile as the ENTRYPOINT for the Docker image. Please refer to the parameters.json documentation for further details about creating this file, parameter options available, and examples.
In addition to the items defined by you, the following arguments will be automatically passed to your custom learning block.
| Argument | Passed | Description |
|---|---|---|
--info-file <file> | Always | Provides the file path for train_input.json as a string. The train_input.json file contains configuration details for model training options. See train_input.json. |
--data-directory <dir> | Always | Provides the directory path for training/validation datasets as a string. |
--out-directory <dir> | Always | Provides the directory path to the output directory as a string. This is where block output needs to be written. |
--epochs <value> | Conditional | Passed if no custom parameters are provided. Provides the number of epochs for model training as an integer. |
--learning-rate <value> | Conditional | Passed if no custom parameters are provided. Provides the learning rate for model training as a float. |
Data
Learning blocks operate on data that has already been processed by an input block and a processing block. This processed data is available to your learning block in a single directory, in the NumPy format, and already split into training (train) and validation (test) datasets. By default the train/validation split is 80/20. You can change this ratio using the advanced training settings. The NumPy datasets can be converted to the required format (e.g.tf.data.Dataset) for your model and batched as desired within your custom learning block training script.
In addition to the datasets, a sample_id_details.json file (see sample_id_details.json) is located within the data directory. The location of this directory is specified by the --data-directory <dir> argument and its structure is shown below.
X_*.npy files are float32 arrays in the appropriate shape. You can typically load these into your training pipeline without any modification.
The Y_*.npy files are int32 arrays with four columns: label_index, sample_id, sample_slice_start_ms, and sample_slice_end_ms, unless the labels are bounding boxes.
Note that for custom blocks operating on anomaly detection, *_test.npy files are empty. Anomaly blocks are expected to train on only nominal data, so there’s no train/test split done, instead all data is found in the *_train.npy files.
Image data
TheX_*.npy files follow the NHWC (batch_size, height, width, channels) format for image data.
The Y_*.npy files are a JSON array in the form of:
RGB->BGR option when configuring pixel scaling for your block. See below.
Image data is provided to your learning block with pixels that are already scaled. Pixel scaling is handled automatically by Edge Impulse. There are several options to scale your pixels, some of which include additional processing (e.g. standardization or centering):
- Pixels ranging 0..1 (not normalized)
- Pixels ranging -1..1 (not normalized)
- Pixels ranging -128..127 (not normalized)
- Pixels ranging 0..255 (not normalized)
- PyTorch (pixels ranging 0..1, then standardized using ImageNet mean/std)
- RGB->BGR (pixels ranging 0..255, then centered using ImageNet mean)
Outputs
The expected output from your custom learning block should be in TensorFlow SavedModel, TFLite, ONNX, or pickled scikit-learn format. For object detection models, it is also important to ensure that the output layer of your model is supported by Edge Impulse. Similarly for anomaly detection models, it is also important to ensure that the output of your model is supported by Edge Impulse.File output options
TFLite file(s):model.tflite- a TFLite file with float32 inputs and outputsmodel_quantized_int8_io.tflite- a quantized TFLite file with int8 inputs and outputs
saved_model.zip file.
TensorFlow SavedModel:
saved_model.zip- a TensorFlow SavedModel file
model.onnx- an ONNX file with int8, float16 or float32 inputs and outputs
model.pkl- a pickled instance of the scikit-learn model
Object detection output layers
Unfortunately object detection models typically don’t have a standard way to go from neural network output layer to bounding boxes. Currently Edge Impulse supports the following types of output layers. The most up-to-date list can be found in the API documentation forObjectDetectionLastLayer.
- FOMO
- MobileNet SSD
- NVIDIA TAO RetinaNet
- NVIDIA TAO SSD
- NVIDIA TAO YOLOv3
- NVIDIA TAO YOLOv4
- YOLOv2 for BrainChip Akida
- YOLOv5 (coordinates scaled 0..1)
- YOLOv5 (coordinates in absolute values)
- YOLOv7
- YOLOv11 (coordinates scaled 0..1)
- YOLOv11 (coordinates in absolute values)
- YOLOX
- YOLO Pro
Anomaly detection output format
Similarly, anomaly detection models don’t have a standard way to go from neural network outputs to a final anomaly score. Currently in Edge Impulse, the model output is expected to be a 1D array containing a single score. Support for visual anomaly detection models will also be available soon.Configuring advanced training settings
After pushing your custom learning block to Edge Impulse, in Studio you will notice that below the section of custom parameters that you have exposed for your block, there is another section titled “Advanced training settings”. These settings allow you to optionally adjust the train/validation split, split on a metadata key, and profile the int8 version of your model. If you are testing your block locally using theedge-impulse-blocks runner tool as described below, you can adjust the train/validation split using the --validation-set-size <size> argument but you are unable to split using a metadata key. To profile your model after training locally, see Getting profiling metrics.
Getting profiling metrics
After training a custom learning block locally, you can use the profiling API to get latency, RAM and ROM estimates. This is very useful as you can immediately see whether your model will fit on device or not. Additionally, you can use this API as part your experiment tracking (e.g. in Weights & Biases or MLFlow) to wield out models that won’t fit your latency or memory constraints. You can also use the Python SDK to profile your model easily. See here for an example on how to profile a model created in Keras.Editing built-in blocks
Most learning blocks built in the Edge Impulse (e.g. classifier, regression, or FOMO blocks) can be edited locally and then pushed back to Edge Impulse as a custom block. This is great if you want to make heavy modifications to these training pipelines, for example to do custom data augmentation. To download a block, go to any learning block settings page in your project, click the three dots, and select Edit block locally. Once downloaded, follow the instructions in the README file.
Initializing the block
When you are finished developing your block locally, you will want to initialize it. The procedure to initialize your block is described in the custom blocks overview page. Please refer to that documentation for details.Testing the block locally
To speed up your development process, you can test and train your custom learning block locally. There are two ways to achieve this. You will need to have Docker installed on your machine for either approach.With blocks runner
For the first method, you can use the CLIedge-impulse-blocks runner tool. See Block runner for additional details. The runner expects the following arguments for learning blocks.
| Argument | Description |
|---|---|
--epochs <number> | If not provided, you will be prompted to enter a value. |
--learning-rate <learningRate> | If not provided, you will be prompted to enter a value. |
--validation-set-size <size> | Defaults to 0.2 but can be overwritten. |
--input-shape <shape> | Automatically identified but can be overwritten. |
--extra-args <args> | Additional arguments for your script. |
/home), an output directory (e.g. /home/out), and any other parameters required for your script.
ei-block-data directory within your custom block directory. It will contain a subdirectory with the associated project ID as the name - this is the directory that gets mounted into the container as /home.
The first time you enter the above command, you will be asked some questions to configure the runner. Follow the prompts to complete this. If you would like to change the configuration in future, you can execute the runner command with the --clean flag.
With Docker
For the second method, you can use the block runner to download the required data from your project, then build the Docker image and run the container directly. The advantage of this approach is that you do not need to go through the feature generation and data splitting process each time you want to train your block. If your data changes, you can download it again.Pushing the block to Edge Impulse
When you have initialized and finished testing your block locally, you will want to push it to Edge Impulse. The procedure to push your block to Edge Impulse is described in the custom blocks overview page. Please refer to that documentation for details.Using the block in a project
After you have pushed your block to Edge Impulse, it can be used in the same way as any other built-in block.Examples
Edge Impulse has developed several example custom learning blocks. The code for these blocks can be found in public repositories under the Edge Impulse GitHub account. The repository names typically follow the convention ofexample-custom-ml-<description>. As such, they can be found by going to the Edge Impulse account and searching the repositories for ml-block.
Below are direct links to some examples:
- Fully connected model (Keras)
- Fully connected model (PyTorch)
- Logistic regression model (scikit-learn)
- EfficientNet (Keras)
- YOLOv5 (PyTorch)
Troubleshooting
Block parameters do not update
Block parameters do not update
If changes you have made to your
parameters.json file are not being reflected, or there are no parameters at all, in your block after being pushed to Studio, you may need to update the Edge Impulse CLI: