The edge-impulse-api library contains JavaScript and TypeScript bindings to the Edge Impulse API for Node.js and browser environments. It lets you automate anything that you can do through the Studio UI (and much more).

Installation

Node.js

Install the package via npm (also see the npm package page):
npm install edge-impulse-api

Browser

For browser-based environments, you can include the API bindings directly from the Edge Impulse Studio CDN:
  • Development / Debugging: https://studio.edgeimpulse.com/api-bindings/browser/edge-impulse-api.js
  • Minified Production Version: https://studio.edgeimpulse.com/api-bindings/browser/edge-impulse-api.min.js
  • TypeScript Definition File: https://studio.edgeimpulse.com/api-bindings/browser/edge-impulse-api.d.ts
Or download these, and add them your project.

Examples

Instantiating the Library

Node.js (via require)
const EdgeImpulseApi = require('edge-impulse-api').EdgeImpulseApi;
const api = new EdgeImpulseApi();
Node.js (via imports)
import { EdgeImpulseApi } from 'edge-impulse-api';
const api = new EdgeImpulseApi();
Browser
<script src="https://studio.acc2.edgeimpulse.com/assets/7e353e8d99158a6915072395386421ea6b2fe40f/studio-api/studio-api-bundle.js"></script>
<script>
    const api = new EdgeImpulseApi();
</script>

Authenticating

Before you can use the API bindings you’ll need to authenticate. Preferably do this through an API key.

API Key

API Keys grant access to a single project.
(async () => {
    const api = new EdgeImpulseApi();
    await api.authenticate({
        method: 'apiKey',
        apiKey: 'ei_...', // your API key here
    });
})();

Username / Password (JWT)

Username and password authentication gives access to every project in your account. Where possible, use API keys instead. You can cache the JWT token (typically valid for 30 days, unless reconfigured by your enterprise administrator) to avoid putting your credentials directly in code.
(async () => {
    try {
        const api = new EdgeImpulseApi();

        const jwtToken = await api.login.login({
            username: 'myusername',
            password: 'mypassword'
        });

        await api.authenticate({
            method: 'jwtToken',
            jwtToken: jwtToken.token || '',
        });
    }
    catch (ex) {
        // check token expiration
        const tokenExpired = (ex.message || ex.toString()).indexOf('Your JWT token has expired') > -1;
        if (tokenExpired) {
            console.log('Token was expired, need to re-log in', ex);
            process.exit(1);
        }

        console.log('Failed to make a request', ex);
        process.exit(1);
    }
})();

Calling API Functions

The following example lists active projects and retrieves project information.
// fetch all projects (if using API key authentication, this will only return a single project)
let projects = await api.projects.listProjects();
console.log('all projects', projects.projects.map(p => {
    return {
        id: p.id,
        name: p.name,
        owner: p.owner,
    };
}));

// get more project details
let projectInfo = await api.projects.getProjectInfo(projects.projects[0].id);
console.log('projectInfo', projectInfo);

Running Jobs

Long-running API calls (such as retraining a network) return a job. Here is how you retrain a Keras model block, wait for the job to complete, and print the real-time logs:
(async () => {
    try {
        const PROJECT_ID = 12345;

        let impulseRes = await api.impulse.getImpulse(PROJECT_ID);
        if (!impulseRes.impulse) {
            throw new Error('Project has no impulse');
        }
        let kerasBlock = impulseRes.impulse.learnBlocks.find(x => x.type.indexOf('keras') > -1);
        if (!kerasBlock) {
            throw new Error('Failed to find a Keras block in ' + JSON.stringify(impulseRes.impulse, null, 4));
        }

        // grab the config
        let kerasConfig = await api.learn.getKeras(PROJECT_ID, kerasBlock.id);

        // and retrain with same config
        let trainJob = await api.jobs.trainKerasJob(PROJECT_ID, kerasBlock.id, kerasConfig);
        console.log('Created train job with ID', trainJob.id);

        await api.runJobUntilCompletion({
            type: 'project',
            projectId: PROJECT_ID,
            jobId: trainJob.id,
        }, data => {
            process.stdout.write(data);
        });

        console.log('Train job completed');
    }
    catch (ex) {
        console.log('Failed to make a request', ex);
        process.exit(1);
    }
})();

Browser Integration

Simple Browser Example

The following is a complete HTML and JavaScript example using the Edge Impulse API bindings bundle in the browser:
<!DOCTYPE html>
<html>
<head>
    <meta charset="utf-8">
    <title>Browser test</title>
    <style>
        body > div, body > hr {
            margin-bottom: 12px;
        }
    </style>
</head>
<body>
    <div>
        <div>API key</div>
        <div><input id="api-key" placeholder="ei_..." style="width: 300px"></div>
    </div>
    <div>
        <button id="fetch-info">Fetch project info</button>
    </div>
    <hr>
    <div>Project info: <span id="project-name">...</span></div>
    <hr>
    <div>
        <button id="run-export-data" disabled>Run export data job</button>
    </div>
    <pre id="job-output"></pre>

    <script src="https://studio.edgeimpulse.com/api-bindings/browser/edge-impulse-api.js"></script>
    <script>
        // Create new API instance, you'll need to authenticate first (via api.authenticate()), see below
        const api = new EdgeImpulseApi();

        const apiKeyInputEl = document.querySelector('#api-key');
        const fetchInfoBtn = document.querySelector('#fetch-info');
        const projectNameEl = document.querySelector('#project-name');
        const runExportDataBtn = document.querySelector('#run-export-data');
        const jobOutputEl = document.querySelector('#job-output');

        let projectId = -1;

        fetchInfoBtn.onclick = async (ev) => {
            ev.preventDefault();

            fetchInfoBtn.disabled = true;

            try {
                await api.authenticate({
                    method: 'apiKey',
                    apiKey: apiKeyInputEl.value,
                });

                // this'll return a single project when you
                const projects = (await api.projects.listProjects()).projects;
                const project = (await api.projects.getProjectInfo(projects[0].id)).project;
                console.log('project', project.owner + ' / ' + project.name);
                projectNameEl.textContent = project.owner + ' / ' + project.name;

                projectId = project.id;

                runExportDataBtn.disabled = false;
            }
            catch (ex) {
                runExportDataBtn.disabled = true;
                alert(`Error: ${ex.message || ex.toString()}`);
            }
            finally {
                fetchInfoBtn.disabled = false;
            }
        };

        runExportDataBtn.onclick = async (ev) => {
            ev.preventDefault();

            runExportDataBtn.disabled = true;

            try {
                if (projectId === -1) {
                    throw new Error(`projectId is -1, did you not fetch info first?`);
                }

                jobOutputEl.textContent += 'Creating export job...\n';

                // export data
                let exportJob = await api.jobs.startOriginalExportJob(projectId, {
                    retainCrops: true,
                    uploaderFriendlyFilenames: false,
                });
                jobOutputEl.textContent += 'Created export job with ID ' + exportJob.id + '\n';

                // any job can be awaited until completion (will use websockets/polling to see if the
                // job succeeds). The second argument is a data callback (with job logs).
                await api.runJobUntilCompletion({
                    type: 'project',
                    projectId: projectId,
                    jobId: exportJob.id,
                }, data => {
                    console.log(data);
                    jobOutputEl.textContent += data;
                });

                console.log('Job completed');
                jobOutputEl.textContent += 'Job completed\n';
            }
            catch (ex) {
                alert(`Error: ${ex.message || ex.toString()}`);
            }
            finally {
                runExportDataBtn.disabled = false;
            }
        };
    </script>
</body>
</html>

Type-hinting

Node.js

The Node.js package already includes types, so if you’re using Node.js, you’ll automatically get TypeScript integration and type-hinting.
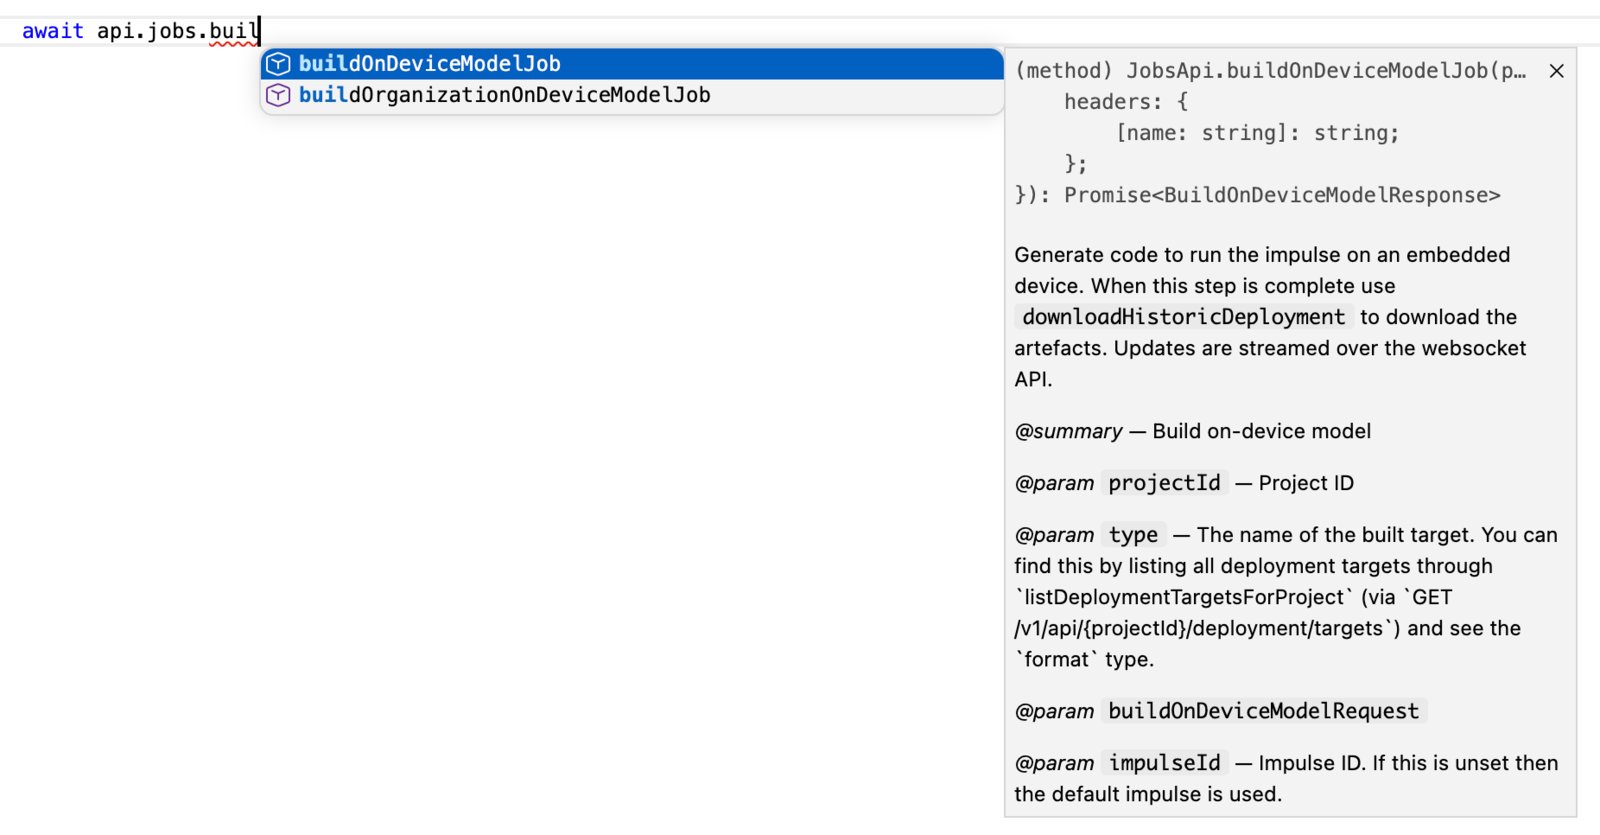
Browser (inline <script> tags)

To get local type-hinting, download edge-impulse-api.d.ts, and reference it using a triple-slash directive at the top of your TypeScript file:
/// <reference path="path/to/edge-impulse-api.d.ts" />

Browser (TypeScript project)

To get local type-hinting, download edge-impulse-api.d.ts, then add it to the includes section of your tsconfig.json:
{
    // ...
    "include": [
        "./**/*",
        "../studio-api/edge-impulse-api.d.ts"
    ]
}
Then you can reference the module from any TypeScript file:
import { EdgeImpulseApi } from "../studio-api/edge-impulse-api";