> ## Documentation Index
> Fetch the complete documentation index at: https://docs.edgeimpulse.com/llms.txt
> Use this file to discover all available pages before exploring further.
# Arduino UNO Q - Zephyr Module
> Deploy an Edge Impulse Zephyr module and run ML inference on the STM32 side of the dual-system Arduino UNO Q board.
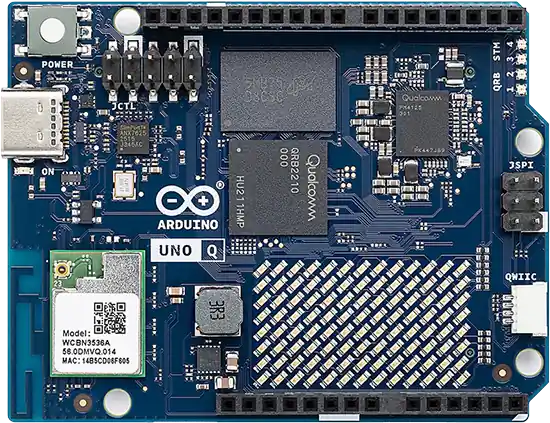
The Arduino® UNO™ Q is a dual-system board combining a Qualcomm QCS2210 (running Linux Debian) and an STMicroelectronics STM32U585 Microcontroller (running Zephyr RTOS).\
This guide walks you through deploying an Edge Impulse Zephyr module and running inference on the STM32 side.
`west` support for the UNO Q is still experimental. Debugging requires ADB port forwarding.\
See the official Zephyr documentation for the latest details:\
[https://docs.zephyrproject.org/latest/boards/arduino/uno\_q/doc/index.html](https://docs.zephyrproject.org/latest/boards/arduino/uno_q/doc/index.html)
 # Overview
The UNO Q consists of:
* **Qualcomm QCS2210** – Runs Linux Debian (host logic, logging, cloud, UI).
* **STMicroelectronics STM32U585 Microcontroller** – Runs Zephyr RTOS (real-time sensor IO + ML inference).
Your Edge Impulse model runs on the Zephyr (STM32) MCU, while the Linux side may consume results via UART, SPI, I²C, or shared logging.
# Prerequisites
* Edge Impulse Zephyr Module installed\
[https://docs.edgeimpulse.com/hardware/deployments/run-zephyr-module](https://docs.edgeimpulse.com/hardware/deployments/run-zephyr-module)
* ADB (Android Debug Bridge) installed:
```bash theme={"system"}
brew install android-platform-tools
```
* Optional: [OpenOCD](https://openocd.org/) or Segger J-Link (SWD debugging)
For IMU-based inference examples, you can use:
* **[X-NUCLEO-IKS02A1](https://www.st.com/en/evaluation-tools/x-nucleo-iks01a3.html)** - STMicroelectronics industrial motion MEMS sensor expansion board with ISM330DHCX 6-axis IMU. Connects via Arduino headers or I2C.
* **Arduino UNO R4 WiFi IMU Shield** with the LSM6DSOX sensor via the ESLOV connector.
Alternatively, you can use Qwiic-compatible IMU sensors via the Qwiic connector, such as:
* **SparkFun Qwiic 6DoF IMU** (LSM6DSO)
* **SparkFun Triple Axis Accelerometer** (ADXL345)
* **Grove 3-axis Accelerometer** (ADXL335) with a Grove to Qwiic adapter
These sensors connect via I2C and are compatible with Zephyr's sensor API.
# Step 1: Verify ADB Connection
First, verify your UNO Q is connected via USB and visible to ADB:
```bash theme={"system"}
adb devices
```
You should see something like:
```
List of devices attached
1914980263 device
```
ADB communicates with the Linux side of the UNO Q. Keep this connection active throughout development - the Linux side acts as the bridge for debugging the STM32 MCU.
## Step 2: Initialize the Example Project with Edge Impulse Zephyr Module
See our Edge Impulse Zephyr Module for the latest [deployment instructions](https://docs.edgeimpulse.com/hardware/deployments/run-zephyr-module)
Create and initialize your Zephyr workspace:
```bash theme={"system"}
mkdir ~/zephyrproject && cd ~/zephyrproject
west init -m https://github.com/edgeimpulse/example-standalone-inferencing-zephyr-module
cd example-standalone-inferencing-zephyr-module
west update
```
**All subsequent `west` commands (build, flash, debug) should be run from `~/zephyrproject/example-standalone-inferencing-zephyr-module`** unless otherwise specified.
This pulls:
* Zephyr core RTOS
* Edge Impulse Zephyr Module (edge-impulse-sdk-zephyr)
* Example app sources under src/
# Step 3: Deploy Your Model from Edge Impulse Studio
In Edge Impulse Studio, go to Deployment > Zephyr Module
Click Build
Download the .zip file (e.g. my\_model-zephyr.zip)
Extract it into your project:
```bash theme={"system"}
mkdir -p model
unzip ~/Downloads/my_model-zephyr.zip -d model
```
# Step 4: Add Model Path to CMakeLists.txt
Edit the project CMake file:
add the following line to the end of CMakeLists.txt:
```cmake theme={"system"}
list(APPEND ZEPHYR_EXTRA_MODULES ${CMAKE_CURRENT_SOURCE_DIR}/model)
```
This tells the build system where to find your Edge Impulse model.
# Step 5: Configure UNO Q Board for Zephyr Build
Open .west/config and set the board:
```bash theme={"system"}
[build]
board = arduino_uno_q
```
The UNO Q shares its STM32U585 Microcontroller architecture with the UNO Q, so arduino\_uno\_q is a working target until official uno\_q Zephyr support is merged. See Zephyr docs for the latest [here](https://docs.zephyrproject.org/latest/boards/arduino/uno_q/doc/index.html)
# Step 6: Build the Firmware
From the `~/zephyrproject/example-standalone-inferencing-zephyr-module` directory, build the firmware:
```bash theme={"system"}
west build -b arduino_uno_q --pristine
```
If you've built before and want a clean build:
```bash theme={"system"}
west build --pristine
```
You should see output similar to:
```
[858/858] Linking CXX executable zephyr/zephyr.elf
Memory region Used Size Region Size %age Used
FLASH: 164584 B 1 MB 15.70%
RAM: 19320 B 448 KB 4.21%
IDT_LIST: 0 GB 32 KB 0.00%
```
Now you have validated the build, you are ready to flash your own model and custom applications to the UNO Q.
# Step 7: Flash and Debug the UNO Q
The UNO Q requires a two-step process for flashing and debugging the STM32 MCU.
## Start the Debug Bridge
In **Terminal 1**, start the ADB port forwarding and OpenOCD server:
```bash theme={"system"}
adb forward tcp:3333 tcp:3333 && adb shell arduino-debug
```
Keep this terminal running. It bridges your development machine to the on-board OpenOCD server.
## Flash or Debug the Firmware
In **Terminal 2**, navigate to your project directory and run the flash or debug command:
```bash theme={"system"}
cd ~/zephyrproject/example-standalone-inferencing-zephyr-module
```
**To flash:**
```bash theme={"system"}
west flash -r openocd
```
**To debug:**
```bash theme={"system"}
west debug -r openocd
```
You should see output similar to:
```
-- runners.openocd: Flashing file: build/zephyr/zephyr.hex
```
The UNO Q does **not** support the `dfu-util` runner. Always use `openocd` as the runner for flashing and debugging.
# Step 8: View Inference Results
Once flashed, open a serial console to the UNO Q:
```bash theme={"system"}
minicom -D /dev/ttyACM0 -b 115200
```
Expected output (example):
```
Edge Impulse standalone inferencing (Zephyr)
Predictions:
normal: 0.02
anomaly: 0.98
```
# Step 9: (Advanced) Connect Linux & Zephyr Sides
If you want the Qualcomm Linux side to read inference results:
Use UART or shared SPI/I2C between QCS2210 ↔ STM32U585
Forward results to Linux process (e.g. Python script monitoring /dev/ttyS\*)
This lets you run high-level logic or cloud uploads on Debian while Zephyr handles real-time ML.
# Step 10: Update and Maintain
```bash theme={"system"}
west update
```
This keeps both Zephyr and Edge Impulse SDK up to date.
# Summary
You've successfully deployed an Edge Impulse model using the Edge Impulse Zephyr Module to the STM32 MCU on the UNO Q.
You can now build more complex applications combining real-time inference on Zephyr fully utilizing the UNO Q dual-system architecture, and leverage the low power MCU to the fullest extent.
# Overview
The UNO Q consists of:
* **Qualcomm QCS2210** – Runs Linux Debian (host logic, logging, cloud, UI).
* **STMicroelectronics STM32U585 Microcontroller** – Runs Zephyr RTOS (real-time sensor IO + ML inference).
Your Edge Impulse model runs on the Zephyr (STM32) MCU, while the Linux side may consume results via UART, SPI, I²C, or shared logging.
# Prerequisites
* Edge Impulse Zephyr Module installed\
[https://docs.edgeimpulse.com/hardware/deployments/run-zephyr-module](https://docs.edgeimpulse.com/hardware/deployments/run-zephyr-module)
* ADB (Android Debug Bridge) installed:
```bash theme={"system"}
brew install android-platform-tools
```
* Optional: [OpenOCD](https://openocd.org/) or Segger J-Link (SWD debugging)
For IMU-based inference examples, you can use:
* **[X-NUCLEO-IKS02A1](https://www.st.com/en/evaluation-tools/x-nucleo-iks01a3.html)** - STMicroelectronics industrial motion MEMS sensor expansion board with ISM330DHCX 6-axis IMU. Connects via Arduino headers or I2C.
* **Arduino UNO R4 WiFi IMU Shield** with the LSM6DSOX sensor via the ESLOV connector.
Alternatively, you can use Qwiic-compatible IMU sensors via the Qwiic connector, such as:
* **SparkFun Qwiic 6DoF IMU** (LSM6DSO)
* **SparkFun Triple Axis Accelerometer** (ADXL345)
* **Grove 3-axis Accelerometer** (ADXL335) with a Grove to Qwiic adapter
These sensors connect via I2C and are compatible with Zephyr's sensor API.
# Step 1: Verify ADB Connection
First, verify your UNO Q is connected via USB and visible to ADB:
```bash theme={"system"}
adb devices
```
You should see something like:
```
List of devices attached
1914980263 device
```
ADB communicates with the Linux side of the UNO Q. Keep this connection active throughout development - the Linux side acts as the bridge for debugging the STM32 MCU.
## Step 2: Initialize the Example Project with Edge Impulse Zephyr Module
See our Edge Impulse Zephyr Module for the latest [deployment instructions](https://docs.edgeimpulse.com/hardware/deployments/run-zephyr-module)
Create and initialize your Zephyr workspace:
```bash theme={"system"}
mkdir ~/zephyrproject && cd ~/zephyrproject
west init -m https://github.com/edgeimpulse/example-standalone-inferencing-zephyr-module
cd example-standalone-inferencing-zephyr-module
west update
```
**All subsequent `west` commands (build, flash, debug) should be run from `~/zephyrproject/example-standalone-inferencing-zephyr-module`** unless otherwise specified.
This pulls:
* Zephyr core RTOS
* Edge Impulse Zephyr Module (edge-impulse-sdk-zephyr)
* Example app sources under src/
# Step 3: Deploy Your Model from Edge Impulse Studio
In Edge Impulse Studio, go to Deployment > Zephyr Module
Click Build
Download the .zip file (e.g. my\_model-zephyr.zip)
Extract it into your project:
```bash theme={"system"}
mkdir -p model
unzip ~/Downloads/my_model-zephyr.zip -d model
```
# Step 4: Add Model Path to CMakeLists.txt
Edit the project CMake file:
add the following line to the end of CMakeLists.txt:
```cmake theme={"system"}
list(APPEND ZEPHYR_EXTRA_MODULES ${CMAKE_CURRENT_SOURCE_DIR}/model)
```
This tells the build system where to find your Edge Impulse model.
# Step 5: Configure UNO Q Board for Zephyr Build
Open .west/config and set the board:
```bash theme={"system"}
[build]
board = arduino_uno_q
```
The UNO Q shares its STM32U585 Microcontroller architecture with the UNO Q, so arduino\_uno\_q is a working target until official uno\_q Zephyr support is merged. See Zephyr docs for the latest [here](https://docs.zephyrproject.org/latest/boards/arduino/uno_q/doc/index.html)
# Step 6: Build the Firmware
From the `~/zephyrproject/example-standalone-inferencing-zephyr-module` directory, build the firmware:
```bash theme={"system"}
west build -b arduino_uno_q --pristine
```
If you've built before and want a clean build:
```bash theme={"system"}
west build --pristine
```
You should see output similar to:
```
[858/858] Linking CXX executable zephyr/zephyr.elf
Memory region Used Size Region Size %age Used
FLASH: 164584 B 1 MB 15.70%
RAM: 19320 B 448 KB 4.21%
IDT_LIST: 0 GB 32 KB 0.00%
```
Now you have validated the build, you are ready to flash your own model and custom applications to the UNO Q.
# Step 7: Flash and Debug the UNO Q
The UNO Q requires a two-step process for flashing and debugging the STM32 MCU.
## Start the Debug Bridge
In **Terminal 1**, start the ADB port forwarding and OpenOCD server:
```bash theme={"system"}
adb forward tcp:3333 tcp:3333 && adb shell arduino-debug
```
Keep this terminal running. It bridges your development machine to the on-board OpenOCD server.
## Flash or Debug the Firmware
In **Terminal 2**, navigate to your project directory and run the flash or debug command:
```bash theme={"system"}
cd ~/zephyrproject/example-standalone-inferencing-zephyr-module
```
**To flash:**
```bash theme={"system"}
west flash -r openocd
```
**To debug:**
```bash theme={"system"}
west debug -r openocd
```
You should see output similar to:
```
-- runners.openocd: Flashing file: build/zephyr/zephyr.hex
```
The UNO Q does **not** support the `dfu-util` runner. Always use `openocd` as the runner for flashing and debugging.
# Step 8: View Inference Results
Once flashed, open a serial console to the UNO Q:
```bash theme={"system"}
minicom -D /dev/ttyACM0 -b 115200
```
Expected output (example):
```
Edge Impulse standalone inferencing (Zephyr)
Predictions:
normal: 0.02
anomaly: 0.98
```
# Step 9: (Advanced) Connect Linux & Zephyr Sides
If you want the Qualcomm Linux side to read inference results:
Use UART or shared SPI/I2C between QCS2210 ↔ STM32U585
Forward results to Linux process (e.g. Python script monitoring /dev/ttyS\*)
This lets you run high-level logic or cloud uploads on Debian while Zephyr handles real-time ML.
# Step 10: Update and Maintain
```bash theme={"system"}
west update
```
This keeps both Zephyr and Edge Impulse SDK up to date.
# Summary
You've successfully deployed an Edge Impulse model using the Edge Impulse Zephyr Module to the STM32 MCU on the UNO Q.
You can now build more complex applications combining real-time inference on Zephyr fully utilizing the UNO Q dual-system architecture, and leverage the low power MCU to the fullest extent.