> ## Documentation Index
> Fetch the complete documentation index at: https://docs.edgeimpulse.com/llms.txt
> Use this file to discover all available pages before exploring further.
# Two-stage OCR on Linux devices
> Build a two-stage OCR pipeline on Linux edge devices using model cascading — detect text regions, then recognize characters.
In this tutorial, you will build a complete Optical Character Recognition (OCR) pipeline on Linux-based edge devices using Edge Impulse. This two-stage approach—first detecting text regions, then recognizing characters of the selected regions—makes OCR efficient and practical for real-world applications like reading signs, labels, documents, or license plates in industrial, retail, or assistive scenarios. By leveraging model cascading, you run a lightweight detector continuously and invoke the recognizer only on promising crops, optimizing CPU/GPU usage on devices like the Arduino® UNO™ Q, Rubik Pi, RB3 Gen 2 and more.
At the end of this tutorial, you will have a working OCR system running locally via a Python web UI (or CLI), understand how to import and deploy pretrained `PaddleOCR` models in Edge Impulse, and see how to integrate this into your own Python applications using the Edge Impulse Linux SDK.
 There is also a companion GitHub repository with the full code, prebuilt models, and scripts: [Two-stage OCR for Linux (Edge Impulse)](https://github.com/edgeimpulse/example-ocr-linux-python).
## Prerequisites
For this tutorial, you will need:
* A Linux-based device supported by Edge Impulse (e.g. UNO Q, Rubik Pi, RB3 Gen 2, or any aarch64 Linux board with a camera).
* A webcam or CSI camera connected to your device.
* Python 3.8+ installed.
* [Edge Impulse account](https://studio.edgeimpulse.com/signup?utm_medium=outbound\&utm_source=none\&utm_campaign=21157154-new-user-acquisition_fall2025\&utm_content=ocr-tutorial) (free tier is sufficient).
* Edge Impulse Linux CLI: Install via `npm install -g edge-impulse-cli` or follow [Edge Impulse CLI docs](https://docs.edgeimpulse.com/docs/cli-installation).
If you don't have a supported board, you can test on your development machine (macOS/Linux) and later deploy to edge hardware.
## Building your models in Edge Impulse
This OCR pipeline uses two imported models via Bring Your Own Model (BYOM):
* **Text Detector** (object detection, single-class): Locates text bounding boxes using the pretrained PaddleOCR detector.
* **Text Recognizer** (freeform output): Reads text from cropped regions. Must be the pretrained PaddleOCR recognizer.
### Upload the Text Detector model
* Download the PaddleOCR detector ONNX from Hugging Face: [monkt/paddleocr-onnx](https://huggingface.co/monkt/paddleocr-onnx) (`det.onnx`).
* Create a new Edge Impulse project (e.g., "PaddleOCR Detector - Pretrained").
There is also a companion GitHub repository with the full code, prebuilt models, and scripts: [Two-stage OCR for Linux (Edge Impulse)](https://github.com/edgeimpulse/example-ocr-linux-python).
## Prerequisites
For this tutorial, you will need:
* A Linux-based device supported by Edge Impulse (e.g. UNO Q, Rubik Pi, RB3 Gen 2, or any aarch64 Linux board with a camera).
* A webcam or CSI camera connected to your device.
* Python 3.8+ installed.
* [Edge Impulse account](https://studio.edgeimpulse.com/signup?utm_medium=outbound\&utm_source=none\&utm_campaign=21157154-new-user-acquisition_fall2025\&utm_content=ocr-tutorial) (free tier is sufficient).
* Edge Impulse Linux CLI: Install via `npm install -g edge-impulse-cli` or follow [Edge Impulse CLI docs](https://docs.edgeimpulse.com/docs/cli-installation).
If you don't have a supported board, you can test on your development machine (macOS/Linux) and later deploy to edge hardware.
## Building your models in Edge Impulse
This OCR pipeline uses two imported models via Bring Your Own Model (BYOM):
* **Text Detector** (object detection, single-class): Locates text bounding boxes using the pretrained PaddleOCR detector.
* **Text Recognizer** (freeform output): Reads text from cropped regions. Must be the pretrained PaddleOCR recognizer.
### Upload the Text Detector model
* Download the PaddleOCR detector ONNX from Hugging Face: [monkt/paddleocr-onnx](https://huggingface.co/monkt/paddleocr-onnx) (`det.onnx`).
* Create a new Edge Impulse project (e.g., "PaddleOCR Detector - Pretrained").
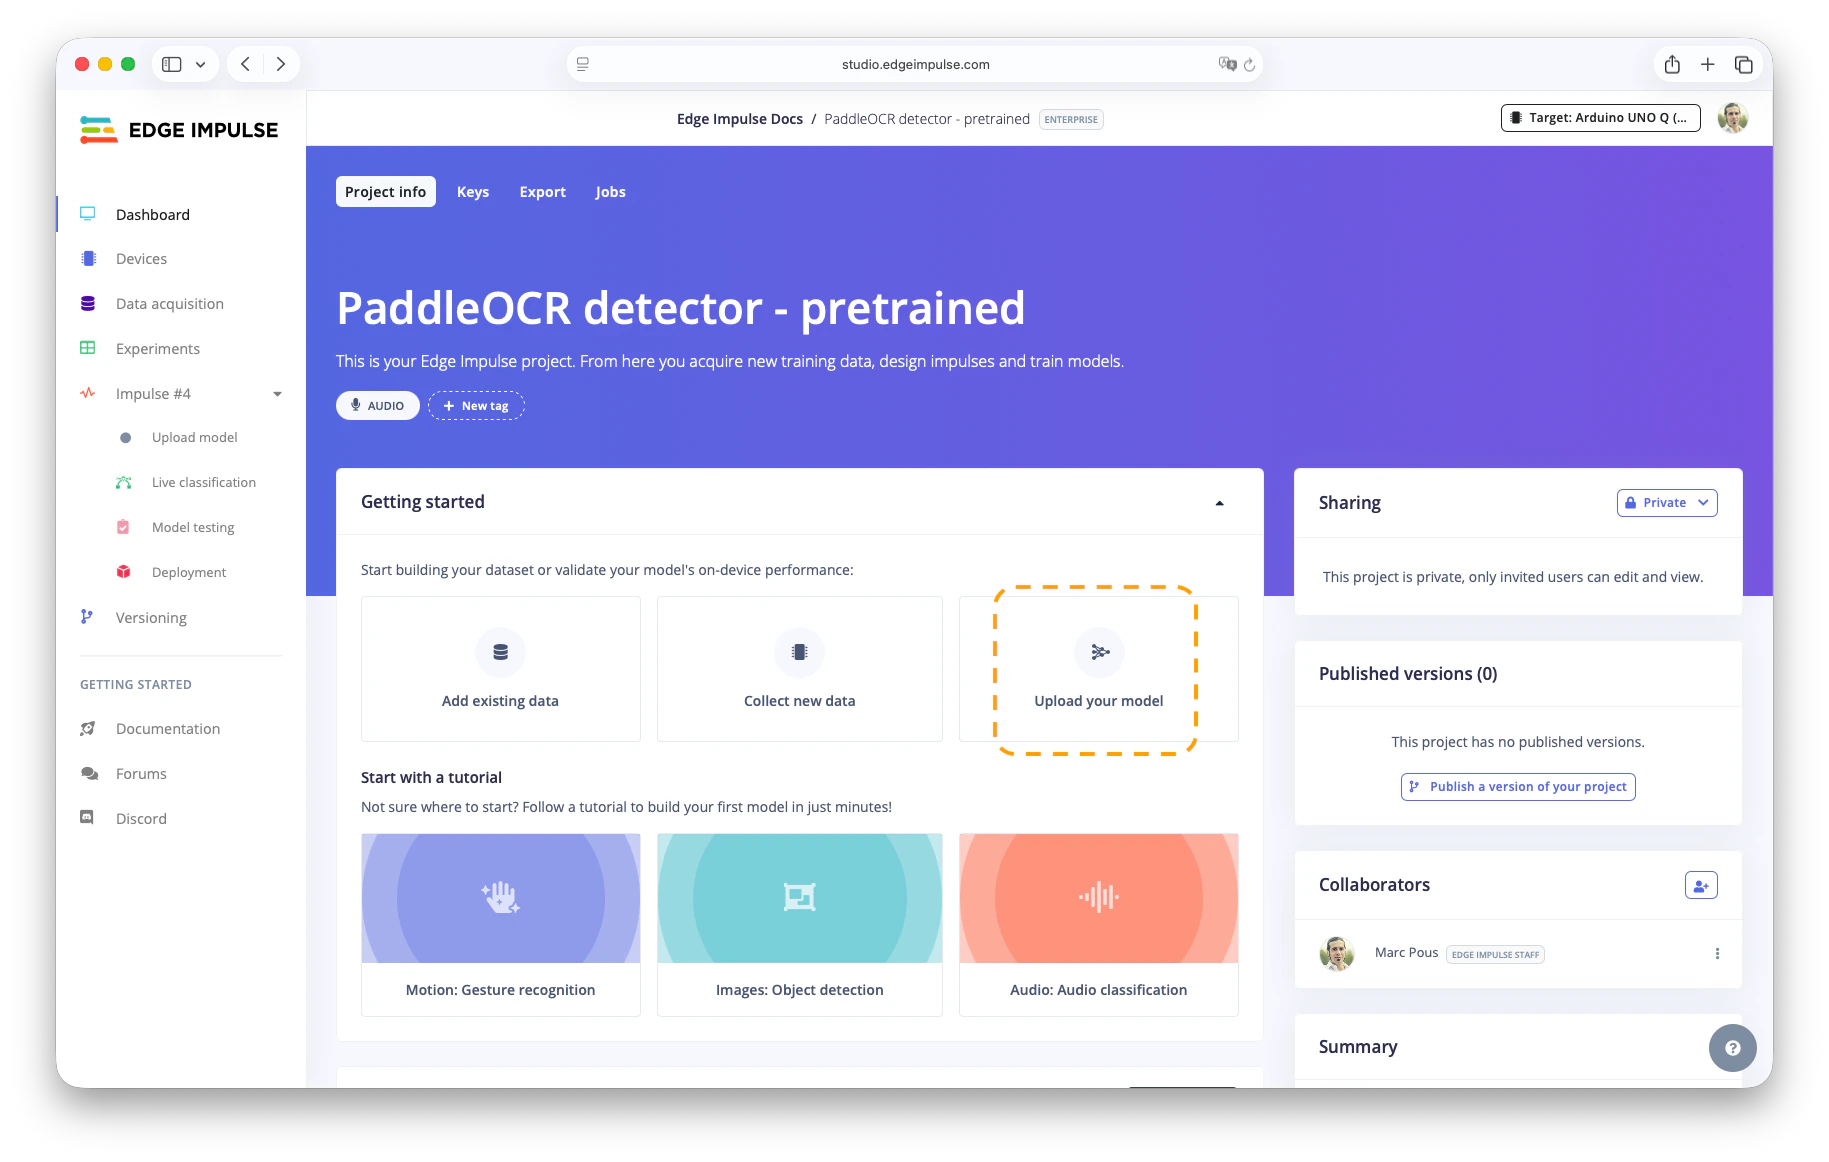 * Go to Dashboard > Upload your model.
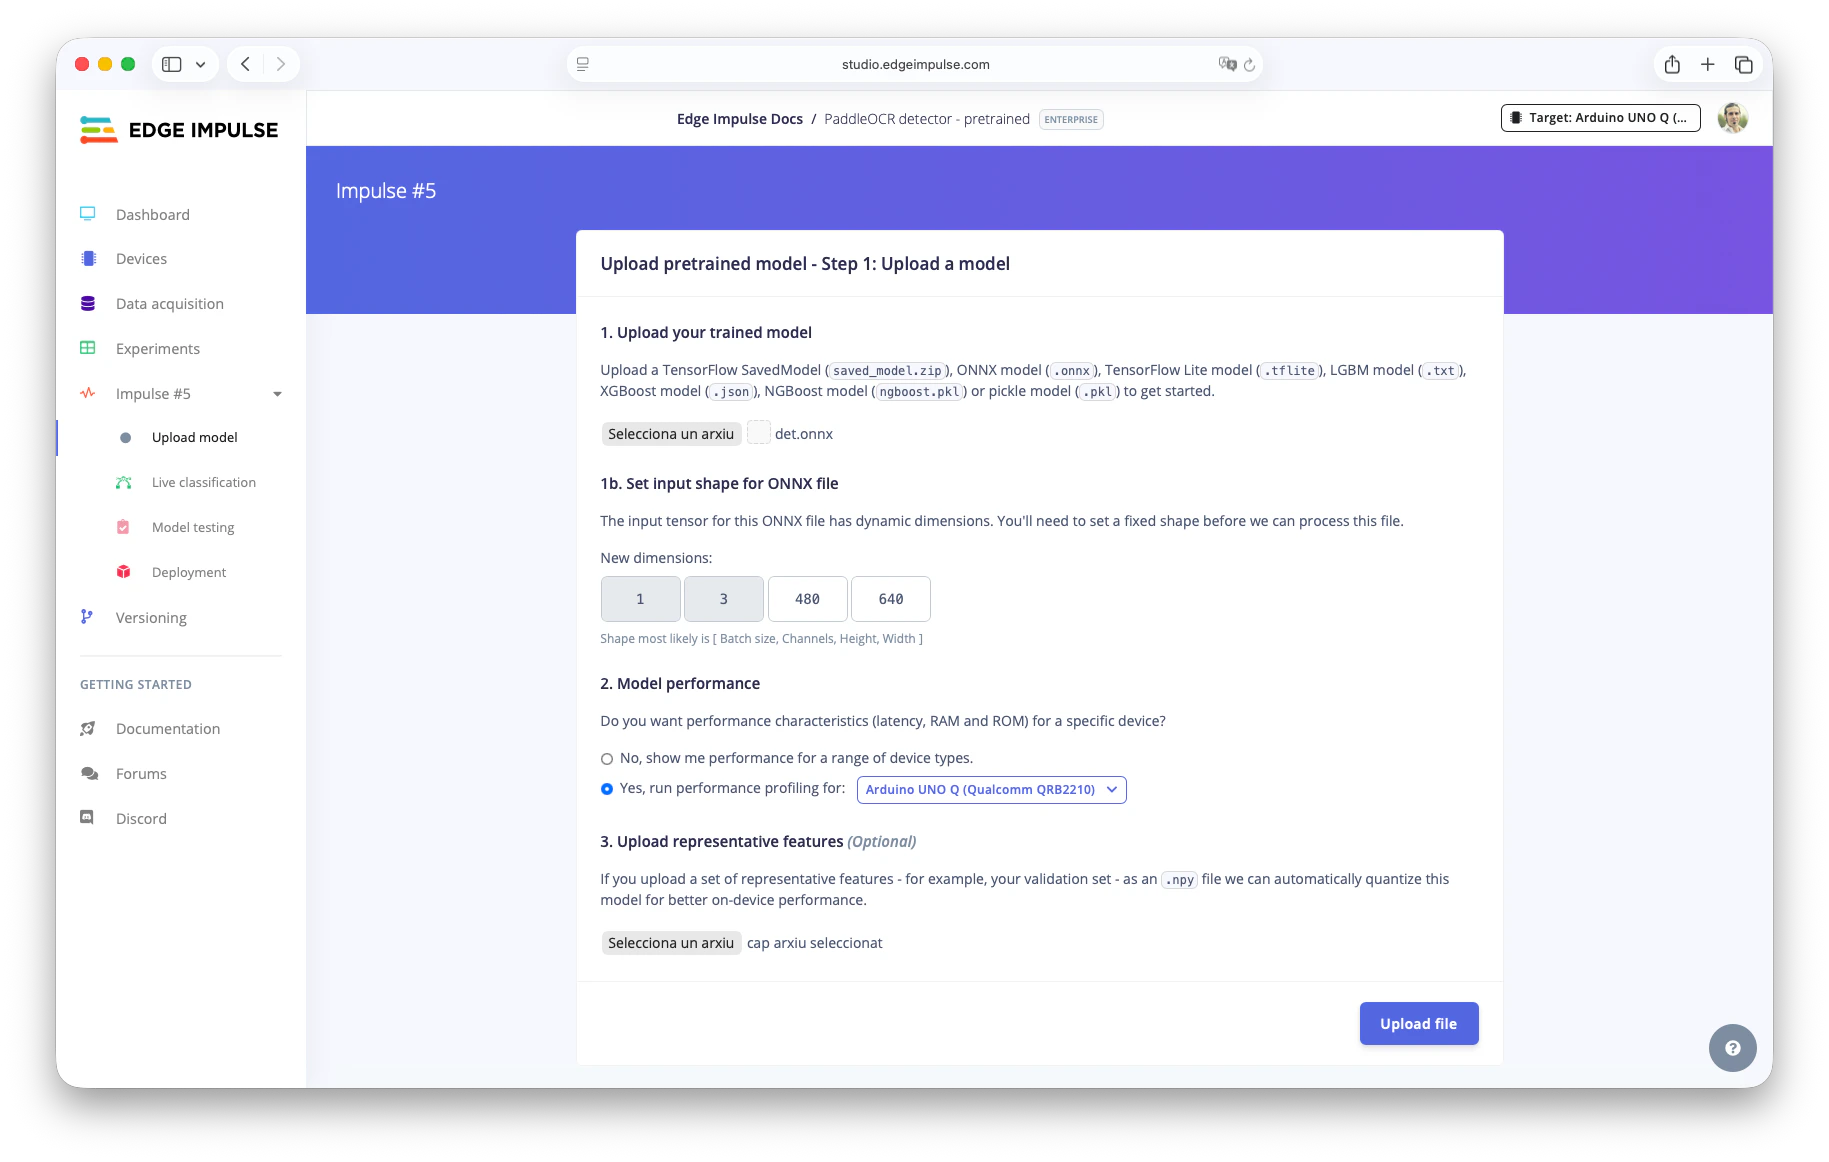
* Upload `det.onnx`.
* Set input shape: `1, 3, 480, 640` (adjust resolution if needed).
* Optional: Quantize by uploading a representative dataset (e.g., `source_models/repr_dataset_480_640.npy` from the repo).
* Go to Dashboard > Upload your model.
* Upload `det.onnx`.
* Set input shape: `1, 3, 480, 640` (adjust resolution if needed).
* Optional: Quantize by uploading a representative dataset (e.g., `source_models/repr_dataset_480_640.npy` from the repo).
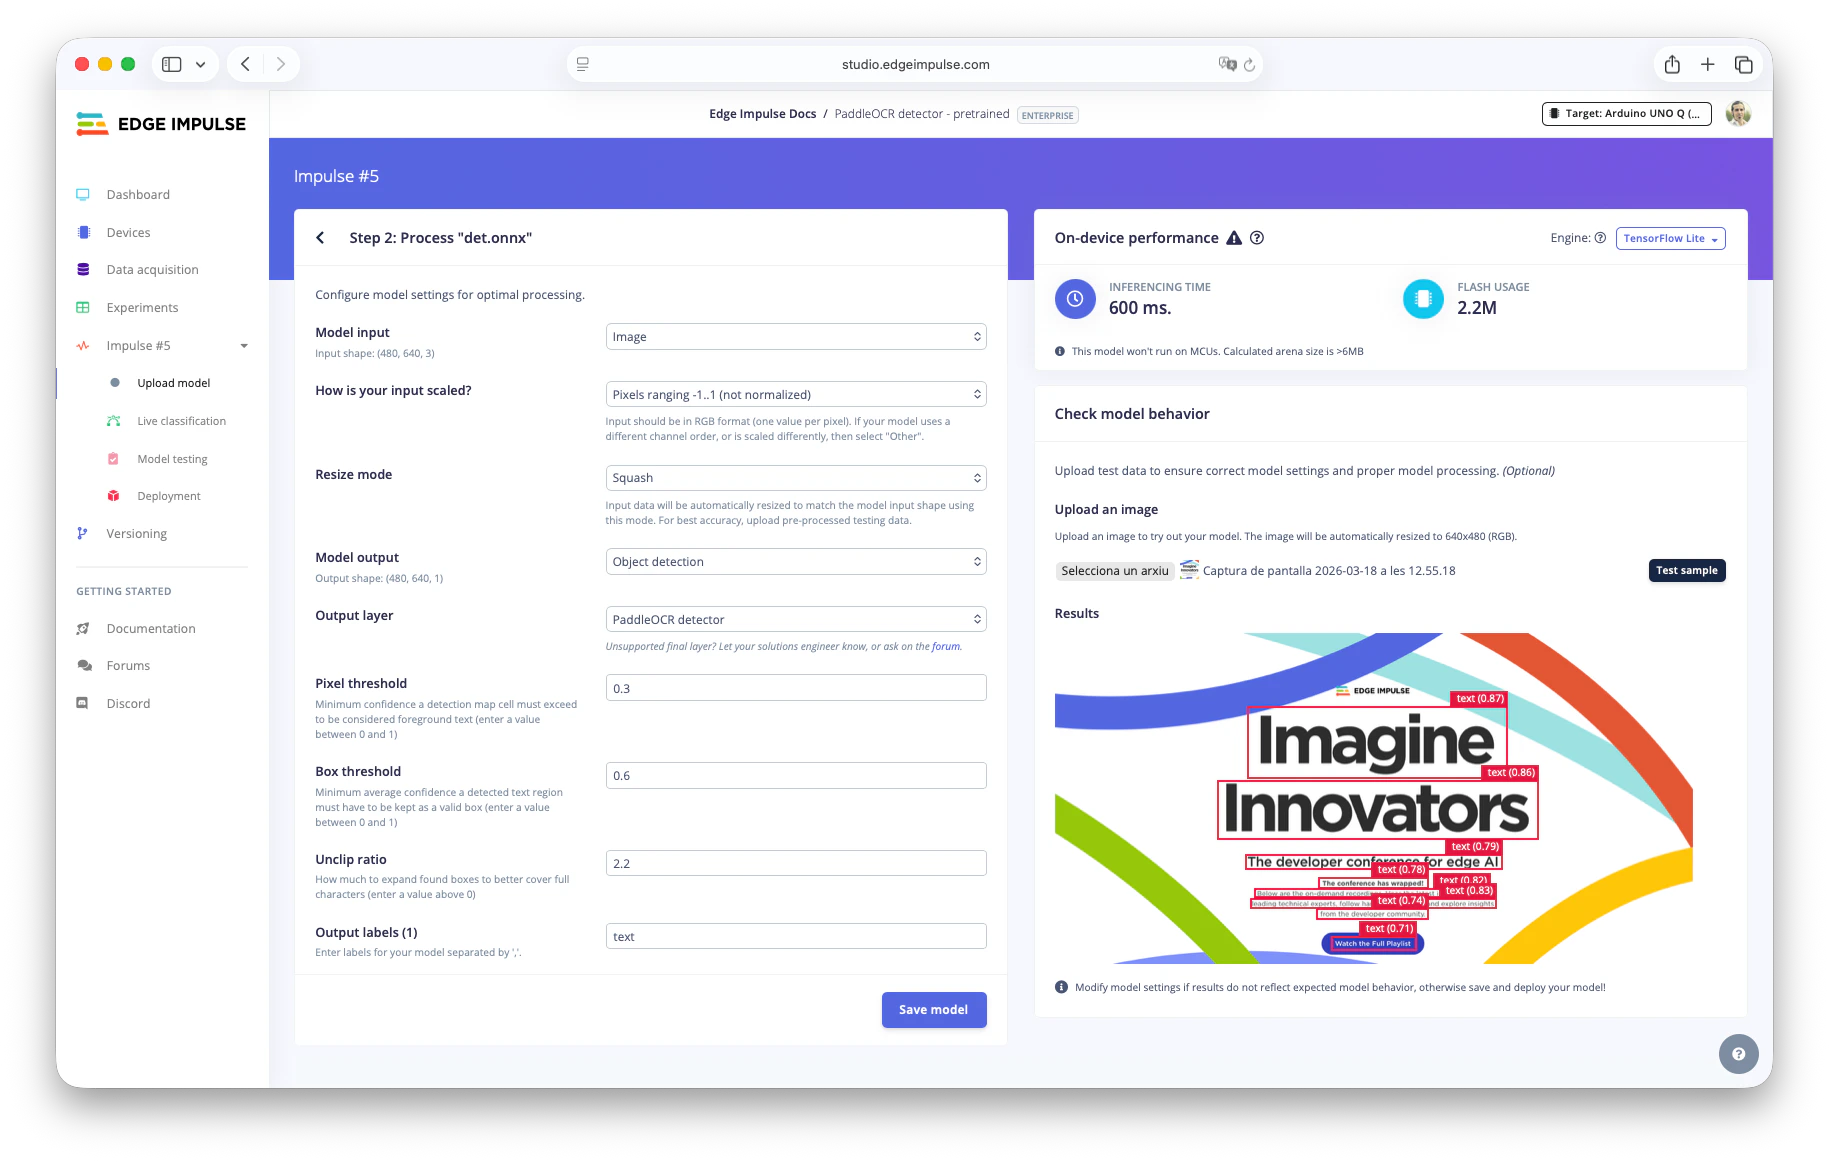
 * In Step 2:
* Model input: Image.
* Scaling: Pixels range -1..1 (not normalized).
* Output: Object detection.
* Output layer: PaddleOCR detector.
* Test with an image and tune thresholds if needed.
* In Step 2:
* Model input: Image.
* Scaling: Pixels range -1..1 (not normalized).
* Output: Object detection.
* Output layer: PaddleOCR detector.
* Test with an image and tune thresholds if needed.
 * Save the model.
* Deploy as `.eim`: Go to the Deployment section, select your target (e.g., `Linux aarch64` or `Arduino UNO Q`), and download both `float32` and `int8` variants.
### Uploading the Text Recognizer model
* Download a [PaddleOCR recognizer model (English)](https://huggingface.co/monkt/paddleocr-onnx/resolve/436f75fa5a51ecc6b1d27892684d9c49ac8600c0/languages/english/rec.onnx) (`rec.onnx`) in ONNX format (other languages available on HF: [monkt/paddleocr-onnx](https://huggingface.co/monkt/paddleocr-onnx)). For other languages, grab the matching `dict.txt`.
* Create another Edge Impulse Studio project (e.g., "PaddleOCR Recognizer - Pretrained").
* Upload `rec.onnx` with input shape `1, 3, 48, 320`.
* Optional: Quantize with representative dataset.
* If you want to use another resolution, you'll need to create a new representative dataset. Run from this repository:
Create a new venv, and install dependencies in `source_models/requirements.txt`
```
cd source_models && python3 -m venv .venv && source .venv/bin/activate && pip3 install -r requirements.txt && cd ..
```
Download an OpenImages subset
```
oi_download_images --base_dir=source_models/openimages --labels Car --limit 200
```
Create a representative dataset from OpenImages 'car' class, scaled -1..1
```
python3 source_models/create_representative_dataset.py --height 48 --width 320 --limit 60
```
* In Step 2:
* Model input: Image.
* Scaling: -1..1.
* Resize mode: Squash.
* Output: Freeform.
* Save and deploy `.eim` files as above.
## Downloading models to your device
On your target device (ensure hardware-specific optimizations):
* Install Edge Impulse CLI if not already.
* Download detector:
```
edge-impulse-linux-runner --download ./detect.eim --clean
```
* (Log in and select your detector project; repeat for int8 variant if quantized.)
* Download recognizer similarly.
* Place files in your project folder (e.g., `models/arduino-uno-q/` or `models/linux-aarch64/`).
### Running the OCR Python application
Clone the repo:
```
git clone https://github.com/edgeimpulse/example-ocr-linux-python
cd example-ocr-linux-python
```
Set up environment:
```
python3 -m venv .venv
source .venv/bin/activate
pip install -r requirements.txt
chmod +x models/*/*.eim
```
Run the web UI (recommended for interactive demo):
```
python3 web_inference.py \
--detect-file ./models//detect.eim \
--predict-file ./models//recognizer.eim \
--dict-file ./source_models/rec_en_dict.txt
```
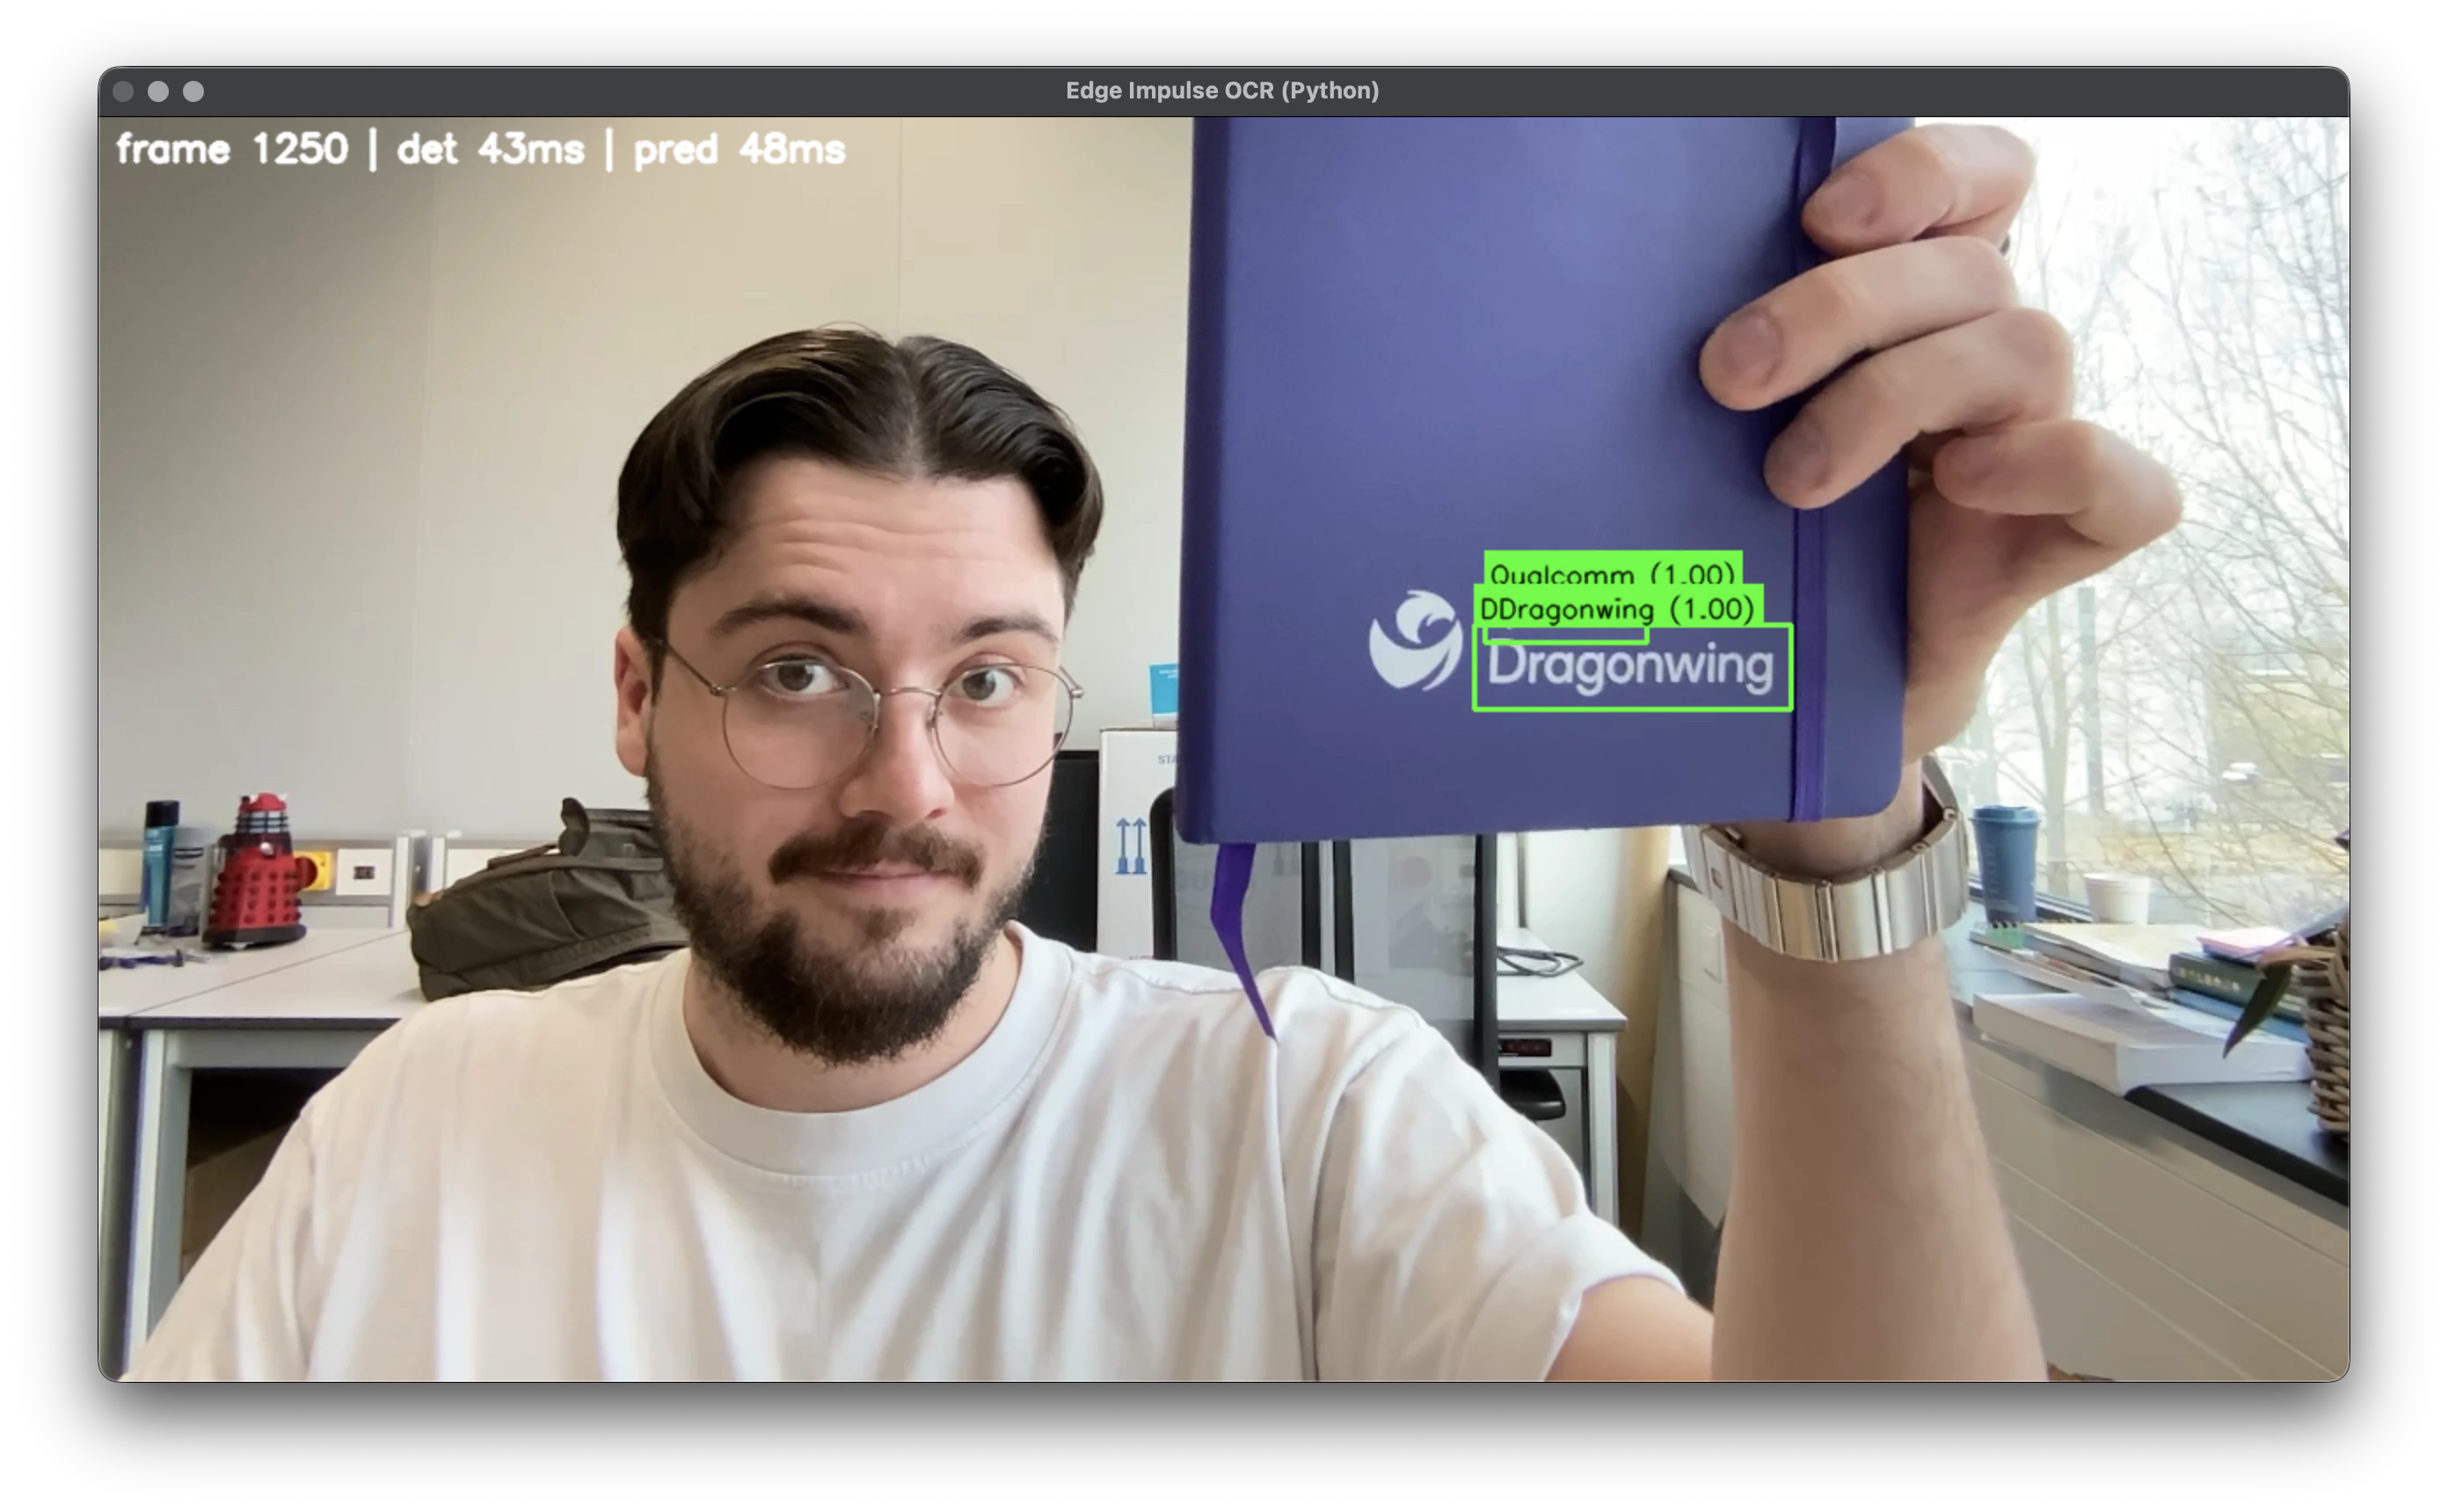
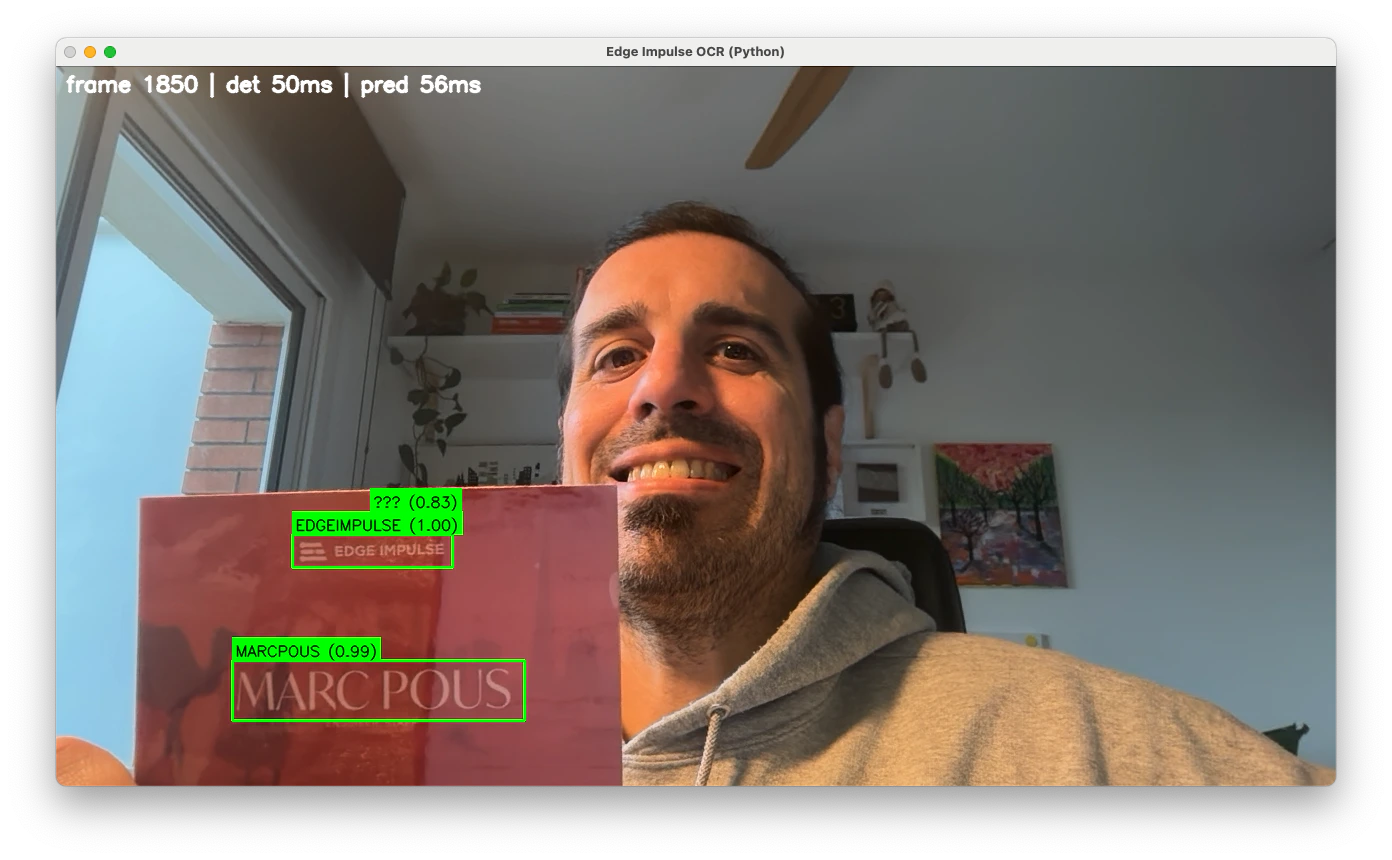
Open `http://:5000` in a browser, select your camera (e.g., `/dev/video2`), and start inference. You will see live detection bounding boxes and recognized text overlaid!
* Save the model.
* Deploy as `.eim`: Go to the Deployment section, select your target (e.g., `Linux aarch64` or `Arduino UNO Q`), and download both `float32` and `int8` variants.
### Uploading the Text Recognizer model
* Download a [PaddleOCR recognizer model (English)](https://huggingface.co/monkt/paddleocr-onnx/resolve/436f75fa5a51ecc6b1d27892684d9c49ac8600c0/languages/english/rec.onnx) (`rec.onnx`) in ONNX format (other languages available on HF: [monkt/paddleocr-onnx](https://huggingface.co/monkt/paddleocr-onnx)). For other languages, grab the matching `dict.txt`.
* Create another Edge Impulse Studio project (e.g., "PaddleOCR Recognizer - Pretrained").
* Upload `rec.onnx` with input shape `1, 3, 48, 320`.
* Optional: Quantize with representative dataset.
* If you want to use another resolution, you'll need to create a new representative dataset. Run from this repository:
Create a new venv, and install dependencies in `source_models/requirements.txt`
```
cd source_models && python3 -m venv .venv && source .venv/bin/activate && pip3 install -r requirements.txt && cd ..
```
Download an OpenImages subset
```
oi_download_images --base_dir=source_models/openimages --labels Car --limit 200
```
Create a representative dataset from OpenImages 'car' class, scaled -1..1
```
python3 source_models/create_representative_dataset.py --height 48 --width 320 --limit 60
```
* In Step 2:
* Model input: Image.
* Scaling: -1..1.
* Resize mode: Squash.
* Output: Freeform.
* Save and deploy `.eim` files as above.
## Downloading models to your device
On your target device (ensure hardware-specific optimizations):
* Install Edge Impulse CLI if not already.
* Download detector:
```
edge-impulse-linux-runner --download ./detect.eim --clean
```
* (Log in and select your detector project; repeat for int8 variant if quantized.)
* Download recognizer similarly.
* Place files in your project folder (e.g., `models/arduino-uno-q/` or `models/linux-aarch64/`).
### Running the OCR Python application
Clone the repo:
```
git clone https://github.com/edgeimpulse/example-ocr-linux-python
cd example-ocr-linux-python
```
Set up environment:
```
python3 -m venv .venv
source .venv/bin/activate
pip install -r requirements.txt
chmod +x models/*/*.eim
```
Run the web UI (recommended for interactive demo):
```
python3 web_inference.py \
--detect-file ./models//detect.eim \
--predict-file ./models//recognizer.eim \
--dict-file ./source_models/rec_en_dict.txt
```
Open `http://:5000` in a browser, select your camera (e.g., `/dev/video2`), and start inference. You will see live detection bounding boxes and recognized text overlaid!
 For CLI-only (with display):
```
python3 python/python-inference.py --detect-file ... --predict-file ... --dict-file ... --display
```
Use `--camera ` to select input.
## Understanding model cascading
The app runs inference with the detector model. Only when text is found (above the confidence threshold) does it crop the region and run the recognizer model.
This cascading saves resources—critical on edge devices like the UNO Q or others.
Find here another example of [Model Cascading between an object detection model and a VLM](https://www.edgeimpulse.com/blog/coming-soon-in-edge-ai-model-cascading-with-vlms/).
## Troubleshooting
No common issues have been identified thus far. If you encounter an issue, please reach out on the [forum](https://forum.edgeimpulse.com), or, if you are on the Enterprise plan, through your support channels.
If you don't see the camera connected when testing the application first check
```
ls /dev/video*
```
Check if you have any camera connected. If the issue persist and you don't see your camera send us the logs in the [Edge Impulse forum](https://forum.edgeimpulse.com/).
The recommendation here if you have slow inference is to try `int8` models or lower resolution.
## Next steps
If you arrived here you have built a powerful, local OCR system on Linux edge hardware. Now you can integrate it into robotics, glasses, or industrial inspection projects.
We can't wait to see what you will build next!
For CLI-only (with display):
```
python3 python/python-inference.py --detect-file ... --predict-file ... --dict-file ... --display
```
Use `--camera ` to select input.
## Understanding model cascading
The app runs inference with the detector model. Only when text is found (above the confidence threshold) does it crop the region and run the recognizer model.
This cascading saves resources—critical on edge devices like the UNO Q or others.
Find here another example of [Model Cascading between an object detection model and a VLM](https://www.edgeimpulse.com/blog/coming-soon-in-edge-ai-model-cascading-with-vlms/).
## Troubleshooting
No common issues have been identified thus far. If you encounter an issue, please reach out on the [forum](https://forum.edgeimpulse.com), or, if you are on the Enterprise plan, through your support channels.
If you don't see the camera connected when testing the application first check
```
ls /dev/video*
```
Check if you have any camera connected. If the issue persist and you don't see your camera send us the logs in the [Edge Impulse forum](https://forum.edgeimpulse.com/).
The recommendation here if you have slow inference is to try `int8` models or lower resolution.
## Next steps
If you arrived here you have built a powerful, local OCR system on Linux edge hardware. Now you can integrate it into robotics, glasses, or industrial inspection projects.
We can't wait to see what you will build next!