> ## Documentation Index
> Fetch the complete documentation index at: https://docs.edgeimpulse.com/llms.txt
> Use this file to discover all available pages before exploring further.
# Deploy pretrained models with freeform outputs
> Import and deploy a pretrained model with custom input/output formats into Edge Impulse using freeform model deployment.
This is an advanced feature that requires familiarity with machine learning architectures and model deployment.
It enables models that do not conform to the standard input/output format expected by Edge Impulse but requires manual handling of data preprocessing and postprocessing.
By default, Edge Impulse supports limited output formats for machine learning models (classification, regression, anomaly detection & object detection). However, there are scenarios where you may want to compile and deploy a model architecture that does not conform to these formats.
This tutorial shows how you can upload, deploy and test a model with non-standard input and output shapes using the freeform model integration feature in Edge Impulse's "Bring Your Own Model" (BYOM) framework.
## Example use cases
For this tutorial we will focus on an image upscaling example, but this approach can be applied to various models, such as:
* Denoising models (for images or audio)
* Super-resolution models (for images or audio)
* Pose estimation models
* Image segmentation models
* Time-series forecasting models
## Image upscaling example on Linux or Mac
Qualcomm® AI Hub provides a variety of pretrained models that can be used for different tasks. Many of them use non-standard input and output shapes, making them suitable candidates for freeform model integration. In this example, we will use the "QuickSRNetSmall" model from Qualcomm® AI Hub. You can bring your own model as well, as long as it conforms to the [Bring Your Own Model requirements](/studio/projects/dashboard/byom#limitations).
The QuickSRNetSmall model is a super-resolution model that takes a low-resolution image as input and produces a high-resolution image as output. The model expects an input shape of (128,128,3) flattened to a list and produces an output image 4x the resolution (512, 512, 3).
Here is an example of the input and output of the QuickSRNetSmall model:
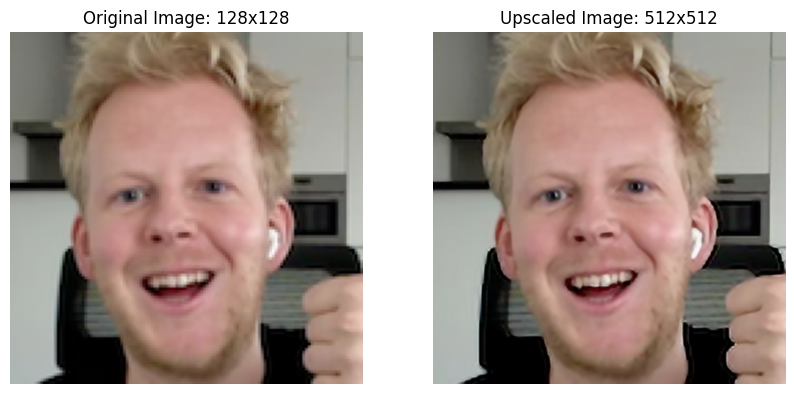 Traditionally, Edge Impulse would not support this model because the output is not a single label, value or set of bounding boxes, but rather a high-dimensional image. However, by using the freeform model integration feature, we can upload and deploy this model to an edge device.
This example uses the [Linux Python SDK](https://github.com/edgeimpulse/linux-sdk-python) to run the model locally.
### Converting the model
1. Download the QuickSRNetSmall model from [Qualcomm® AI Hub](https://aihub.qualcomm.com/models/quicksrnetsmall) as a quantized w8a8 `.tflite` file.
2. In Edge Impulse Studio open a new project and on the dashboard click "Upload your model"
3. Select your .tflite model file and upload it.
4. To configure your model input correctly for this image upscaling example select:
* Model Input: "Image"
* How is your Input scaled: "Pixels ranging 0..1 (not normalized)"
* Resize mode: "Squash"
* Model Output: "Freeform"
5. Click "Save model" to complete the upload process.
6. Build the model into an .EIM executable for your target device (Linux or macOS deployment options)
7. Once the build is complete the file will automatically be downloaded to your computer.
8. Follow the instructions on screen to mark the file as executable (e.g. `chmod +x .eim`)
### Testing the model locally
1. Install the Edge Impulse Linux python SDK and its dependencies (if you haven't already).
You'll need a Python 3.6+ environment with pip installed. Run the following commands in your terminal to install the SDK and its dependencies:
```bash theme={"system"}
pip install numpy>=1.19,<3
pip install opencv-python>=4.5.1.48,<5
pip install PyAudio>=0.2.11,<0.3
pip install six>=1.16.0,<2
pip install edge-impulse-linux
```
2. Download a low-resolution test image (replace `byom-freeform-example-input.png`) and resize it to 128x128 pixels using an image editing tool or library of your choice.
Traditionally, Edge Impulse would not support this model because the output is not a single label, value or set of bounding boxes, but rather a high-dimensional image. However, by using the freeform model integration feature, we can upload and deploy this model to an edge device.
This example uses the [Linux Python SDK](https://github.com/edgeimpulse/linux-sdk-python) to run the model locally.
### Converting the model
1. Download the QuickSRNetSmall model from [Qualcomm® AI Hub](https://aihub.qualcomm.com/models/quicksrnetsmall) as a quantized w8a8 `.tflite` file.
2. In Edge Impulse Studio open a new project and on the dashboard click "Upload your model"
3. Select your .tflite model file and upload it.
4. To configure your model input correctly for this image upscaling example select:
* Model Input: "Image"
* How is your Input scaled: "Pixels ranging 0..1 (not normalized)"
* Resize mode: "Squash"
* Model Output: "Freeform"
5. Click "Save model" to complete the upload process.
6. Build the model into an .EIM executable for your target device (Linux or macOS deployment options)
7. Once the build is complete the file will automatically be downloaded to your computer.
8. Follow the instructions on screen to mark the file as executable (e.g. `chmod +x .eim`)
### Testing the model locally
1. Install the Edge Impulse Linux python SDK and its dependencies (if you haven't already).
You'll need a Python 3.6+ environment with pip installed. Run the following commands in your terminal to install the SDK and its dependencies:
```bash theme={"system"}
pip install numpy>=1.19,<3
pip install opencv-python>=4.5.1.48,<5
pip install PyAudio>=0.2.11,<0.3
pip install six>=1.16.0,<2
pip install edge-impulse-linux
```
2. Download a low-resolution test image (replace `byom-freeform-example-input.png`) and resize it to 128x128 pixels using an image editing tool or library of your choice.
 3. Run the following Python script to preprocess the image, run the model (replace `path_to_your.eim`), and show the output image:
```python theme={"system"}
from edge_impulse_linux.image import ImageImpulseRunner
import cv2
import matplotlib.pyplot as plt
import numpy as np
img = cv2.imread('byom-freeform-example-input.png')
img = cv2.cvtColor(img, cv2.COLOR_BGR2RGB) # Convert image to RGB
modelfile = "path_to_your.eim"
runner = ImageImpulseRunner(modelfile)
model_info = runner.init()
# Get features from the image resized to match the model input
features, cropped = runner.get_features_from_image_auto_studio_settings(img)
# Pass the image data to the model for inference
res = runner.classify(features)
# Extract the freeform results
freeform_results = np.array(res["result"]["freeform"])
# Calculate possible width and height (since it's RGB, shape should be (w*h*3,))
total_pixels = freeform_results.size // 3
side = int(np.sqrt(total_pixels))
# convert back to image and show
img_out = freeform_results.reshape((side, side, 3))
# Show the original and generated images side by side
fig, axs = plt.subplots(1, 2, figsize=(10, 5))
axs[0].imshow(img)
axs[0].set_title(f'Original Image: {img.shape[1]}x{img.shape[0]}')
axs[0].axis('off')
axs[1].imshow(img_out)
axs[1].set_title(f'Upscaled Image: {img_out.shape[1]}x{img_out.shape[0]}')
axs[1].axis('off')
plt.show()
```
This example could be expanded to work on any resolution by tiling the input image into 128x128 patches, running each patch through the model, and then stitching the output patches back together.
## Conclusion
In this tutorial, we demonstrated how to upload, deploy, and test a pretrained model with non-standard input and output shapes using Edge Impulse's freeform model integration feature. This approach allows you to leverage a wide range of machine learning models for various applications, even if they do not conform to the traditional input/output formats supported by Edge Impulse.
This feature enables complex model cascading use-cases- for example, you could use a denoising model as a preprocessing step before feeding the cleaned data into a traditional Edge Impulse classification model.
There are some key considerations to keep in mind when using this feature:
* You are responsible for ensuring that the input data is preprocessed correctly to match the model's expected input shape and format.
* You are also responsible for postprocessing the model's output to extract meaningful information.
* The model must conform to the [Bring Your Own Model requirements](/studio/projects/dashboard/byom#limitations).
3. Run the following Python script to preprocess the image, run the model (replace `path_to_your.eim`), and show the output image:
```python theme={"system"}
from edge_impulse_linux.image import ImageImpulseRunner
import cv2
import matplotlib.pyplot as plt
import numpy as np
img = cv2.imread('byom-freeform-example-input.png')
img = cv2.cvtColor(img, cv2.COLOR_BGR2RGB) # Convert image to RGB
modelfile = "path_to_your.eim"
runner = ImageImpulseRunner(modelfile)
model_info = runner.init()
# Get features from the image resized to match the model input
features, cropped = runner.get_features_from_image_auto_studio_settings(img)
# Pass the image data to the model for inference
res = runner.classify(features)
# Extract the freeform results
freeform_results = np.array(res["result"]["freeform"])
# Calculate possible width and height (since it's RGB, shape should be (w*h*3,))
total_pixels = freeform_results.size // 3
side = int(np.sqrt(total_pixels))
# convert back to image and show
img_out = freeform_results.reshape((side, side, 3))
# Show the original and generated images side by side
fig, axs = plt.subplots(1, 2, figsize=(10, 5))
axs[0].imshow(img)
axs[0].set_title(f'Original Image: {img.shape[1]}x{img.shape[0]}')
axs[0].axis('off')
axs[1].imshow(img_out)
axs[1].set_title(f'Upscaled Image: {img_out.shape[1]}x{img_out.shape[0]}')
axs[1].axis('off')
plt.show()
```
This example could be expanded to work on any resolution by tiling the input image into 128x128 patches, running each patch through the model, and then stitching the output patches back together.
## Conclusion
In this tutorial, we demonstrated how to upload, deploy, and test a pretrained model with non-standard input and output shapes using Edge Impulse's freeform model integration feature. This approach allows you to leverage a wide range of machine learning models for various applications, even if they do not conform to the traditional input/output formats supported by Edge Impulse.
This feature enables complex model cascading use-cases- for example, you could use a denoising model as a preprocessing step before feeding the cleaned data into a traditional Edge Impulse classification model.
There are some key considerations to keep in mind when using this feature:
* You are responsible for ensuring that the input data is preprocessed correctly to match the model's expected input shape and format.
* You are also responsible for postprocessing the model's output to extract meaningful information.
* The model must conform to the [Bring Your Own Model requirements](/studio/projects/dashboard/byom#limitations).