> ## Documentation Index
> Fetch the complete documentation index at: https://docs.edgeimpulse.com/llms.txt
> Use this file to discover all available pages before exploring further.
# Use embeddings for sensor fusion
> Combine high-dimensional audio or image embeddings with time-series sensor data for advanced sensor fusion using custom DSP blocks.
export const CardOpenStudioTutorial = ({href}) =>
Skip the setup: clone a ready-to-use Edge Impulse project with the dataset, impulse, and trained model.
;
Sensor fusion is about combining data from various sensors to gain a more comprehensive understanding of your environment. In this tutorial, we will demonstrate sensor fusion by bringing together high-dimensional **audio or image** data with **time-series sensor** data. This combination allows you to extract deeper insights from your sensor data.
This is an advanced tutorial where you will need to parse your dataset to create multi-sensor data samples, train several Edge Impulse project in order to extract the embeddings from the `tflite` models, create [custom DSP blocks](/studio/organizations/custom-blocks/custom-processing-blocks) and, finally, modify the C++ inferencing SDK.
If you are looking for a more beginner-level tutorial, please head to the [Sensor Fusion](/tutorials/end-to-end/environmental-sensor-fusion) tutorial.
## Concepts
**Multi-impulse vs multi-model vs sensor fusion**
Running **multi-impulse** refers to running two separate projects (different data, different DSP blocks and different models) on the same target. It will require modifying some files in the EI-generated SDKs.
Running **multi-model** refers to running two different models (same data, same DSP block but different tflite models) on the same target. See how to run a motion classifier model and an anomaly detection model on the same device in [this tutorial](/tutorials/end-to-end/motion-recognition).
**Sensor fusion** refers to the process of combining data from different types of sensors to give more information to the neural network. To extract meaningful information from this data, you can use the same DSP block, multiples DSP blocks, or use neural networks embeddings like we will see in this tutorial.
Also, see this video (starting min 13):
### The Challenge of Handling Multiple Data Types
When you have data coming from multiple sources, such as a microphone capturing audio, a camera capturing images, and sensors collecting time-series data. Integrating these diverse data types can be tricky and conventional methods fall short.
### The Limitations of Default Workflows
With the standard workflow, if you have data streams from various sources, you might want to create separate DSP blocks for each data type. For instance, if you're dealing with audio data from microphones, image data from cameras, and time-series sensor data from accelerometers, you could create separate DSP blocks for each. For example:
* A spectrogram-based DSP block for audio data
* An image DSP block for image data
* A spectral analysis block for time-series sensor data
This approach initially seems logical but comes with limitations:
When using separate DSP blocks, you're constrained in your choice of neural networks. The features extracted from each data type are fundamentally different. For example, a pixel in an image or an image's spectrogram and a data point from an accelerometer's time-series data have distinct characteristics. This incompatibility makes it challenging to use a convolutional neural network (CNN) that is typically effective for image data or spectrogram. As a result, fully connected networks may be your only option, which are not ideal for audio or image data.
### The Role of Embeddings
To bypass the limitation stated above, you may consider using neural networks embeddings. In essence, embeddings are compact, meaningful representations of your data, learned by a neural network.
Embeddings are used throughout Edge Impulse, including the [Data Explorer](/studio/projects/data-acquisition/data-explorer) and this advanced sensor fusion tutorial.
While training the neural network, the model try to find the mathematical formula that best maps the input to the output. This is done by tweaking each neuron (each neuron is a parameter in our formula). The interesting part is that each layer of the neural network will start acting like a feature extracting step but highly tuned for your specific data.
Finally, instead of having a classifier for last layer (usually a `softmax` layer), we cut the neural network somewhere at the end and we obtained the embeddings.
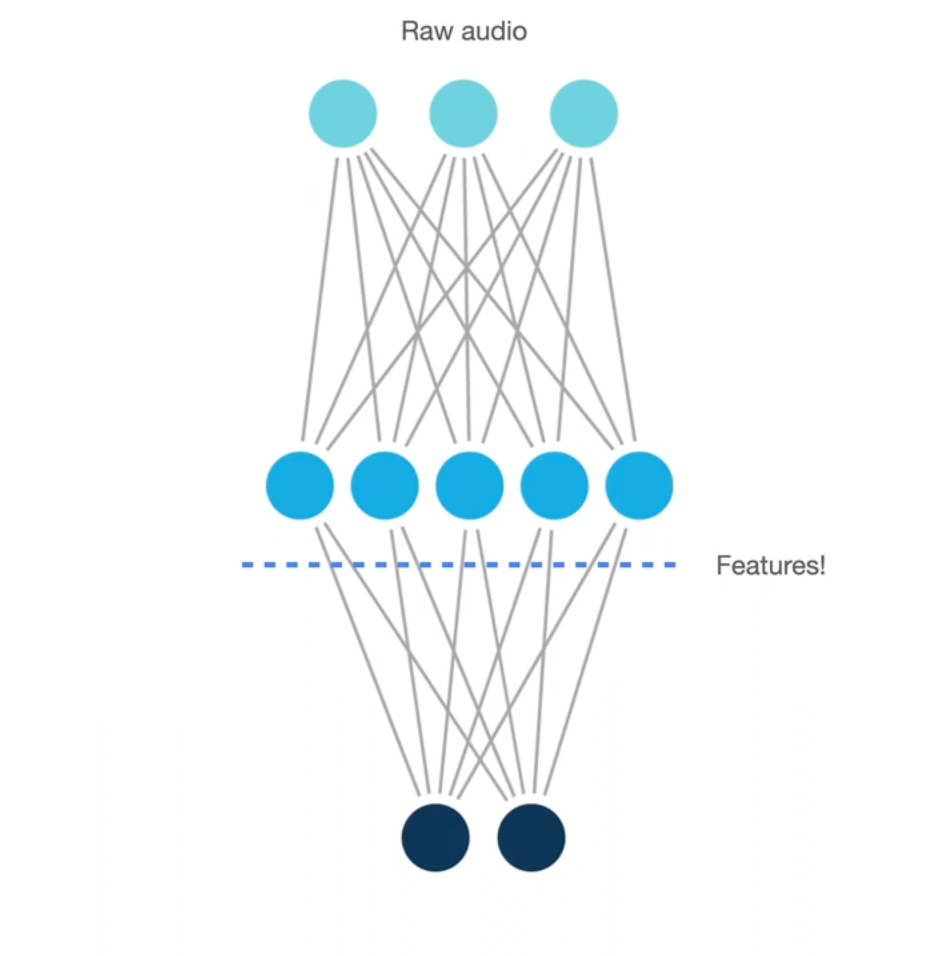 Thus, we can consider the embeddings as learnt features and we will pass these "features" to the final Impulse:
## Sensor Fusion Workflow using Embeddings
Here's how we approach advanced sensor fusion with Edge Impulse.
In this workflow, we will show how to perform sensor fusion using both audio data and accelerometer data to classify different stages of a grinding coffee machine (`grind`, `idle`, `pump` and `extract`). First, we are going to use a spectrogram DSP block and a NN classifier using two dense network. This first impulse will then be used to generate the embeddings and will be made available in a custom DSP block. Finally, we are going to train a fully connected layer using features coming from both the generated embeddings and a spectral feature DSP block.
We have develop two Edge Impulse public projects, one publicly available dataset and a Github repository containing the source code to help you follow the steps:
* Dataset: [Coffee Machine Stages](https://cdn.edgeimpulse.com/datasets/coffee_machine_stages.zip)
* Edge Impulse project 1 (used to generate the embeddings): [Audio Sensor Fusion - Step 1](https://studio.edgeimpulse.com/public/299343/latest)
* Edge Impulse project 2 (final impulse): [Audio Sensor Fusion - Step 2](https://studio.edgeimpulse.com/public/299865/latest)
* Github repository containing the source code: [Sensor fusion using NN Embeddings](https://github.com/edgeimpulse/example-sensor-fusion-using-embeddings/)
Please note that with a few changes, you will be able to change the sensor type (audio to images) or the first pre-processing method (spectrogram to MFE/MFCC).
### 1. Prepare your dataset
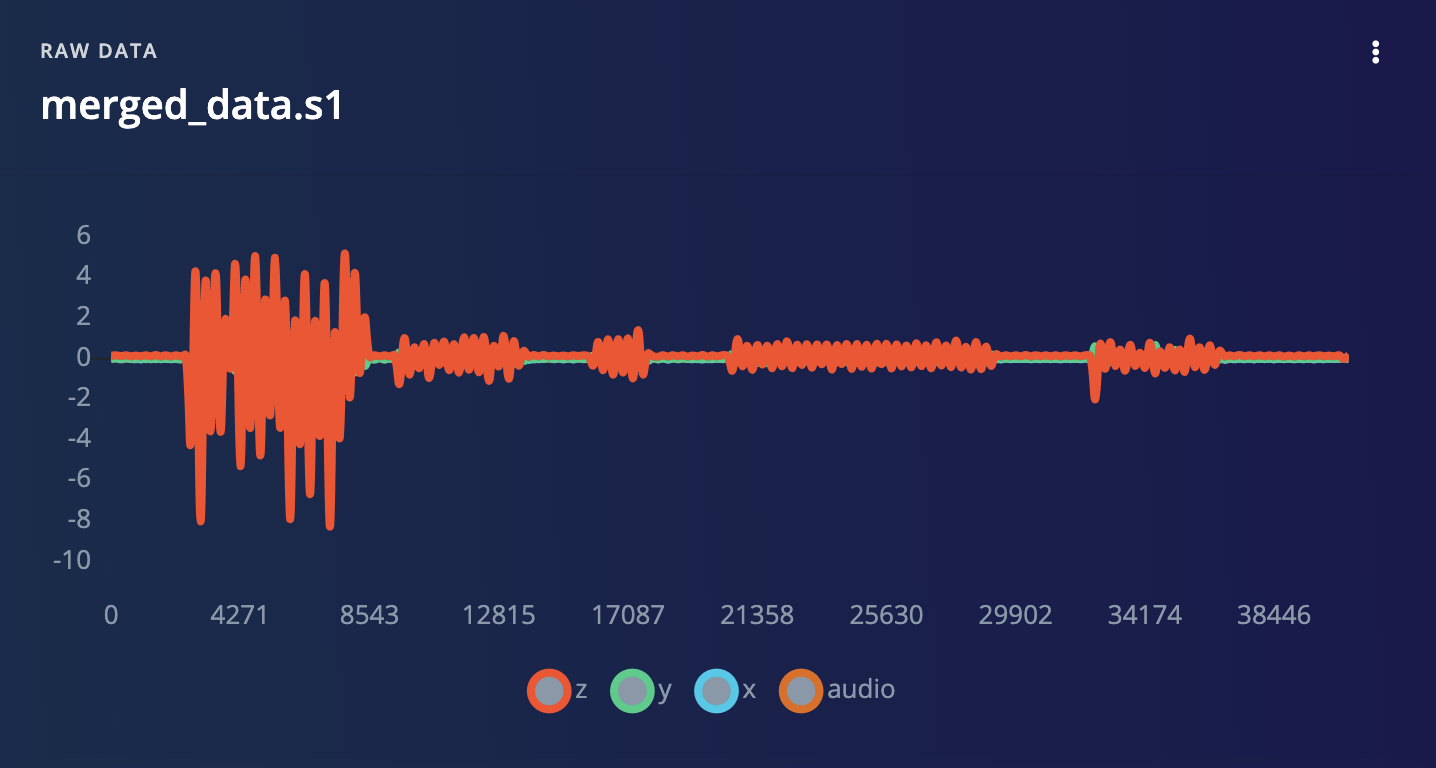
The first step is to have input data samples that contain both sensors.
In Edge Impulse studio, you can easily visualize time-series data, like audio and accelerometer data.
Thus, we can consider the embeddings as learnt features and we will pass these "features" to the final Impulse:
## Sensor Fusion Workflow using Embeddings
Here's how we approach advanced sensor fusion with Edge Impulse.
In this workflow, we will show how to perform sensor fusion using both audio data and accelerometer data to classify different stages of a grinding coffee machine (`grind`, `idle`, `pump` and `extract`). First, we are going to use a spectrogram DSP block and a NN classifier using two dense network. This first impulse will then be used to generate the embeddings and will be made available in a custom DSP block. Finally, we are going to train a fully connected layer using features coming from both the generated embeddings and a spectral feature DSP block.
We have develop two Edge Impulse public projects, one publicly available dataset and a Github repository containing the source code to help you follow the steps:
* Dataset: [Coffee Machine Stages](https://cdn.edgeimpulse.com/datasets/coffee_machine_stages.zip)
* Edge Impulse project 1 (used to generate the embeddings): [Audio Sensor Fusion - Step 1](https://studio.edgeimpulse.com/public/299343/latest)
* Edge Impulse project 2 (final impulse): [Audio Sensor Fusion - Step 2](https://studio.edgeimpulse.com/public/299865/latest)
* Github repository containing the source code: [Sensor fusion using NN Embeddings](https://github.com/edgeimpulse/example-sensor-fusion-using-embeddings/)
Please note that with a few changes, you will be able to change the sensor type (audio to images) or the first pre-processing method (spectrogram to MFE/MFCC).
### 1. Prepare your dataset
The first step is to have input data samples that contain both sensors.
In Edge Impulse studio, you can easily visualize time-series data, like audio and accelerometer data.
 *Note: it is not trivial to group together images and time-series. Our core-engineering team is working on improving this workflow. In the meantime, as a workaround, you can encode your image as time-series with one axis per channel (red, green, blue) plus the sensor:*
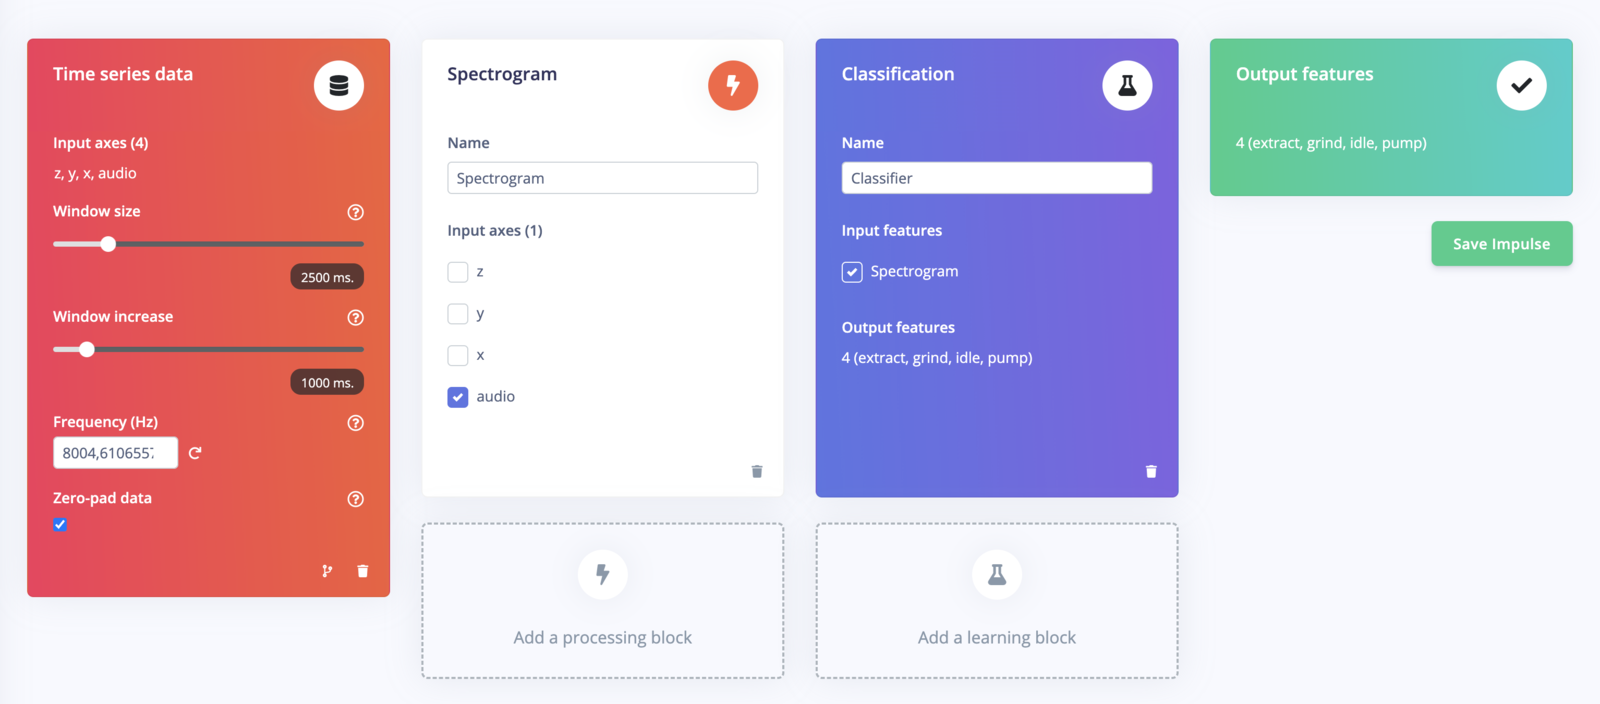
 ### 2. Training Edge Impulse projects for each high-dimensional sensor data
Train separate projects for high dimensional data (audio or image data). Each project contains both a DSP block and a trained neural network.
### 2. Training Edge Impulse projects for each high-dimensional sensor data
Train separate projects for high dimensional data (audio or image data). Each project contains both a DSP block and a trained neural network.
 See [Audio Sensor Fusion - Step 1](https://studio.edgeimpulse.com/public/299343/latest)
### 3. Generate the Embeddings using the exported C++ inferencing SDK
Clone this repository:
```
git clone https://github.com/edgeimpulse/example-sensor-fusion-using-embeddings.git
```
Download the generated Impulse to extract the embeddings, which encapsulate distilled knowledge about their respective data types.
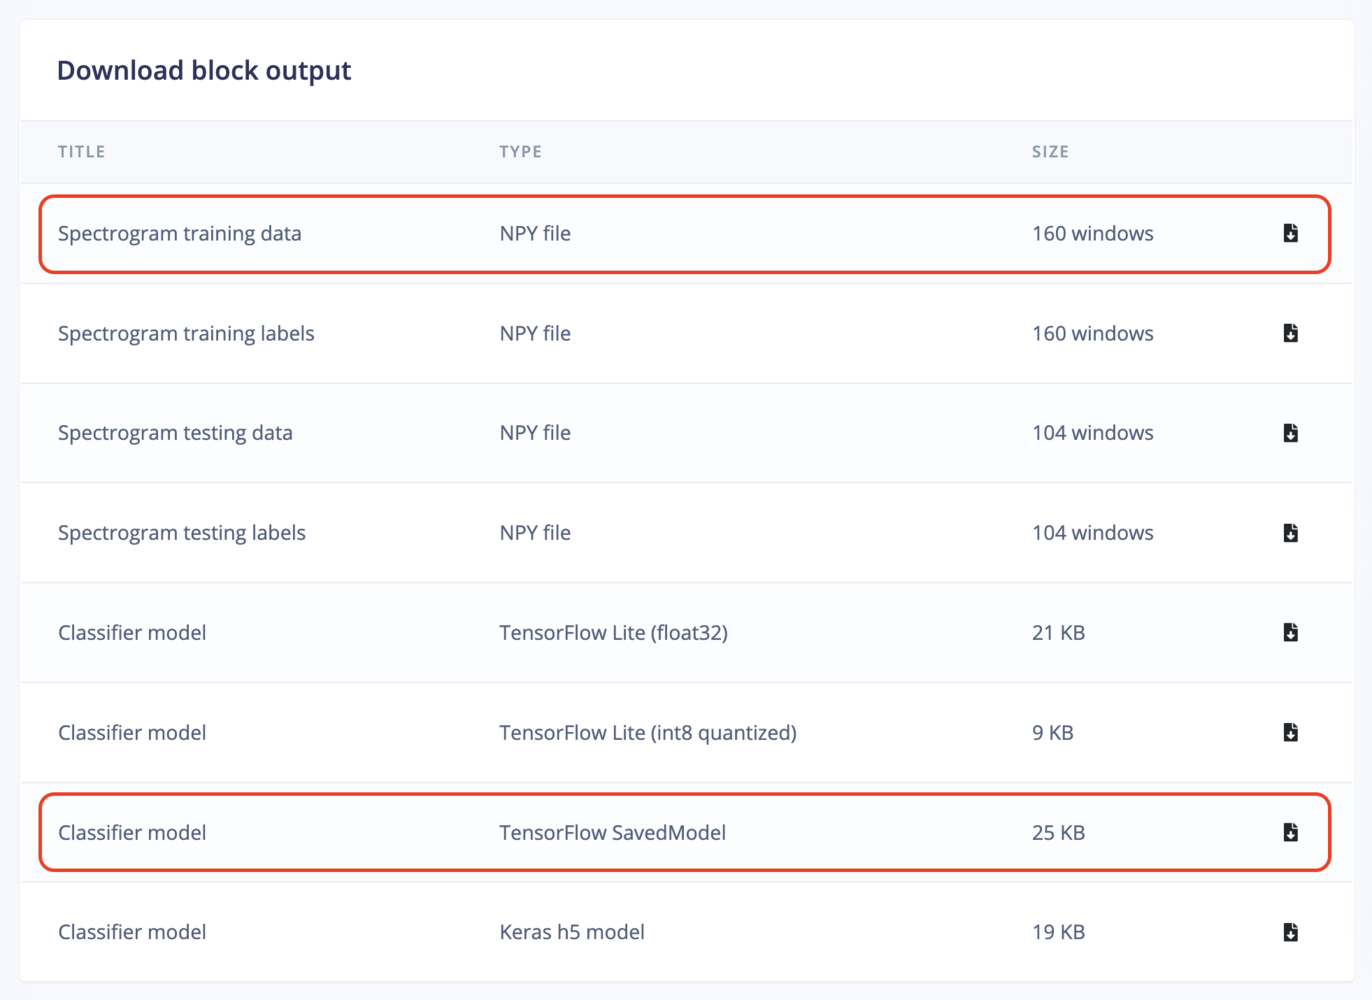
**Download Model**: From the project [dashboard](/studio/projects/dashboard#7-block-outputs), download the TensorFlow SavedModel (`saved_model`). Extract the save\_model directory and place it under the `/input` repository.
**Download Test Data**: From the same dashboard, download the test or train data NPY file (`input.npy`). Place this numpy array file under the `/input` repository. This will allow us to generate a quantized version of the tflite embeddings. Ideally choose the test data if you have some data available.
See [Audio Sensor Fusion - Step 1](https://studio.edgeimpulse.com/public/299343/latest)
### 3. Generate the Embeddings using the exported C++ inferencing SDK
Clone this repository:
```
git clone https://github.com/edgeimpulse/example-sensor-fusion-using-embeddings.git
```
Download the generated Impulse to extract the embeddings, which encapsulate distilled knowledge about their respective data types.
**Download Model**: From the project [dashboard](/studio/projects/dashboard#7-block-outputs), download the TensorFlow SavedModel (`saved_model`). Extract the save\_model directory and place it under the `/input` repository.
**Download Test Data**: From the same dashboard, download the test or train data NPY file (`input.npy`). Place this numpy array file under the `/input` repository. This will allow us to generate a quantized version of the tflite embeddings. Ideally choose the test data if you have some data available.
 **Generate the embeddings:**
```
python saved-model-to-embeddings.py --input input/ --output dsp-blocks/features-from-audio-embeddings
```
This will cut off the last layer of the neural network and convert it to LiteRT (previously Tensorflow Lite) (TFLite) format. You can follow the process outlined in the `saved_model_to_embeddings.py` script for this conversion for a better understanding.
### 4. Encapsulate the Embeddings in a Custom DSP Block
To make sensor fusion work seamlessly, Edge Impulse enables you to create custom DSP blocks. These blocks combine the necessary spectrogram/image-processing and neural network components for each data type.
**Custom DSP Block Configuration**: In the DSP block, perform two key operations as specified in the `dsp.py` script:
* Run the DSP step with fixed parameters.
* Run the neural network.
Replace this following lines in `dsp-blocks/features-from-audio-embeddings/dsp.py` to match your DSP configuration:
```
def generate_features(implementation_version, draw_graphs, raw_data, axes, sampling_freq):
frame_length = 0.032
frame_stride = 0.024
fft_length = 128
noise_floor_db = -85
...
```
If you want to use another DSP block than the spectrogram one, all the source code of the available DSP code can be found in this public repository: [processing-blocks](https://github.com/edgeimpulse/processing-blocks)
**Return Neural Network Embeddings:** The DSP block should be configured to return the neural network embeddings, as opposed to the final classification result.
**Implement get\_tflite\_implementation:** Ensure that the `get_tflite_implementation` function returns the TFLite model. Note that the on-device implementation will not be correct initially when generating the C++ library, as only the neural network part is compiled. We will fix this in the final exported C++ Library.
Now publish your new custom DSP block.
```
cd dsp-blocks/features-from-audio-embeddings
edge-impulse-block init
```
Fill the necessary information and push your block:
```
edge-impulse-block push
```
*During development, it might be easier to host the block locally so you can make changes, see [Custom processing blocks](/studio/organizations/custom-blocks/custom-processing-blocks)*
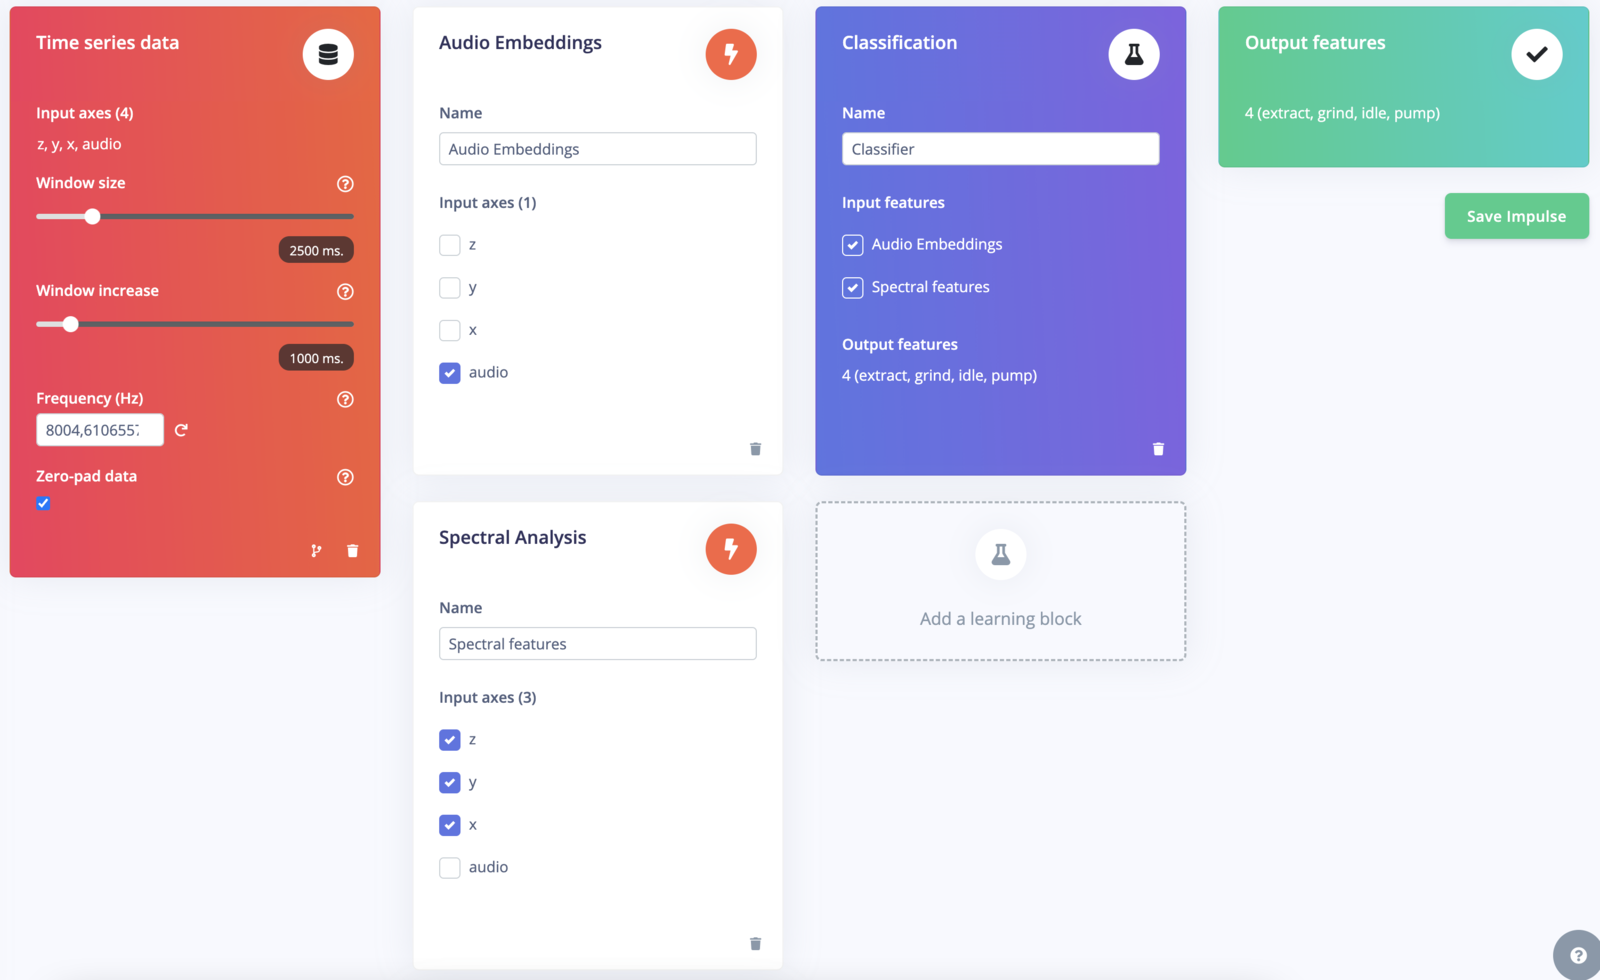
### 5. Create a New Impulse
**Multiple DSP Blocks**: Create a new impulse with three DSP blocks and a classifier block. The routing should be as follows:
* Audio data routed through the custom block.
* Sensor data routed through spectral analysis.
**Generate the embeddings:**
```
python saved-model-to-embeddings.py --input input/ --output dsp-blocks/features-from-audio-embeddings
```
This will cut off the last layer of the neural network and convert it to LiteRT (previously Tensorflow Lite) (TFLite) format. You can follow the process outlined in the `saved_model_to_embeddings.py` script for this conversion for a better understanding.
### 4. Encapsulate the Embeddings in a Custom DSP Block
To make sensor fusion work seamlessly, Edge Impulse enables you to create custom DSP blocks. These blocks combine the necessary spectrogram/image-processing and neural network components for each data type.
**Custom DSP Block Configuration**: In the DSP block, perform two key operations as specified in the `dsp.py` script:
* Run the DSP step with fixed parameters.
* Run the neural network.
Replace this following lines in `dsp-blocks/features-from-audio-embeddings/dsp.py` to match your DSP configuration:
```
def generate_features(implementation_version, draw_graphs, raw_data, axes, sampling_freq):
frame_length = 0.032
frame_stride = 0.024
fft_length = 128
noise_floor_db = -85
...
```
If you want to use another DSP block than the spectrogram one, all the source code of the available DSP code can be found in this public repository: [processing-blocks](https://github.com/edgeimpulse/processing-blocks)
**Return Neural Network Embeddings:** The DSP block should be configured to return the neural network embeddings, as opposed to the final classification result.
**Implement get\_tflite\_implementation:** Ensure that the `get_tflite_implementation` function returns the TFLite model. Note that the on-device implementation will not be correct initially when generating the C++ library, as only the neural network part is compiled. We will fix this in the final exported C++ Library.
Now publish your new custom DSP block.
```
cd dsp-blocks/features-from-audio-embeddings
edge-impulse-block init
```
Fill the necessary information and push your block:
```
edge-impulse-block push
```
*During development, it might be easier to host the block locally so you can make changes, see [Custom processing blocks](/studio/organizations/custom-blocks/custom-processing-blocks)*
### 5. Create a New Impulse
**Multiple DSP Blocks**: Create a new impulse with three DSP blocks and a classifier block. The routing should be as follows:
* Audio data routed through the custom block.
* Sensor data routed through spectral analysis.
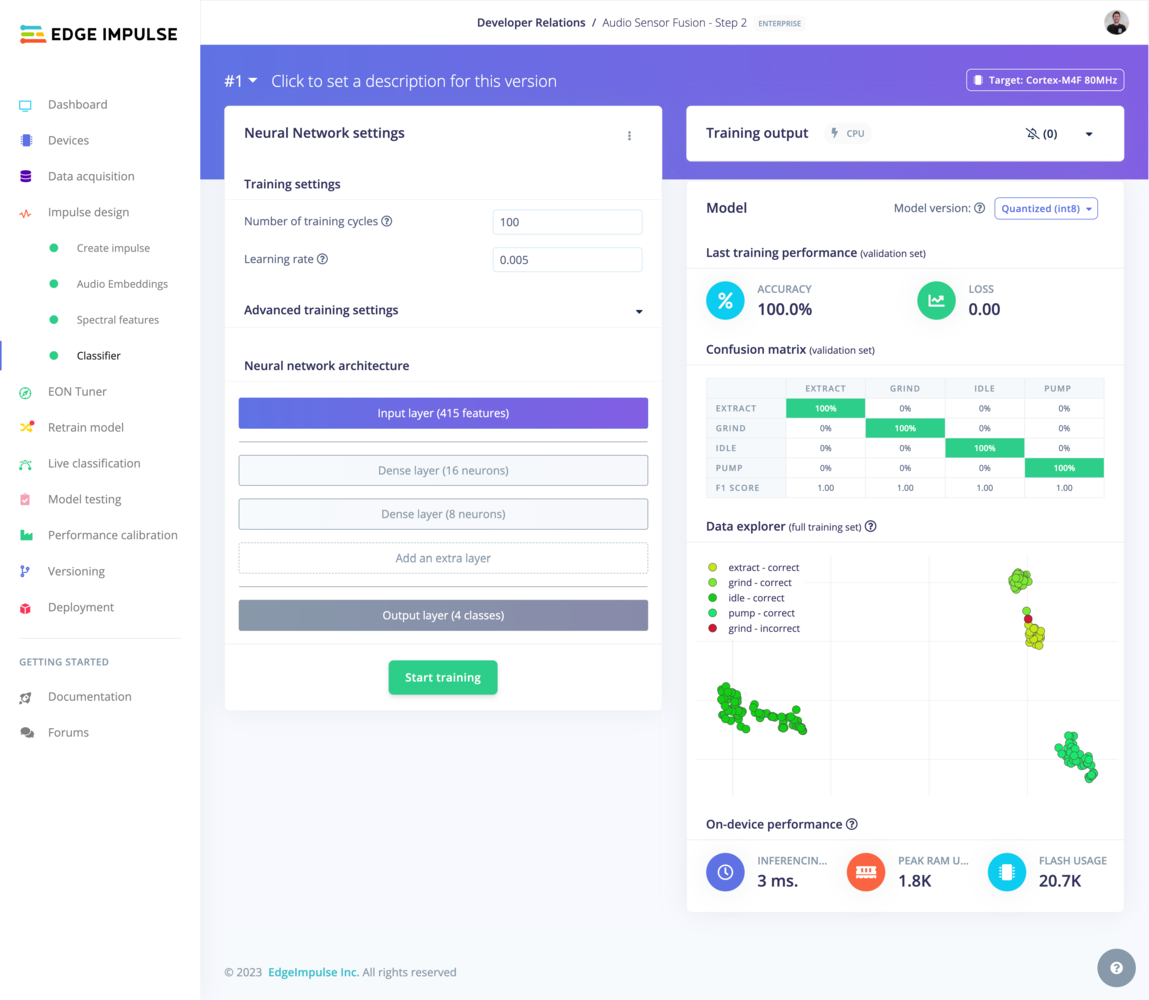
 See [Audio Sensor Fusion - Step 2](https://studio.edgeimpulse.com/public/299865/latest)
**Training the Model**: Train the model within the new impulse, using a **fully-connected network**.
See [Audio Sensor Fusion - Step 2](https://studio.edgeimpulse.com/public/299865/latest)
**Training the Model**: Train the model within the new impulse, using a **fully-connected network**.
 ### 6. Export and Modify the C++ Library
**Export as a C++ Library**:
* In the Edge Impulse platform, export your project as a C++ library.
* Choose the model type that suits your target device (`quantized` vs. `float32`).
* Make sure to select **EON compiler** option
* Copy the exported C++ library to the `example-cpp` folder for easy access.
**Add a Forward Declaration**:
* In the `model-parameters/model_variables.h` file of the exported C++ library, add a forward declaration for the custom DSP block you created.
For example:
```
int custom_sensor_fusion_features(signal_t *signal, matrix_t *output_matrix, void *config_ptr, const float frequency);
```
And change `&extract_tflite_eon_features` into `&custom_sensor_fusion_features` in the `ei_dsp_blocks` object.
```
ei_model_dsp_t ei_dsp_blocks[ei_dsp_blocks_size] = {
{ // DSP block 46
207,
&extract_spectral_analysis_features,
(void*)&ei_dsp_config_46,
ei_dsp_config_46_axes,
ei_dsp_config_46_axes_size
},
{ // DSP block 58
416,
&custom_sensor_fusion_features, // <-- change is here
(void*)&ei_dsp_config_58,
ei_dsp_config_58_axes,
ei_dsp_config_58_axes_size
}
};
```
**Implement the Custom DSP Block**:
In the `main.cpp` file of the C++ library, implement the custom\_sensor\_fusion\_features block. This block should:
1. Call into the Edge Impulse SDK to generate features.
2. Execute the rest of the DSP block, including neural network inference.
For example, see the main.cpp file in the [Github repository](https://github.com/edgeimpulse/example-sensor-fusion-using-embeddings/blob/main/cpp-example/source/main.cpp#L13C1-L16C120)
```
/**
Custom DSP function implementation
*/
int custom_sensor_fusion_features(signal_t *signal, matrix_t *output_matrix, void *config_ptr, const float frequency) {
...
}
```
### 7. Compile and run the app
* Copy a test sample's *raw features* into the `features[]` array in `source/main.cpp`
* Enter `make -j` in this directory to compile the project. If you encounter any OOM memory error try `make -j4` (replace 4 with the number of cores available)
* Enter `./build/app` to run the application
* Compare the output predictions to the predictions of the test sample in the Edge Impulse Studio.
```
run_classifier returned: 0
Timing: DSP 4 ms, inference 0 ms, anomaly 0 ms
Predictions:
extract: 0.01953
grind: 0.98047
idle: 0.00000
pump: 0.00000
```
*Note that if you are using the quantized version of the model, you may encounter a slight difference between the Studio Live Classification page and the above results, the float32 model however should give you the same results.*
Congratulations on successfully completing this advanced tutorial. You have been through the complex process of integrating high-dimensional audio or image data with time-series sensor data, employing advanced techniques like custom DSP blocks, neural network embeddings, and modifications to the C++ inferencing SDK. Also, note that you can simplify this workflow using [custom deployment blocks](/studio/organizations/custom-blocks/custom-deployment-blocks) to generate the custom DSP block with the embeddings.
If you are interested in using it for an enterprise project, please request an [expert-led trial](https://edgeimpulse.com/expert-led-trial) and our solution engineers can work with you on the integration.
### 6. Export and Modify the C++ Library
**Export as a C++ Library**:
* In the Edge Impulse platform, export your project as a C++ library.
* Choose the model type that suits your target device (`quantized` vs. `float32`).
* Make sure to select **EON compiler** option
* Copy the exported C++ library to the `example-cpp` folder for easy access.
**Add a Forward Declaration**:
* In the `model-parameters/model_variables.h` file of the exported C++ library, add a forward declaration for the custom DSP block you created.
For example:
```
int custom_sensor_fusion_features(signal_t *signal, matrix_t *output_matrix, void *config_ptr, const float frequency);
```
And change `&extract_tflite_eon_features` into `&custom_sensor_fusion_features` in the `ei_dsp_blocks` object.
```
ei_model_dsp_t ei_dsp_blocks[ei_dsp_blocks_size] = {
{ // DSP block 46
207,
&extract_spectral_analysis_features,
(void*)&ei_dsp_config_46,
ei_dsp_config_46_axes,
ei_dsp_config_46_axes_size
},
{ // DSP block 58
416,
&custom_sensor_fusion_features, // <-- change is here
(void*)&ei_dsp_config_58,
ei_dsp_config_58_axes,
ei_dsp_config_58_axes_size
}
};
```
**Implement the Custom DSP Block**:
In the `main.cpp` file of the C++ library, implement the custom\_sensor\_fusion\_features block. This block should:
1. Call into the Edge Impulse SDK to generate features.
2. Execute the rest of the DSP block, including neural network inference.
For example, see the main.cpp file in the [Github repository](https://github.com/edgeimpulse/example-sensor-fusion-using-embeddings/blob/main/cpp-example/source/main.cpp#L13C1-L16C120)
```
/**
Custom DSP function implementation
*/
int custom_sensor_fusion_features(signal_t *signal, matrix_t *output_matrix, void *config_ptr, const float frequency) {
...
}
```
### 7. Compile and run the app
* Copy a test sample's *raw features* into the `features[]` array in `source/main.cpp`
* Enter `make -j` in this directory to compile the project. If you encounter any OOM memory error try `make -j4` (replace 4 with the number of cores available)
* Enter `./build/app` to run the application
* Compare the output predictions to the predictions of the test sample in the Edge Impulse Studio.
```
run_classifier returned: 0
Timing: DSP 4 ms, inference 0 ms, anomaly 0 ms
Predictions:
extract: 0.01953
grind: 0.98047
idle: 0.00000
pump: 0.00000
```
*Note that if you are using the quantized version of the model, you may encounter a slight difference between the Studio Live Classification page and the above results, the float32 model however should give you the same results.*
Congratulations on successfully completing this advanced tutorial. You have been through the complex process of integrating high-dimensional audio or image data with time-series sensor data, employing advanced techniques like custom DSP blocks, neural network embeddings, and modifications to the C++ inferencing SDK. Also, note that you can simplify this workflow using [custom deployment blocks](/studio/organizations/custom-blocks/custom-deployment-blocks) to generate the custom DSP block with the embeddings.
If you are interested in using it for an enterprise project, please request an [expert-led trial](https://edgeimpulse.com/expert-led-trial) and our solution engineers can work with you on the integration.