> ## Documentation Index
> Fetch the complete documentation index at: https://docs.edgeimpulse.com/llms.txt
> Use this file to discover all available pages before exploring further.
# Android data collector
> Collect phone sensor data, images, and BLE-relayed inference results from a Zephyr device, and upload directly to your Edge Impulse project
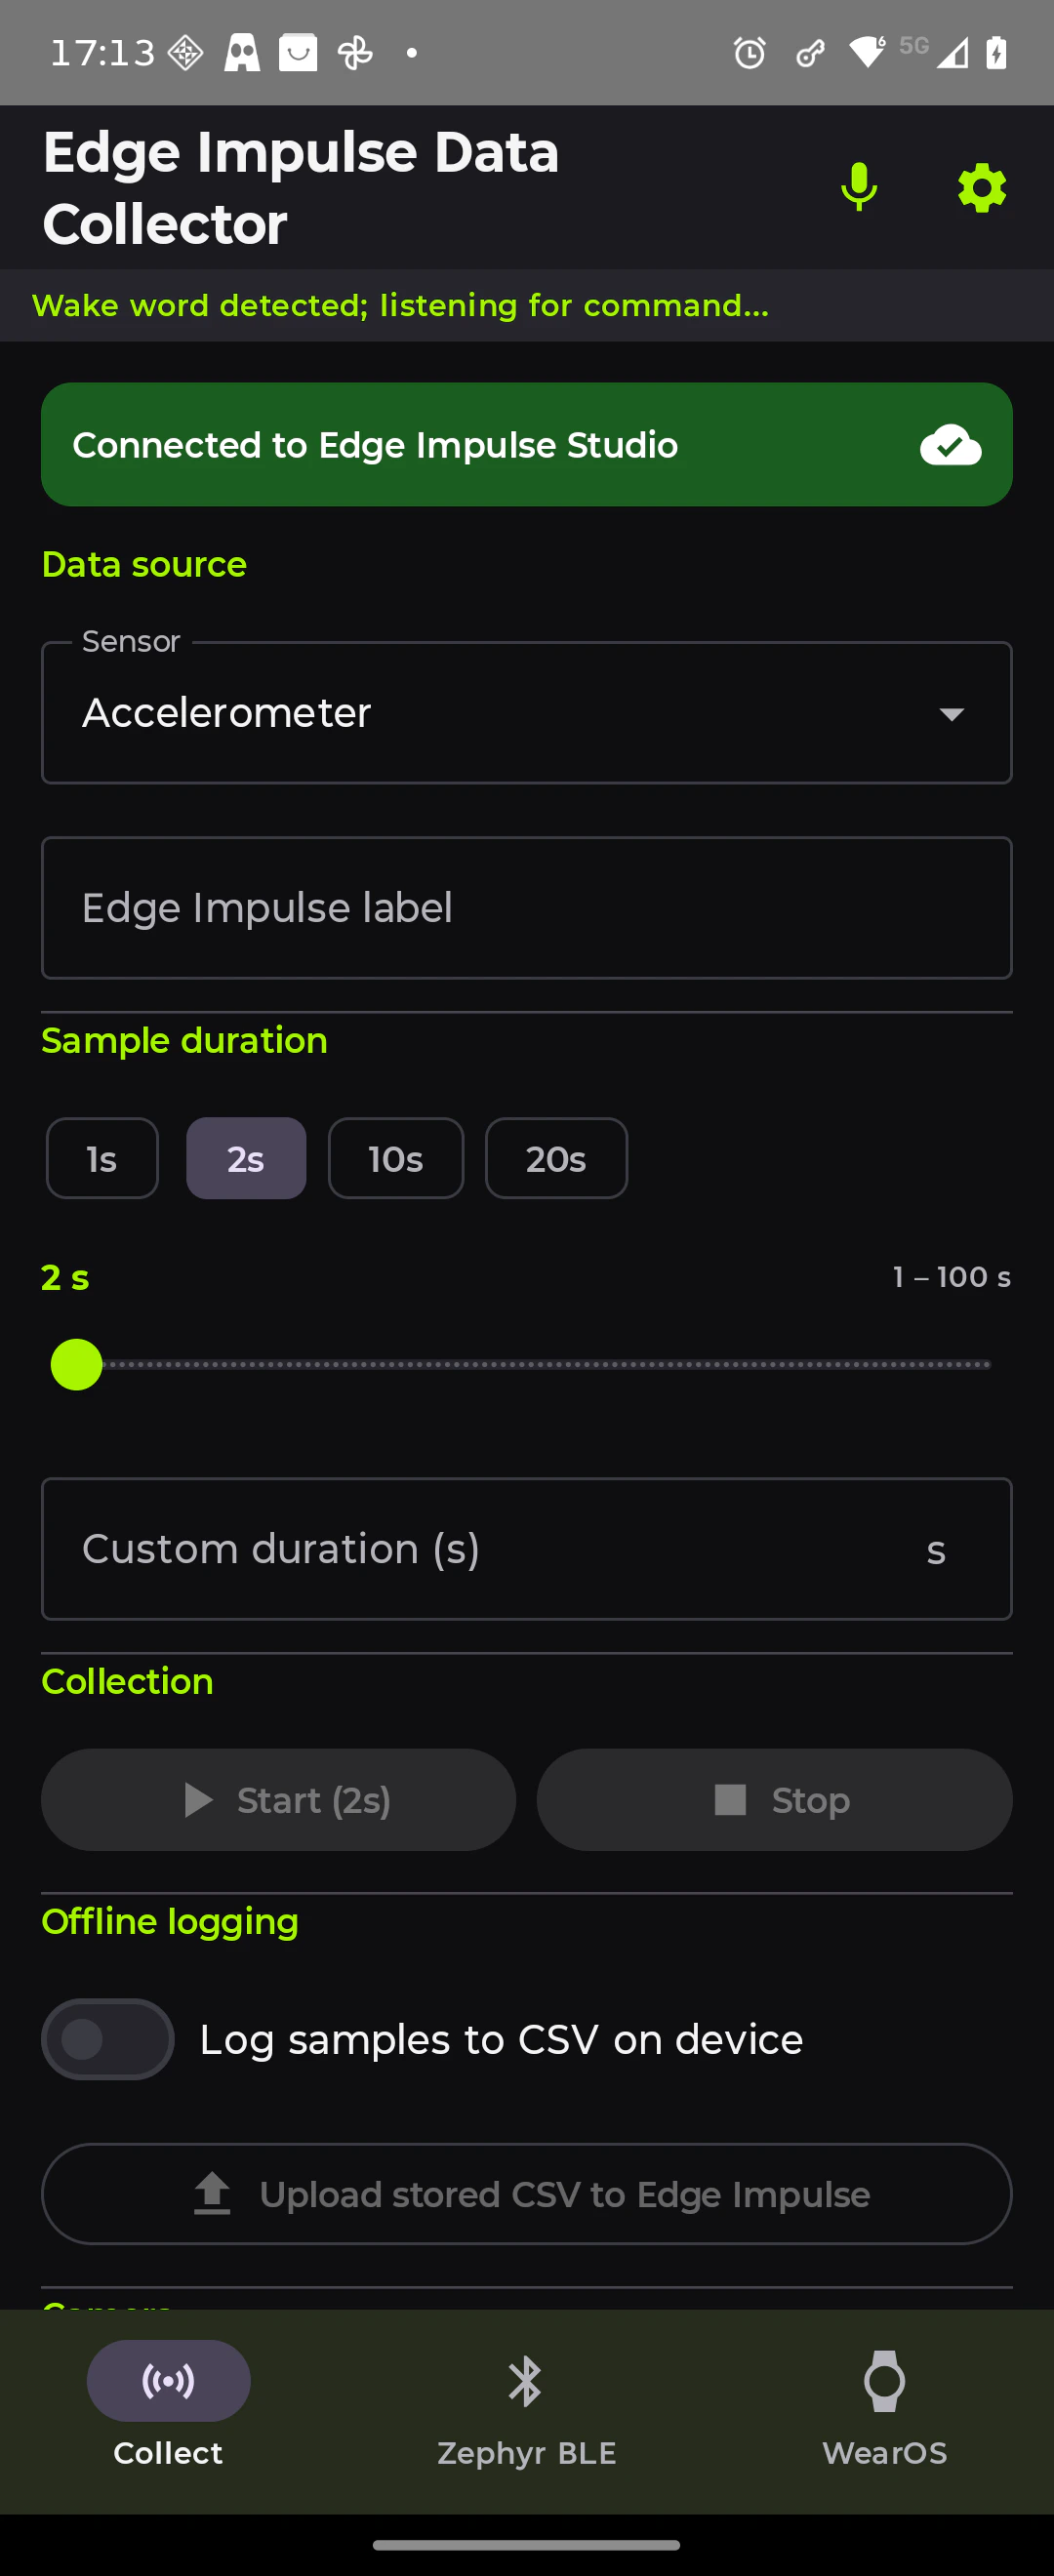
This tutorial walks you through the **Edge Impulse Data Collector** Android app — a four-in-one data acquisition client that uploads phone accelerometer/PPG data, camera images, BLE-streamed results from a companion Zephyr device, and USB OTG serial data from Arduino microcontrollers directly to your Edge Impulse project. It is a data collection companion to the inference tutorials in this series: build your dataset here, then train a model and deploy it using the other examples.
*Collecting accelerometer data on the phone and uploading it live to Edge Impulse — end-to-end from tap to labelled sample in Studio.*
Sideload directly onto any Android 9.0 (API 28) or later device — no build tools required. Or follow the steps below to build from source.
## What you'll build
An Android app with four tabs:
| Tab | What it does |
| -------------- | ------------------------------------------------------------------------------------------------------------------------------------------------------------------------------------------------------------------------------- |
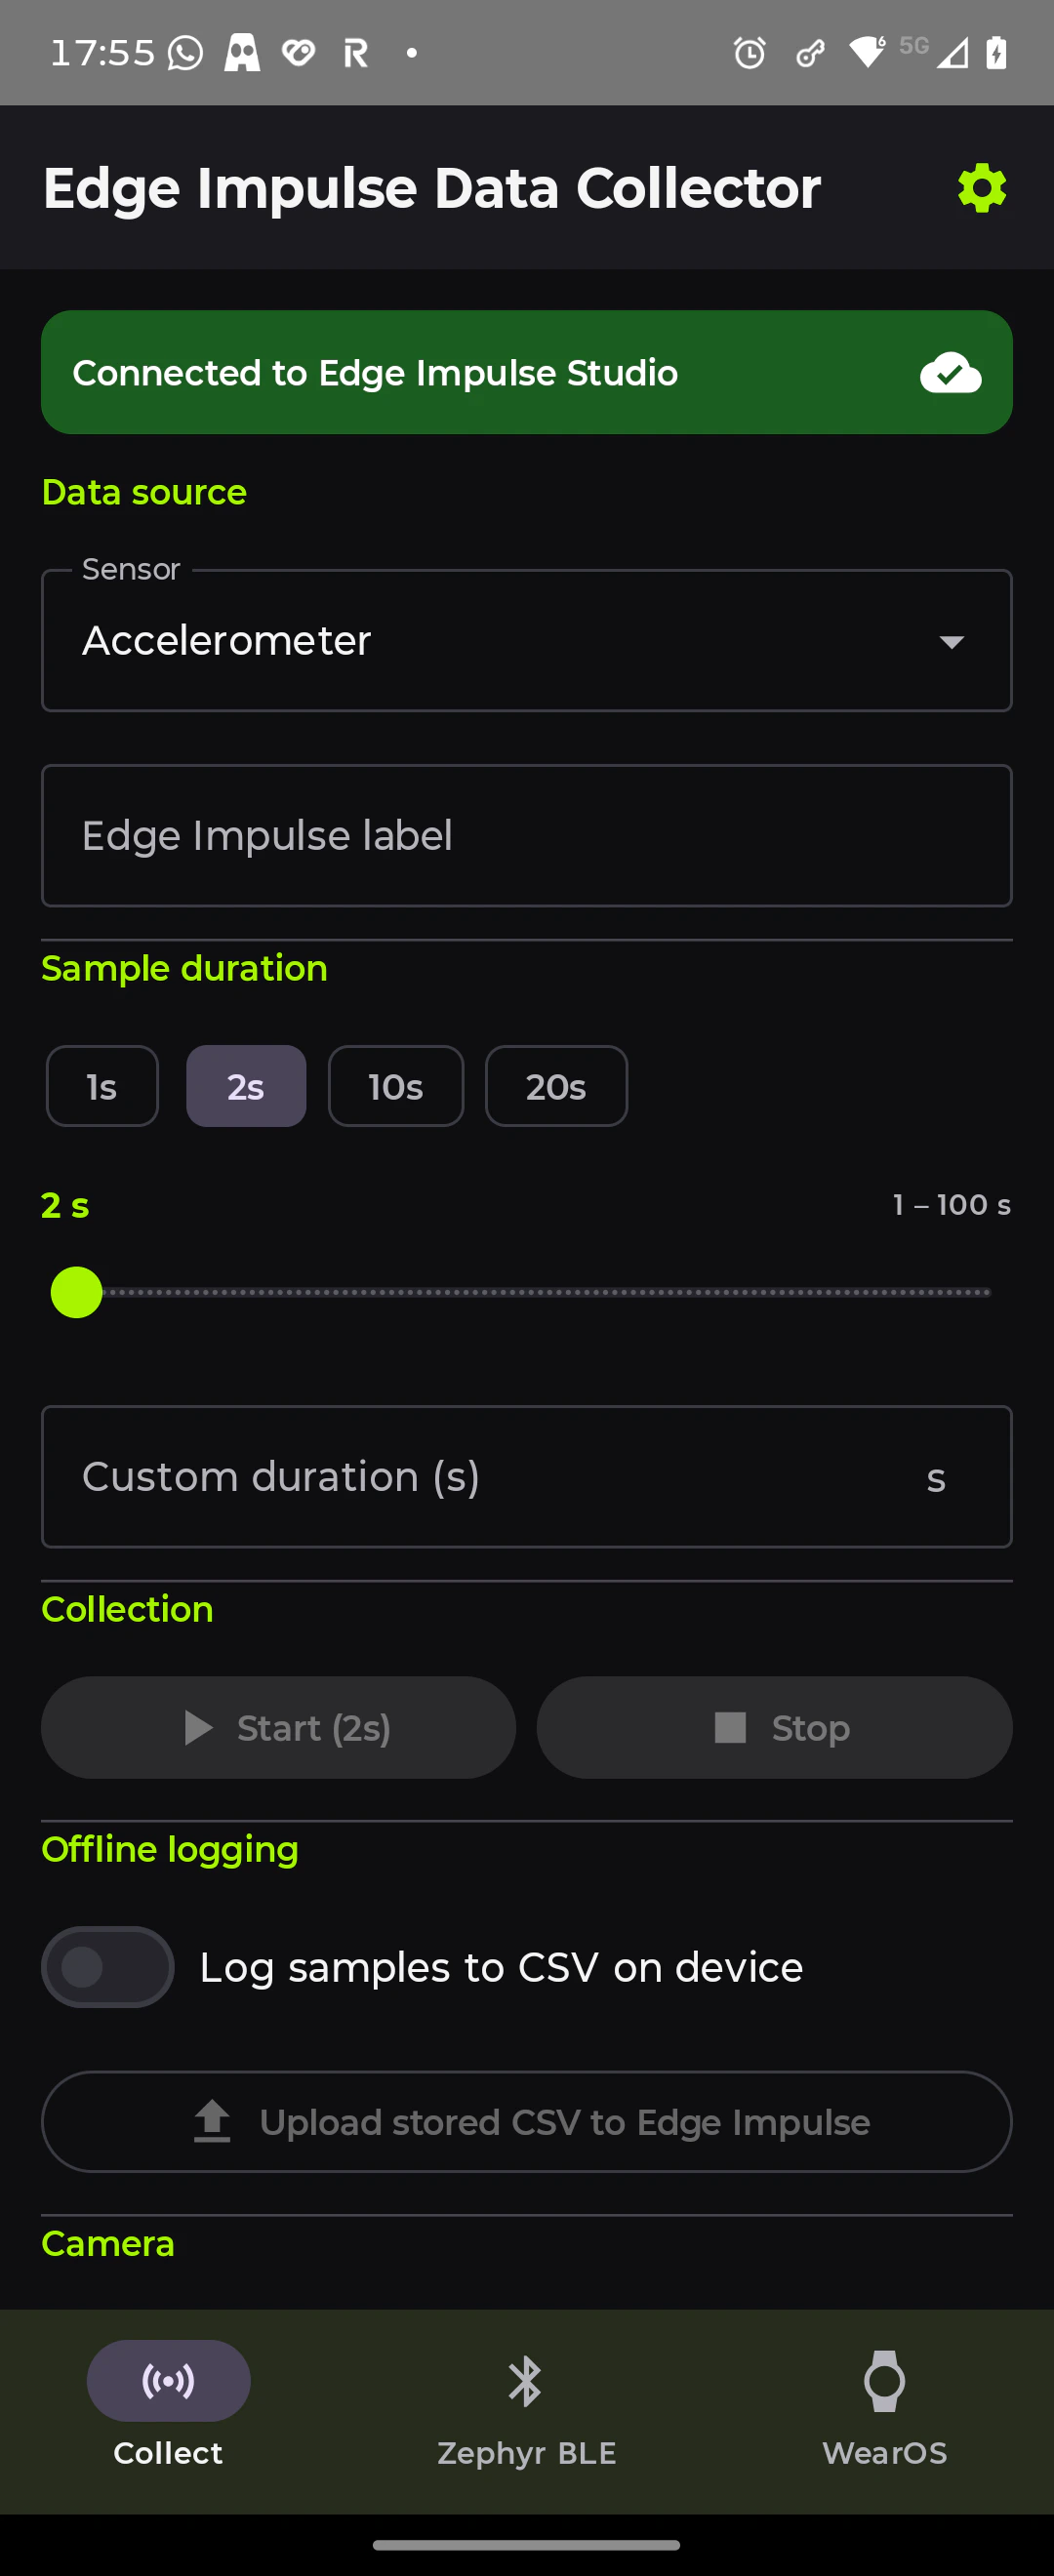
| **Collect** | Streams phone accelerometer or PPG (heart rate) data and uploads to Edge Impulse; captures and uploads labelled images from the camera; supports offline CSV logging for field use |
| **Zephyr BLE** | Connects to a Nordic Thingy:53 or Nesso N1 running the [`ei-zephyr-ble-gatt-client`](../zephyr/zephyr-ble-gatt-client) firmware; receives raw IMU windows and inference results over BLE GATT and forwards them to your project |
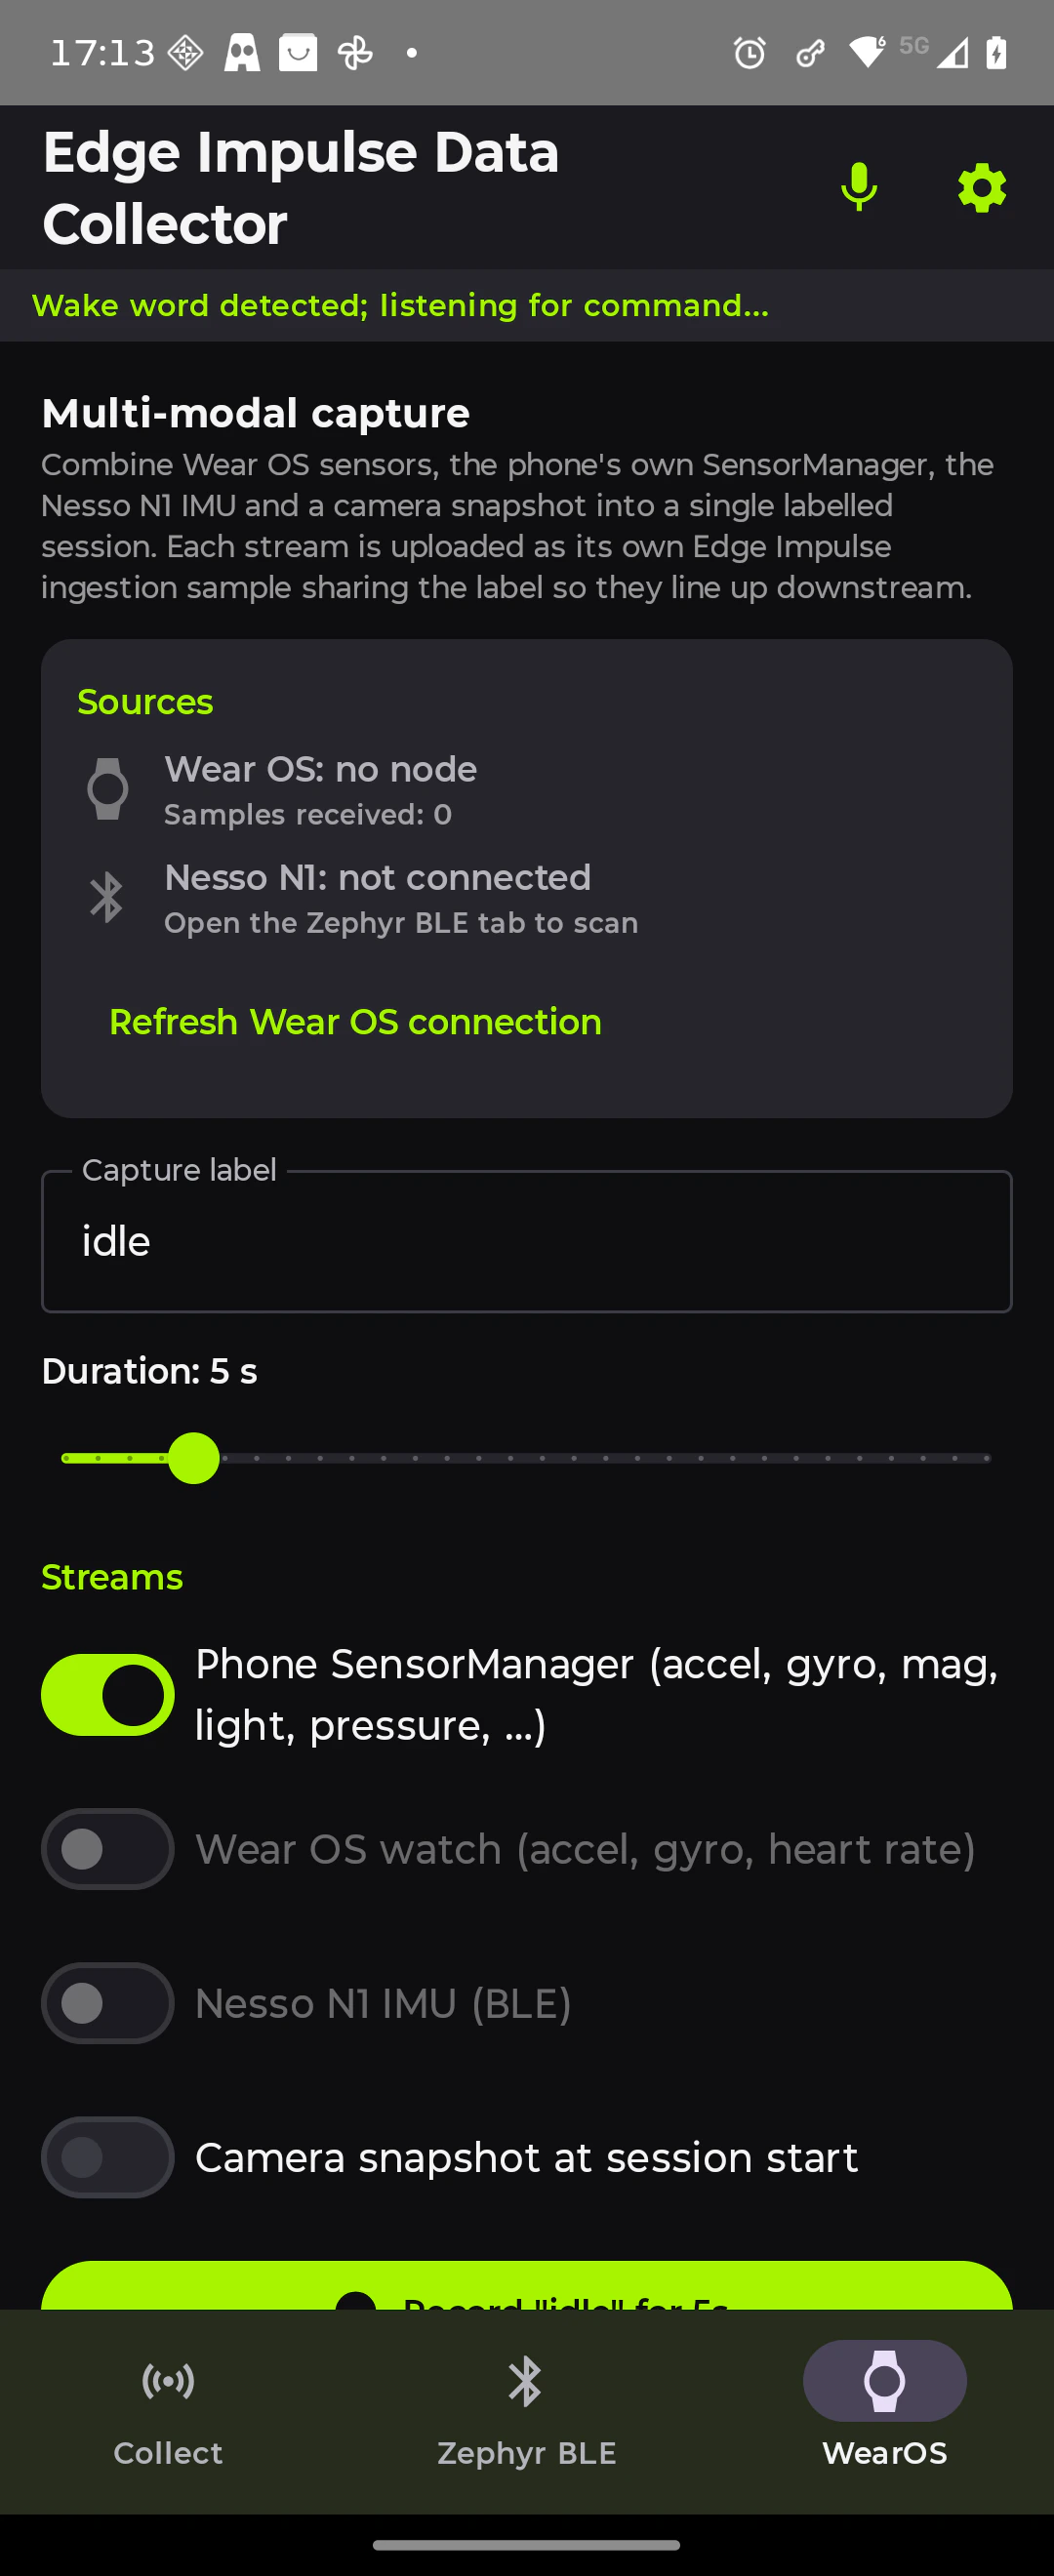
| **WearOS** | Relays heart rate, accelerometer, and GPS from a paired Wear OS watch via the Wearable Data Layer API |
| **USB OTG** | Connects directly to an Arduino over USB OTG; streams IMU CSV data and optionally captures camera frames from boards like the Nano 33 BLE Sense + TinyML Kit, ESP32-S3-EYE, UNO R4, and Nesso N1 — no BLE or Wi-Fi required |
## Prerequisites
* An [Edge Impulse account](https://edgeimpulse.com/signup)
* An Edge Impulse project and API key
* Android Studio (Ladybug 2024.2.2 or later)
* Android device running API 26 (Android 8.0) or later — API 31+ recommended for on‑device speech recognition; the bundled TensorFlow Lite wake‑word engine runs on any API 26+ device
* For the Zephyr BLE tab: a device flashed with [`ei-zephyr-ble-gatt-client`](../zephyr/zephyr-ble-gatt-client)
* For the WearOS tab: a paired Wear OS watch with the companion module installed
* For the USB OTG tab: an Arduino from the [supported board list](#11-connect-a-usb-otg-arduino-device) flashed with the matching sketch from `sample-arduino/`; a USB OTG adapter for your phone
A pre-built APK is available at `sample-apk/edge-impulse-data-collector.apk` in the repository if you want to sideload without building.
## 1. Clone the repository
```bash theme={"system"}
git clone https://github.com/edgeimpulse/example-android-inferencing.git
cd example-android-inferencing/android-data-collector
```
## 2. Get your API key
1. Open your project in [Edge Impulse Studio](https://studio.edgeimpulse.com).
2. Go to **Dashboard → Keys**.
3. Click **Add new API key** and copy it (`ei_xxxxxxxxxxxxxxxxxxxxxxxxxxxxxxxx`).
## 3. Configure the API key
Add your key to `~/.gradle/gradle.properties` (recommended — keeps secrets out of source control):
```properties theme={"system"}
EI_API_KEY=ei_xxxxxxxxxxxxxxxxxxxxxxxxxxxxxxxx
```
Alternatively, add it to the local `gradle.properties` in the project root, but do **not** commit that file.
Never hard-code API keys in source code or commit them to version control.
## 4. Build and install
```bash theme={"system"}
./gradlew :app:assembleDebug
adb install app/build/outputs/apk/debug/app-debug.apk
```
Or open the project in Android Studio and run it directly on a connected device.
### Install the Wear OS companion (optional)
If you want to use the **WearOS** tab, install the `wearosdatalogger` module on your watch. The cleanest path is `adb` over Wi‑Fi:
1. On the watch: **Settings → Developer options → Wireless debugging → ON**.
2. Tap **Pair new device** — note the **IP:port** and the **6‑digit pairing code** displayed.
3. On your laptop (same Wi‑Fi as the watch — and not on a guest/AP‑isolated network, with any VPN off):
```bash theme={"system"}
adb pair :
   adb connect :5555
   adb devices -l
   ```

4. Build and install the watch APK, targeting the watch by serial:

   ```bash theme={"system"}
   ./gradlew :wearosdatalogger:assembleDebug
   WATCH=$(adb devices | awk '/device$/ && !/emulator/' | sed -n '2p' | cut -f1)
   adb -s "$WATCH" install -r wearosdatalogger/build/outputs/apk/debug/wearosdatalogger-debug.apk
   ```

   Or in one shot: `ANDROID_SERIAL=$WATCH ./gradlew :wearosdatalogger:installDebug`.


  The pairing port and 6‑digit code are single‑use and expire within \~60 seconds. If `adb pair` returns `protocol fault (couldn't read status message)`, close the "Pair new device" screen on the watch, reopen it for a fresh port + code, and pass both in one command (don't wait for the interactive prompt). Also make sure your `adb` is recent — `brew install --cask android-platform-tools` (≥ v34).


  If Wi‑Fi pairing keeps refusing, tunnel through the phone instead: enable **Debug over Bluetooth** on both watch and phone, toggle it on in the Wear OS companion app, then `adb forward tcp:4444 localabstract:/adb-hub && adb connect 127.0.0.1:4444`.


Once installed, launch **WearOS Data Logger** on the watch and open the **WearOS** tab in the phone app — the watch node will appear and start streaming heart rate, accelerometer, and GPS.

## 5. Collect sensor data

1. Open the app and go to the **Collect** tab.
2. Enter your **Edge Impulse label** — for example `walking`, `idle`, or `running`. This maps directly to the class label in Edge Impulse Studio.
3. Select a **Sensor**: `Accelerometer` or `PPG (Heart Rate)`.
4. Tap **Start** — live sensor values stream to the screen.
5. Tap **Stop** — the sample uploads immediately to your project.
6. Repeat with different labels to build a balanced dataset.


  Aim for at least 2–3 minutes of data per class. Edge Impulse Studio splits recordings into windows automatically when you create your impulse.


## 6. Capture images

On the same **Collect** tab:

1. Enter a label (e.g. `crack`, `no_crack`).
2. Tap **Capture & upload image** — the rear camera fires and the JPEG uploads with that label.
3. Repeat to build an image dataset for classification or object detection.

## 7. Offline logging

Use this when you have no data connection (factory floor, outdoors):

1. Enable **Log samples to CSV on device**.
2. Tap **Start** / **Stop** as normal — samples accumulate in a local CSV file.
3. When back online, tap **Upload stored CSV to Edge Impulse** to batch-upload everything.

## 8. Multi‑modal capture and auto source priority

The **Collect** tab also exposes a **Multi‑modal capture** card that records from every connected source in parallel for a fixed duration and uploads each stream with the same label. By default the app picks the highest‑fidelity source that is currently connected, so you only have to pair what you actually want to use:

| Priority | Source                                          | Active when                                                    |
| -------- | ----------------------------------------------- | -------------------------------------------------------------- |
| 1        | Zephyr BLE (Nesso N1 / Nano 33 BLE / Thingy:53) | Connected on the **Zephyr BLE** tab                            |
| 2        | Wear OS watch IMU + heart rate                  | Companion app installed and node visible on the **WearOS** tab |
| 3        | Phone accelerometer / PPG                       | Always available as a fallback                                 |

Flip the **Camera snapshot** toggle to also fire a single JPEG at the start of each capture. The camera path goes through CameraX `takePicture(…, OnImageCapturedCallback)` and uploads in‑memory — no temporary files are written to disk.

## 9. Voice control ("Hey Android")

The app ships with an on‑device wake‑word model (`hey_android`) trained in Edge Impulse Studio plus Android's offline `SpeechRecognizer`, so you can label and trigger captures hands‑free — useful when the phone is strapped to a wrist, helmet, or vehicle dashboard.

1. Tap the **microphone icon** in the top app bar to enable voice control. Grant `RECORD_AUDIO` when prompted. The icon turns blue when the wake engine is running and a status banner appears under the tab bar.
2. Say **“Hey Android”**. The wake engine fires, KWS pauses, and the speech recognizer starts listening for a follow‑up command.
3. Speak a command in the form **“capture N seconds with label LABEL”**, for example:

   * *“capture 5 seconds with label idle”*
   * *“record 10 seconds with label updown”*
   * *“start 20 seconds with label circle”*

   Recognised verbs: `capture`, `record`, `start`. Duration accepts digits (`5`, `10`, `20`) or spelled numbers up to sixty. Labels parsed today: `idle`, `updown` (also `up down` / `up‑down`), `circle` — add more in `voice/VoiceCommandParser.kt`.
4. The recording starts immediately on whichever source is currently highest‑priority (Zephyr › Wear › phone) and uploads with the label you spoke. The wake engine resumes \~300 ms after the capture completes.


  The wake word runs fully on‑device via the embedded Edge Impulse C++ SDK and a prebuilt `arm64-v8a` TensorFlow Lite runtime (no network). Speech‑to‑text uses Android's `createOnDeviceSpeechRecognizer` (API 31+) with `EXTRA_PREFER_OFFLINE=true`; on devices without an offline recognizer it transparently falls back to the network recognizer.


## 10. Connect a Zephyr device (optional)

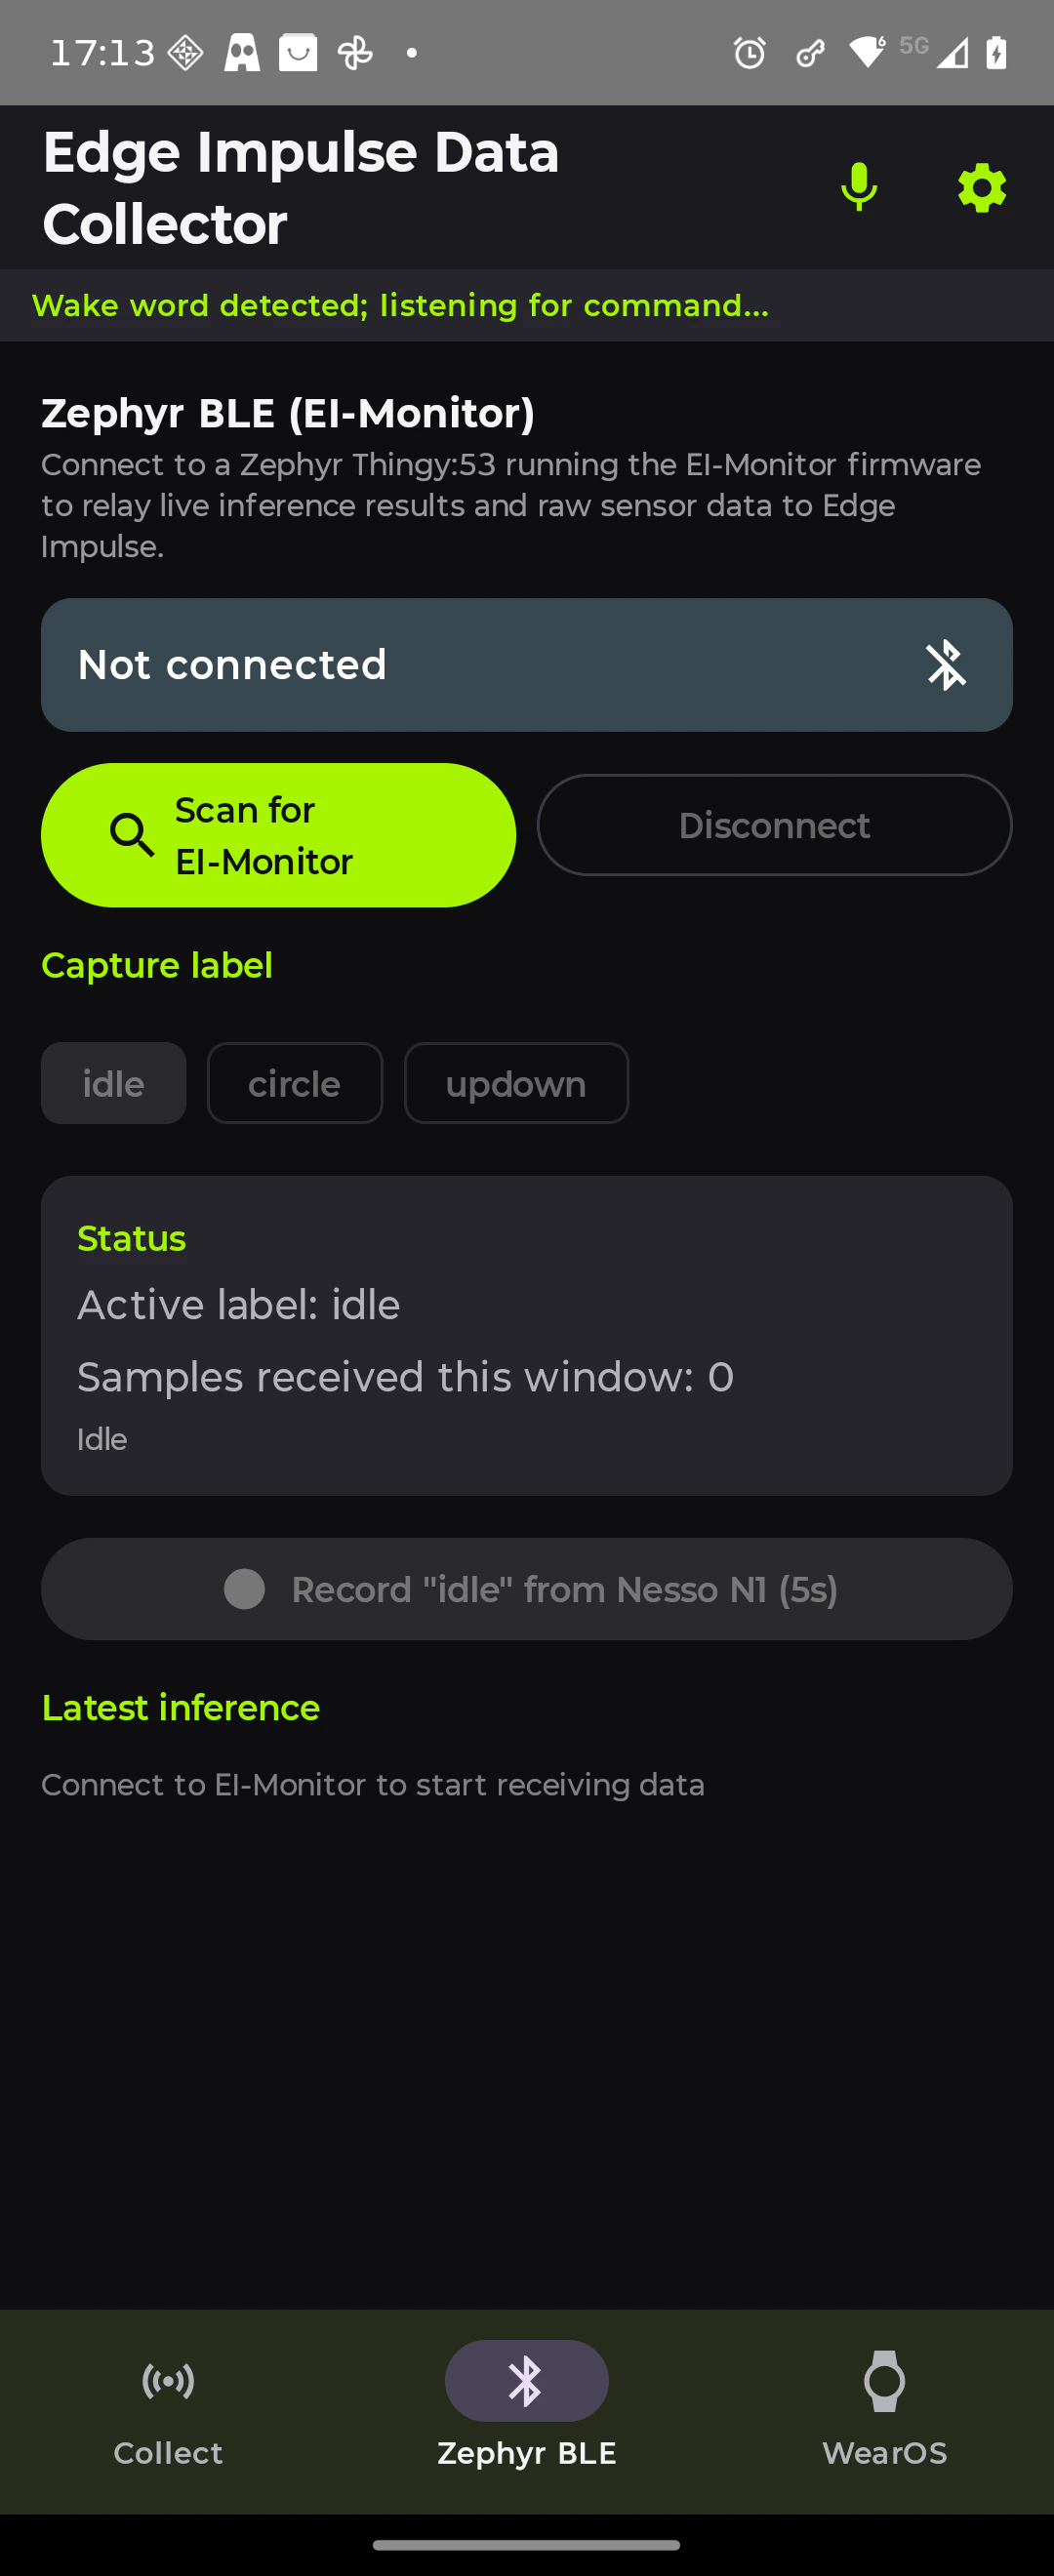
The **Zephyr BLE** tab acts as a BLE central, scanning for a device advertising as `EI-Monitor` and running the [`ei-zephyr-ble-gatt-client`](../zephyr/zephyr-ble-gatt-client) firmware.

Which firmware behaviour you get depends on which board you build for — the board's `.conf` file toggles `CONFIG_EI_SENSOR_LOCAL`:

| Board                     | Build target              | Mode                              | What it sends                                               |
| ------------------------- | ------------------------- | --------------------------------- | ----------------------------------------------------------- |
| Arduino Nesso N1          | `arduino_nesso_n1`        | Local sensor (ESP32-C6 + BMI270)  | Raw IMU + optional on-device inference                      |
| Arduino Nano 33 BLE Sense | `arduino_nano_33_ble`     | Local sensor (nRF52840 + LSM9DS1) | Raw IMU + optional on-device inference                      |
| Nordic Thingy:53          | `thingy53_nrf5340_cpuapp` | Relay                             | Inference + raw IMU relayed from an `EI-Golioth` peripheral |

1. Flash the board of your choice with the firmware — see the [BLE GATT client tutorial](../zephyr/zephyr-ble-gatt-client).
2. Open the **Zephyr BLE** tab.
3. Tap **Scan for EI-Monitor** — the device appears in the list.
4. Tap the device to connect — the banner turns green.


5. Raw IMU windows and labelled inference results stream in and upload automatically to your project.


  An inference notification is only uploaded once at least one raw sensor window has been received for the same connection. If you see an inference result on screen but no upload, check that the firmware also advertises the sensor characteristic and that your phone has subscribed to it (the app does this automatically on connect).


The app decodes the 52-byte `inference_result_t` binary notification from the firmware:

| Field                    | Type       | Offset |
| ------------------------ | ---------- | ------ |
| `label`                  | `char[32]` | 0      |
| `confidence`             | `float`    | 32     |
| `dsp_time_ms`            | `uint32_t` | 36     |
| `classification_time_ms` | `uint32_t` | 40     |
| `timestamp`              | `uint64_t` | 44     |

## 11. Connect a USB OTG Arduino device

The **USB OTG** tab turns the Android phone into a USB host, reading CDC-ACM serial data from any Arduino that implements the wire protocol. No BLE, Wi-Fi, or network connection is needed — data flows directly over the cable.

### Supported boards and sketches

All sketches are in the `sample-arduino/` directory of the repository.

| Board                                                          | Sketch                                          | Sensors                               | Camera       |
| -------------------------------------------------------------- | ----------------------------------------------- | ------------------------------------- | ------------ |
| Arduino Nano 33 BLE Sense Rev1 or Rev2 + TinyML Kit            | `nano33ble_ai_kit_otg/nano33ble_ai_kit_otg.ino` | LSM9DS1 (Rev1) / BMI270+BMM150 (Rev2) | OV7675 QQVGA |
| Espressif ESP32-S3-EYE / ESP32-EYE / ESP32-CAM                 | `esp32_eye_otg/esp32_eye_otg.ino`               | MPU-6050 (S3-EYE built-in)            | OV2640       |
| Arduino UNO R4 WiFi / R4 Minima / UNO WiFi Rev2 / UNO classic  | `uno_r4_otg/uno_r4_otg.ino`                     | LSM6DSOX / LSM6DS3 / MPU-6050         | —            |
| Arduino Nano 33 BLE / Nano 33 IoT / generic Arduino + MPU-6050 | `nesso_usb_serial_imu/nesso_usb_serial_imu.ino` | LSM9DS1 / LSM6DS3 / MPU-6050          | —            |

### Wire protocol

All sketches output the same text protocol at 115200 baud:

```
!ax,ay,az,gx,gy,gz          ← column header (once on boot)
0.12,-0.34,9.81,...         ← CSV data row
# comment                   ← ignored by app
IMG:160,120,GRAYSCALE,19200 ← camera frame header (camera-capable boards only)
                 ← frame payload
```

The app parses the `!` header to identify sensor axes and auto-detects the `IMG:` header to switch into image capture mode.

### Flash and connect

1. Open the sketch for your board in the Arduino IDE.
2. Edit the `#define` at the top of the file to match your exact board variant.
3. Install the libraries listed in the sketch header via **Tools → Manage Libraries**.
4. Upload the sketch.
5. Connect: **Phone USB-C → OTG adapter → USB-A → Board USB cable**.
   For boards without native USB (UNO classic, ESP32-CAM), use an FTDI / CP2102 / CH340 USB-serial adapter instead.
6. Open the app and switch to the **USB OTG** tab — the device is detected automatically and IMU streaming starts.

### Nano 33 BLE Sense + TinyML Kit (IMU + camera)

The `nano33ble_ai_kit_otg` sketch extends the IMU stream with camera capture via the OV7675 on the Arduino TinyML Kit shield. IMU streaming starts automatically on boot; use the following serial commands (sent from the **USB OTG** tab or any serial monitor at 115200 baud) to control the camera:

| Command | Action                                           |
| ------- | ------------------------------------------------ |
| `s`     | Start / resume IMU streaming                     |
| `p`     | Pause IMU streaming                              |
| `c`     | Capture one QQVGA frame and send it over USB     |
| `g`     | Toggle pixel format between GRAYSCALE and RGB565 |
| `r`     | Resume IMU streaming after a camera capture      |
| `?`     | Print IMU and camera status                      |

Frame sizes: 19 200 bytes (GRAYSCALE 160 × 120) or 38 400 bytes (RGB565 160 × 120).


  The Nano 33 BLE enumerates as a CDC-ACM device — no USB-serial dongle is needed. Select `BOARD_NANO33BLE` at the top of the sketch for Rev1 (LSM9DS1) or uncomment `BOARD_NANO33BLE_REV2` for Rev2 (BMI270 + BMM150). Switch the camera pixel format between `GRAYSCALE` and `RGB565` by editing the `CAM_FORMAT` define or sending the `g` command at runtime.


## 12. Verify your data in Edge Impulse Studio

1. Open your project in [studio.edgeimpulse.com](https://studio.edgeimpulse.com).
2. Go to **Data acquisition** — your samples appear with labels, timestamps, and sensor axes.
3. Use the **Training / Test split** slider to allocate data.
4. Proceed to **Create impulse** to design and train your model.

## How it works


The Android app acts as a **hub**: it aggregates data from every connected source, buffers it locally in CSV, and uploads to Edge Impulse via the ingestion API. All sources feed through a single `DataRepository` so the upload path is identical regardless of where the data came from.

```mermaid theme={"system"}
flowchart TD
    subgraph UI["MainActivity (Compose)"]
        direction LR
        C[Collect]
        Z[ZephyrBLE]
        W[WearOS]
        U[USB OTG]
    end
    UI --> VM[SensorViewModel]
    VM --> SC["SensorCollector\nphone IMU / PPG"]
    VM --> ZB["ZephyrBLEClient\nBLE → Thingy:53 / Nesso N1"]
    VM --> CH["CameraHelper\nCameraX JPEG"]
    VM --> EM["EdgeImpulseManager\nremote-mgmt WebSocket"]
    VM --> UO["UsbOtgClient\nUSB OTG → Arduino CDC-ACM"]
    SC --> DR["DataRepository\nCSV log · HTTPS ingestion · image upload"]
    ZB --> DR
    CH --> DR
    UO --> DR
    EM --> EI
    DR --> EI["Edge Impulse APIs\ningestion + remote-mgmt"]
```

### Data flows

| Source                    | Format                                        | Edge Impulse endpoint     |
| ------------------------- | --------------------------------------------- | ------------------------- |
| Phone accelerometer / PPG | `IngestionPayload` JSON                       | `POST /api/training/data` |
| Camera JPEG               | binary `image/jpeg`                           | `POST /api/training/data` |
| Zephyr inference result   | JSON, `x-label` = inferred class              | `POST /api/training/data` |
| Zephyr raw IMU            | buffered CSV → flush on inference             | `POST /api/training/data` |
| USB OTG IMU stream        | buffered CSV → flush on label                 | `POST /api/training/data` |
| USB OTG camera frame      | binary `image/jpeg` or raw bytes              | `POST /api/training/data` |
| EI Studio remote trigger  | WebSocket `wss://remote-mgmt.edgeimpulse.com` | stream                    |

## Permissions

The app requests these on first launch. All are optional — missing permissions disable only the feature that needs them, not the whole app.

| Permission                             | Required by                                                                                                       |
| -------------------------------------- | ----------------------------------------------------------------------------------------------------------------- |
| `CAMERA`                               | Capture & upload image                                                                                            |
| `BODY_SENSORS`                         | PPG / heart rate                                                                                                  |
| `ACCESS_FINE_LOCATION`                 | BLE scanning on Android \< 12                                                                                     |
| `BLUETOOTH_SCAN` / `BLUETOOTH_CONNECT` | Zephyr BLE tab (Android 12+)                                                                                      |
| `RECORD_AUDIO`                         | Voice control ("Hey Android" wake word + on‑device speech‑to‑text command parsing)                                |
| USB host permission                    | USB OTG tab — auto-granted via the USB host intent filter when the device is plugged in; no manual grant required |

## Troubleshooting


    Your API key is missing or wrong. Check that `EI_API_KEY` is set in `~/.gradle/gradle.properties` and rebuild the app. The key must start with `ei_`.


    * Confirm the firmware is running and the device is advertising. Open a serial monitor and look for `Advertising as EI-Monitor`.
    * On Android 12+, grant `BLUETOOTH_SCAN` and `BLUETOOTH_CONNECT` permissions in **Settings → Apps → Edge Impulse Data Collector → Permissions**.
    * On Android \< 12, grant `ACCESS_FINE_LOCATION` — Android requires location permission for BLE scanning.
    * Make sure your phone's Bluetooth is on and the device is within range (\~10 m).


    * The firmware must be running and actively sampling. Check the Zephyr serial log for `BLE GATT server started`.
    * Verify the firmware's GATT service UUID matches `GattProfile.kt` in the app: `12345678-1234-5678-1234-56789abcdef0`.
    * Try disconnecting and reconnecting — the CCCD subscription can occasionally fail on first connect.


    Grant `CAMERA` permission in **Settings → Apps → Edge Impulse Data Collector → Permissions** and try again. If you're on a build older than 25 May 2026, pull the latest source — an earlier CameraX integration silently dropped frames; this is fixed on `main` and the `fix/data-collector-ble-reliability` branch (commit `8319aaa`).


    * Check that you have a proper OTG adapter and that the cable is firmly seated at both ends.
    * Some phone USB-C ports are charge-only and do not support USB host mode. Try a different port or a different OTG adapter.
    * The Arduino must be running the sketch and fully booted before you plug in.
    * Dismiss any "Allow access to USB device?" system dialog that appears — the app handles the permission request automatically on first connect.
    * For boards using a USB-serial chip (CP2102, CH340, FTDI FT232), the app bundles drivers for the most common chips. Less common chips may not be recognised.


    * Confirm you uploaded `nano33ble_ai_kit_otg.ino` (or `esp32_eye_otg.ino`) — `nesso_usb_serial_imu.ino` and `uno_r4_otg.ino` are IMU-only and do not support camera capture.
    * Tap the camera icon on the **USB OTG** tab (or send the `c` command) to trigger a capture; the tab does not auto-stream camera frames.
    * Verify that the OV7675 camera module is firmly seated in the TinyML Kit shield connector on the Nano 33 BLE Sense.
    * Check the serial output with a monitor at 115200 baud — a `# ERROR: camera not available` line means the camera failed to initialise.


    Make sure the **Edge Impulse label** field is not empty before tapping **Upload stored CSV**. Labels are required and cannot be inferred from the CSV file.


    Install the companion wearable module from the `wearosdatalogger/` directory in the repository on your watch (see [Install the Wear OS companion](#install-the-wear-os-companion-optional)), then re-pair via Android's Wear OS app.


    The pairing code and port are single‑use and expire fast. Close the **Pair new device** dialog on the watch, reopen it for a fresh **IP:port + 6‑digit code**, and pass both inline:

    ```bash theme={"system"}
    adb kill-server && adb start-server
    adb pair :
    ```

    If `nc -zv  ` says **succeeded** but `adb pair` still fails, it's almost always a stale code — reopen the watch dialog one more time. If the port is unreachable, the watch and laptop are on different subnets / Wi‑Fi bands, or a VPN / firewall is blocking it.


## Next steps

Once your dataset is in Edge Impulse Studio:

* **Create impulse** — add a processing block (e.g. Spectral Analysis for IMU, MobileNet for images) and a learning block, then train.
* **Deploy to Android** — use the [Static Buffer Inference](./static-buffer-inference), [Keyword Spotting](./keyword-spotting), or [Camera Inference](./camera-inference) tutorials to run your trained model on-device.
* **Add hardware acceleration** — see [QNN Hardware Acceleration](./qnn-acceleration) to speed up inference using Qualcomm's Hexagon NPU on Snapdragon devices.

## Resources

* [Repository — android-data-collector](https://github.com/edgeimpulse/example-android-inferencing/tree/main/android-data-collector)
* [Companion firmware — ei-zephyr-ble-gatt-client](../zephyr/zephyr-ble-gatt-client)
* [Edge Impulse ingestion API reference](https://docs.edgeimpulse.com/reference/ingestion-api)
* [Android Bluetooth LE guide](https://developer.android.com/develop/connectivity/bluetooth/ble/ble-overview)
 5. Raw IMU windows and labelled inference results stream in and upload automatically to your project.
 The Android app acts as a **hub**: it aggregates data from every connected source, buffers it locally in CSV, and uploads to Edge Impulse via the ingestion API. All sources feed through a single `DataRepository` so the upload path is identical regardless of where the data came from.
```mermaid theme={"system"}
flowchart TD
subgraph UI["MainActivity (Compose)"]
direction LR
C[Collect]
Z[ZephyrBLE]
W[WearOS]
U[USB OTG]
end
UI --> VM[SensorViewModel]
VM --> SC["SensorCollector\nphone IMU / PPG"]
VM --> ZB["ZephyrBLEClient\nBLE → Thingy:53 / Nesso N1"]
VM --> CH["CameraHelper\nCameraX JPEG"]
VM --> EM["EdgeImpulseManager\nremote-mgmt WebSocket"]
VM --> UO["UsbOtgClient\nUSB OTG → Arduino CDC-ACM"]
SC --> DR["DataRepository\nCSV log · HTTPS ingestion · image upload"]
ZB --> DR
CH --> DR
UO --> DR
EM --> EI
DR --> EI["Edge Impulse APIs\ningestion + remote-mgmt"]
```
### Data flows
| Source | Format | Edge Impulse endpoint |
| ------------------------- | --------------------------------------------- | ------------------------- |
| Phone accelerometer / PPG | `IngestionPayload` JSON | `POST /api/training/data` |
| Camera JPEG | binary `image/jpeg` | `POST /api/training/data` |
| Zephyr inference result | JSON, `x-label` = inferred class | `POST /api/training/data` |
| Zephyr raw IMU | buffered CSV → flush on inference | `POST /api/training/data` |
| USB OTG IMU stream | buffered CSV → flush on label | `POST /api/training/data` |
| USB OTG camera frame | binary `image/jpeg` or raw bytes | `POST /api/training/data` |
| EI Studio remote trigger | WebSocket `wss://remote-mgmt.edgeimpulse.com` | stream |
## Permissions
The app requests these on first launch. All are optional — missing permissions disable only the feature that needs them, not the whole app.
| Permission | Required by |
| -------------------------------------- | ----------------------------------------------------------------------------------------------------------------- |
| `CAMERA` | Capture & upload image |
| `BODY_SENSORS` | PPG / heart rate |
| `ACCESS_FINE_LOCATION` | BLE scanning on Android \< 12 |
| `BLUETOOTH_SCAN` / `BLUETOOTH_CONNECT` | Zephyr BLE tab (Android 12+) |
| `RECORD_AUDIO` | Voice control ("Hey Android" wake word + on‑device speech‑to‑text command parsing) |
| USB host permission | USB OTG tab — auto-granted via the USB host intent filter when the device is plugged in; no manual grant required |
## Troubleshooting
The Android app acts as a **hub**: it aggregates data from every connected source, buffers it locally in CSV, and uploads to Edge Impulse via the ingestion API. All sources feed through a single `DataRepository` so the upload path is identical regardless of where the data came from.
```mermaid theme={"system"}
flowchart TD
subgraph UI["MainActivity (Compose)"]
direction LR
C[Collect]
Z[ZephyrBLE]
W[WearOS]
U[USB OTG]
end
UI --> VM[SensorViewModel]
VM --> SC["SensorCollector\nphone IMU / PPG"]
VM --> ZB["ZephyrBLEClient\nBLE → Thingy:53 / Nesso N1"]
VM --> CH["CameraHelper\nCameraX JPEG"]
VM --> EM["EdgeImpulseManager\nremote-mgmt WebSocket"]
VM --> UO["UsbOtgClient\nUSB OTG → Arduino CDC-ACM"]
SC --> DR["DataRepository\nCSV log · HTTPS ingestion · image upload"]
ZB --> DR
CH --> DR
UO --> DR
EM --> EI
DR --> EI["Edge Impulse APIs\ningestion + remote-mgmt"]
```
### Data flows
| Source | Format | Edge Impulse endpoint |
| ------------------------- | --------------------------------------------- | ------------------------- |
| Phone accelerometer / PPG | `IngestionPayload` JSON | `POST /api/training/data` |
| Camera JPEG | binary `image/jpeg` | `POST /api/training/data` |
| Zephyr inference result | JSON, `x-label` = inferred class | `POST /api/training/data` |
| Zephyr raw IMU | buffered CSV → flush on inference | `POST /api/training/data` |
| USB OTG IMU stream | buffered CSV → flush on label | `POST /api/training/data` |
| USB OTG camera frame | binary `image/jpeg` or raw bytes | `POST /api/training/data` |
| EI Studio remote trigger | WebSocket `wss://remote-mgmt.edgeimpulse.com` | stream |
## Permissions
The app requests these on first launch. All are optional — missing permissions disable only the feature that needs them, not the whole app.
| Permission | Required by |
| -------------------------------------- | ----------------------------------------------------------------------------------------------------------------- |
| `CAMERA` | Capture & upload image |
| `BODY_SENSORS` | PPG / heart rate |
| `ACCESS_FINE_LOCATION` | BLE scanning on Android \< 12 |
| `BLUETOOTH_SCAN` / `BLUETOOTH_CONNECT` | Zephyr BLE tab (Android 12+) |
| `RECORD_AUDIO` | Voice control ("Hey Android" wake word + on‑device speech‑to‑text command parsing) |
| USB host permission | USB OTG tab — auto-granted via the USB host intent filter when the device is plugged in; no manual grant required |
## Troubleshooting