> ## Documentation Index
> Fetch the complete documentation index at: https://docs.edgeimpulse.com/llms.txt
> Use this file to discover all available pages before exploring further.
# Use the Edge Impulse Python SDK with TensorFlow and Keras


 [TensorFlow](https://www.tensorflow.org/) is an open source library for training machine learning models. [Keras](https://keras.io/) is an open source Python library that makes creating neural networks in TensorFlow much easier. We use these two libraries together to very quickly train a model to identify handwritten digits. From there, we use the Edge Impulse Python SDK library to profile the model to see how inference will perform on a target edge device. Then, we use the SDK again to convert our trained model to a C++ library that can be deployed to an edge hardware platform, such as a microcontroller.
Follow the code below to see how to train a simple machine learning model and deploy it to a C++ library using Edge Impulse.
To learn more about using the Python SDK, please see: [Edge Impulse Python SDK Overview](/tools/libraries/sdks/studio/python).
```python theme={"system"}
# If you have not done so already, install the following dependencies
!python -m pip install tensorflow==2.12.0 edgeimpulse
```
```python theme={"system"}
from tensorflow import keras
import edgeimpulse as ei
```
You will need to obtain an API key from an Edge Impulse project. Log into [edgeimpulse.com](https://edgeimpulse.com/) and create a new project. Open the project, navigate to **Dashboard** and click on the **Keys** tab to view your API keys. Double-click on the API key to highlight it, right-click, and select **Copy**.
[TensorFlow](https://www.tensorflow.org/) is an open source library for training machine learning models. [Keras](https://keras.io/) is an open source Python library that makes creating neural networks in TensorFlow much easier. We use these two libraries together to very quickly train a model to identify handwritten digits. From there, we use the Edge Impulse Python SDK library to profile the model to see how inference will perform on a target edge device. Then, we use the SDK again to convert our trained model to a C++ library that can be deployed to an edge hardware platform, such as a microcontroller.
Follow the code below to see how to train a simple machine learning model and deploy it to a C++ library using Edge Impulse.
To learn more about using the Python SDK, please see: [Edge Impulse Python SDK Overview](/tools/libraries/sdks/studio/python).
```python theme={"system"}
# If you have not done so already, install the following dependencies
!python -m pip install tensorflow==2.12.0 edgeimpulse
```
```python theme={"system"}
from tensorflow import keras
import edgeimpulse as ei
```
You will need to obtain an API key from an Edge Impulse project. Log into [edgeimpulse.com](https://edgeimpulse.com/) and create a new project. Open the project, navigate to **Dashboard** and click on the **Keys** tab to view your API keys. Double-click on the API key to highlight it, right-click, and select **Copy**.
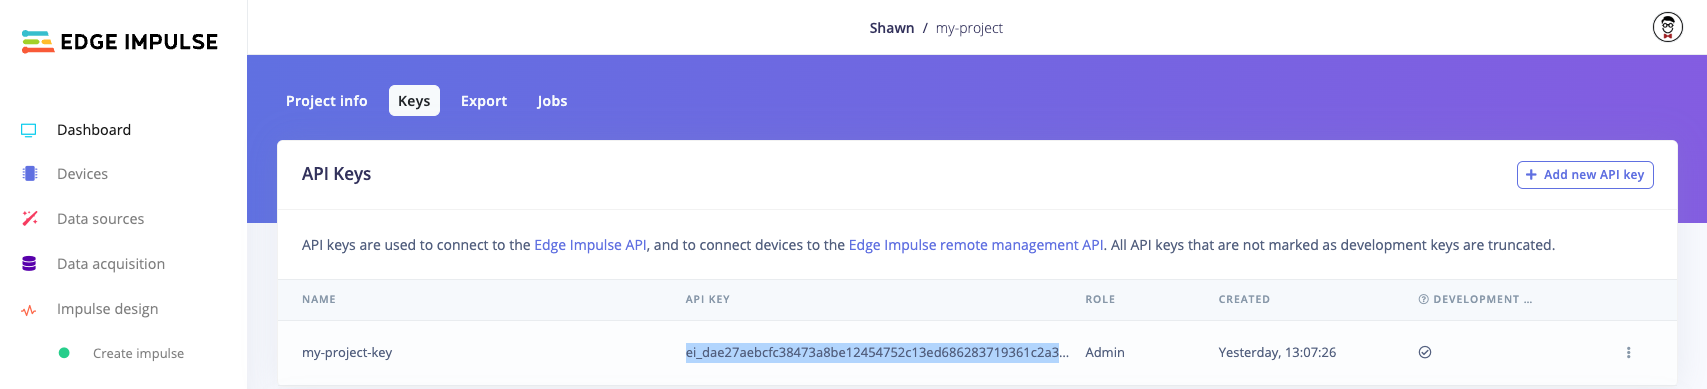 Note that you do not actually need to use the project in the Edge Impulse Studio. We just need the API Key.
Paste that API key string in the `ei.API_KEY` value in the following cell:
```python theme={"system"}
# Settings
ei.API_KEY = "ei_dae2..." # Change this to your Edge Impulse API key
labels = ["0", "1", "2", "3", "4", "5", "6", "7", "8", "9"]
num_classes = len(labels)
deploy_filename = "my_model_cpp.zip"
```
## Train a machine learning model
We want to create a classifier that can uniquely identify handwritten digits. To start, we will use TensorFlow and Keras to train a very simple convolutional neural network (CNN) on the classic [MNIST](http://yann.lecun.com/exdb/mnist/) dataset, which consists of handwritten digits from 0 to 9.
```python theme={"system"}
# Load MNIST data
(x_train, y_train), (x_test, y_test) = keras.datasets.mnist.load_data()
x_train = keras.utils.normalize(x_train, axis=1)
x_test = keras.utils.normalize(x_test, axis=1)
y_train = keras.utils.to_categorical(y_train, num_classes)
y_test = keras.utils.to_categorical(y_test, num_classes)
input_shape = x_train[0].shape
```
```python theme={"system"}
# Build the model
model = keras.Sequential([
keras.layers.Flatten(),
keras.layers.Dense(32, activation='relu', input_shape=input_shape),
keras.layers.Dense(num_classes, activation='softmax')
])
# Compile the model
model.compile(optimizer='adam',
loss='categorical_crossentropy',
metrics=['accuracy'])
```
```python theme={"system"}
# Train the model
model.fit(x_train,
y_train,
epochs=5)
```
```python theme={"system"}
# Evaluate model on test set
score = model.evaluate(x_test, y_test, verbose=0)
print(f"Test loss: {score[0]}")
print(f"Test accuracy: {score[1]}")
```
## Profile your model
To start, we need to list the possible target devices we can use for profiling. We need to pick from this list.
```python theme={"system"}
# List the available profile target devices
ei.model.list_profile_devices()
```
You should see a list printed such as:
```
['alif-he',
'alif-hp',
'arduino-nano-33-ble',
'arduino-nicla-vision',
'portenta-h7',
'brainchip-akd1000',
'cortex-m4f-80mhz',
'cortex-m7-216mhz',
...
'ti-tda4vm']
```
A common option is the `cortex-m4f-80mhz`, as this is a relatively low-power microcontroller family. From there, we can use the Edge Impulse Python SDK to generate a profile for your model to ensure it fits on your target hardware and meets your timing requirements.
```python theme={"system"}
# Estimate the RAM, ROM, and inference time for our model on the target hardware family
try:
profile = ei.model.profile(model=model,
device='cortex-m4f-80mhz')
print(profile.summary())
except Exception as e:
print(f"Could not profile: {e}")
```
## Deploy your model
Once you are happy with the performance of the model, you can deploy it to a number of possible hardware targets. To see the available hardware targets, run the following:
```python theme={"system"}
# List the available profile target devices
ei.model.list_deployment_targets()
```
You should see a list printed such as:
```
['zip',
'arduino',
'tinkergen',
'cubemx',
'wasm',
...
'runner-linux-aarch64-tda4vm']
```
The most generic target is to download a .zip file that holds a C++ library containing the inference runtime and your trained model, so we choose `'zip'` from the above list. To do that, we first need to create a Classification object which contains our label strings (and other optional information about the model). These strings will be added to the C++ library metadata so you can access them in your edge application.
Note that instead of writing the raw bytes to a file, you can also specify an `output_directory` argument in the `.deploy()` function. Your deployment file(s) will be downloaded to that directory.
**Important!** The deployment targets list will change depending on the values provided for `model`, `model_output_type`, and `model_input_type` in the next part. For example, you will not see `openmv` listed once you upload a model (e.g. using `.profile()` or `.deploy()`) if `model_input_type` is not set to `ei.model.input_type.ImageInput()`. If you attempt to deploy to an unavailable target, you will receive the error `Could not deploy: deploy_target: ...`. If `model_input_type` is not provided, it will default to [OtherInput](/tools/libraries/sdks/studio/python/edgeimpulse/model/input_type#otherinput). See [this page](/tools/libraries/sdks/studio/python/edgeimpulse/model/input_type) for more information about input types.
```python theme={"system"}
# Set model information, such as your list of labels
model_output_type = ei.model.output_type.Classification(labels=labels)
# Set model input type
model_input_type = ei.model.input_type.OtherInput()
# Create C++ library with trained model
deploy_bytes = None
try:
deploy_bytes = ei.model.deploy(model=model,
model_output_type=model_output_type,
model_input_type=model_input_type,
deploy_target='zip')
except Exception as e:
print(f"Could not deploy: {e}")
# Write the downloaded raw bytes to a file
if deploy_bytes:
with open(deploy_filename, 'wb') as f:
f.write(deploy_bytes.getvalue())
```
Your model C++ library should be downloaded as the file *my\_model\_cpp.zip* in the same directory as this notebook. You are now ready to use your C++ model in your embedded and edge device application! To use the C++ model for local inference, see our documentation [here](/hardware/deployments/run-cpp-overview).
Note that you do not actually need to use the project in the Edge Impulse Studio. We just need the API Key.
Paste that API key string in the `ei.API_KEY` value in the following cell:
```python theme={"system"}
# Settings
ei.API_KEY = "ei_dae2..." # Change this to your Edge Impulse API key
labels = ["0", "1", "2", "3", "4", "5", "6", "7", "8", "9"]
num_classes = len(labels)
deploy_filename = "my_model_cpp.zip"
```
## Train a machine learning model
We want to create a classifier that can uniquely identify handwritten digits. To start, we will use TensorFlow and Keras to train a very simple convolutional neural network (CNN) on the classic [MNIST](http://yann.lecun.com/exdb/mnist/) dataset, which consists of handwritten digits from 0 to 9.
```python theme={"system"}
# Load MNIST data
(x_train, y_train), (x_test, y_test) = keras.datasets.mnist.load_data()
x_train = keras.utils.normalize(x_train, axis=1)
x_test = keras.utils.normalize(x_test, axis=1)
y_train = keras.utils.to_categorical(y_train, num_classes)
y_test = keras.utils.to_categorical(y_test, num_classes)
input_shape = x_train[0].shape
```
```python theme={"system"}
# Build the model
model = keras.Sequential([
keras.layers.Flatten(),
keras.layers.Dense(32, activation='relu', input_shape=input_shape),
keras.layers.Dense(num_classes, activation='softmax')
])
# Compile the model
model.compile(optimizer='adam',
loss='categorical_crossentropy',
metrics=['accuracy'])
```
```python theme={"system"}
# Train the model
model.fit(x_train,
y_train,
epochs=5)
```
```python theme={"system"}
# Evaluate model on test set
score = model.evaluate(x_test, y_test, verbose=0)
print(f"Test loss: {score[0]}")
print(f"Test accuracy: {score[1]}")
```
## Profile your model
To start, we need to list the possible target devices we can use for profiling. We need to pick from this list.
```python theme={"system"}
# List the available profile target devices
ei.model.list_profile_devices()
```
You should see a list printed such as:
```
['alif-he',
'alif-hp',
'arduino-nano-33-ble',
'arduino-nicla-vision',
'portenta-h7',
'brainchip-akd1000',
'cortex-m4f-80mhz',
'cortex-m7-216mhz',
...
'ti-tda4vm']
```
A common option is the `cortex-m4f-80mhz`, as this is a relatively low-power microcontroller family. From there, we can use the Edge Impulse Python SDK to generate a profile for your model to ensure it fits on your target hardware and meets your timing requirements.
```python theme={"system"}
# Estimate the RAM, ROM, and inference time for our model on the target hardware family
try:
profile = ei.model.profile(model=model,
device='cortex-m4f-80mhz')
print(profile.summary())
except Exception as e:
print(f"Could not profile: {e}")
```
## Deploy your model
Once you are happy with the performance of the model, you can deploy it to a number of possible hardware targets. To see the available hardware targets, run the following:
```python theme={"system"}
# List the available profile target devices
ei.model.list_deployment_targets()
```
You should see a list printed such as:
```
['zip',
'arduino',
'tinkergen',
'cubemx',
'wasm',
...
'runner-linux-aarch64-tda4vm']
```
The most generic target is to download a .zip file that holds a C++ library containing the inference runtime and your trained model, so we choose `'zip'` from the above list. To do that, we first need to create a Classification object which contains our label strings (and other optional information about the model). These strings will be added to the C++ library metadata so you can access them in your edge application.
Note that instead of writing the raw bytes to a file, you can also specify an `output_directory` argument in the `.deploy()` function. Your deployment file(s) will be downloaded to that directory.
**Important!** The deployment targets list will change depending on the values provided for `model`, `model_output_type`, and `model_input_type` in the next part. For example, you will not see `openmv` listed once you upload a model (e.g. using `.profile()` or `.deploy()`) if `model_input_type` is not set to `ei.model.input_type.ImageInput()`. If you attempt to deploy to an unavailable target, you will receive the error `Could not deploy: deploy_target: ...`. If `model_input_type` is not provided, it will default to [OtherInput](/tools/libraries/sdks/studio/python/edgeimpulse/model/input_type#otherinput). See [this page](/tools/libraries/sdks/studio/python/edgeimpulse/model/input_type) for more information about input types.
```python theme={"system"}
# Set model information, such as your list of labels
model_output_type = ei.model.output_type.Classification(labels=labels)
# Set model input type
model_input_type = ei.model.input_type.OtherInput()
# Create C++ library with trained model
deploy_bytes = None
try:
deploy_bytes = ei.model.deploy(model=model,
model_output_type=model_output_type,
model_input_type=model_input_type,
deploy_target='zip')
except Exception as e:
print(f"Could not deploy: {e}")
# Write the downloaded raw bytes to a file
if deploy_bytes:
with open(deploy_filename, 'wb') as f:
f.write(deploy_bytes.getvalue())
```
Your model C++ library should be downloaded as the file *my\_model\_cpp.zip* in the same directory as this notebook. You are now ready to use your C++ model in your embedded and edge device application! To use the C++ model for local inference, see our documentation [here](/hardware/deployments/run-cpp-overview).