> ## Documentation Index
> Fetch the complete documentation index at: https://docs.edgeimpulse.com/llms.txt
> Use this file to discover all available pages before exploring further.
# Use the Edge Impulse Python SDK with Hugging Face


 🤗 [Hugging Face](https://huggingface.co/) offers a suite of tools that assist with various AI applications. Most notably, they provide a [hub](https://huggingface.co/models) for people to share their pre-trained models. In this tutorial, we will demonstrate how to download a simple [ResNet](https://en.wikipedia.org/wiki/Residual_neural_network) model from the Hugging Face hub, profile it, and convert it to a C++ library for use in your edge application. This particular model was trained to identify species of bean plants using the [bean dataset](https://www.tensorflow.org/datasets/catalog/beans).
To learn more about using the Python SDK, please see: [Edge Impulse Python SDK Overview](/tools/libraries/sdks/studio/python)
```python theme={"system"}
# If you have not done so already, install the following dependencies
!python -m pip install huggingface_hub edgeimpulse
```
```python theme={"system"}
import json
from huggingface_hub import hf_hub_download
import edgeimpulse as ei
```
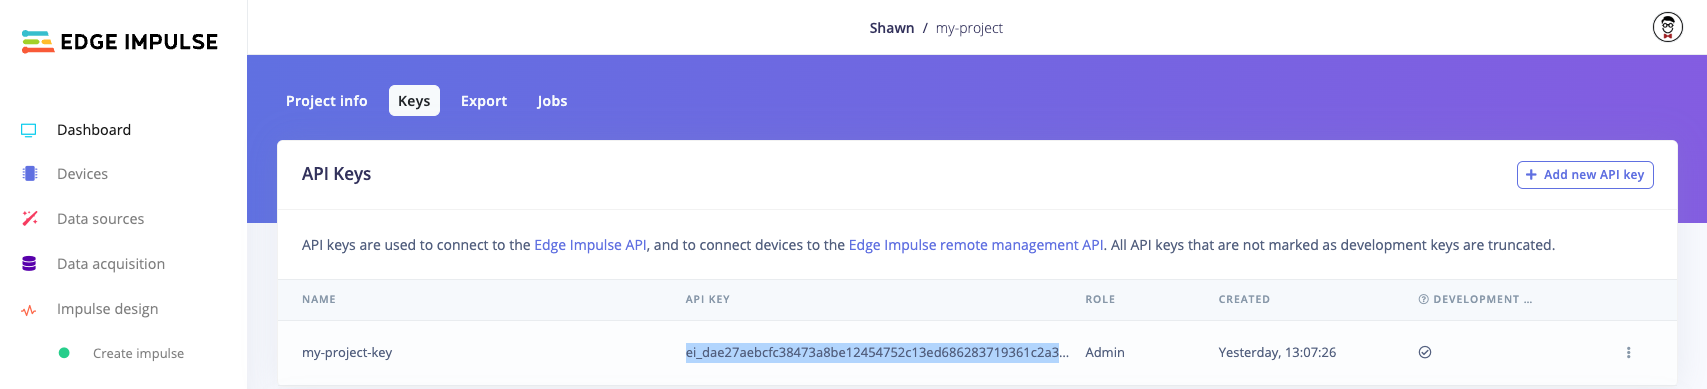
You will need to obtain an API key from an Edge Impulse project. Log into [edgeimpulse.com](https://edgeimpulse.com/) and create a new project. Open the project, navigate to **Dashboard** and click on the **Keys** tab to view your API keys. Double-click on the API key to highlight it, right-click, and select **Copy**.
🤗 [Hugging Face](https://huggingface.co/) offers a suite of tools that assist with various AI applications. Most notably, they provide a [hub](https://huggingface.co/models) for people to share their pre-trained models. In this tutorial, we will demonstrate how to download a simple [ResNet](https://en.wikipedia.org/wiki/Residual_neural_network) model from the Hugging Face hub, profile it, and convert it to a C++ library for use in your edge application. This particular model was trained to identify species of bean plants using the [bean dataset](https://www.tensorflow.org/datasets/catalog/beans).
To learn more about using the Python SDK, please see: [Edge Impulse Python SDK Overview](/tools/libraries/sdks/studio/python)
```python theme={"system"}
# If you have not done so already, install the following dependencies
!python -m pip install huggingface_hub edgeimpulse
```
```python theme={"system"}
import json
from huggingface_hub import hf_hub_download
import edgeimpulse as ei
```
You will need to obtain an API key from an Edge Impulse project. Log into [edgeimpulse.com](https://edgeimpulse.com/) and create a new project. Open the project, navigate to **Dashboard** and click on the **Keys** tab to view your API keys. Double-click on the API key to highlight it, right-click, and select **Copy**.
 Note that you do not actually need to use the project in the Edge Impulse Studio. We just need the API Key.
Paste that API key string in the `ei.API_KEY` value in the following cell:
```python theme={"system"}
# Edge Impulse Settings
ei.API_KEY = "ei_dae2..."
target_device = 'cortex-m4f-80mhz'
deploy_filename = "my_model_cpp.zip"
```
To download a model from the Hugging Face hub, we need to first find a model. Head to [huggingface.co/models](https://huggingface.co/models). On the left side, click **Image Classification** to filter under the *Tasks* tab and under the *Libraries* tab, filter by **ONNX** (as the Edge Impulse Python SDK easily accepts ONNX models). You should see the *resnet-tiny-beans* model trained by user *fxmarty*.
Note that you do not actually need to use the project in the Edge Impulse Studio. We just need the API Key.
Paste that API key string in the `ei.API_KEY` value in the following cell:
```python theme={"system"}
# Edge Impulse Settings
ei.API_KEY = "ei_dae2..."
target_device = 'cortex-m4f-80mhz'
deploy_filename = "my_model_cpp.zip"
```
To download a model from the Hugging Face hub, we need to first find a model. Head to [huggingface.co/models](https://huggingface.co/models). On the left side, click **Image Classification** to filter under the *Tasks* tab and under the *Libraries* tab, filter by **ONNX** (as the Edge Impulse Python SDK easily accepts ONNX models). You should see the *resnet-tiny-beans* model trained by user *fxmarty*.
 Click on the *resnet-tiny-beans* entry (or follow [this link](https://huggingface.co/fxmarty/resnet-tiny-beans)) to read about the model and view the files. If you click on the Files\* tab, you can see all of the files available in this particular model.
 Set the name of the repo (username/repo-name) and the file we want to download.
```python theme={"system"}
# Define file location for our model
repo_name = "fxmarty/resnet-tiny-beans"
download_dir = "./"
model_filename = "model.onnx"
# Download pre-trained model
hf_hub_download(repo_id=repo_name,
filename=model_filename,
local_dir=download_dir)
```
## Profile your model
To start, we need to list the possible target devices we can use for profiling. We need to pick from this list.
```python theme={"system"}
# List the available profile target devices
ei.model.list_profile_devices()
```
You should see a list printed such as:
```
['alif-he',
'alif-hp',
'arduino-nano-33-ble',
'arduino-nicla-vision',
'portenta-h7',
'brainchip-akd1000',
'cortex-m4f-80mhz',
'cortex-m7-216mhz',
...
'ti-tda4vm']
```
A common option is the `cortex-m4f-80mhz`, as this is a relatively low-power microcontroller family. From there, we can use the Edge Impulse Python SDK to generate a profile for your model to ensure it fits on your target hardware and meets your timing requirements.
```python theme={"system"}
# Estimate the RAM, ROM, and inference time for our model on the target hardware family
try:
profile = ei.model.profile(model=model_filename,
device='cortex-m4f-80mhz')
print(profile.summary())
except Exception as e:
print(f"Could not profile: {e}")
```
## Deploy your model
Once you are happy with the performance of the model, you can deploy it to a number of possible hardware targets. To see the available hardware targets, run the following:
```python theme={"system"}
# List the available profile target devices
ei.model.list_deployment_targets()
```
You should see a list printed such as:
```
['zip',
'arduino',
'tinkergen',
'cubemx',
'wasm',
...
'runner-linux-aarch64-tda4vm']
```
The most generic target is to download a .zip file containing a C++ library containing the inference runtime and your trained model, so we choose `'zip'` from the above list. We also need to tell Edge Impulse how we are planning to use the model. In this case, we want to perform classification, so we set the output type to Classification.
Note that instead of writing the raw bytes to a file, you can also specify an `output_directory` argument in the `.deploy()` function. Your deployment file(s) will be downloaded to that directory.
```python theme={"system"}
# Create C++ library with trained model
deploy_bytes = None
try:
deploy_bytes = ei.model.deploy(model=model_filename,
model_output_type=ei.model.output_type.Classification(),
deploy_target='zip')
except Exception as e:
print(f"Could not deploy: {e}")
# Write the downloaded raw bytes to a file
if deploy_bytes:
with open(deploy_filename, 'wb') as f:
f.write(deploy_bytes.getvalue())
```
Your model C++ library should be downloaded as the file *my\_model\_cpp.zip* in the same directory as this notebook. You are now ready to use your C++ model in your embedded and edge device application! To use the C++ model for local inference, see our documentation [here](/hardware/deployments/run-cpp-overview).
Set the name of the repo (username/repo-name) and the file we want to download.
```python theme={"system"}
# Define file location for our model
repo_name = "fxmarty/resnet-tiny-beans"
download_dir = "./"
model_filename = "model.onnx"
# Download pre-trained model
hf_hub_download(repo_id=repo_name,
filename=model_filename,
local_dir=download_dir)
```
## Profile your model
To start, we need to list the possible target devices we can use for profiling. We need to pick from this list.
```python theme={"system"}
# List the available profile target devices
ei.model.list_profile_devices()
```
You should see a list printed such as:
```
['alif-he',
'alif-hp',
'arduino-nano-33-ble',
'arduino-nicla-vision',
'portenta-h7',
'brainchip-akd1000',
'cortex-m4f-80mhz',
'cortex-m7-216mhz',
...
'ti-tda4vm']
```
A common option is the `cortex-m4f-80mhz`, as this is a relatively low-power microcontroller family. From there, we can use the Edge Impulse Python SDK to generate a profile for your model to ensure it fits on your target hardware and meets your timing requirements.
```python theme={"system"}
# Estimate the RAM, ROM, and inference time for our model on the target hardware family
try:
profile = ei.model.profile(model=model_filename,
device='cortex-m4f-80mhz')
print(profile.summary())
except Exception as e:
print(f"Could not profile: {e}")
```
## Deploy your model
Once you are happy with the performance of the model, you can deploy it to a number of possible hardware targets. To see the available hardware targets, run the following:
```python theme={"system"}
# List the available profile target devices
ei.model.list_deployment_targets()
```
You should see a list printed such as:
```
['zip',
'arduino',
'tinkergen',
'cubemx',
'wasm',
...
'runner-linux-aarch64-tda4vm']
```
The most generic target is to download a .zip file containing a C++ library containing the inference runtime and your trained model, so we choose `'zip'` from the above list. We also need to tell Edge Impulse how we are planning to use the model. In this case, we want to perform classification, so we set the output type to Classification.
Note that instead of writing the raw bytes to a file, you can also specify an `output_directory` argument in the `.deploy()` function. Your deployment file(s) will be downloaded to that directory.
```python theme={"system"}
# Create C++ library with trained model
deploy_bytes = None
try:
deploy_bytes = ei.model.deploy(model=model_filename,
model_output_type=ei.model.output_type.Classification(),
deploy_target='zip')
except Exception as e:
print(f"Could not deploy: {e}")
# Write the downloaded raw bytes to a file
if deploy_bytes:
with open(deploy_filename, 'wb') as f:
f.write(deploy_bytes.getvalue())
```
Your model C++ library should be downloaded as the file *my\_model\_cpp.zip* in the same directory as this notebook. You are now ready to use your C++ model in your embedded and edge device application! To use the C++ model for local inference, see our documentation [here](/hardware/deployments/run-cpp-overview).