> ## Documentation Index
> Fetch the complete documentation index at: https://docs.edgeimpulse.com/llms.txt
> Use this file to discover all available pages before exploring further.
# Particle Photon 2 and Boron - motion recognition
> Recognize gestures from IMU data on the Particle Photon 2 or Boron using Edge Impulse.
export const CardOpenStudioTutorial = ({href}) =>
Skip the setup: clone a ready-to-use Edge Impulse project with the dataset, impulse, and trained model.
;
This tutorial is for Particle hardware only, and just the [Photon 2](https://store.particle.io/products/photon-2) & [Boron](https://www.particle.io/devices/b-series/) devices.
In this tutorial, you'll use machine learning to build a gesture recognition system that runs on the Photon 2 or Boron. This is a hard task to solve using rule-based programming, as people don't perform gestures in the exact same way every time. But machine learning can handle these variations with ease. You'll learn how to collect high-frequency data from an IMU, build a neural network classifier, and how to deploy your model back to a device. At the end of this tutorial, you'll have a firm understanding of applying machine learning with Particle Photon 2 or Boron using Edge Impulse.
## 1. Prerequisites
For this tutorial you'll need:
* [Photon 2](/hardware/boards/particle-photon-2)
**OR**
* [Boron](/hardware/boards/particle-boron)
Each device page above includes instructions for collecting data using the appropriate path, since Photon 2 can be flashed with a binary and directly connect to Studio while the Boron device cannot and needs to use the [Edge Impulse Data Forwarder](/tools/clis/edge-impulse-cli/data-forwarder).
## 2. Collecting your first data
### Photon 2
To collect data from the Photon 2 please follow these steps:
1. Create a new Edge Impulse Studio project, remember the name you create for it.
2. Connect your device to the Edge Impulse studio by running following command in a terminal:
```
edge-impulse-daemon --clean
```
3. After connecting, the Edge Impulse Daemon will ask to login to your account and select the project. Alternatively, you can copy the API Key from the Keys section of your project and use the --api-key flag instead of --clean.
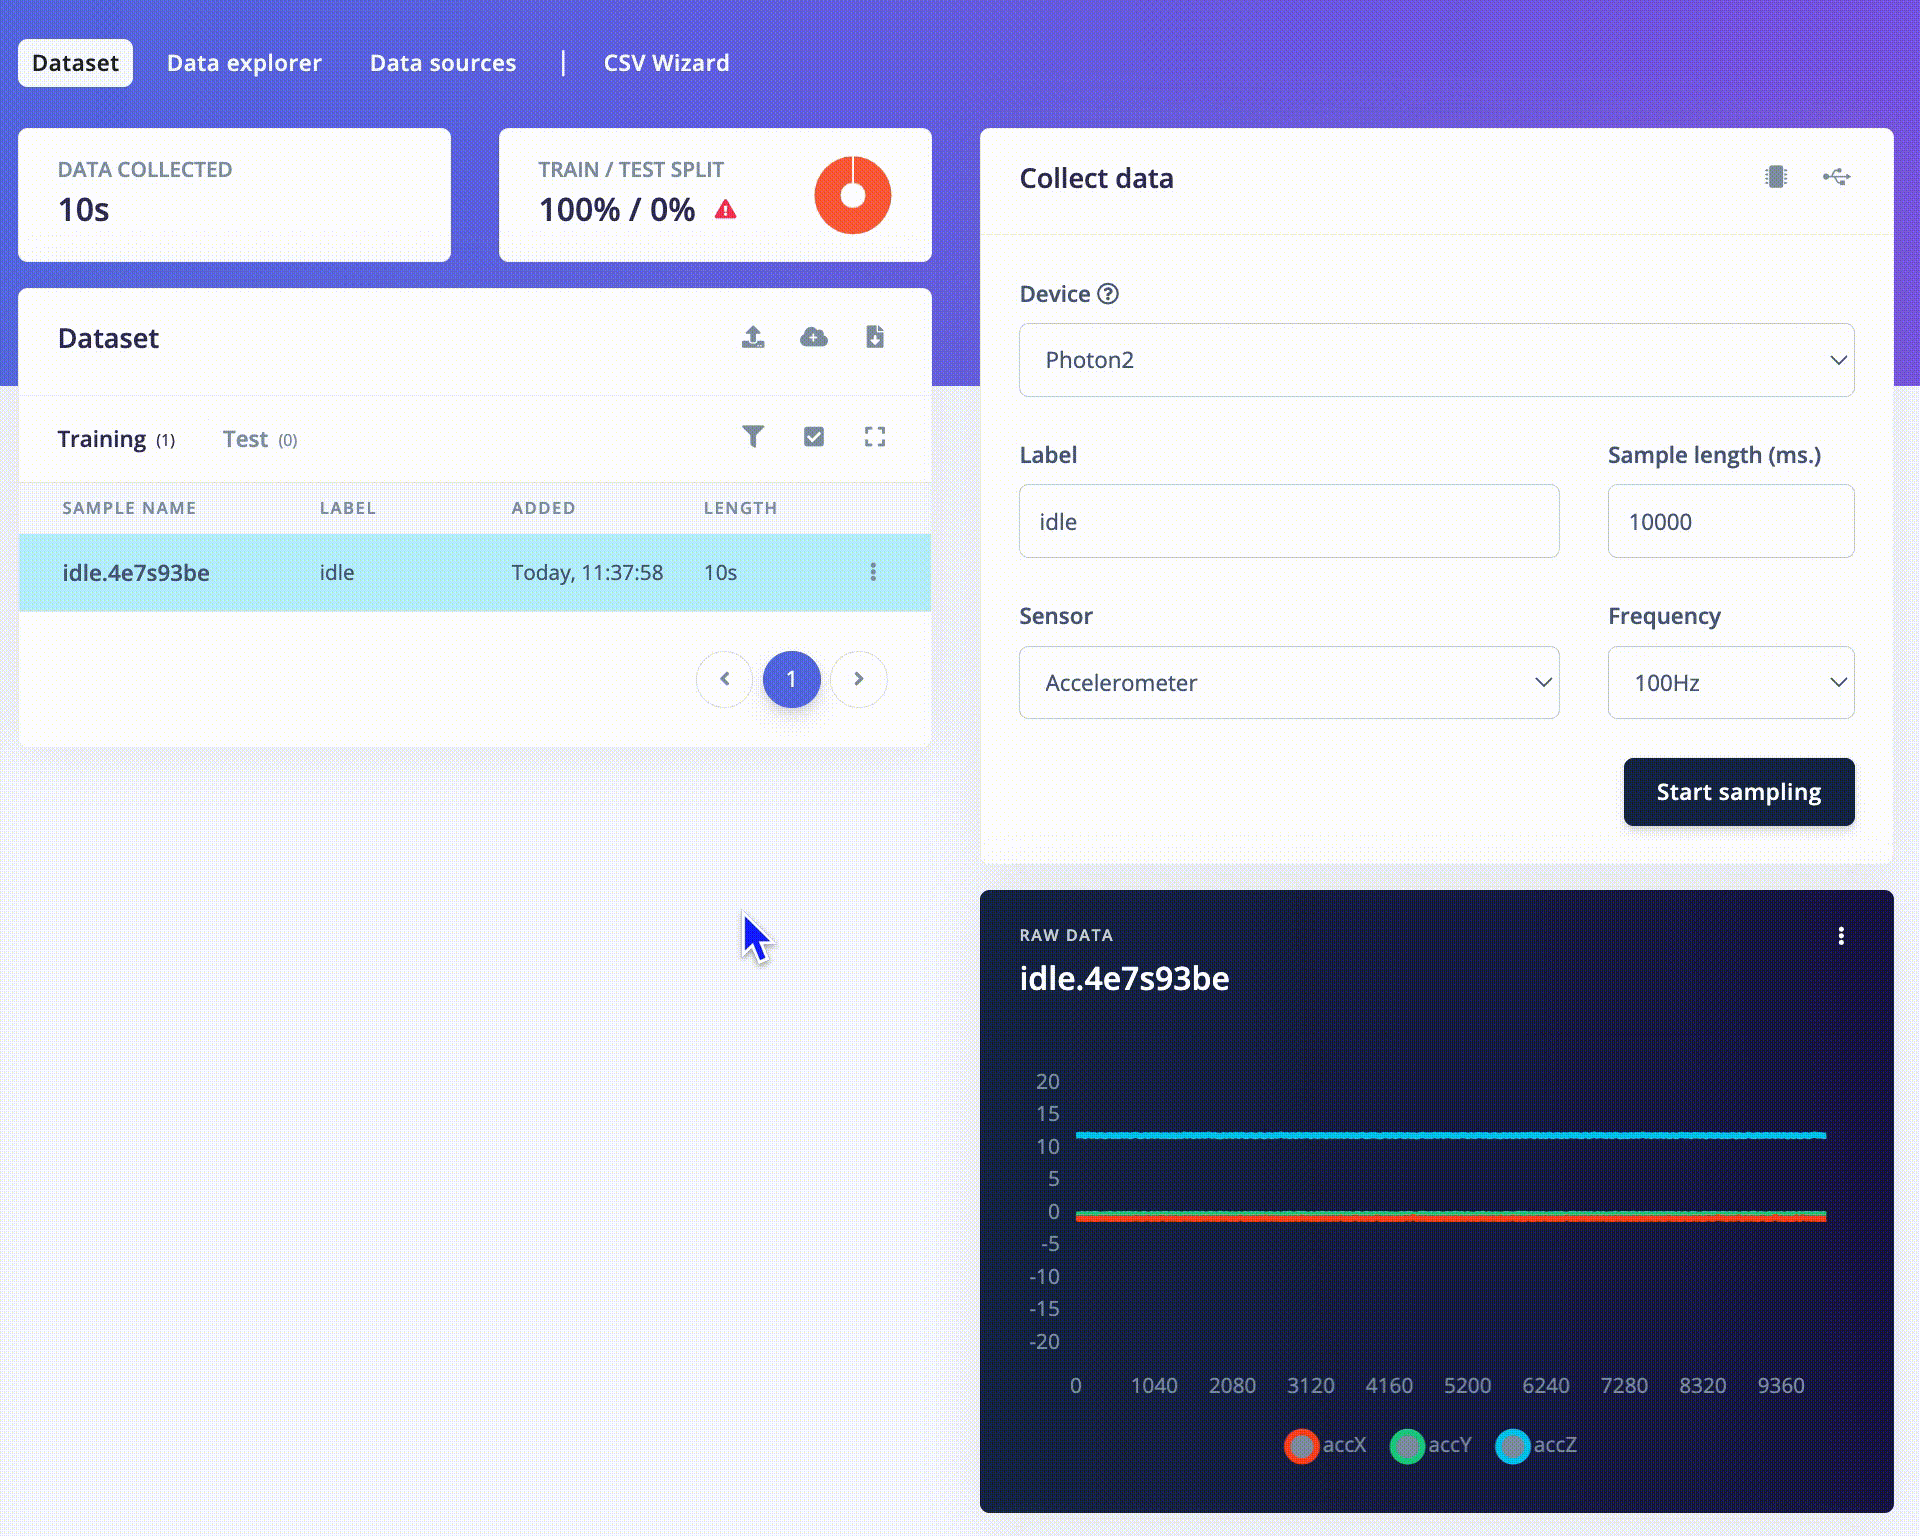
4. Open your Edge Impulse Studio Project and click on **Devices**. Verify that your device is listed here.
 5. Start gathering data by clicking on **Data acquisition**
 ### Boron
1. Navigate to the [Particle Data Ingestion](https://github.com/edgeimpulse/particle-ingestion) project on Github and clone the repo and follow the Readme.
2. Connect your Boron device with ADXL345 connected and start the [Edge Impulse Data Forwarder](/tools/clis/edge-impulse-cli/data-forwarder) being sure to follow the instructions for the forwarder to connect it to your Studio project.
3. Start gathering data by clicking on **Data acquisition** and click **Start sampling**
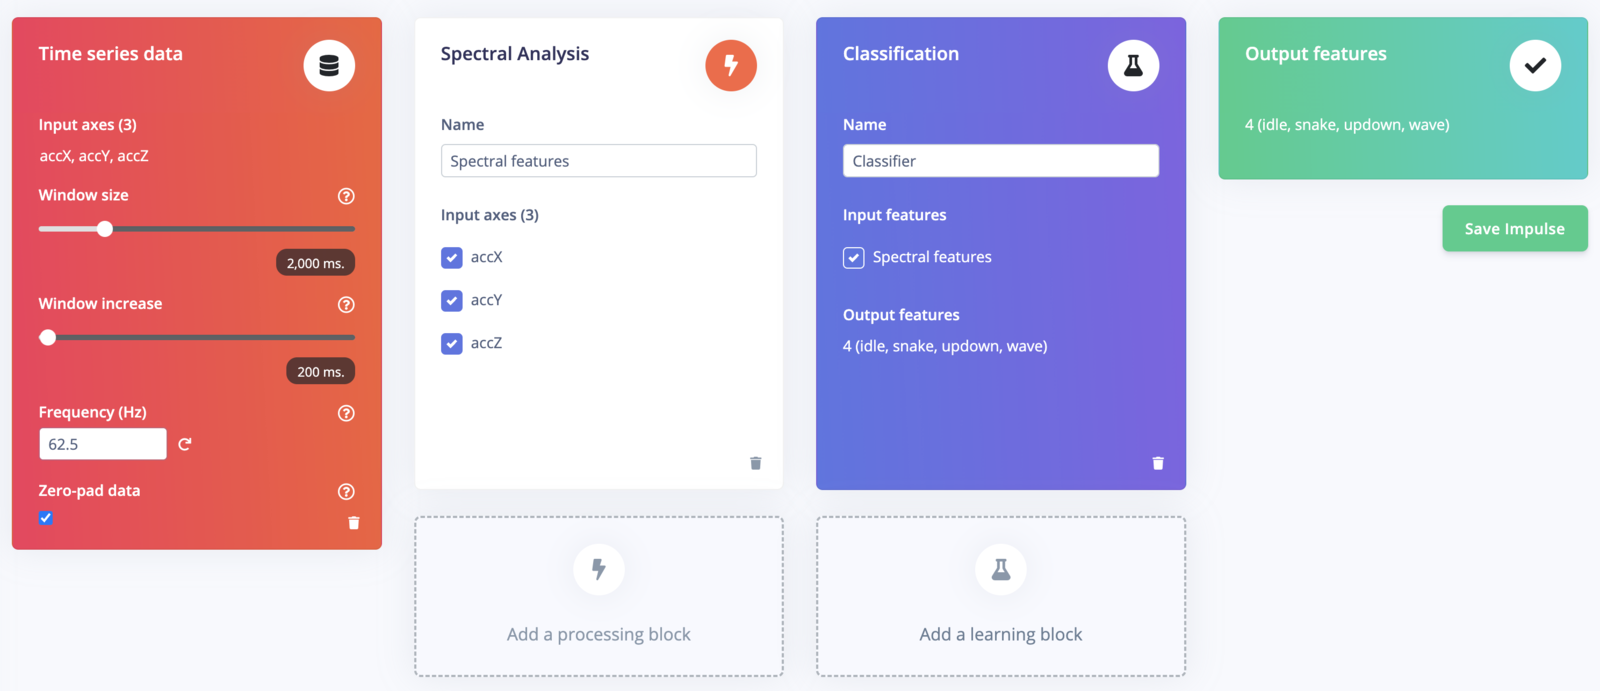
## 3. Designing an impulse
With the training set in place you can design an impulse. An impulse takes the raw data, slices it up in smaller windows, uses signal processing blocks to extract features, and then uses a learning block to classify new data. Signal processing blocks always return the same values for the same input and are used to make raw data easier to process, while learning blocks learn from past experiences.
For this tutorial we'll use the 'Spectral Analysis' signal processing block which turns raw data into a set of important features. Then we'll use a 'Neural Network' learning block, that takes these generated features and learns to distinguish between our different classes of motion.
In Studio go to **Create impulse**, then click on **Add a processing block** and choose **Spectral Analysis**. Next click on **Add a learning block** and choose **Classification** and then finally click **Save impulse**.
### Boron
1. Navigate to the [Particle Data Ingestion](https://github.com/edgeimpulse/particle-ingestion) project on Github and clone the repo and follow the Readme.
2. Connect your Boron device with ADXL345 connected and start the [Edge Impulse Data Forwarder](/tools/clis/edge-impulse-cli/data-forwarder) being sure to follow the instructions for the forwarder to connect it to your Studio project.
3. Start gathering data by clicking on **Data acquisition** and click **Start sampling**
## 3. Designing an impulse
With the training set in place you can design an impulse. An impulse takes the raw data, slices it up in smaller windows, uses signal processing blocks to extract features, and then uses a learning block to classify new data. Signal processing blocks always return the same values for the same input and are used to make raw data easier to process, while learning blocks learn from past experiences.
For this tutorial we'll use the 'Spectral Analysis' signal processing block which turns raw data into a set of important features. Then we'll use a 'Neural Network' learning block, that takes these generated features and learns to distinguish between our different classes of motion.
In Studio go to **Create impulse**, then click on **Add a processing block** and choose **Spectral Analysis**. Next click on **Add a learning block** and choose **Classification** and then finally click **Save impulse**.
 ### Configuring the Spectral Analysis block
To configure your signal processing block, click **Spectral features** in the menu on the left. This will show you the raw data on top of the screen (you can select other files via the drop down menu), and the processed features on the right.
Click **Save parameters**. This will send you to the 'Feature generation' screen.
Click **Generate features** to start the process.
Afterwards the 'Feature explorer' will load. This is a plot of all the extracted features against all the generated windows. You can use this graph to compare your complete data set. A good rule of thumb is that if you can visually separate the data on a number of axes, then the machine learning model will be able to do so as well.
### Configuring the neural network
With all data processed it's time to start training a neural network. Neural networks are algorithms, modeled loosely after the human brain, that can learn to recognize patterns that appear in their training data. The network that we're training here will take the processing block features as an input, and try to map this to one of the possible classes.
Click on **Classifier** in the left hand menu.
With everything in place, click **Start training**.
Congratulations, you've trained a neural network with Edge Impulse and ready to deploy on Syntiant hardware! But what do all these numbers mean?
At the start of training, 20% of the training data is set aside for *validation*. This means that instead of being used to train the model, it is used to evaluate how the model is performing. The *Last training performance* panel displays the results of this validation, providing some vital information about your model and how well it is working. Bear in mind that your exact numbers may differ from the ones in this tutorial.
On the left hand side of the panel, *Accuracy* refers to the percentage of windows of audio that were correctly classified. The higher number the better, although an accuracy approaching 100% is unlikely, and is often a sign that your model has *overfit* the training data. You will find out whether this is true in the next stage, during model testing. For many applications, an accuracy above 85% can be considered very good.
The *Confusion matrix* is a table showing the balance of correctly versus incorrectly classified windows. To understand it, compare the values in each row.
## 4. Deploying to your device
With the impulse designed, trained and verified you can deploy this model back to your device. This makes the model run without an internet connection, minimizes latency, and runs with minimum power consumption.
To export your model, click on **Deployment** in the menu. Then under 'Build firmware' select the Particle Library option and click **Build**
Follow the instructions from the device's documentation page for how to use the Particle Workbench extension in VS Code and deploy on your device.
## 5. Conclusion
Congratulations! Now that you've trained and deployed your model you can go further and build your own custom firmware!
We can't wait to see what you'll build! 🚀
### Configuring the Spectral Analysis block
To configure your signal processing block, click **Spectral features** in the menu on the left. This will show you the raw data on top of the screen (you can select other files via the drop down menu), and the processed features on the right.
Click **Save parameters**. This will send you to the 'Feature generation' screen.
Click **Generate features** to start the process.
Afterwards the 'Feature explorer' will load. This is a plot of all the extracted features against all the generated windows. You can use this graph to compare your complete data set. A good rule of thumb is that if you can visually separate the data on a number of axes, then the machine learning model will be able to do so as well.
### Configuring the neural network
With all data processed it's time to start training a neural network. Neural networks are algorithms, modeled loosely after the human brain, that can learn to recognize patterns that appear in their training data. The network that we're training here will take the processing block features as an input, and try to map this to one of the possible classes.
Click on **Classifier** in the left hand menu.
With everything in place, click **Start training**.
Congratulations, you've trained a neural network with Edge Impulse and ready to deploy on Syntiant hardware! But what do all these numbers mean?
At the start of training, 20% of the training data is set aside for *validation*. This means that instead of being used to train the model, it is used to evaluate how the model is performing. The *Last training performance* panel displays the results of this validation, providing some vital information about your model and how well it is working. Bear in mind that your exact numbers may differ from the ones in this tutorial.
On the left hand side of the panel, *Accuracy* refers to the percentage of windows of audio that were correctly classified. The higher number the better, although an accuracy approaching 100% is unlikely, and is often a sign that your model has *overfit* the training data. You will find out whether this is true in the next stage, during model testing. For many applications, an accuracy above 85% can be considered very good.
The *Confusion matrix* is a table showing the balance of correctly versus incorrectly classified windows. To understand it, compare the values in each row.
## 4. Deploying to your device
With the impulse designed, trained and verified you can deploy this model back to your device. This makes the model run without an internet connection, minimizes latency, and runs with minimum power consumption.
To export your model, click on **Deployment** in the menu. Then under 'Build firmware' select the Particle Library option and click **Build**
Follow the instructions from the device's documentation page for how to use the Particle Workbench extension in VS Code and deploy on your device.
## 5. Conclusion
Congratulations! Now that you've trained and deployed your model you can go further and build your own custom firmware!
We can't wait to see what you'll build! 🚀