> ## Documentation Index
> Fetch the complete documentation index at: https://docs.edgeimpulse.com/llms.txt
> Use this file to discover all available pages before exploring further.
# Dataset
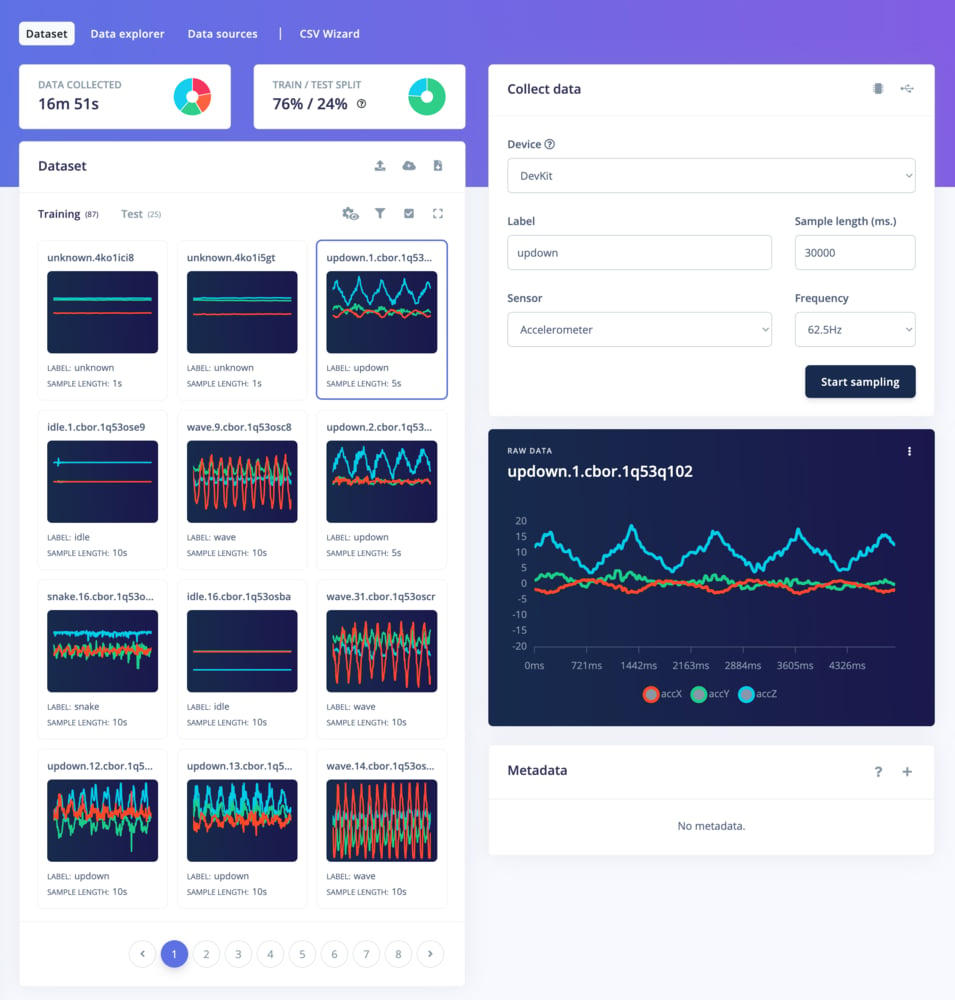
All collected data for each project can be viewed on the **Dataset** tab. You can see how your data has been split for your training, validation, and test sets, as well as the data distribution for each class in your dataset. You can also send new sensor data to your project either by file upload, WebUSB, the API, or the CLI.
 ## Add data to your project
From the dataset tab, you can add data to your project in two ways: by collecting new data using devices connected to your project or by uploading existing datasets.
### Collect new data
The panel on the right allows you to collect data directly from any fully supported platform:
* Through [WebUSB](https://edgeimpulse.com/blog/collect-sensor-data-straight-from-your-web-browser)
* Using the [Edge Impulse CLI daemon](/tools/clis/edge-impulse-cli/serial-daemon)
* From the [Edge Impulse for Linux CLI](/tools/clis/edge-impulse-linux-cli)
The WebUSB and the Edge Impulse daemon work with any fully supported device by flashing the pre-built Edge Impulse firmware to your board. See the list of [fully supported boards](/hardware).
**Device not fully supported?**
If your device is not in the officially supported list, you can also collect data using the [CLI data forwarder](/tools/clis/edge-impulse-cli/data-forwarder) by directly writing the sensor values over a serial connection. The "data forwarder" then signs the data and sends it to the ingestion service.
When using the Edge Impulse for Linux CLI, run `edge-impulse-linux --clean` and it will add your platform to the device list of your project. You will then will be able to interact with it from the **Collect data** panel.
### Upload existing data
Edge Impulse also supports different [data acquisition formats](/tools/specifications/data-acquisition/json-cbor) and [dataset annotation formats](/tools/specifications/data-annotation/object-detection) (Pascal VOC, YOLO TXT, COCO JSON, Edge Impulse Object Detection, OpenImage CSV). You can import that data into your project in several ways:
* [Studio uploader](/studio/projects/data-acquisition/dataset/uploader)
* [CLI uploader](/tools/clis/edge-impulse-cli/uploader)
* [CSV Wizard](/studio/projects/data-acquisition/csv-wizard)
* [Ingestion API](/apis/ingestion)
* [Import from cloud storage](/studio/organizations/data/cloud-data-storage)
* [Upload portals](/studio/organizations/upload-portals)
**Edge Impulse Datasets**
Need inspiration? Check out our collection of [Edge Impulse datasets](/datasets) that contains publicly available datasets collected, generated, or curated by Edge Impulse or its partners.
These datasets highlight specific use cases, helping you understand the types of data commonly encountered in projects like object detection, audio classification, and visual anomaly detection.
## Dataset overview panel
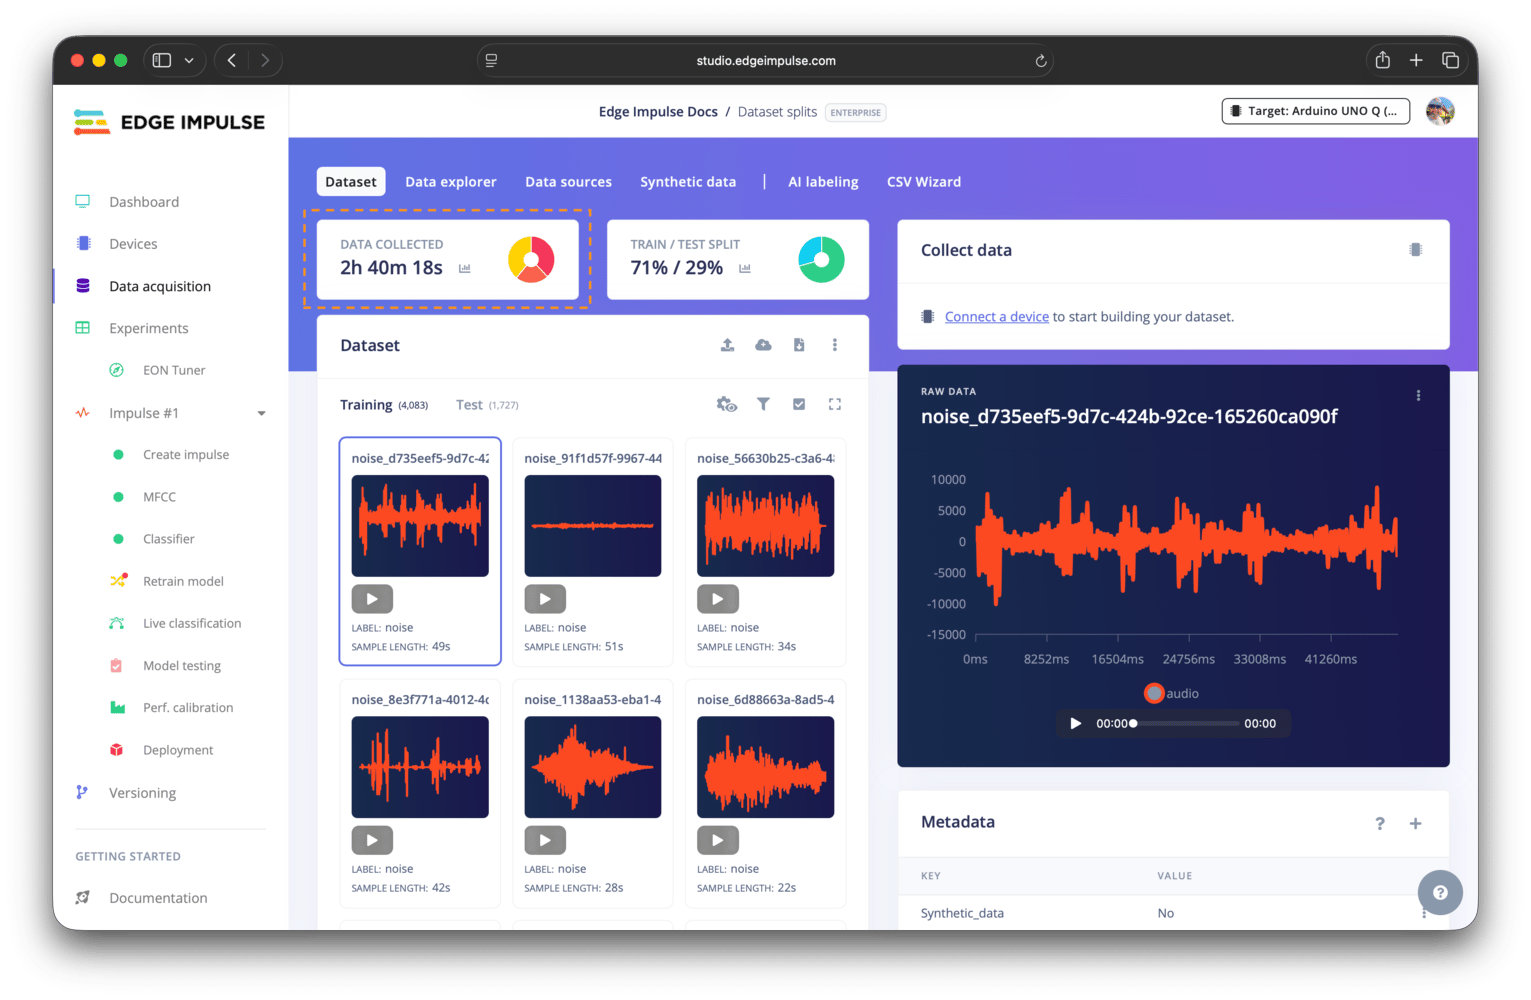
The dataset overview panel provides a high-level summary of your collected data, including the number of samples, class balance, labels breakdown, and metadata distribution. This overview can help you understand the composition of your dataset and identify any potential issues, such as class imbalance or missing metadata.
## Add data to your project
From the dataset tab, you can add data to your project in two ways: by collecting new data using devices connected to your project or by uploading existing datasets.
### Collect new data
The panel on the right allows you to collect data directly from any fully supported platform:
* Through [WebUSB](https://edgeimpulse.com/blog/collect-sensor-data-straight-from-your-web-browser)
* Using the [Edge Impulse CLI daemon](/tools/clis/edge-impulse-cli/serial-daemon)
* From the [Edge Impulse for Linux CLI](/tools/clis/edge-impulse-linux-cli)
The WebUSB and the Edge Impulse daemon work with any fully supported device by flashing the pre-built Edge Impulse firmware to your board. See the list of [fully supported boards](/hardware).
**Device not fully supported?**
If your device is not in the officially supported list, you can also collect data using the [CLI data forwarder](/tools/clis/edge-impulse-cli/data-forwarder) by directly writing the sensor values over a serial connection. The "data forwarder" then signs the data and sends it to the ingestion service.
When using the Edge Impulse for Linux CLI, run `edge-impulse-linux --clean` and it will add your platform to the device list of your project. You will then will be able to interact with it from the **Collect data** panel.
### Upload existing data
Edge Impulse also supports different [data acquisition formats](/tools/specifications/data-acquisition/json-cbor) and [dataset annotation formats](/tools/specifications/data-annotation/object-detection) (Pascal VOC, YOLO TXT, COCO JSON, Edge Impulse Object Detection, OpenImage CSV). You can import that data into your project in several ways:
* [Studio uploader](/studio/projects/data-acquisition/dataset/uploader)
* [CLI uploader](/tools/clis/edge-impulse-cli/uploader)
* [CSV Wizard](/studio/projects/data-acquisition/csv-wizard)
* [Ingestion API](/apis/ingestion)
* [Import from cloud storage](/studio/organizations/data/cloud-data-storage)
* [Upload portals](/studio/organizations/upload-portals)
**Edge Impulse Datasets**
Need inspiration? Check out our collection of [Edge Impulse datasets](/datasets) that contains publicly available datasets collected, generated, or curated by Edge Impulse or its partners.
These datasets highlight specific use cases, helping you understand the types of data commonly encountered in projects like object detection, audio classification, and visual anomaly detection.
## Dataset overview panel
The dataset overview panel provides a high-level summary of your collected data, including the number of samples, class balance, labels breakdown, and metadata distribution. This overview can help you understand the composition of your dataset and identify any potential issues, such as class imbalance or missing metadata.
 ### Dataset distribution
Clicking the chart icon in the dataset overview panel will open the dataset distribution modal, where you can see the distribution of your data across different labels and metadata values.
#### Labels breakdown
The labels breakdown option shows the distribution of your data samples across the labels in your dataset. This can help you identify any class imbalance issues, where some classes have significantly more samples than others, which can lead to biased model training.
### Dataset distribution
Clicking the chart icon in the dataset overview panel will open the dataset distribution modal, where you can see the distribution of your data across different labels and metadata values.
#### Labels breakdown
The labels breakdown option shows the distribution of your data samples across the labels in your dataset. This can help you identify any class imbalance issues, where some classes have significantly more samples than others, which can lead to biased model training.
 #### Metadata distribution
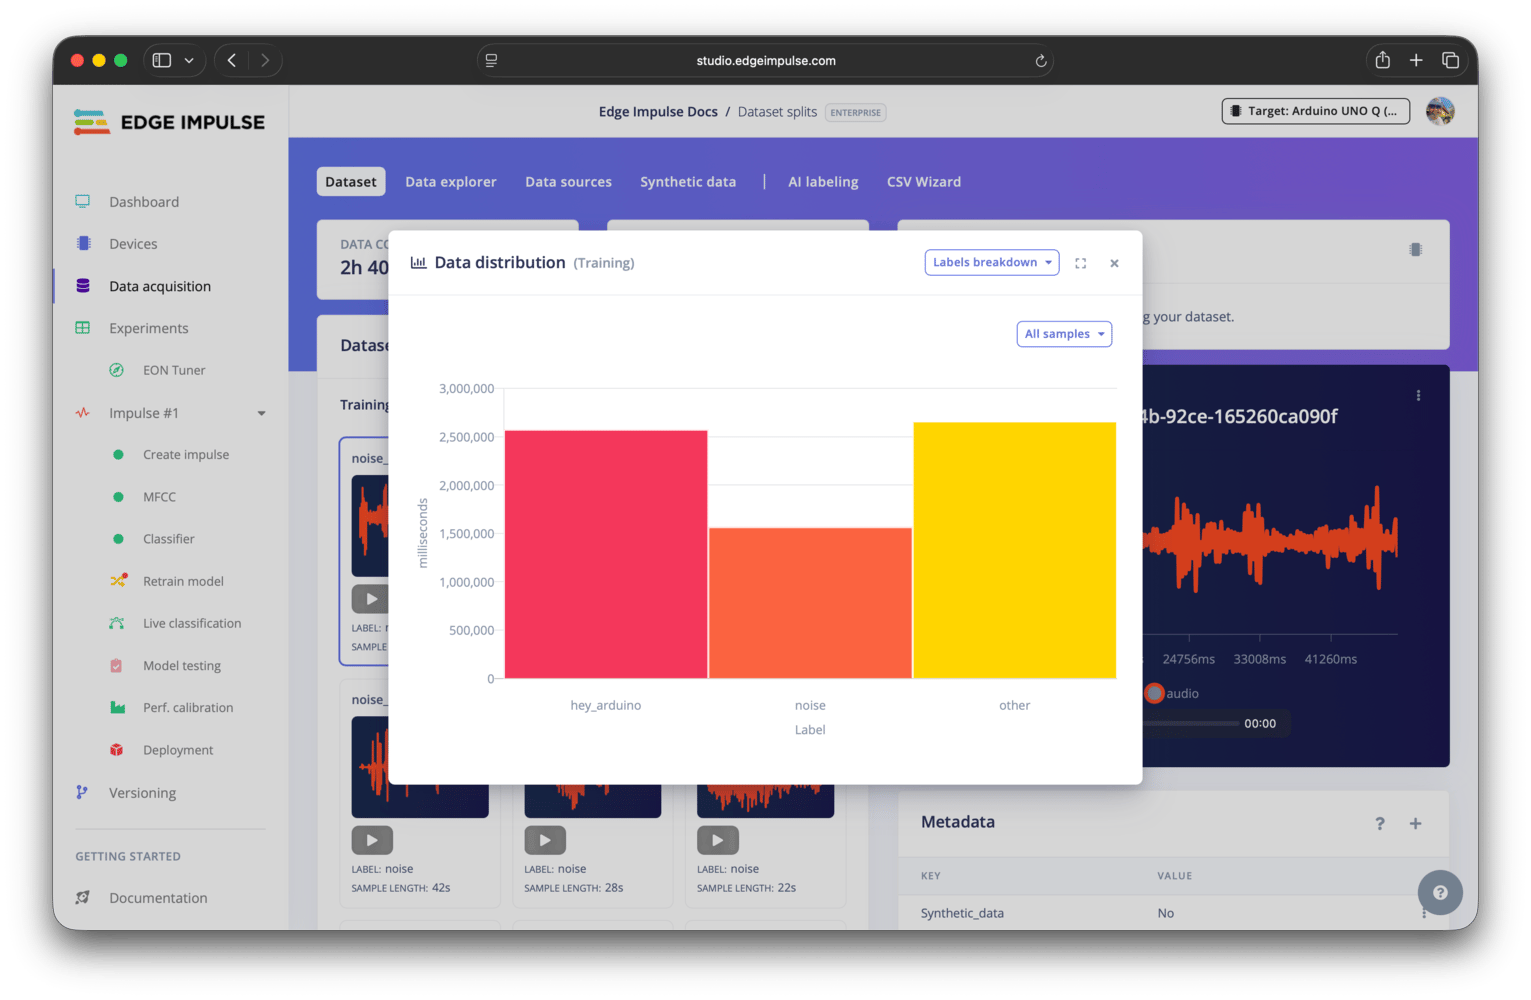
The metadata distribution option shows the distribution of your data samples across different metadata values in your dataset. This can help you identify any potential issues with your metadata, such as missing values or imbalanced distributions across different metadata keys.
See the [Metadata analytics](/studio/projects/data-acquisition/dataset/metadata#metadata-analytics) documentation for additional details.
#### Metadata distribution
The metadata distribution option shows the distribution of your data samples across different metadata values in your dataset. This can help you identify any potential issues with your metadata, such as missing values or imbalanced distributions across different metadata keys.
See the [Metadata analytics](/studio/projects/data-acquisition/dataset/metadata#metadata-analytics) documentation for additional details.
 ## Dataset split panel
**Validation set only available when explicit validation set setting is enabled**
The validation set option is only available when the explicit validation set [advanced setting](/studio/projects/data-acquisition/dataset/advanced-settings) is enabled. If this setting is disabled, no separate validation set option will be shown.
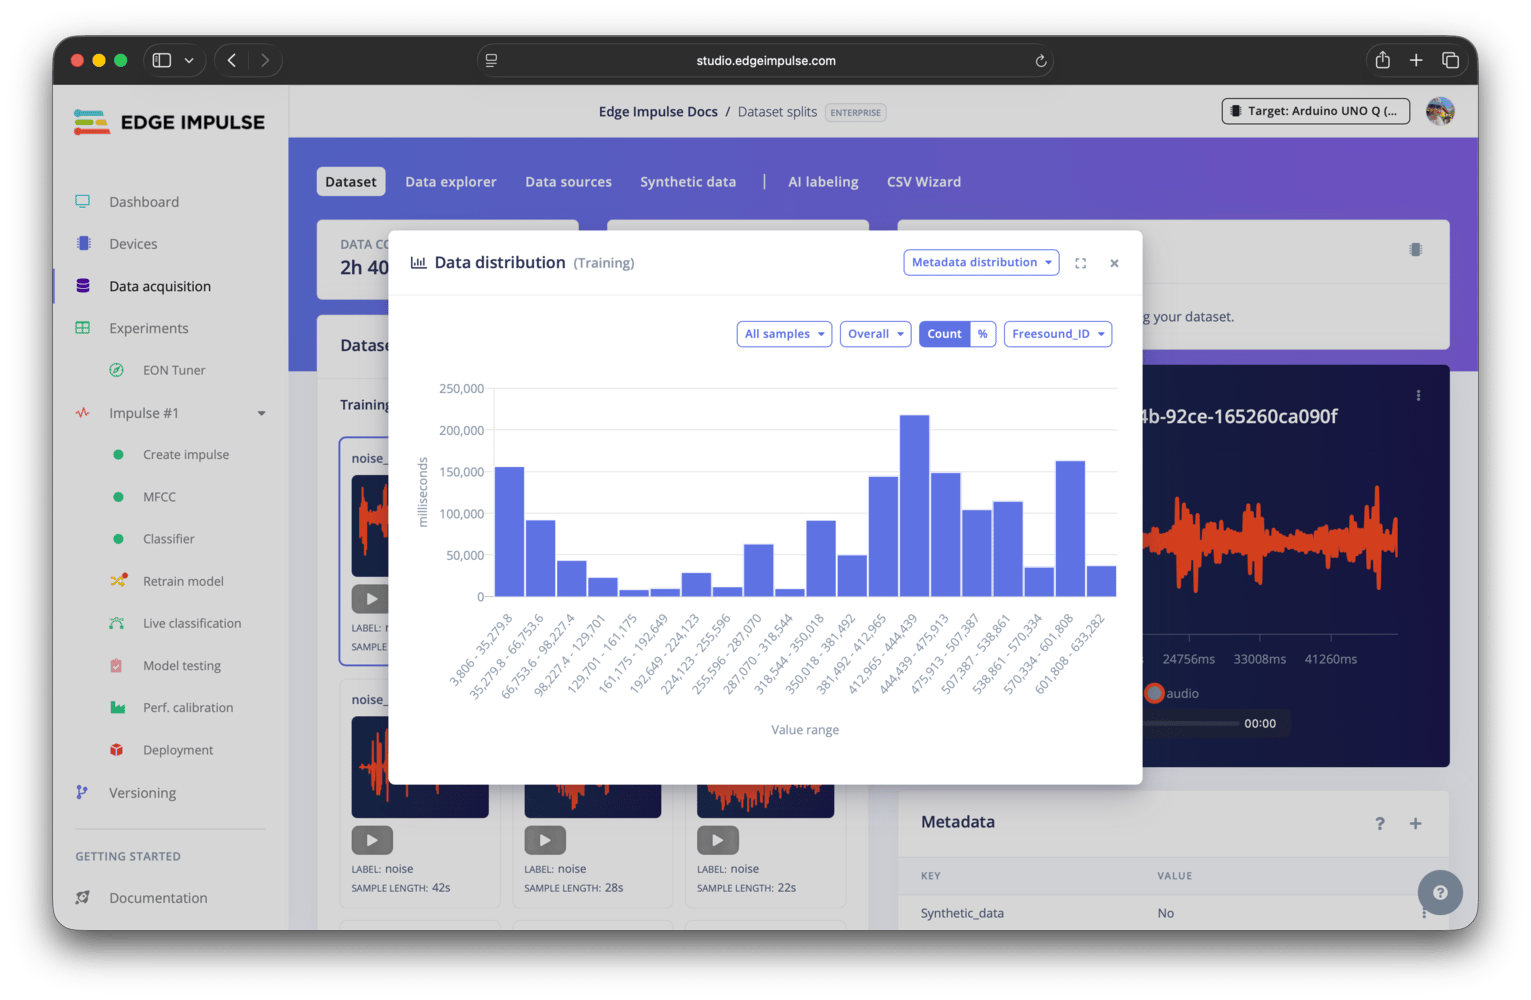
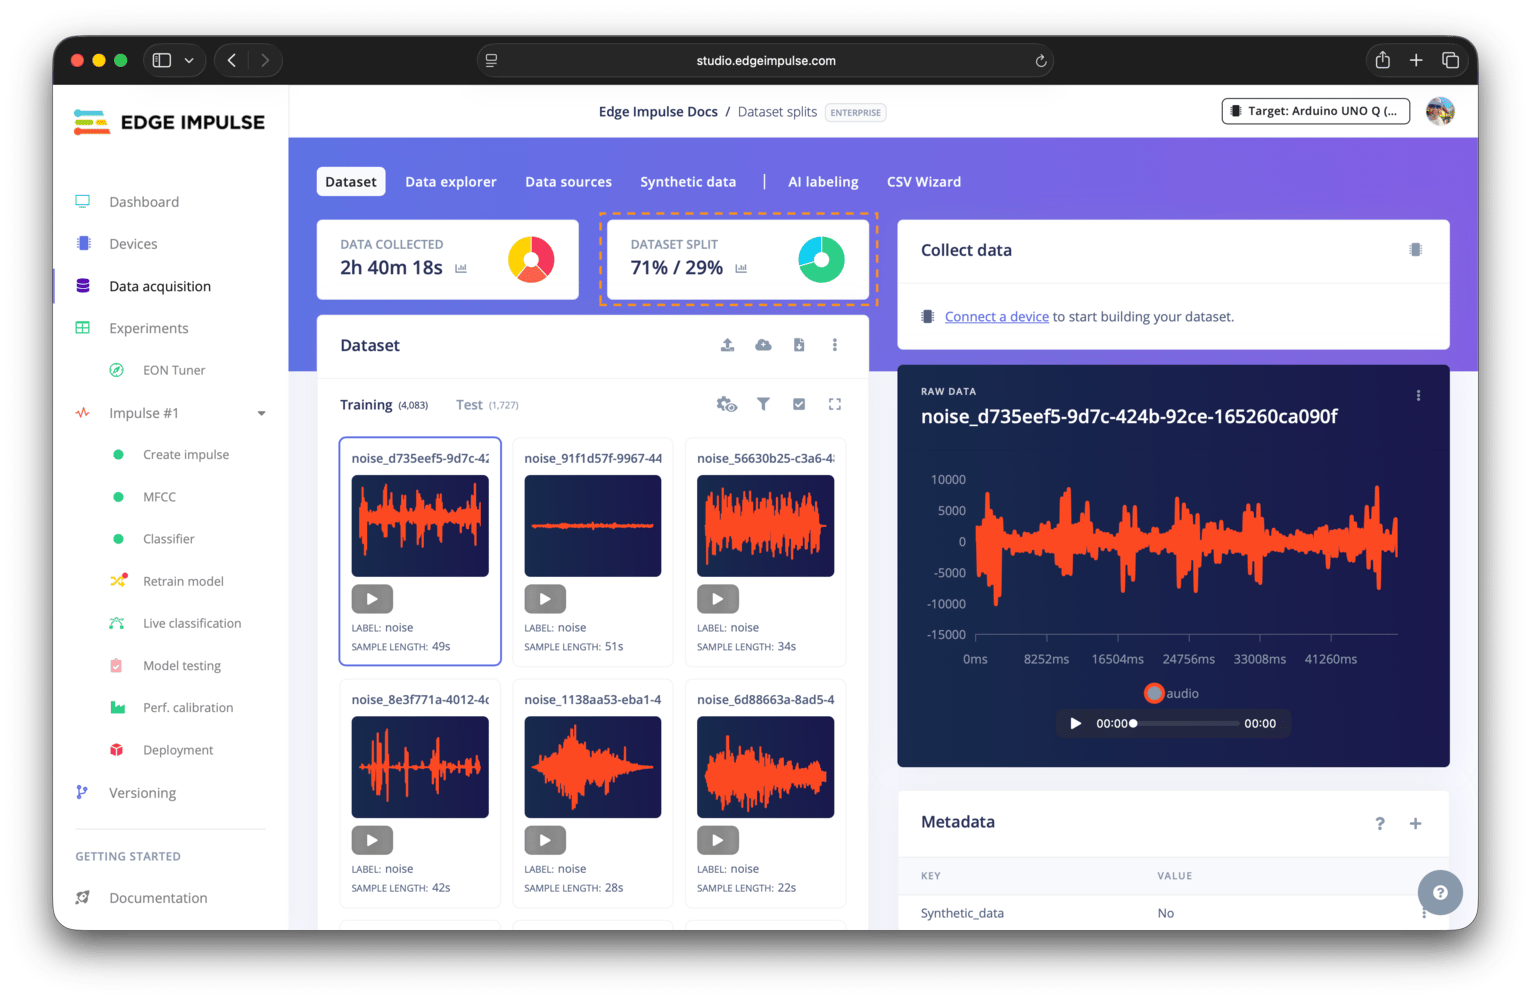
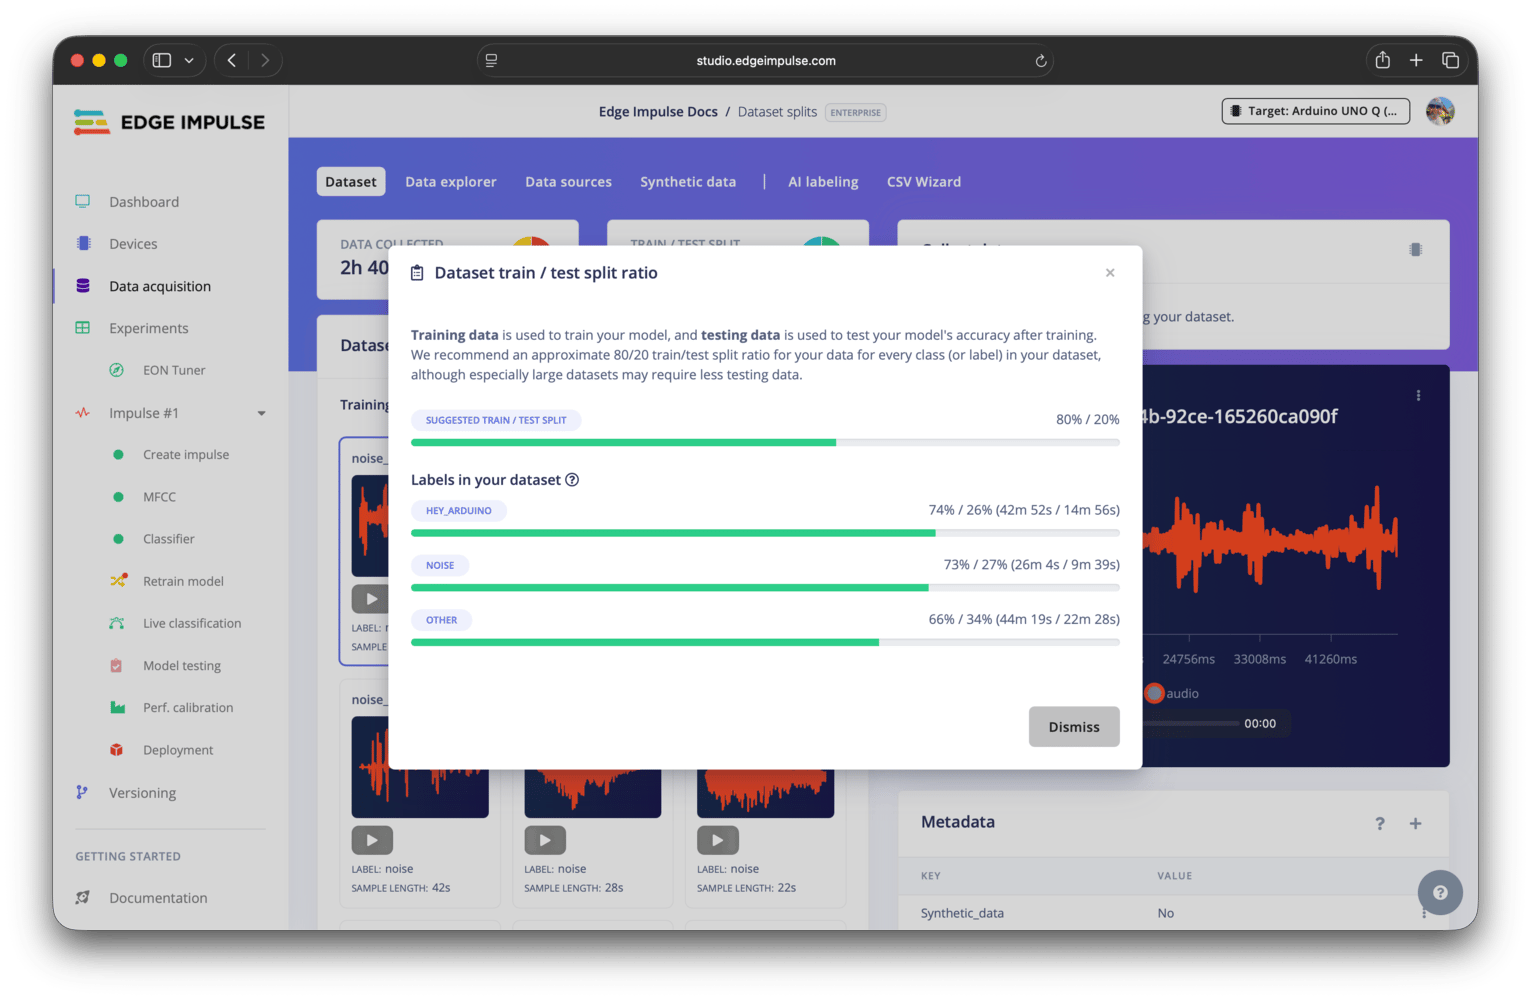
The dataset split panel shows how your data is split between the training, validation, and test sets, as well as the distribution of your labels in each set. This can help you ensure that your dataset split is balanced and representative of your overall dataset, which is important for training and evaluating machine learning models effectively.
## Dataset split panel
**Validation set only available when explicit validation set setting is enabled**
The validation set option is only available when the explicit validation set [advanced setting](/studio/projects/data-acquisition/dataset/advanced-settings) is enabled. If this setting is disabled, no separate validation set option will be shown.
The dataset split panel shows how your data is split between the training, validation, and test sets, as well as the distribution of your labels in each set. This can help you ensure that your dataset split is balanced and representative of your overall dataset, which is important for training and evaluating machine learning models effectively.
 Clicking the chart icon in the dataset split panel will open the modal that shows the split per label.
 Fine grained control over your dataset split is available through the [Define dataset splits](/studio/projects/data-acquisition/dataset/splits) functionality, where you can specify split percentages, stratify your data by labels and/or metadata, and group your data by metadata keys to prevent data leakage.
## Dataset panel
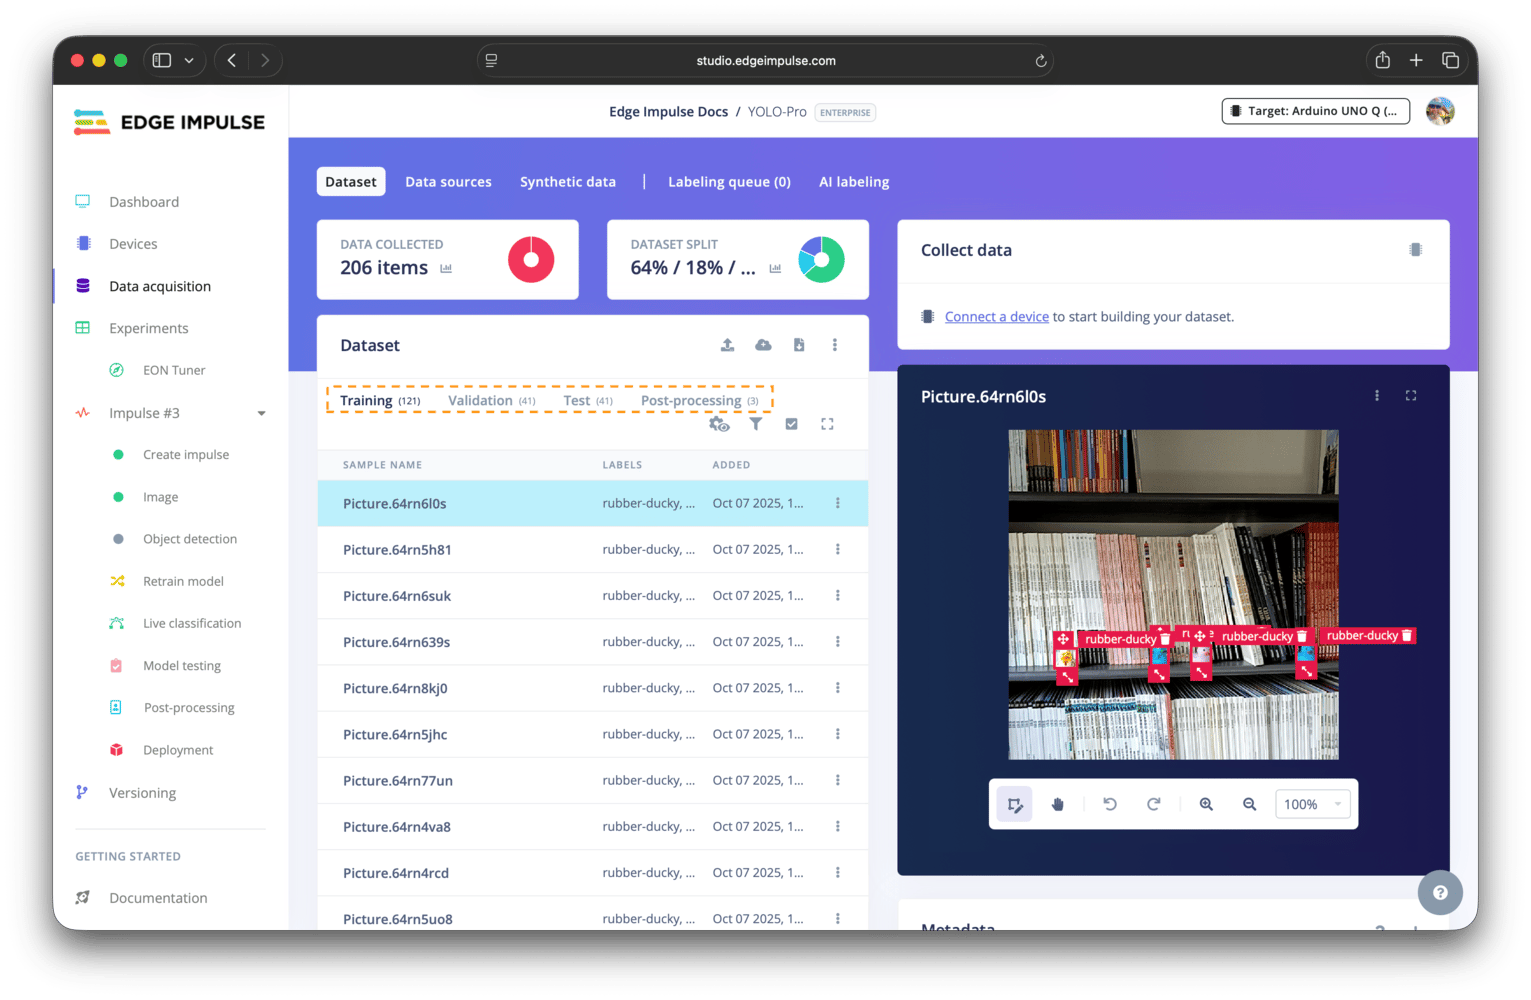
Your dataset is displayed across different sections: training, validation, test, and post-processing. Each section contains the data samples that are assigned to it. The exact sections available depend on your project type and the dataset settings you have enabled.
Fine grained control over your dataset split is available through the [Define dataset splits](/studio/projects/data-acquisition/dataset/splits) functionality, where you can specify split percentages, stratify your data by labels and/or metadata, and group your data by metadata keys to prevent data leakage.
## Dataset panel
Your dataset is displayed across different sections: training, validation, test, and post-processing. Each section contains the data samples that are assigned to it. The exact sections available depend on your project type and the dataset settings you have enabled.
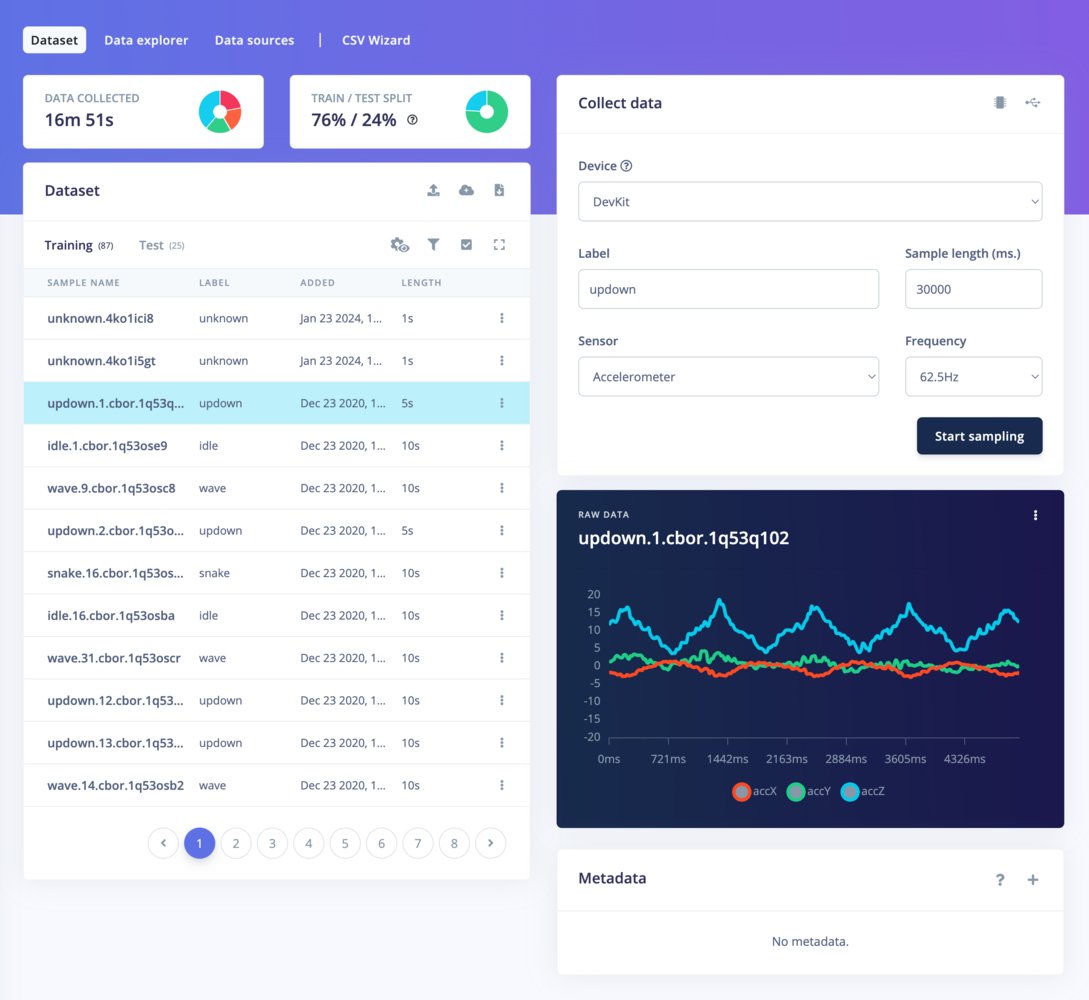
 By default, the dataset is displayed in a list view, but you can switch to a grid view for a more visual overview of your data samples, and adjust other view settings by clicking the view settings icon:

 ### Training data
The training section contains the data samples that are assigned to the training set. These samples are used to train your machine learning model.
### Validation data
**Validation set only available when explicit validation set setting is enabled**
The validation set option is only available when the explicit validation set [advanced setting](/studio/projects/data-acquisition/dataset/advanced-settings) is enabled. If this setting is disabled, no separate validation set option will be shown.
The validation section contains the data samples that are assigned to the validation set. These samples are used to validate your machine learning model during training.
### Test data
The testing section contains the data samples that are assigned to the testing set. These samples are used to evaluate the performance of your machine learning model after it has been trained.
### Post-processing data
**Post-processing is only for object detection projects**
The post-processing section is only available for object detection projects, as it is designed for uploading and managing video data that will be used for advanced post-processing features, such as object tracking. If you are working on a different type of project, you will not see the post-processing section in your dataset panel.
The post-processing section contains the data samples that are used for post-processing purposes, such as object tracking. These samples are not used for training or testing your machine learning model, but they can be used to configure and test post-processing algorithms directly in Studio.
For more information on how to use object tracking and post-processing, see our [Object tracking](/studio/projects/post-processing/object-tracking) documentation.
### Dataset filters
The dataset filters enable you to filter data samples based on some criteria of choice. This can be based on:
* **Search by name or ID** - find samples by their sample name or unique ID.
* **Labels** - show samples for one or more classes. For regression projects, use **Label range** to filter by numeric label values.
* **Metadata** - show samples that match selected metadata keys and values, samples with no value for a metadata key, or samples with no metadata.
* **Date added** - choose a custom date range, or quickly filter to samples added today, yesterday, last week, or last month.
* **Status** - show only enabled or disabled samples.
* **Length** - filter samples by duration in milliseconds.
* **Frequency** - filter samples by sample frequency in hertz.
### Training data
The training section contains the data samples that are assigned to the training set. These samples are used to train your machine learning model.
### Validation data
**Validation set only available when explicit validation set setting is enabled**
The validation set option is only available when the explicit validation set [advanced setting](/studio/projects/data-acquisition/dataset/advanced-settings) is enabled. If this setting is disabled, no separate validation set option will be shown.
The validation section contains the data samples that are assigned to the validation set. These samples are used to validate your machine learning model during training.
### Test data
The testing section contains the data samples that are assigned to the testing set. These samples are used to evaluate the performance of your machine learning model after it has been trained.
### Post-processing data
**Post-processing is only for object detection projects**
The post-processing section is only available for object detection projects, as it is designed for uploading and managing video data that will be used for advanced post-processing features, such as object tracking. If you are working on a different type of project, you will not see the post-processing section in your dataset panel.
The post-processing section contains the data samples that are used for post-processing purposes, such as object tracking. These samples are not used for training or testing your machine learning model, but they can be used to configure and test post-processing algorithms directly in Studio.
For more information on how to use object tracking and post-processing, see our [Object tracking](/studio/projects/post-processing/object-tracking) documentation.
### Dataset filters
The dataset filters enable you to filter data samples based on some criteria of choice. This can be based on:
* **Search by name or ID** - find samples by their sample name or unique ID.
* **Labels** - show samples for one or more classes. For regression projects, use **Label range** to filter by numeric label values.
* **Metadata** - show samples that match selected metadata keys and values, samples with no value for a metadata key, or samples with no metadata.
* **Date added** - choose a custom date range, or quickly filter to samples added today, yesterday, last week, or last month.
* **Status** - show only enabled or disabled samples.
* **Length** - filter samples by duration in milliseconds.
* **Frequency** - filter samples by sample frequency in hertz.
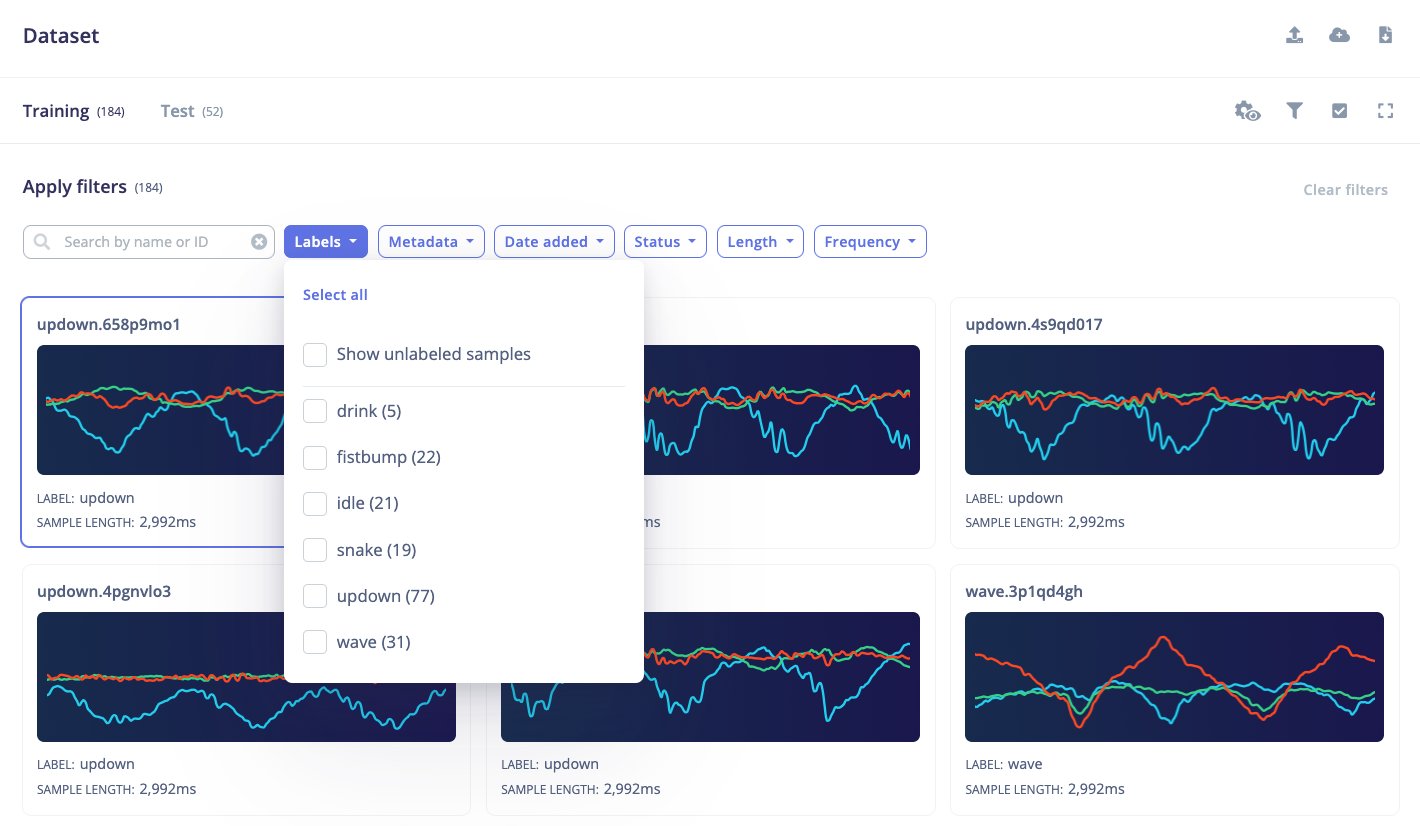 After filtering the dataset, you can use the multi-select controls to perform batch actions on the matching samples, including editing labels, deleting samples, enabling or disabling samples, adding or clearing metadata, and moving samples between dataset splits.
## Data sample preview panel
When selecting a data sample, you can see a preview of the sample on the right panel. The type of preview depends on the type of data sample, and it can be a time-series graph, an image, a table, or a video player.
### Time-series data samples
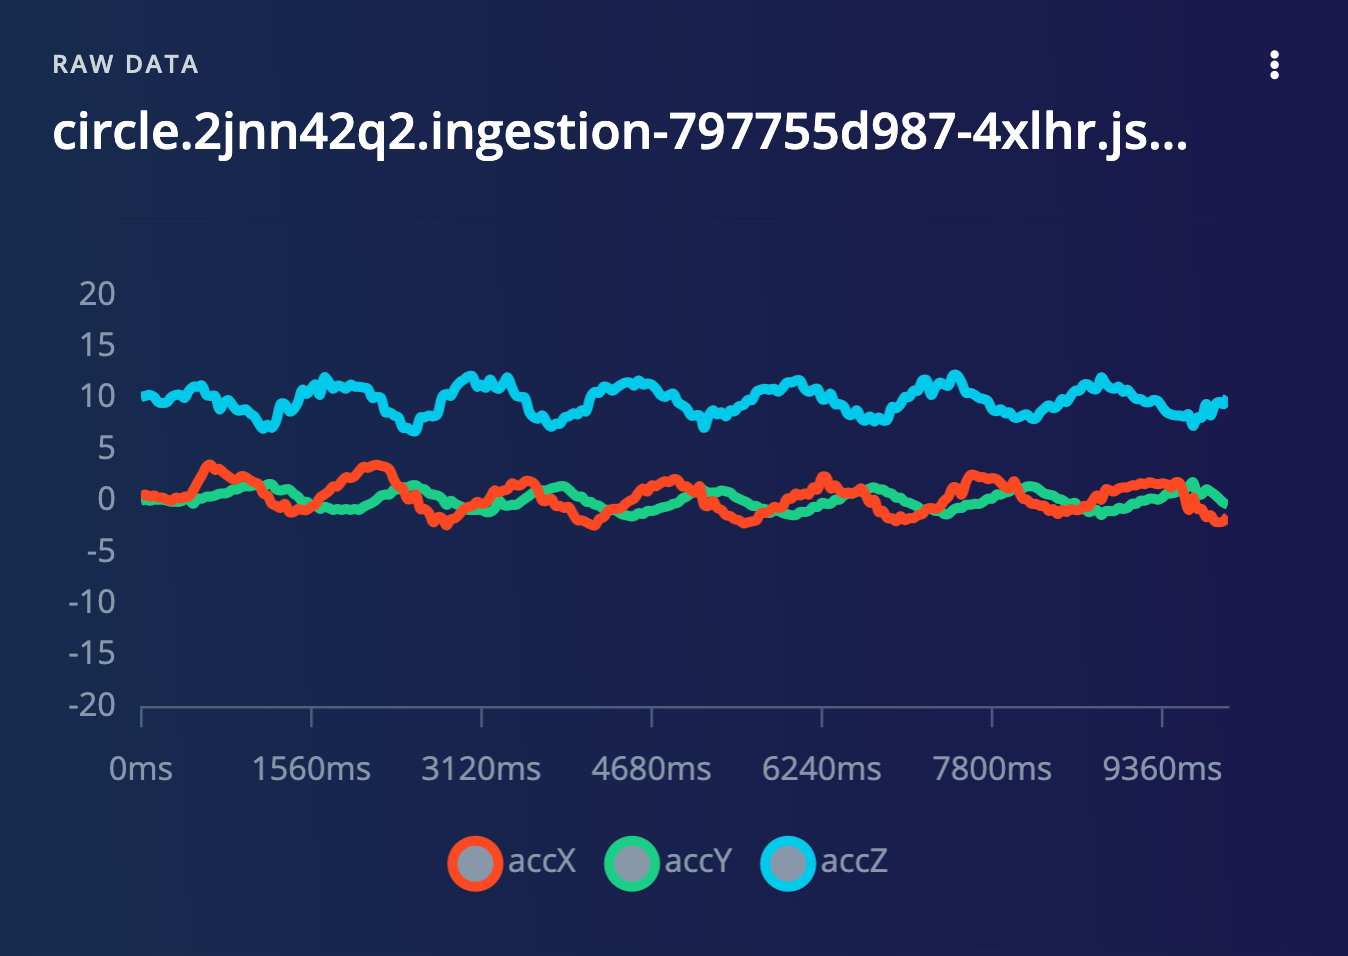
Time-series data samples (including audio) appear as a graph, with the x-axis representing time and the y-axis representing the sensor values:
After filtering the dataset, you can use the multi-select controls to perform batch actions on the matching samples, including editing labels, deleting samples, enabling or disabling samples, adding or clearing metadata, and moving samples between dataset splits.
## Data sample preview panel
When selecting a data sample, you can see a preview of the sample on the right panel. The type of preview depends on the type of data sample, and it can be a time-series graph, an image, a table, or a video player.
### Time-series data samples
Time-series data samples (including audio) appear as a graph, with the x-axis representing time and the y-axis representing the sensor values:
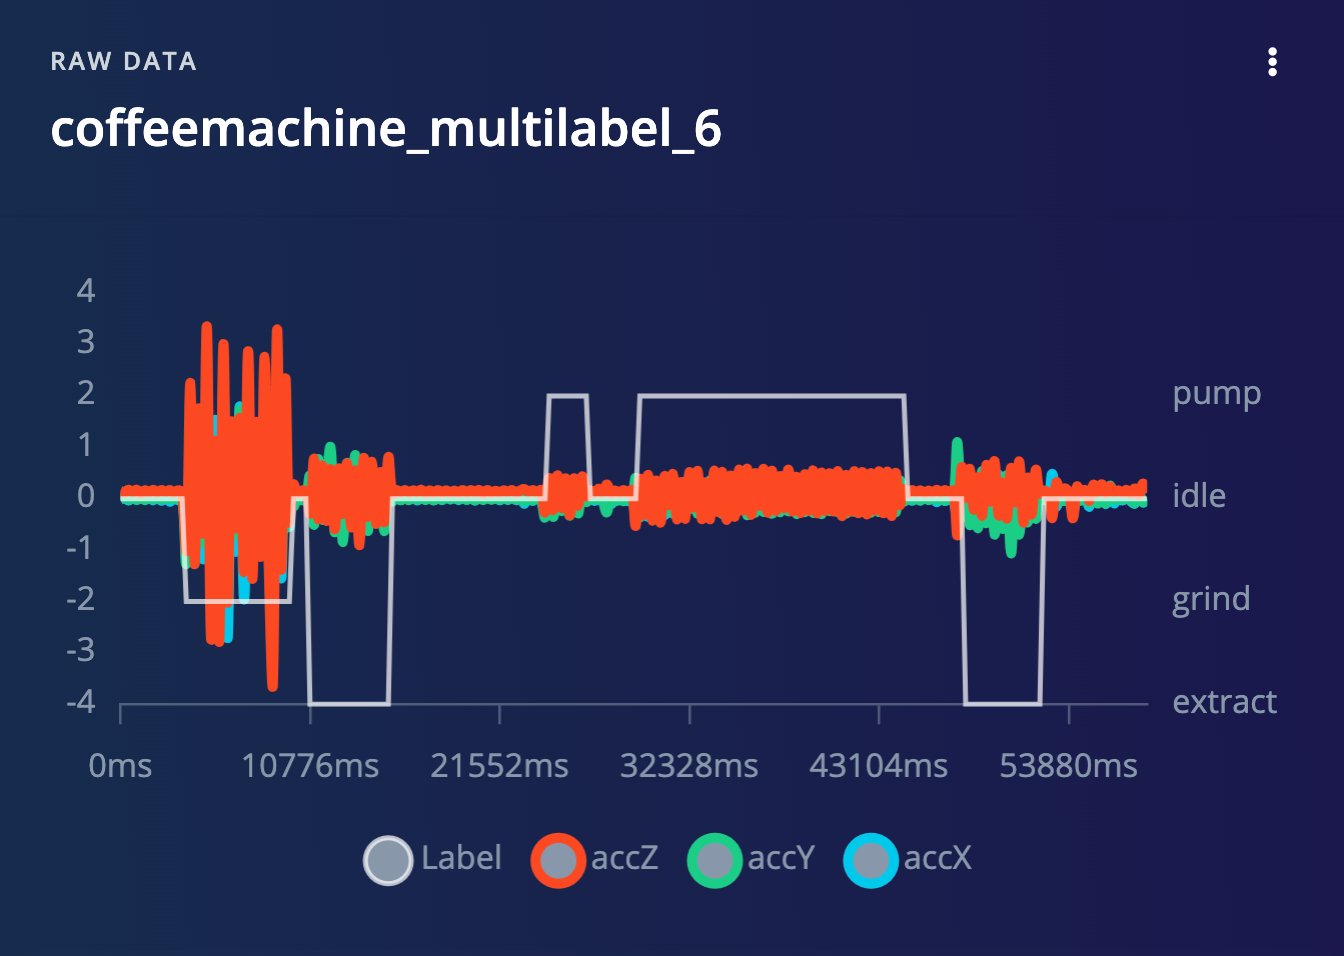
 If you are dealing with multi-label data samples, here is the corresponding preview:
 ### Images data samples
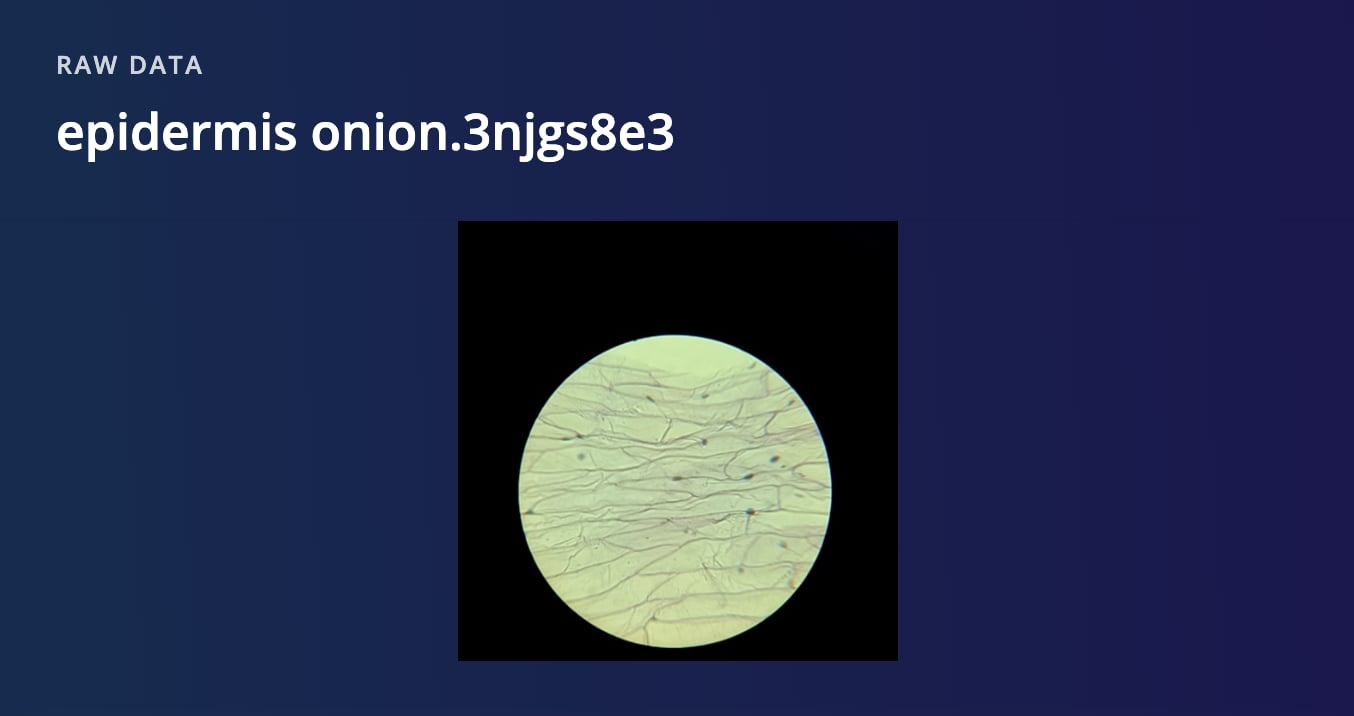
Raw images can be directly visualized from the preview:
### Images data samples
Raw images can be directly visualized from the preview:
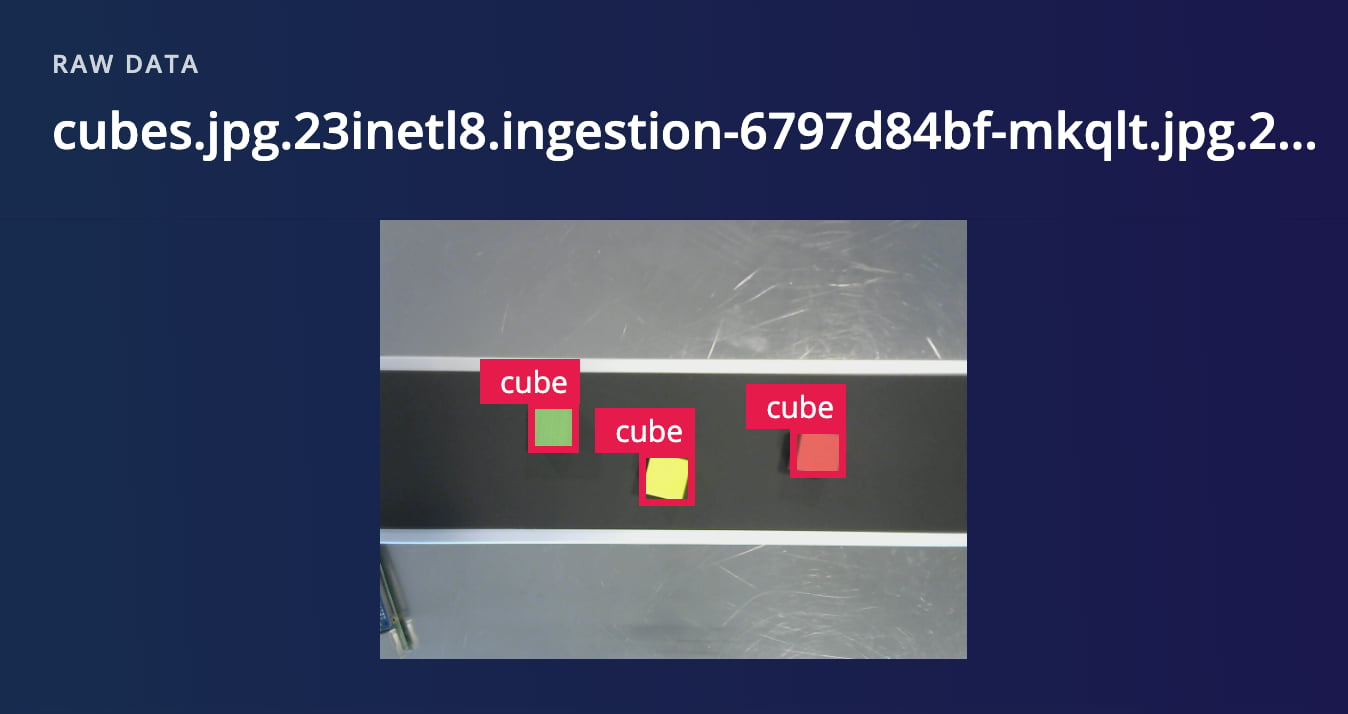
 For object detection projects, the corresponding bounding boxes are displayed on the images:
 ### Video data samples
Raw videos (.mp4) can be directly visualized from the preview:
### Video data samples
Raw videos (.mp4) can be directly visualized from the preview:
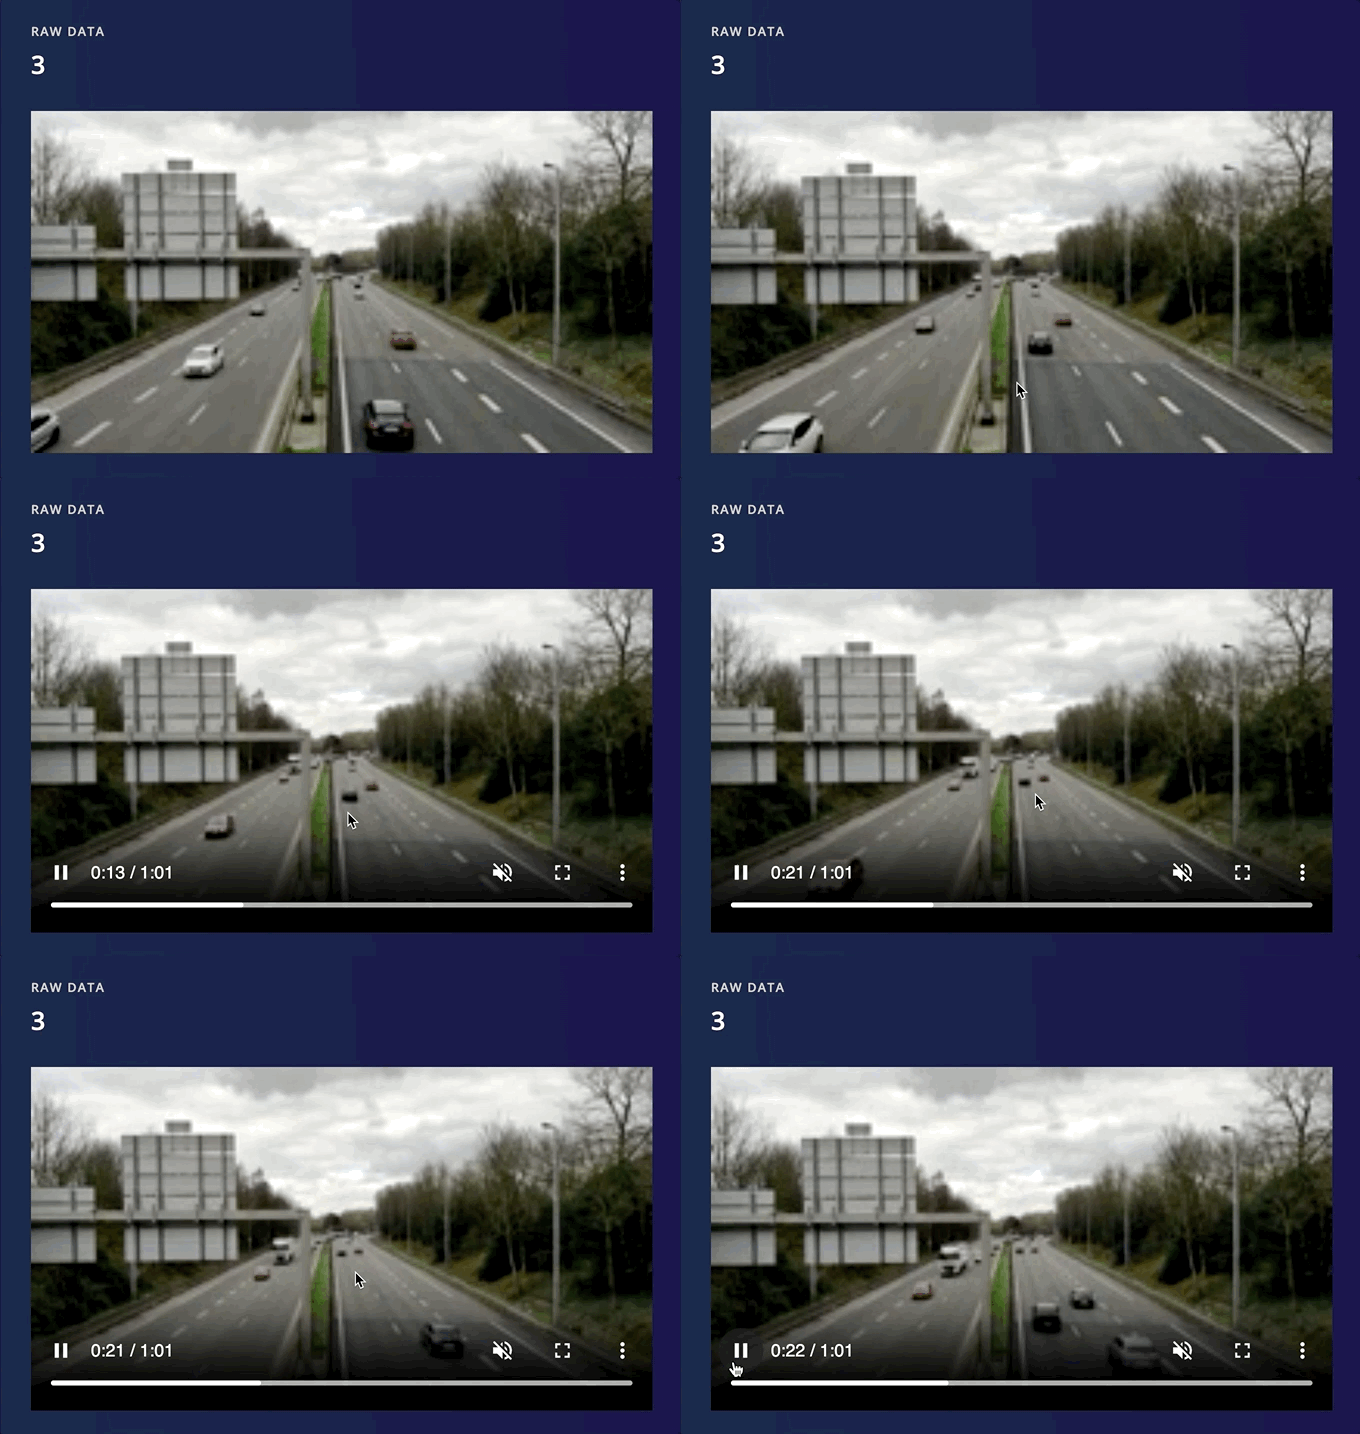 Please note that you will need to split the videos into individual frames before training, as we do not support training on video files.
### Tabular data samples
Preview the values of tabular data samples:
Please note that you will need to split the videos into individual frames before training, as we do not support training on video files.
### Tabular data samples
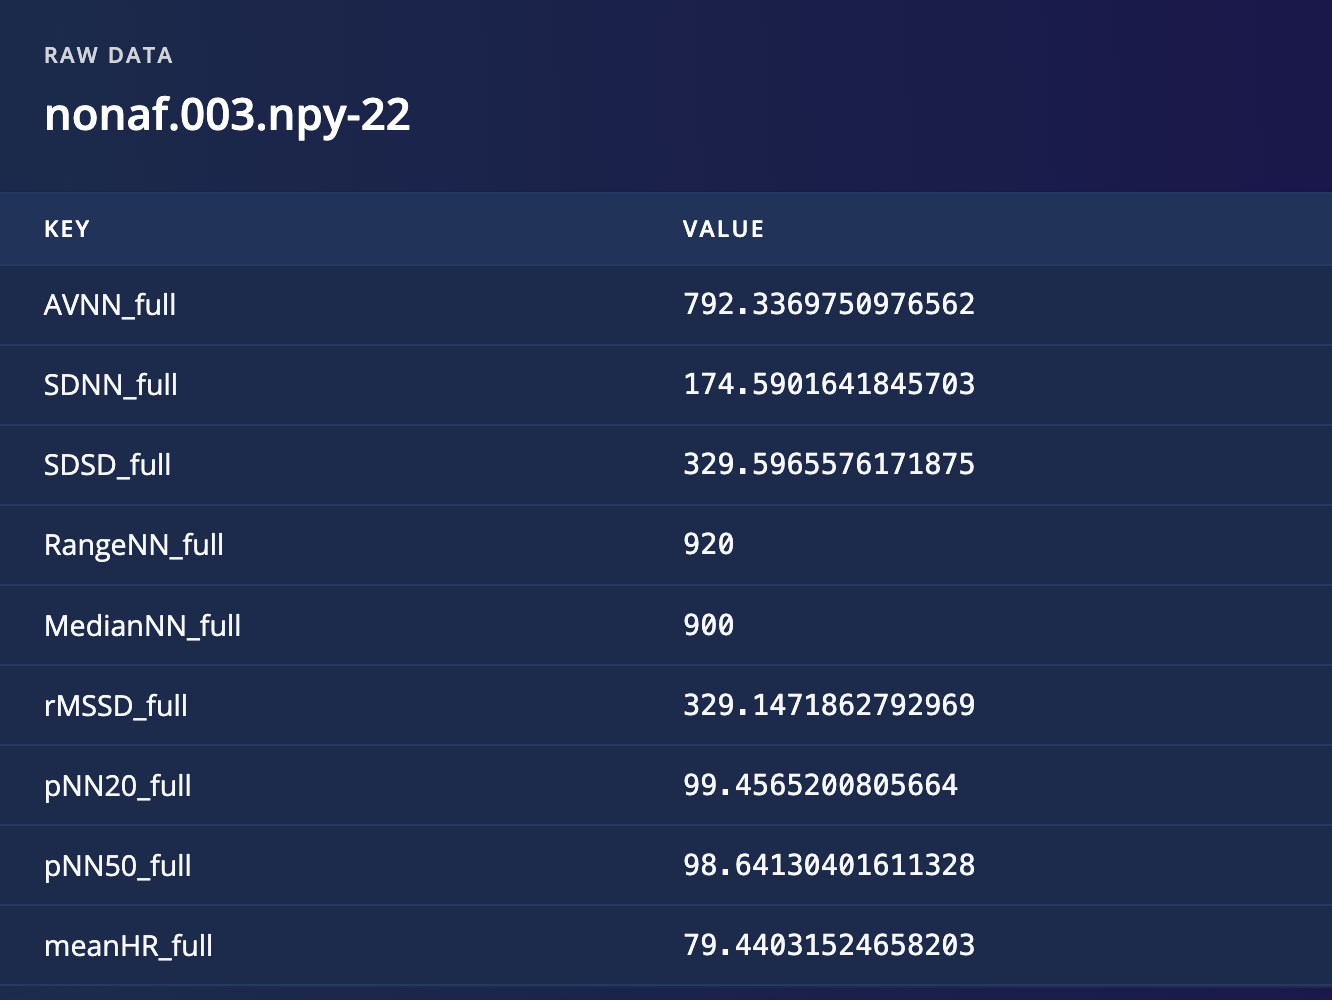
Preview the values of tabular data samples:
 ## Data sample actions
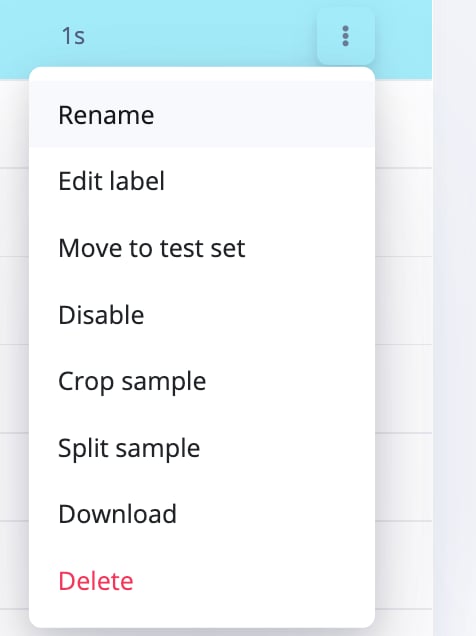
Data samples can be manipulated in various ways, such as renaming, editing labels, disabling, cropping, splitting, downloading, and deleting. These actions can be applied at the data sample level by simply navigating to the individual data sample, clicking on "**⋮**", and selecting the type of action you want to perform on the specific sample.
## Data sample actions
Data samples can be manipulated in various ways, such as renaming, editing labels, disabling, cropping, splitting, downloading, and deleting. These actions can be applied at the data sample level by simply navigating to the individual data sample, clicking on "**⋮**", and selecting the type of action you want to perform on the specific sample.
 ### Edit label
#### Single label
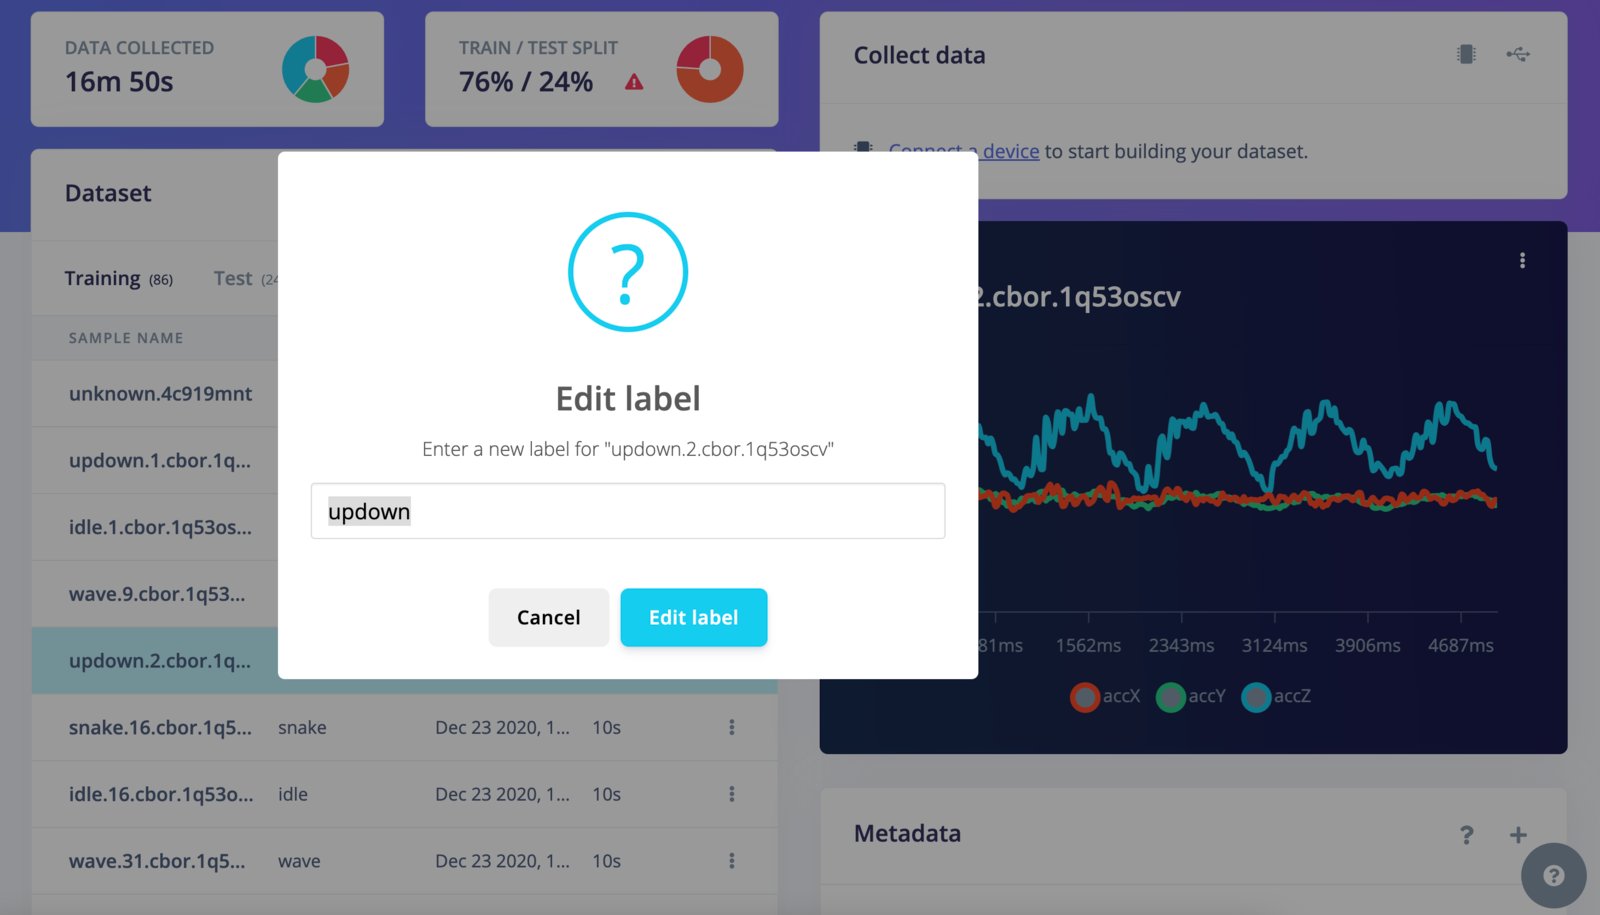
To edit the label of a data sample, go to the sample you want to edit and click **⋮**, then select **Edit label**. You can then enter a new label for your sample in the text field.
### Edit label
#### Single label
To edit the label of a data sample, go to the sample you want to edit and click **⋮**, then select **Edit label**. You can then enter a new label for your sample in the text field.
 #### Multi-label
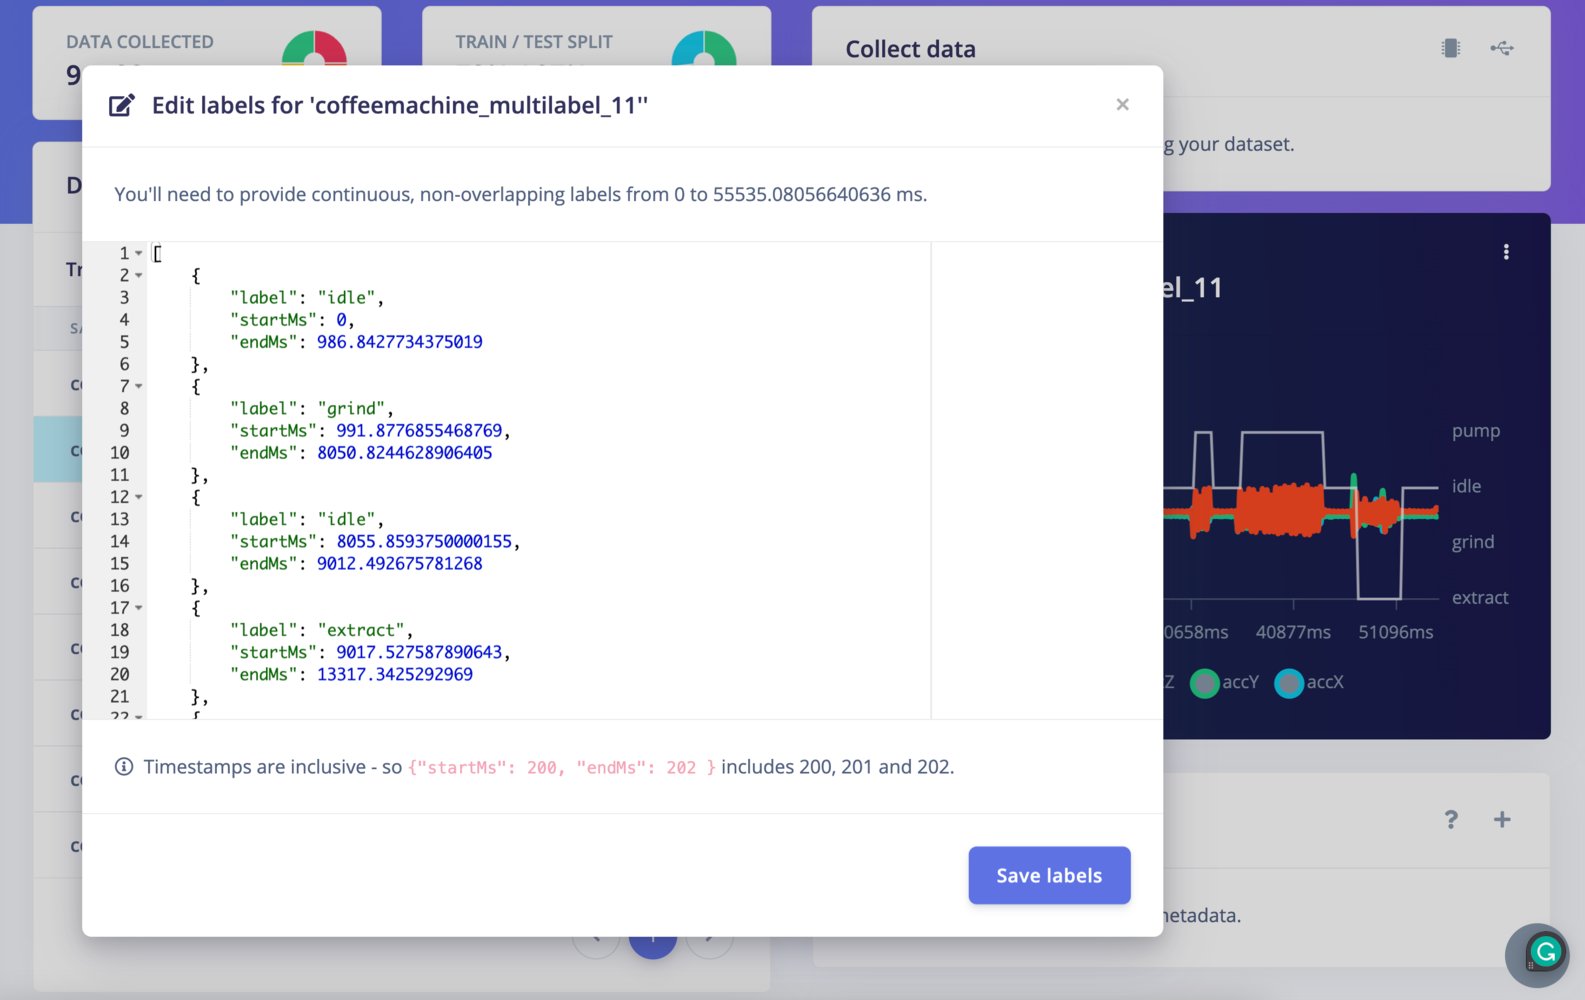
To edit the labels of a multi-label data sample, go to the sample you want to edit and click **⋮**, then select **Edit labels**. You can then modify the labels for your sample in the provided interface.
See the [multi-label](/studio/projects/data-acquisition/dataset/multi-label#editing-multi-label-samples) documentation for more information.
#### Multi-label
To edit the labels of a multi-label data sample, go to the sample you want to edit and click **⋮**, then select **Edit labels**. You can then modify the labels for your sample in the provided interface.
See the [multi-label](/studio/projects/data-acquisition/dataset/multi-label#editing-multi-label-samples) documentation for more information.
 ### Crop sample
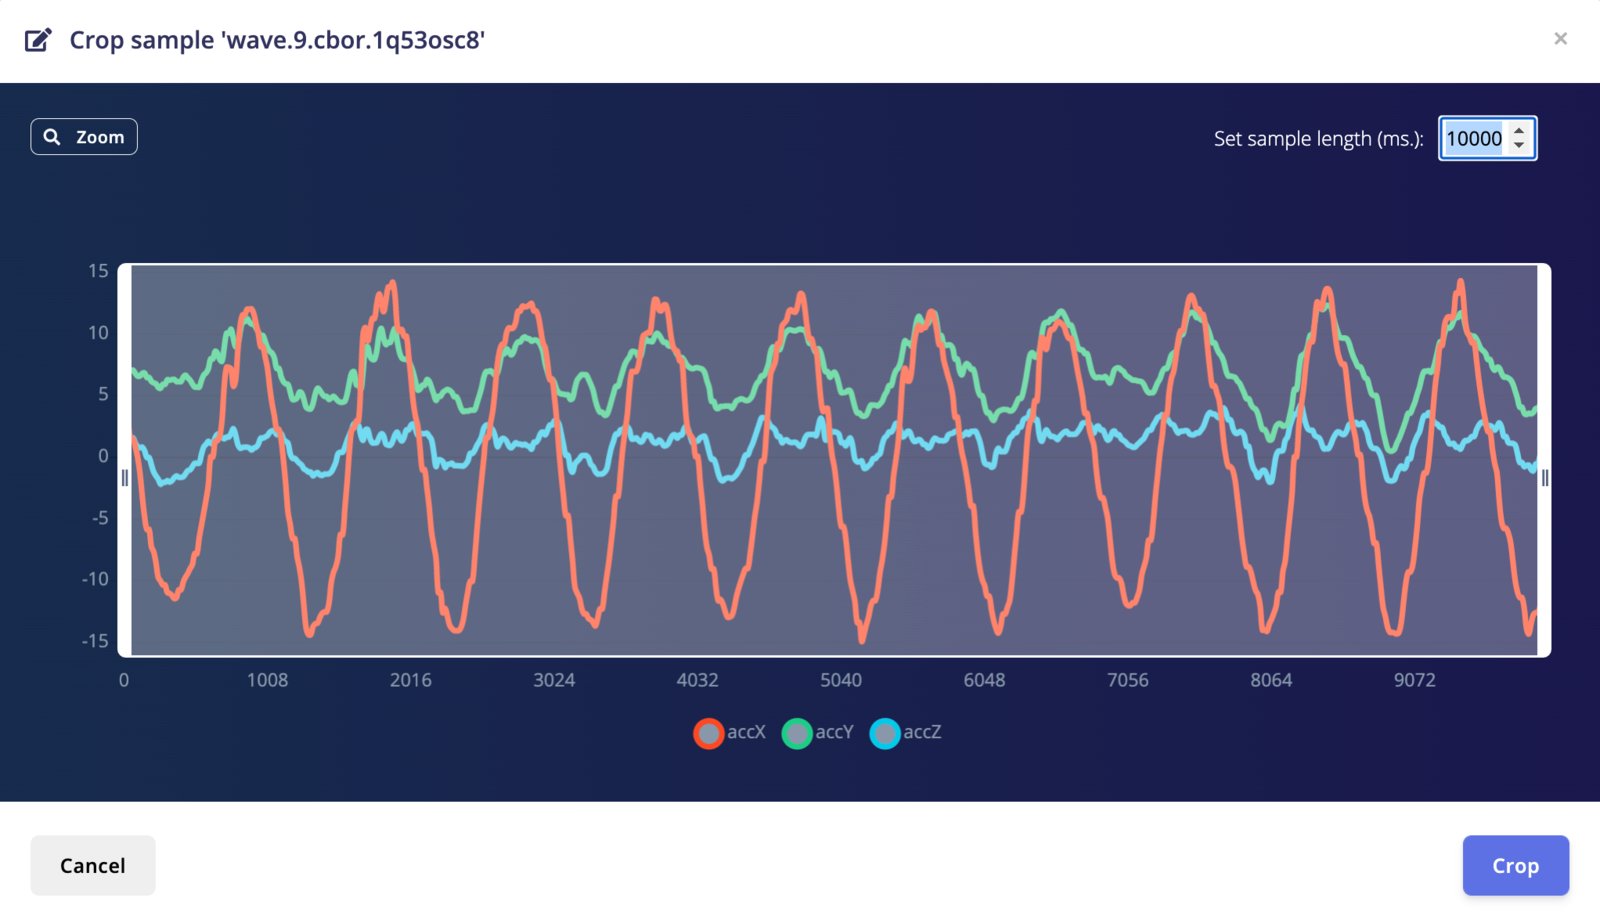
To crop a data sample, go to the sample you want to crop and click **⋮**, then select **Crop sample**. You can specify a length, or drag the handles to resize the window, then move the window around to make your selection.
Made a wrong crop? No problem, just click **Crop sample** again and you can move your selection around. To undo the crop, just set the sample length to a high number, and the whole sample will be selected again.
### Crop sample
To crop a data sample, go to the sample you want to crop and click **⋮**, then select **Crop sample**. You can specify a length, or drag the handles to resize the window, then move the window around to make your selection.
Made a wrong crop? No problem, just click **Crop sample** again and you can move your selection around. To undo the crop, just set the sample length to a high number, and the whole sample will be selected again.
 ### Split sample
Besides cropping you can also split data automatically. This allows you to perform one motion repeatedly, or say a keyword over and over again, and the events will be automatically detected and can be stored as individual samples during splitting. This makes it easy to quickly build a high-quality dataset of discrete events.
To split a sample, go to the sample you want to split and click **⋮**, then select **Split sample**. You can set the window length, and all events are automatically detected. If you're splitting audio data you can also listen to events by clicking on the window, the audio player is automatically populated with that specific split.
### Split sample
Besides cropping you can also split data automatically. This allows you to perform one motion repeatedly, or say a keyword over and over again, and the events will be automatically detected and can be stored as individual samples during splitting. This makes it easy to quickly build a high-quality dataset of discrete events.
To split a sample, go to the sample you want to split and click **⋮**, then select **Split sample**. You can set the window length, and all events are automatically detected. If you're splitting audio data you can also listen to events by clicking on the window, the audio player is automatically populated with that specific split.
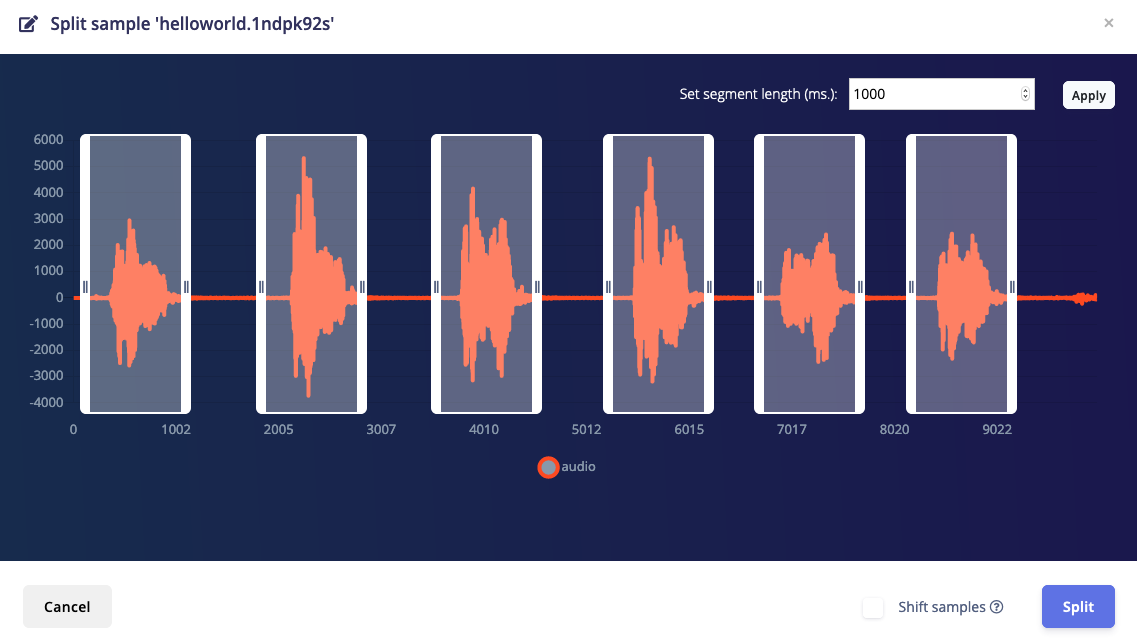 Samples are automatically centered in the window, which might lead to problems on some models (the neural network could learn a shortcut where data in the middle of the window is always associated with a certain label), so you can select "Shift samples" to automatically move the data a little bit around.
Splitting data is - like cropping data - non-destructive. If you're not happy with a split just click Crop sample and you can move the selection around easily.
## Advanced settings
The dataset advanced settings provide additional configuration options for you to control and customize the data used in your project. See the dataset [Advanced settings](/studio/projects/data-acquisition/dataset/advanced-settings) documentation for more details.
## Additional resources
* [Data acquisition](/studio/projects/data-acquisition)
* [Uploader](/studio/projects/data-acquisition/dataset/uploader)
* [Splits](/studio/projects/data-acquisition/dataset/splits)
* [Metadata](/studio/projects/data-acquisition/dataset/metadata)
* [Multi-label data](/studio/projects/data-acquisition/dataset/multi-label)
* [Tabular data](/studio/projects/data-acquisition/dataset/tabular-data)
* [Advanced settings](/studio/projects/data-acquisition/dataset/advanced-settings)
Samples are automatically centered in the window, which might lead to problems on some models (the neural network could learn a shortcut where data in the middle of the window is always associated with a certain label), so you can select "Shift samples" to automatically move the data a little bit around.
Splitting data is - like cropping data - non-destructive. If you're not happy with a split just click Crop sample and you can move the selection around easily.
## Advanced settings
The dataset advanced settings provide additional configuration options for you to control and customize the data used in your project. See the dataset [Advanced settings](/studio/projects/data-acquisition/dataset/advanced-settings) documentation for more details.
## Additional resources
* [Data acquisition](/studio/projects/data-acquisition)
* [Uploader](/studio/projects/data-acquisition/dataset/uploader)
* [Splits](/studio/projects/data-acquisition/dataset/splits)
* [Metadata](/studio/projects/data-acquisition/dataset/metadata)
* [Multi-label data](/studio/projects/data-acquisition/dataset/multi-label)
* [Tabular data](/studio/projects/data-acquisition/dataset/tabular-data)
* [Advanced settings](/studio/projects/data-acquisition/dataset/advanced-settings)