> ## Documentation Index
> Fetch the complete documentation index at: https://docs.edgeimpulse.com/llms.txt
> Use this file to discover all available pages before exploring further.
# Custom processing blocks
Custom processing blocks are a way to extend the capabilities of Edge Impulse beyond the [processing blocks](/studio/projects/processing-blocks) built into the platform. If none of the existing blocks created by Edge Impulse fit your needs, you can create custom processing blocks to implement your own feature generation algorithms for unique project requirements.
Ready to dive in and start building? Jump to the [examples](/studio/organizations/custom-blocks/custom-processing-blocks#examples)!
**Hosting custom processing blocks in Edge Impulse is only available on the Enterprise plan**
Hosting a custom processing block in the Edge Impulse infrastructure, and making it available to everyone in your organization, is only available on the Enterprise plan. Other developers can host their custom processing block themselves and expose it to projects. See [Testing the block locally](/studio/organizations/custom-blocks/custom-processing-blocks#testing-the-block-locally) in this document.
## Block structure
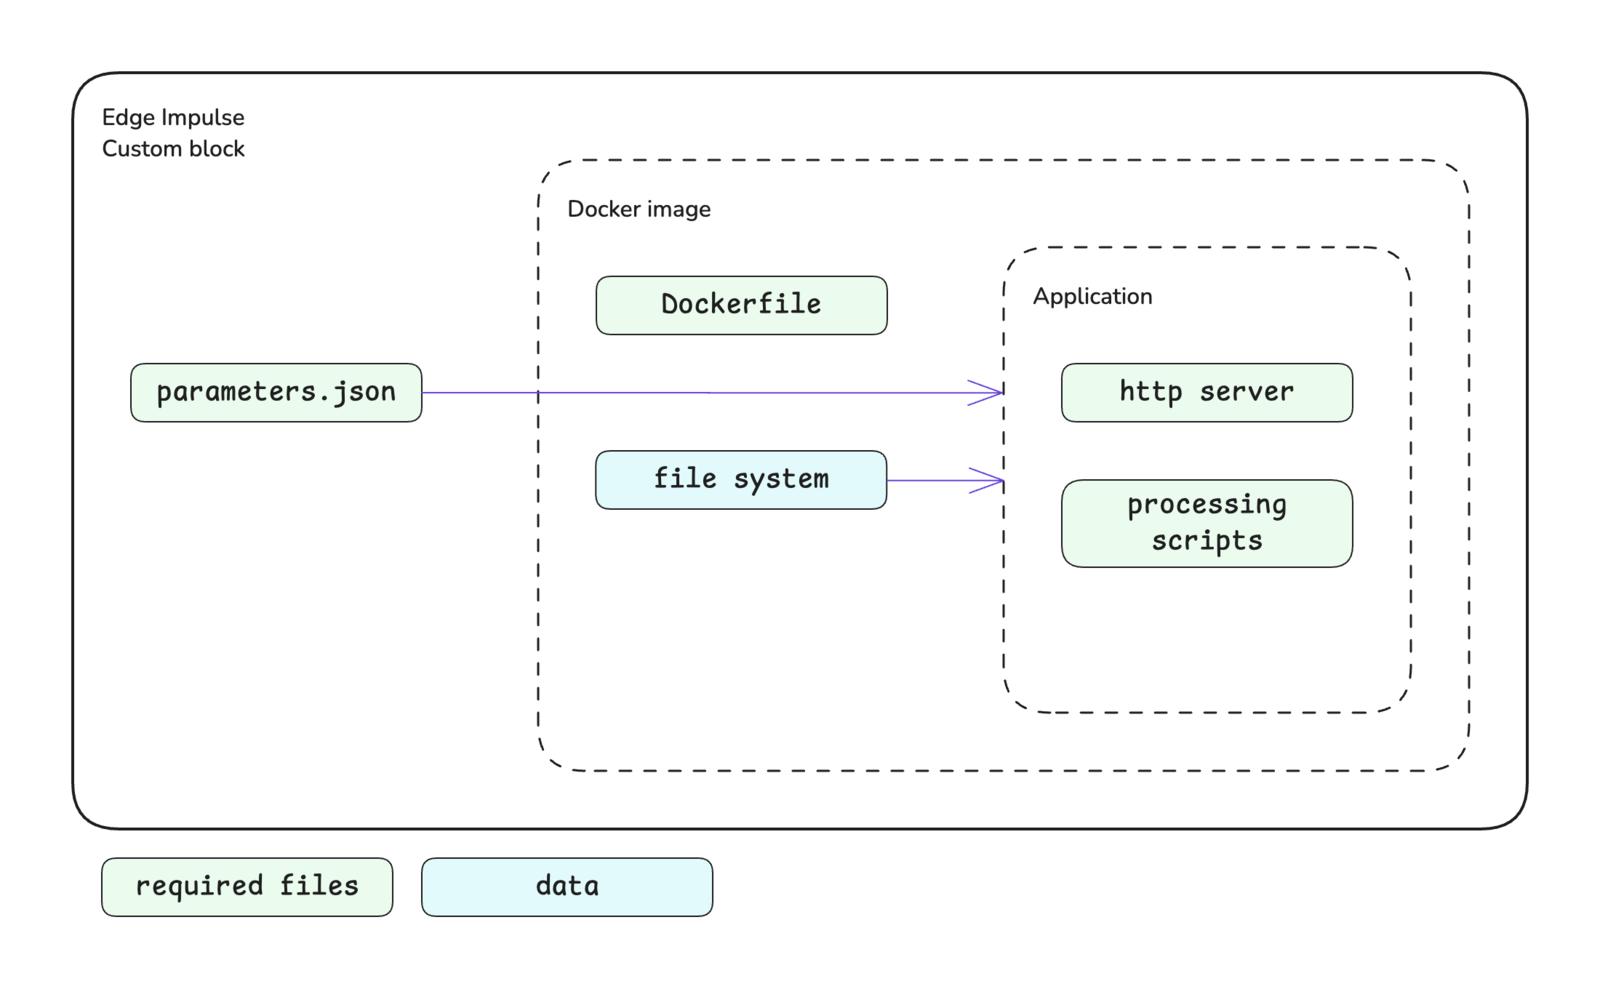
The processing block structure is shown below. A key difference for processing blocks versus other types of blocks is that they implement an HTTP server within the application. Please see the [custom blocks](/studio/organizations/custom-blocks) overview page for more details.
 ## Block interface
Processing blocks are expected to implement an HTTP server to handle requests. The sections below define the required and optional inputs (requests) and the expected outputs (responses) for custom processing blocks.
### Inputs
Information will be provided to your custom processing block through the request headers and body.
#### Requests
| Method | Path | Description |
| ------ | ------------- | ----------------------------------------------------------- |
| GET | `/` | Requesting general information about the processing block. |
| GET | `/parameters` | Requesting the `parameters.json` file for the block. |
| POST | `/run` | Requesting features be generated for a single data sample. |
| POST | `/batch` | Requesting features be generated for multiple data samples. |
#### Request headers
| Header | Passed | Description |
| ----------------- | ----------- | ---------------------------------------------------------------------------------- |
| `x-ei-project-id` | Conditional | Provided with `GET /run` or `GET /batch` requests. The ID of the project. |
| `x-ei-sample-id` | Conditional | Provided with `GET /run` request. The ID of the sample to be processed. |
| `x-ei-sample-ids` | Conditional | Provided with `GET /batch` request. A list of IDs of data samples to be processed. |
#### Request body
The request body adheres to the following interfaces for the `POST` methods. `GET` methods do not have a request body.
```typescript POST /run theme={"system"}
interface DSPRequestBody {
features: number[];
axes: string[];
sampling_freq: number;
draw_graphs: boolean;
project_id: number;
implementation_version: number;
params: { [k: string]: string | number | boolean | number[] | string[] | null };
calculate_performance: boolean;
named_axes: { [k: string]: string | false } | false | undefined;
}
```
```typescript POST /batch theme={"system"}
interface DSPBatchRequestBody {
features: number[][];
axes: string[];
sampling_freq: number;
implementation_version: number;
params: { [k: string]: string | number | boolean | number[] | string[] | null };
state: string;
named_axes: { [k: string]: string | false } | false | undefined;
}
```
The data samples that need to be processed by your script to generate features are provided as arrays in the `features` property.
The `axes` property provides the names of the signals for the data sample. For example, if this was an accelerometer data sample, the axes could be `[ 'accX', 'accY', 'accZ' ]`. These names could be mapped to other names in the `named_axes` property.
The parameters defined in your `parameters.json` file will be passed to your block in the `params` property. If your parameter names contain dashes, these are replaced with underscores before being added to the request body. For example, a processing block parameter named `custom-processing-param` is passed as `custom_processing_param`. Please refer to the [parameters.json](/tools/specifications/files/parameters-json) documentation for further details about creating this file, parameter options available, and examples.
### Outputs
The expected response from the HTTP server in your custom processing block varies depending on the type of request.
#### GET methods
`GET /`:
A plain text response with some information about the block. For example, the response could be the block name and author.
```
Custom processing block by Awesome Developer.
```
`GET /parameters`:
The parameters file returned as a JSON object.
#### POST methods
The POST response bodies are expected to adhere to the following interfaces.
```typescript POST /run theme={"system"}
{
success: boolean,
error?: string
} & DSPRunResponse
interface DSPRunResponse {
features: number[];
graphs: DSPRunGraph[];
labels: string[] | undefined;
fft_used: number[] | undefined;
performance: {
error: string | undefined | null,
result: {
time_ms: number
memory: number
}
} | undefined;
benchmark_fw_hash: string;
output_config: DSPFeatureMetadataOutput;
state_string: string | undefined;
}
interface DSPRunGraph {
name: string;
image?: string;
imageMimeType?: string;
X?: { [k: string]: number[] };
y?: number[];
suggestedYMin: number | undefined;
suggestedYMax: number | undefined;
suggestedXMin: number | undefined;
suggestedXMax: number | undefined;
type: string;
lineWidth: number | undefined;
smoothing: boolean;
axisLabels?: { X: string; y: string; };
highlights?: { [k: string]: number[] };
}
type DSPFeatureMetadataOutput = {
type: 'image',
shape: { width: number, height: number, channels: number, frames?: number },
axes?: number
} | {
type: 'spectrogram',
shape: { width: number, height: number },
axes?: number
} | {
type: 'flat',
shape: { width: number },
axes?: number
};
```
```typescript POST /batch theme={"system"}
{
success: boolean,
error?: string
} & DSPRunResponse
interface DSPBatchRunResponse {
features: number[][];
labels: string[];
frequency: number | undefined;
fft_used: number[] | undefined;
output_config: DSPFeatureMetadataOutput;
state_string: string | undefined;
state: string | undefined;
}
type DSPFeatureMetadataOutput = {
type: 'image',
shape: { width: number, height: number, channels: number, frames?: number },
axes?: number
} | {
type: 'spectrogram',
shape: { width: number, height: number },
axes?: number
} | {
type: 'flat',
shape: { width: number },
axes?: number
};
```
The `features` property is where you return the features that were generated by processing the data sample(s).
The `labels` property can be used return the names of the features you generated. For example, if you calculated the average, maximum, and minimum values of the signal, the labels could be `[ 'Average', 'Maximum', 'Minimum' ]`. These labels will be used for the feature explorer.
## Adding visualizations
The results of generating features can be shown in Studio through graphs and the [feature explorer](/studio/projects/processing-blocks/feature-explorer).
### Graphs
When configuring parameters for a processing block in Studio, a preview of the feature generation results for a single sample is shown. This preview can include displaying graphs. These are the graphs that you define and return in the `graphs` property of the response body for the `POST /run` method. Graphs should be created in your feature generation script conditionally based on the `draw_graphs` property in the request body. See the interface for a graphs object in the [Outputs](/studio/organizations/custom-blocks/custom-processing-blocks#outputs) section above.
Graphs can be of different types: linear, logarithmic, or an image. The type of graph is controlled by the `type` property of a graph object.
| Graph | Type value |
| ----------- | ------------- |
| Linear | `linear` |
| Logarithmic | `logarithmic` |
| Image | `image` |
### Feature explorer
The results of generating features on all samples can be shown in the feature explorer. If you output high-dimensional data, you can enable dimensionality reduction for the feature explorer. This will run UMAP over the data to compress the features into two dimensions. To do so, you can set the `visualization` property in your `parameters.json` file to `dimensionalityReduction`.
## Initializing the block
When you are finished developing your block locally, you will want to initialize it. The procedure to initialize your block is described in the [custom blocks](/studio/organizations/custom-blocks) overview page. Please refer to that documentation for details.
## Testing the block locally
The most convenient way to test your custom processing block before pushing it to Edge Impulse is to host it locally and then expose it to the internet so that it can be accessed by Studio. There are two ways to achieve this. You will need to have Docker and [ngrok](https://ngrok.com/) installed on your machine for either approach.
### With blocks runner
For the first method, you can use the CLI `edge-impulse-blocks runner` tool. See [Block runner](/tools/clis/edge-impulse-cli/blocks#block-runner) for additional details.
The port you publish for your Docker container can be configured in the parameters.json file. The blocks runner will also look for the `EXPOSE` instruction in your Dockerfile and publish that port for you if you wish to override the default port.
```bash theme={"system"}
edge-impulse-blocks runner
```
Note down the public URL that is returned in the terminal. You can use this URL to add the block to an impulse in a Studio project.
### With ngrok and Docker
For the second method, you can run Docker and ngrok directly instead of using the CLI blocks runner tool. First, you can build the Docker image and run the container.
```bash theme={"system"}
docker build -t custom-processing-block .
docker run -p 4446:4446 -it --rm custom-processing-block
```
Then, after signing up for and installing ngrok, you can use their CLI to create a public forwarding URL. Note down the `https://` forwarding address in the response. You can use this URL to add the block to an impulse in a Studio project.
```bash theme={"system"}
ngrok http 4446
```
```bash theme={"system"}
Session Status online
Account Edge Impulse (Plan: Free)
Version 2.3.35
Region United States (us)
Web Interface http://127.0.0.1:4040
Forwarding http://4d48dca5.ngrok.io -> http://localhost:4446
Forwarding https://4d48dca5.ngrok.io -> http://localhost:4446
```
### Viewing in Studio
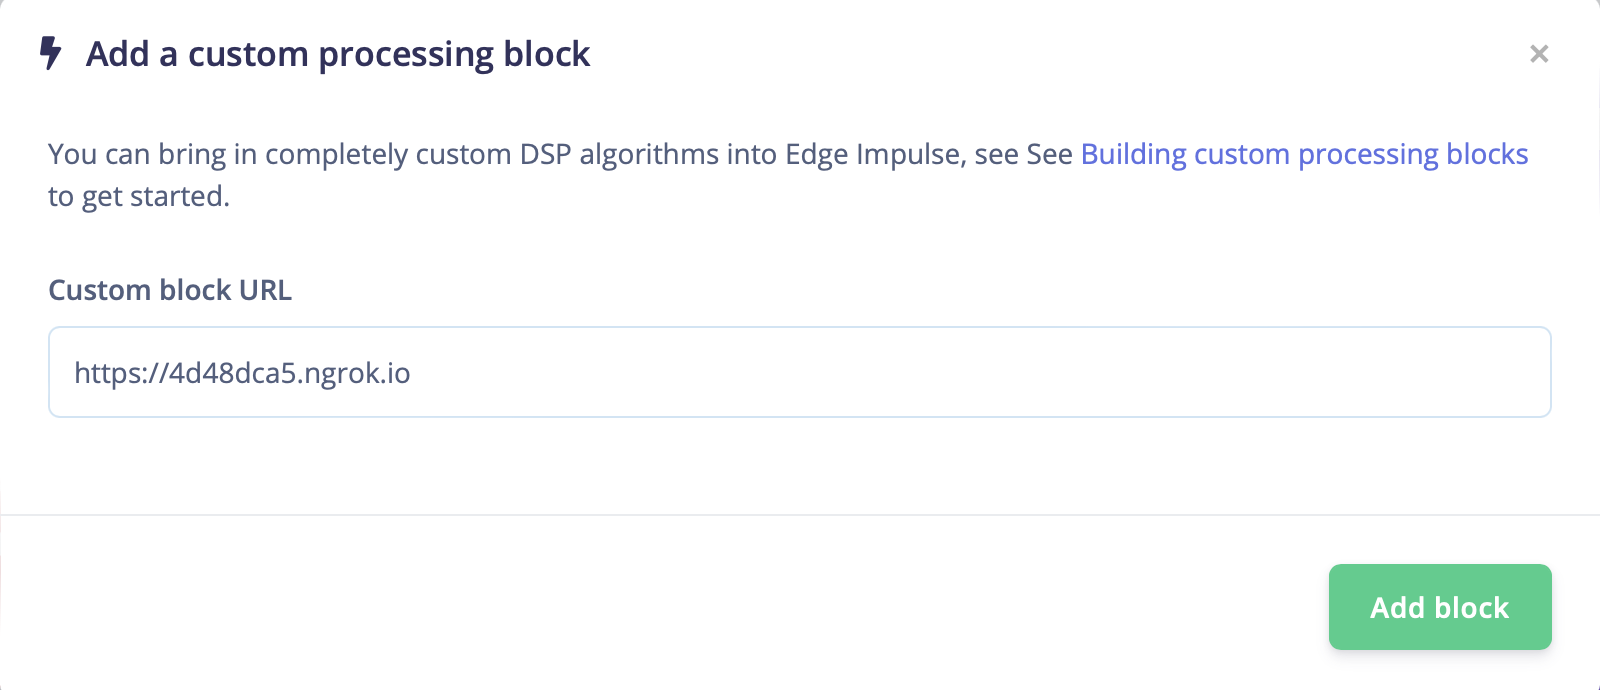
With a public URL for your custom processing block, you can go into your project and add a processing block to your impulse. When the processing block selection modal pops up, go to the bottom left corner and click the `Add custom block` button. In the next modal that pops up, enter your forwarding URL from above and save. The block can now be used in your project and you will be able to view the processing results, including any visualizations you have created.
## Block interface
Processing blocks are expected to implement an HTTP server to handle requests. The sections below define the required and optional inputs (requests) and the expected outputs (responses) for custom processing blocks.
### Inputs
Information will be provided to your custom processing block through the request headers and body.
#### Requests
| Method | Path | Description |
| ------ | ------------- | ----------------------------------------------------------- |
| GET | `/` | Requesting general information about the processing block. |
| GET | `/parameters` | Requesting the `parameters.json` file for the block. |
| POST | `/run` | Requesting features be generated for a single data sample. |
| POST | `/batch` | Requesting features be generated for multiple data samples. |
#### Request headers
| Header | Passed | Description |
| ----------------- | ----------- | ---------------------------------------------------------------------------------- |
| `x-ei-project-id` | Conditional | Provided with `GET /run` or `GET /batch` requests. The ID of the project. |
| `x-ei-sample-id` | Conditional | Provided with `GET /run` request. The ID of the sample to be processed. |
| `x-ei-sample-ids` | Conditional | Provided with `GET /batch` request. A list of IDs of data samples to be processed. |
#### Request body
The request body adheres to the following interfaces for the `POST` methods. `GET` methods do not have a request body.
```typescript POST /run theme={"system"}
interface DSPRequestBody {
features: number[];
axes: string[];
sampling_freq: number;
draw_graphs: boolean;
project_id: number;
implementation_version: number;
params: { [k: string]: string | number | boolean | number[] | string[] | null };
calculate_performance: boolean;
named_axes: { [k: string]: string | false } | false | undefined;
}
```
```typescript POST /batch theme={"system"}
interface DSPBatchRequestBody {
features: number[][];
axes: string[];
sampling_freq: number;
implementation_version: number;
params: { [k: string]: string | number | boolean | number[] | string[] | null };
state: string;
named_axes: { [k: string]: string | false } | false | undefined;
}
```
The data samples that need to be processed by your script to generate features are provided as arrays in the `features` property.
The `axes` property provides the names of the signals for the data sample. For example, if this was an accelerometer data sample, the axes could be `[ 'accX', 'accY', 'accZ' ]`. These names could be mapped to other names in the `named_axes` property.
The parameters defined in your `parameters.json` file will be passed to your block in the `params` property. If your parameter names contain dashes, these are replaced with underscores before being added to the request body. For example, a processing block parameter named `custom-processing-param` is passed as `custom_processing_param`. Please refer to the [parameters.json](/tools/specifications/files/parameters-json) documentation for further details about creating this file, parameter options available, and examples.
### Outputs
The expected response from the HTTP server in your custom processing block varies depending on the type of request.
#### GET methods
`GET /`:
A plain text response with some information about the block. For example, the response could be the block name and author.
```
Custom processing block by Awesome Developer.
```
`GET /parameters`:
The parameters file returned as a JSON object.
#### POST methods
The POST response bodies are expected to adhere to the following interfaces.
```typescript POST /run theme={"system"}
{
success: boolean,
error?: string
} & DSPRunResponse
interface DSPRunResponse {
features: number[];
graphs: DSPRunGraph[];
labels: string[] | undefined;
fft_used: number[] | undefined;
performance: {
error: string | undefined | null,
result: {
time_ms: number
memory: number
}
} | undefined;
benchmark_fw_hash: string;
output_config: DSPFeatureMetadataOutput;
state_string: string | undefined;
}
interface DSPRunGraph {
name: string;
image?: string;
imageMimeType?: string;
X?: { [k: string]: number[] };
y?: number[];
suggestedYMin: number | undefined;
suggestedYMax: number | undefined;
suggestedXMin: number | undefined;
suggestedXMax: number | undefined;
type: string;
lineWidth: number | undefined;
smoothing: boolean;
axisLabels?: { X: string; y: string; };
highlights?: { [k: string]: number[] };
}
type DSPFeatureMetadataOutput = {
type: 'image',
shape: { width: number, height: number, channels: number, frames?: number },
axes?: number
} | {
type: 'spectrogram',
shape: { width: number, height: number },
axes?: number
} | {
type: 'flat',
shape: { width: number },
axes?: number
};
```
```typescript POST /batch theme={"system"}
{
success: boolean,
error?: string
} & DSPRunResponse
interface DSPBatchRunResponse {
features: number[][];
labels: string[];
frequency: number | undefined;
fft_used: number[] | undefined;
output_config: DSPFeatureMetadataOutput;
state_string: string | undefined;
state: string | undefined;
}
type DSPFeatureMetadataOutput = {
type: 'image',
shape: { width: number, height: number, channels: number, frames?: number },
axes?: number
} | {
type: 'spectrogram',
shape: { width: number, height: number },
axes?: number
} | {
type: 'flat',
shape: { width: number },
axes?: number
};
```
The `features` property is where you return the features that were generated by processing the data sample(s).
The `labels` property can be used return the names of the features you generated. For example, if you calculated the average, maximum, and minimum values of the signal, the labels could be `[ 'Average', 'Maximum', 'Minimum' ]`. These labels will be used for the feature explorer.
## Adding visualizations
The results of generating features can be shown in Studio through graphs and the [feature explorer](/studio/projects/processing-blocks/feature-explorer).
### Graphs
When configuring parameters for a processing block in Studio, a preview of the feature generation results for a single sample is shown. This preview can include displaying graphs. These are the graphs that you define and return in the `graphs` property of the response body for the `POST /run` method. Graphs should be created in your feature generation script conditionally based on the `draw_graphs` property in the request body. See the interface for a graphs object in the [Outputs](/studio/organizations/custom-blocks/custom-processing-blocks#outputs) section above.
Graphs can be of different types: linear, logarithmic, or an image. The type of graph is controlled by the `type` property of a graph object.
| Graph | Type value |
| ----------- | ------------- |
| Linear | `linear` |
| Logarithmic | `logarithmic` |
| Image | `image` |
### Feature explorer
The results of generating features on all samples can be shown in the feature explorer. If you output high-dimensional data, you can enable dimensionality reduction for the feature explorer. This will run UMAP over the data to compress the features into two dimensions. To do so, you can set the `visualization` property in your `parameters.json` file to `dimensionalityReduction`.
## Initializing the block
When you are finished developing your block locally, you will want to initialize it. The procedure to initialize your block is described in the [custom blocks](/studio/organizations/custom-blocks) overview page. Please refer to that documentation for details.
## Testing the block locally
The most convenient way to test your custom processing block before pushing it to Edge Impulse is to host it locally and then expose it to the internet so that it can be accessed by Studio. There are two ways to achieve this. You will need to have Docker and [ngrok](https://ngrok.com/) installed on your machine for either approach.
### With blocks runner
For the first method, you can use the CLI `edge-impulse-blocks runner` tool. See [Block runner](/tools/clis/edge-impulse-cli/blocks#block-runner) for additional details.
The port you publish for your Docker container can be configured in the parameters.json file. The blocks runner will also look for the `EXPOSE` instruction in your Dockerfile and publish that port for you if you wish to override the default port.
```bash theme={"system"}
edge-impulse-blocks runner
```
Note down the public URL that is returned in the terminal. You can use this URL to add the block to an impulse in a Studio project.
### With ngrok and Docker
For the second method, you can run Docker and ngrok directly instead of using the CLI blocks runner tool. First, you can build the Docker image and run the container.
```bash theme={"system"}
docker build -t custom-processing-block .
docker run -p 4446:4446 -it --rm custom-processing-block
```
Then, after signing up for and installing ngrok, you can use their CLI to create a public forwarding URL. Note down the `https://` forwarding address in the response. You can use this URL to add the block to an impulse in a Studio project.
```bash theme={"system"}
ngrok http 4446
```
```bash theme={"system"}
Session Status online
Account Edge Impulse (Plan: Free)
Version 2.3.35
Region United States (us)
Web Interface http://127.0.0.1:4040
Forwarding http://4d48dca5.ngrok.io -> http://localhost:4446
Forwarding https://4d48dca5.ngrok.io -> http://localhost:4446
```
### Viewing in Studio
With a public URL for your custom processing block, you can go into your project and add a processing block to your impulse. When the processing block selection modal pops up, go to the bottom left corner and click the `Add custom block` button. In the next modal that pops up, enter your forwarding URL from above and save. The block can now be used in your project and you will be able to view the processing results, including any visualizations you have created.
 ## Pushing the block to Edge Impulse
When you have initialized and finished testing your block locally, you will want to push it to Edge Impulse. The procedure to push your block to Edge Impulse is described in the [custom blocks](/studio/organizations/custom-blocks) overview page. Please refer to that documentation for details.
## Using the block in a project
After you have pushed your block to Edge Impulse, it can be used in the same way as any other built-in block.
## Running on device
One caveat for custom processing blocks is that Edge Impulse cannot automatically generate optimized code to run on-device as is done with processing blocks built into the platform. This code will need to be written by you. To help you get started, the structure is provided for you.
After exporting the C++ library from the Deployment page in Studio, you can see that a forward declaration for your custom processing block will have been created for you in the `model-parameters/model_variables.h` file.
```cpp theme={"system"}
int extract_my_preprocessing_features(signal_t *signal, matrix_t *output_matrix, void *config_ptr, const float frequency);
```
The name for the function comes from the `cppType` property in your `parameters.json` file.
```cpp theme={"system"}
extract_{cppType}_features(...)
```
You will need to implement this function in the `main.cpp` file of the C++ library. Example implementations for the processing blocks built into Edge Impulse can be found in the [C++ inferencing SDK](https://github.com/edgeimpulse/inferencing-sdk-cpp/tree/master/dsp).
## Examples
Edge Impulse has developed several processing blocks that are built into the platform. The code for these blocks can be found in a public repository under the [Edge Impulse GitHub account](https://github.com/edgeimpulse). See below. Additional examples can also be found in the Edge Impulse account. These repository names typically follow the convention of `example-custom-processing-block-`. As such, they can be found by searching the repositories for `example-custom-processing`.
Below are direct links to some examples:
* [processing-blocks](https://github.com/edgeimpulse/processing-blocks)
* [example-custom-processing-block-python](https://github.com/edgeimpulse/example-custom-processing-block-python)
## Troubleshooting
No common issues have been identified thus far. If you encounter an issue, please reach out on the [forum](https://forum.edgeimpulse.com) or, if you are on the Enterprise plan, through your support channels.
## Additional resources
* [Custom blocks](/studio/organizations/custom-blocks)
* [Processing blocks](/studio/projects/processing-blocks)
* [edge-impulse-blocks](/tools/clis/edge-impulse-cli/blocks)
* [parameters.json](/tools/specifications/files/parameters-json)
* [Building a custom processing block](/tutorials/topics/feature-extraction/build-custom-processing-blocks)
## Pushing the block to Edge Impulse
When you have initialized and finished testing your block locally, you will want to push it to Edge Impulse. The procedure to push your block to Edge Impulse is described in the [custom blocks](/studio/organizations/custom-blocks) overview page. Please refer to that documentation for details.
## Using the block in a project
After you have pushed your block to Edge Impulse, it can be used in the same way as any other built-in block.
## Running on device
One caveat for custom processing blocks is that Edge Impulse cannot automatically generate optimized code to run on-device as is done with processing blocks built into the platform. This code will need to be written by you. To help you get started, the structure is provided for you.
After exporting the C++ library from the Deployment page in Studio, you can see that a forward declaration for your custom processing block will have been created for you in the `model-parameters/model_variables.h` file.
```cpp theme={"system"}
int extract_my_preprocessing_features(signal_t *signal, matrix_t *output_matrix, void *config_ptr, const float frequency);
```
The name for the function comes from the `cppType` property in your `parameters.json` file.
```cpp theme={"system"}
extract_{cppType}_features(...)
```
You will need to implement this function in the `main.cpp` file of the C++ library. Example implementations for the processing blocks built into Edge Impulse can be found in the [C++ inferencing SDK](https://github.com/edgeimpulse/inferencing-sdk-cpp/tree/master/dsp).
## Examples
Edge Impulse has developed several processing blocks that are built into the platform. The code for these blocks can be found in a public repository under the [Edge Impulse GitHub account](https://github.com/edgeimpulse). See below. Additional examples can also be found in the Edge Impulse account. These repository names typically follow the convention of `example-custom-processing-block-`. As such, they can be found by searching the repositories for `example-custom-processing`.
Below are direct links to some examples:
* [processing-blocks](https://github.com/edgeimpulse/processing-blocks)
* [example-custom-processing-block-python](https://github.com/edgeimpulse/example-custom-processing-block-python)
## Troubleshooting
No common issues have been identified thus far. If you encounter an issue, please reach out on the [forum](https://forum.edgeimpulse.com) or, if you are on the Enterprise plan, through your support channels.
## Additional resources
* [Custom blocks](/studio/organizations/custom-blocks)
* [Processing blocks](/studio/projects/processing-blocks)
* [edge-impulse-blocks](/tools/clis/edge-impulse-cli/blocks)
* [parameters.json](/tools/specifications/files/parameters-json)
* [Building a custom processing block](/tutorials/topics/feature-extraction/build-custom-processing-blocks)