> ## Documentation Index
> Fetch the complete documentation index at: https://docs.edgeimpulse.com/llms.txt
> Use this file to discover all available pages before exploring further.
# Custom deployment blocks
**Only available on the Enterprise plan**
This feature is only available on the Enterprise plan. Review our [plans and pricing](https://edgeimpulse.com/pricing) or sign up for our free [expert-led trial](https://edgeimpulse.com/expert-led-trial) today.
Custom deployment blocks are a way to extend the capabilities of Edge Impulse beyond the [deployment](/studio/projects/deployment) options built into the platform. If none of the existing blocks created by Edge Impulse fit your needs, you can create custom deployment blocks to build and export your own libraries or firmware binaries for unique project requirements.
Ready to dive in and start building? Jump to the [examples](/studio/organizations/custom-blocks/custom-deployment-blocks#examples)!
## Block structure
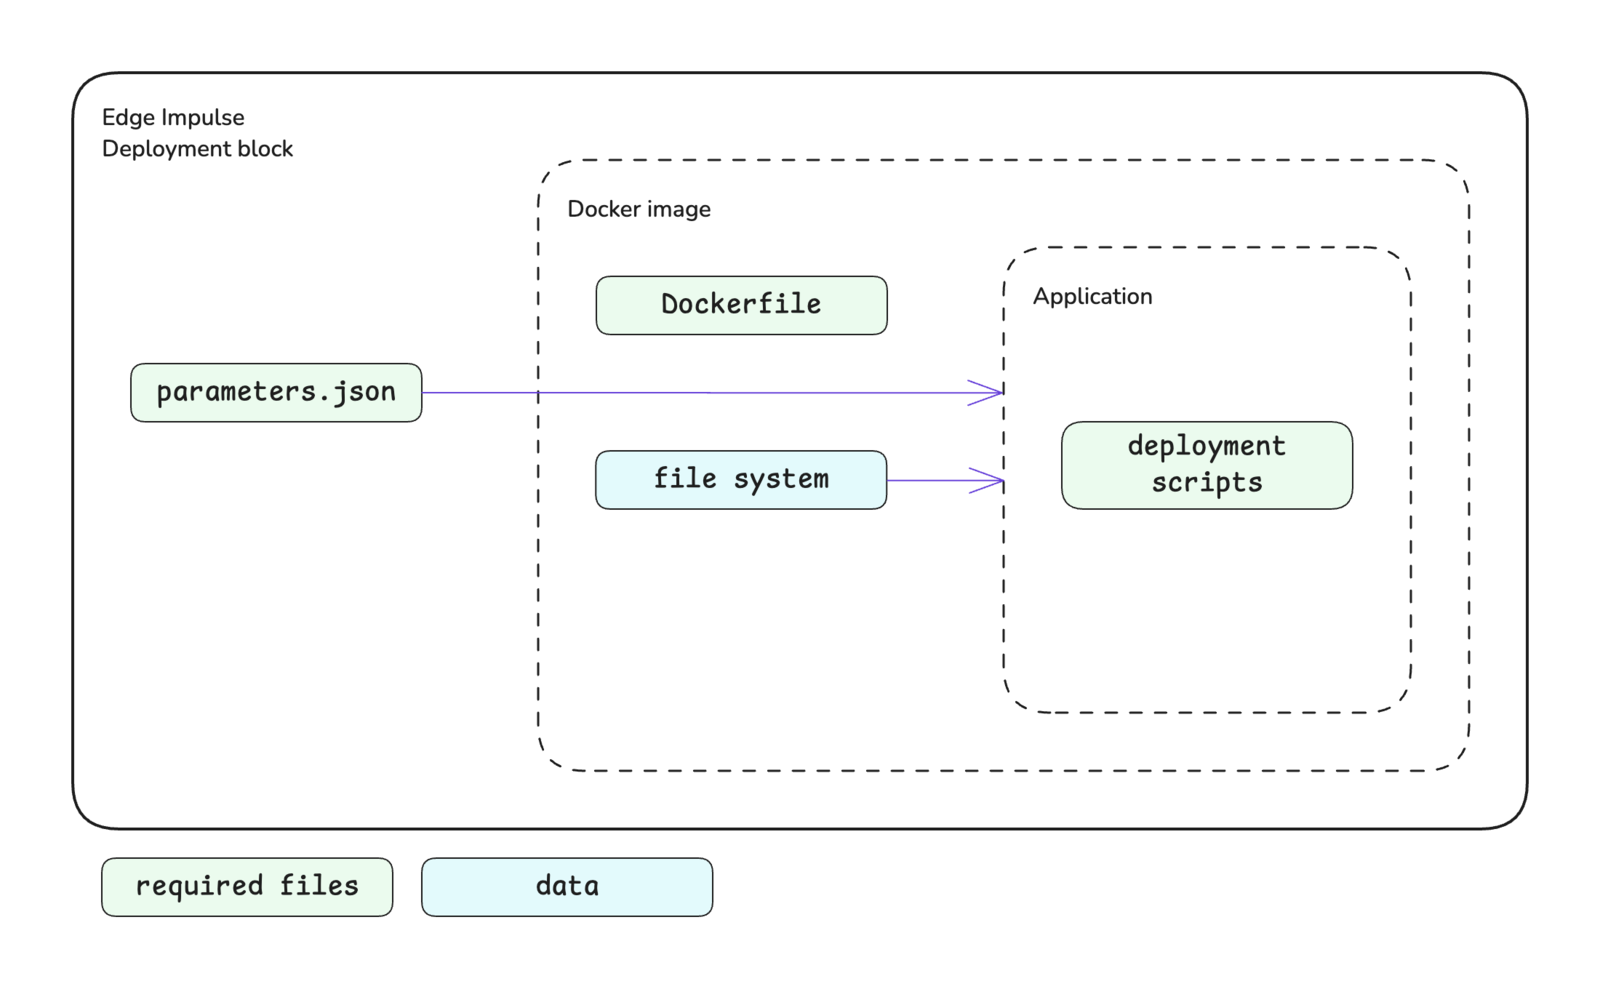
The deployment block structure is shown below. A custom deployment block consists of:
* **Scripts**: Your deployment logic (Python, JavaScript, etc.)
* **Dockerfile**: Instructions for building the container image
* **parameters.json**: Block metadata and parameter definitions
* **package.json** (optional): Node.js dependencies if using JavaScript/TypeScript
 Example `package.json` for a Node.js-based deployment block:
```json theme={"system"}
{
"name": "custom-deploy-block",
"version": "1.0.0",
"private": true,
"description": "Custom deployment block",
"author": "Your Name ",
"license": "Apache-2.0",
"dependencies": {
"commander": "5.1.0"
}
}
```
Please see the [custom blocks](/studio/organizations/custom-blocks) overview page for more details.
## Block interface
The sections below define the required and optional inputs and the expected outputs for custom deployment blocks.
### Inputs
Deployment blocks have access to command line arguments and input files.
#### Command line arguments
The following arguments will be automatically passed to your custom deployment block.
| Argument | Passed | Description |
| ------------------- | ------ | ----------------------------------------------------------------------------------------------------------------------------------------------------------------------------------------------------------------------------------------------- |
| `--metadata ` | Always | Provides the file path for `deployment-metadata.json` as a string. The `deployment-metadata.json` file contains details about the impulse being deployed. See [deployment-metadata.json](/tools/specifications/files/deployment-metadata-json). |
CLI arguments can also be specified using the `cliArguments` property in the `parameters.json` file. Alternatively, these arguments can be added (or changed) by editing the block in Studio.
#### Files
Your deployment block will be passed an input directory that contains all the information required for a deployment, including: deployment metadata, the Edge Impulse SDK, the trained model (in multiple formats), and all supporting source code to run the impulse.
The input directory path is stored in the `input` property under the `folders` property in the `deployment-metadata.json` file, which can be loaded using the `--metadata ` argument that is passed to the deployment block.
The input directory structure is shown below.
```bash theme={"system"}
input/
├── deployment-metadata.json
├── edge-impulse-sdk/
├── model-parameters/
├── tflite-model/
├── trained.h5.zip
├── trained.savedmodel.zip
└── trained.tflite
```
### Outputs
The expected output from your custom deployment block is a ZIP file named `deploy.zip` located in the output directory. This archive is what will be downloaded for the user after your block has finished building.
The output directory path is stored in the `output` property under the `folders` property in the `deployment-metadata.json` file, which can be loaded using the `--metadata ` argument that is passed to the deployment block.
## Creating a build directory
The input and output directories listed in the `deployment-metadata.json` file are located on network storage. Therefore to improve the speed of your deployment block, it is best practice to create a build directory, copy in the required items for your build, then write the output archive to the output directory.
In the example below, the `app_dir` contained the build instructions and files required to compile a Linux application.
```python theme={"system"}
# Define directories.
input_dir = metadata['folders']['input']
output_dir = metadata['folders']['output']
app_dir = os.path.join(os.path.dirname(os.path.realpath(__file__)), 'app')
# Create the build directory.
build_dir = '/tmp/build'
if os.path.exists(build_dir):
shutil.rmtree(build_dir)
os.makedirs(build_dir)
# Copy in the data from both 'input' and 'app' directories.
os.system('cp -r ' + input_dir + '/* ' + build_dir)
os.system('cp -r ' + app_dir + '/* ' + build_dir)
```
## Mounting learning block data
If your custom deployment block requires access to the data used to train your model, you can mount the learning block by setting the `mountLearnBlock` property to `true`. This will mount all files for the learning block, including the training data, under a `/data` directory within your block.
The training data is already split into train and test (validation) sets. Please refer to the Data section under Inputs in the [custom learning block](/studio/organizations/custom-blocks/custom-learning-blocks) documentation for additional details.
## Accessing the internet
Deployment blocks do not have access to the internet by default. If you need to access information outside of your block, such as project items through the Edge Impulse API, you will need to set the `privileged` property to `true`.
This will enable internet access and pass in the project API key in the `deployment-metadata.json` file (if a project development API key is set) that can be used to authenticate with the Edge Impulse API. Note that if you also require the project ID, this can be retrieved using the [list active projects](/apis/studio/projects/list-active-projects) API endpoint.
## Custom parameters
Custom deployment blocks can accept user-defined parameters that are configured at deployment time. These parameters are defined in the `parameters` array within your `parameters.json` file and are presented to users in the Studio UI when they deploy with your custom block.
Each parameter defines a configuration option with properties including:
* `name`: The display label shown in the UI
* `param`: The parameter name used when passed to your script as a command line argument (e.g., `--param-name `)
* `type`: The input type (e.g., `select` for dropdown menus)
* `value`: The default value
* `valid`: Array of allowed values for the parameter
* `help`: Optional description text to guide users
When a user deploys with custom parameters:
1. Selected values are passed to your deployment block script as command line arguments
2. Configuration is stored in `project_deployment_history` to persist settings across deployments
This allows users to customize deployment behavior for different use cases, such as:
* Target hardware configurations
* Build optimization levels
* Custom firmware settings
* Output format selection
### Build options
Parameters can be presented as dropdown menus in the deployment UI, allowing users to select from predefined options. This is particularly useful for build configurations where only specific values are valid.
Example dropdown parameter configuration:
```json theme={"system"}
{
"name": "Name of option",
"value": "option-a",
"type": "select",
"param": "build-option-1",
"help": "Description of what this option controls",
"valid": [
"option-a",
"option-b",
"option-c"
]
},
{
"name": "Name of option2",
"value": "choice-1",
"type": "select",
"param": "build-option-2",
"valid": [
"choice-1",
"choice-2"
]
}
```
Parameters can also be conditionally shown based on other parameter values using the `showIf` property:
```json theme={"system"}
{
"name": "Advanced setting",
"value": "default",
"type": "select",
"param": "advanced-option",
"valid": ["default", "custom"],
"showIf": {
"parameter": "build-option-1",
"operator": "eq",
"value": "option-a"
}
}
```
See the [parameters.json](/tools/specifications/files/parameters-json) documentation for details on defining parameter types, validation rules, and default values.
## Showing optimization options
Setting the `showOptimizations` property to `true` will present the user with additional optimization options on the Deployment page in Studio.
Firstly, if the `supportsEonCompiler` property is set to `true` (see below), the user will be presented with a dropdown to select between building the deployment using the EON Compiler or standard TFLite file inputs.
Secondly, the user will be presented with quantization options, if applicable. If the user selects the quantized model option, the `trained.tflite` file will be the `int8` version of the model; otherwise it will be the `float32` version.
## Using the EON Compiler
If the `supportsEonCompiler` property is set to `true`, the inputs for the deployment block will be the [EON Compiler](/studio/projects/deployment/eon-compiler) version of the files; otherwise the inputs will be the TFLite version of the files.
However, if the `showOptimizations` property is set to `true` (see above), the user will have the option on the Deployment page in Studio to select between the EON Compiler or standard TFLite file inputs.
## Setting an image for the block
The default image that will appear for your block in the dropdown in Studio on the Deployment page is the Edge Impulse logo. If you would like to change this, you can do so by editing the block after it has been pushed to Studio.
## Initializing the block
When you are finished developing your block locally, you will want to initialize it. The procedure to initialize your block is described in the [custom blocks](/studio/organizations/custom-blocks) overview page. Please refer to that documentation for details.
## Testing the block locally
**Testing locally does not mount the learning block**
If your custom deployment block requires access to the learning block files after it has been mounted, testing locally will not work as the methods to download data described below do not include the learning block data.
To speed up your development process, you can test your custom deployment block locally. There are two ways to achieve this. You will need to have Docker installed on your machine for either approach.
### With blocks runner
For the first method, you can use the CLI `edge-impulse-blocks runner` tool. See [Block runner](/tools/clis/edge-impulse-cli/blocks#block-runner) for additional details. The runner does not expect any command line arguments for deployment blocks. However, if your deployment block requires arguments, you can pass them as a single string using the `--extra-args ` argument.
```bash theme={"system"}
edge-impulse-blocks runner --extra-args "--custom-param-one foo --custom-param-two bar"
```
The first time you enter the above command, you will be asked some questions to configure the runner. Follow the prompts to complete this. If you would like to change the configuration in future, you can execute the runner command with the `--clean` flag.
Using the above approach will create an `ei-block-data` directory within your custom block directory. It will contain several subdirectories.
| Directory | Description |
| ---------------------- | ------------------------------------------------------------------------------------ |
| `download/` | Download directory for the archive of required input files for the deployment block. |
| `/input/` | The input files archive will be automatically extracted to this location. |
| `/output/` | Where the output from your build script is expected to be written. |
### With Docker
For the second method, you can use the CLI block runner or Studio to download the required data from your project, then build the Docker image and run the container directly.
You can download the data by calling the block runner with the `--download-data ` argument. The directory specifies the location where the downloaded data should be extracted. To make this work properly the directory needs to be named `input/`. Before extraction, the data archive will first be downloaded to `ei-block-data/download/`.
```bash theme={"system"}
edge-impulse-blocks runner --download-data input/
```
Alternatively, you can go to the Deployment page for your project in Studio and select `Custom block` as your deployment option. This will allow you to download a ZIP file of the required input files for you deployment block. Extract this archive to a directory called `input/` within your custom deployment block directory.
After downloading the required input files for your block, you can then build the Docker image and run the container.
```bash theme={"system"}
docker build -t custom-deployment-block .
docker run --rm -v $PWD:/home custom-deployment-block --metadata /home/input/deployment-metadata.json
```
## Pushing the block to Edge Impulse
When you have initialized and finished testing your block locally, you will want to push it to Edge Impulse. The procedure to push your block to Edge Impulse is described in the [custom blocks](/studio/organizations/custom-blocks) overview page. Please refer to that documentation for details.
## Using the block in a project
After you have pushed your block to Edge Impulse, it can be used in the same way as any other built-in block.
## Examples
Edge Impulse has developed several examples of custom deployment blocks. The code for these blocks can be found in public repositories under the [Edge Impulse GitHub account](https://github.com/edgeimpulse). Unfortunately, the repository names don't follow a naming convention. However, they can be found by going to the Edge Impulse account and searching the repositories for `deploy`.
Below are direct links to a some examples:
* [Custom deployment block example](https://github.com/edgeimpulse/example-custom-deployment-block)
* [Merge multiple impulses](https://github.com/edgeimpulse/multi-impulse-deployment-block)
## Troubleshooting
No common issues have been identified thus far. If you encounter an issue, please reach out on the [forum](https://forum.edgeimpulse.com) or, if you are on the Enterprise plan, through your support channels.
## Additional resources
* [Custom blocks](/studio/organizations/custom-blocks)
* [Deployment](/studio/projects/deployment)
* [EON Compiler](/studio/projects/deployment/eon-compiler)
* [edge-impulse-blocks](/tools/clis/edge-impulse-cli/blocks)
* [parameters.json](/tools/specifications/files/parameters-json)
* [deployment-metadata.json](/tools/specifications/files/deployment-metadata-json)
Example `package.json` for a Node.js-based deployment block:
```json theme={"system"}
{
"name": "custom-deploy-block",
"version": "1.0.0",
"private": true,
"description": "Custom deployment block",
"author": "Your Name ",
"license": "Apache-2.0",
"dependencies": {
"commander": "5.1.0"
}
}
```
Please see the [custom blocks](/studio/organizations/custom-blocks) overview page for more details.
## Block interface
The sections below define the required and optional inputs and the expected outputs for custom deployment blocks.
### Inputs
Deployment blocks have access to command line arguments and input files.
#### Command line arguments
The following arguments will be automatically passed to your custom deployment block.
| Argument | Passed | Description |
| ------------------- | ------ | ----------------------------------------------------------------------------------------------------------------------------------------------------------------------------------------------------------------------------------------------- |
| `--metadata ` | Always | Provides the file path for `deployment-metadata.json` as a string. The `deployment-metadata.json` file contains details about the impulse being deployed. See [deployment-metadata.json](/tools/specifications/files/deployment-metadata-json). |
CLI arguments can also be specified using the `cliArguments` property in the `parameters.json` file. Alternatively, these arguments can be added (or changed) by editing the block in Studio.
#### Files
Your deployment block will be passed an input directory that contains all the information required for a deployment, including: deployment metadata, the Edge Impulse SDK, the trained model (in multiple formats), and all supporting source code to run the impulse.
The input directory path is stored in the `input` property under the `folders` property in the `deployment-metadata.json` file, which can be loaded using the `--metadata ` argument that is passed to the deployment block.
The input directory structure is shown below.
```bash theme={"system"}
input/
├── deployment-metadata.json
├── edge-impulse-sdk/
├── model-parameters/
├── tflite-model/
├── trained.h5.zip
├── trained.savedmodel.zip
└── trained.tflite
```
### Outputs
The expected output from your custom deployment block is a ZIP file named `deploy.zip` located in the output directory. This archive is what will be downloaded for the user after your block has finished building.
The output directory path is stored in the `output` property under the `folders` property in the `deployment-metadata.json` file, which can be loaded using the `--metadata ` argument that is passed to the deployment block.
## Creating a build directory
The input and output directories listed in the `deployment-metadata.json` file are located on network storage. Therefore to improve the speed of your deployment block, it is best practice to create a build directory, copy in the required items for your build, then write the output archive to the output directory.
In the example below, the `app_dir` contained the build instructions and files required to compile a Linux application.
```python theme={"system"}
# Define directories.
input_dir = metadata['folders']['input']
output_dir = metadata['folders']['output']
app_dir = os.path.join(os.path.dirname(os.path.realpath(__file__)), 'app')
# Create the build directory.
build_dir = '/tmp/build'
if os.path.exists(build_dir):
shutil.rmtree(build_dir)
os.makedirs(build_dir)
# Copy in the data from both 'input' and 'app' directories.
os.system('cp -r ' + input_dir + '/* ' + build_dir)
os.system('cp -r ' + app_dir + '/* ' + build_dir)
```
## Mounting learning block data
If your custom deployment block requires access to the data used to train your model, you can mount the learning block by setting the `mountLearnBlock` property to `true`. This will mount all files for the learning block, including the training data, under a `/data` directory within your block.
The training data is already split into train and test (validation) sets. Please refer to the Data section under Inputs in the [custom learning block](/studio/organizations/custom-blocks/custom-learning-blocks) documentation for additional details.
## Accessing the internet
Deployment blocks do not have access to the internet by default. If you need to access information outside of your block, such as project items through the Edge Impulse API, you will need to set the `privileged` property to `true`.
This will enable internet access and pass in the project API key in the `deployment-metadata.json` file (if a project development API key is set) that can be used to authenticate with the Edge Impulse API. Note that if you also require the project ID, this can be retrieved using the [list active projects](/apis/studio/projects/list-active-projects) API endpoint.
## Custom parameters
Custom deployment blocks can accept user-defined parameters that are configured at deployment time. These parameters are defined in the `parameters` array within your `parameters.json` file and are presented to users in the Studio UI when they deploy with your custom block.
Each parameter defines a configuration option with properties including:
* `name`: The display label shown in the UI
* `param`: The parameter name used when passed to your script as a command line argument (e.g., `--param-name `)
* `type`: The input type (e.g., `select` for dropdown menus)
* `value`: The default value
* `valid`: Array of allowed values for the parameter
* `help`: Optional description text to guide users
When a user deploys with custom parameters:
1. Selected values are passed to your deployment block script as command line arguments
2. Configuration is stored in `project_deployment_history` to persist settings across deployments
This allows users to customize deployment behavior for different use cases, such as:
* Target hardware configurations
* Build optimization levels
* Custom firmware settings
* Output format selection
### Build options
Parameters can be presented as dropdown menus in the deployment UI, allowing users to select from predefined options. This is particularly useful for build configurations where only specific values are valid.
Example dropdown parameter configuration:
```json theme={"system"}
{
"name": "Name of option",
"value": "option-a",
"type": "select",
"param": "build-option-1",
"help": "Description of what this option controls",
"valid": [
"option-a",
"option-b",
"option-c"
]
},
{
"name": "Name of option2",
"value": "choice-1",
"type": "select",
"param": "build-option-2",
"valid": [
"choice-1",
"choice-2"
]
}
```
Parameters can also be conditionally shown based on other parameter values using the `showIf` property:
```json theme={"system"}
{
"name": "Advanced setting",
"value": "default",
"type": "select",
"param": "advanced-option",
"valid": ["default", "custom"],
"showIf": {
"parameter": "build-option-1",
"operator": "eq",
"value": "option-a"
}
}
```
See the [parameters.json](/tools/specifications/files/parameters-json) documentation for details on defining parameter types, validation rules, and default values.
## Showing optimization options
Setting the `showOptimizations` property to `true` will present the user with additional optimization options on the Deployment page in Studio.
Firstly, if the `supportsEonCompiler` property is set to `true` (see below), the user will be presented with a dropdown to select between building the deployment using the EON Compiler or standard TFLite file inputs.
Secondly, the user will be presented with quantization options, if applicable. If the user selects the quantized model option, the `trained.tflite` file will be the `int8` version of the model; otherwise it will be the `float32` version.
## Using the EON Compiler
If the `supportsEonCompiler` property is set to `true`, the inputs for the deployment block will be the [EON Compiler](/studio/projects/deployment/eon-compiler) version of the files; otherwise the inputs will be the TFLite version of the files.
However, if the `showOptimizations` property is set to `true` (see above), the user will have the option on the Deployment page in Studio to select between the EON Compiler or standard TFLite file inputs.
## Setting an image for the block
The default image that will appear for your block in the dropdown in Studio on the Deployment page is the Edge Impulse logo. If you would like to change this, you can do so by editing the block after it has been pushed to Studio.
## Initializing the block
When you are finished developing your block locally, you will want to initialize it. The procedure to initialize your block is described in the [custom blocks](/studio/organizations/custom-blocks) overview page. Please refer to that documentation for details.
## Testing the block locally
**Testing locally does not mount the learning block**
If your custom deployment block requires access to the learning block files after it has been mounted, testing locally will not work as the methods to download data described below do not include the learning block data.
To speed up your development process, you can test your custom deployment block locally. There are two ways to achieve this. You will need to have Docker installed on your machine for either approach.
### With blocks runner
For the first method, you can use the CLI `edge-impulse-blocks runner` tool. See [Block runner](/tools/clis/edge-impulse-cli/blocks#block-runner) for additional details. The runner does not expect any command line arguments for deployment blocks. However, if your deployment block requires arguments, you can pass them as a single string using the `--extra-args ` argument.
```bash theme={"system"}
edge-impulse-blocks runner --extra-args "--custom-param-one foo --custom-param-two bar"
```
The first time you enter the above command, you will be asked some questions to configure the runner. Follow the prompts to complete this. If you would like to change the configuration in future, you can execute the runner command with the `--clean` flag.
Using the above approach will create an `ei-block-data` directory within your custom block directory. It will contain several subdirectories.
| Directory | Description |
| ---------------------- | ------------------------------------------------------------------------------------ |
| `download/` | Download directory for the archive of required input files for the deployment block. |
| `/input/` | The input files archive will be automatically extracted to this location. |
| `/output/` | Where the output from your build script is expected to be written. |
### With Docker
For the second method, you can use the CLI block runner or Studio to download the required data from your project, then build the Docker image and run the container directly.
You can download the data by calling the block runner with the `--download-data ` argument. The directory specifies the location where the downloaded data should be extracted. To make this work properly the directory needs to be named `input/`. Before extraction, the data archive will first be downloaded to `ei-block-data/download/`.
```bash theme={"system"}
edge-impulse-blocks runner --download-data input/
```
Alternatively, you can go to the Deployment page for your project in Studio and select `Custom block` as your deployment option. This will allow you to download a ZIP file of the required input files for you deployment block. Extract this archive to a directory called `input/` within your custom deployment block directory.
After downloading the required input files for your block, you can then build the Docker image and run the container.
```bash theme={"system"}
docker build -t custom-deployment-block .
docker run --rm -v $PWD:/home custom-deployment-block --metadata /home/input/deployment-metadata.json
```
## Pushing the block to Edge Impulse
When you have initialized and finished testing your block locally, you will want to push it to Edge Impulse. The procedure to push your block to Edge Impulse is described in the [custom blocks](/studio/organizations/custom-blocks) overview page. Please refer to that documentation for details.
## Using the block in a project
After you have pushed your block to Edge Impulse, it can be used in the same way as any other built-in block.
## Examples
Edge Impulse has developed several examples of custom deployment blocks. The code for these blocks can be found in public repositories under the [Edge Impulse GitHub account](https://github.com/edgeimpulse). Unfortunately, the repository names don't follow a naming convention. However, they can be found by going to the Edge Impulse account and searching the repositories for `deploy`.
Below are direct links to a some examples:
* [Custom deployment block example](https://github.com/edgeimpulse/example-custom-deployment-block)
* [Merge multiple impulses](https://github.com/edgeimpulse/multi-impulse-deployment-block)
## Troubleshooting
No common issues have been identified thus far. If you encounter an issue, please reach out on the [forum](https://forum.edgeimpulse.com) or, if you are on the Enterprise plan, through your support channels.
## Additional resources
* [Custom blocks](/studio/organizations/custom-blocks)
* [Deployment](/studio/projects/deployment)
* [EON Compiler](/studio/projects/deployment/eon-compiler)
* [edge-impulse-blocks](/tools/clis/edge-impulse-cli/blocks)
* [parameters.json](/tools/specifications/files/parameters-json)
* [deployment-metadata.json](/tools/specifications/files/deployment-metadata-json)