> ## Documentation Index
> Fetch the complete documentation index at: https://docs.edgeimpulse.com/llms.txt
> Use this file to discover all available pages before exploring further.
# Custom blocks
Much functionality in Edge Impulse is based on the concept of blocks. There are existing blocks built into the platform to achieve dedicated tasks. If these pre-built blocks do not fit your needs, you can edit existing blocks or develop from scratch to create custom blocks that extend the capabilities of Edge Impulse. These include:
* [Custom AI labeling blocks](/studio/organizations/custom-blocks/custom-ai-labeling-blocks)
* [Custom deployment blocks](/studio/organizations/custom-blocks/custom-deployment-blocks)
* [Custom learning blocks](/studio/organizations/custom-blocks/custom-learning-blocks)
* [Custom processing blocks](/studio/organizations/custom-blocks/custom-processing-blocks)
* [Custom synthetic data blocks](/studio/organizations/custom-blocks/custom-synthetic-data-blocks)
* [Custom transformation blocks](/studio/organizations/custom-blocks/custom-transformation-blocks)
The sections below provide an overview of custom blocks. The details for each specific type of block can be found on its own documentation page linked above.
## Block structure
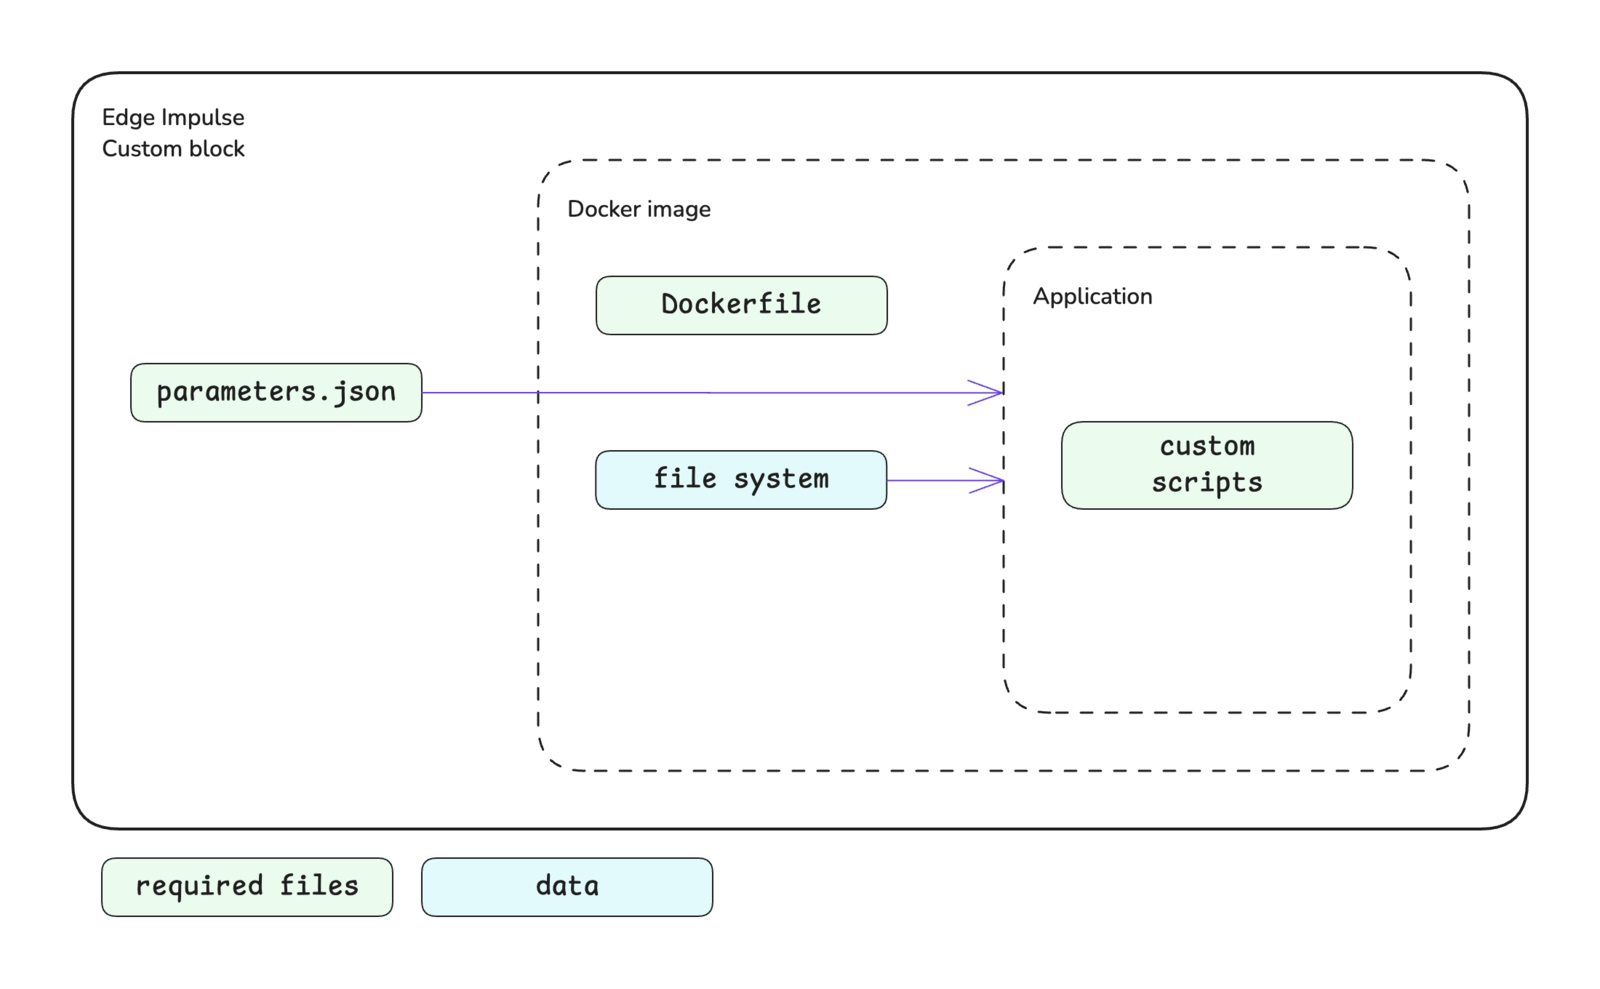
A block in Edge Impulse encapsulates a Docker image and provides information to the container when it is run. Different parameters, environment variables, and data will be passed in and different volumes will be mounted depending on the type of block.
The basic structure of a block is shown below. At a minimum, a custom block consists of a directory containing your scripts, a Dockerfile, and a `parameters.json` file. Block specific structures are shown in their respective documentation.
 ### Scripts
The Docker container executes the scripts that you have written for your custom block. At Edge Impulse, block scripts are mostly written in Python, Javascript/Typescript, or Bash. However, these scripts can be written in any language that you are comfortable with.
The initial script that you would like to be executed is defined in the Dockerfile as the `ENTRYPOINT` for the image.
### Dockerfile
**Do not set the** `WORKDIR` **argument to** `/home` or `/data`
The `/home` and `/data` directory paths are used by Edge Impulse. Therefore, if you set the working directory for your container to this path, your files will be overwritten and rendered inaccessible. You will notice in most examples from Edge Impulse, the argument for the `WORKDIR` instruction is set to `/app`.
**Use the** `ENTRYPOINT` **instruction**
It is important to set the `ENTRYPOINT` instruction at the end of your Dockerfile to specify the default executable for the container. This instruction is used to turn a container into a standalone executable and blocks in Edge Impulse have been designed with this in mind.
Do not use the `RUN` or `CMD` instructions to set the default executable. The `RUN` instruction is not meant for this purpose (it's meant for building layers of an image) and the `CMD` instruction is not what Edge Impulse expects.
The Dockerfile is the instruction set for building the Docker image that will be run as a container in your custom block. The documentation for each type of custom block contains links to GitHub repositories for block examples, which each contain a Dockerfile. Referencing these is a great starting point when developing your own Dockerfile.
In general, the argument you define as the `ENTRYPOINT` in your Dockerfile will be your custom script. For processing blocks, however, this will be an HTTP server. In this case, you will also need to expose the port for your server using the `EXPOSE` instruction.
If you want to leverage GPU compute for your custom learning blocks, you will need to make sure to install the CUDA packages. You can refer to the [example-custom-ml-keras](https://github.com/edgeimpulse/example-custom-ml-block-keras) repository to see an example Dockerfile that installs these packages.
When running in Edge Impulse, processing and learning block containers do not have network access. Make sure you don't download dependencies while running these containers, only when building the images.
### Parameters
A `parameters.json` file is to be included at the root of your custom block directory. This file describes the block itself and identifies the parameter items that will be exposed for configuration in Studio and, in turn, passed to the script you defined in your Dockerfile as the `ENTRYPOINT`. See [parameters.json](/tools/specifications/files/parameters-json) for more details.
In most cases, the parameter items defined in your `parameters.json` file are passed to your script as command line arguments. For example, a parameter named `custom-param-one` with an associated value will be passed to your script as `--custom-param-one `.
Processing blocks are handled differently. In the case of processing blocks, parameter items are passed as properties in the body of an HTTP request. In this case, a parameter named `custom-param-one` with an associated value will be passed to the function generating features in your script as an argument named `custom_param_one`. Notice the dashes have been converted to underscores.
One additional note in regards to how parameter items are passed is that items of the type `secret` will be passed as environment variables instead of command line arguments.
Parameter types are enforced and validation is performed automatically when values are being entered in Studio.
## Developing a custom block
The first steps to developing a custom block are to write your scripts and Dockerfile. Once those are completed, you can initialize the block, test it locally, and push it to Edge Impulse using the [edge-impulse-blocks](/tools/clis/edge-impulse-cli/blocks) tool in the Edge Impulse CLI.
### Initializing the block
From within your custom block directory, run the `edge-impulse-blocks init` command and follow the prompts to initialize your block. This will do two things:
1. Create an `.ei-block-config` file that associates the block with your organization
2. Create a `parameters.json` file (if one does not already exist in your custom block directory)
After the `parameters.json` file is created, you will want to take a look at it and make modifications as necessary. The CLI creates a basic file for you and you may want to include additional metadata and parameter items.
### Testing the block locally
There are several levels of testing locally that you can do while developing your custom block:
1. Calling your script directly, passing it any required environment variables and arguments
2. Building the Docker image and running the container directly, passing it any required environment variables and arguments
3. Using the blocks runner tool in the Edge Impulse CLI to test the complete block
To use the blocks runner tool in the Edge Impulse CLI, run the `edge-impulse-blocks runner` command from within your custom block directory and follow the prompts to test your block locally. See [Block runner](/tools/clis/edge-impulse-cli/blocks#block-runner).
Refer to the documentation for your type of custom block for additional details about testing locally.
### Pushing the block to Edge Impulse
**Custom learning blocks can be pushed to a developer profile**
Unlike all other types of custom blocks, a custom learning block can be pushed to a developer profile (non-Enterprise plan account).
After initializing and testing your custom block, you can push it to Edge Impulse to make it available for use by everyone in your organization.
From within your custom block directory, run the `edge-impulse-blocks push` command and follow the prompts to push your block to Edge Impulse.
Once pushed successfully, your block will appear in your organization or, if it is a custom learning block and you are not on the Enterprise plan, in your developer profile. See [Editing a custom block in Studio](/studio/organizations/custom-blocks#editing-a-custom-block-in-studio) for images showing each block type after being pushed to Edge Impulse.
### Resetting the block configuration
If at some point you need to change configuration settings for your block that aren't being shown when you run the `edge-impulse-blocks` commands, say to download data from a different project with the `runner`, you can execute any of the respective commands with the `--clean` flag.
### Importing existing Docker images
If you have previously created a Docker image for a custom block and are hosting it on Docker Hub, you can create a custom block that uses this image.
To do so, go to your organization and select the item in the left sidebar menu for the type of custom block you would like to create. On that custom block page, select the `+ Add new block` button (or select an existing block to edit). In the modal that pops up, configure your block as desired and in the **Docker container** field enter the details for your image in the `username/image:tag` format.
## Editing a custom block in Studio
After successfully pushing your custom block to Edge Impulse you can edit it from within Studio.
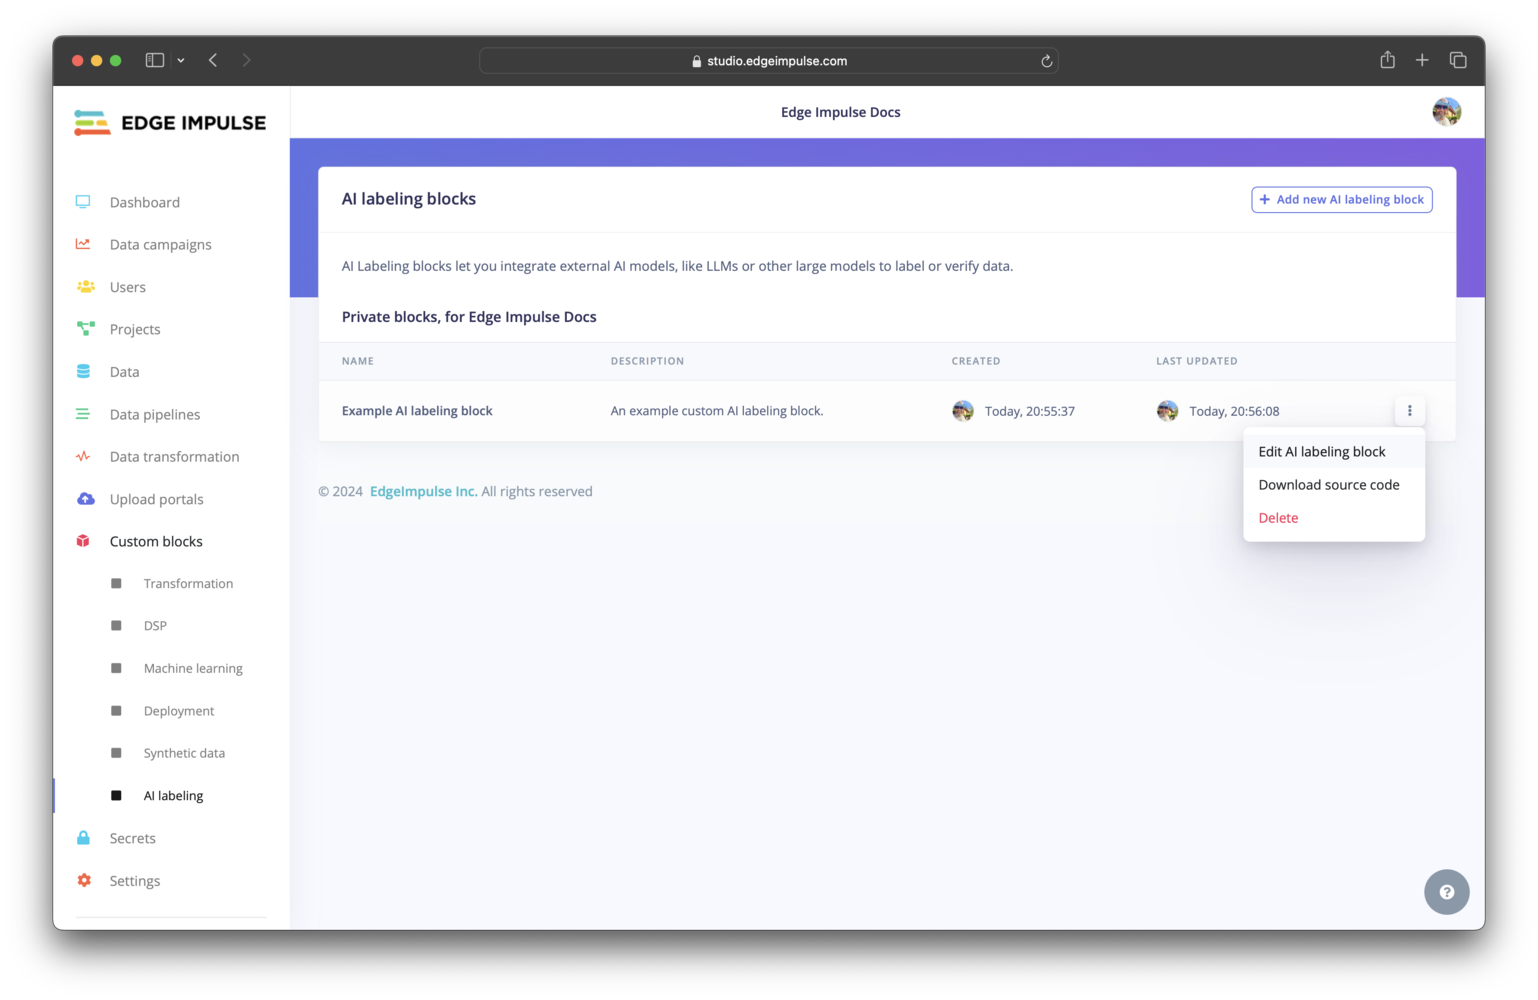
Click on **AI labeling** under Custom blocks. You should find your custom AI labeling block listed here. To view the configuration settings for your block and edit them, you can click on the three dots and select **Edit AI labeling block**.
### Scripts
The Docker container executes the scripts that you have written for your custom block. At Edge Impulse, block scripts are mostly written in Python, Javascript/Typescript, or Bash. However, these scripts can be written in any language that you are comfortable with.
The initial script that you would like to be executed is defined in the Dockerfile as the `ENTRYPOINT` for the image.
### Dockerfile
**Do not set the** `WORKDIR` **argument to** `/home` or `/data`
The `/home` and `/data` directory paths are used by Edge Impulse. Therefore, if you set the working directory for your container to this path, your files will be overwritten and rendered inaccessible. You will notice in most examples from Edge Impulse, the argument for the `WORKDIR` instruction is set to `/app`.
**Use the** `ENTRYPOINT` **instruction**
It is important to set the `ENTRYPOINT` instruction at the end of your Dockerfile to specify the default executable for the container. This instruction is used to turn a container into a standalone executable and blocks in Edge Impulse have been designed with this in mind.
Do not use the `RUN` or `CMD` instructions to set the default executable. The `RUN` instruction is not meant for this purpose (it's meant for building layers of an image) and the `CMD` instruction is not what Edge Impulse expects.
The Dockerfile is the instruction set for building the Docker image that will be run as a container in your custom block. The documentation for each type of custom block contains links to GitHub repositories for block examples, which each contain a Dockerfile. Referencing these is a great starting point when developing your own Dockerfile.
In general, the argument you define as the `ENTRYPOINT` in your Dockerfile will be your custom script. For processing blocks, however, this will be an HTTP server. In this case, you will also need to expose the port for your server using the `EXPOSE` instruction.
If you want to leverage GPU compute for your custom learning blocks, you will need to make sure to install the CUDA packages. You can refer to the [example-custom-ml-keras](https://github.com/edgeimpulse/example-custom-ml-block-keras) repository to see an example Dockerfile that installs these packages.
When running in Edge Impulse, processing and learning block containers do not have network access. Make sure you don't download dependencies while running these containers, only when building the images.
### Parameters
A `parameters.json` file is to be included at the root of your custom block directory. This file describes the block itself and identifies the parameter items that will be exposed for configuration in Studio and, in turn, passed to the script you defined in your Dockerfile as the `ENTRYPOINT`. See [parameters.json](/tools/specifications/files/parameters-json) for more details.
In most cases, the parameter items defined in your `parameters.json` file are passed to your script as command line arguments. For example, a parameter named `custom-param-one` with an associated value will be passed to your script as `--custom-param-one `.
Processing blocks are handled differently. In the case of processing blocks, parameter items are passed as properties in the body of an HTTP request. In this case, a parameter named `custom-param-one` with an associated value will be passed to the function generating features in your script as an argument named `custom_param_one`. Notice the dashes have been converted to underscores.
One additional note in regards to how parameter items are passed is that items of the type `secret` will be passed as environment variables instead of command line arguments.
Parameter types are enforced and validation is performed automatically when values are being entered in Studio.
## Developing a custom block
The first steps to developing a custom block are to write your scripts and Dockerfile. Once those are completed, you can initialize the block, test it locally, and push it to Edge Impulse using the [edge-impulse-blocks](/tools/clis/edge-impulse-cli/blocks) tool in the Edge Impulse CLI.
### Initializing the block
From within your custom block directory, run the `edge-impulse-blocks init` command and follow the prompts to initialize your block. This will do two things:
1. Create an `.ei-block-config` file that associates the block with your organization
2. Create a `parameters.json` file (if one does not already exist in your custom block directory)
After the `parameters.json` file is created, you will want to take a look at it and make modifications as necessary. The CLI creates a basic file for you and you may want to include additional metadata and parameter items.
### Testing the block locally
There are several levels of testing locally that you can do while developing your custom block:
1. Calling your script directly, passing it any required environment variables and arguments
2. Building the Docker image and running the container directly, passing it any required environment variables and arguments
3. Using the blocks runner tool in the Edge Impulse CLI to test the complete block
To use the blocks runner tool in the Edge Impulse CLI, run the `edge-impulse-blocks runner` command from within your custom block directory and follow the prompts to test your block locally. See [Block runner](/tools/clis/edge-impulse-cli/blocks#block-runner).
Refer to the documentation for your type of custom block for additional details about testing locally.
### Pushing the block to Edge Impulse
**Custom learning blocks can be pushed to a developer profile**
Unlike all other types of custom blocks, a custom learning block can be pushed to a developer profile (non-Enterprise plan account).
After initializing and testing your custom block, you can push it to Edge Impulse to make it available for use by everyone in your organization.
From within your custom block directory, run the `edge-impulse-blocks push` command and follow the prompts to push your block to Edge Impulse.
Once pushed successfully, your block will appear in your organization or, if it is a custom learning block and you are not on the Enterprise plan, in your developer profile. See [Editing a custom block in Studio](/studio/organizations/custom-blocks#editing-a-custom-block-in-studio) for images showing each block type after being pushed to Edge Impulse.
### Resetting the block configuration
If at some point you need to change configuration settings for your block that aren't being shown when you run the `edge-impulse-blocks` commands, say to download data from a different project with the `runner`, you can execute any of the respective commands with the `--clean` flag.
### Importing existing Docker images
If you have previously created a Docker image for a custom block and are hosting it on Docker Hub, you can create a custom block that uses this image.
To do so, go to your organization and select the item in the left sidebar menu for the type of custom block you would like to create. On that custom block page, select the `+ Add new block` button (or select an existing block to edit). In the modal that pops up, configure your block as desired and in the **Docker container** field enter the details for your image in the `username/image:tag` format.
## Editing a custom block in Studio
After successfully pushing your custom block to Edge Impulse you can edit it from within Studio.
Click on **AI labeling** under Custom blocks. You should find your custom AI labeling block listed here. To view the configuration settings for your block and edit them, you can click on the three dots and select **Edit AI labeling block**.
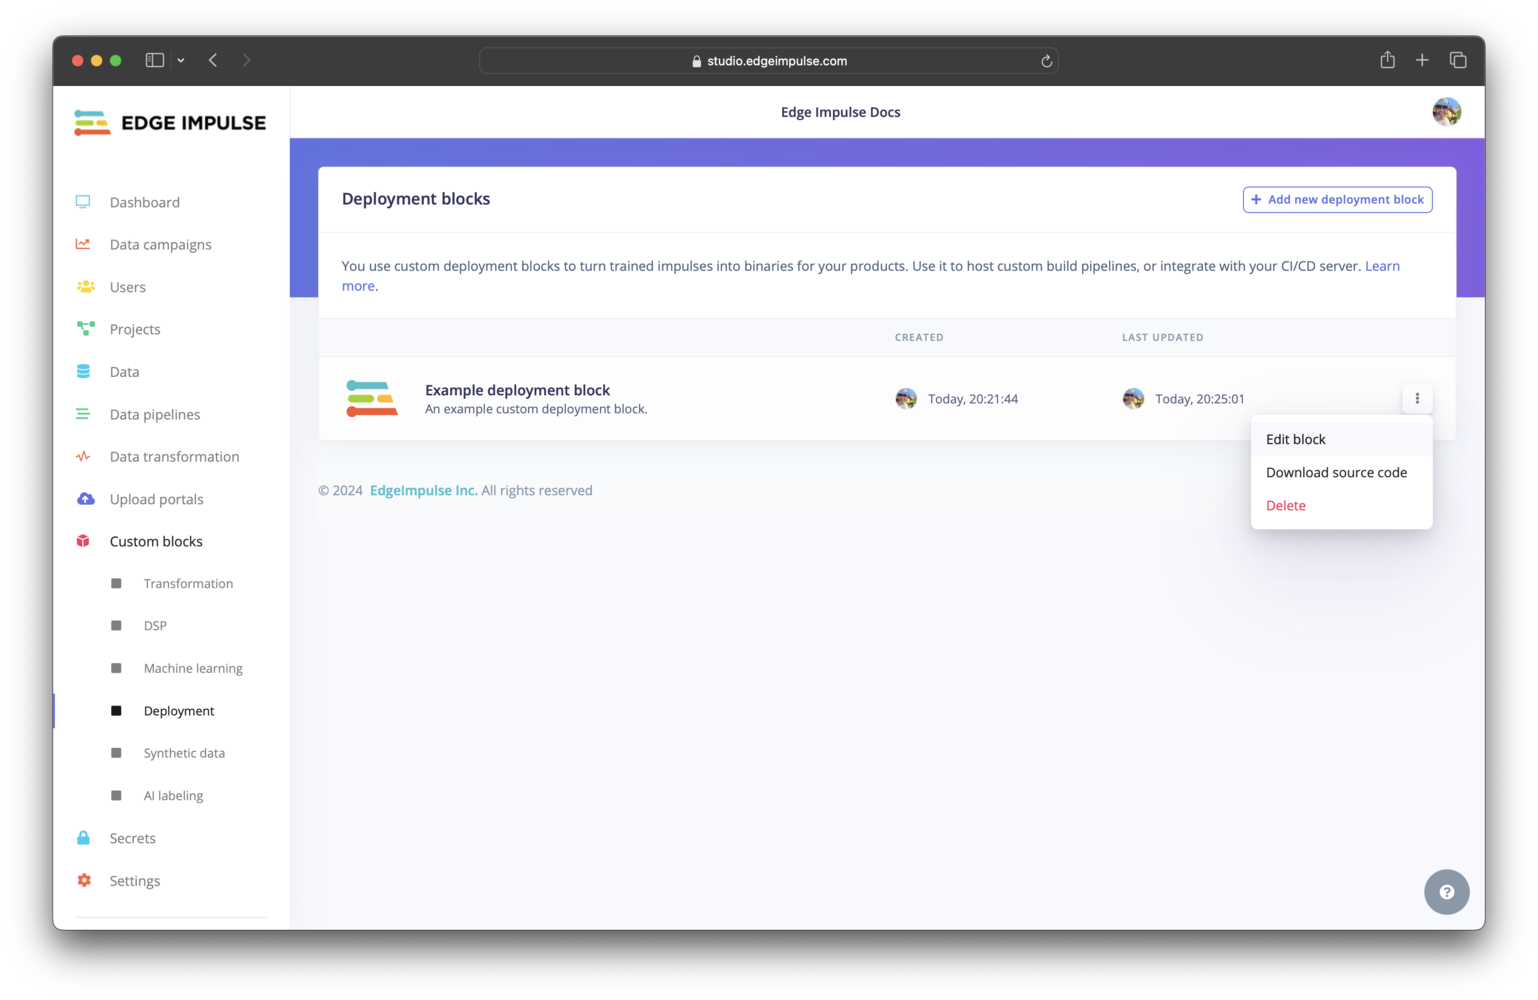
 Click on **Deployment** under Custom blocks. You should find your custom deployment block listed here. To view the configuration settings for your block and edit them, you can click on the three dots and select **Edit block**.
 **Organization (Enterprise plan)**
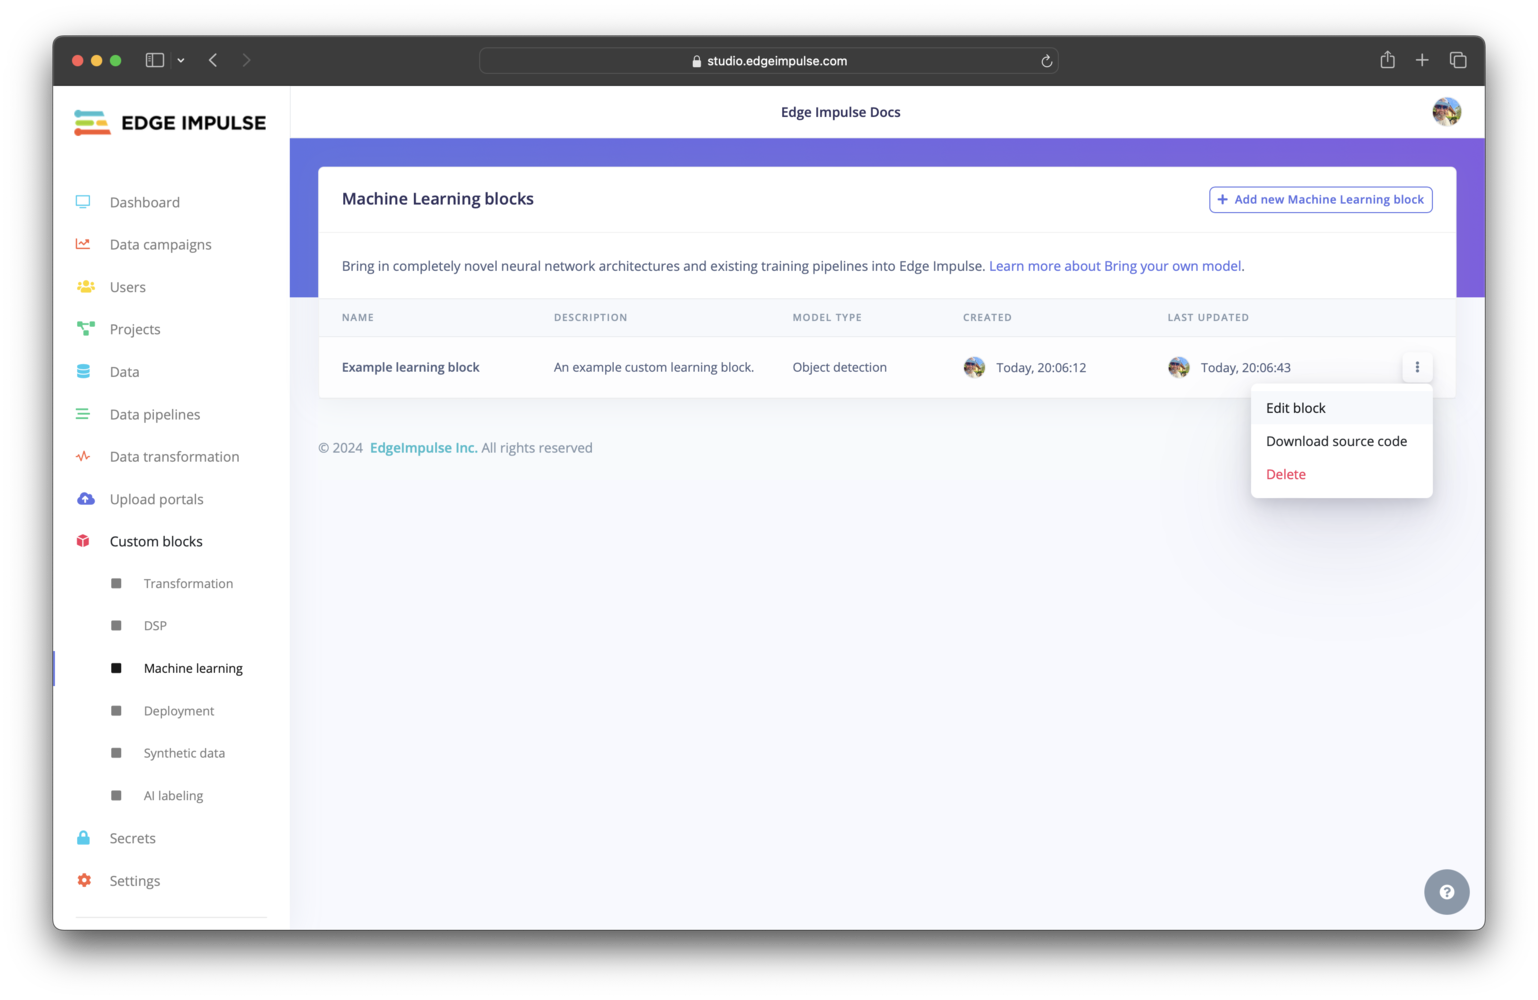
Click on **Machine learning** under Custom blocks. You should find your custom learning block listed here. To view the configuration settings for your block and edit them, you can click on the three dots and select **Edit block**.
**Organization (Enterprise plan)**
Click on **Machine learning** under Custom blocks. You should find your custom learning block listed here. To view the configuration settings for your block and edit them, you can click on the three dots and select **Edit block**.
 **Developer profile (all other plans)**
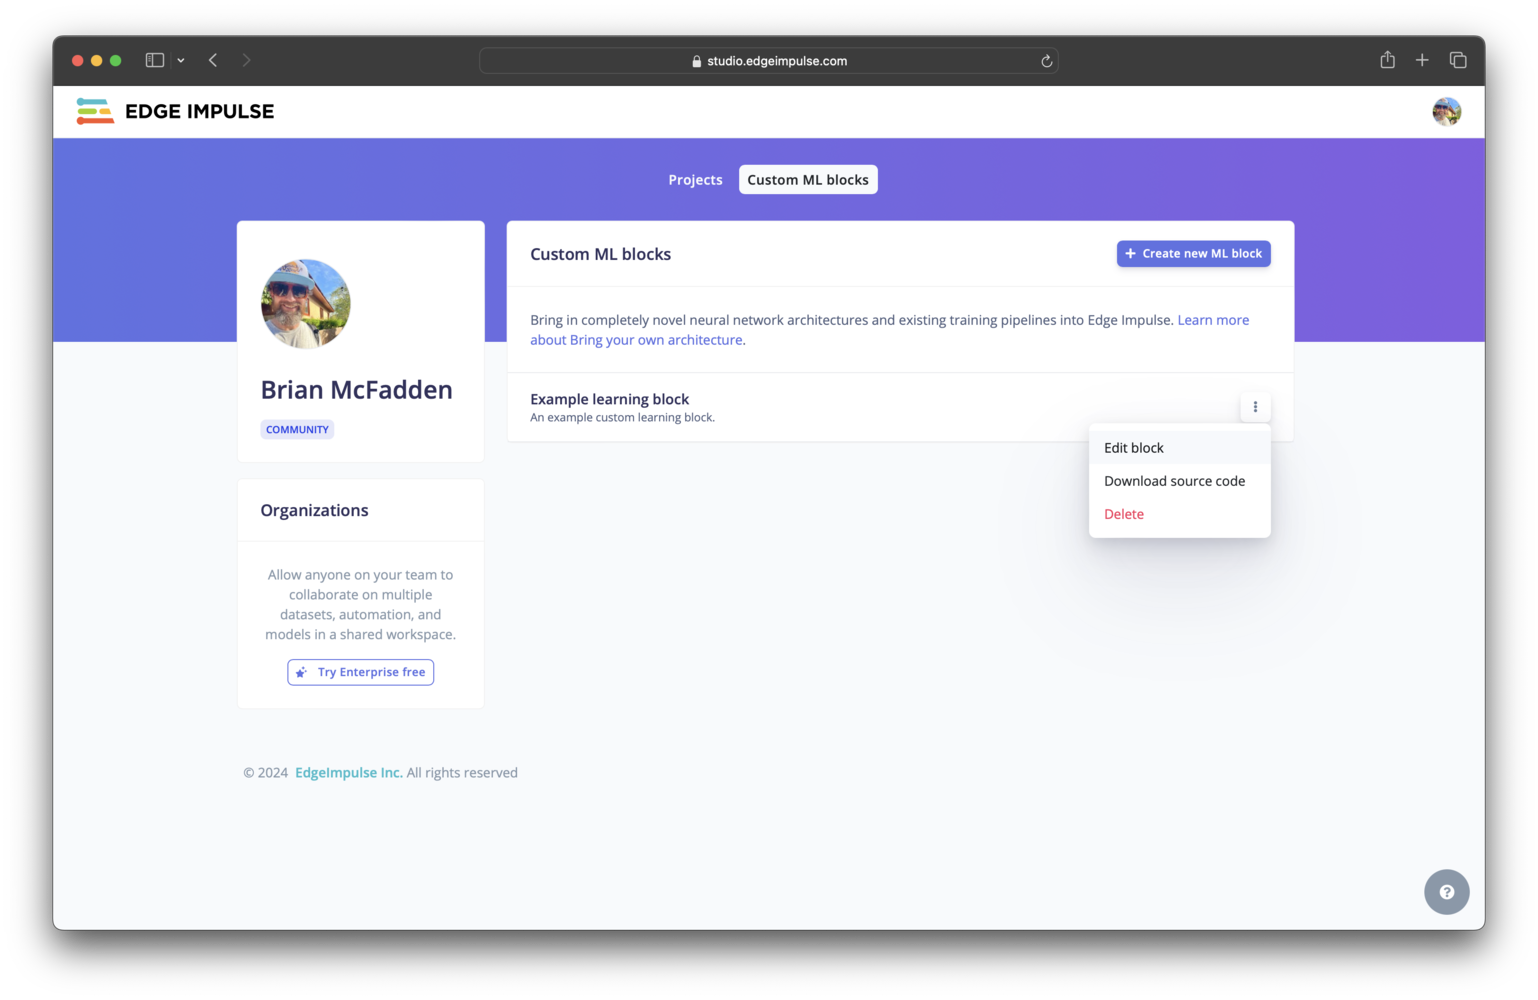
Click on your photo in the top right corner of your developer profile, select **Custom ML blocks**. To view the configuration settings for your block and edit them, you can click on the three dots and select **Edit block**.
**Developer profile (all other plans)**
Click on your photo in the top right corner of your developer profile, select **Custom ML blocks**. To view the configuration settings for your block and edit them, you can click on the three dots and select **Edit block**.
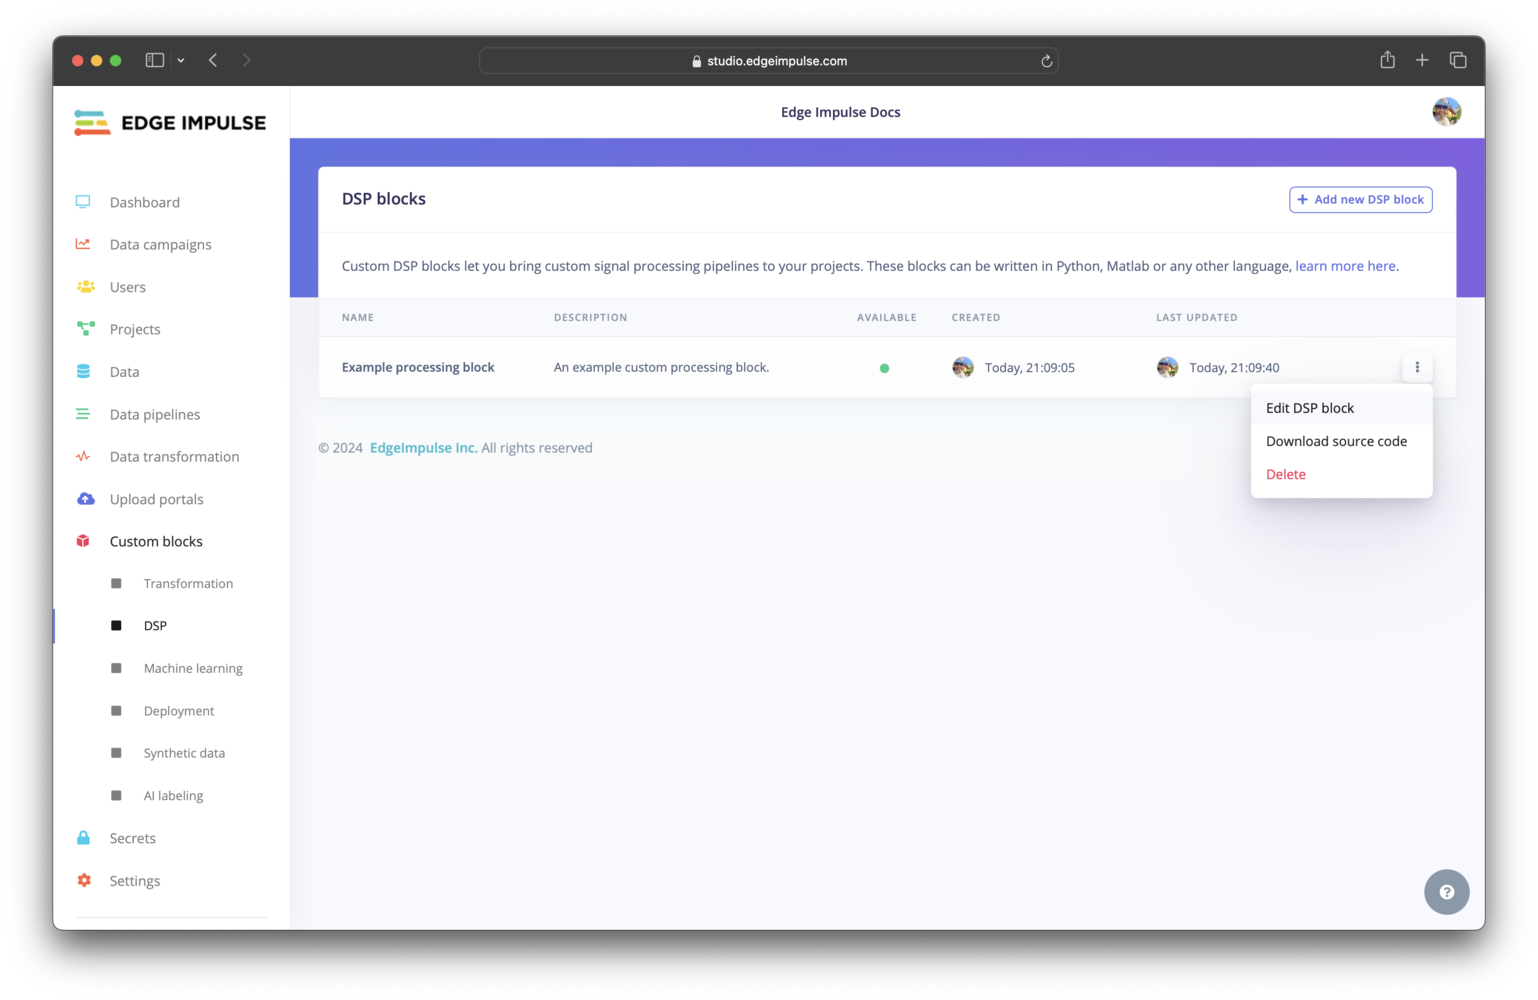
 Click on **DSP** under Custom blocks. You should find your custom processing block listed here. To view the configuration settings for your block and edit them, you can click on the three dots and select **Edit DSP block**.
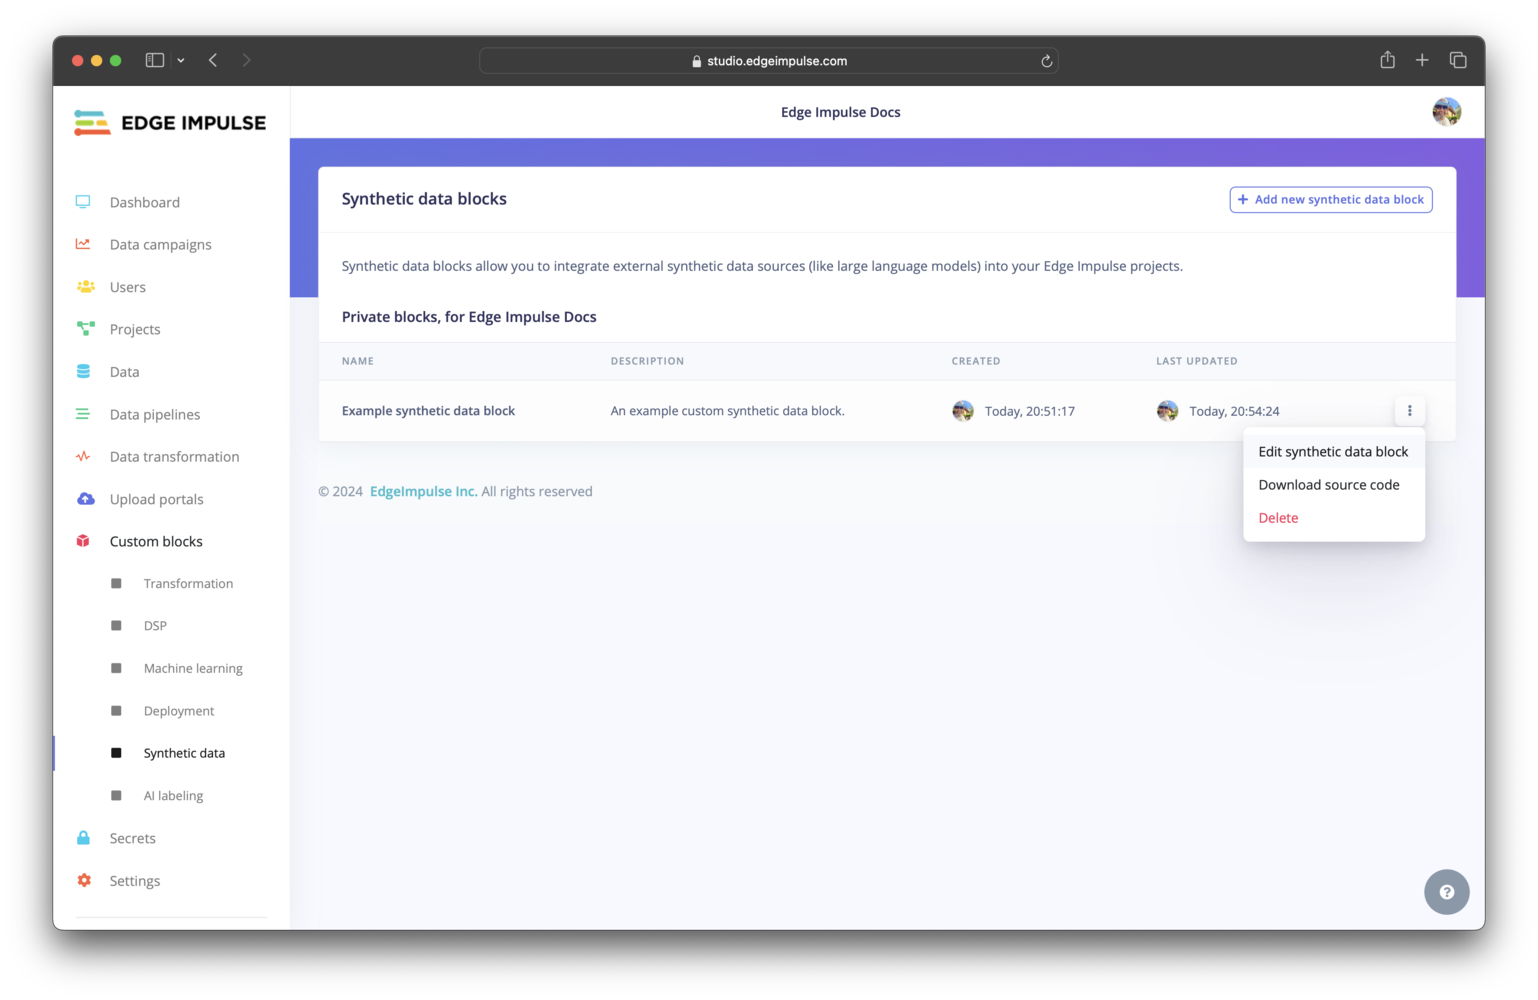
 Click on **Synthetic data** under Custom blocks. You should find your custom synthetic data block listed here. To view the configuration settings for your block and edit them, you can click on the three dots and select **Edit synthetic data block**.
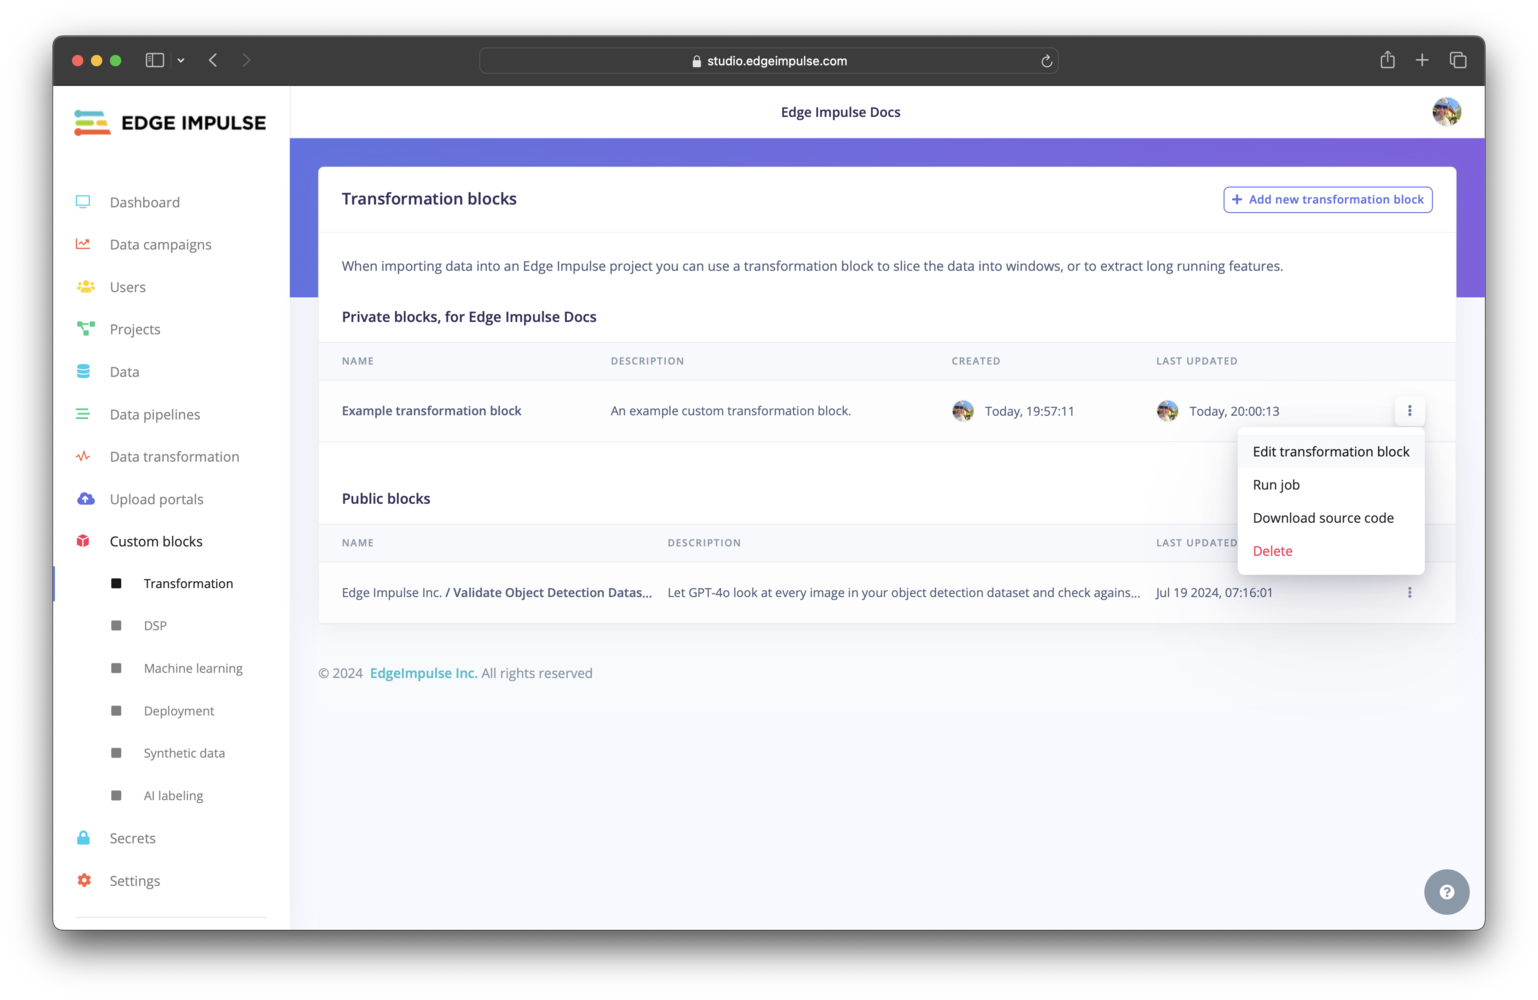
 Click on **Transformation** under Custom blocks. You should find your custom transformation block listed here. To view the configuration settings for your block and edit them, you can click on the three dots and select **Edit transformation block**.
 ### Setting compute requests and limits
Most blocks have the option to set the compute requests and limits (number of CPUs and memory) and some have the option to set the maximum running time duration. These items cannot, however, be configured from the `parameters.json` file; they must be configured when editing the block after it has been pushed to Edge Impulse.
## Additional resources
* [edge-impulse-blocks](/tools/clis/edge-impulse-cli/blocks)
* [parameters.json](/tools/specifications/files/parameters-json)
### Setting compute requests and limits
Most blocks have the option to set the compute requests and limits (number of CPUs and memory) and some have the option to set the maximum running time duration. These items cannot, however, be configured from the `parameters.json` file; they must be configured when editing the block after it has been pushed to Edge Impulse.
## Additional resources
* [edge-impulse-blocks](/tools/clis/edge-impulse-cli/blocks)
* [parameters.json](/tools/specifications/files/parameters-json)