> ## Documentation Index
> Fetch the complete documentation index at: https://docs.edgeimpulse.com/llms.txt
> Use this file to discover all available pages before exploring further.
# Forest Guard Decentralized Edge-AI LoRa Mesh Network for Forest Surveillance
Created By: [Mukesh Sankhla](https://www.linkedin.com/in/mukeshsankhla)
Public Project Link: [https://studio.edgeimpulse.com/public/779225/live](https://studio.edgeimpulse.com/public/779225/live)
GitHub Repo: [https://github.com/MukeshSankhla/Forest-Guard](https://github.com/MukeshSankhla/Forest-Guard)
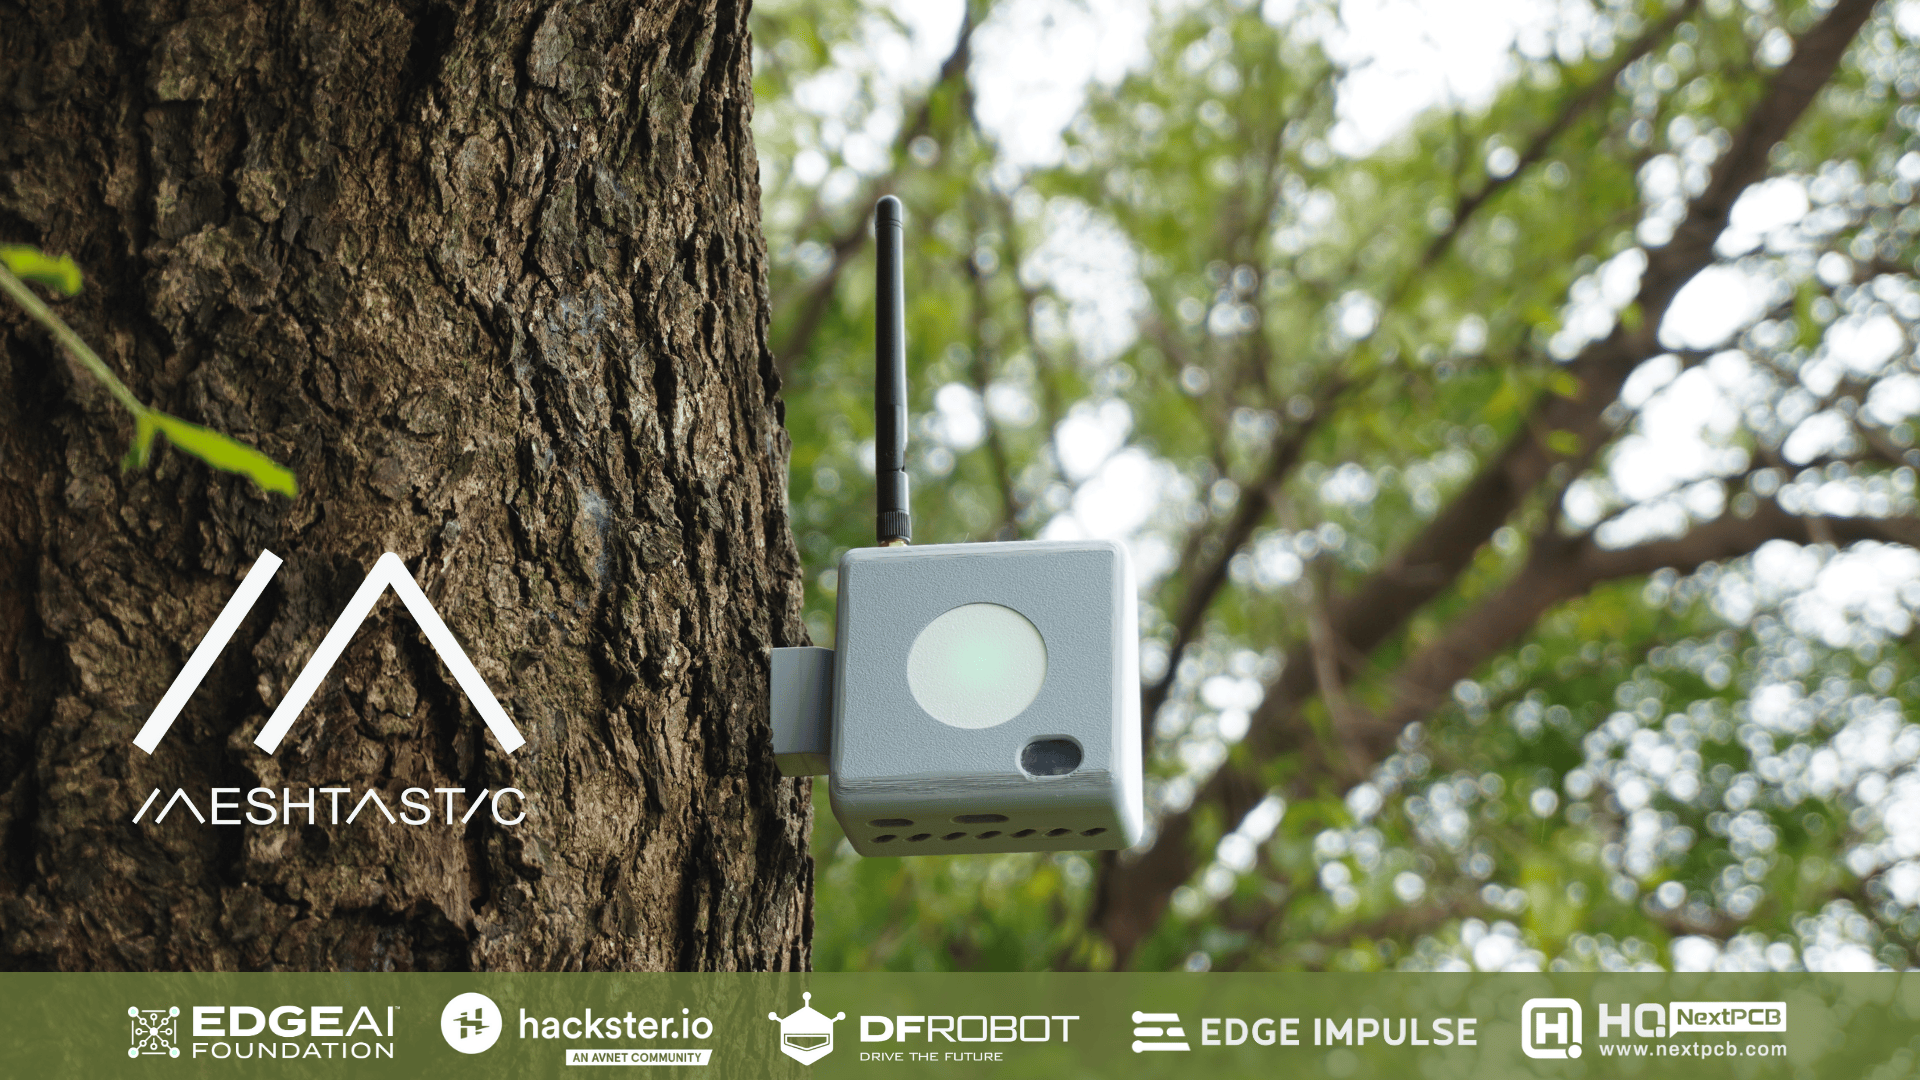 ## Intro
Forests are the lungs of our planet, yet they remain vulnerable to poaching, illegal logging, and devastating wildfires. Remote regions are often unmonitored because they lack infrastructure, no cellular coverage, no internet, and no reliable power. Traditional solutions depend on towers, GSM networks, or satellite links, all of which are either unreliable or prohibitively expensive in deep forest zones.
Forest Guard redefines forest monitoring with a self-sustaining, decentralized, and intelligent mesh network that brings security where no traditional network can.
**What Makes Forest Guard Different?**
Instead of relying on costly connectivity, our system builds a solar-powered sensor mesh using LoRa Meshtastic. Each node is intelligent at the edge, capable of running AI models locally to detect events like gunshots via an onboard microphone and Edge Impulse classification. Coupled with environmental sensors and a smoke detector, the system can issue real-time alerts about fire outbreaks or human intrusion.
When an anomaly is detected, the alert propagates through the LoRa mesh to a gateway node, which syncs with the cloud when internet is available. The data is visualized on a web-based dashboard, showing sensor activity, live alerts, and precise node locations on a map.
This means no single point of failure, no dependency on fragile infrastructure, and the ability to scale across vast landscapes with just low-power radios and the sun.
**Why It Matters**
1. Early Fire Detection - Prevent small sparks from becoming catastrophic forest fires.
2. Anti-Poaching & Logging Defense - Gunshot detection provides actionable intelligence for rangers.
3. Sustainable Design - Fully solar-powered nodes with custom PCBs for durability.
4. Decentralized & Resilient - Operates even without internet; data flows peer-to-peer until a gateway is reached.
5. Community & Conservation Impact - Helps safeguard biodiversity, human settlements, and natural heritage.
With the NextPCB, we will fabricate custom PCBs for the sensor nodes. These PCBs integrate:
1. ESP32-S3 & RP2040 LoRa modules
2. Solar & battery management
3. Environmental, smoke, and audio sensors
This ensures ruggedness, consistent quality, and rapid deployment of multiple nodes, transforming our prototype into a scalable, field-ready system.
## Intro
Forests are the lungs of our planet, yet they remain vulnerable to poaching, illegal logging, and devastating wildfires. Remote regions are often unmonitored because they lack infrastructure, no cellular coverage, no internet, and no reliable power. Traditional solutions depend on towers, GSM networks, or satellite links, all of which are either unreliable or prohibitively expensive in deep forest zones.
Forest Guard redefines forest monitoring with a self-sustaining, decentralized, and intelligent mesh network that brings security where no traditional network can.
**What Makes Forest Guard Different?**
Instead of relying on costly connectivity, our system builds a solar-powered sensor mesh using LoRa Meshtastic. Each node is intelligent at the edge, capable of running AI models locally to detect events like gunshots via an onboard microphone and Edge Impulse classification. Coupled with environmental sensors and a smoke detector, the system can issue real-time alerts about fire outbreaks or human intrusion.
When an anomaly is detected, the alert propagates through the LoRa mesh to a gateway node, which syncs with the cloud when internet is available. The data is visualized on a web-based dashboard, showing sensor activity, live alerts, and precise node locations on a map.
This means no single point of failure, no dependency on fragile infrastructure, and the ability to scale across vast landscapes with just low-power radios and the sun.
**Why It Matters**
1. Early Fire Detection - Prevent small sparks from becoming catastrophic forest fires.
2. Anti-Poaching & Logging Defense - Gunshot detection provides actionable intelligence for rangers.
3. Sustainable Design - Fully solar-powered nodes with custom PCBs for durability.
4. Decentralized & Resilient - Operates even without internet; data flows peer-to-peer until a gateway is reached.
5. Community & Conservation Impact - Helps safeguard biodiversity, human settlements, and natural heritage.
With the NextPCB, we will fabricate custom PCBs for the sensor nodes. These PCBs integrate:
1. ESP32-S3 & RP2040 LoRa modules
2. Solar & battery management
3. Environmental, smoke, and audio sensors
This ensures ruggedness, consistent quality, and rapid deployment of multiple nodes, transforming our prototype into a scalable, field-ready system.


 **The Big Picture**
Forest Guard isn’t just a hardware project; it’s a blueprint for protecting forests worldwide. By combining edge AI, mesh networking, and sustainable power, we deliver a system that communities, conservationists, and governments can deploy today to build a safer, greener tomorrow.
## Supplies
**Components For 1x Node Unit:**
**The Big Picture**
Forest Guard isn’t just a hardware project; it’s a blueprint for protecting forests worldwide. By combining edge AI, mesh networking, and sustainable power, we deliver a system that communities, conservationists, and governments can deploy today to build a safer, greener tomorrow.
## Supplies
**Components For 1x Node Unit:**
 1. 1x Custom Node PCB
2. 1x [Gravity: Multifunctional Environmental sensor](https://www.dfrobot.com/product-2528.html)
3. 1x [Gravity: GNSS Sensor](https://www.dfrobot.com/product-2651.html)
4. 1x [Fermion: I2S MEMS Microphone](https://www.dfrobot.com/product-2637.html)
5. 1x [Fermion: MEMS Smoke Detection Sensor](https://www.dfrobot.com/product-2698.html)
6. 1x [RP2040 LoRa with Type C adapter](https://www.waveshare.com/rp2040-lora.htm?sku=26542)
7. 1x [Li-Po Battery](https://techiesms.com/product/1500mah-3-7v-li-po-battery/)
8. 1x [70x70mm Solar Panel](https://techiesms.com/product/mini-epoxy-solar-panel-70x70-mm/)
9. 8x [M3x10mm Screws](https://www.dfrobot.com/product-841.html)
1. 1x Custom Node PCB
2. 1x [Gravity: Multifunctional Environmental sensor](https://www.dfrobot.com/product-2528.html)
3. 1x [Gravity: GNSS Sensor](https://www.dfrobot.com/product-2651.html)
4. 1x [Fermion: I2S MEMS Microphone](https://www.dfrobot.com/product-2637.html)
5. 1x [Fermion: MEMS Smoke Detection Sensor](https://www.dfrobot.com/product-2698.html)
6. 1x [RP2040 LoRa with Type C adapter](https://www.waveshare.com/rp2040-lora.htm?sku=26542)
7. 1x [Li-Po Battery](https://techiesms.com/product/1500mah-3-7v-li-po-battery/)
8. 1x [70x70mm Solar Panel](https://techiesms.com/product/mini-epoxy-solar-panel-70x70-mm/)
9. 8x [M3x10mm Screws](https://www.dfrobot.com/product-841.html)


 **Components For 1x Gateway Unit:**
 1. 1x [Arduino Uno R4 WiFi](https://www.dfrobot.com/product-2700.html)
2. 1x [Fermion: 3.5” 480x320 TFT LCD Display](https://www.dfrobot.com/product-2107.html)
3. 1x [RP2040 LoRa](https://www.waveshare.com/rp2040-lora.htm?sku=26591)
4. 1x [Li-Po Battery](https://techiesms.com/product/1500mah-3-7v-li-po-battery/)
5. 1x [Micro Push Switch](https://www.amazon.com/mxuteuk-Self-Lock-Flashlight-Latching-BK-1208/dp/B086L1WKS3/ref=sr_1_15?crid=36ZOJ9SAIUDS0\&dib=eyJ2IjoiMSJ9.zm2b2eGNCSReGFJuUskv691lpV2tKav6uBLD27VVQZMyCwOMFkUlSbVOTXYy8ZJ7sTGnHgZrt-GpoDlQVplkeHCifur1phAdvndooU-V66zX0g_hdhhLXgztJ8bIVIyqPl8ik91KUjabhdjp9jxUN-TDC53s5StBHNUGw6unWKcd0S0PpCw9AoKzz_joMJNHuyrrl6J_D10sxRjwTmIt6aWTpA_OO-uo6OCelqsNgpw.n93ojHC0ZUD9pckHoKxtWmC_pw6ioAxpVLO76BloI1Q\&dib_tag=se\&keywords=mini%2Bswitch\&qid=1757991302\&sprefix=mini%2Bswitc%2Caps%2C464\&sr=8-15\&th=1)
6. 4x [M2x5mm Screws](https://www.amazon.com/4mm-6mm-10mm-12mm-16mm/dp/B0B93G1H9L/ref=sr_1_1_sspa?crid=2GR42NYXUIMID\&dib=eyJ2IjoiMSJ9.Xe3zLQ7GMbVX4e9UdWnn10jmwVZbrhtrPgqKBL6jyA9giwWnMO_syicAVx0SqjwmyQ3S8ZBgPyBJd7m30o0efQgCu5xpCBUaLdX6_Yr3DZ7eUbAJUxp3BYhjcgL-8RxRY0Uk7VQafZPhQh9Sg9Nxg1LvrvByA1wrTKX4yInN41Ve31AoRWz2lgZMABQR8o6QY-KltVrHKGda8fx43bDSc9X-By4T010KSPjlOLZuI84.2DMZxvKbVecFjM3DbGS6Nj-fDLEpk5pngZRohIU-xzk\&dib_tag=se\&keywords=M2%2Bscrews\&qid=1757991555\&sprefix=m2%2Bscre%2Caps%2C533\&sr=8-1-spons\&sp_csd=d2lkZ2V0TmFtZT1zcF9hdGY\&th=1)
7. 1x 3V Buzzer
1. 1x [Arduino Uno R4 WiFi](https://www.dfrobot.com/product-2700.html)
2. 1x [Fermion: 3.5” 480x320 TFT LCD Display](https://www.dfrobot.com/product-2107.html)
3. 1x [RP2040 LoRa](https://www.waveshare.com/rp2040-lora.htm?sku=26591)
4. 1x [Li-Po Battery](https://techiesms.com/product/1500mah-3-7v-li-po-battery/)
5. 1x [Micro Push Switch](https://www.amazon.com/mxuteuk-Self-Lock-Flashlight-Latching-BK-1208/dp/B086L1WKS3/ref=sr_1_15?crid=36ZOJ9SAIUDS0\&dib=eyJ2IjoiMSJ9.zm2b2eGNCSReGFJuUskv691lpV2tKav6uBLD27VVQZMyCwOMFkUlSbVOTXYy8ZJ7sTGnHgZrt-GpoDlQVplkeHCifur1phAdvndooU-V66zX0g_hdhhLXgztJ8bIVIyqPl8ik91KUjabhdjp9jxUN-TDC53s5StBHNUGw6unWKcd0S0PpCw9AoKzz_joMJNHuyrrl6J_D10sxRjwTmIt6aWTpA_OO-uo6OCelqsNgpw.n93ojHC0ZUD9pckHoKxtWmC_pw6ioAxpVLO76BloI1Q\&dib_tag=se\&keywords=mini%2Bswitch\&qid=1757991302\&sprefix=mini%2Bswitc%2Caps%2C464\&sr=8-15\&th=1)
6. 4x [M2x5mm Screws](https://www.amazon.com/4mm-6mm-10mm-12mm-16mm/dp/B0B93G1H9L/ref=sr_1_1_sspa?crid=2GR42NYXUIMID\&dib=eyJ2IjoiMSJ9.Xe3zLQ7GMbVX4e9UdWnn10jmwVZbrhtrPgqKBL6jyA9giwWnMO_syicAVx0SqjwmyQ3S8ZBgPyBJd7m30o0efQgCu5xpCBUaLdX6_Yr3DZ7eUbAJUxp3BYhjcgL-8RxRY0Uk7VQafZPhQh9Sg9Nxg1LvrvByA1wrTKX4yInN41Ve31AoRWz2lgZMABQR8o6QY-KltVrHKGda8fx43bDSc9X-By4T010KSPjlOLZuI84.2DMZxvKbVecFjM3DbGS6Nj-fDLEpk5pngZRohIU-xzk\&dib_tag=se\&keywords=M2%2Bscrews\&qid=1757991555\&sprefix=m2%2Bscre%2Caps%2C533\&sr=8-1-spons\&sp_csd=d2lkZ2V0TmFtZT1zcF9hdGY\&th=1)
7. 1x 3V Buzzer


 **Tools**
1. 3D Printer (for enclosures and mounting parts)
2. Soldering Kit (iron, solder wire, flux, wick)
3. Screwdriver Kit (for M2/M3 hardware)
## Step 1: PCB Design
**Tools**
1. 3D Printer (for enclosures and mounting parts)
2. Soldering Kit (iron, solder wire, flux, wick)
3. Screwdriver Kit (for M2/M3 hardware)
## Step 1: PCB Design
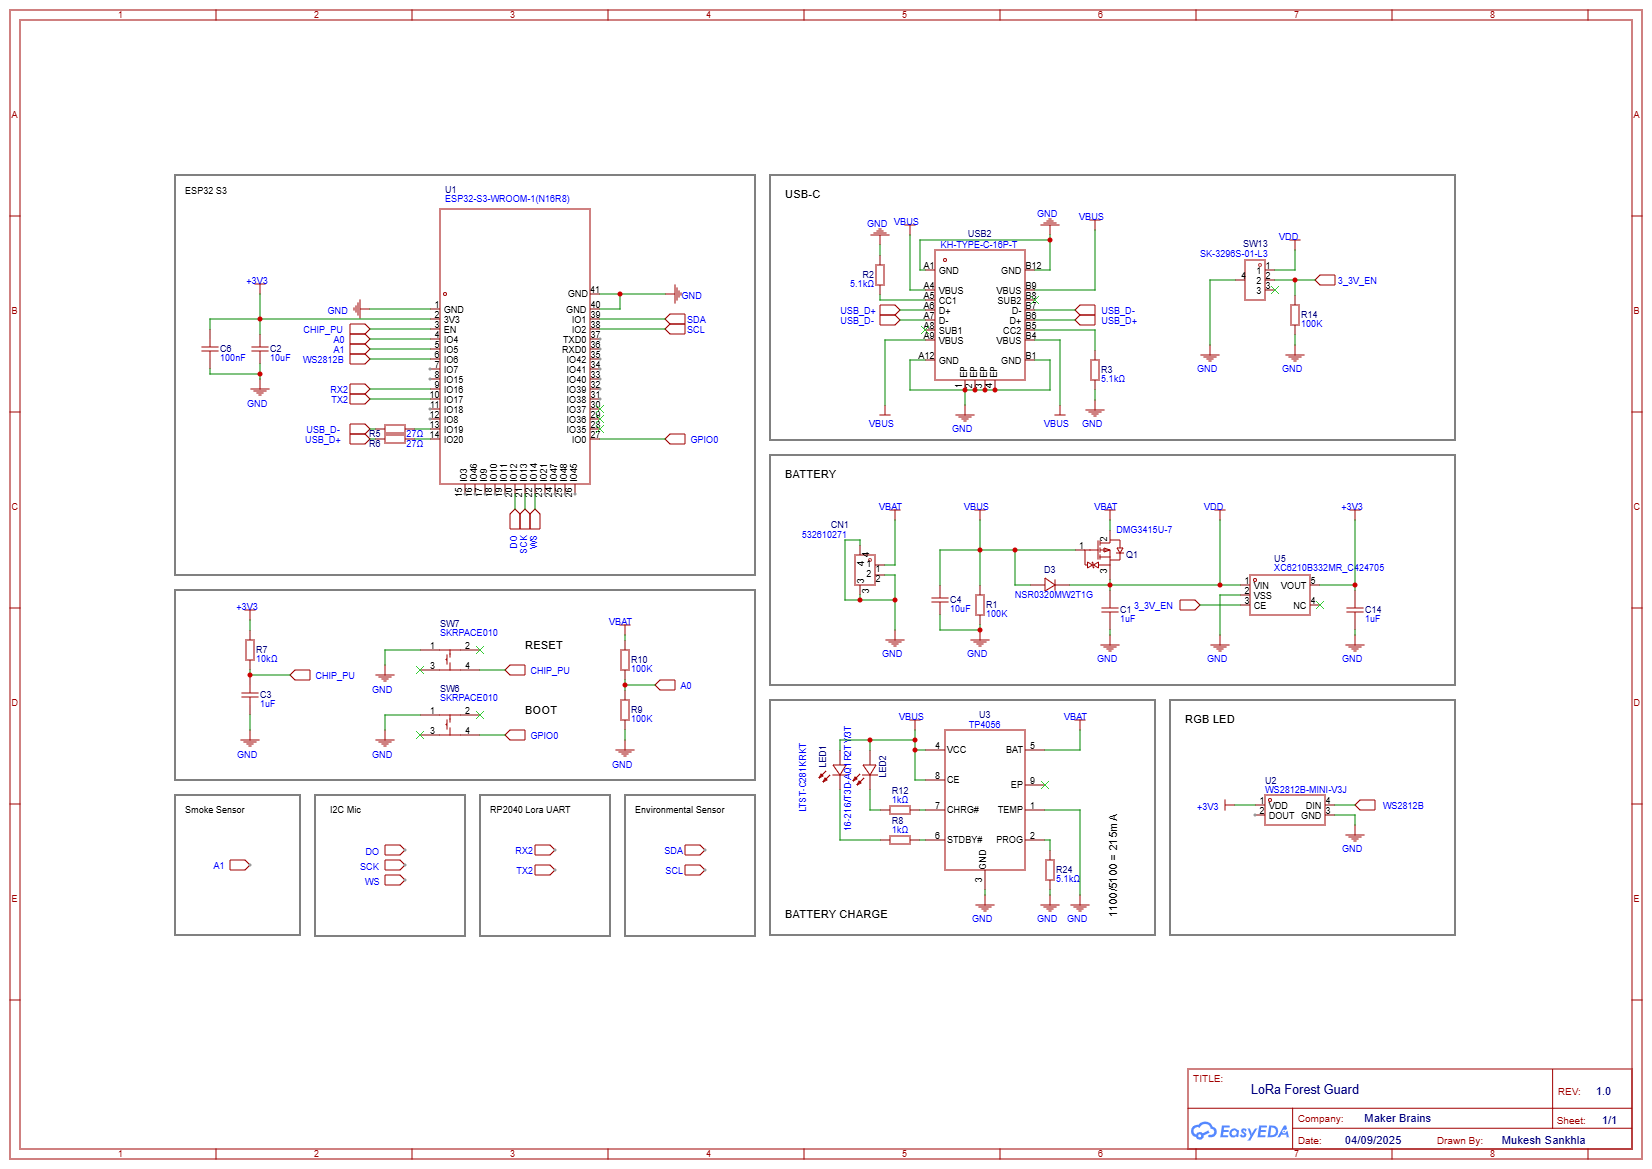
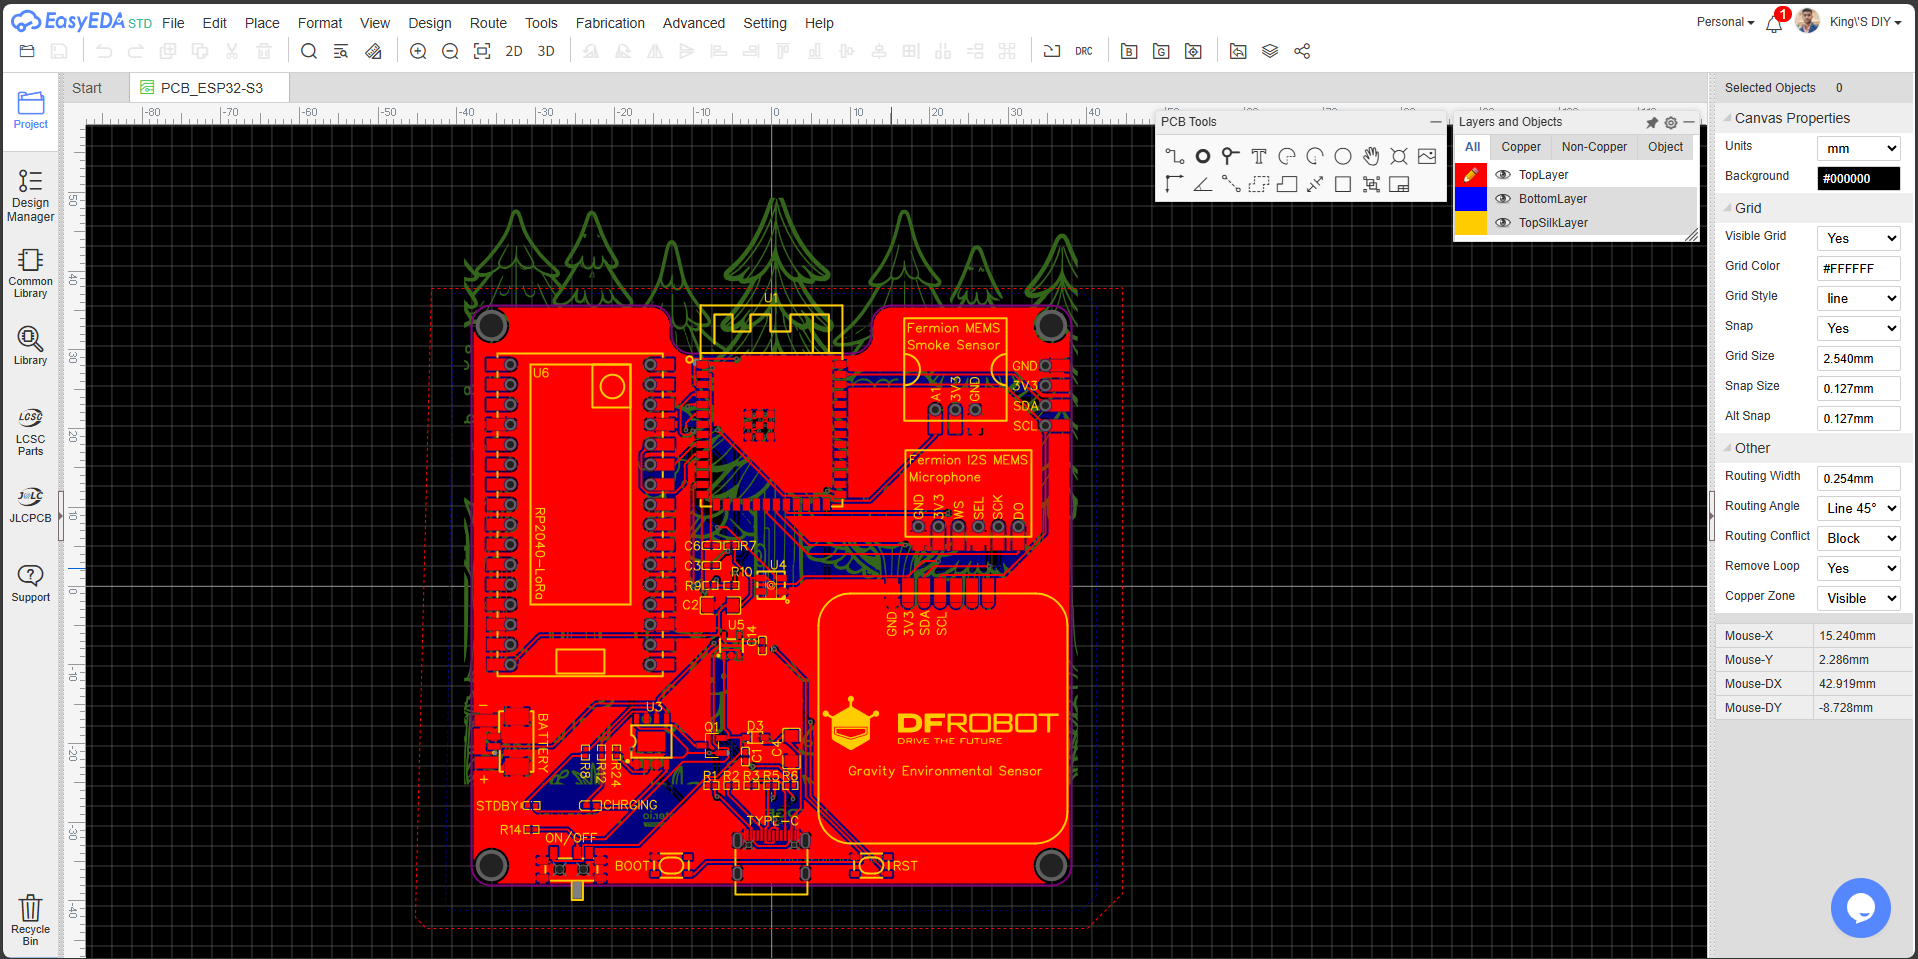
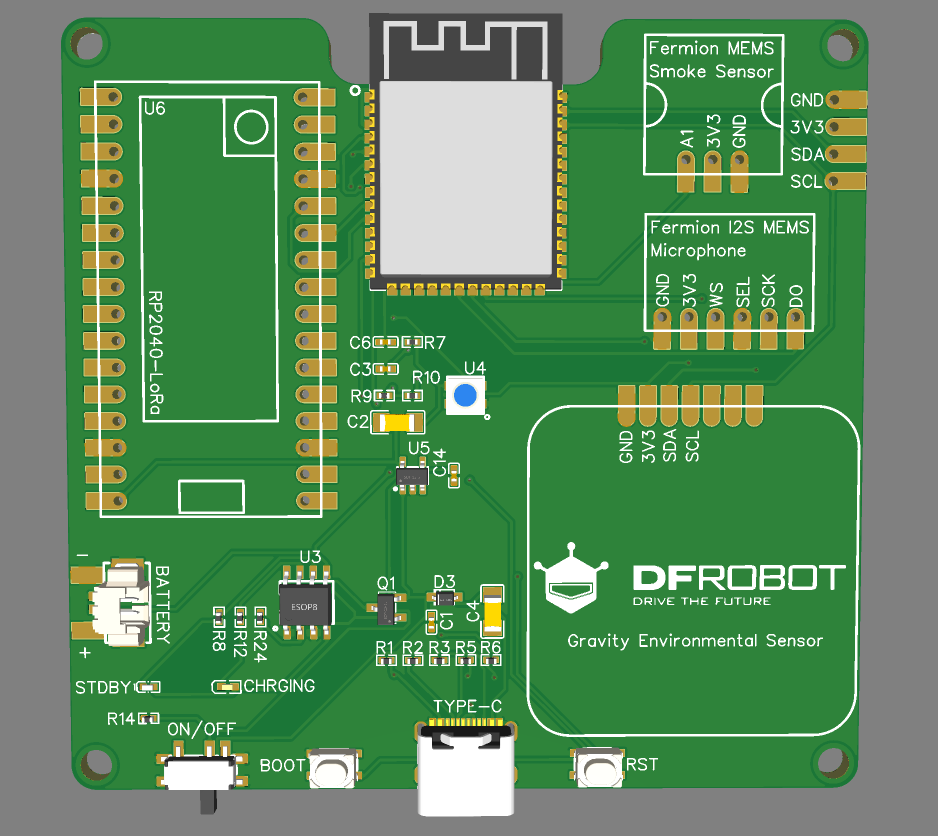
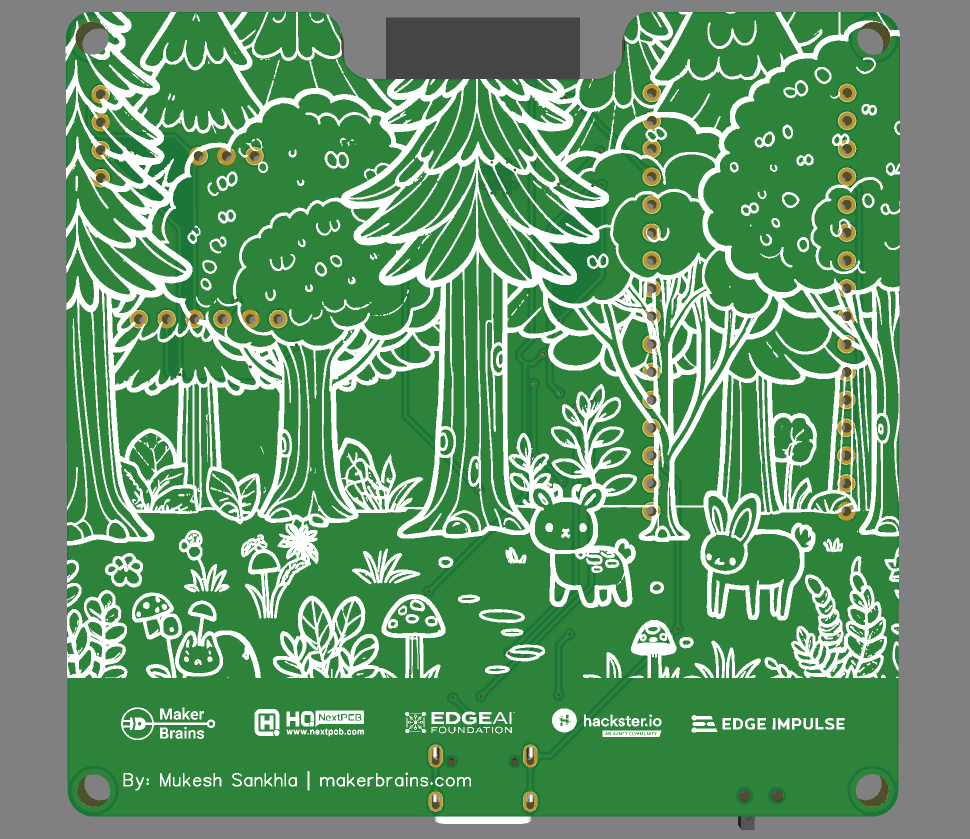
 Designing the **Forest Guard PCB** was the very first milestone in this project.
I am not a professional PCB designer, but with hands-on experience in electronics and by studying references from existing **ESP32-S3 development boards**, I created a **custom PCB** in **EasyEDA** that integrates:
1. ESP32-S3 as the main controller
2. Battery management and charging circuit
3. Type-C USB for programming/power
4. Headers for plugging in LoRa module and sensors
The PCB design files (Gerber + BOM) are available on my GitHub repository:
👉 [Forest-Guard GitHub Repository](https://github.com/MukeshSankhla/Forest-Guard)
To bring this design to life, I got **5× PCBs fabricated** and **2× fully assembled boards** (with SMD assembly for ESP32-S3, battery & power management, Type-C, etc.) manufactured by **NextPCB**. The sensors and LoRa modules are later mounted as through-hole or header components.
This combination gave me the flexibility to test multiple prototypes, while the assembled PCBs saved me time and ensured **professional quality soldering of fine-pitch SMD parts**.
Designing the **Forest Guard PCB** was the very first milestone in this project.
I am not a professional PCB designer, but with hands-on experience in electronics and by studying references from existing **ESP32-S3 development boards**, I created a **custom PCB** in **EasyEDA** that integrates:
1. ESP32-S3 as the main controller
2. Battery management and charging circuit
3. Type-C USB for programming/power
4. Headers for plugging in LoRa module and sensors
The PCB design files (Gerber + BOM) are available on my GitHub repository:
👉 [Forest-Guard GitHub Repository](https://github.com/MukeshSankhla/Forest-Guard)
To bring this design to life, I got **5× PCBs fabricated** and **2× fully assembled boards** (with SMD assembly for ESP32-S3, battery & power management, Type-C, etc.) manufactured by **NextPCB**. The sensors and LoRa modules are later mounted as through-hole or header components.
This combination gave me the flexibility to test multiple prototypes, while the assembled PCBs saved me time and ensured **professional quality soldering of fine-pitch SMD parts**.


 ## Step 2: Meshtastic Setup on RP2040 LoRa
We’ll flash the Meshtastic firmware onto the RP2040 LoRa modules and configure them for **UART communication**.
⚠️ **Important Safety Note**:
Always connect the **antenna before powering on** the LoRa module to prevent damage.
## Step 2: Meshtastic Setup on RP2040 LoRa
We’ll flash the Meshtastic firmware onto the RP2040 LoRa modules and configure them for **UART communication**.
⚠️ **Important Safety Note**:
Always connect the **antenna before powering on** the LoRa module to prevent damage.


 **1. Flashing Meshtastic Firmware**
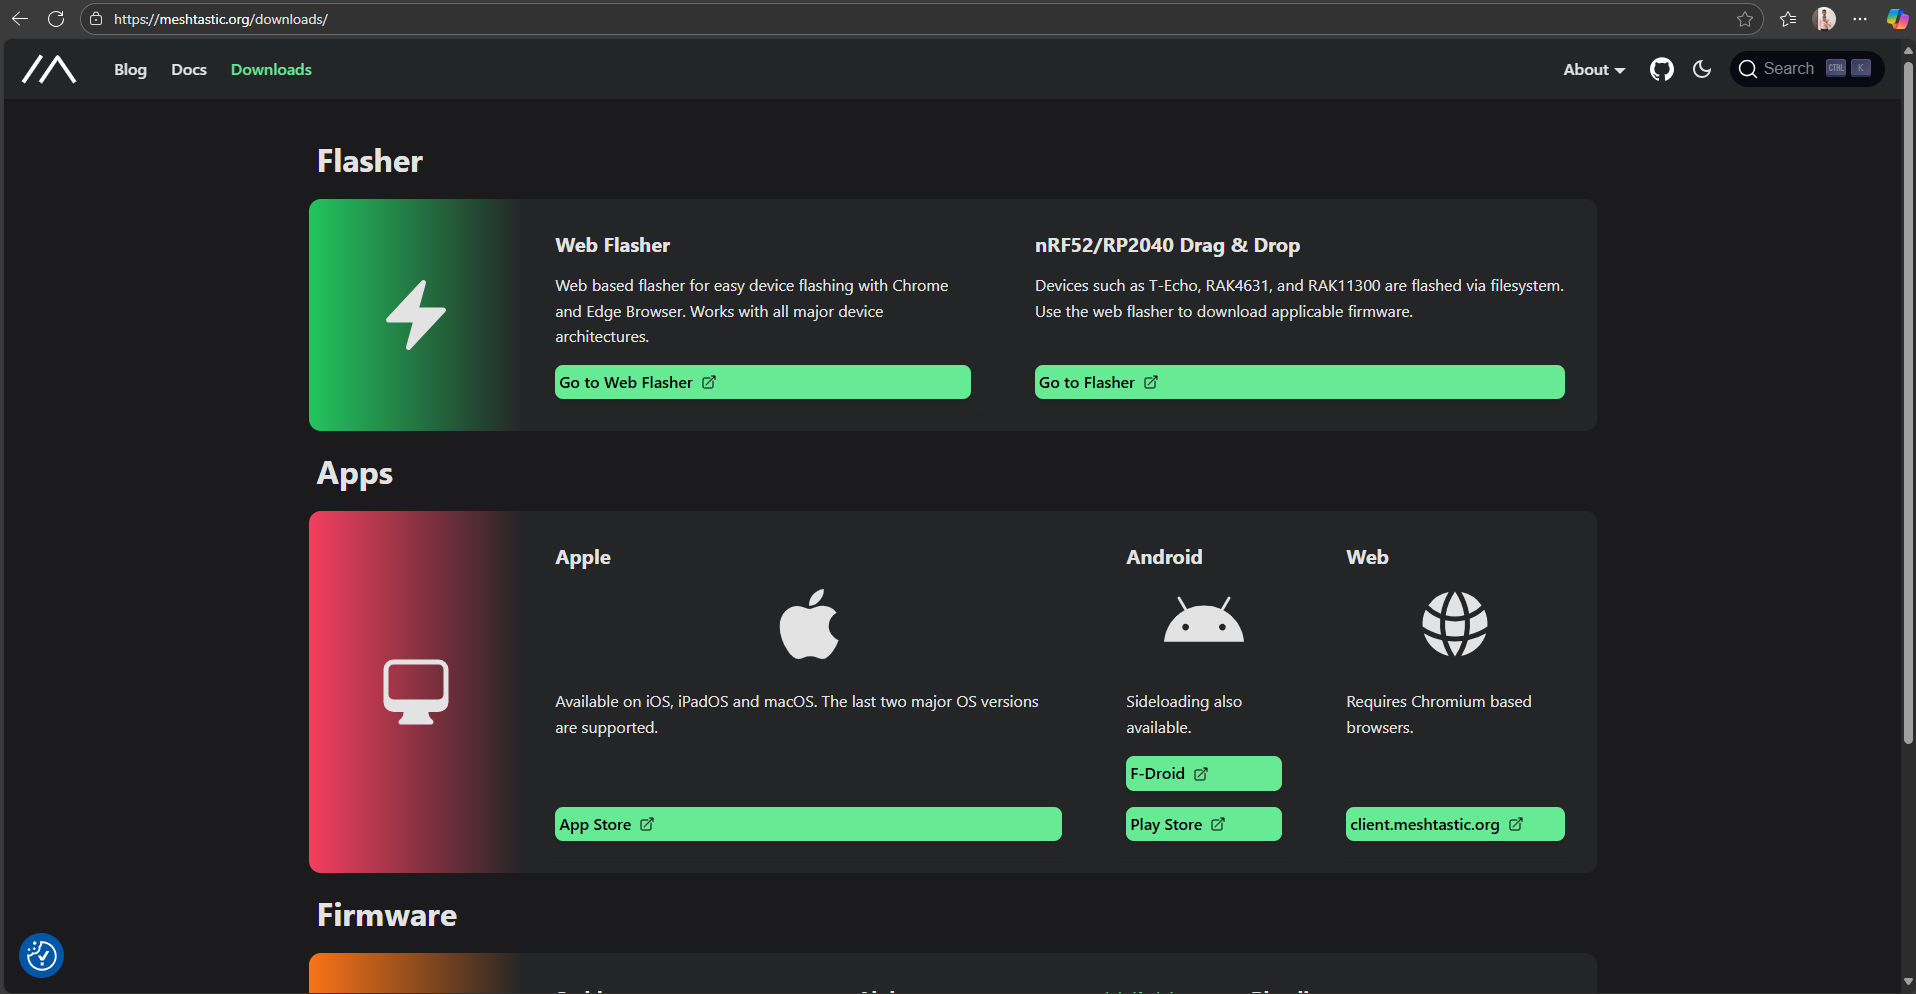
1. Go to [Meshtastic Downloads](https://meshtastic.org/downloads/).
2. Click **Go to Flasher**.
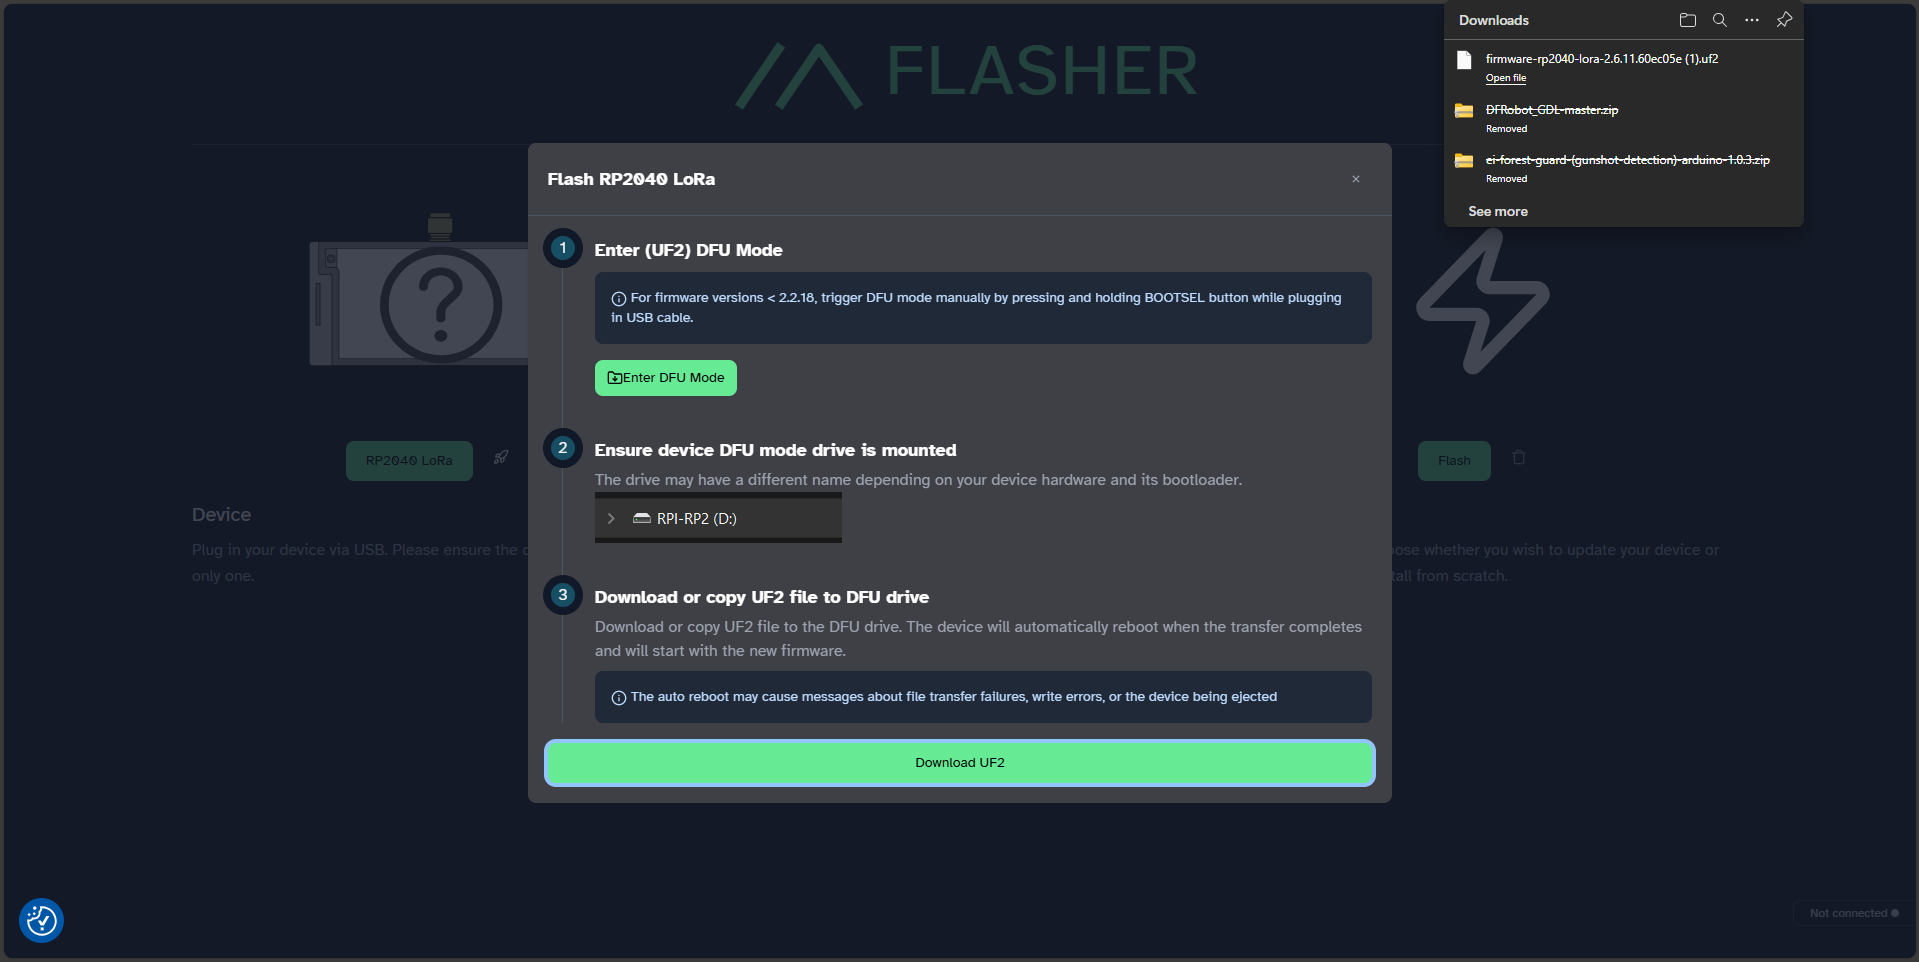
3. Select **Target Device: RP2040 LoRa**.
4. Choose a version → click **Flash** → then **Continue**.
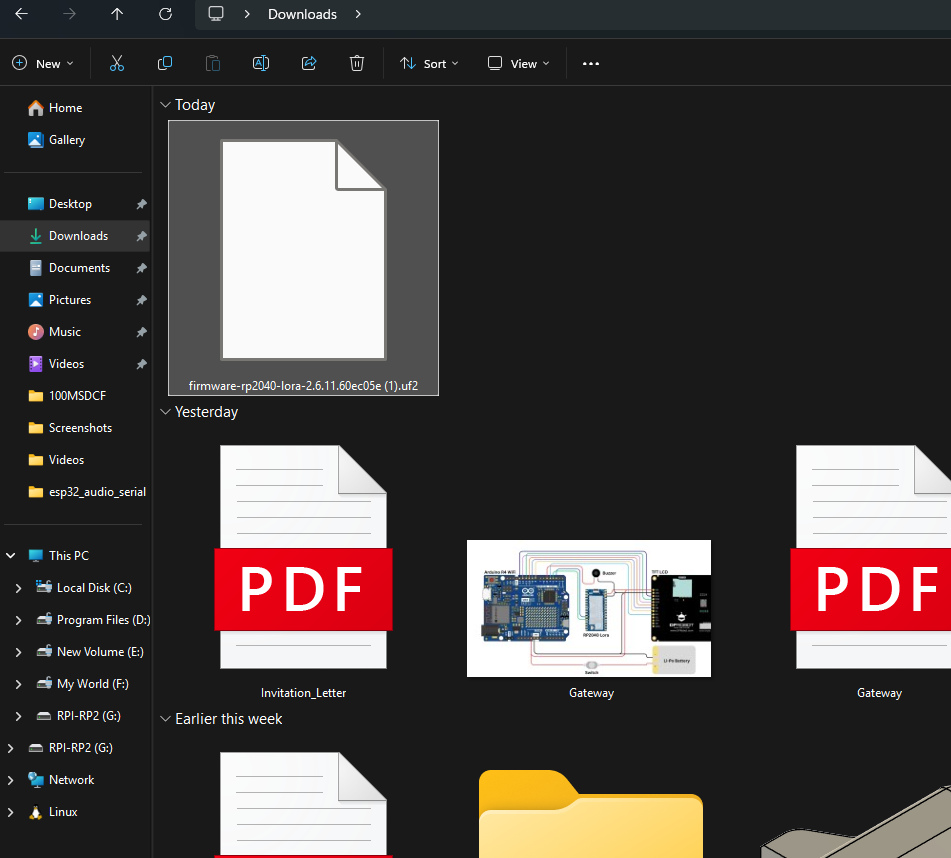
5. Download the **.UF2 firmware file**.
**1. Flashing Meshtastic Firmware**
1. Go to [Meshtastic Downloads](https://meshtastic.org/downloads/).
2. Click **Go to Flasher**.
3. Select **Target Device: RP2040 LoRa**.
4. Choose a version → click **Flash** → then **Continue**.
5. Download the **.UF2 firmware file**.
 **2. Upload Firmware to RP2040**
1. Press and hold the **BOOT** button on the module.
2. While holding BOOT, connect the **USB Type-C** cable to your PC.
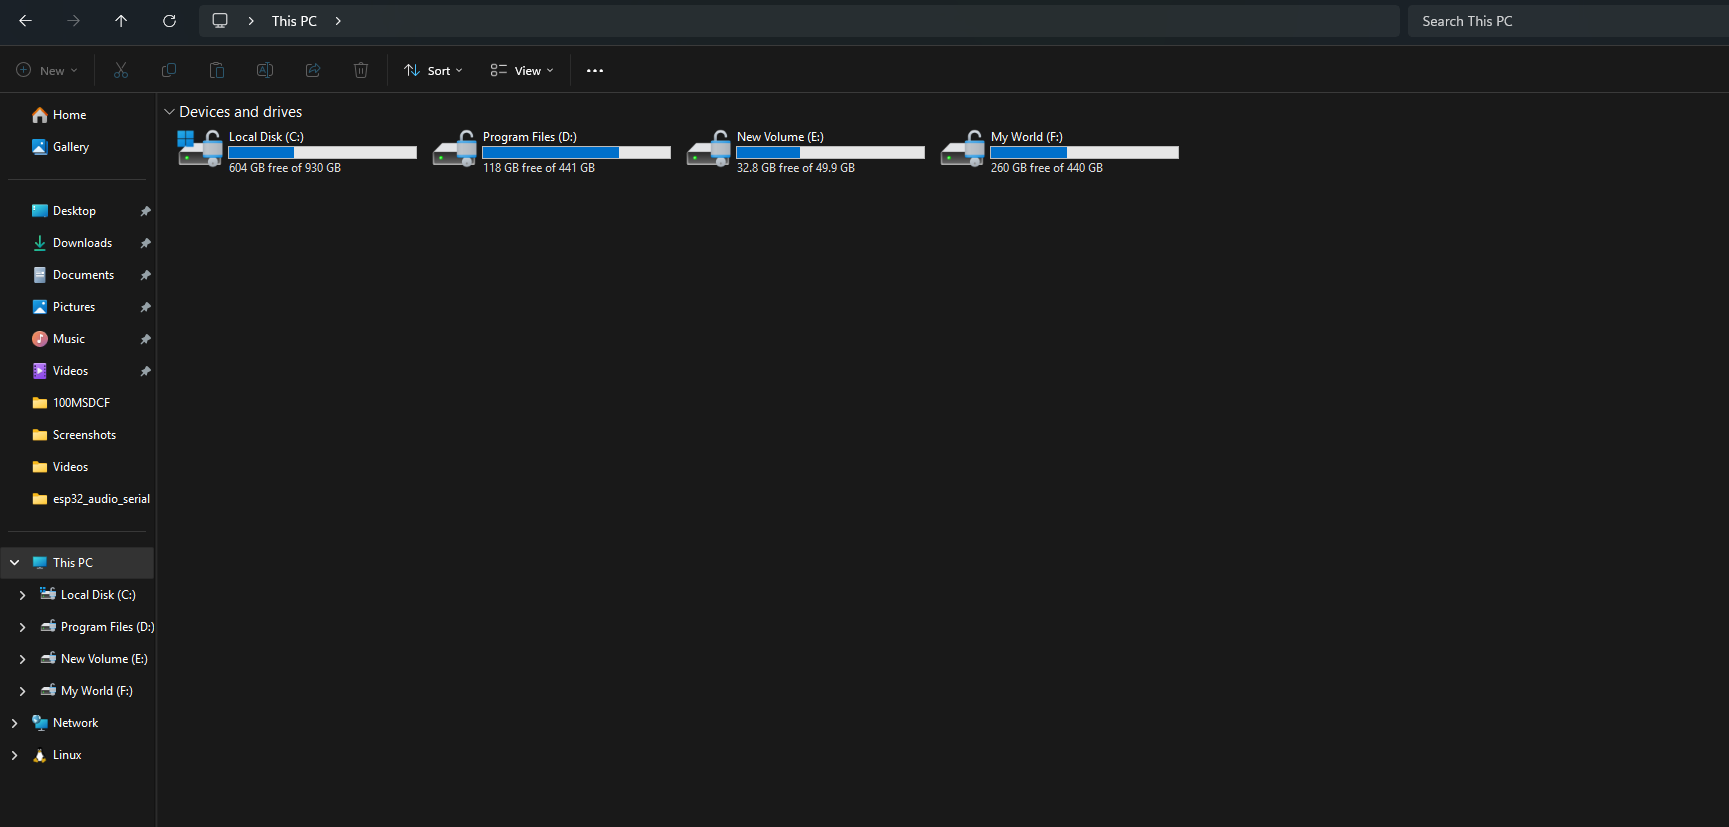
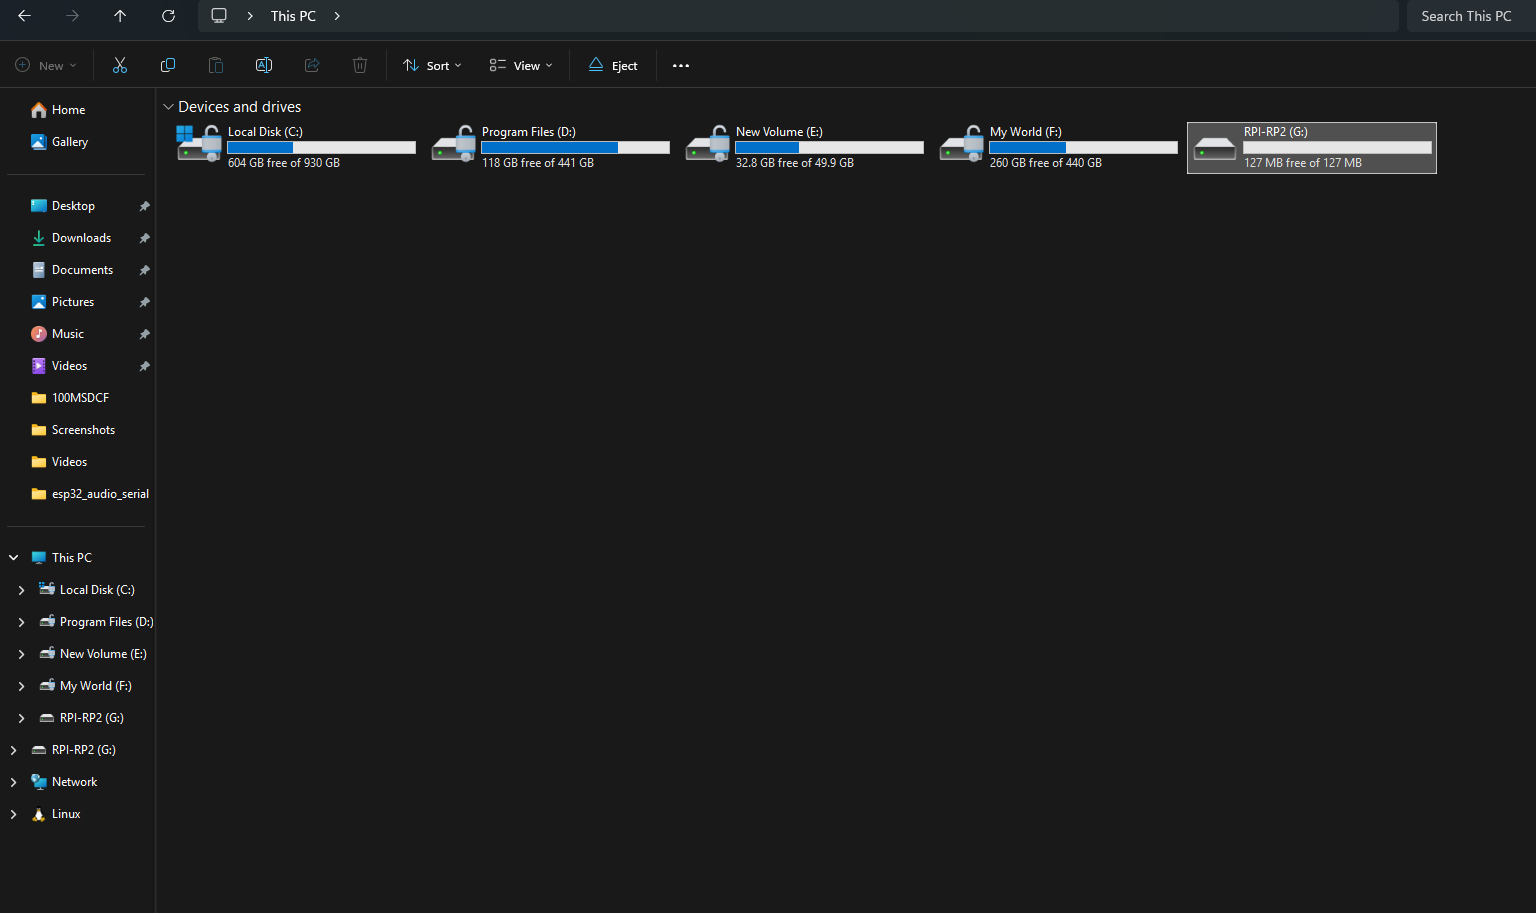
3. A new drive named **RP2** will appear.
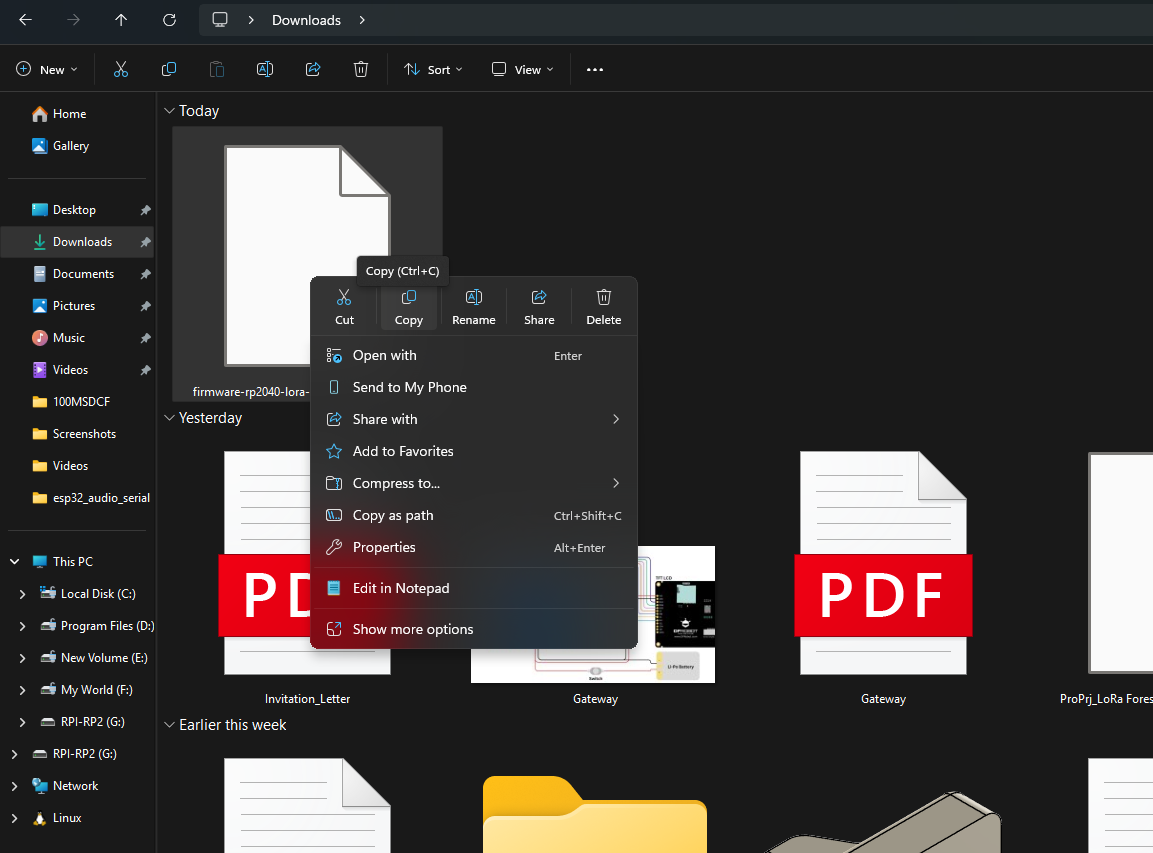
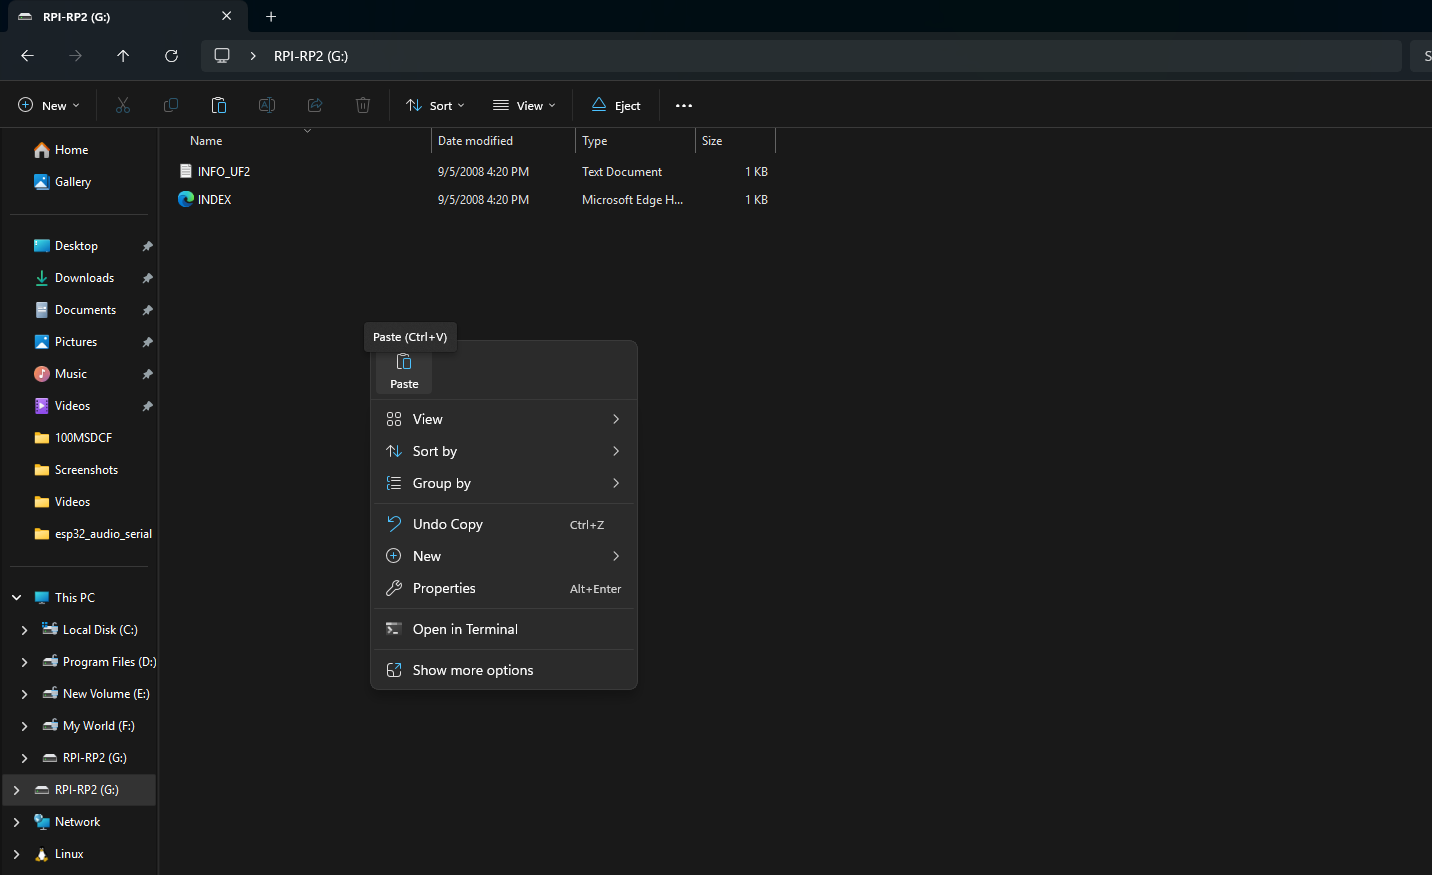
4. Copy the downloaded **.UF2 file** into the RP2 drive.
5. Once copied, press the **RESET** button.
6. The device will reboot with the new firmware.
**2. Upload Firmware to RP2040**
1. Press and hold the **BOOT** button on the module.
2. While holding BOOT, connect the **USB Type-C** cable to your PC.
3. A new drive named **RP2** will appear.
4. Copy the downloaded **.UF2 file** into the RP2 drive.
5. Once copied, press the **RESET** button.
6. The device will reboot with the new firmware.
 **3. Connect to Meshtastic Client**
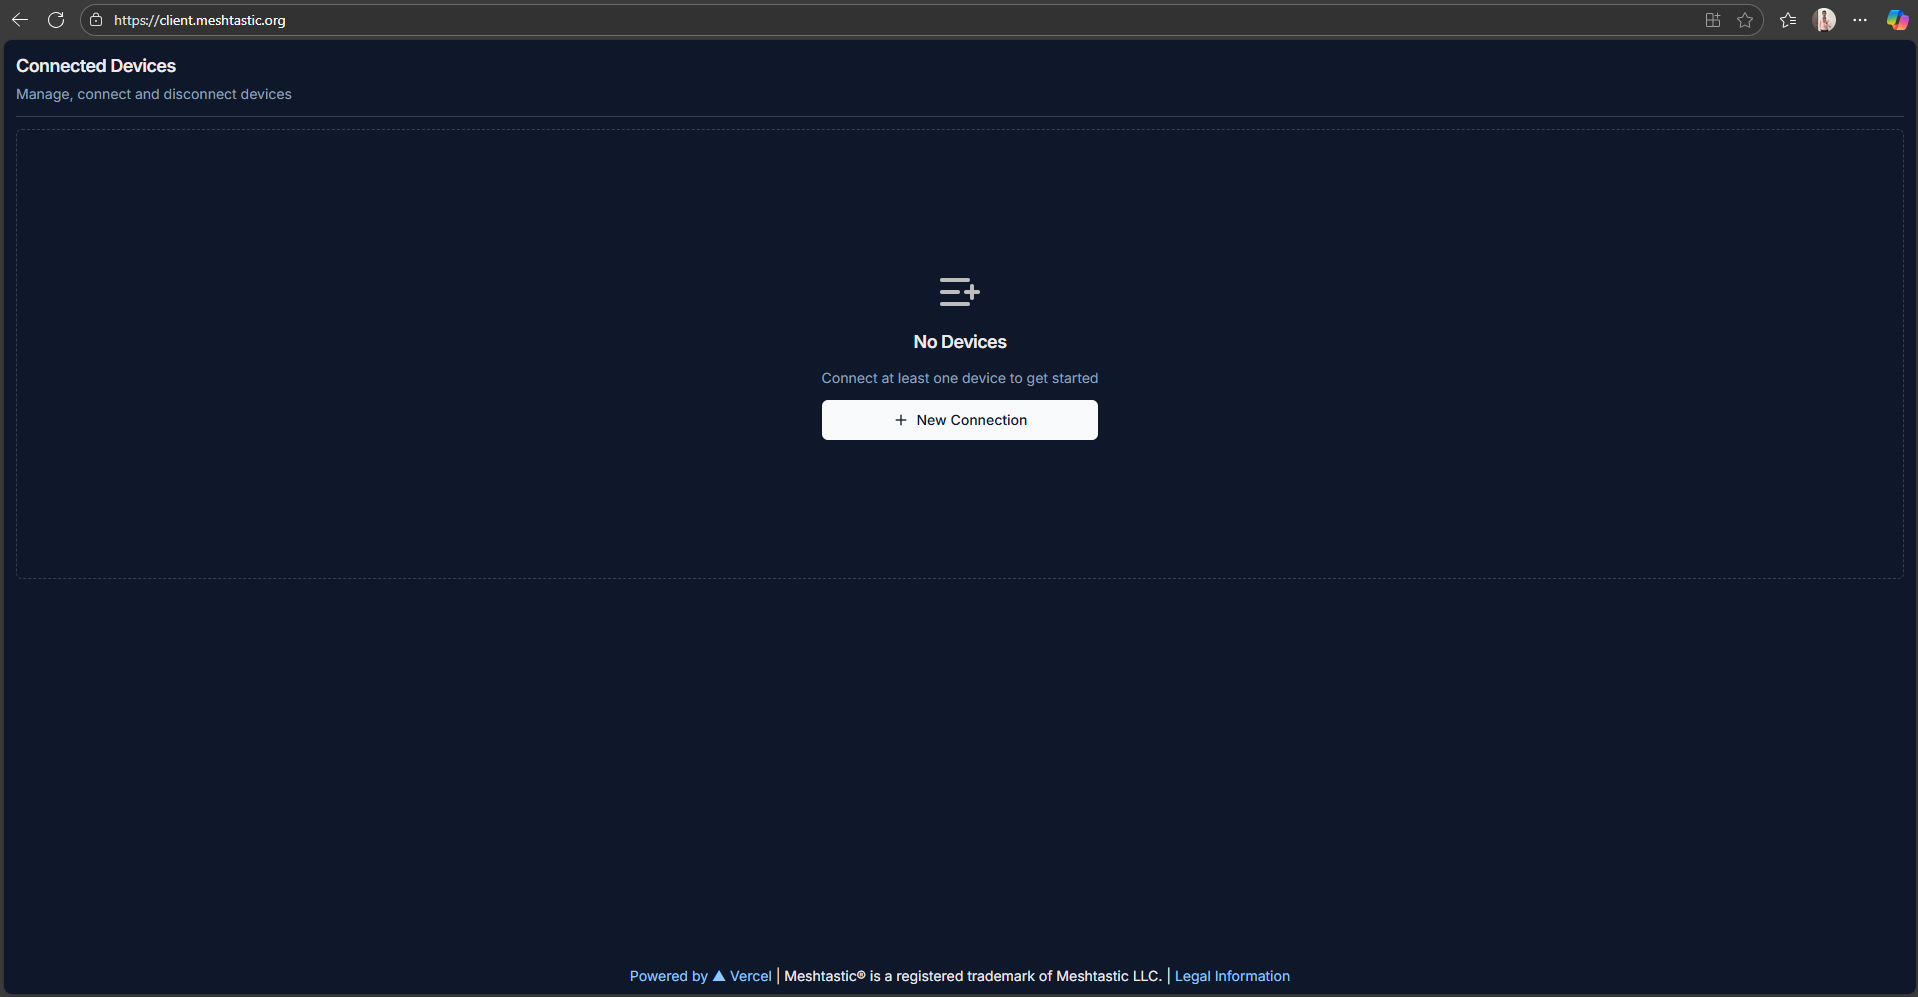
1. Open [Meshtastic Client](https://client.meshtastic.org/).
2. Click **New Connection**.
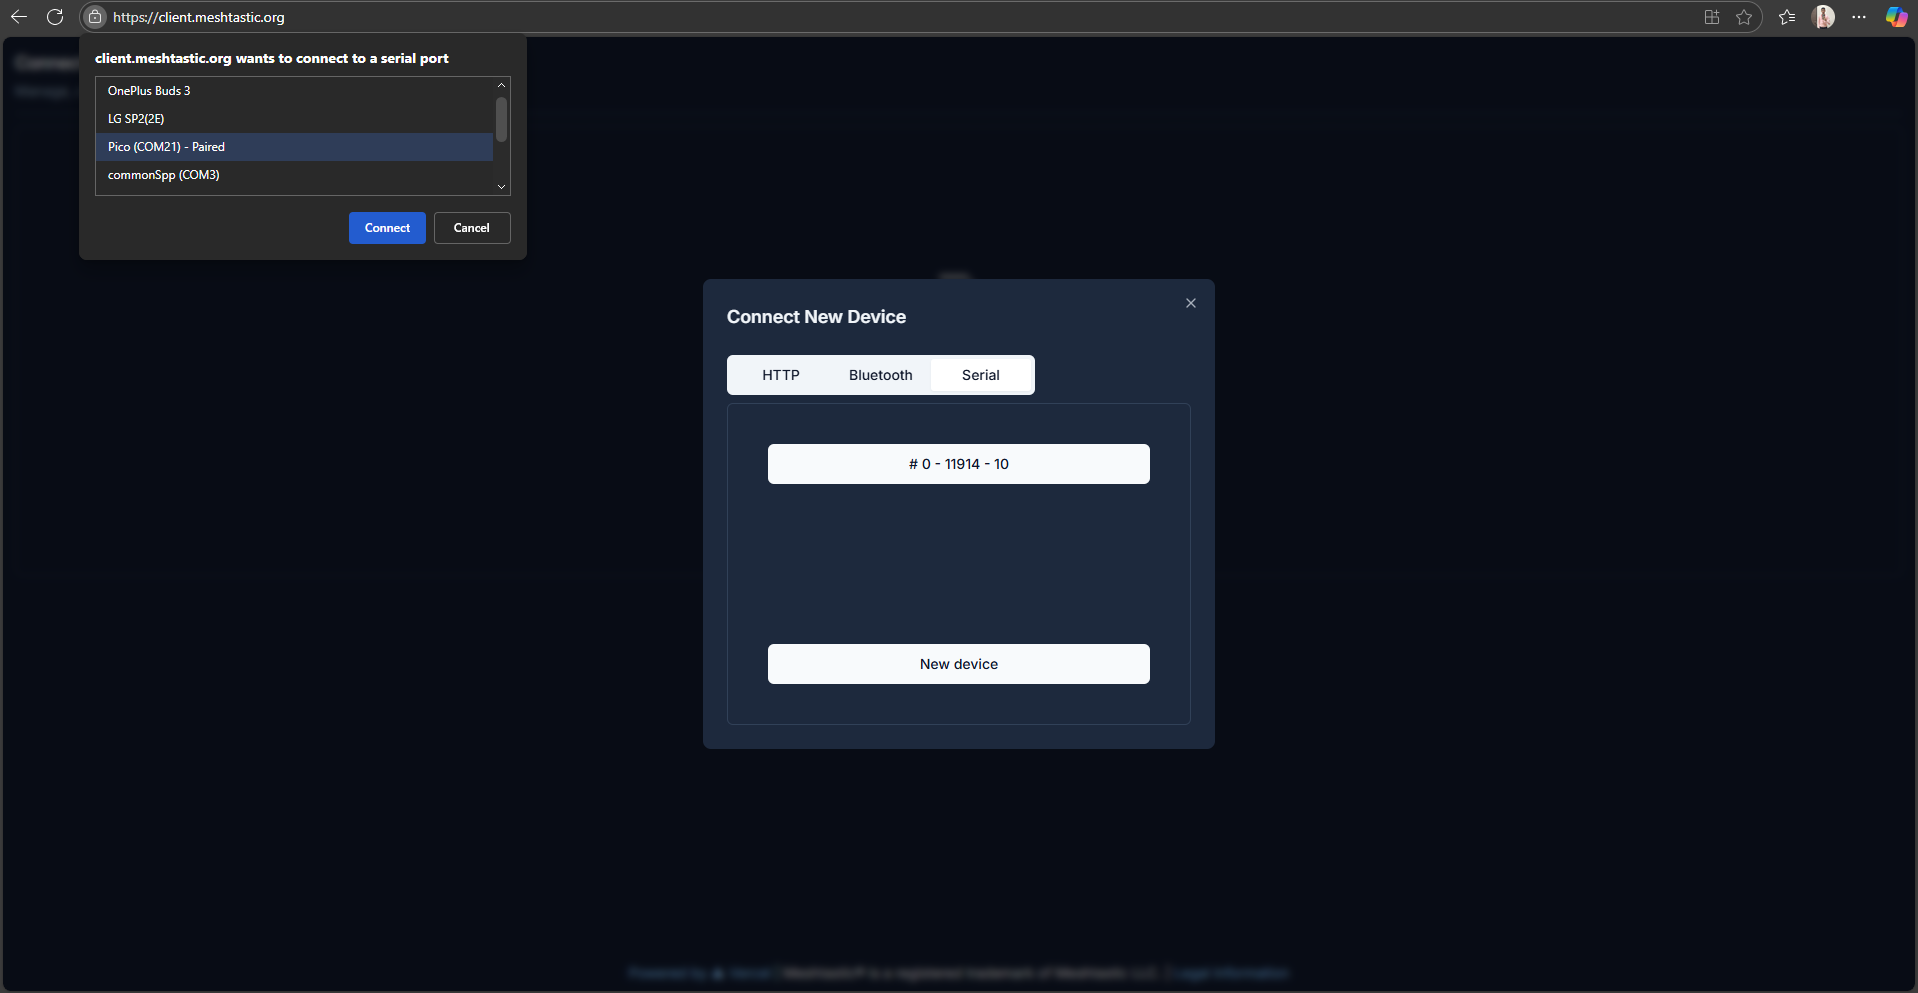
3. Select **Serial**.
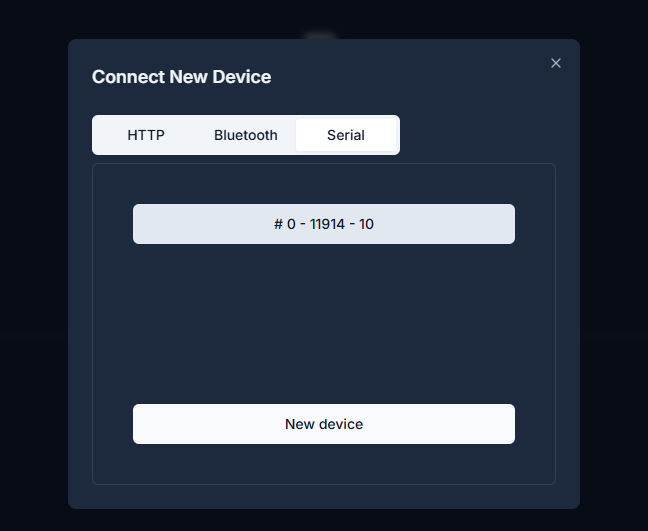
4. Click **New Device** → choose the COM port where your module is connected.
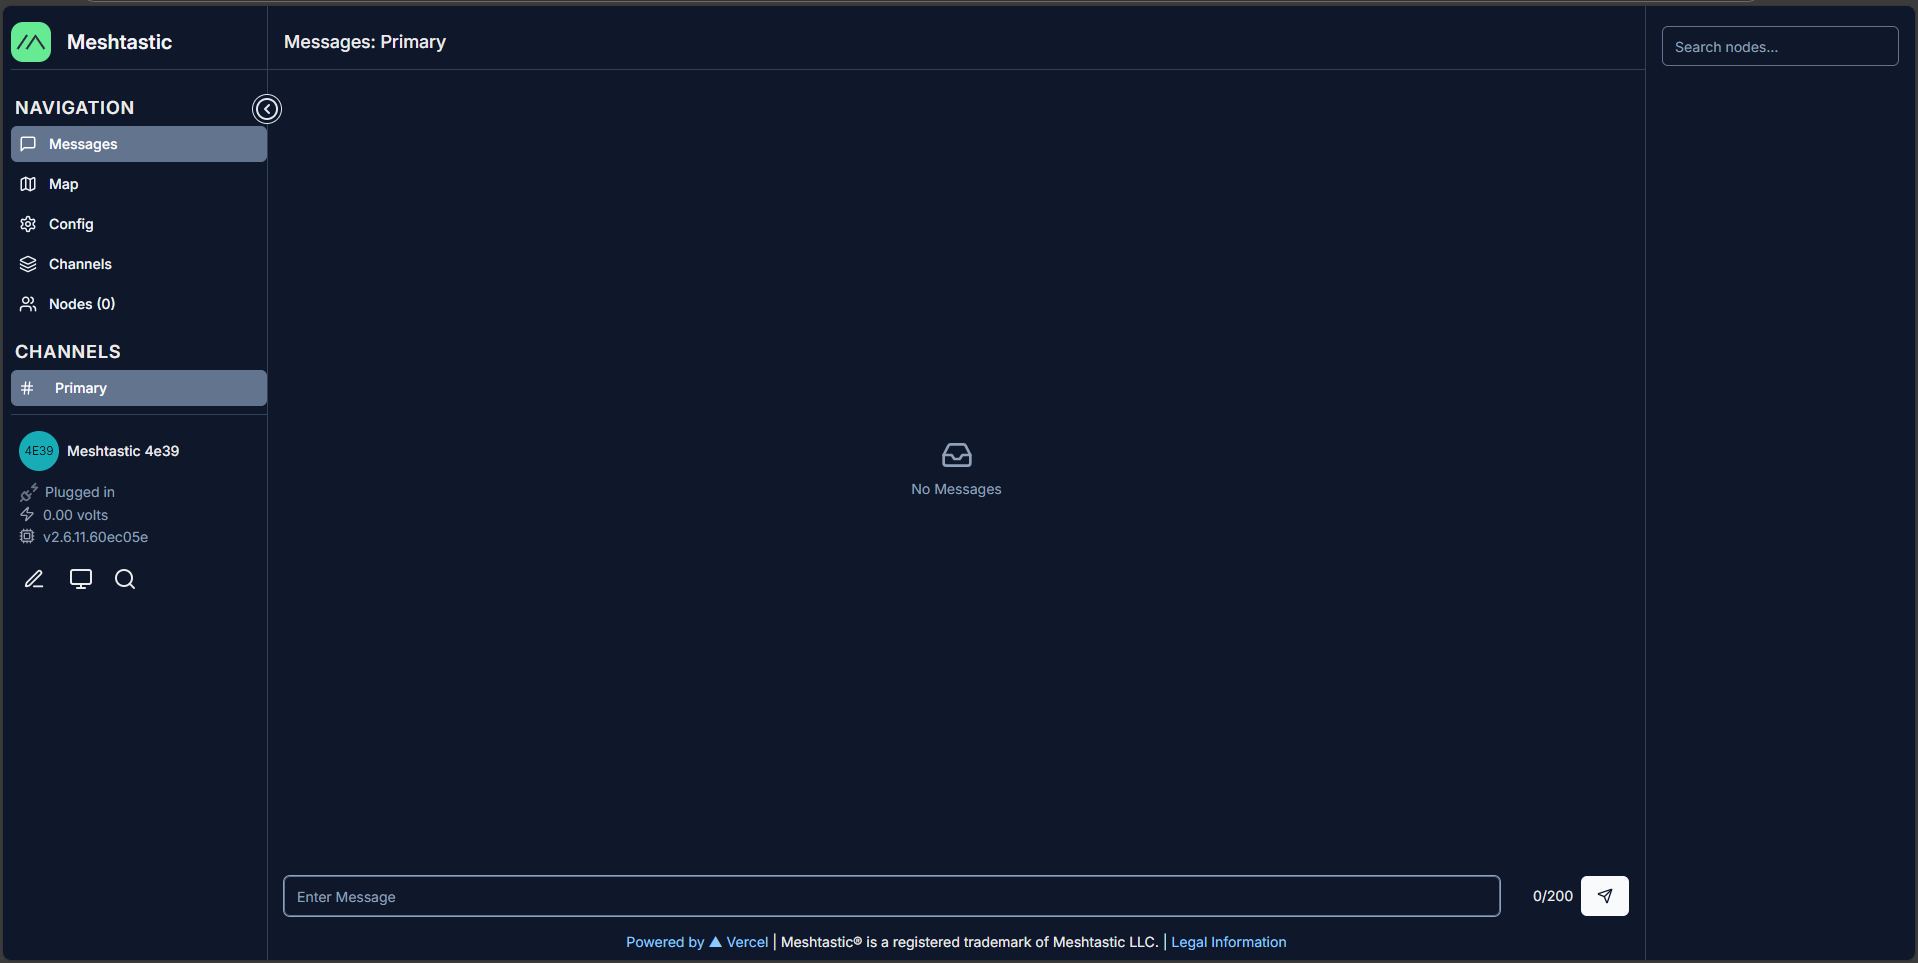
5. You should now see the **Meshtastic Node Page**.
**3. Connect to Meshtastic Client**
1. Open [Meshtastic Client](https://client.meshtastic.org/).
2. Click **New Connection**.
3. Select **Serial**.
4. Click **New Device** → choose the COM port where your module is connected.
5. You should now see the **Meshtastic Node Page**.
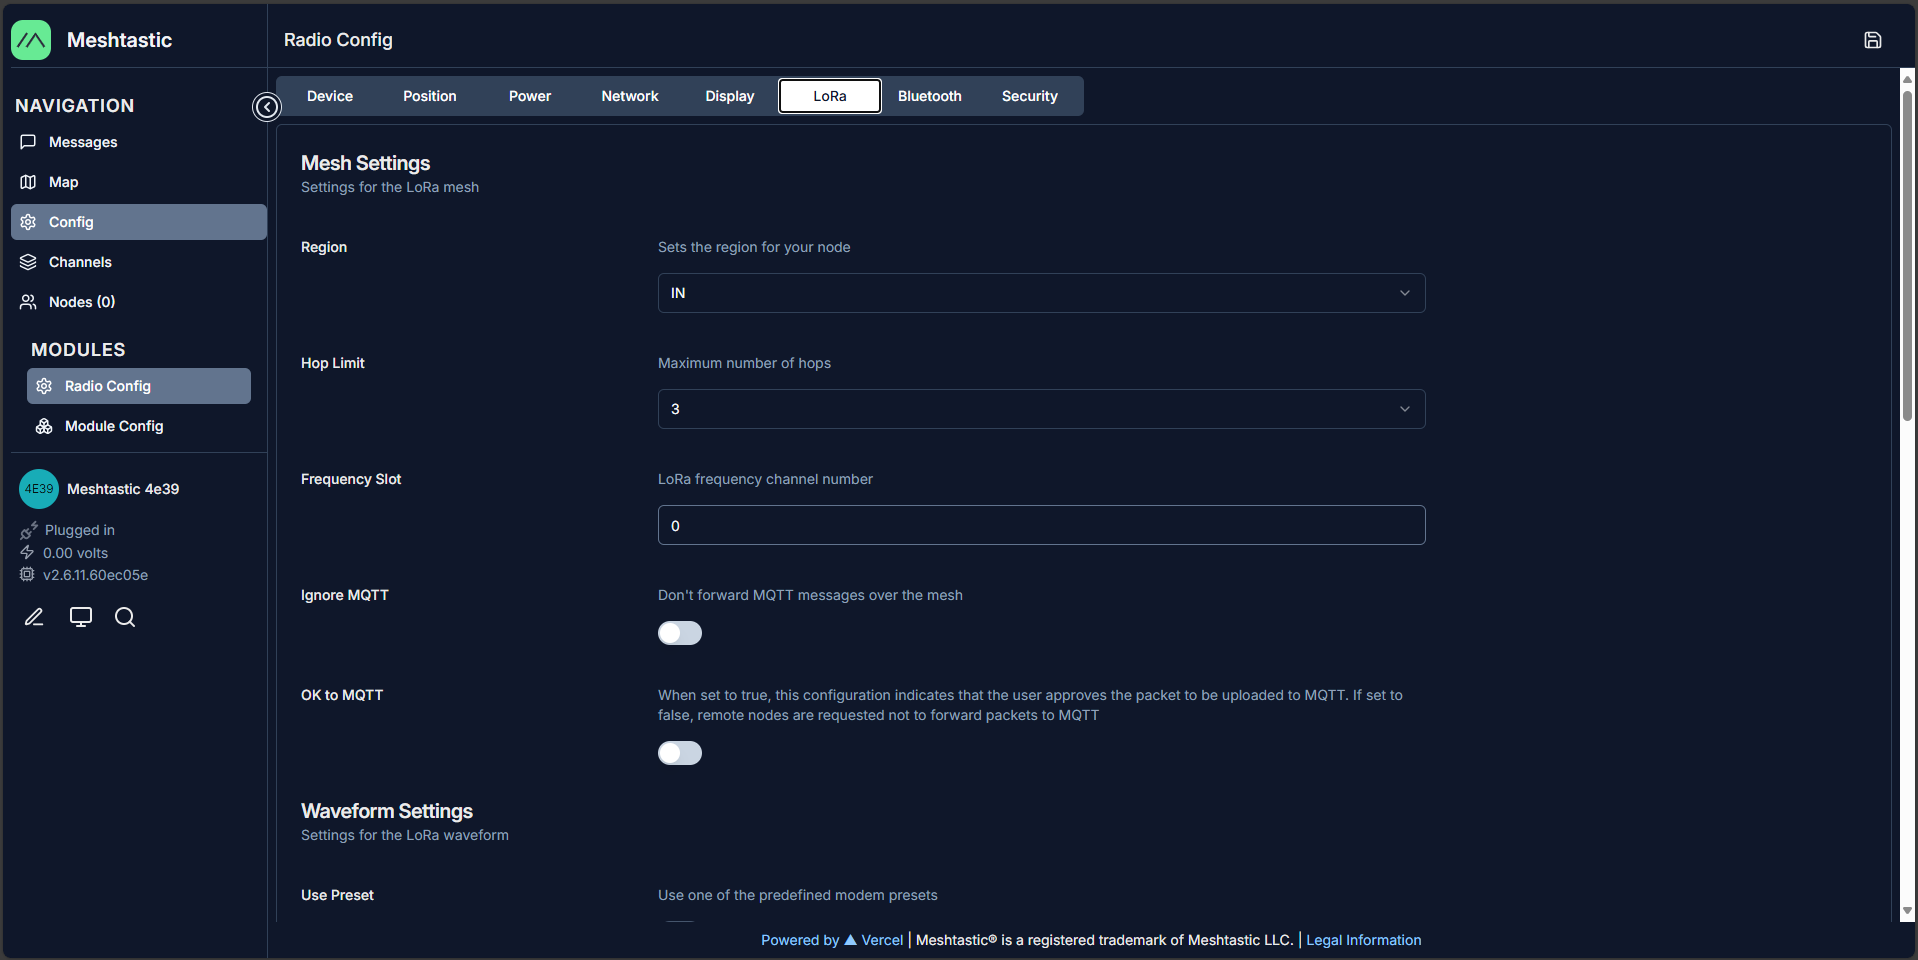
 **4. Configure LoRa Region**
1. Go to **Config → LoRa**.
2. Set the **Region** according to your country’s LoRa regulations.
**4. Configure LoRa Region**
1. Go to **Config → LoRa**.
2. Set the **Region** according to your country’s LoRa regulations.
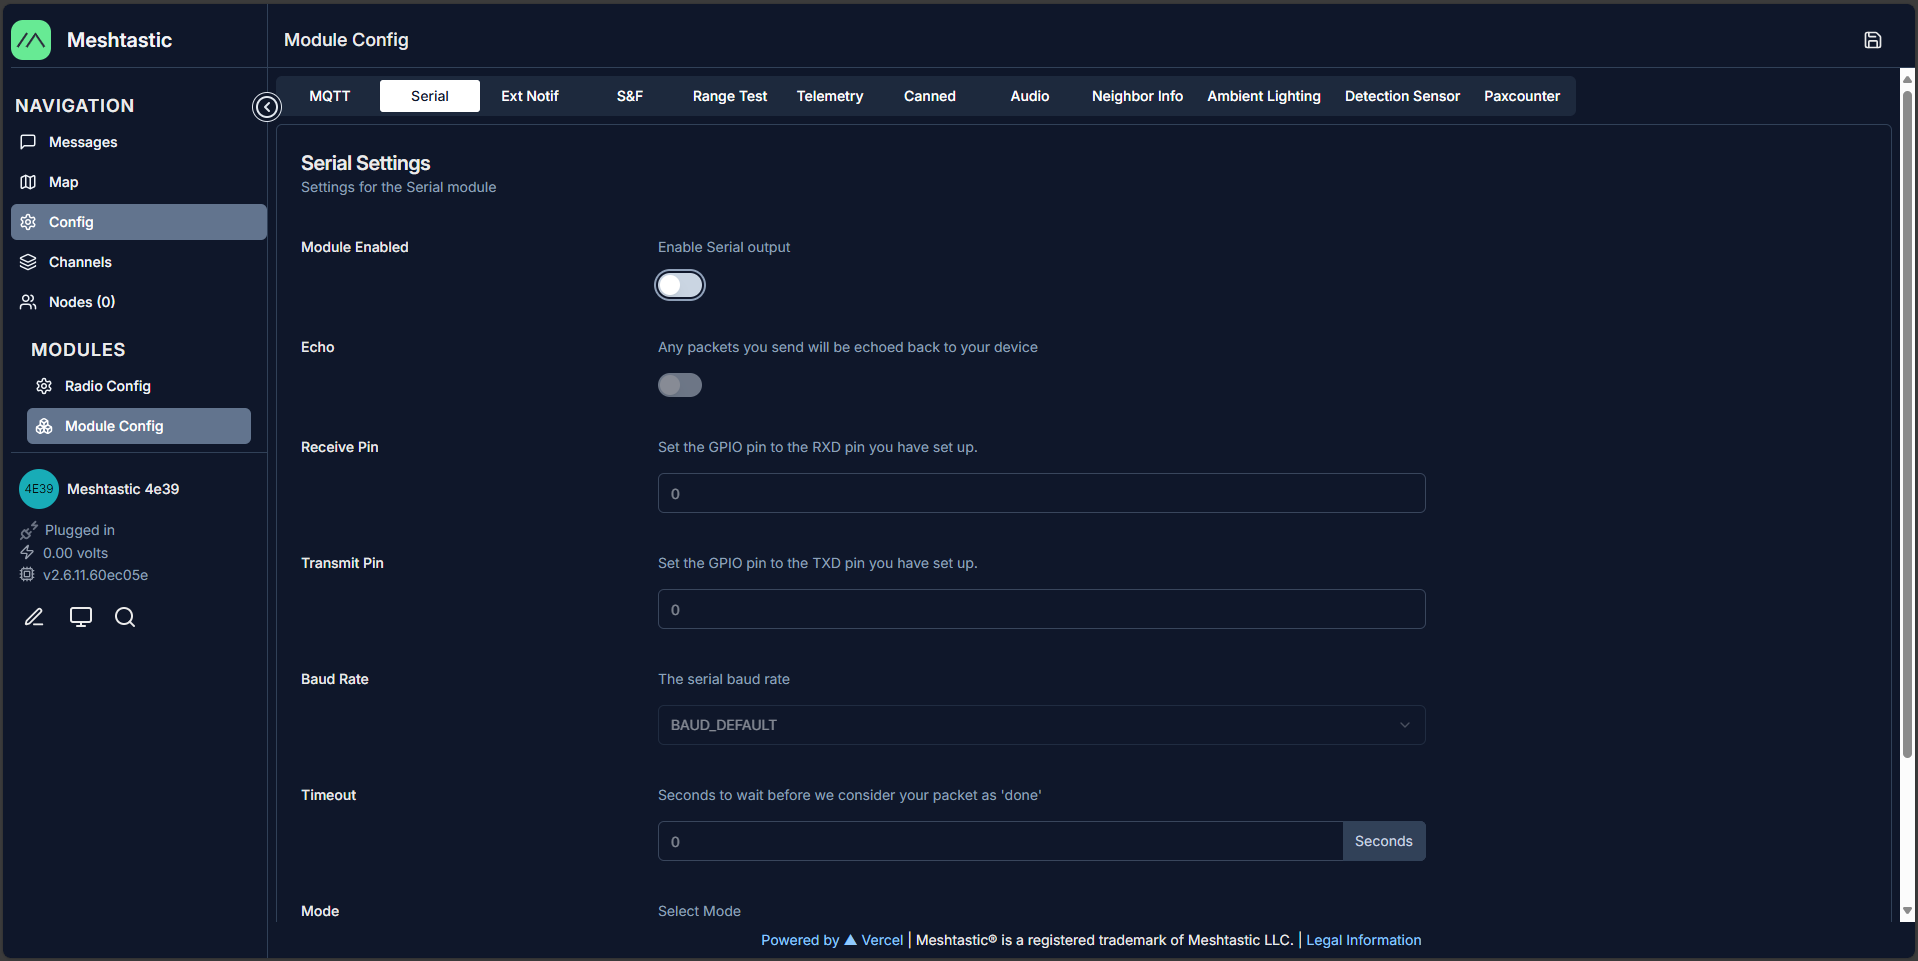
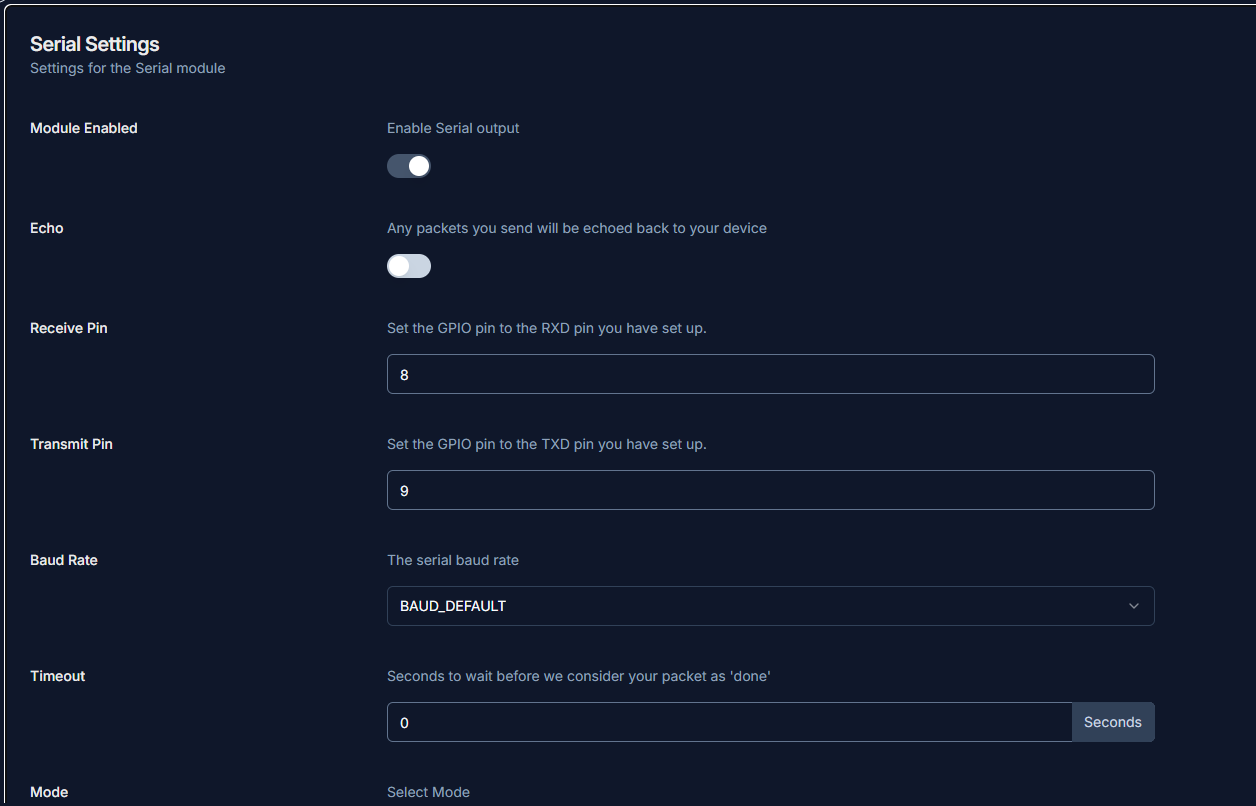
 **5. Configure Serial UART**
1. Go to **Module Config → Serial**.
2. Enable **Serial Output**.
3. Set pins:
4. **Receive Pin (RX): 8**
5. **Transmit Pin (TX): 9**
6. Save by clicking the **top-right save button**.
This configures the module to communicate via **UART** with external devices.
**5. Configure Serial UART**
1. Go to **Module Config → Serial**.
2. Enable **Serial Output**.
3. Set pins:
4. **Receive Pin (RX): 8**
5. **Transmit Pin (TX): 9**
6. Save by clicking the **top-right save button**.
This configures the module to communicate via **UART** with external devices.
 **6. Repeat for All Modules**
Repeat the above steps for every LoRa module you plan to use in your project.
## Step 3: PCB Assembly
**6. Repeat for All Modules**
Repeat the above steps for every LoRa module you plan to use in your project.
## Step 3: PCB Assembly
 With the custom PCB manufactured, the next step is to carefully solder the sensor modules and communication hardware onto the board.
**Components to Solder**
1. Gravity: Multifunctional Environmental Sensor
2. Fermion I²S MEMS Microphone
3. Fermion MEMS Smoke Detection Sensor
4. RP2040 LoRa Module with Type-C Adapter
**Prepare the Workspace**
1. Use a clean, static-free surface.
2. Preheat your soldering iron to around **350 °C** (for leaded solder) or **370–380 °C** (for lead-free).
3. Have tweezers and flux ready to handle small pins.
**Solder Components One by One**
1. Begin with the **smallest modules** (sensors) first MEMS microphone and Smoke sensor..
2. Than carefully align the Environmental sensor and solder the I²C pins.
3. Finally, solder the **LoRa module.**
4. Double-check pin alignment before applying solder. Incorrect orientation can damage the modules.
**Continuity Testing**
1. After soldering each module, use a **multimeter in continuity mode**.
2. Probe between the module pin and the corresponding PCB pad/trace.
3. A beep or zero-resistance confirms proper connectivity.
With the custom PCB manufactured, the next step is to carefully solder the sensor modules and communication hardware onto the board.
**Components to Solder**
1. Gravity: Multifunctional Environmental Sensor
2. Fermion I²S MEMS Microphone
3. Fermion MEMS Smoke Detection Sensor
4. RP2040 LoRa Module with Type-C Adapter
**Prepare the Workspace**
1. Use a clean, static-free surface.
2. Preheat your soldering iron to around **350 °C** (for leaded solder) or **370–380 °C** (for lead-free).
3. Have tweezers and flux ready to handle small pins.
**Solder Components One by One**
1. Begin with the **smallest modules** (sensors) first MEMS microphone and Smoke sensor..
2. Than carefully align the Environmental sensor and solder the I²C pins.
3. Finally, solder the **LoRa module.**
4. Double-check pin alignment before applying solder. Incorrect orientation can damage the modules.
**Continuity Testing**
1. After soldering each module, use a **multimeter in continuity mode**.
2. Probe between the module pin and the corresponding PCB pad/trace.
3. A beep or zero-resistance confirms proper connectivity.


 ## Step 4: Node CAD Design and 3D Printing
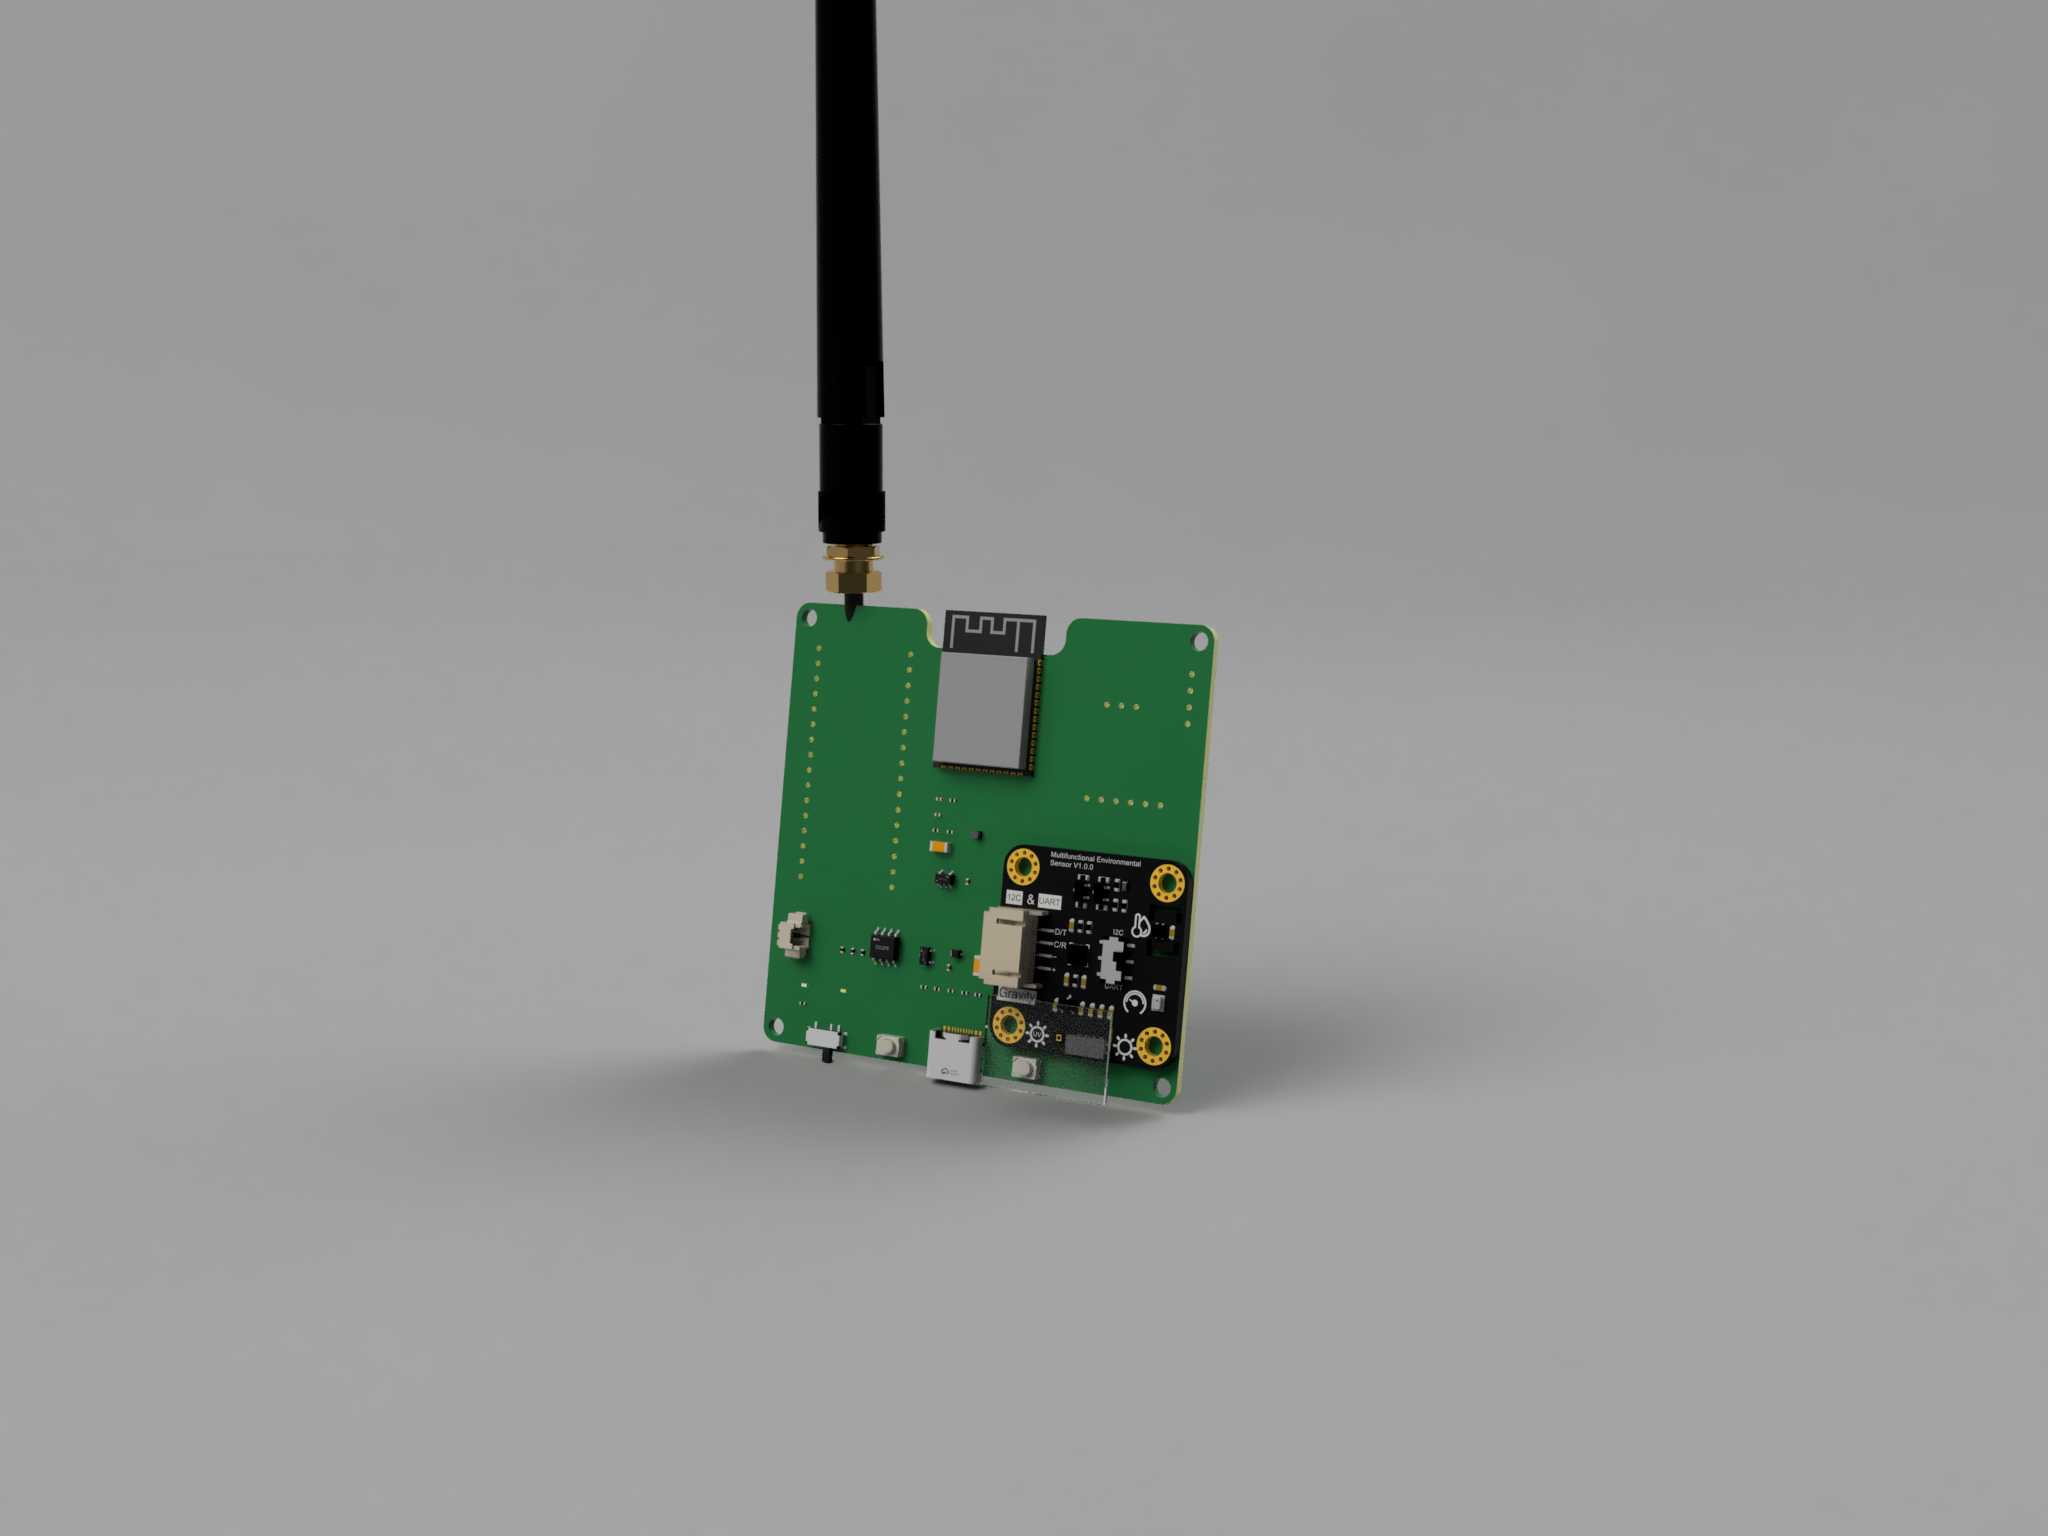
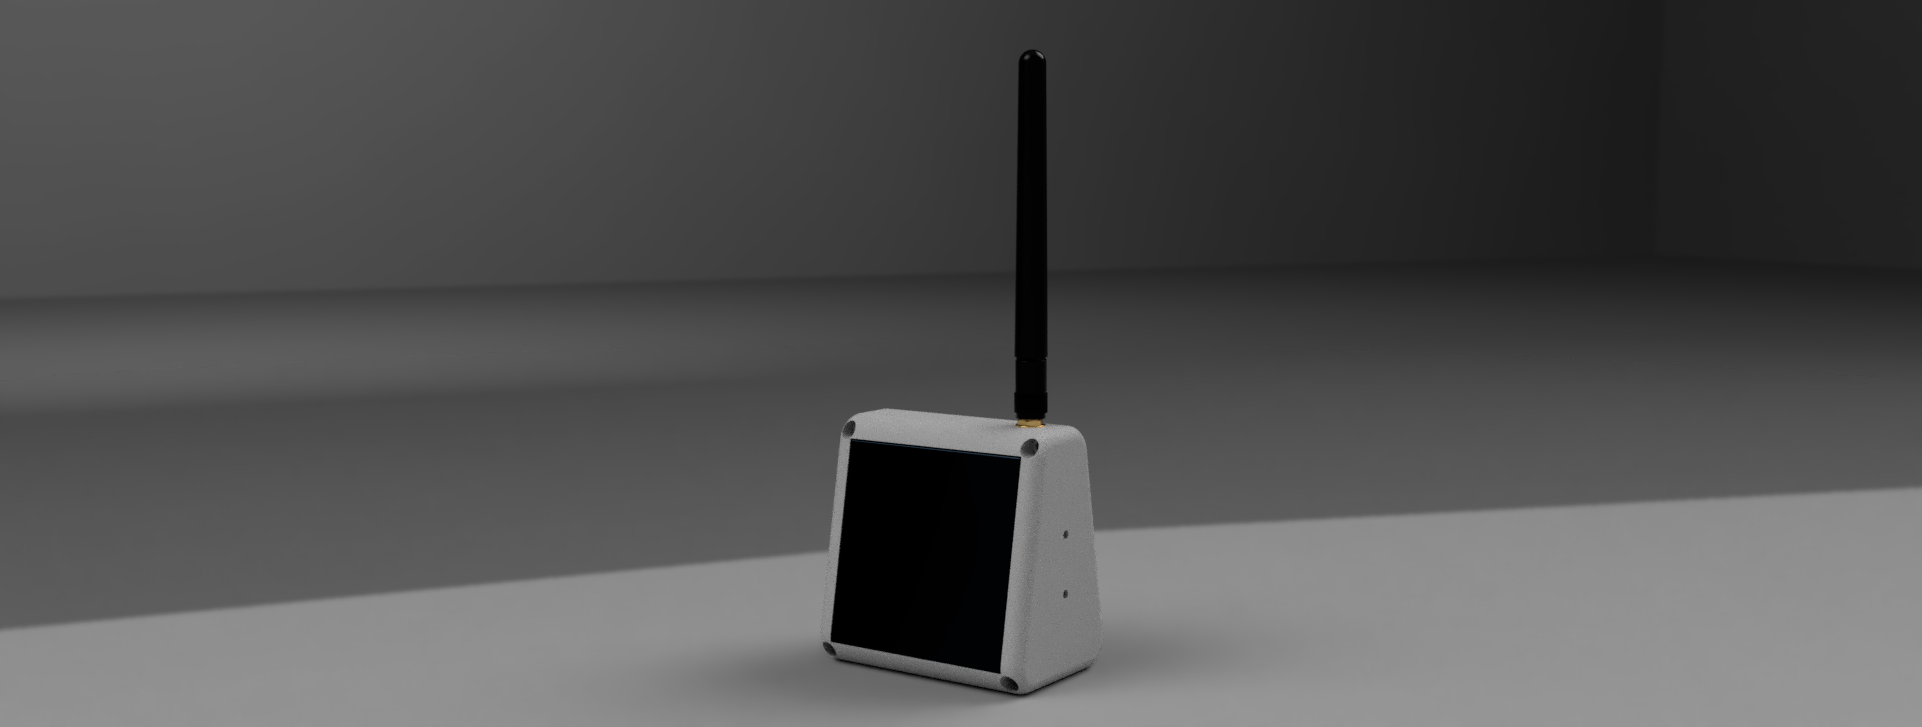
 To make the **Forest Guard Node** truly field ready, I designed a custom **enclosure** in **Fusion 360**. This was done by first importing all the standard components and then exporting the PCB 3D model from EasyEDA into Fusion 360, ensuring that every cutout and mount point lined up perfectly.
**Enclosure Features**
The Node enclosure is made up of multiple parts:
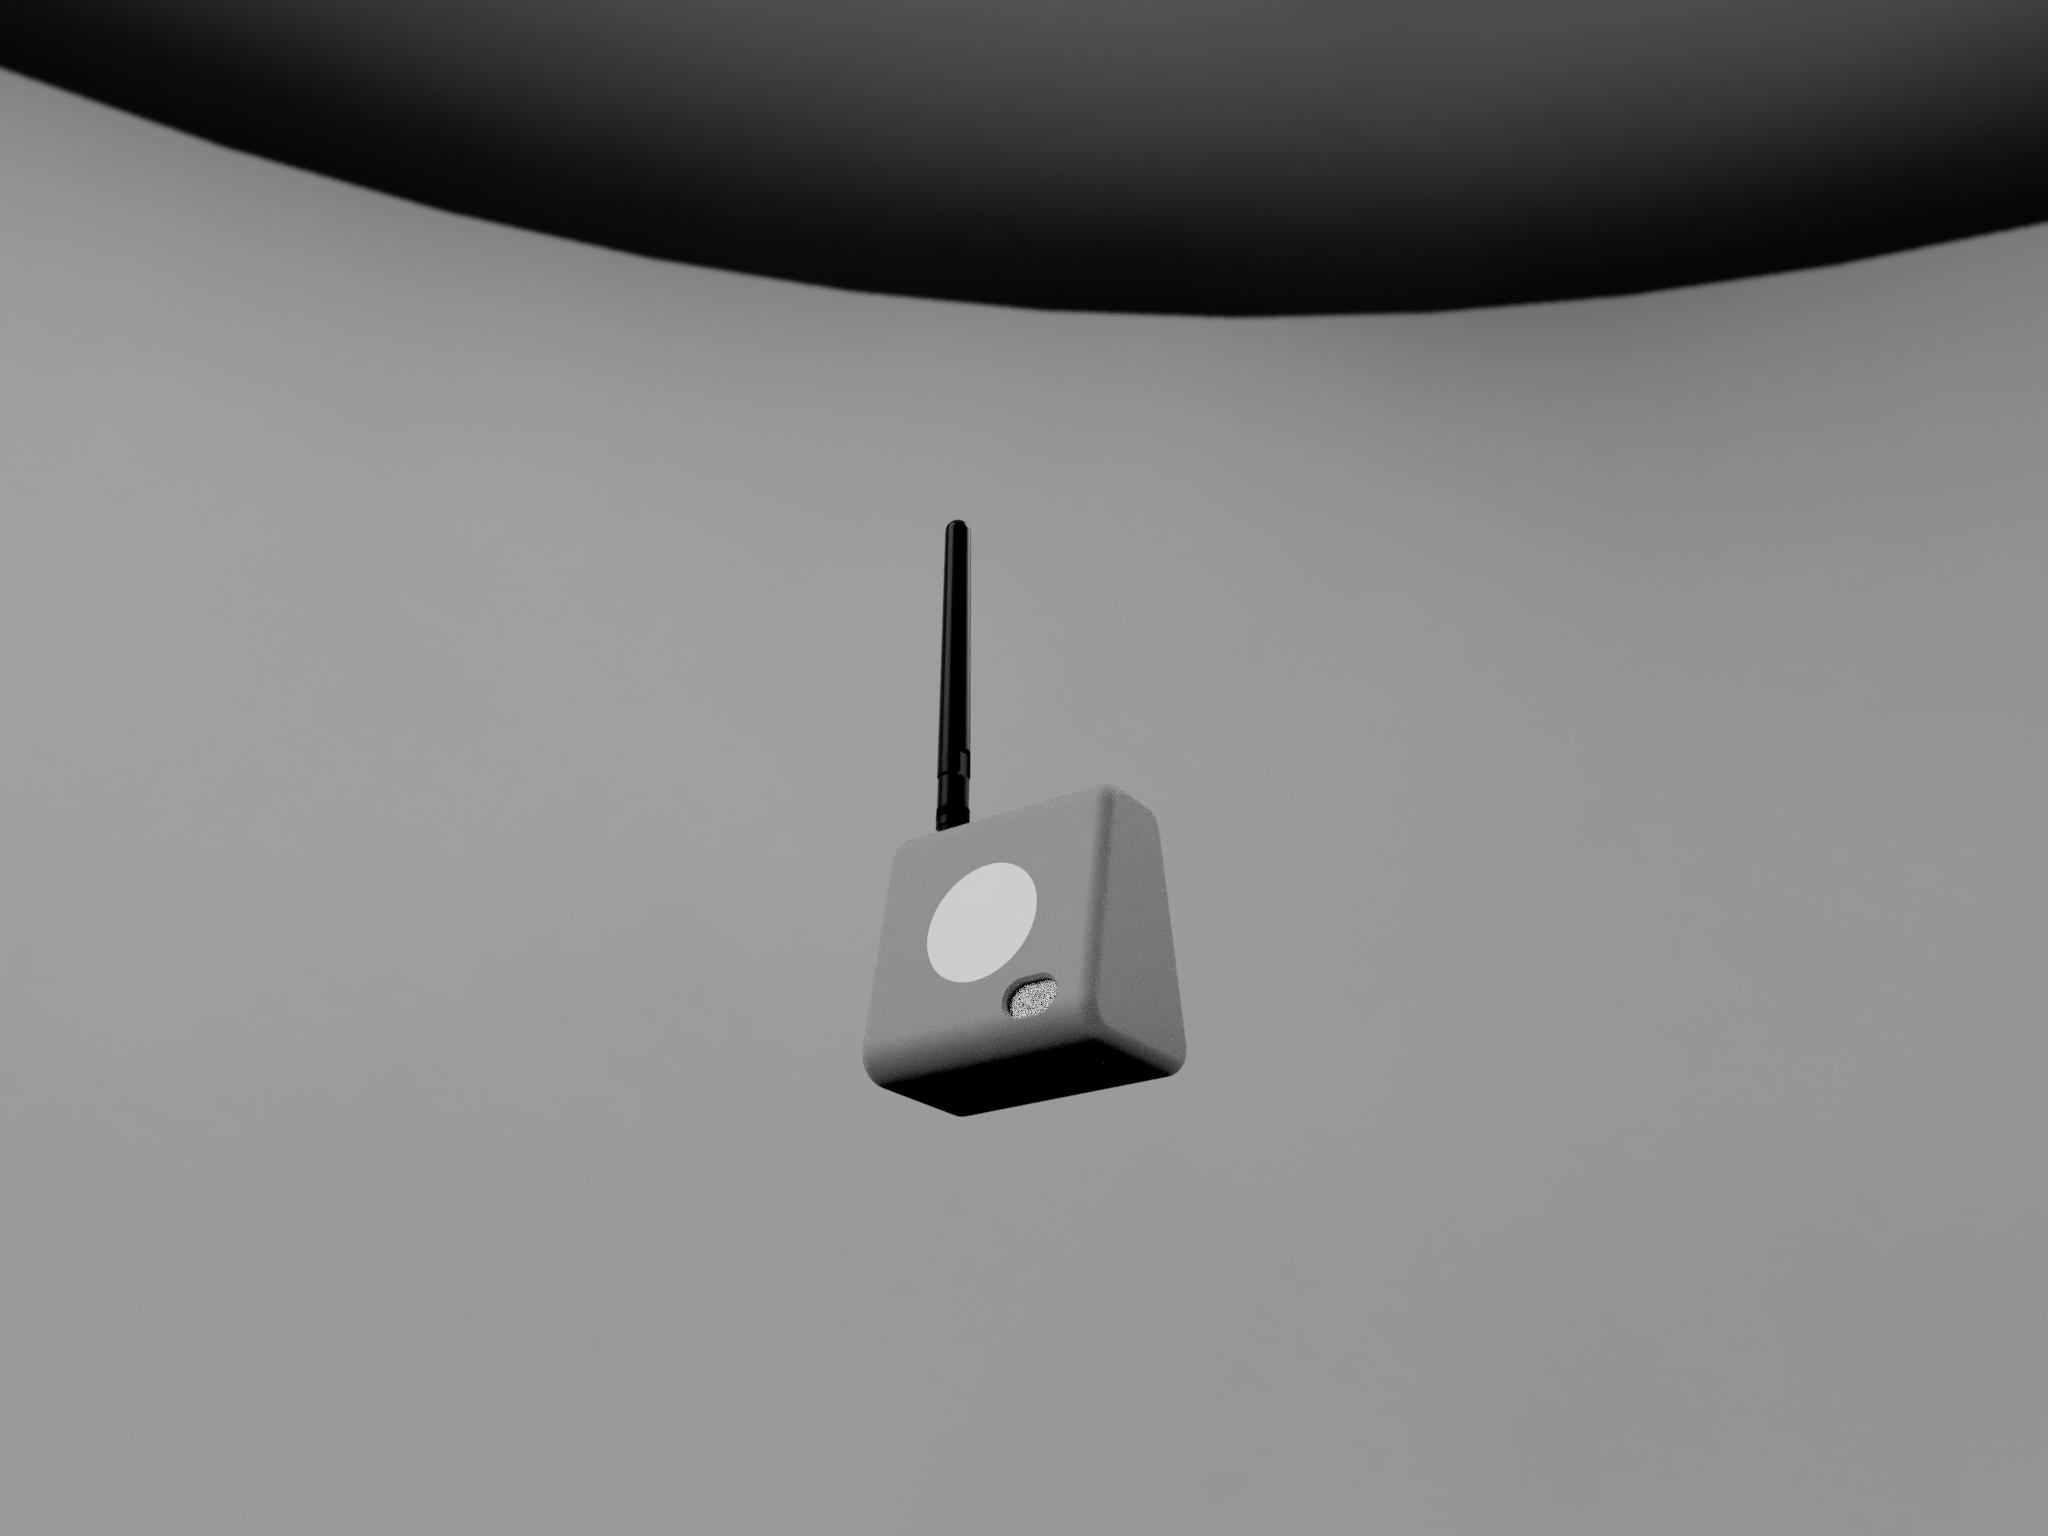
1. **Housing** - Holds the custom PCB, with cutouts for the Type-C port, push switch, and top-mounted LoRa antenna. A large center cutout allows light from the onboard RGB LED to pass through.
2. **Diffuser** - A dedicated piece that diffuses the RGB LED light, making it visible in the field without being harsh.
3. **Cover** - Designed to mount the solar panel on top and provide space for the GNSS sensor.
4. **Mount & Clip Set** - Allows the node to be attached securely to trees, walls, or other structures.
The enclosure is secured with **12× M3 screws**, giving it the feel and robustness of a professional product enclosure.
To make the **Forest Guard Node** truly field ready, I designed a custom **enclosure** in **Fusion 360**. This was done by first importing all the standard components and then exporting the PCB 3D model from EasyEDA into Fusion 360, ensuring that every cutout and mount point lined up perfectly.
**Enclosure Features**
The Node enclosure is made up of multiple parts:
1. **Housing** - Holds the custom PCB, with cutouts for the Type-C port, push switch, and top-mounted LoRa antenna. A large center cutout allows light from the onboard RGB LED to pass through.
2. **Diffuser** - A dedicated piece that diffuses the RGB LED light, making it visible in the field without being harsh.
3. **Cover** - Designed to mount the solar panel on top and provide space for the GNSS sensor.
4. **Mount & Clip Set** - Allows the node to be attached securely to trees, walls, or other structures.
The enclosure is secured with **12× M3 screws**, giving it the feel and robustness of a professional product enclosure.
 **3D Printing**


 I printed the parts on a **Bambu Labs P1S** 3D printer:
1. Housing and cover were printed in **light gray** PLA for durability and aesthetics.
2. Diffuser was printed in **pure white** PLA to achieve soft light diffusion from the RGB LED.
**Files for You**
1. **STL files** - Ready-to-print files for direct 3D printing.
2. **Fusion 360 design file** - For anyone who wants to modify or customize the design further.
#### [Forest Guard Tx Fusion 360 File](https://a360.co/4nuH8am)
## Step 5: Diffuser and Light Visor Assembly
To make the **RGB LED indicator** and **environmental sensor light input** effective, we add a **diffuser** and a **light visor** to the node housing. This ensures the LED glow is soft and visible in the field, while the environmental sensor gets accurate light readings without interference.
**Parts Needed**
1. Housing
2. Diffuser
3. Small piece of clear plastic (cut from packaging or acrylic sheet)
4. Quick glue (super glue or instant adhesive)
**Attach the Diffuser**
1. Apply a thin line of quick glue around the **Diffuser cutout** in the housing.
2. Carefully snap the **diffuser** into place as shown (it should align flush with the cutout).
3. Hold gently for a few seconds until the glue sets.
I printed the parts on a **Bambu Labs P1S** 3D printer:
1. Housing and cover were printed in **light gray** PLA for durability and aesthetics.
2. Diffuser was printed in **pure white** PLA to achieve soft light diffusion from the RGB LED.
**Files for You**
1. **STL files** - Ready-to-print files for direct 3D printing.
2. **Fusion 360 design file** - For anyone who wants to modify or customize the design further.
#### [Forest Guard Tx Fusion 360 File](https://a360.co/4nuH8am)
## Step 5: Diffuser and Light Visor Assembly
To make the **RGB LED indicator** and **environmental sensor light input** effective, we add a **diffuser** and a **light visor** to the node housing. This ensures the LED glow is soft and visible in the field, while the environmental sensor gets accurate light readings without interference.
**Parts Needed**
1. Housing
2. Diffuser
3. Small piece of clear plastic (cut from packaging or acrylic sheet)
4. Quick glue (super glue or instant adhesive)
**Attach the Diffuser**
1. Apply a thin line of quick glue around the **Diffuser cutout** in the housing.
2. Carefully snap the **diffuser** into place as shown (it should align flush with the cutout).
3. Hold gently for a few seconds until the glue sets.


 **Install the Clear Plastic Visor**
1. Locate the **cutout for the Environmental Sensor light input**.
2. Apply a small amount of quick glue around the edges of this cutout.
3. Place the **clear plastic piece** over the opening. This acts as a protective window and ensures correct light transmission for the sensor.
**Install the Clear Plastic Visor**
1. Locate the **cutout for the Environmental Sensor light input**.
2. Apply a small amount of quick glue around the edges of this cutout.
3. Place the **clear plastic piece** over the opening. This acts as a protective window and ensures correct light transmission for the sensor.

 ## Step 6: Solar Wire Soldering
1. Cut **two wires**, each about **10 cm** long (one **red**, one **black**).
2. Solder the **red wire** to the **+ pad** on the back of the battery connector.
3. Solder the **black wire** to the **– pad**.
## Step 6: Solar Wire Soldering
1. Cut **two wires**, each about **10 cm** long (one **red**, one **black**).
2. Solder the **red wire** to the **+ pad** on the back of the battery connector.
3. Solder the **black wire** to the **– pad**.

 ## Step 7: Housing Assembly
1. Take the **assembled PCB**, **housing**, **battery**, and the **LoRa antenna**.
2. First, **connect the antenna** to the LoRa module.
3. ⚠️ *Never power on without the antenna connected.*
4. Connect the **battery** to the PCB.
5. Place the PCB inside the housing, aligning the **Type-C port** with the cutout.
6. Secure the PCB using **4× M3 screws**.
7. Unscrew the antenna, pass it through the **top housing hole**, and screw it back in place.
8. Finally, use **double-sided tape** to fix the battery to the back of the PCB.
## Step 7: Housing Assembly
1. Take the **assembled PCB**, **housing**, **battery**, and the **LoRa antenna**.
2. First, **connect the antenna** to the LoRa module.
3. ⚠️ *Never power on without the antenna connected.*
4. Connect the **battery** to the PCB.
5. Place the PCB inside the housing, aligning the **Type-C port** with the cutout.
6. Secure the PCB using **4× M3 screws**.
7. Unscrew the antenna, pass it through the **top housing hole**, and screw it back in place.
8. Finally, use **double-sided tape** to fix the battery to the back of the PCB.


 ## Step 8: Solar Panel Assembly
1. Take the **solar panel**, **cover**, and **quick glue**.
2. Align the solar panel with the **cutout on the cover** and snap it into place.
3. From the **back side of the cover**, locate the four holes.
4. Apply a small amount of **quick glue** into each hole to secure the panel firmly.
5. Let it sit for a few minutes to allow the glue to set fully.
## Step 8: Solar Panel Assembly
1. Take the **solar panel**, **cover**, and **quick glue**.
2. Align the solar panel with the **cutout on the cover** and snap it into place.
3. From the **back side of the cover**, locate the four holes.
4. Apply a small amount of **quick glue** into each hole to secure the panel firmly.
5. Let it sit for a few minutes to allow the glue to set fully.


 ## Step 9: Cover Assembly
1. Take the **cover** and the **GNSS sensor module**.
2. Connect the **GNSS antenna** to the GNSS module.
3. Place the module over the **mounting holes** on the cover.
4. Secure the module using **4× M3 screws**.
5. Use **double-sided tape** to secure the antenna on the cover so it stays in place.
## Step 9: Cover Assembly
1. Take the **cover** and the **GNSS sensor module**.
2. Connect the **GNSS antenna** to the GNSS module.
3. Place the module over the **mounting holes** on the cover.
4. Secure the module using **4× M3 screws**.
5. Use **double-sided tape** to secure the antenna on the cover so it stays in place.


 ## Step 10: Final Connections
Take the **Housing Assembly** and the **Cover Assembly**.
Use the **4-pin connector** that came with the GNSS sensor:
1. Cut the connector in half using a cutter.
2. Plug one side into the GNSS sensor.
3. Strip the wires on the other side and solder them to the PCB as follows:
* **Red to 3V3**
* **Black to GND**
* **Green to SDA**
* **Blue to SCL**
## Step 10: Final Connections
Take the **Housing Assembly** and the **Cover Assembly**.
Use the **4-pin connector** that came with the GNSS sensor:
1. Cut the connector in half using a cutter.
2. Plug one side into the GNSS sensor.
3. Strip the wires on the other side and solder them to the PCB as follows:
* **Red to 3V3**
* **Black to GND**
* **Green to SDA**
* **Blue to SCL**


 Now connect the **solar wires** coming from the PCB to the solar panel:
* **Black to -Ve**
* **Red to +Ve**
Now connect the **solar wires** coming from the PCB to the solar panel:
* **Black to -Ve**
* **Red to +Ve**

 Double-check all connections before powering on.
## Step 11: Final Assembly
1. Take the **assembled housing** and the **assembled cover**.
2. Carefully align the cover on top of the housing.
3. ⚠️ Make sure **no wires get pinched** during this step.
4. Once aligned, snap the cover into place.
5. Use **4× M3 screws** to securely fasten the cover to the housing.
Now your **Forest Guard Node** is fully assembled and ready for field testing!
Double-check all connections before powering on.
## Step 11: Final Assembly
1. Take the **assembled housing** and the **assembled cover**.
2. Carefully align the cover on top of the housing.
3. ⚠️ Make sure **no wires get pinched** during this step.
4. Once aligned, snap the cover into place.
5. Use **4× M3 screws** to securely fasten the cover to the housing.
Now your **Forest Guard Node** is fully assembled and ready for field testing!

 ## Step 12: Pre-Requisite to Program Node (Edge Impulse)
 Before uploading the **final Node firmware**, we need to prepare the **machine learning (ML) model** that runs locally on the ESP32-S3. This is done using **Edge Impulse**, a powerful platform for developing and deploying ML models directly to embedded devices.
### What is Edge Impulse?
Edge Impulse is an **edge AI development platform** that makes it simple to:
1. Collect and label sensor data (audio, vibration, environmental, camera, etc.).
2. Train ML models using classical algorithms or neural networks.
3. Optimize models for low-power microcontrollers like ESP32, RP2040, and STM32.
4. Generate ready-to-use **Arduino libraries** that can be imported directly into your Node firmware.
This enables us to bring AI directly to the forest, without needing internet access or cloud inference — the model runs **entirely on the Node itself**.
### Audio Classification for Gunshot Detection
For this project, we focus on **audio classification** using the onboard MEMS microphone:
**Data Collection**
1. Record short audio clips of **gunshots** and **background forest sounds** (wind, birds, insects, etc.).
2. Upload these samples into your Edge Impulse project.
**Feature Extraction**
1. Edge Impulse automatically converts raw audio into **spectrograms (MFCCs)**, which represent the frequency patterns of the sound.
2. This allows the model to detect unique signatures of gunshot sounds compared to other noises.
**Model Training**
1. A **classification model** is trained to output labels like:
2. "gunshot"
3. "background"
4. The model learns the difference in frequency and amplitude patterns.
**Deployment**
1. Once trained and tested, export the model as an **Arduino library**.
2. Include this library in your Node code.
3. The ESP32-S3 runs the inference on its second core, ensuring real-time classification without blocking sensor updates or LoRa communication.
### Why This Matters
This setup means that every Node becomes an **intelligent sentinel**:
1. Capable of **hearing gunshots** in the forest.
2. Making real-time decisions without cloud dependency.
3. Sending alerts through the LoRa mesh instantly.
And importantly, this is just the beginning — with Edge Impulse, you can retrain the model on other audio events like **chainsaws (illegal logging)** or **calls of endangered animals**, making the Forest Guard system highly **adaptable and future-proof**.
### Create Edge Impulse Project
To train and deploy your ML model, you first need to set up a project in **Edge Impulse Studio**.
**Create a Project**
Before uploading the **final Node firmware**, we need to prepare the **machine learning (ML) model** that runs locally on the ESP32-S3. This is done using **Edge Impulse**, a powerful platform for developing and deploying ML models directly to embedded devices.
### What is Edge Impulse?
Edge Impulse is an **edge AI development platform** that makes it simple to:
1. Collect and label sensor data (audio, vibration, environmental, camera, etc.).
2. Train ML models using classical algorithms or neural networks.
3. Optimize models for low-power microcontrollers like ESP32, RP2040, and STM32.
4. Generate ready-to-use **Arduino libraries** that can be imported directly into your Node firmware.
This enables us to bring AI directly to the forest, without needing internet access or cloud inference — the model runs **entirely on the Node itself**.
### Audio Classification for Gunshot Detection
For this project, we focus on **audio classification** using the onboard MEMS microphone:
**Data Collection**
1. Record short audio clips of **gunshots** and **background forest sounds** (wind, birds, insects, etc.).
2. Upload these samples into your Edge Impulse project.
**Feature Extraction**
1. Edge Impulse automatically converts raw audio into **spectrograms (MFCCs)**, which represent the frequency patterns of the sound.
2. This allows the model to detect unique signatures of gunshot sounds compared to other noises.
**Model Training**
1. A **classification model** is trained to output labels like:
2. "gunshot"
3. "background"
4. The model learns the difference in frequency and amplitude patterns.
**Deployment**
1. Once trained and tested, export the model as an **Arduino library**.
2. Include this library in your Node code.
3. The ESP32-S3 runs the inference on its second core, ensuring real-time classification without blocking sensor updates or LoRa communication.
### Why This Matters
This setup means that every Node becomes an **intelligent sentinel**:
1. Capable of **hearing gunshots** in the forest.
2. Making real-time decisions without cloud dependency.
3. Sending alerts through the LoRa mesh instantly.
And importantly, this is just the beginning — with Edge Impulse, you can retrain the model on other audio events like **chainsaws (illegal logging)** or **calls of endangered animals**, making the Forest Guard system highly **adaptable and future-proof**.
### Create Edge Impulse Project
To train and deploy your ML model, you first need to set up a project in **Edge Impulse Studio**.
**Create a Project**
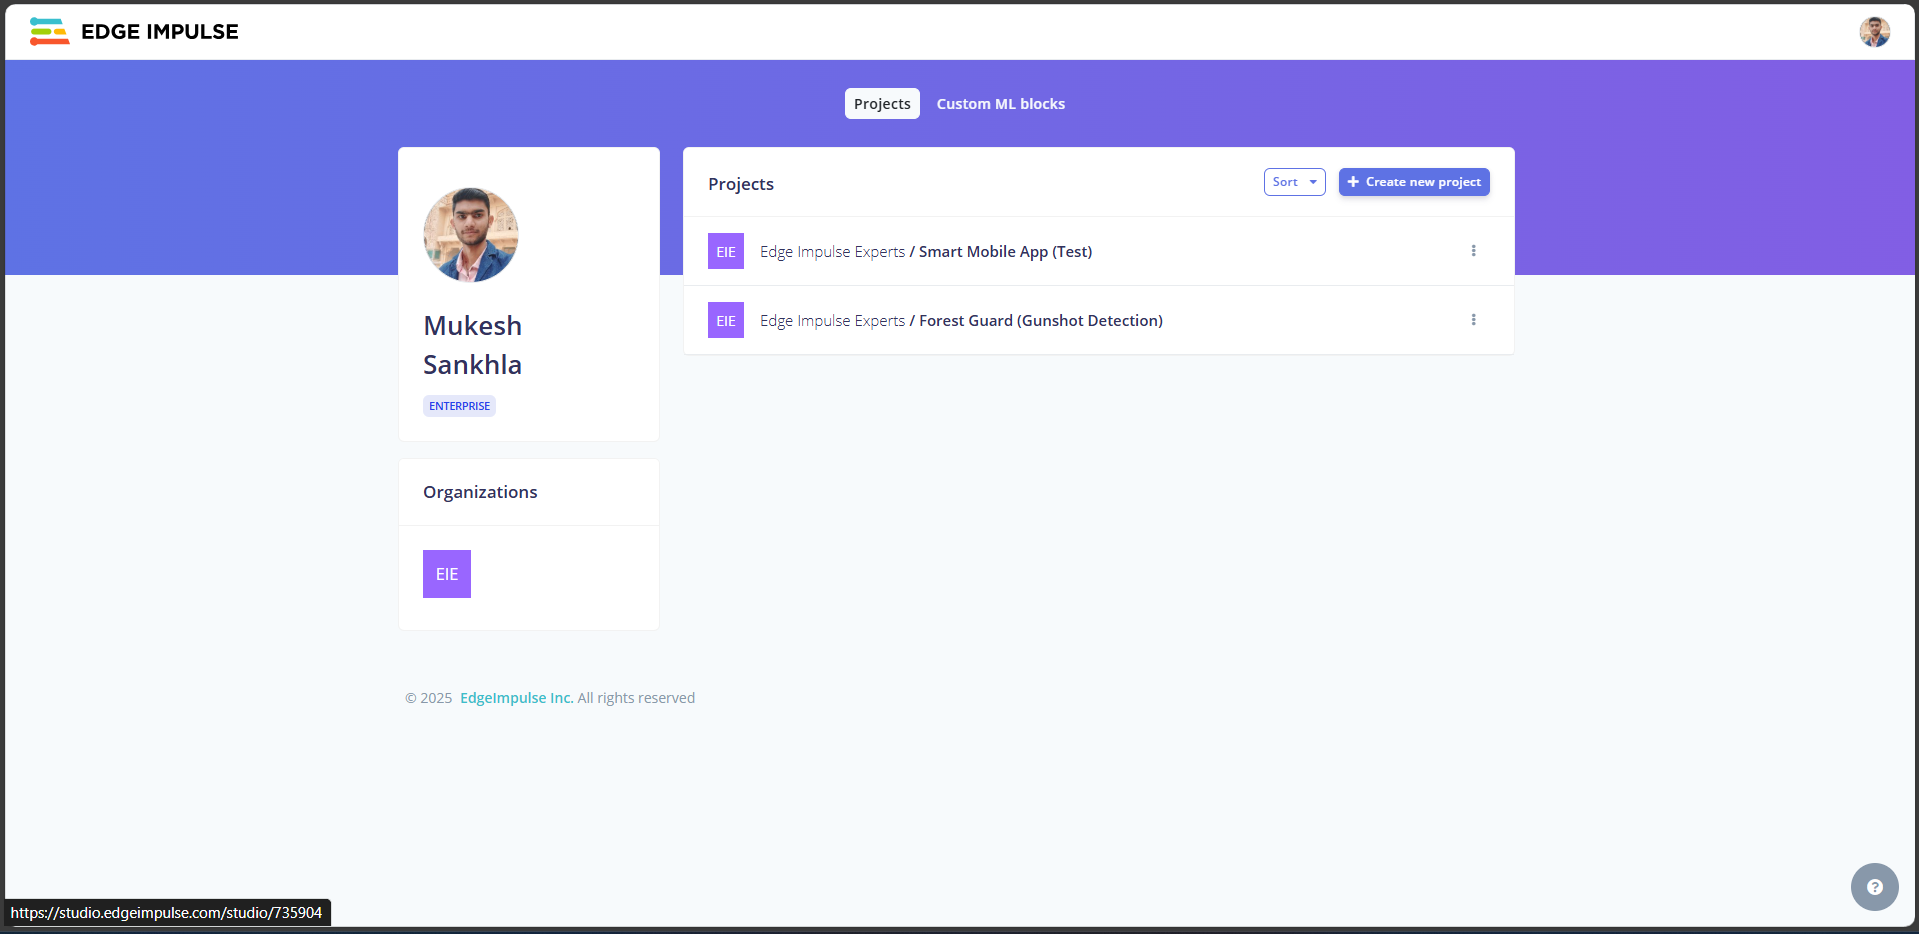 1. Open [Edge Impulse Studio](https://studio.edgeimpulse.com/).
2. **Login** with your account credentials.
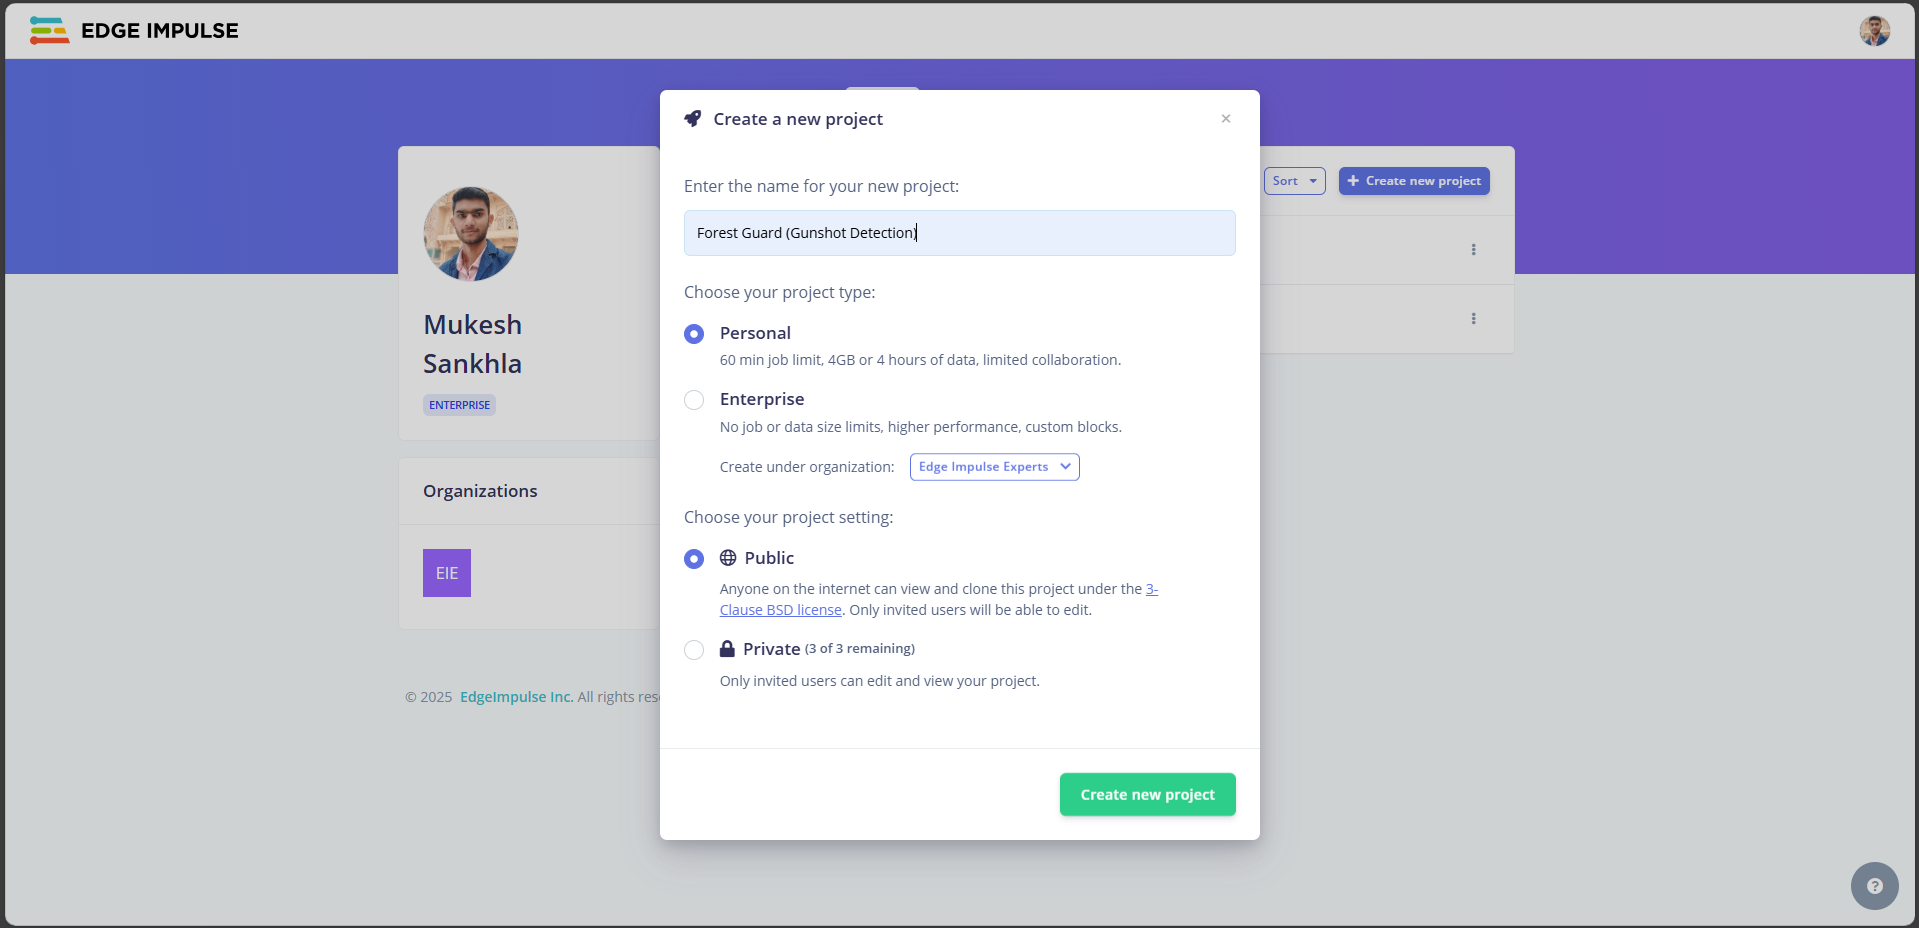
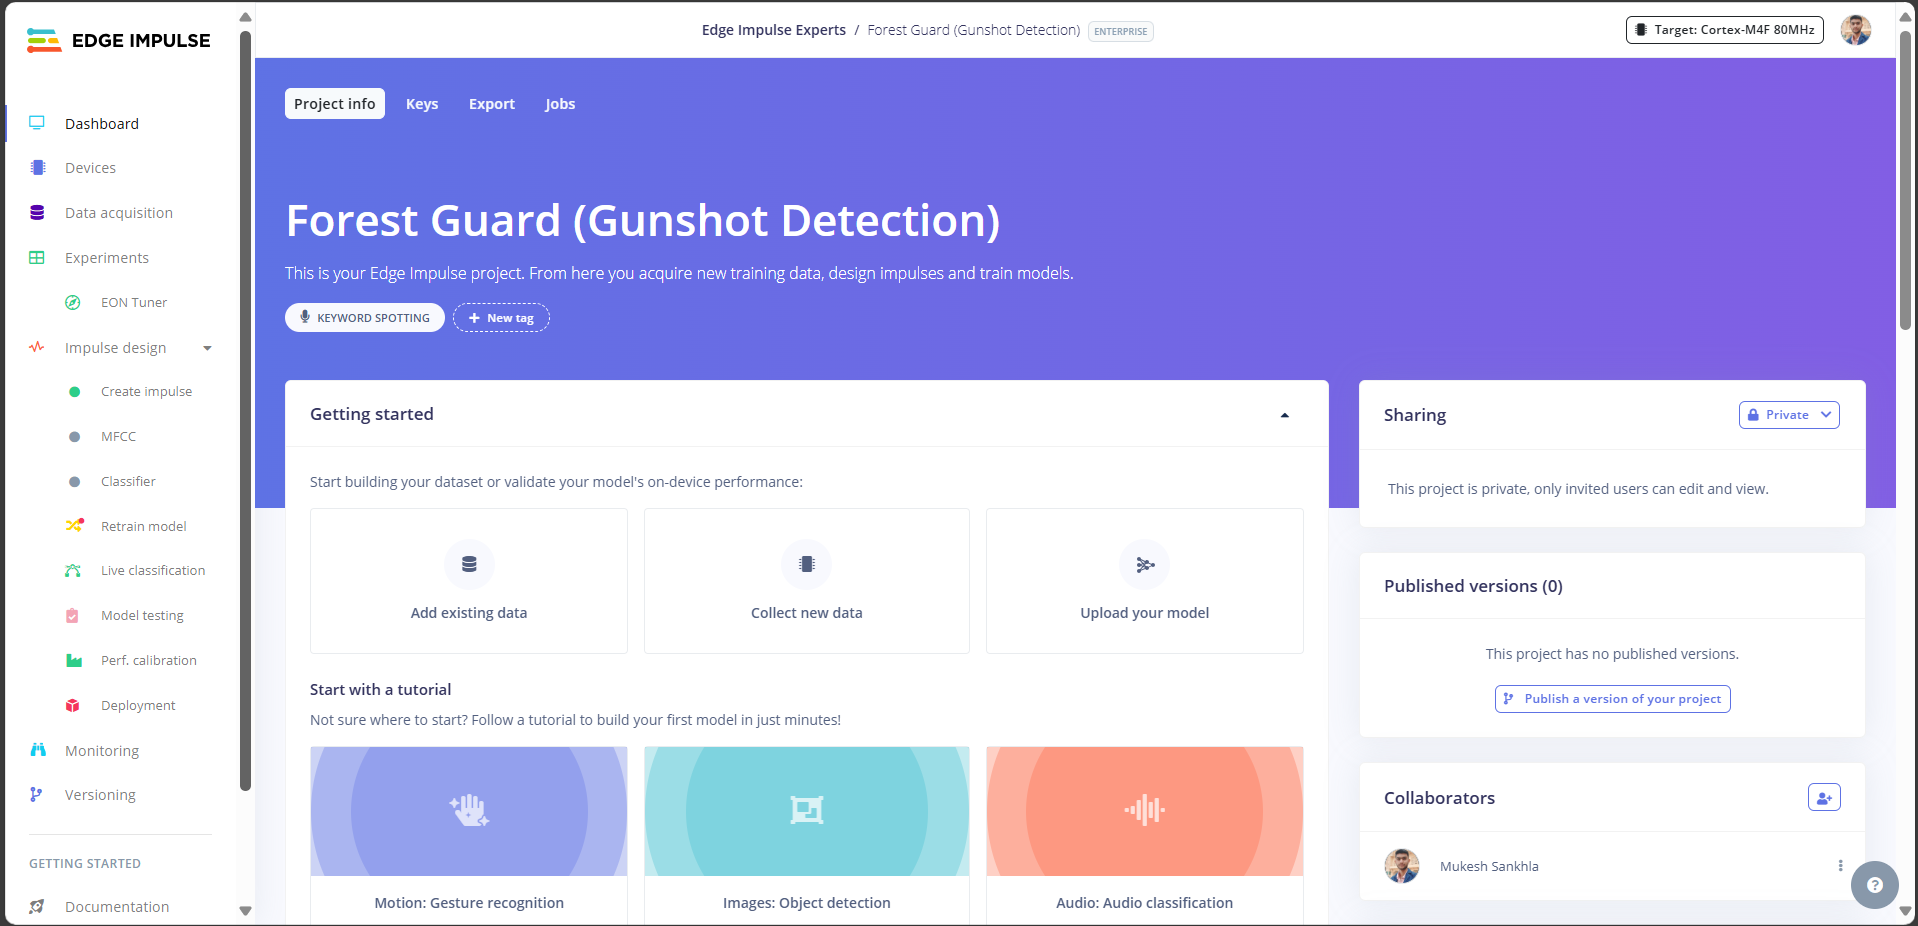
3. Click on **“Create New Project”**.
4. Give your project a meaningful name, e.g., *Forest Guard Gunshot Detector*.
1. Open [Edge Impulse Studio](https://studio.edgeimpulse.com/).
2. **Login** with your account credentials.
3. Click on **“Create New Project”**.
4. Give your project a meaningful name, e.g., *Forest Guard Gunshot Detector*.
 **Get Your Project Key**
1. After the project is created, go to **Dashboard → Keys**.
2. Locate your **Project API Key**.
3. Copy this key and keep it handy — you’ll need it in the Flask tool and Node code to connect data and models to Edge Impulse.
**Get Your Project Key**
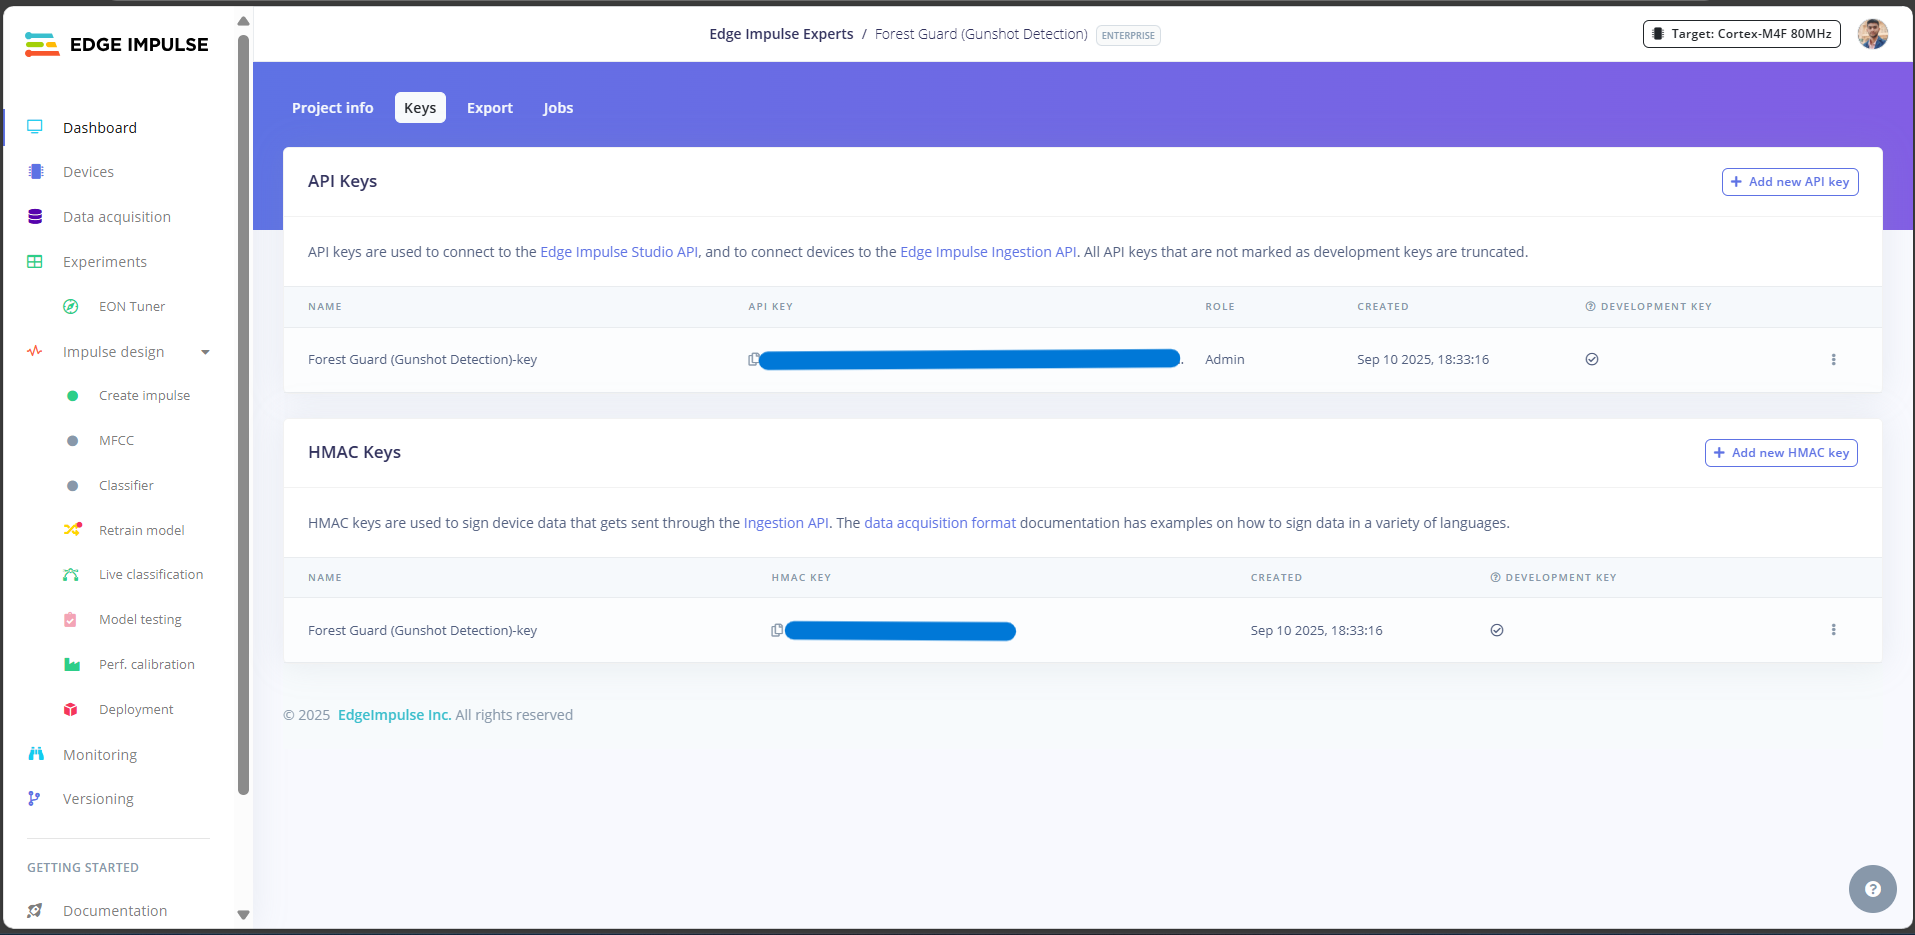
1. After the project is created, go to **Dashboard → Keys**.
2. Locate your **Project API Key**.
3. Copy this key and keep it handy — you’ll need it in the Flask tool and Node code to connect data and models to Edge Impulse.
 ## Step 13: Challenge to Collect Data
One of the biggest hurdles when working with **Edge Impulse** is data collection, especially for **audio** and **image** inputs. While numeric sensor streams (like temperature or humidity) can be pushed directly via serial, Edge Impulse currently doesn’t allow us to easily stream **raw audio** or **image frames** from the ESP32 to their platform in the same fast-forward way.
This means we normally have to:
1. Log data to an **SD card**.
2. Remove the card.
3. Copy files to the computer.
4. Upload them manually to Edge Impulse.
This process quickly becomes tedious when collecting **hundreds of samples**.
### My Solution: Flask Data Uploader
To make this seamless, I built a **Flask-based desktop tool** that bridges the ESP32 and Edge Impulse:
**ESP32 Data Firmware**
1. First, flash a simple Arduino sketch onto the ESP32 that streams audio (from the microphone) or images (from a camera) over **Serial USB**.
**Flask App**
1. On the PC side, run my **Flask tool**.
2. It listens to the ESP32’s serial port and captures the incoming raw data.
3. Using your **Edge Impulse API key**, the tool automatically uploads this data into your project.
**Benefits**
1. No need for SD cards or manual file transfers.
2. Data is organized and labeled as it’s uploaded.
3. Faster iteration when training models with new samples.
## Step 14: ESP32 Audio Serial Code
Before we can collect and upload audio samples into Edge Impulse, we need the ESP32-S3 to **stream raw microphone data** over Serial USB. This is done by flashing a small Arduino sketch that continuously records from the I²S microphone and sends the audio buffer to the PC.
**Install the ESP32 Board Package (Board Manager)**
1. Open **Arduino IDE → File → Preferences**.
2. In **Additional Boards Manager URLs**, add:
[https://raw.githubusercontent.com/espressif/arduino-esp32/gh-pages/package\_esp32\_index.json](https://raw.githubusercontent.com/espressif/arduino-esp32/gh-pages/package_esp32_index.json)
## Step 13: Challenge to Collect Data
One of the biggest hurdles when working with **Edge Impulse** is data collection, especially for **audio** and **image** inputs. While numeric sensor streams (like temperature or humidity) can be pushed directly via serial, Edge Impulse currently doesn’t allow us to easily stream **raw audio** or **image frames** from the ESP32 to their platform in the same fast-forward way.
This means we normally have to:
1. Log data to an **SD card**.
2. Remove the card.
3. Copy files to the computer.
4. Upload them manually to Edge Impulse.
This process quickly becomes tedious when collecting **hundreds of samples**.
### My Solution: Flask Data Uploader
To make this seamless, I built a **Flask-based desktop tool** that bridges the ESP32 and Edge Impulse:
**ESP32 Data Firmware**
1. First, flash a simple Arduino sketch onto the ESP32 that streams audio (from the microphone) or images (from a camera) over **Serial USB**.
**Flask App**
1. On the PC side, run my **Flask tool**.
2. It listens to the ESP32’s serial port and captures the incoming raw data.
3. Using your **Edge Impulse API key**, the tool automatically uploads this data into your project.
**Benefits**
1. No need for SD cards or manual file transfers.
2. Data is organized and labeled as it’s uploaded.
3. Faster iteration when training models with new samples.
## Step 14: ESP32 Audio Serial Code
Before we can collect and upload audio samples into Edge Impulse, we need the ESP32-S3 to **stream raw microphone data** over Serial USB. This is done by flashing a small Arduino sketch that continuously records from the I²S microphone and sends the audio buffer to the PC.
**Install the ESP32 Board Package (Board Manager)**
1. Open **Arduino IDE → File → Preferences**.
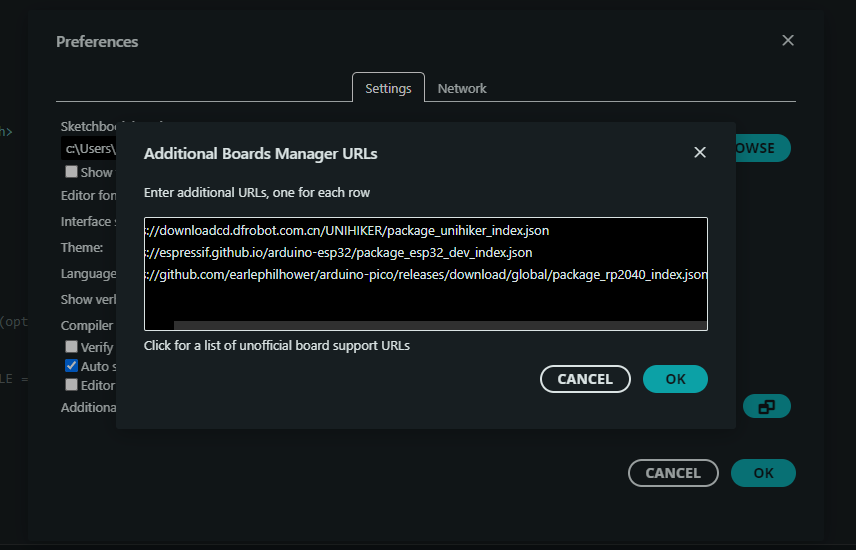
2. In **Additional Boards Manager URLs**, add:
[https://raw.githubusercontent.com/espressif/arduino-esp32/gh-pages/package\_esp32\_index.json](https://raw.githubusercontent.com/espressif/arduino-esp32/gh-pages/package_esp32_index.json)
 3. Click **OK**.
4. Go to **Tools → Board → Boards Manager…**.
5. Search **“ESP32”** and install **esp32 by Espressif Systems** (latest).
3. Click **OK**.
4. Go to **Tools → Board → Boards Manager…**.
5. Search **“ESP32”** and install **esp32 by Espressif Systems** (latest).
 > Tip: After install, restart Arduino IDE if the boards list doesn’t refresh.
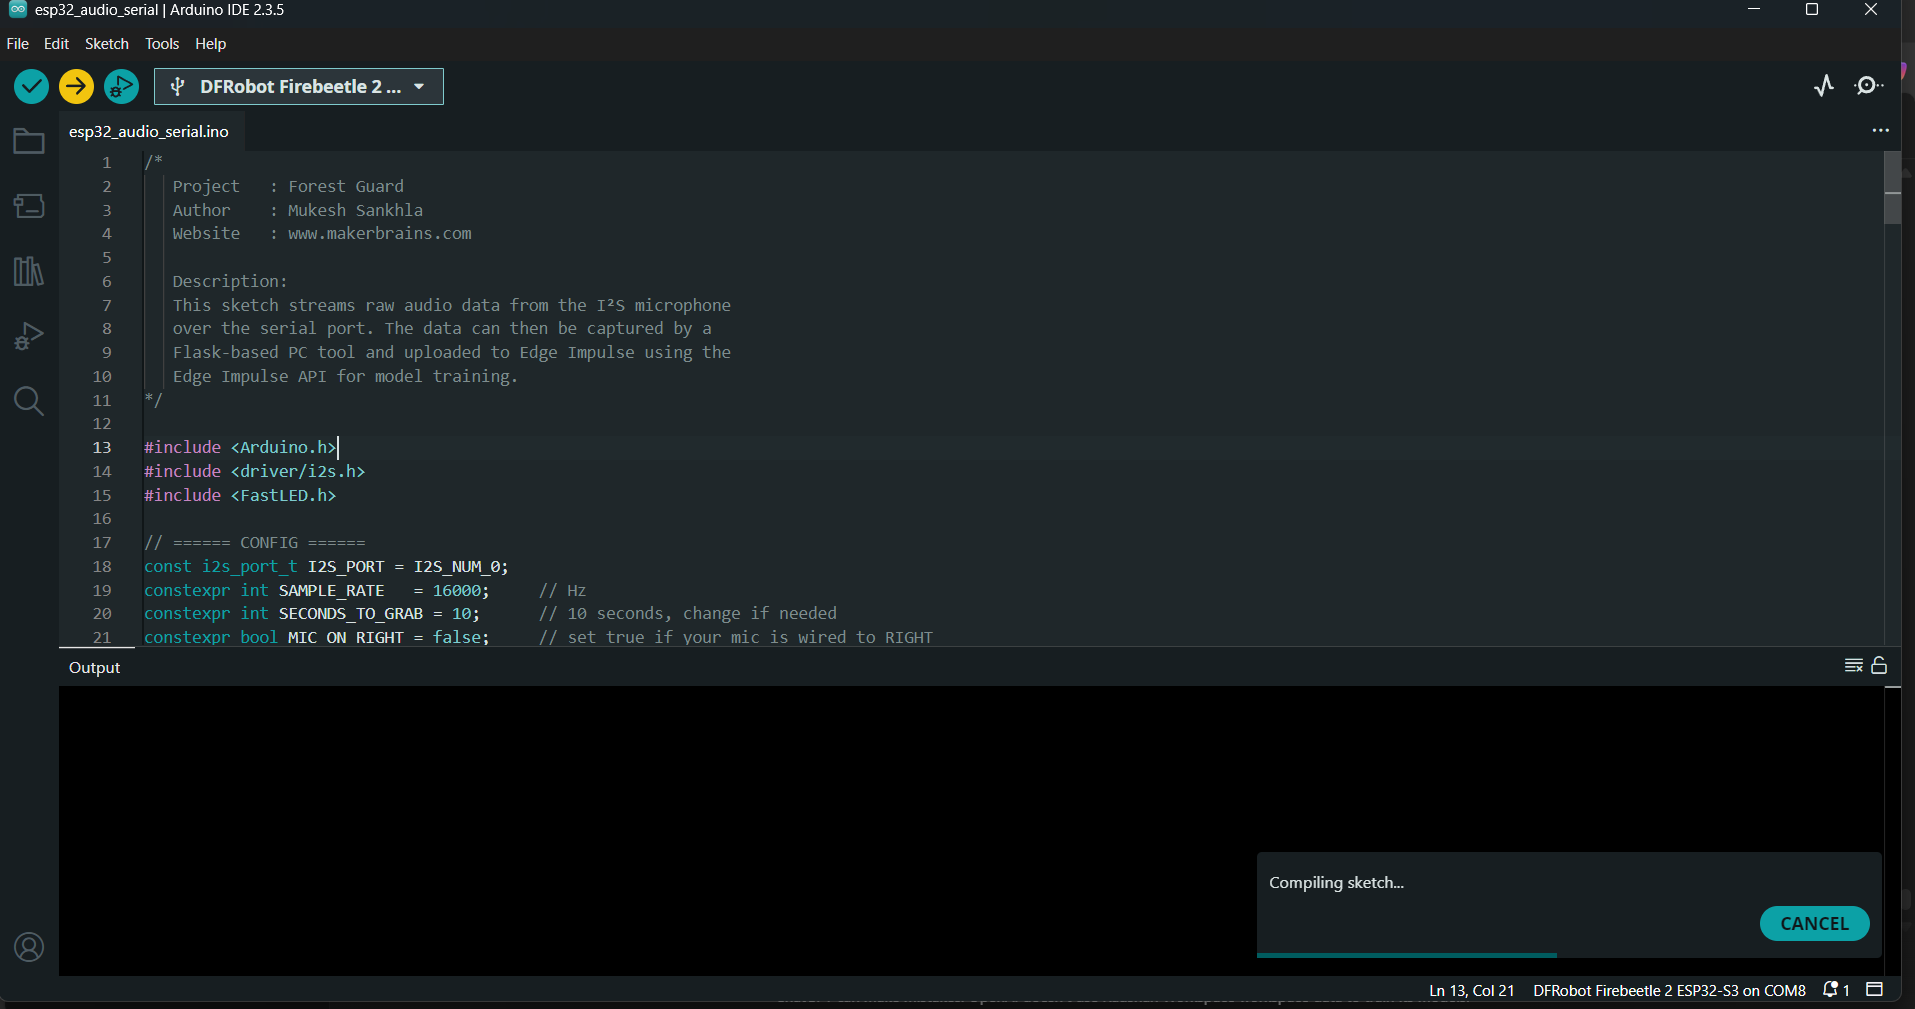
1. Open the provided esp32\_audio\_serial.ino sketch into Arduino IDE.
2. This code initializes the microphone, records a buffer, and streams it line-by-line over Serial.
3. Inside the sketch, you’ll see a configurable parameter:
```cpp theme={"system"}
constexpr int SECONDS_TO_GRAB = 10;
```
Change this value if you want longer or shorter recordings.
Default is **10 seconds** per sample.
1. Go to **Tools → Board → ESP32 → DFRobot FireBeetle 2 ESP32-S3**.
2. Connect your ESP32-S3 to the PC with USB-C.
3. Under **Tools → Port**, choose the correct COM port.
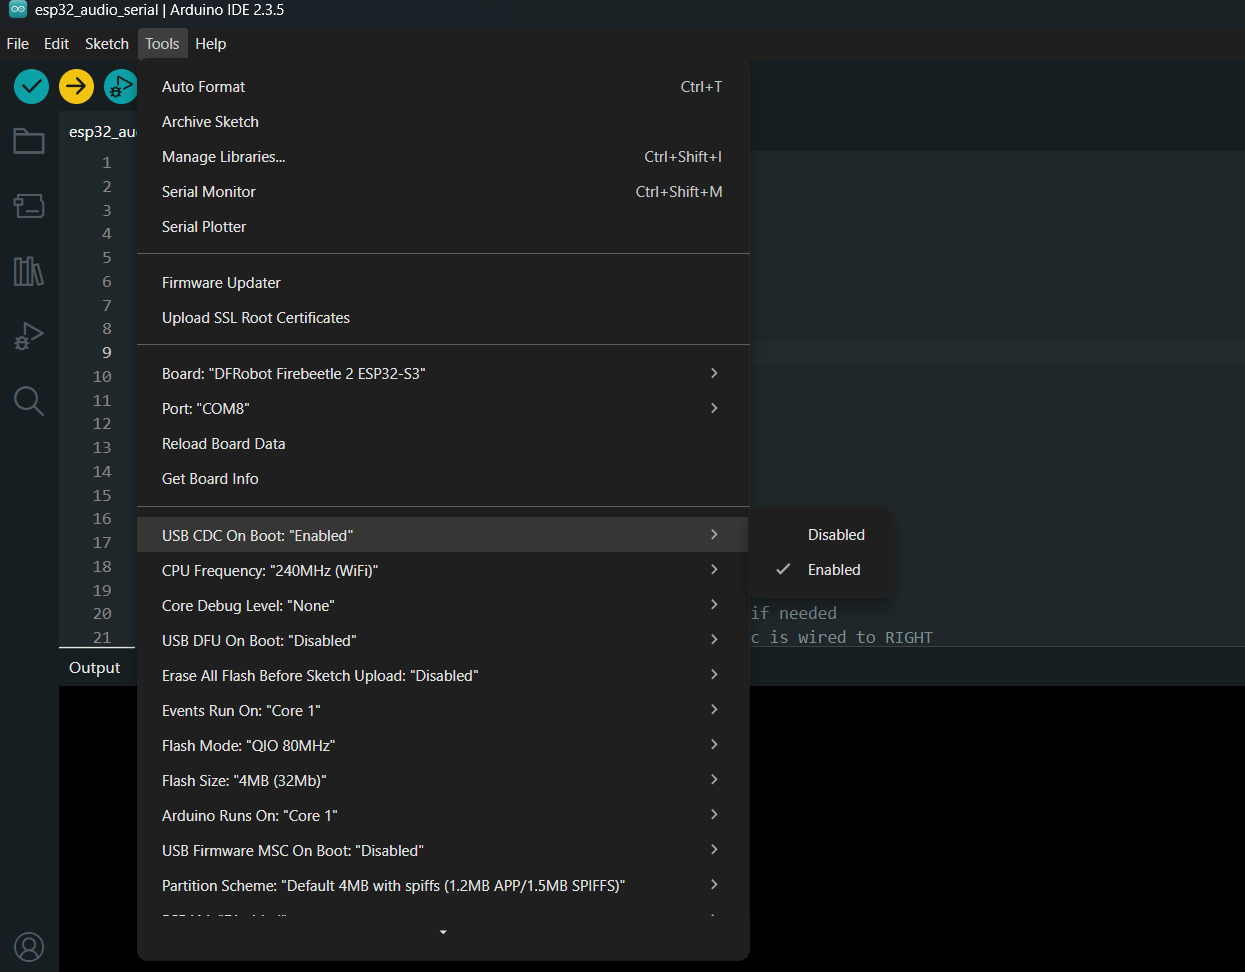
4. Under Tools **→ USB CDC On Boot → Enable**
5. Click **Upload** to flash the code onto your ESP32-S3.
> Tip: After install, restart Arduino IDE if the boards list doesn’t refresh.
1. Open the provided esp32\_audio\_serial.ino sketch into Arduino IDE.
2. This code initializes the microphone, records a buffer, and streams it line-by-line over Serial.
3. Inside the sketch, you’ll see a configurable parameter:
```cpp theme={"system"}
constexpr int SECONDS_TO_GRAB = 10;
```
Change this value if you want longer or shorter recordings.
Default is **10 seconds** per sample.
1. Go to **Tools → Board → ESP32 → DFRobot FireBeetle 2 ESP32-S3**.
2. Connect your ESP32-S3 to the PC with USB-C.
3. Under **Tools → Port**, choose the correct COM port.
4. Under Tools **→ USB CDC On Boot → Enable**
5. Click **Upload** to flash the code onto your ESP32-S3.
 ## Step 15: Run Flask Tool
Now that your ESP32-S3 is streaming microphone data over Serial, let’s use the **Flask Data Tool** to capture it and upload directly into your Edge Impulse project.
**Setup the Flask Tool**
## Step 15: Run Flask Tool
Now that your ESP32-S3 is streaming microphone data over Serial, let’s use the **Flask Data Tool** to capture it and upload directly into your Edge Impulse project.
**Setup the Flask Tool**
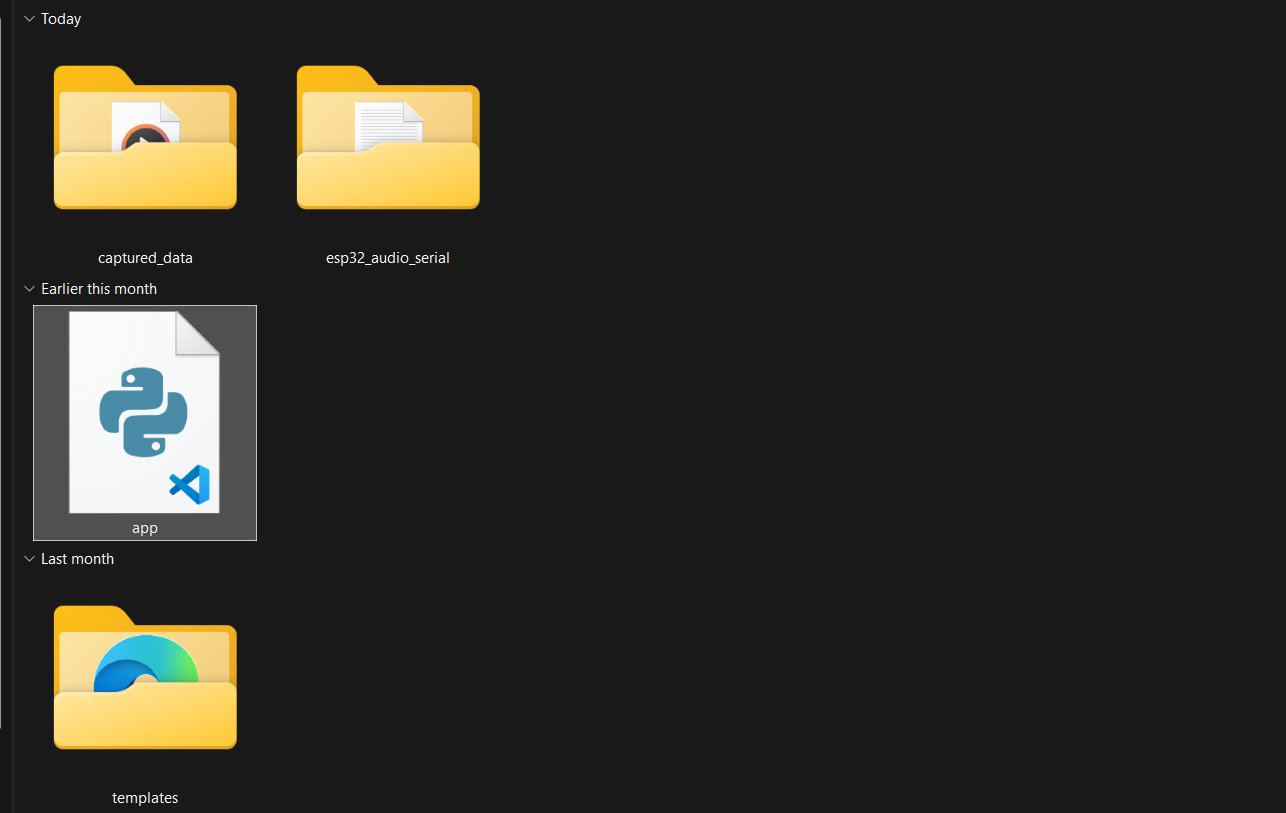 1. Download the project repository:
2. 👉 [Forest-Guard GitHub Repository](https://github.com/MukeshSankhla/Forest-Guard/)
3. Open the **Edge Impulse Data Tool** folder.
4. Run the Flask app:
```
python app.py
```
(File path: Edge Impulse Data Tool/app.py)
**Access the Web Interface**
1. Once the server is running, open your browser and go to:
[http://127.0.0.1:5000/](http://127.0.0.1:5000/)
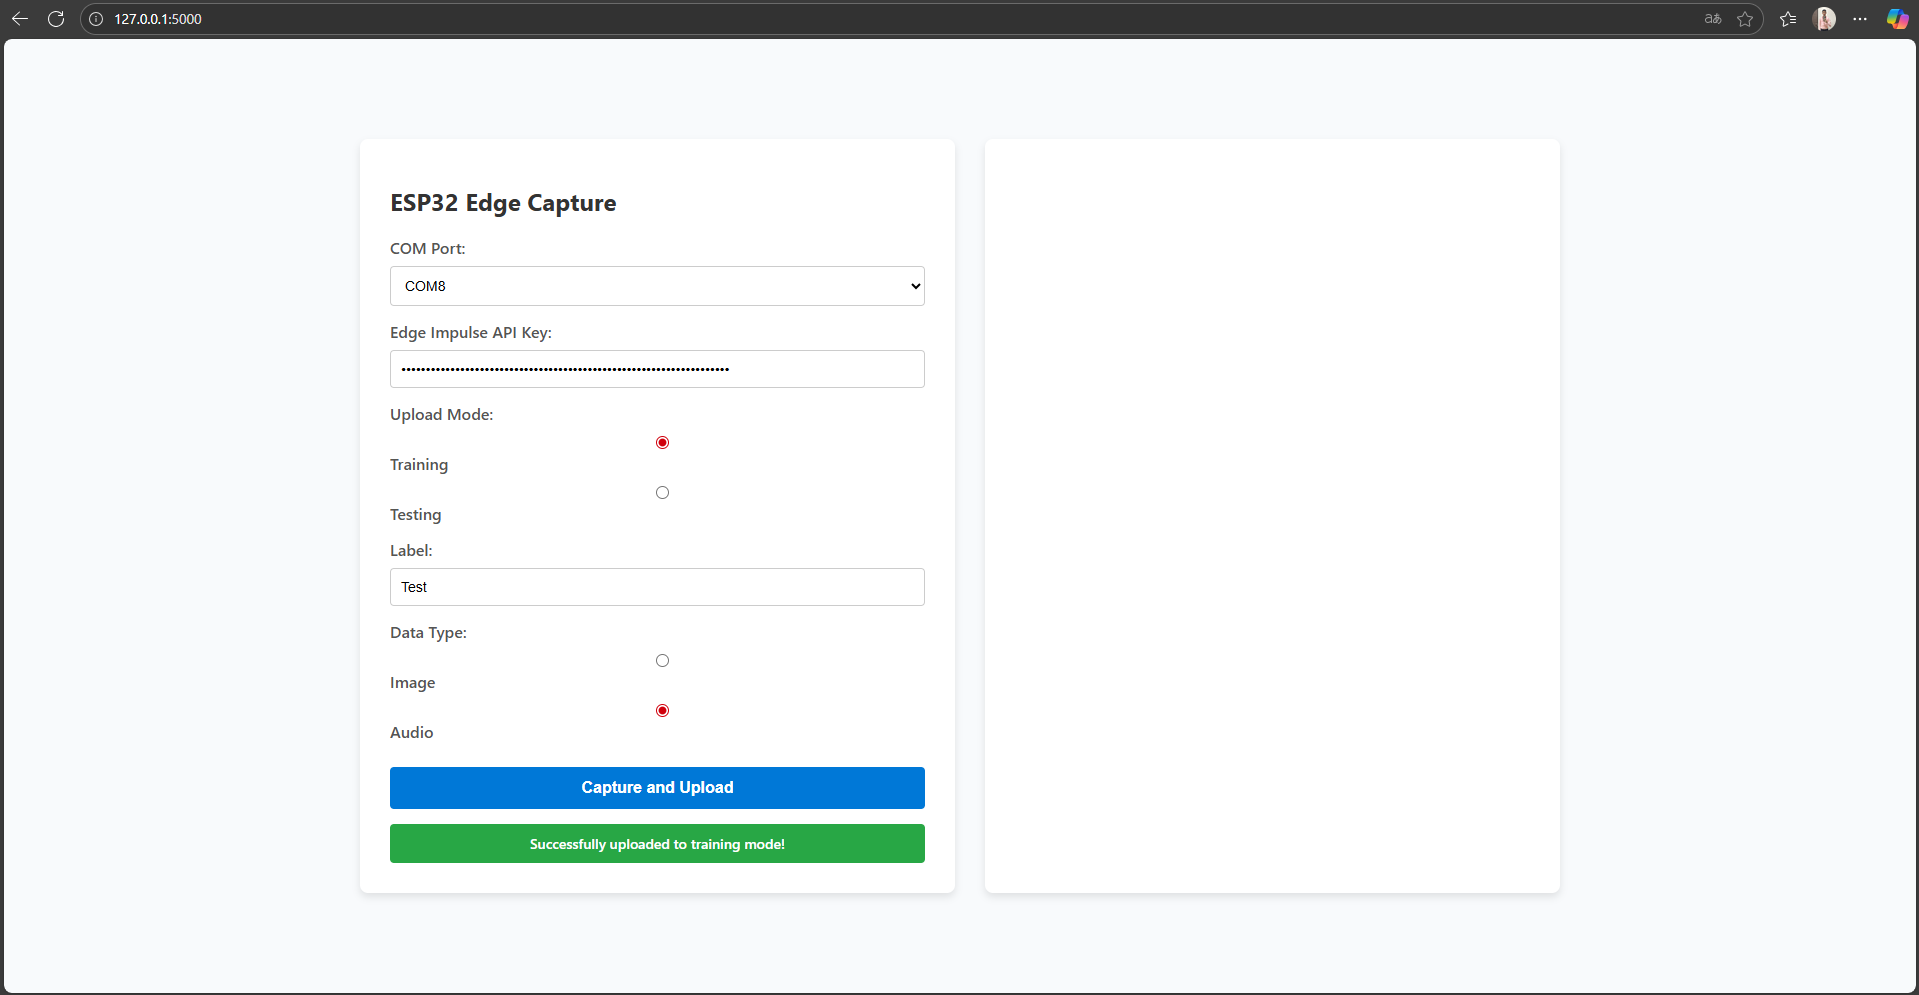
2. You will see the **data collection dashboard**.
1. Download the project repository:
2. 👉 [Forest-Guard GitHub Repository](https://github.com/MukeshSankhla/Forest-Guard/)
3. Open the **Edge Impulse Data Tool** folder.
4. Run the Flask app:
```
python app.py
```
(File path: Edge Impulse Data Tool/app.py)
**Access the Web Interface**
1. Once the server is running, open your browser and go to:
[http://127.0.0.1:5000/](http://127.0.0.1:5000/)
2. You will see the **data collection dashboard**.
 **Collect Audio Data**
1. **Select COM Port** → Choose the port where your ESP32 is connected.
2. **Paste API Key** → Enter your Edge Impulse **project API key** (from Step 14).
3. **Choose Mode** → Select whether this sample is for **training** or **testing**.
4. **Enter Label** → e.g., gunshot or background.
5. **Select Data Type** → Choose **Audio**.
6. **Click Capture** → Recording will begin.
7. The **Node LED will glow green** while audio is being recorded.
8. Once the LED turns off, the captured audio file is automatically uploaded to your Edge Impulse project.
You should now see your labeled audio samples appear inside the **Edge Impulse Studio → Data Acquisition** tab. From here, you can repeat the process to build up your dataset of gunshots and background noise.
**Collect Audio Data**
1. **Select COM Port** → Choose the port where your ESP32 is connected.
2. **Paste API Key** → Enter your Edge Impulse **project API key** (from Step 14).
3. **Choose Mode** → Select whether this sample is for **training** or **testing**.
4. **Enter Label** → e.g., gunshot or background.
5. **Select Data Type** → Choose **Audio**.
6. **Click Capture** → Recording will begin.
7. The **Node LED will glow green** while audio is being recorded.
8. Once the LED turns off, the captured audio file is automatically uploaded to your Edge Impulse project.
You should now see your labeled audio samples appear inside the **Edge Impulse Studio → Data Acquisition** tab. From here, you can repeat the process to build up your dataset of gunshots and background noise.
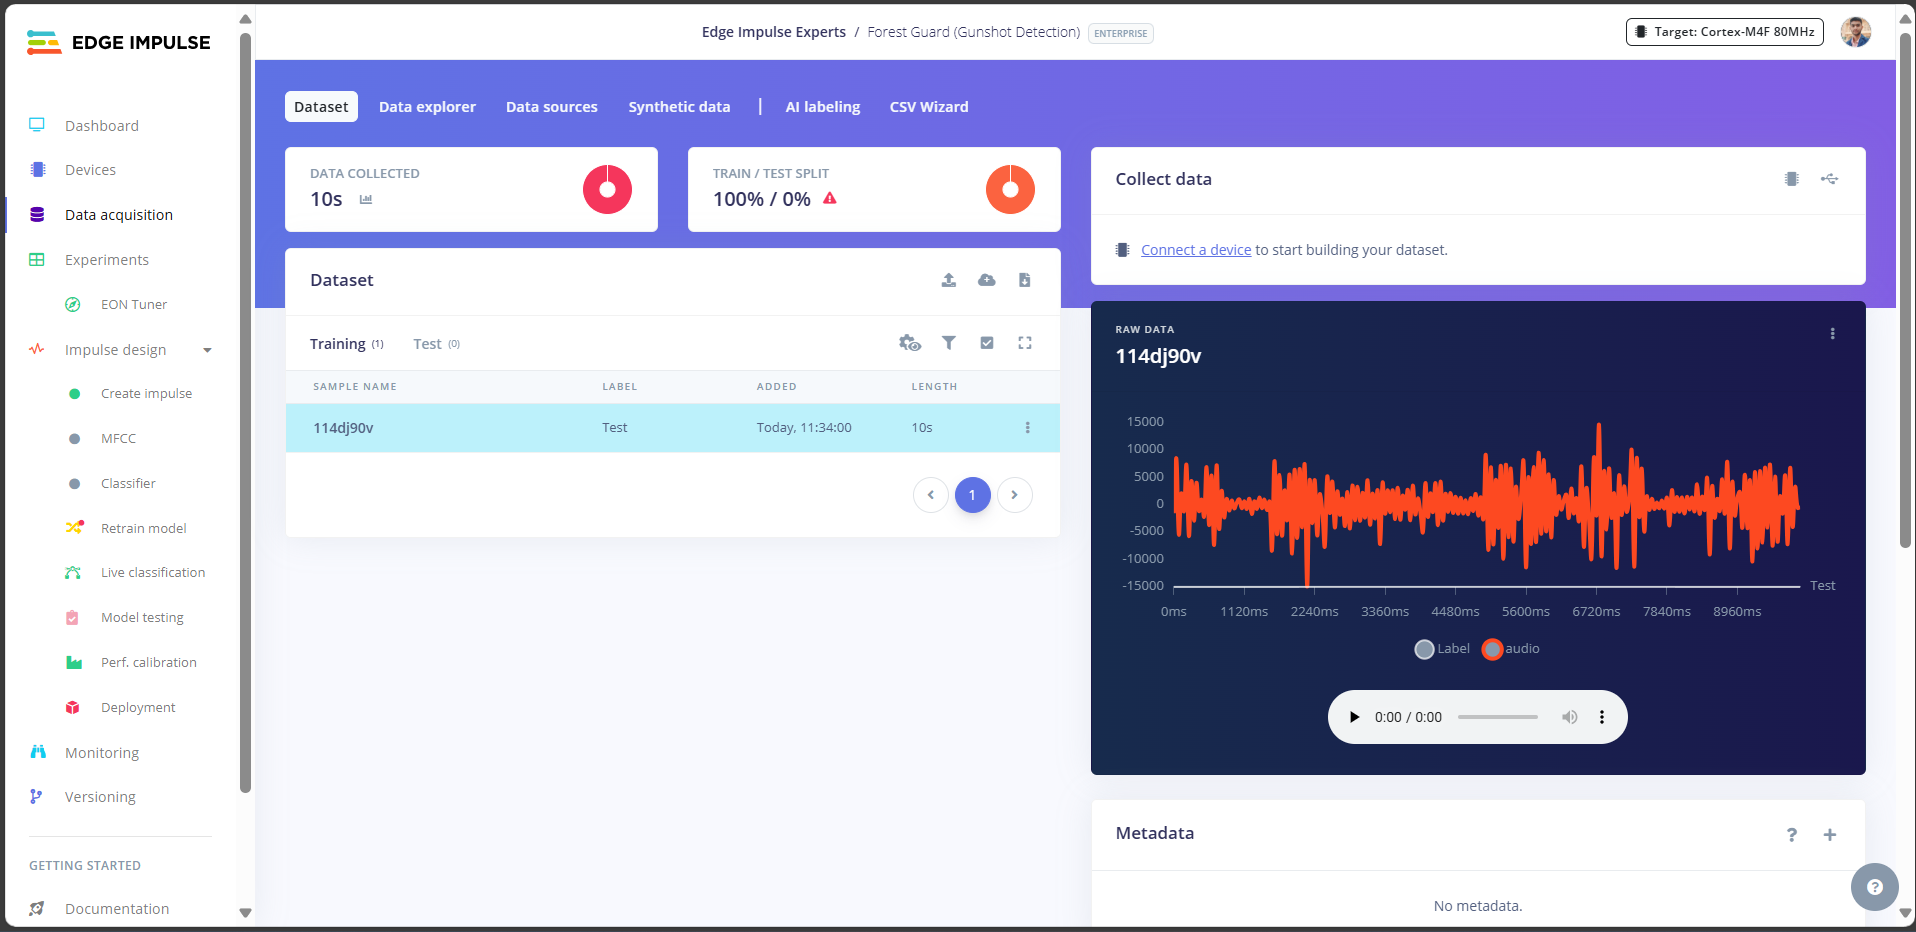 ## Step 16: Collect Data
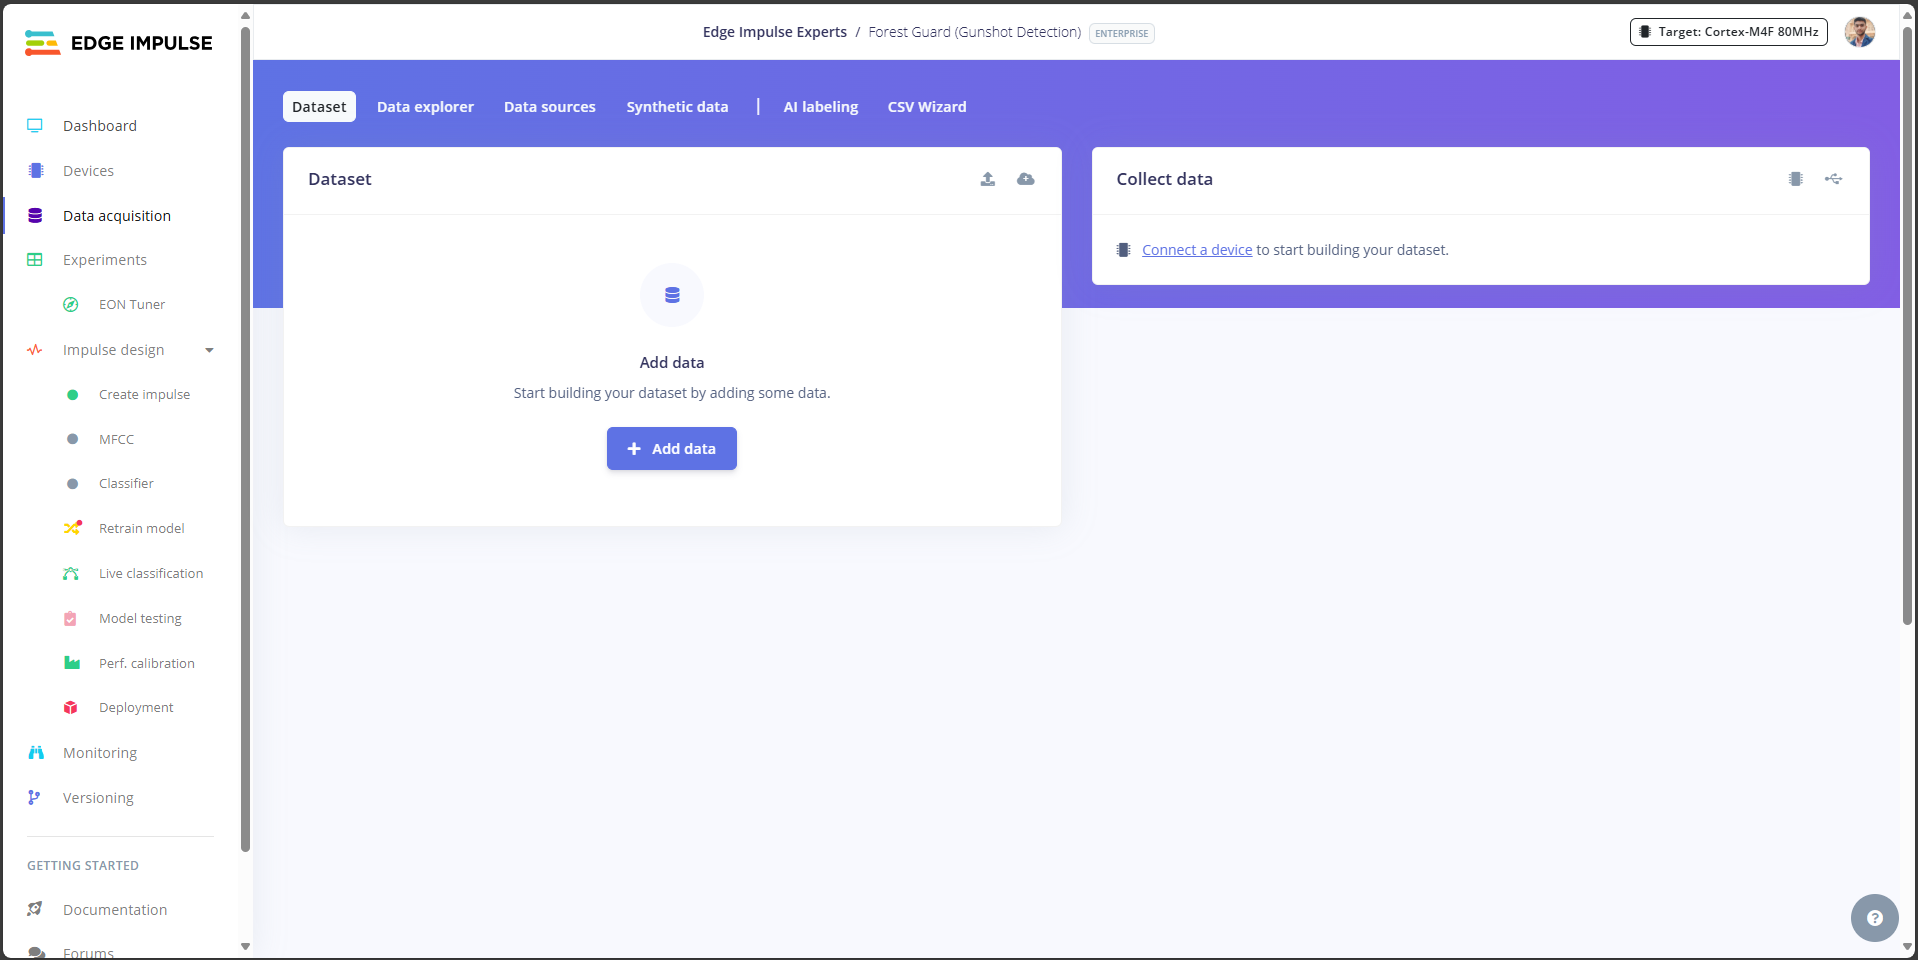 Now that the Flask tool is ready and connected to Edge Impulse, it’s time to build our **training dataset**. A good dataset is the most important factor for achieving a reliable classification model.
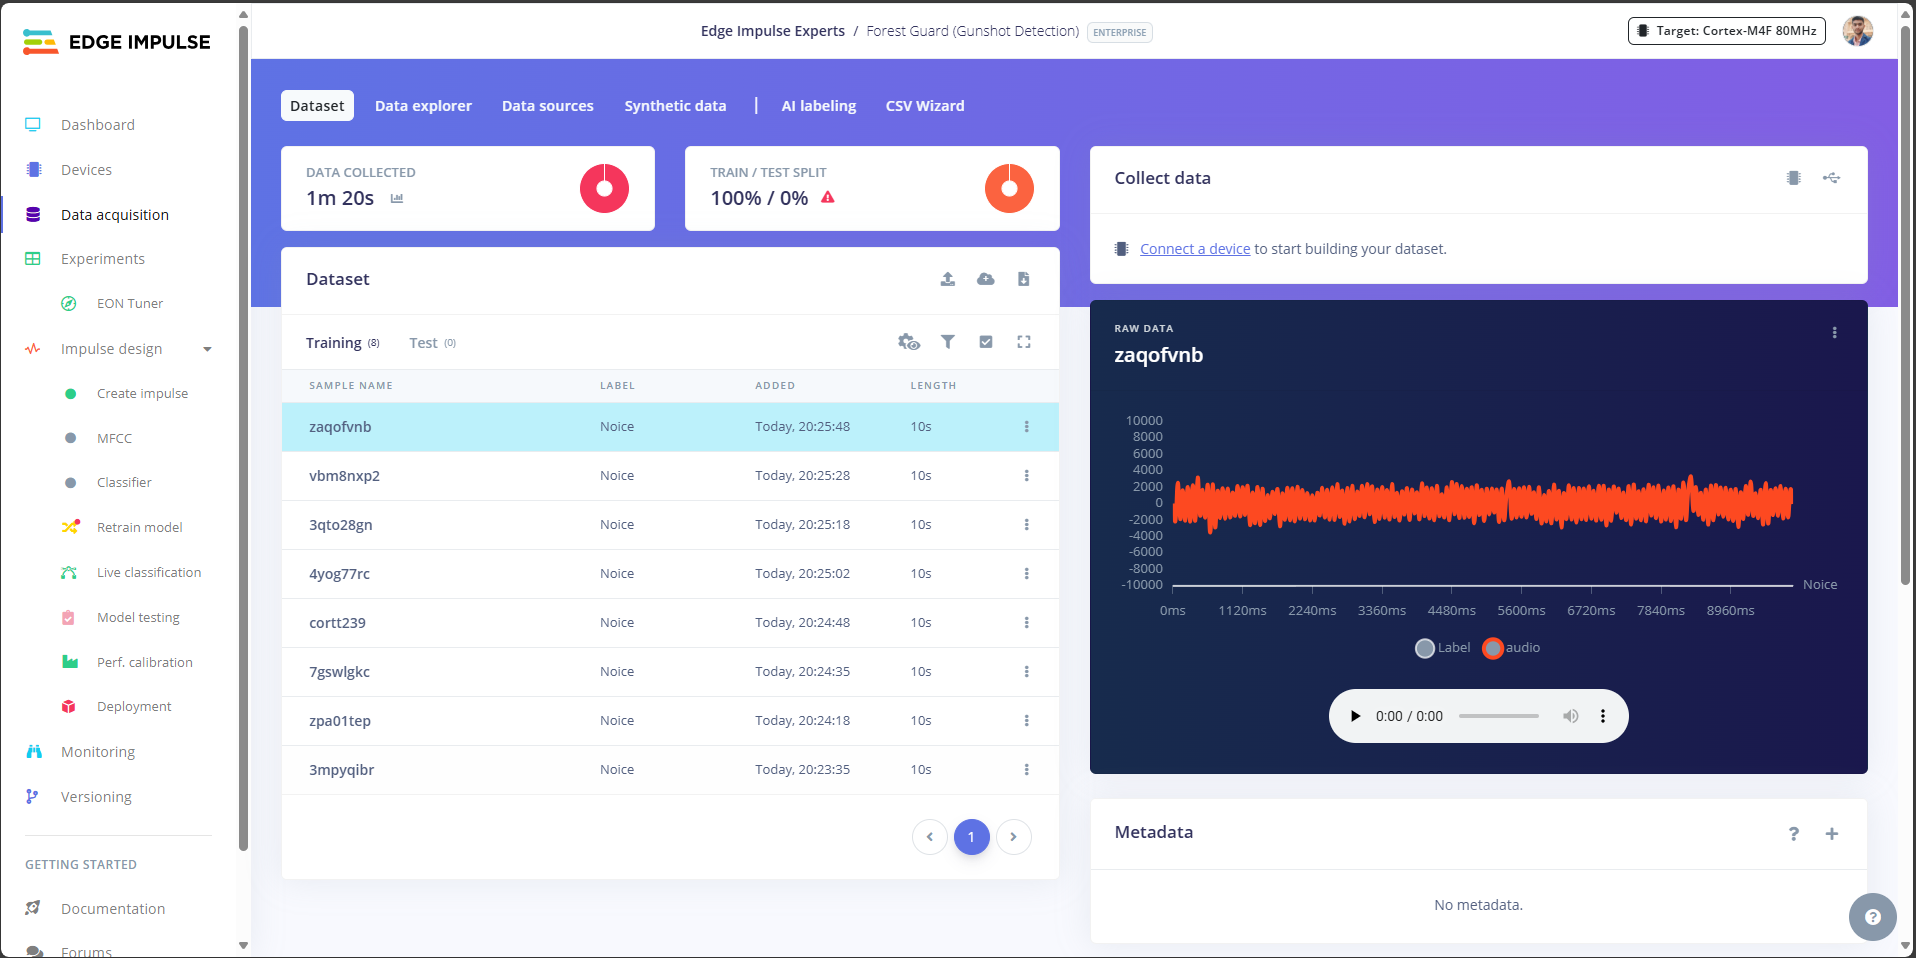
**Collect Background Noise Data**
1. Set the **label** flag to **Noise**.
2. Start recording samples in different environments:
* **Indoors** → quiet rooms, fan noise, people talking.
* **Outdoors** → wind, birds, insects, cars, etc.
3. Collect at least **120 seconds of audio** in each scenario.
4. The more variety, the better the model can tell background noise apart from gunshots.
Now that the Flask tool is ready and connected to Edge Impulse, it’s time to build our **training dataset**. A good dataset is the most important factor for achieving a reliable classification model.
**Collect Background Noise Data**
1. Set the **label** flag to **Noise**.
2. Start recording samples in different environments:
* **Indoors** → quiet rooms, fan noise, people talking.
* **Outdoors** → wind, birds, insects, cars, etc.
3. Collect at least **120 seconds of audio** in each scenario.
4. The more variety, the better the model can tell background noise apart from gunshots.
 **Collect Gunshot Data**
1. Set the **label** flag to **Gun**.
2. Play **different gunshot audio samples** (different calibers, environments, echo levels).
3. Record up to **120 seconds** of audio in total.
Using multiple gunshot sound samples with slightly different characteristics helps the model generalize better to real-world scenarios.
**Collect Gunshot Data**
1. Set the **label** flag to **Gun**.
2. Play **different gunshot audio samples** (different calibers, environments, echo levels).
3. Record up to **120 seconds** of audio in total.
Using multiple gunshot sound samples with slightly different characteristics helps the model generalize better to real-world scenarios.
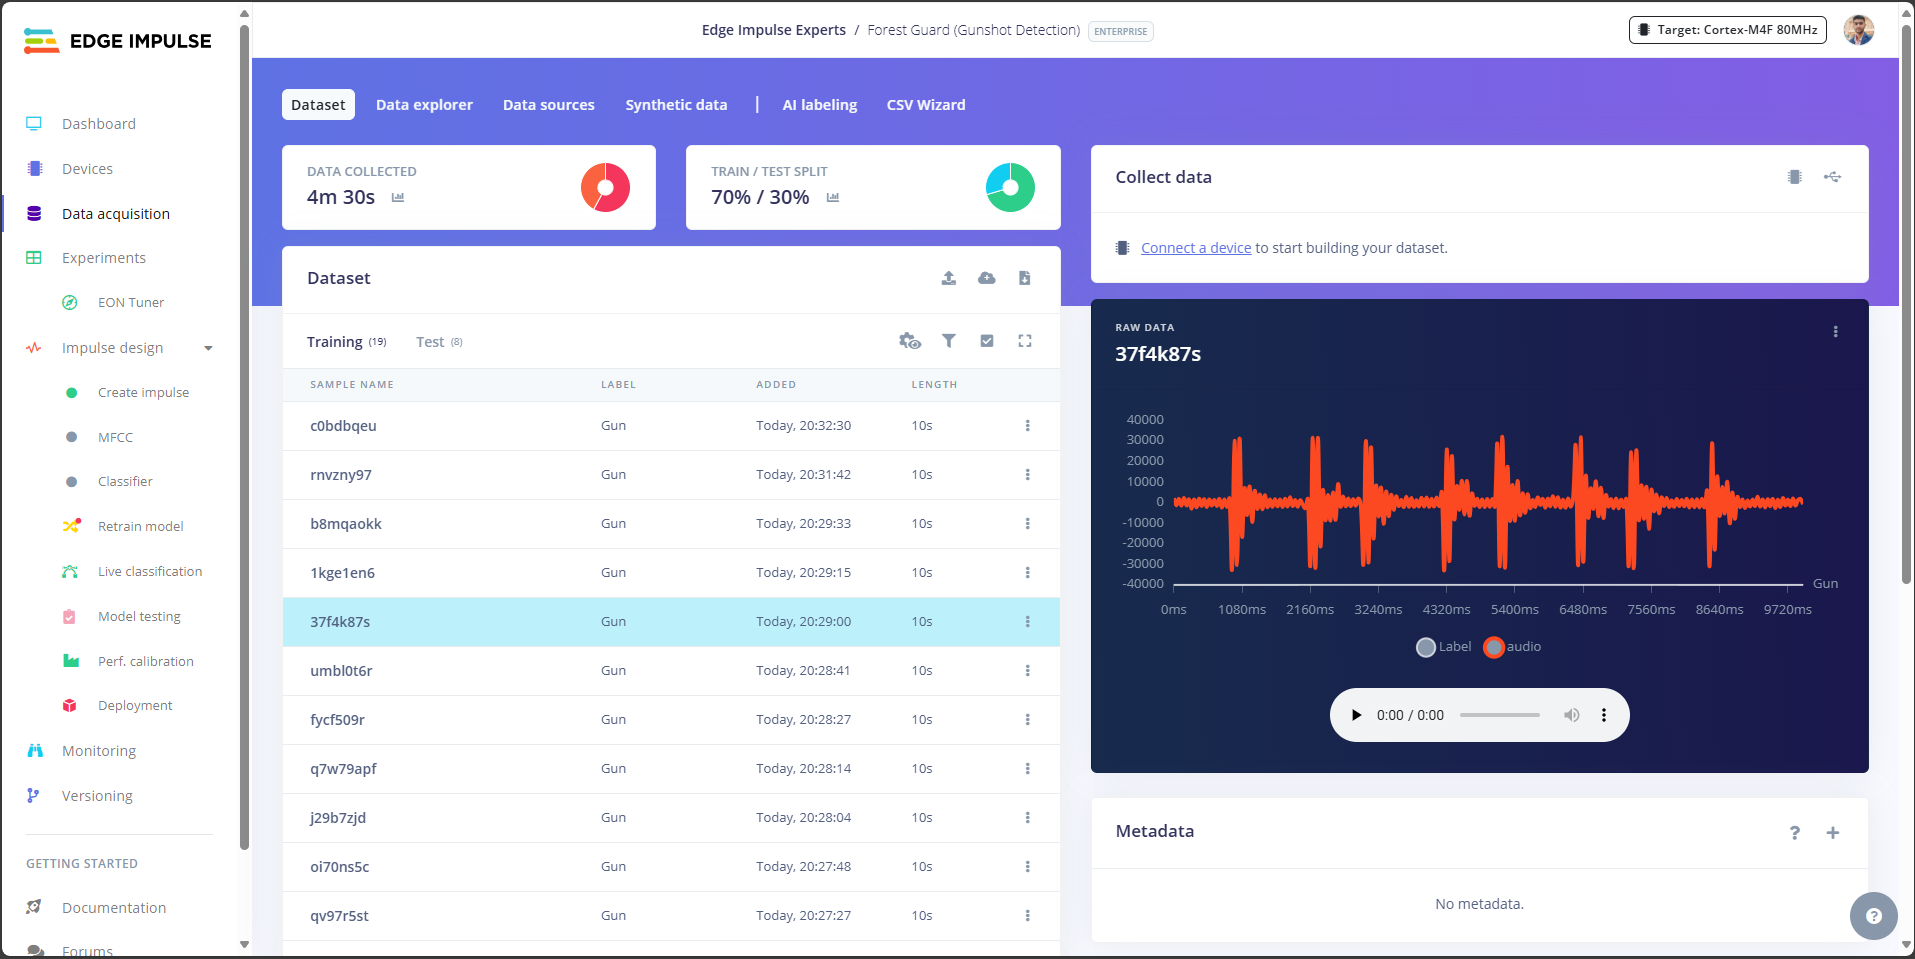 **To make sure the model is reliable:**
1. Split your dataset **80:20** → 80% for **training**, 20% for **testing**.
2. Edge Impulse automatically suggests the split, but you can also move samples manually if needed.
**Tips for Better Results**
1. Collect data at **different volumes and distances**.
2. Try to balance the number of Noise and Gunshot samples.
3. Keep background data diverse - this prevents false positives.
## Step 17: Split Data
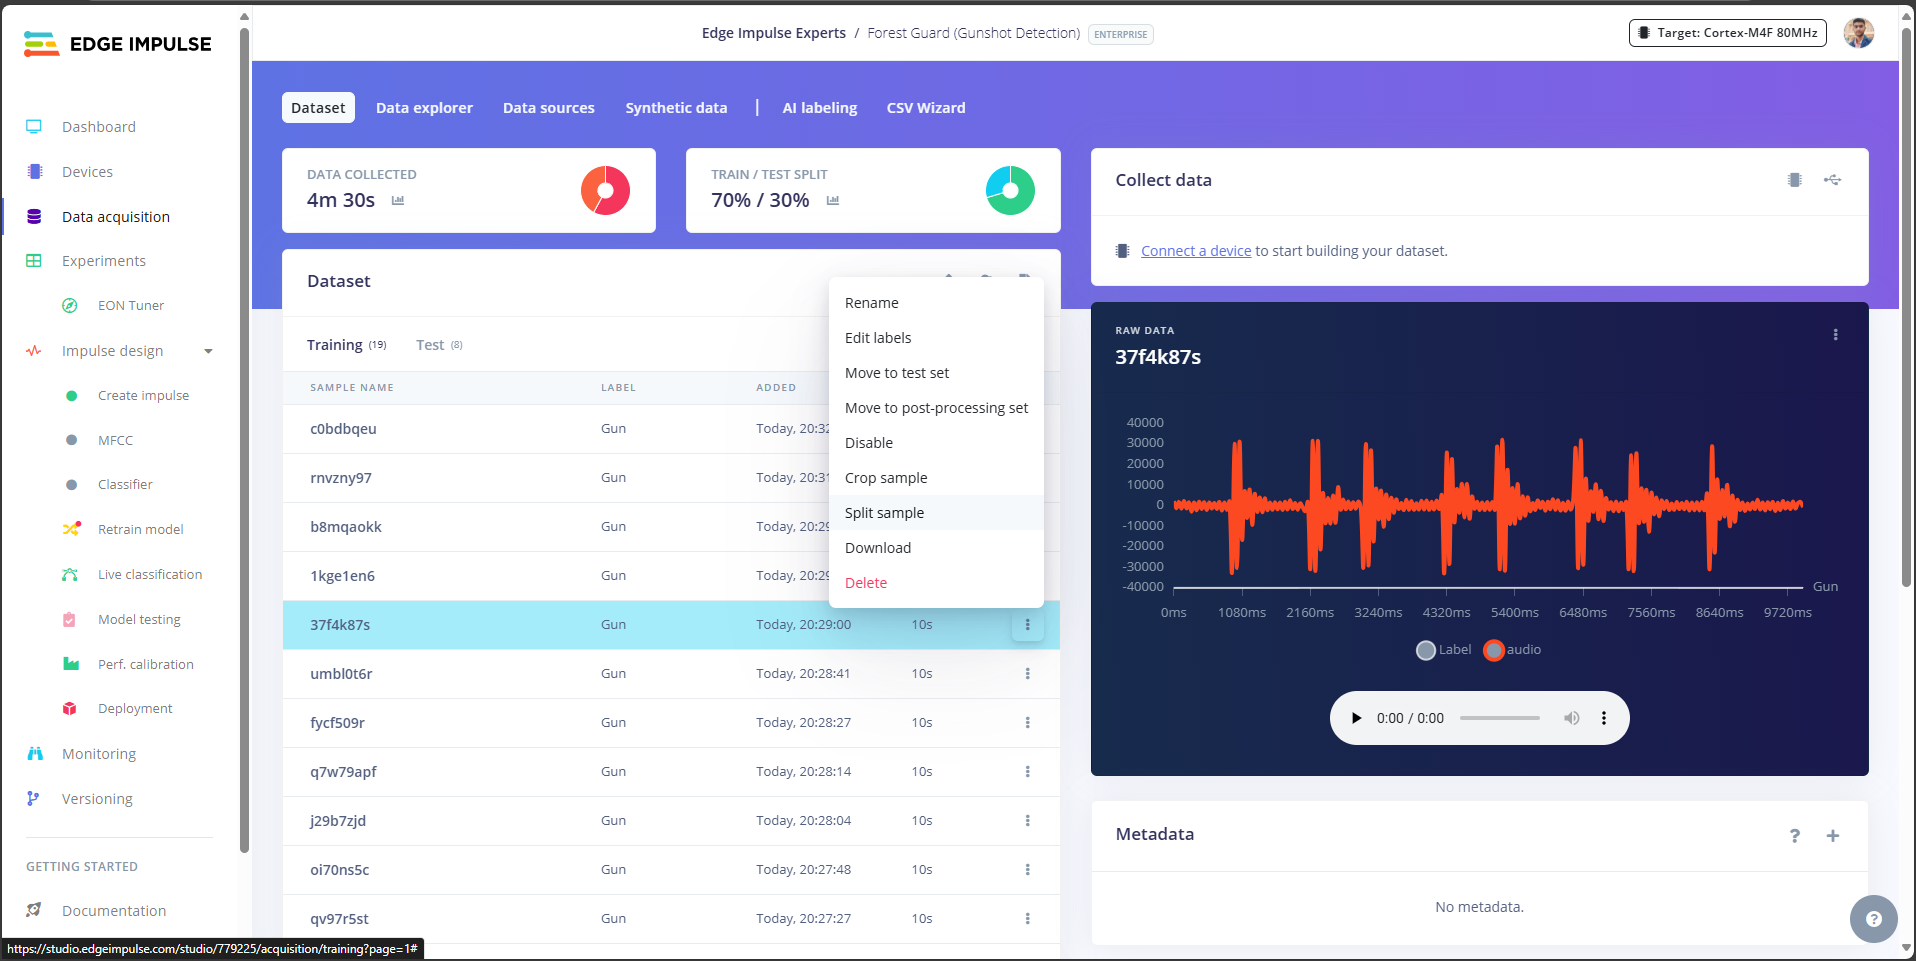
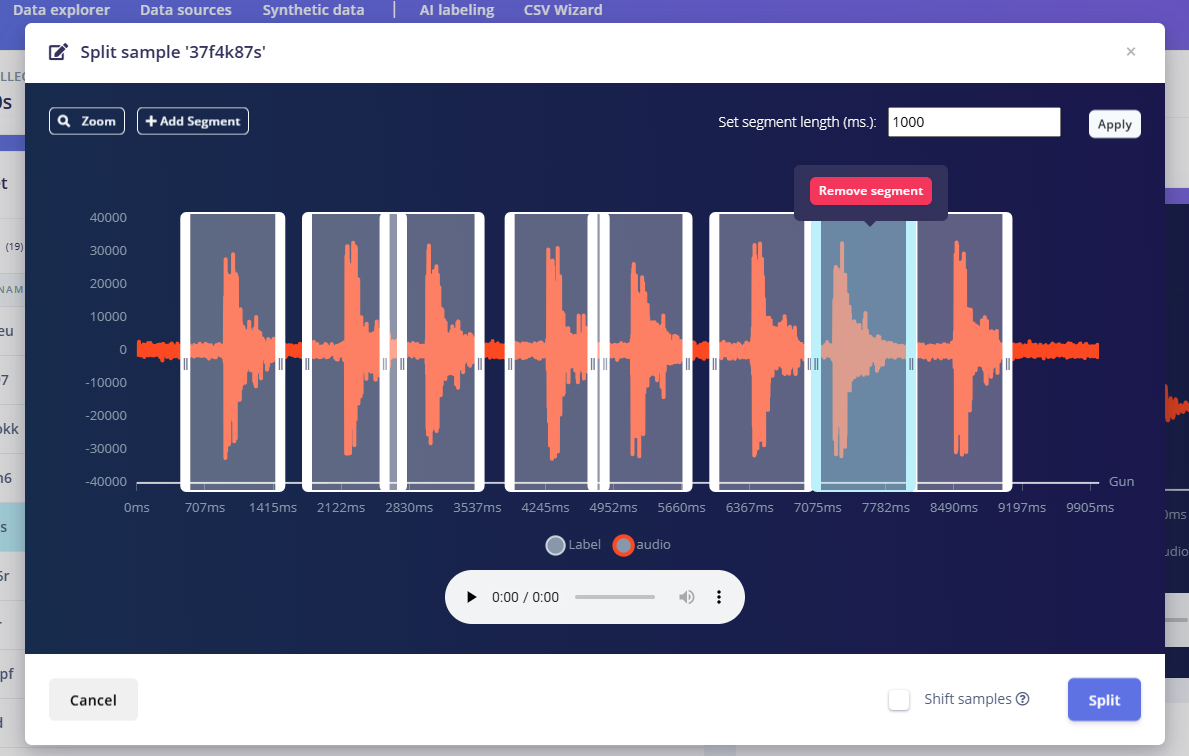
Right now, each recorded audio sample is **10 seconds long**. For better accuracy, we need to **split these into smaller 1-second samples** that can be used as training features in Edge Impulse.
**Splitting Process in Edge Impulse**
1. In **Edge Impulse Studio**, go to the **Data Acquisition** tab.
2. Find one of your **10-second audio samples** (either Noise or Gunshot).
3. Click on the **three dots (…) menu** next to the sample.
4. Choose **Split Sample**.
5. Use the tool to crop each segment into **1-second chunks**.
6. Example: a 10-second audio file becomes **10× 1-second samples**.
7. For gunshot recordings, isolate the exact segment of the shot to ensure the model learns the event clearly.
8. Click **Split** to save.
**To make sure the model is reliable:**
1. Split your dataset **80:20** → 80% for **training**, 20% for **testing**.
2. Edge Impulse automatically suggests the split, but you can also move samples manually if needed.
**Tips for Better Results**
1. Collect data at **different volumes and distances**.
2. Try to balance the number of Noise and Gunshot samples.
3. Keep background data diverse - this prevents false positives.
## Step 17: Split Data
Right now, each recorded audio sample is **10 seconds long**. For better accuracy, we need to **split these into smaller 1-second samples** that can be used as training features in Edge Impulse.
**Splitting Process in Edge Impulse**
1. In **Edge Impulse Studio**, go to the **Data Acquisition** tab.
2. Find one of your **10-second audio samples** (either Noise or Gunshot).
3. Click on the **three dots (…) menu** next to the sample.
4. Choose **Split Sample**.
5. Use the tool to crop each segment into **1-second chunks**.
6. Example: a 10-second audio file becomes **10× 1-second samples**.
7. For gunshot recordings, isolate the exact segment of the shot to ensure the model learns the event clearly.
8. Click **Split** to save.
 ## Step 18: Create Impulse
With your dataset ready and split into 1-second audio clips, the next step in Edge Impulse is to **design the impulse**, the pipeline that converts raw audio into features, and then trains a classification model.
**Create a New Impulse**
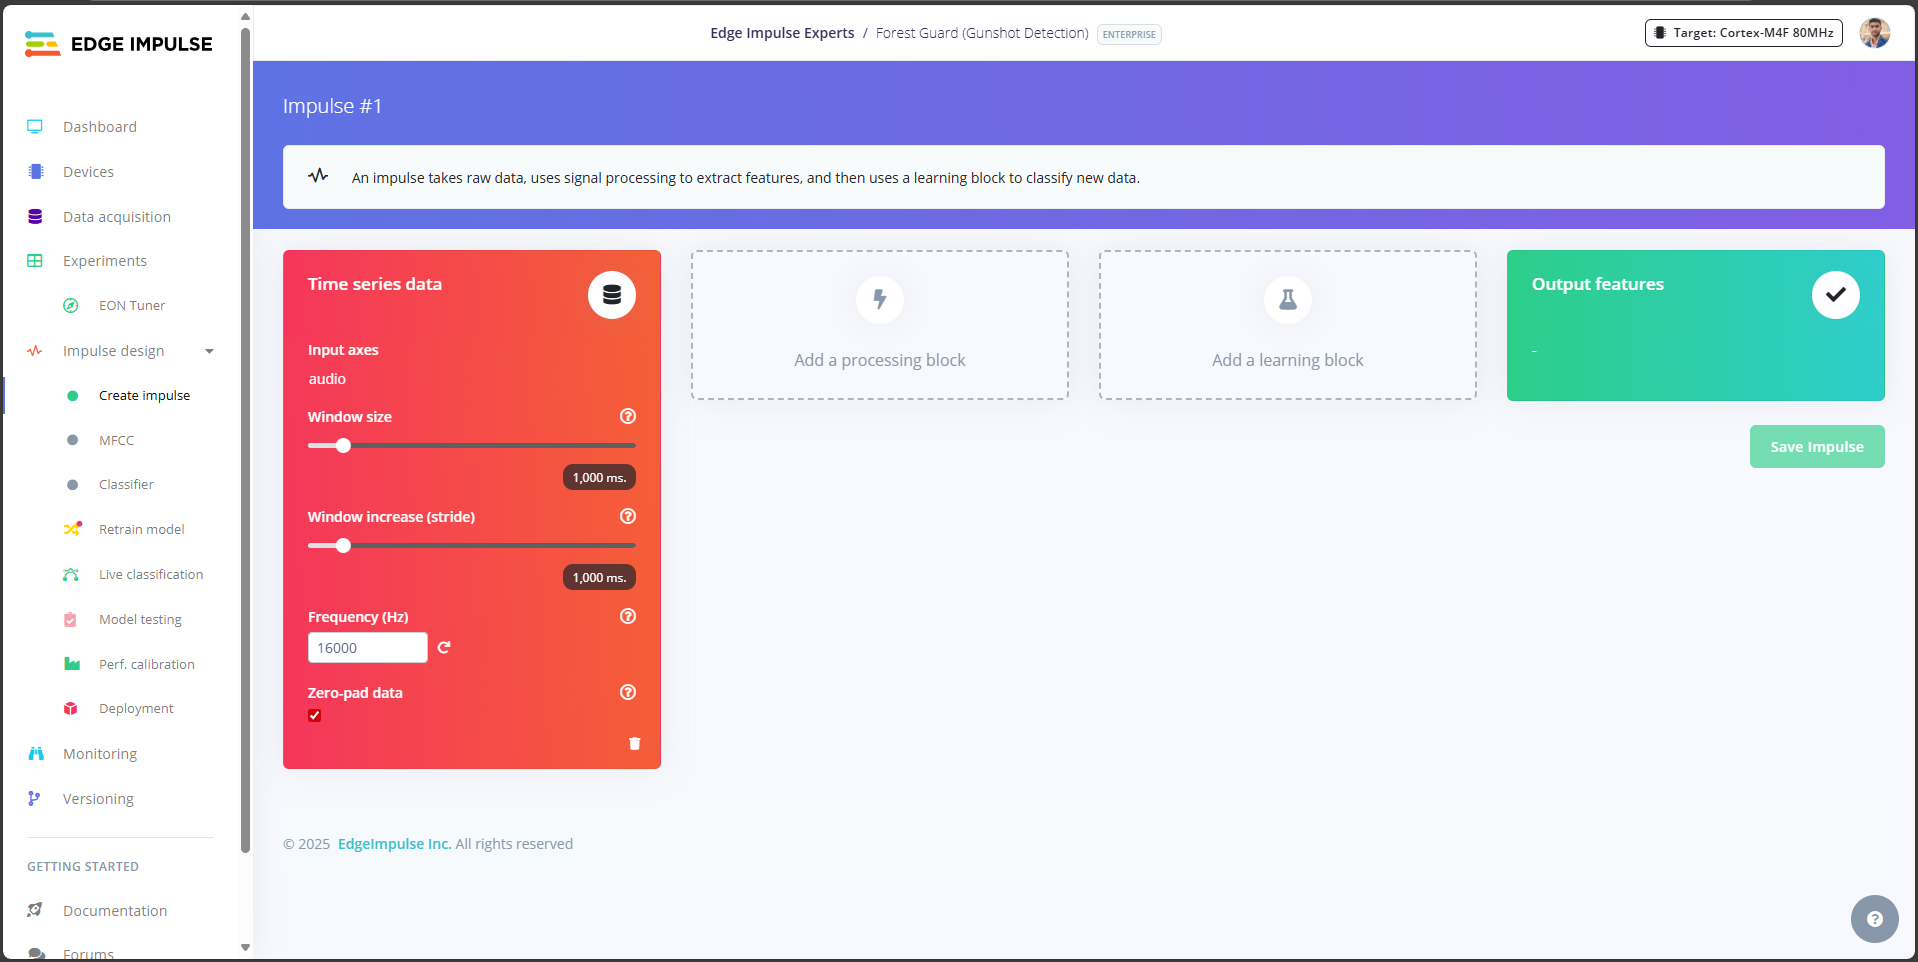
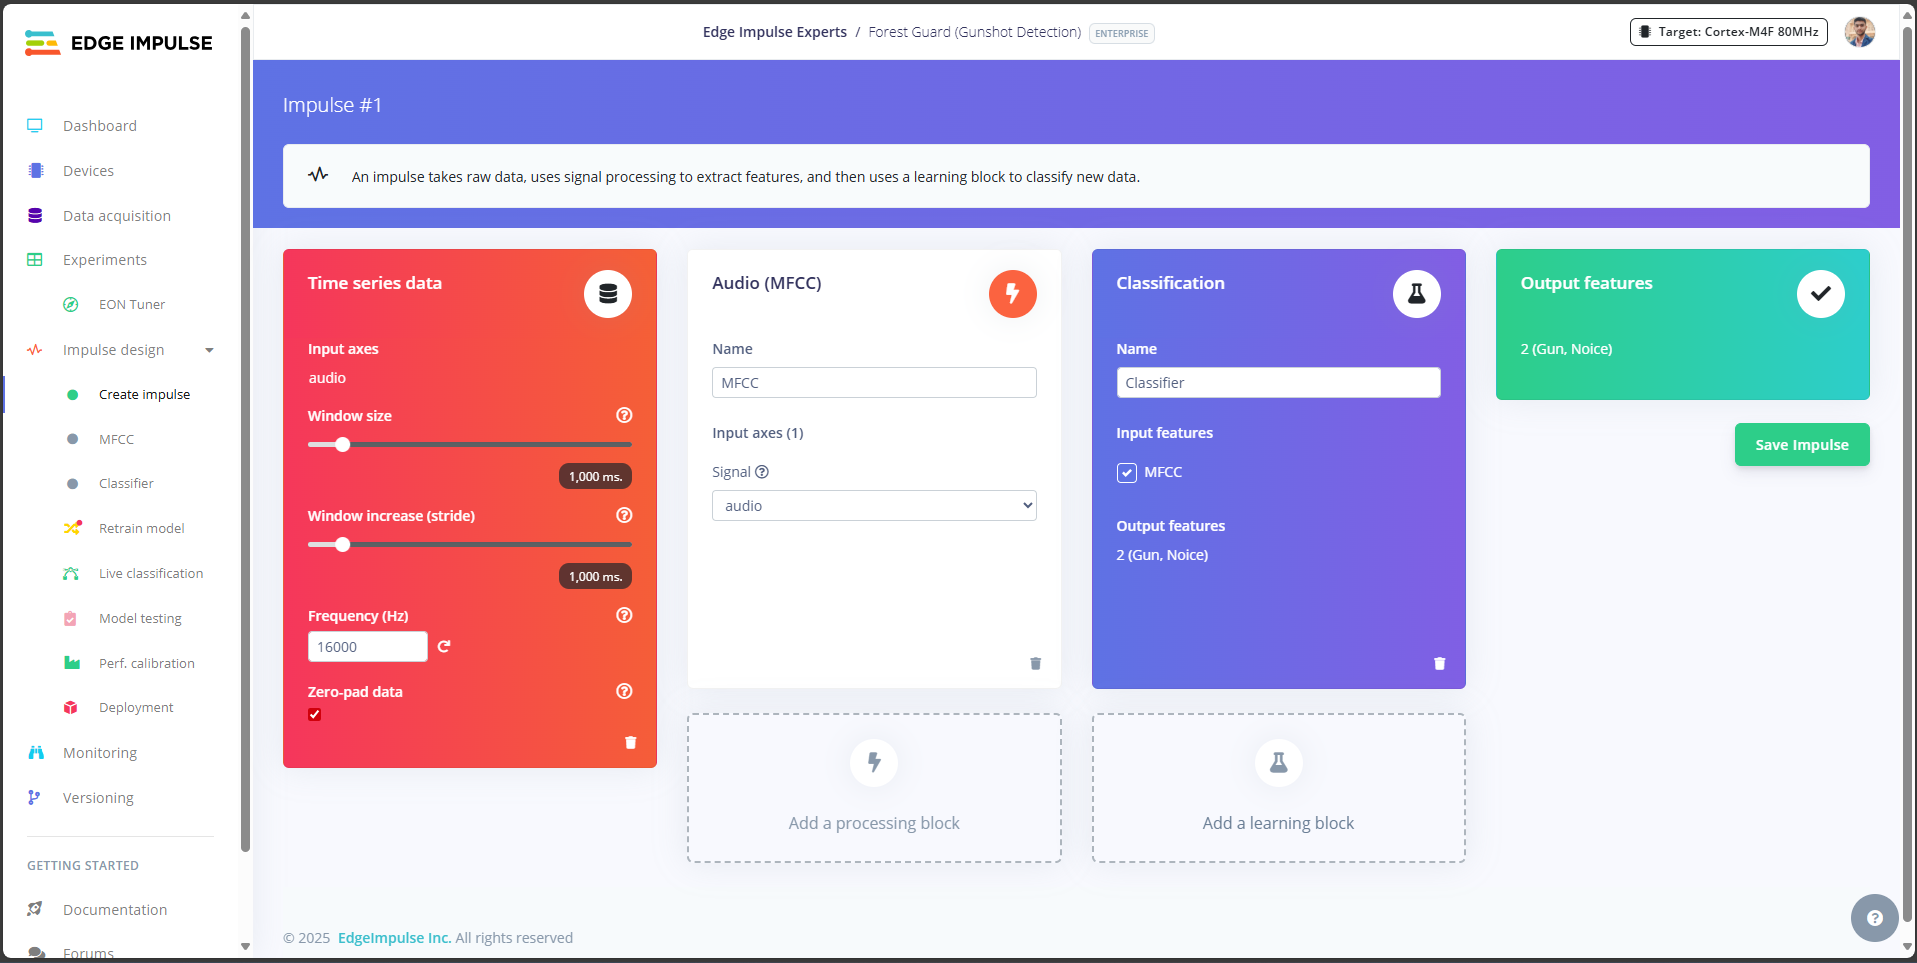
1. In **Edge Impulse Studio**, go to the **Create Impulse** tab.
2. Set the **Window Size** and **Frequency** as shown in the reference image (these define how much audio is processed in each slice and at what sample rate).
## Step 18: Create Impulse
With your dataset ready and split into 1-second audio clips, the next step in Edge Impulse is to **design the impulse**, the pipeline that converts raw audio into features, and then trains a classification model.
**Create a New Impulse**
1. In **Edge Impulse Studio**, go to the **Create Impulse** tab.
2. Set the **Window Size** and **Frequency** as shown in the reference image (these define how much audio is processed in each slice and at what sample rate).
 **Add Blocks**
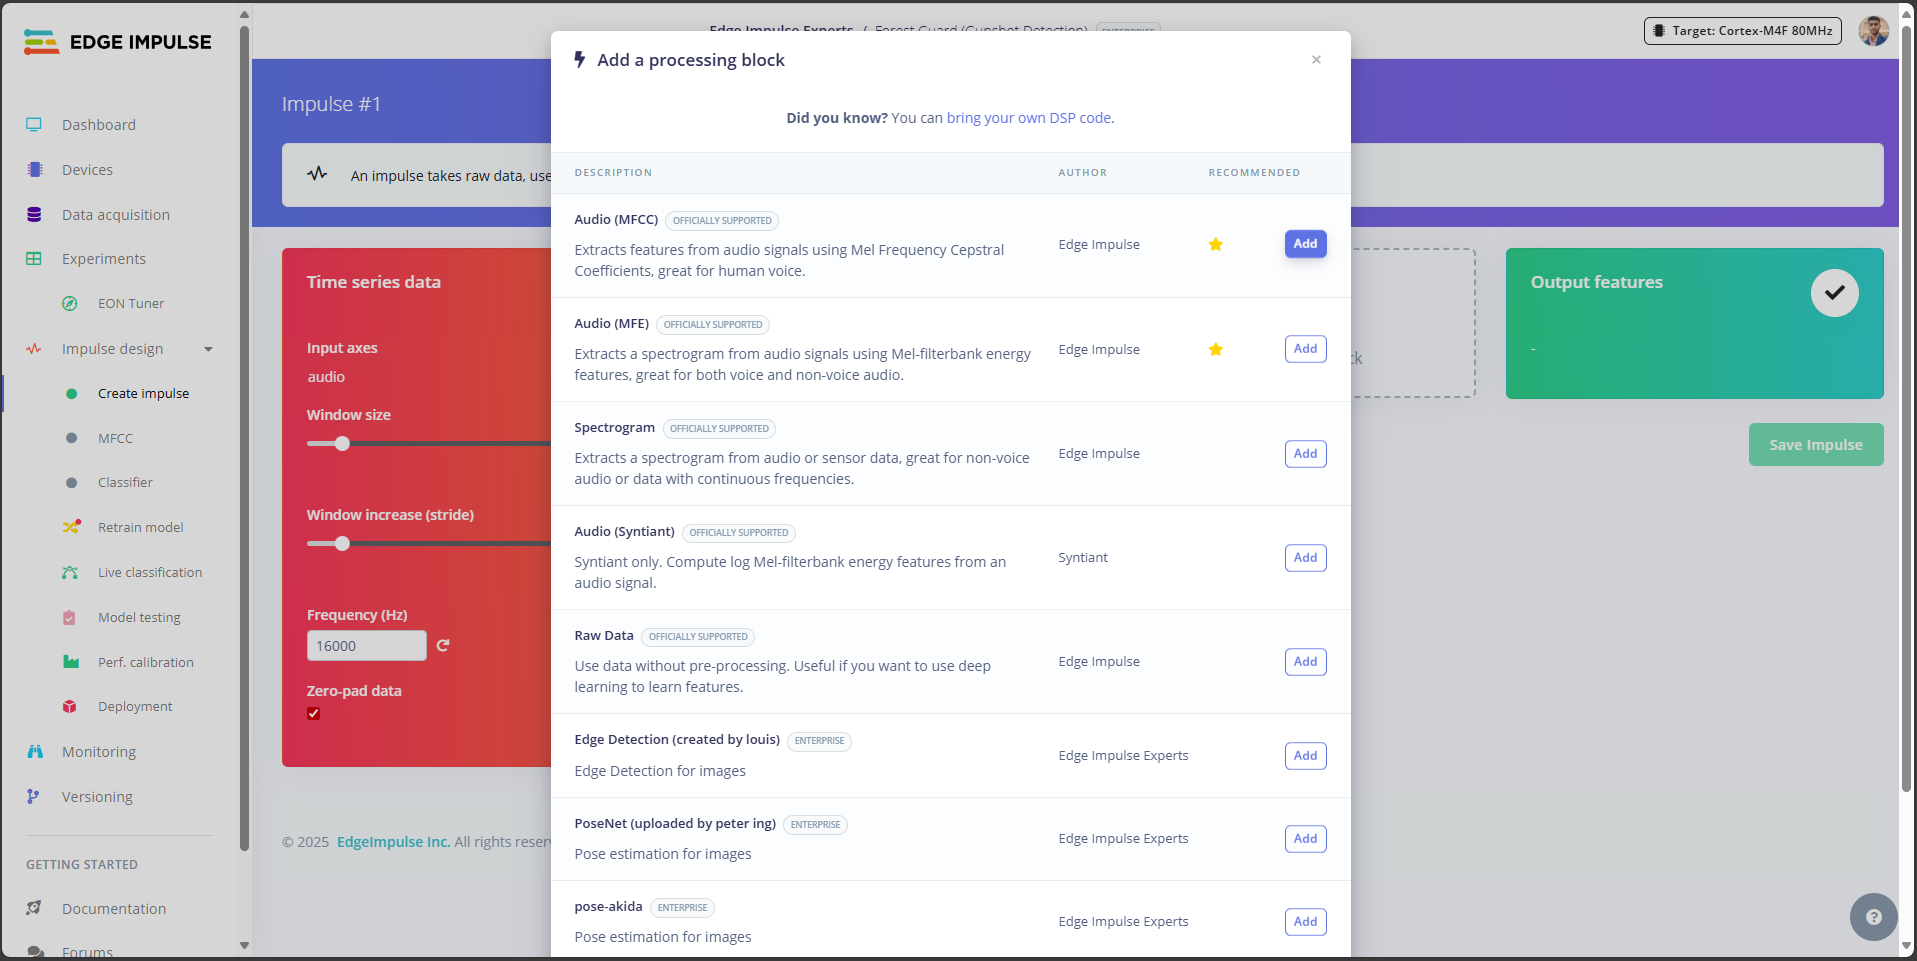
1. **Processing Block:** Select **Audio (MFCC)**.
2. MFCC (Mel-Frequency Cepstral Coefficients) transforms raw sound waves into a spectrogram — a compact representation of sound patterns that the ML model can learn from.
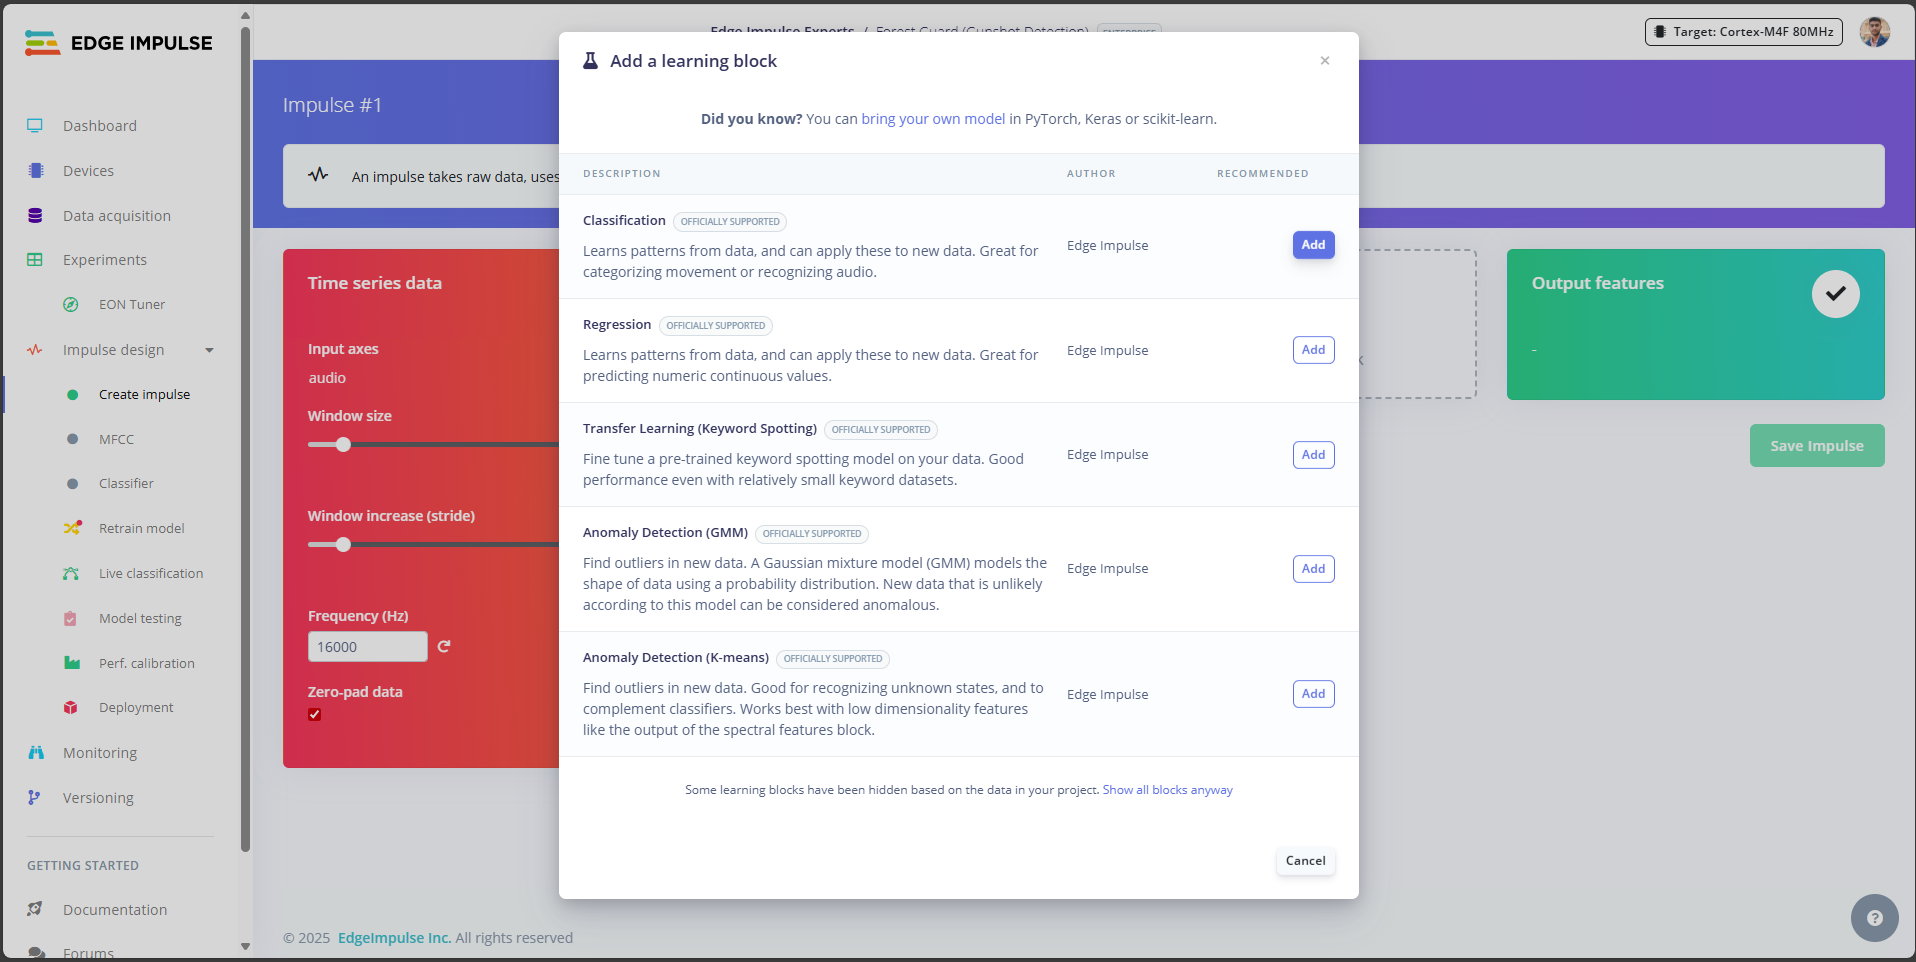
3. **Learning Block:** Select **Classification**.
4. This will train a neural network to classify between labels like Gunshot and Noise.
**Add Blocks**
1. **Processing Block:** Select **Audio (MFCC)**.
2. MFCC (Mel-Frequency Cepstral Coefficients) transforms raw sound waves into a spectrogram — a compact representation of sound patterns that the ML model can learn from.
3. **Learning Block:** Select **Classification**.
4. This will train a neural network to classify between labels like Gunshot and Noise.
 **Save the Impulse**
1. Once both blocks are added and configured, click **Save Impulse**. This locks in the pipeline that will be used in the next steps for feature extraction and training.
**Save the Impulse**
1. Once both blocks are added and configured, click **Save Impulse**. This locks in the pipeline that will be used in the next steps for feature extraction and training.
 ## Step 19: Generate Features
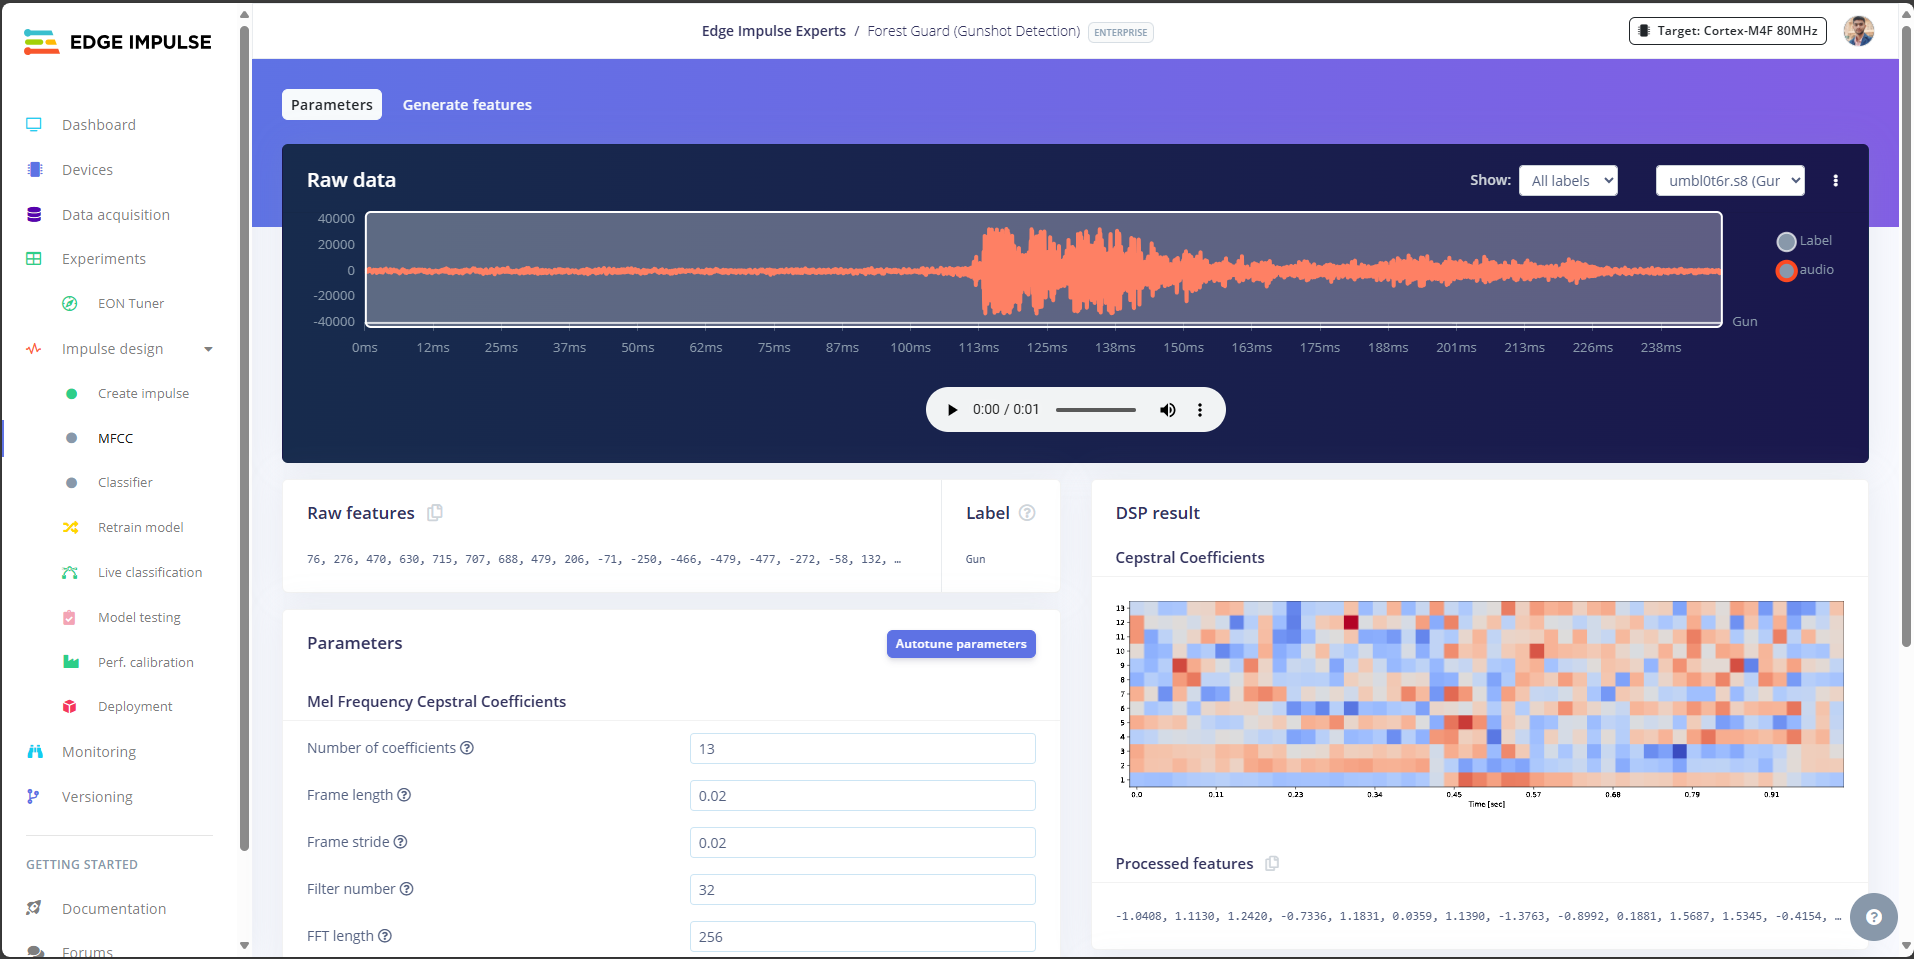
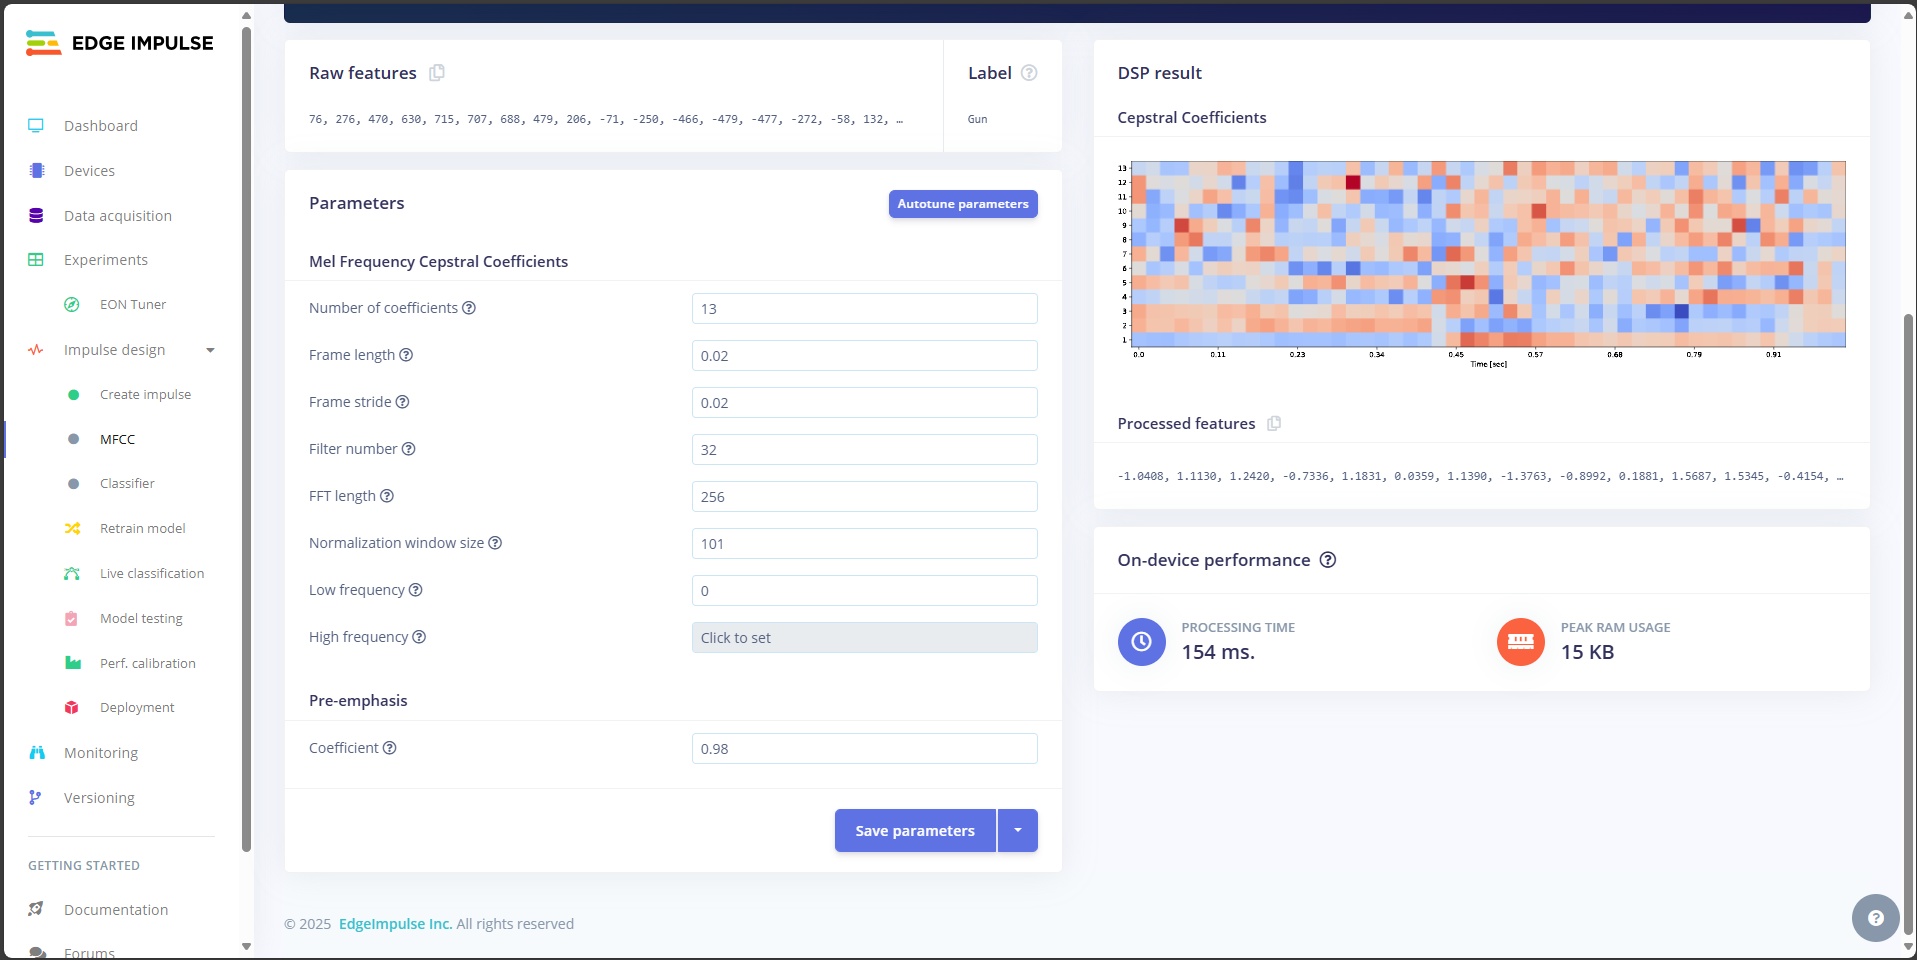
Now that the impulse is created, we need to **extract features** from our audio samples. This is the process that converts raw sound into meaningful patterns (MFCCs) that the classifier can learn from.
1. In **Edge Impulse Studio**, go to the **MFCC** block (under *Impulse Design*).
2. Click **Save Parameters** to confirm the default MFCC settings.
## Step 19: Generate Features
Now that the impulse is created, we need to **extract features** from our audio samples. This is the process that converts raw sound into meaningful patterns (MFCCs) that the classifier can learn from.
1. In **Edge Impulse Studio**, go to the **MFCC** block (under *Impulse Design*).
2. Click **Save Parameters** to confirm the default MFCC settings.
 3. Press **Generate Features**.
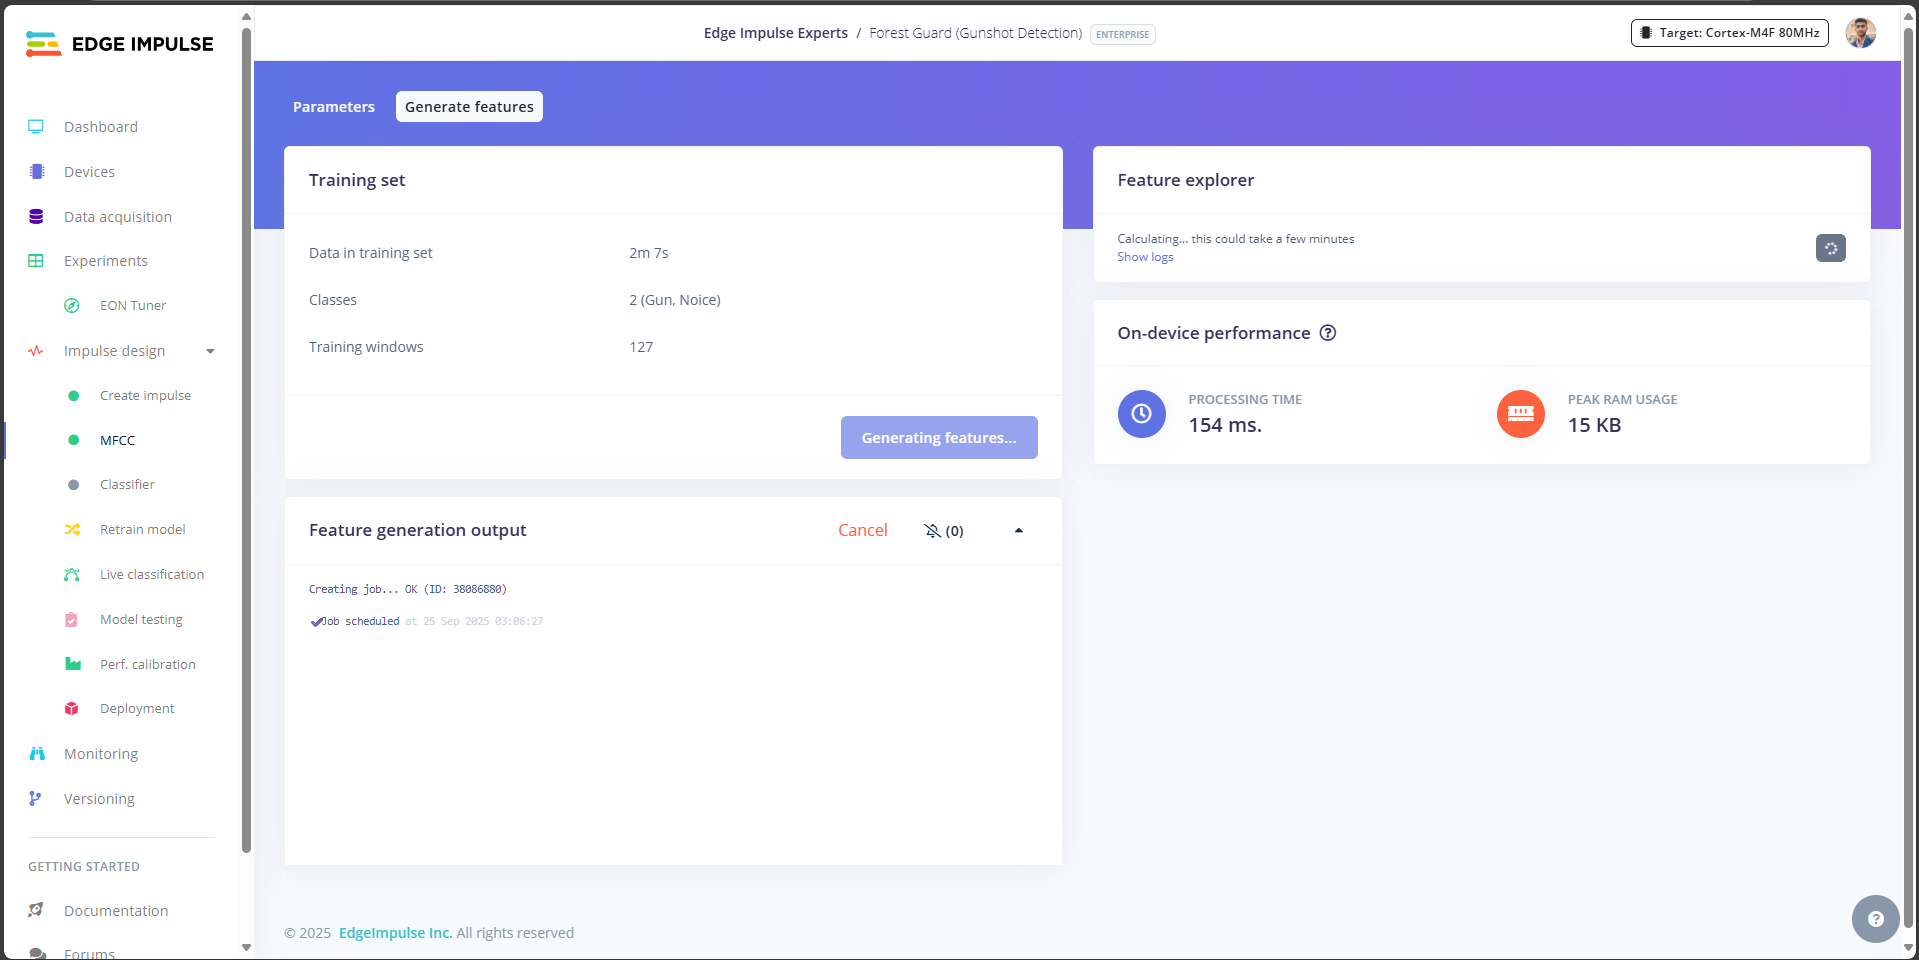 4. Edge Impulse will now process all your audio samples.
5. This step can take a few minutes depending on dataset size.
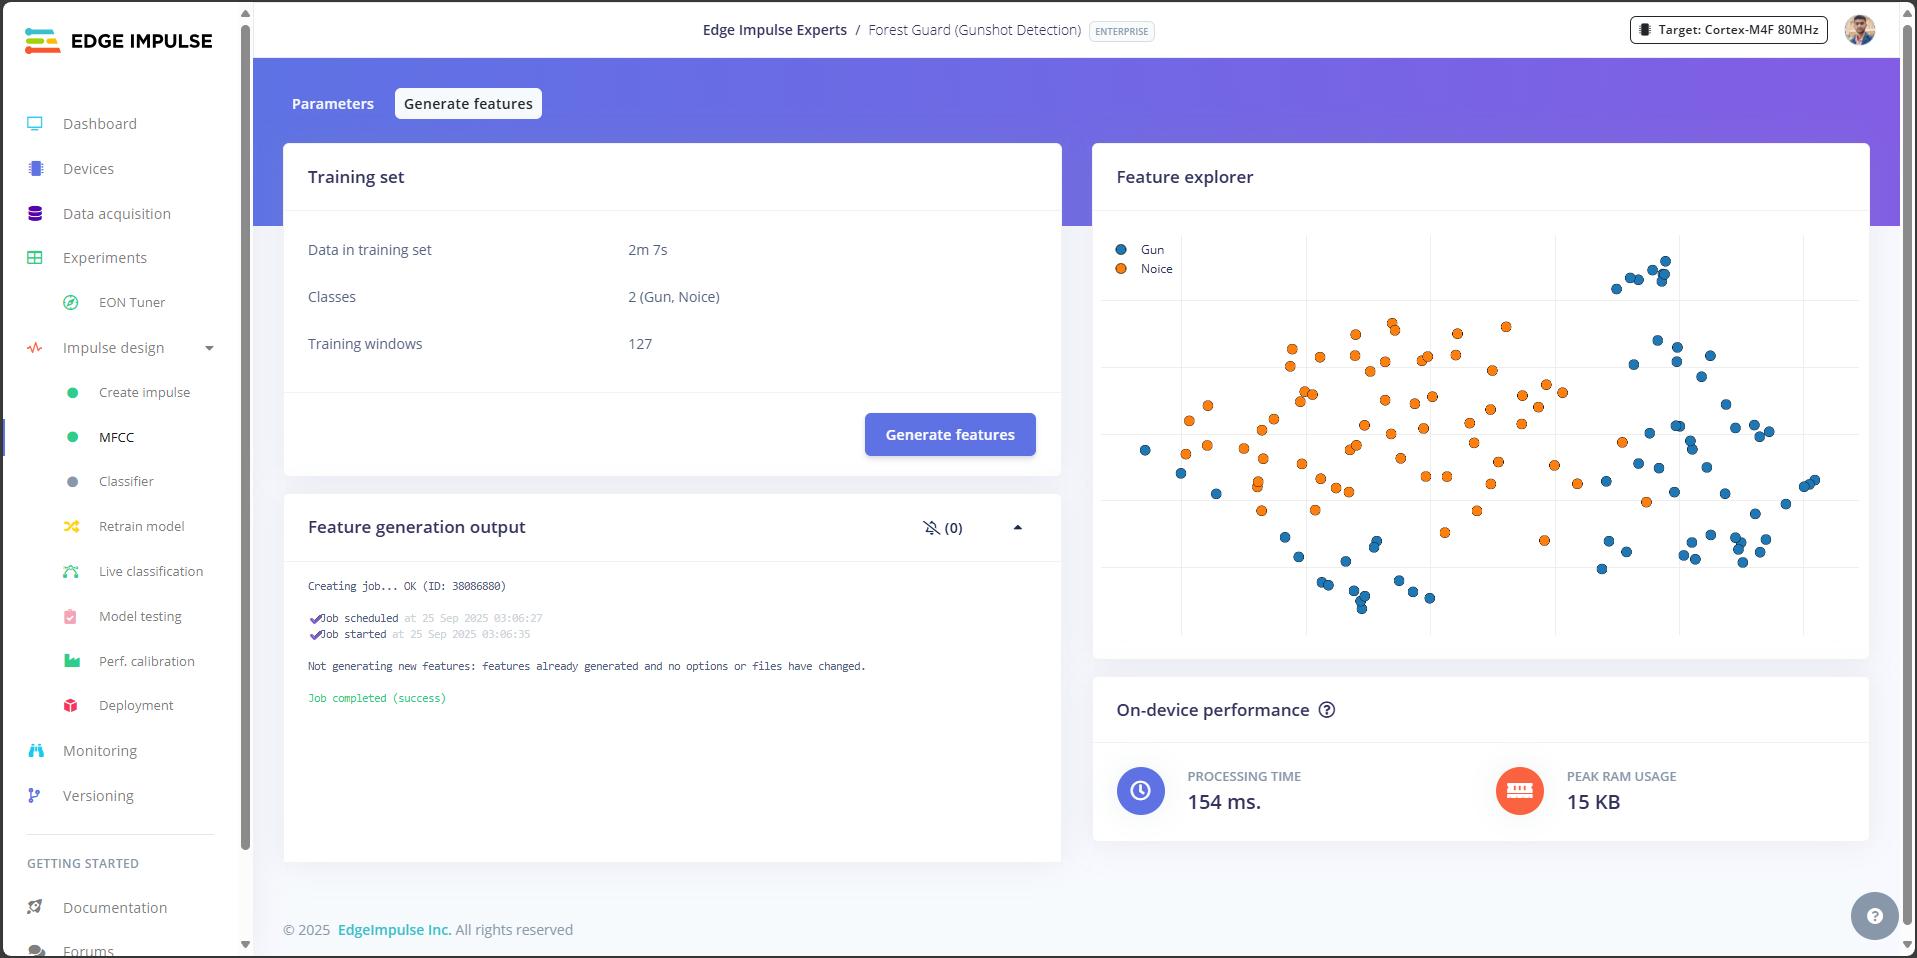
6. Once finished, you’ll see a **Feature Explorer graph** on the right side of the screen.
7. Each point on the graph represents a **1-second audio sample**.
8. Samples with similar characteristics (like background noise) will cluster together, while distinct sounds (like gunshots) will form separate groups.
9. Clear separation between Gunshot and Noise clusters is a **good sign** — it means your model will be easier to train accurately.
4. Edge Impulse will now process all your audio samples.
5. This step can take a few minutes depending on dataset size.
6. Once finished, you’ll see a **Feature Explorer graph** on the right side of the screen.
7. Each point on the graph represents a **1-second audio sample**.
8. Samples with similar characteristics (like background noise) will cluster together, while distinct sounds (like gunshots) will form separate groups.
9. Clear separation between Gunshot and Noise clusters is a **good sign** — it means your model will be easier to train accurately.
 ## Step 20: Train Classification Model
With your features generated, it’s time to train the **Neural Network classifier** that will distinguish between **Gunshot** and **Noise**.
1. In **Edge Impulse Studio**, go to the **Classifier** tab.
2. Click **Save and Train**.
3. Training will take a few minutes depending on dataset size.
## Step 20: Train Classification Model
With your features generated, it’s time to train the **Neural Network classifier** that will distinguish between **Gunshot** and **Noise**.
1. In **Edge Impulse Studio**, go to the **Classifier** tab.
2. Click **Save and Train**.
3. Training will take a few minutes depending on dataset size.
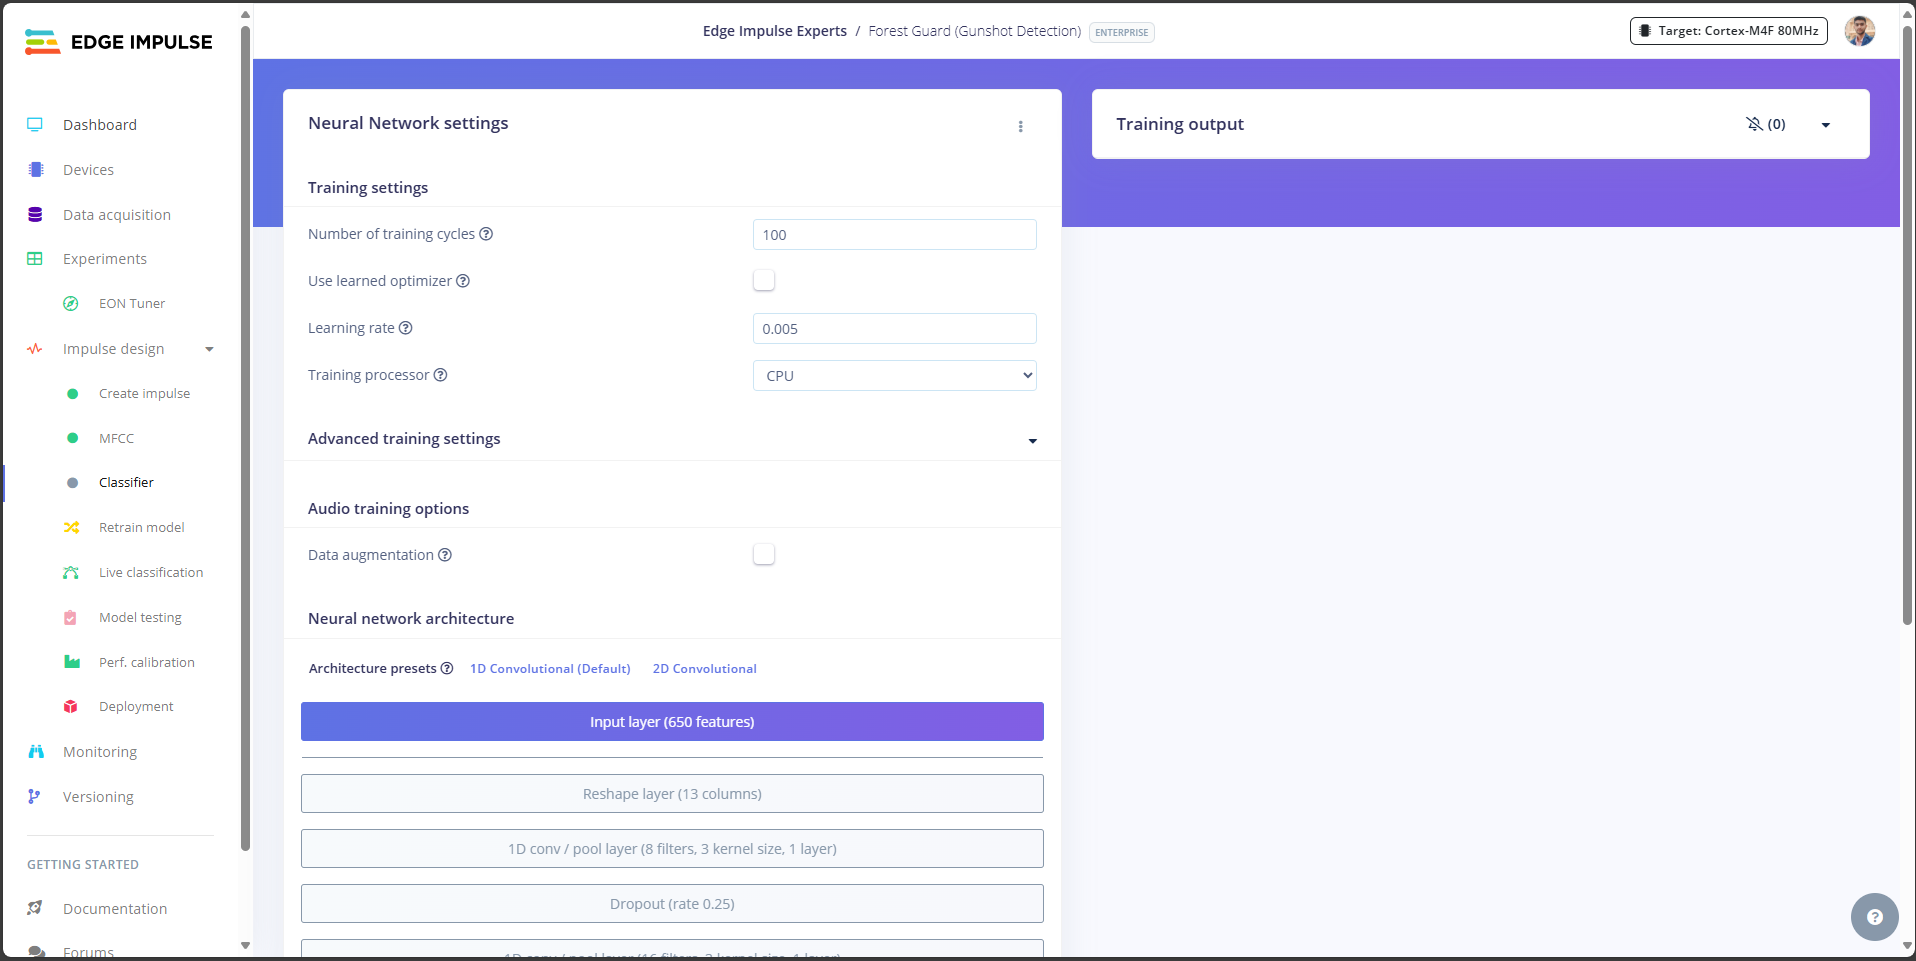
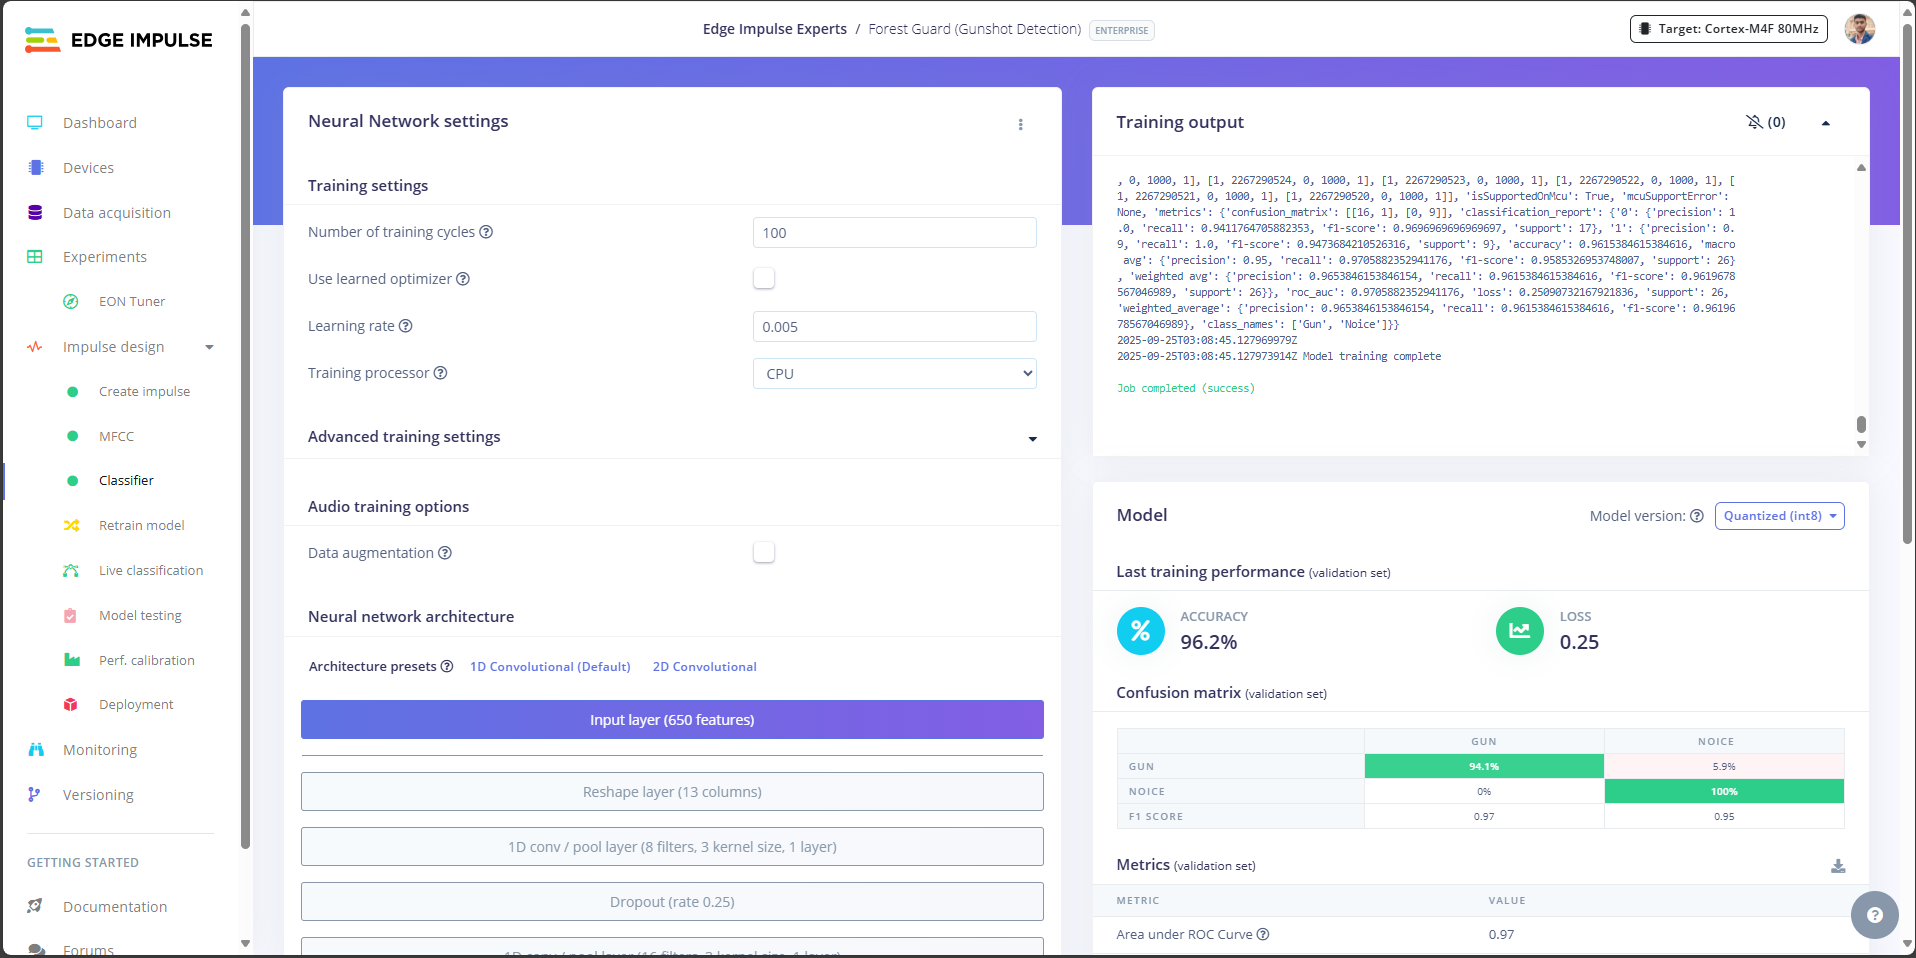
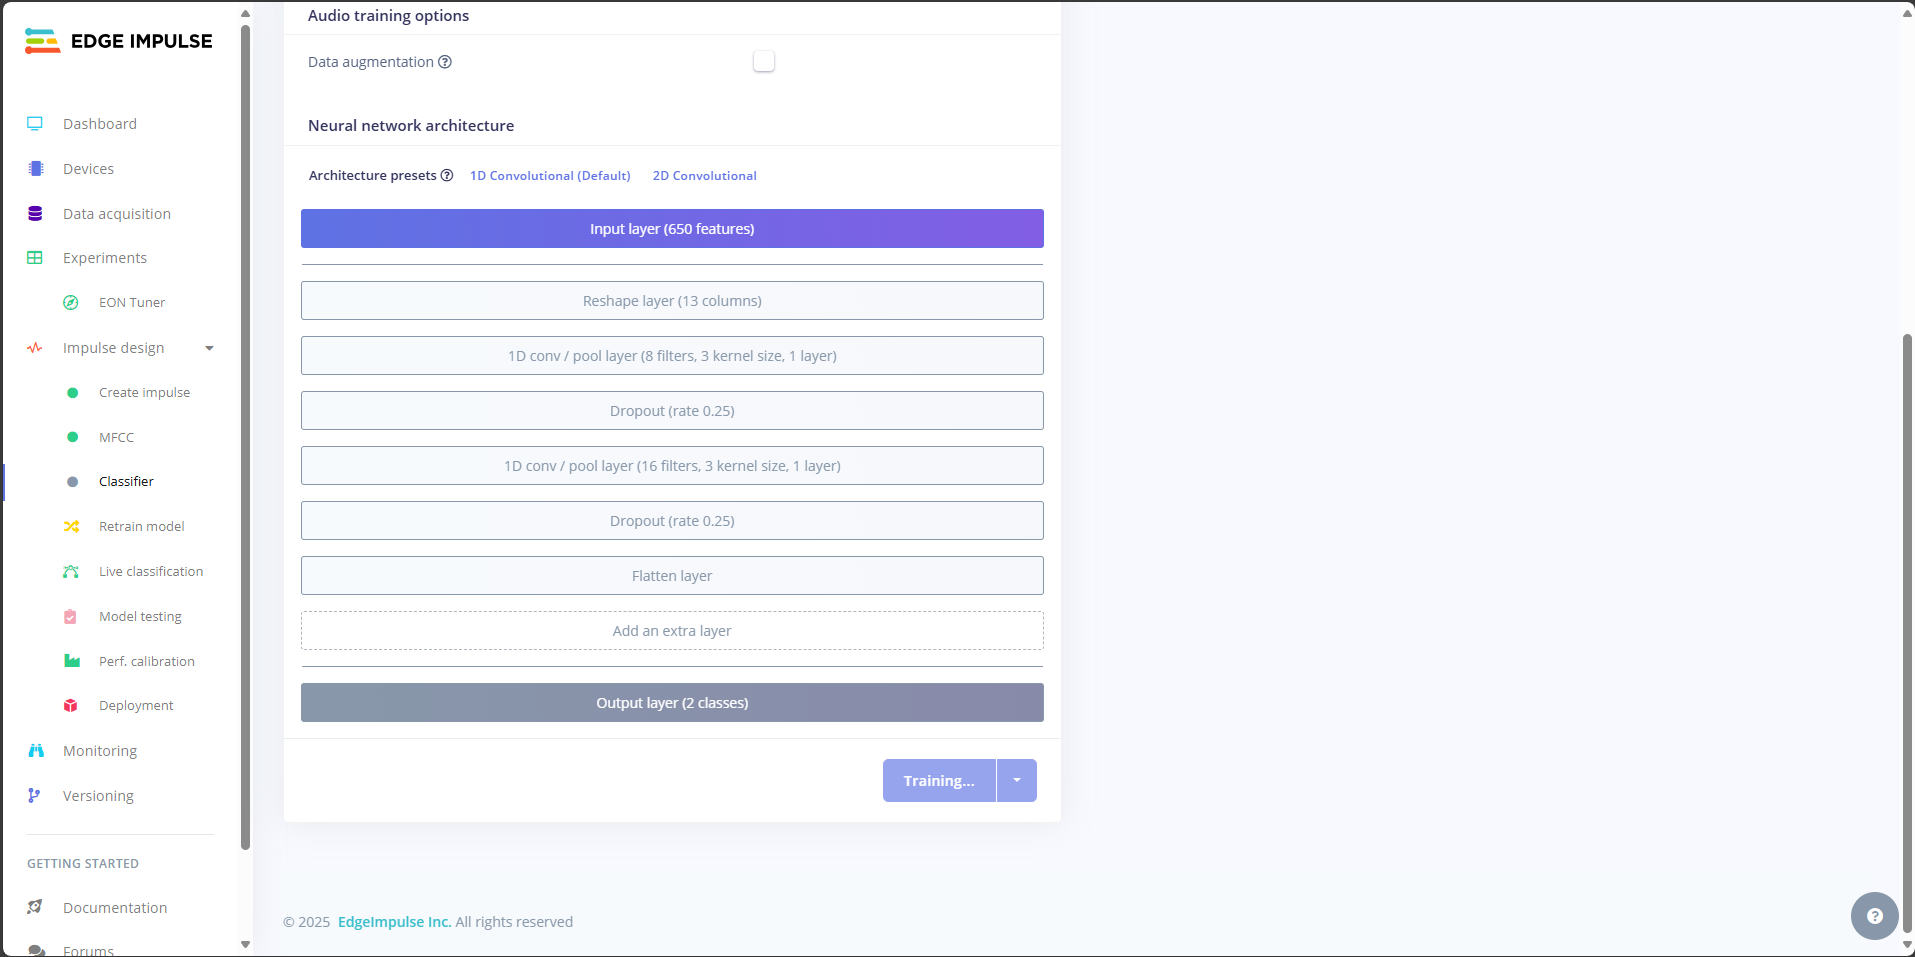 Default training settings usually work well:
1. **Number of training cycles:** 100
2. **Learning rate:** 0.005
3. **Processor:** CPU
4. **Architecture:** 1D Convolutional Neural Network (recommended for audio)
Default training settings usually work well:
1. **Number of training cycles:** 100
2. **Learning rate:** 0.005
3. **Processor:** CPU
4. **Architecture:** 1D Convolutional Neural Network (recommended for audio)
 **Results**
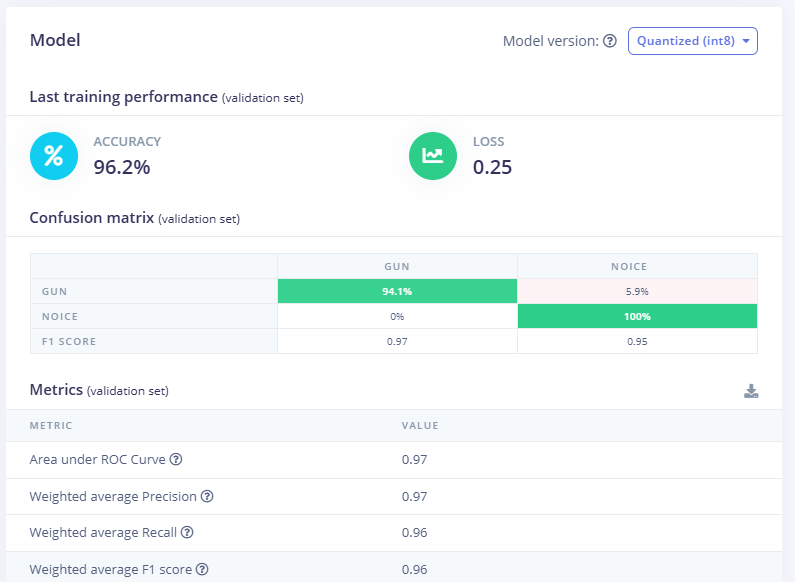 Once training is complete, you’ll see:
1. **Accuracy** → \~96% (based on your dataset).
2. **Loss** → around 0.25 (lower is better).
3. **Confusion Matrix** →
4. Gunshot classified correctly \~94% of the time.
5. Noise classified correctly \~100% of the time.
**Metrics** →
1. Precision: 0.97
2. Recall: 0.96
3. F1 Score: 0.96
**On-device performance** →
Once training is complete, you’ll see:
1. **Accuracy** → \~96% (based on your dataset).
2. **Loss** → around 0.25 (lower is better).
3. **Confusion Matrix** →
4. Gunshot classified correctly \~94% of the time.
5. Noise classified correctly \~100% of the time.
**Metrics** →
1. Precision: 0.97
2. Recall: 0.96
3. F1 Score: 0.96
**On-device performance** →
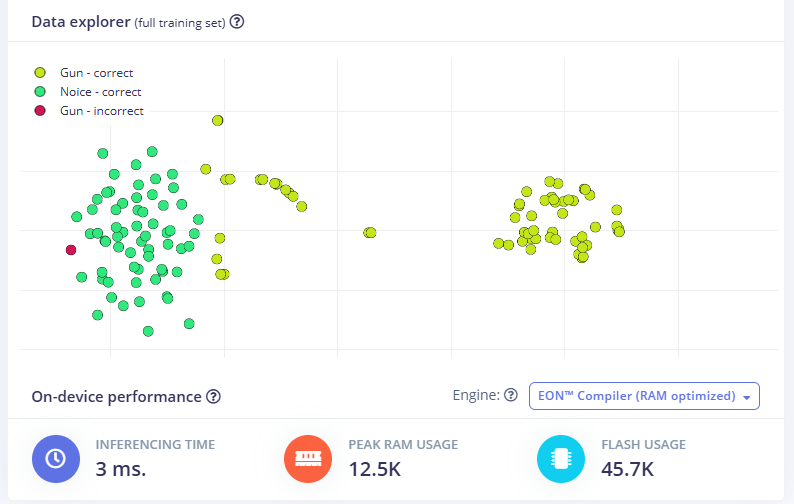 1. Inferencing time: \~3 ms
2. RAM usage: \~12.5 KB
3. Flash usage: \~45 KB
## Step 21: Build and Download the Model
Once your classifier is trained and performing well, the next step is to **export the model** so it can run directly on your ESP32-S3 Node. Edge Impulse makes this very easy by packaging the trained model into an Arduino-compatible library.
1. Inferencing time: \~3 ms
2. RAM usage: \~12.5 KB
3. Flash usage: \~45 KB
## Step 21: Build and Download the Model
Once your classifier is trained and performing well, the next step is to **export the model** so it can run directly on your ESP32-S3 Node. Edge Impulse makes this very easy by packaging the trained model into an Arduino-compatible library.
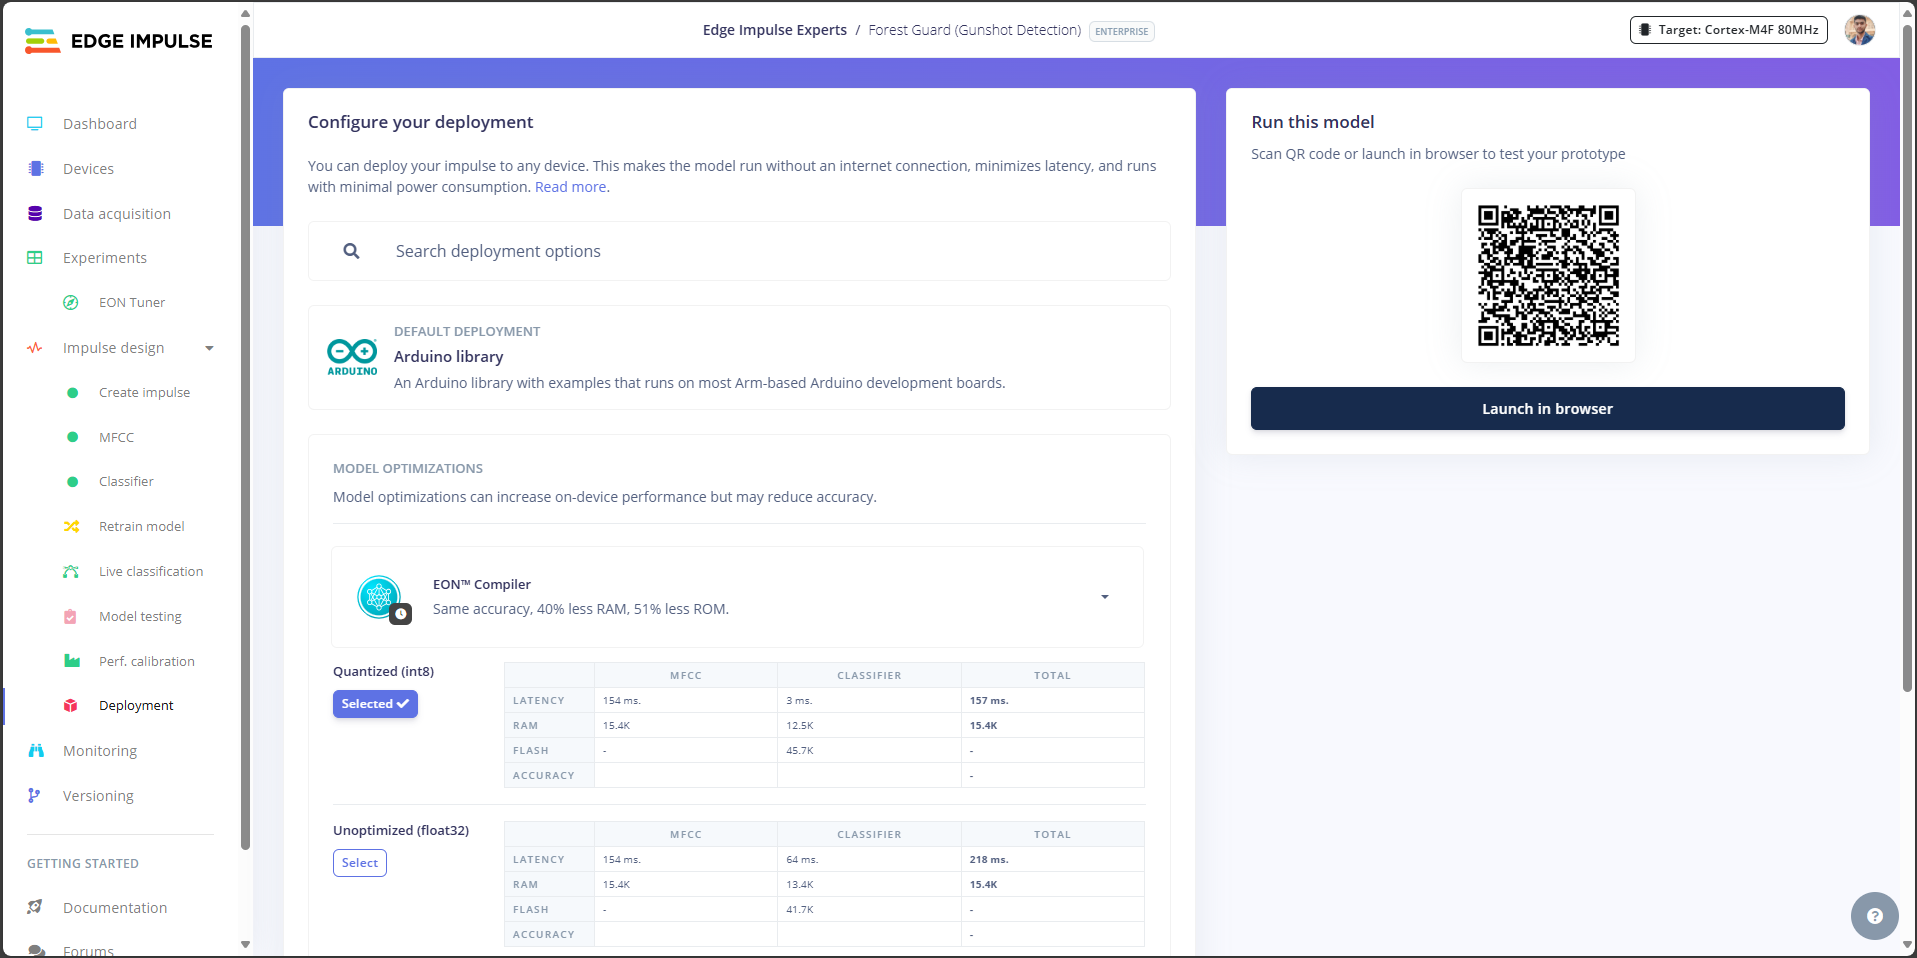 1. In **Edge Impulse Studio**, go to the **Deployment** tab.
2. Under **Deployment options**, select **Arduino library**.
3. This will create a .zip library that can be imported into the Arduino IDE.
4. Click **Build**.
1. In **Edge Impulse Studio**, go to the **Deployment** tab.
2. Under **Deployment options**, select **Arduino library**.
3. This will create a .zip library that can be imported into the Arduino IDE.
4. Click **Build**.
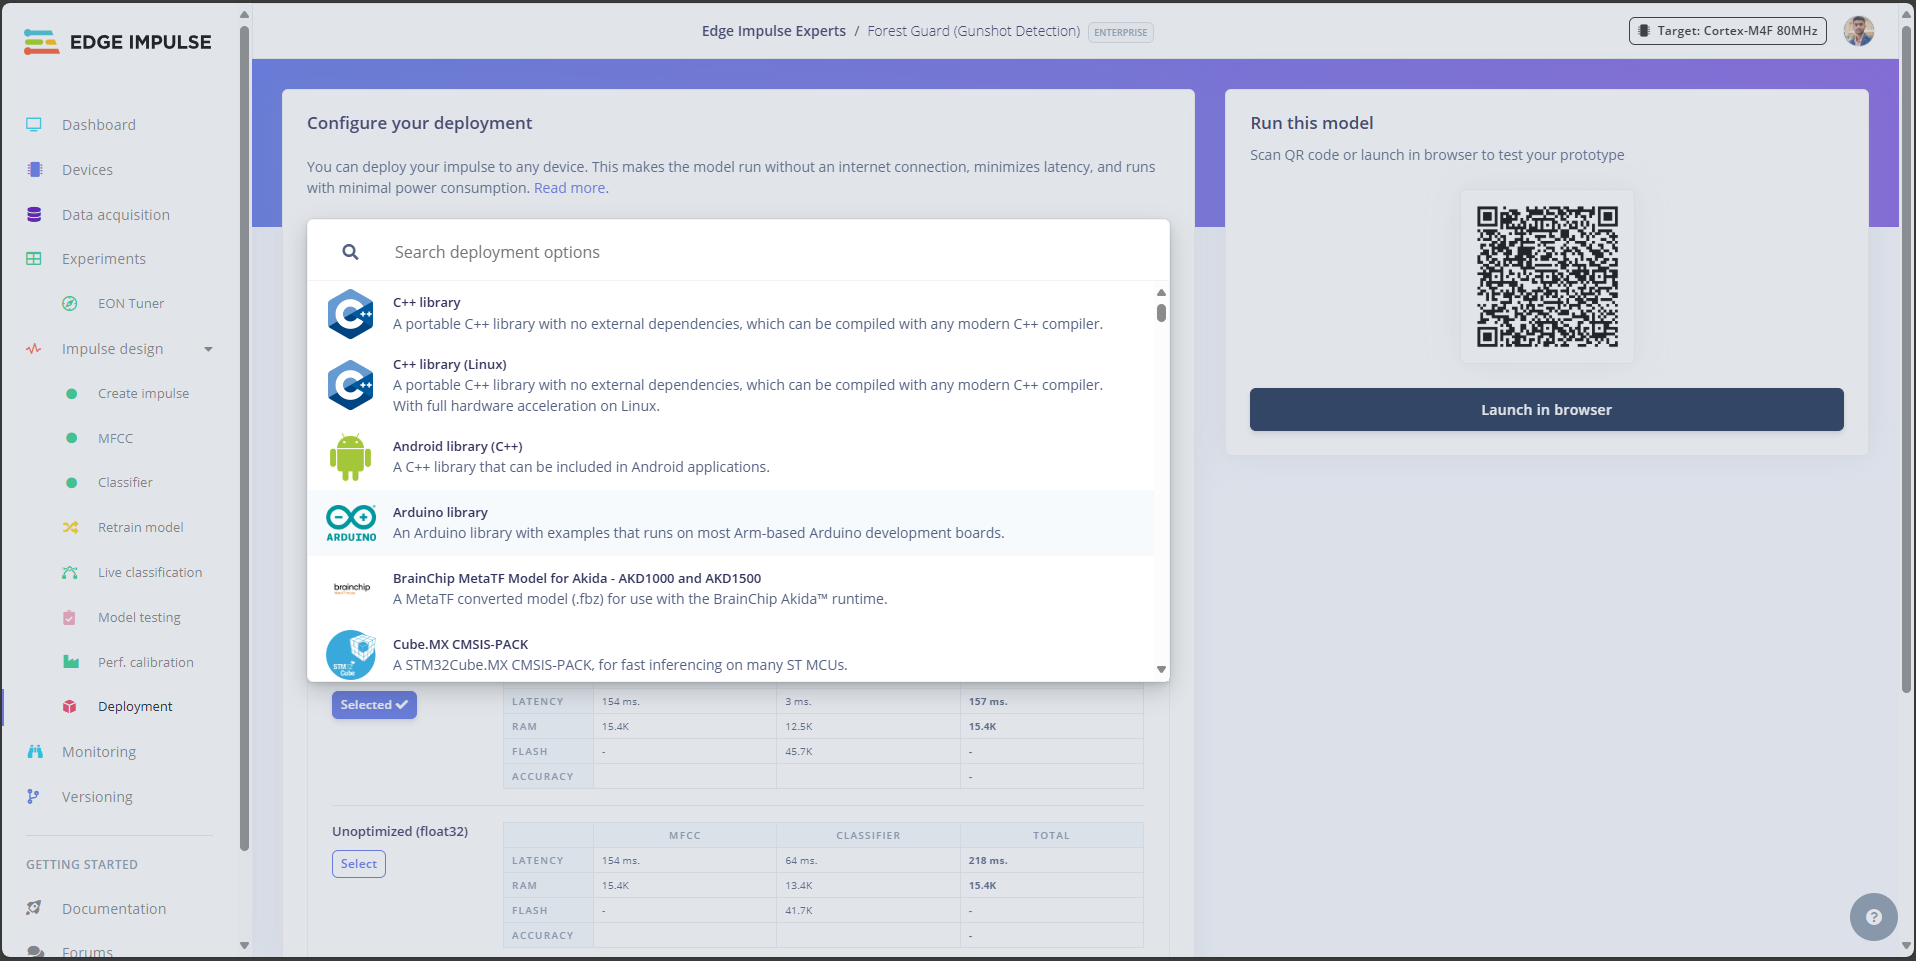
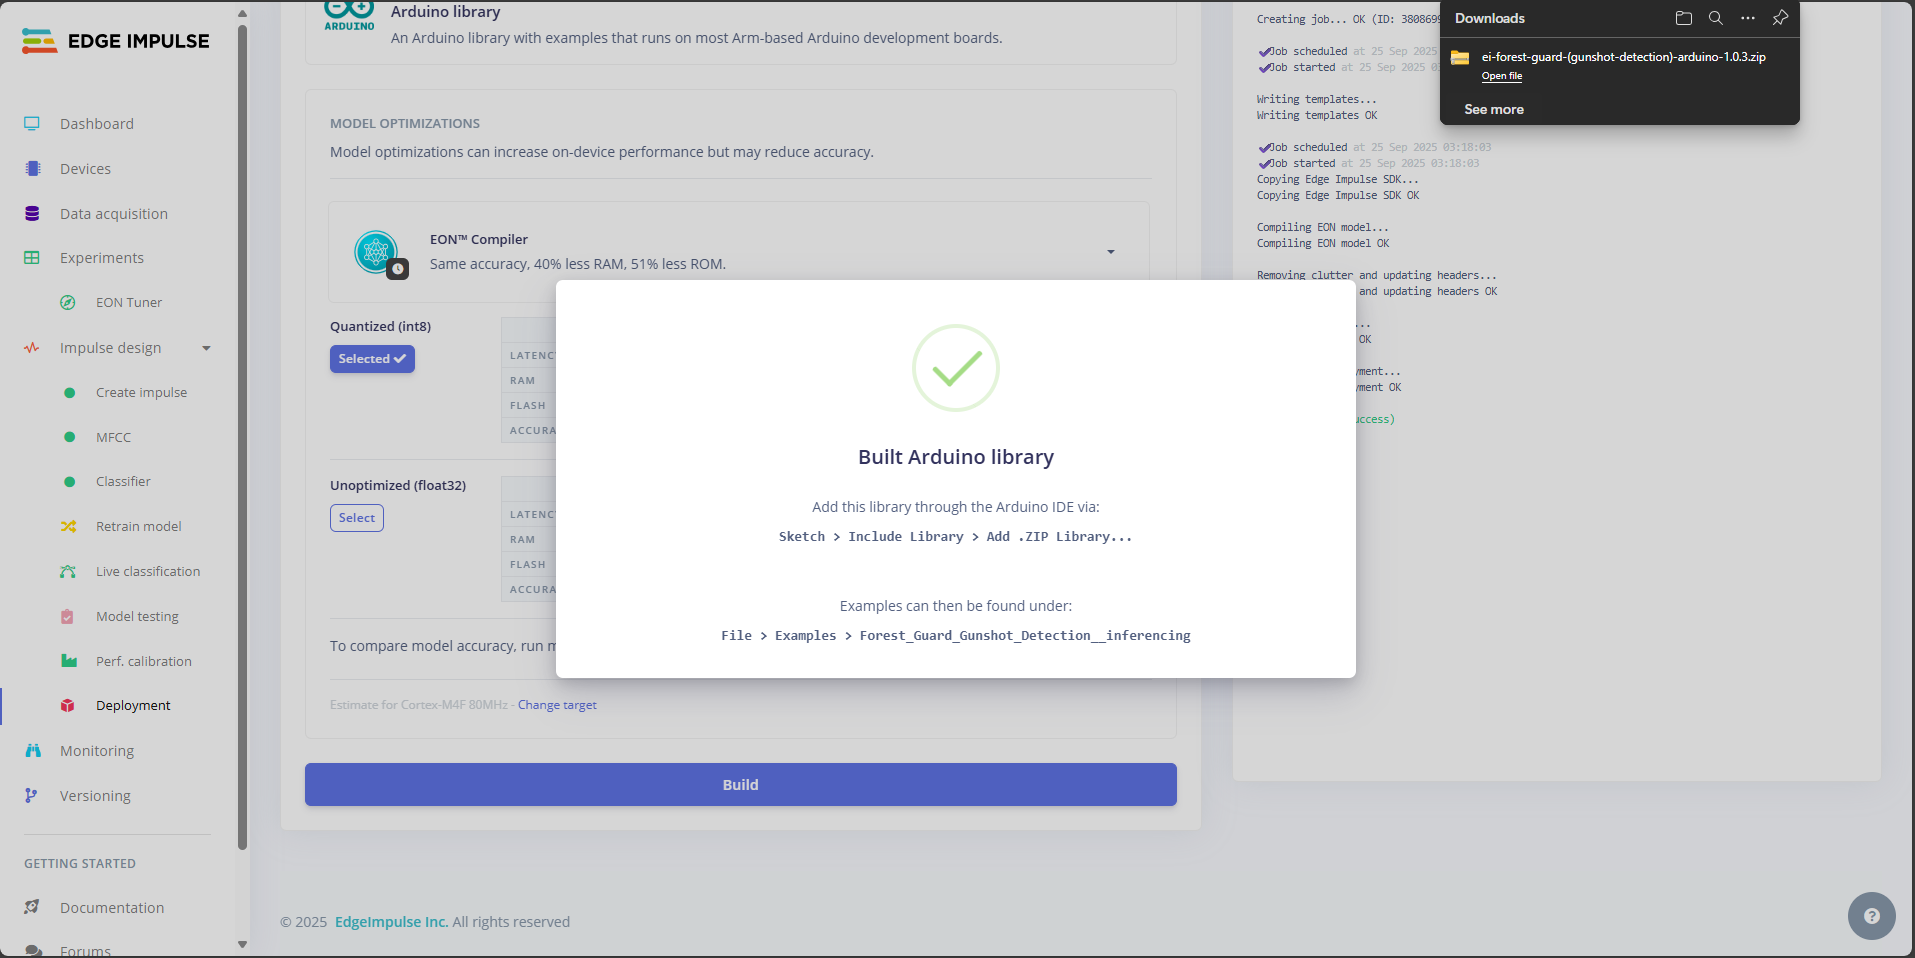
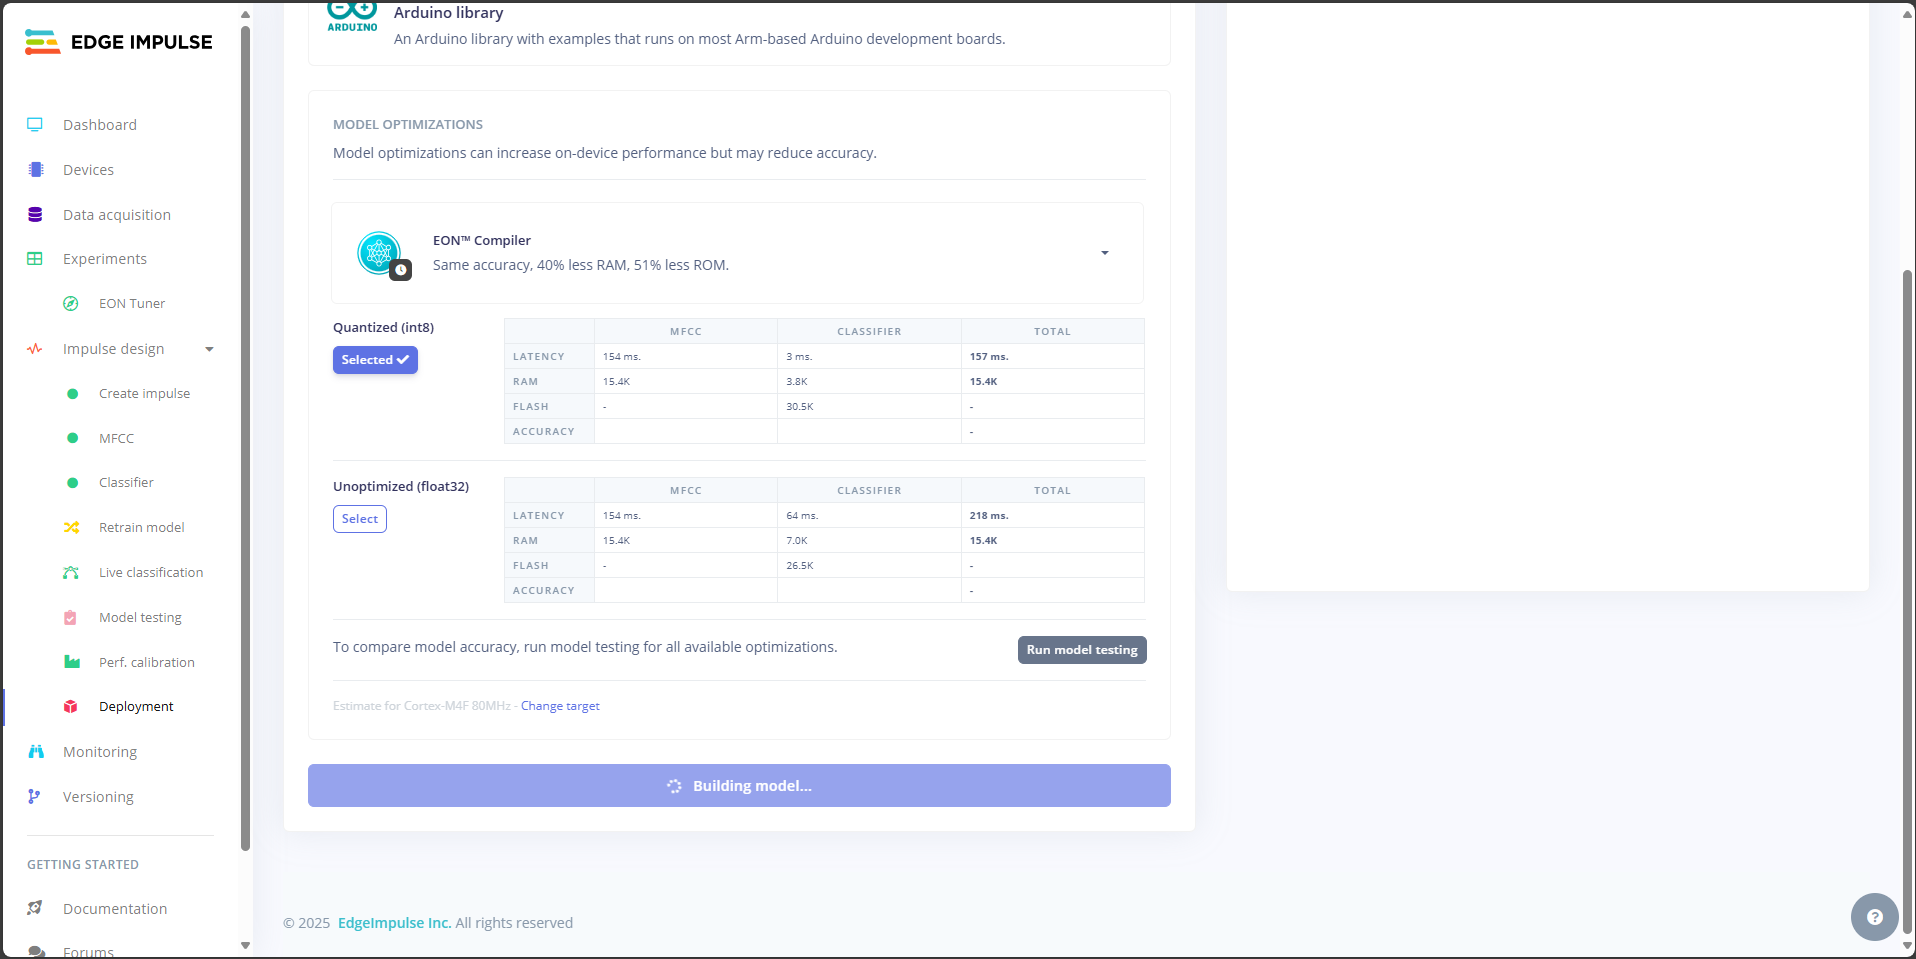 Once the build completes, Edge Impulse will automatically download the library to your computer.
The file will be named something like:
`Forest\_Guard\_Gunshot\_Detector\_arduino-1.0.0.zip`
Once the build completes, Edge Impulse will automatically download the library to your computer.
The file will be named something like:
`Forest\_Guard\_Gunshot\_Detector\_arduino-1.0.0.zip`
 ## Step 22: Arduino Setup
Now that we have our trained Edge Impulse model ready, let’s set up the Arduino IDE with all the required libraries to compile and upload the **Node code**.
**Open the Project**
1. Launch **Arduino IDE**.
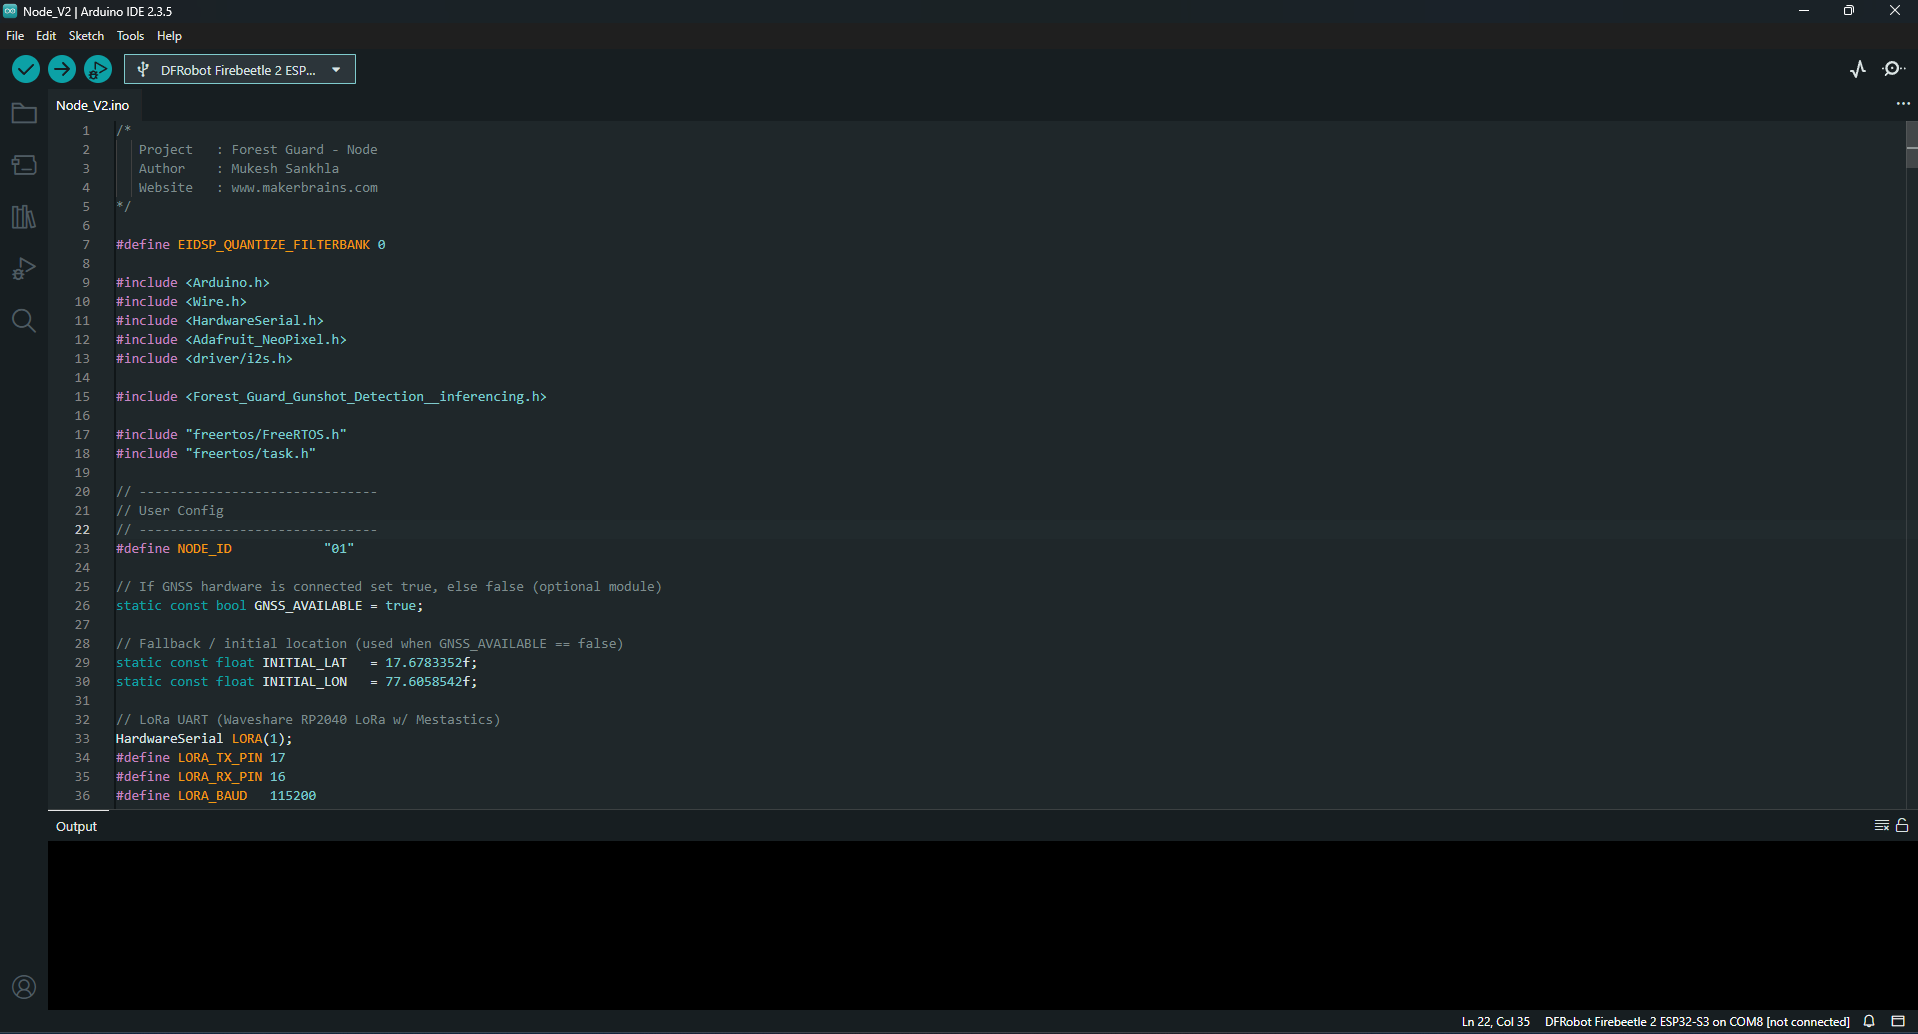
2. Open the Node\_V2.ino file (this is the main code for the Forest Guard Node).
## Step 22: Arduino Setup
Now that we have our trained Edge Impulse model ready, let’s set up the Arduino IDE with all the required libraries to compile and upload the **Node code**.
**Open the Project**
1. Launch **Arduino IDE**.
2. Open the Node\_V2.ino file (this is the main code for the Forest Guard Node).
 **Install Required Libraries**
**1. Edge Impulse Model Library**
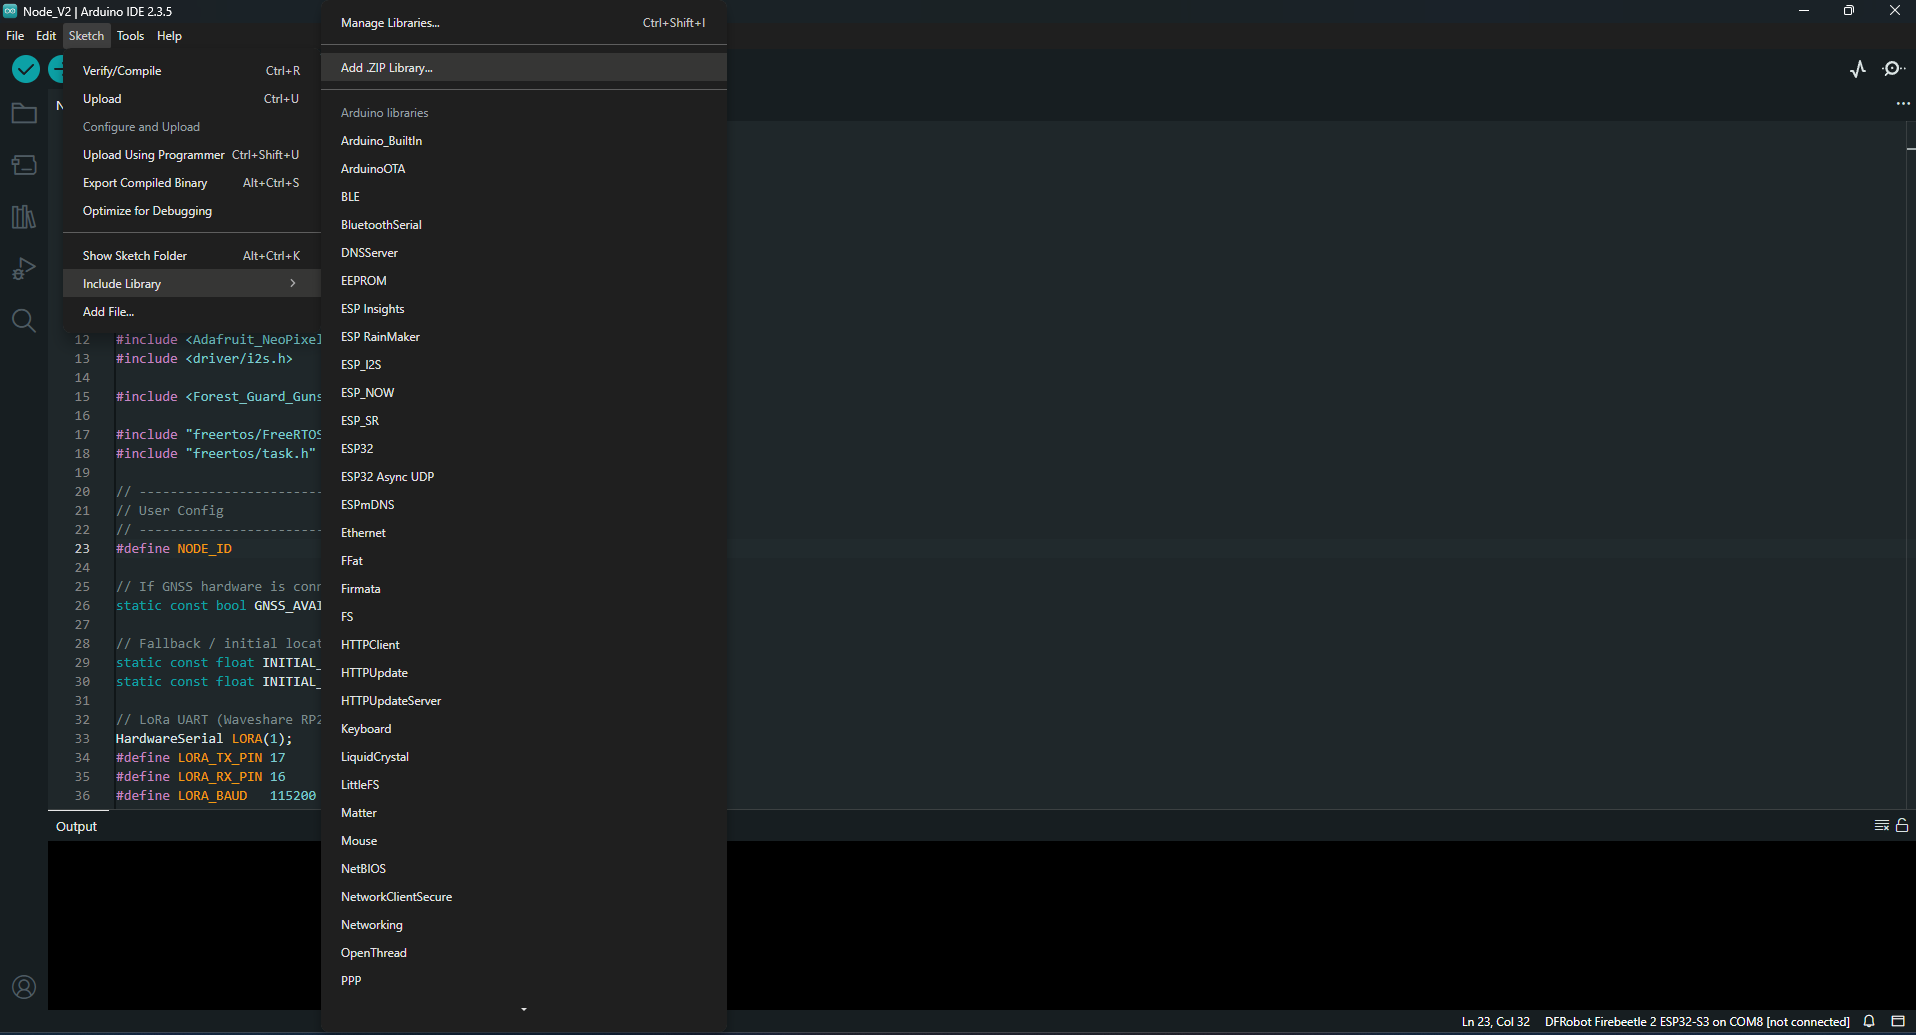
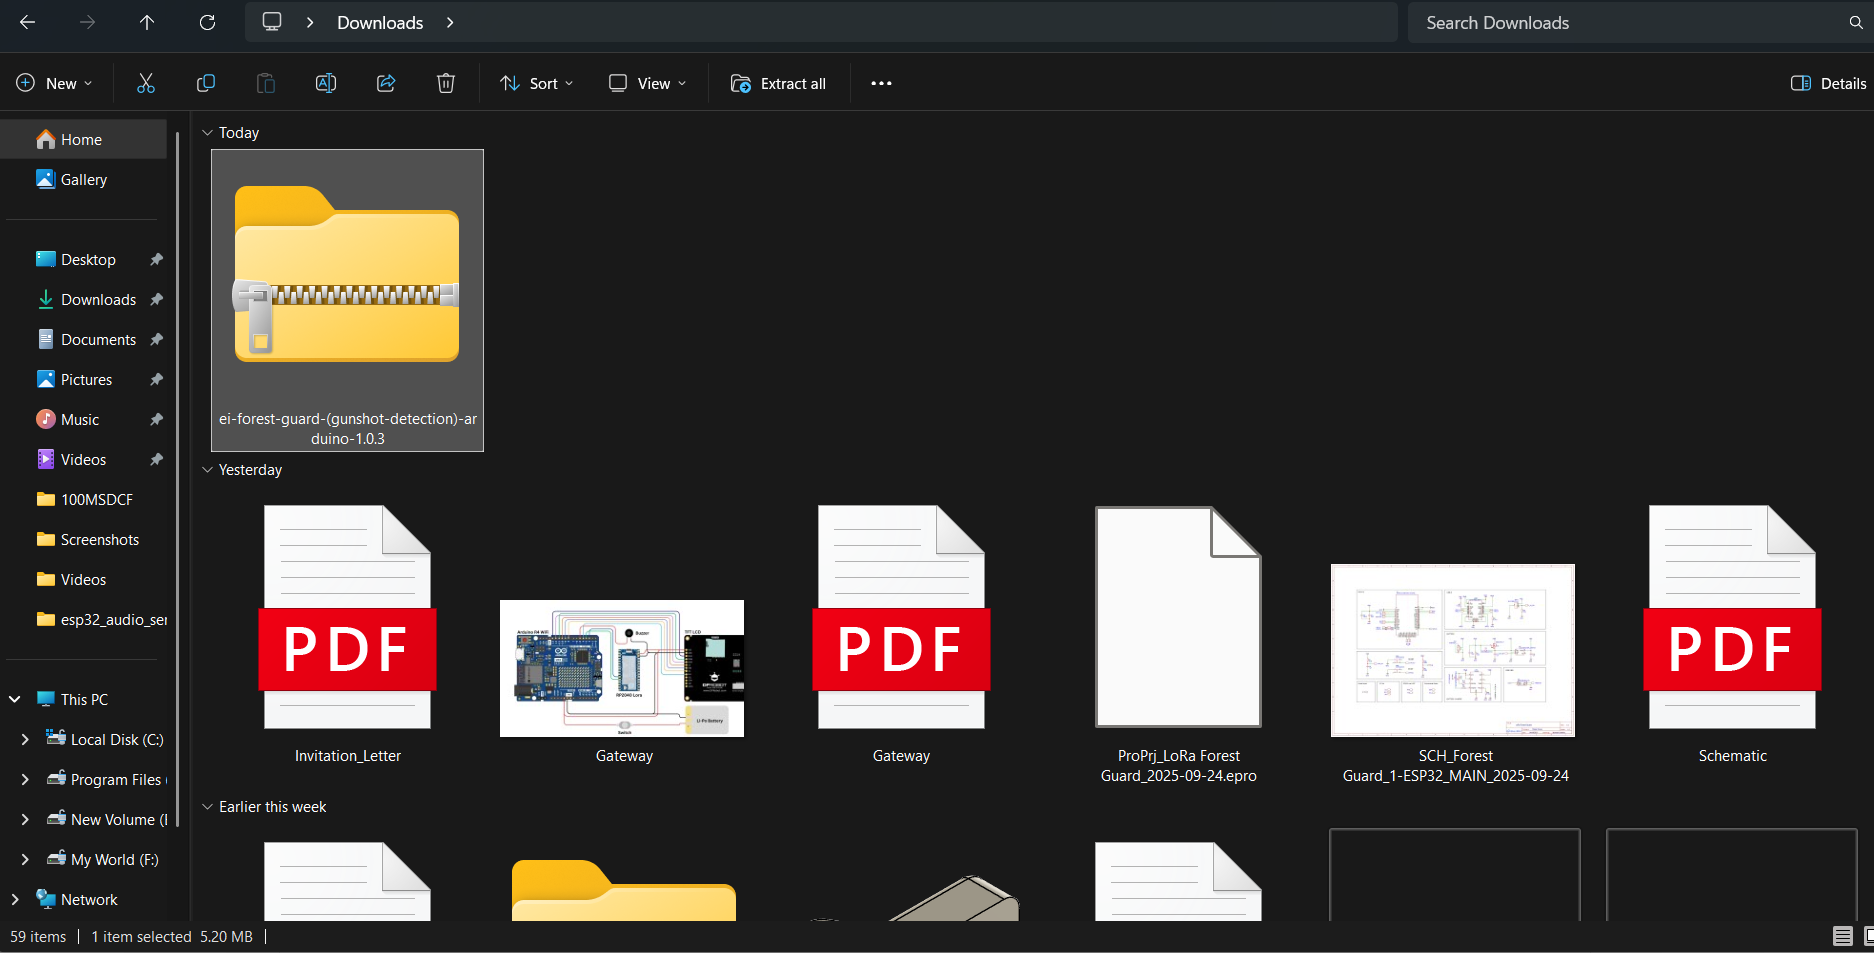
1. Go to **Sketch → Include Library → Add .ZIP Library…**
2. Select the **.zip** file you downloaded from Edge Impulse in **Step 20**.
3. This adds your custom ML model to the project.
**Install Required Libraries**
**1. Edge Impulse Model Library**
1. Go to **Sketch → Include Library → Add .ZIP Library…**
2. Select the **.zip** file you downloaded from Edge Impulse in **Step 20**.
3. This adds your custom ML model to the project.
 **2. GNSS Library**
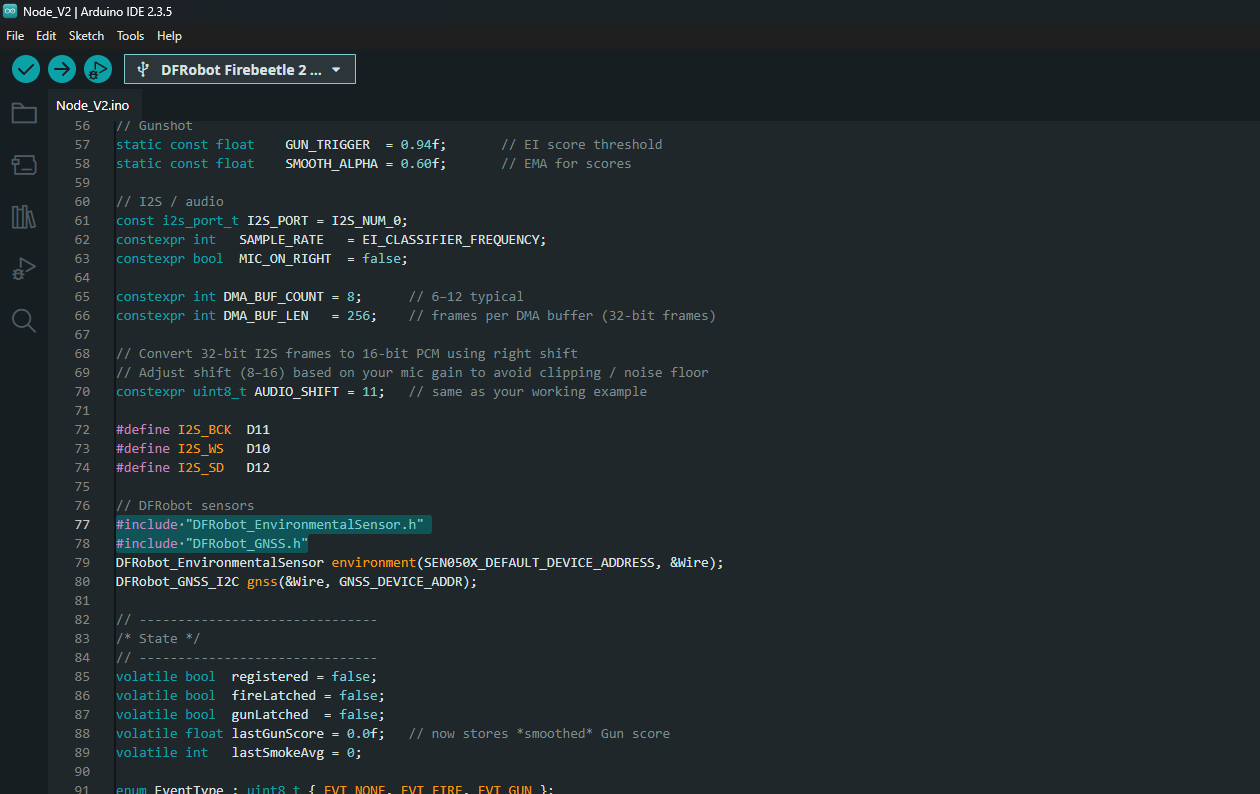 Download and install the GNSS driver library from DFRobot:
👉 [DFRobot GNSS Library](https://github.com/DFRobot/DFRobot_GNSS)
1. Install it the same way (**Add .ZIP Library**).
**3. Environmental Sensor Library**
Download the library for the multifunction environmental sensor:
👉 [DFRobot Environmental Sensor Library](https://github.com/DFRobot/DFRobot_EnvironmentalSensor)
1. Install it the same way (**Add .ZIP Library**).
**4. NeoPixel Library**
Download and install the GNSS driver library from DFRobot:
👉 [DFRobot GNSS Library](https://github.com/DFRobot/DFRobot_GNSS)
1. Install it the same way (**Add .ZIP Library**).
**3. Environmental Sensor Library**
Download the library for the multifunction environmental sensor:
👉 [DFRobot Environmental Sensor Library](https://github.com/DFRobot/DFRobot_EnvironmentalSensor)
1. Install it the same way (**Add .ZIP Library**).
**4. NeoPixel Library**
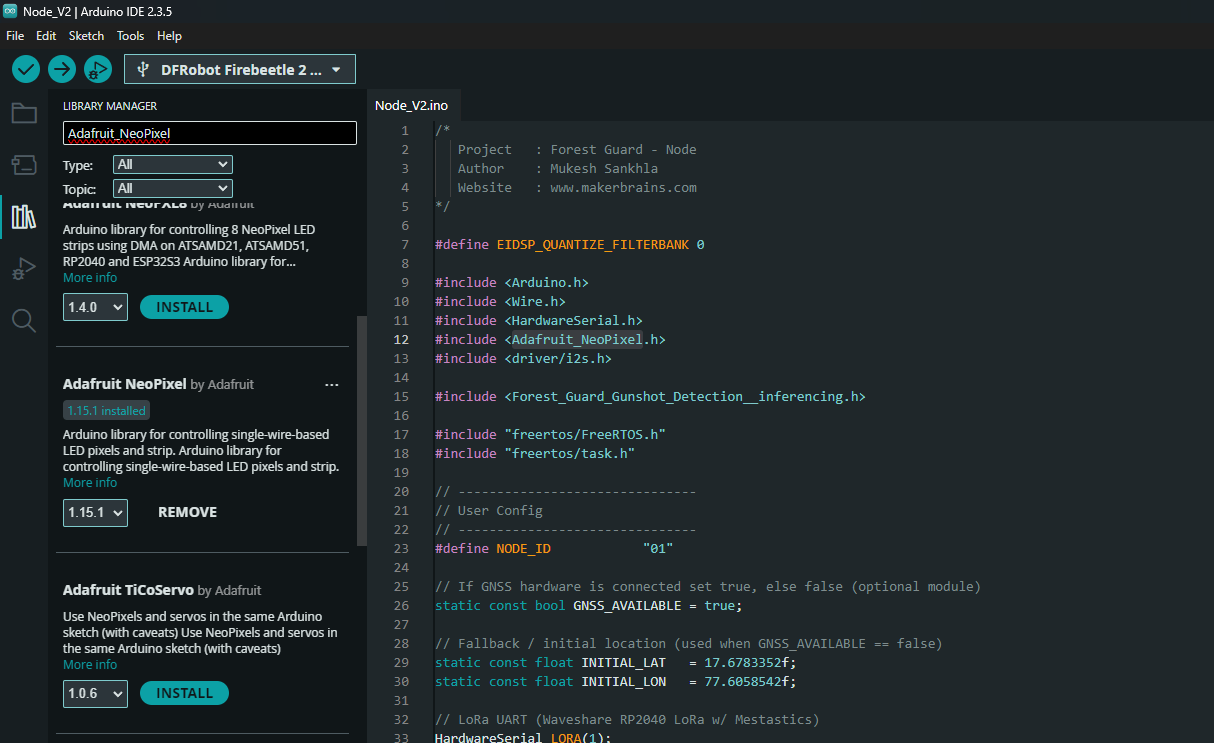 1. In Arduino IDE, open **Library Manager** (Sketch → Include Library → Manage Libraries…).
2. Search for **Adafruit NeoPixel**.
3. Install the latest version.
## Step 23: Upload the Code
Now that everything is configured, it’s time to **flash the Node firmware** to the ESP32-S3.
**Code Adjustments Before Upload**
Open the Node\_V2.ino sketch in Arduino IDE and check the following user configuration section:
1. **Edge Impulse Include**
2. Change the `#include <...inferencing.h>` line to match the filename of the model you downloaded in **Step 20**.
3. Example:
```cpp theme={"system"}
#include
```
1. In Arduino IDE, open **Library Manager** (Sketch → Include Library → Manage Libraries…).
2. Search for **Adafruit NeoPixel**.
3. Install the latest version.
## Step 23: Upload the Code
Now that everything is configured, it’s time to **flash the Node firmware** to the ESP32-S3.
**Code Adjustments Before Upload**
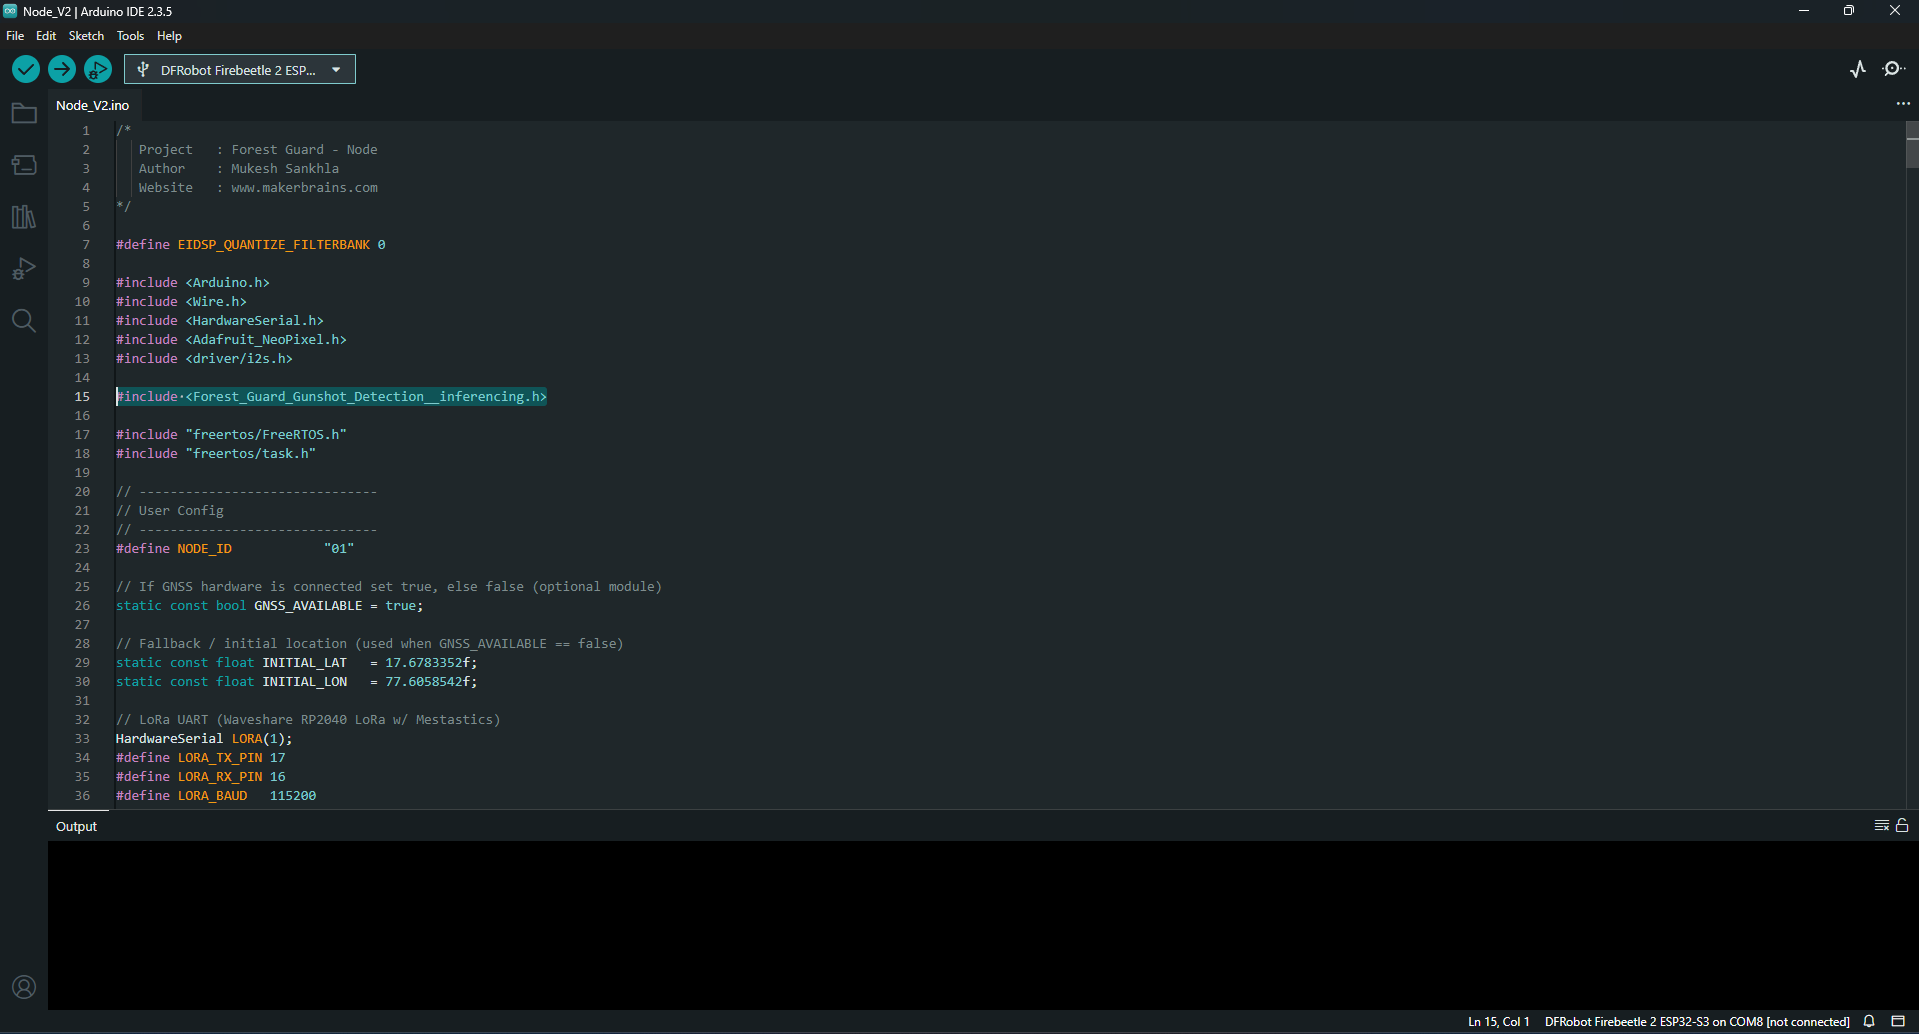
Open the Node\_V2.ino sketch in Arduino IDE and check the following user configuration section:
1. **Edge Impulse Include**
2. Change the `#include <...inferencing.h>` line to match the filename of the model you downloaded in **Step 20**.
3. Example:
```cpp theme={"system"}
#include
```
 **Node ID**
1. Set a unique **NODE\_ID** for each device.
2. Example: "01", "02", etc.
**GNSS Availability**
1. If your Node has a GNSS sensor attached → set GNSS\_AVAILABLE = true.
2. If not → set it to false.
**Manual Location (Optional)**
1. When GNSS is disabled, update the fallback latitude and longitude:
```cpp theme={"system"}
static const float INITIAL_LAT = "------";
static const float INITIAL_LON = "------";
```
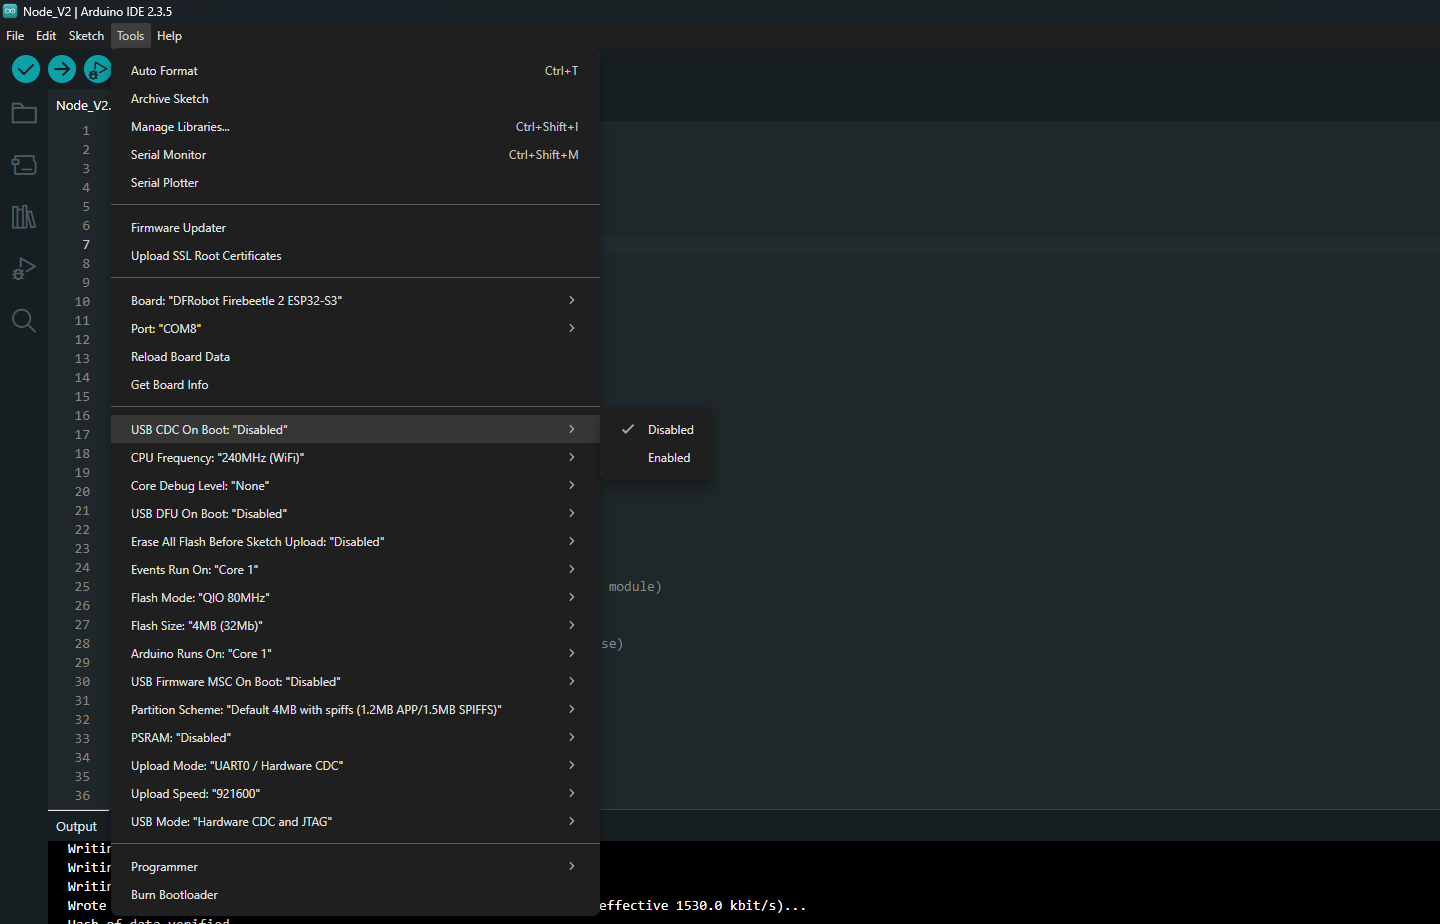
**Arduino IDE Settings**
1. Go to **Tools → Board → ESP32 → DFRobot FireBeetle 2 ESP32-S3**.
2. Connect your ESP32-S3 via **USB-C cable**.
3. Under **Tools → Port**, select the correct **COM port**.
4. Go to **Tools → USB CDC On Boot → Disable**.
**Node ID**
1. Set a unique **NODE\_ID** for each device.
2. Example: "01", "02", etc.
**GNSS Availability**
1. If your Node has a GNSS sensor attached → set GNSS\_AVAILABLE = true.
2. If not → set it to false.
**Manual Location (Optional)**
1. When GNSS is disabled, update the fallback latitude and longitude:
```cpp theme={"system"}
static const float INITIAL_LAT = "------";
static const float INITIAL_LON = "------";
```
**Arduino IDE Settings**
1. Go to **Tools → Board → ESP32 → DFRobot FireBeetle 2 ESP32-S3**.
2. Connect your ESP32-S3 via **USB-C cable**.
3. Under **Tools → Port**, select the correct **COM port**.
4. Go to **Tools → USB CDC On Boot → Disable**.
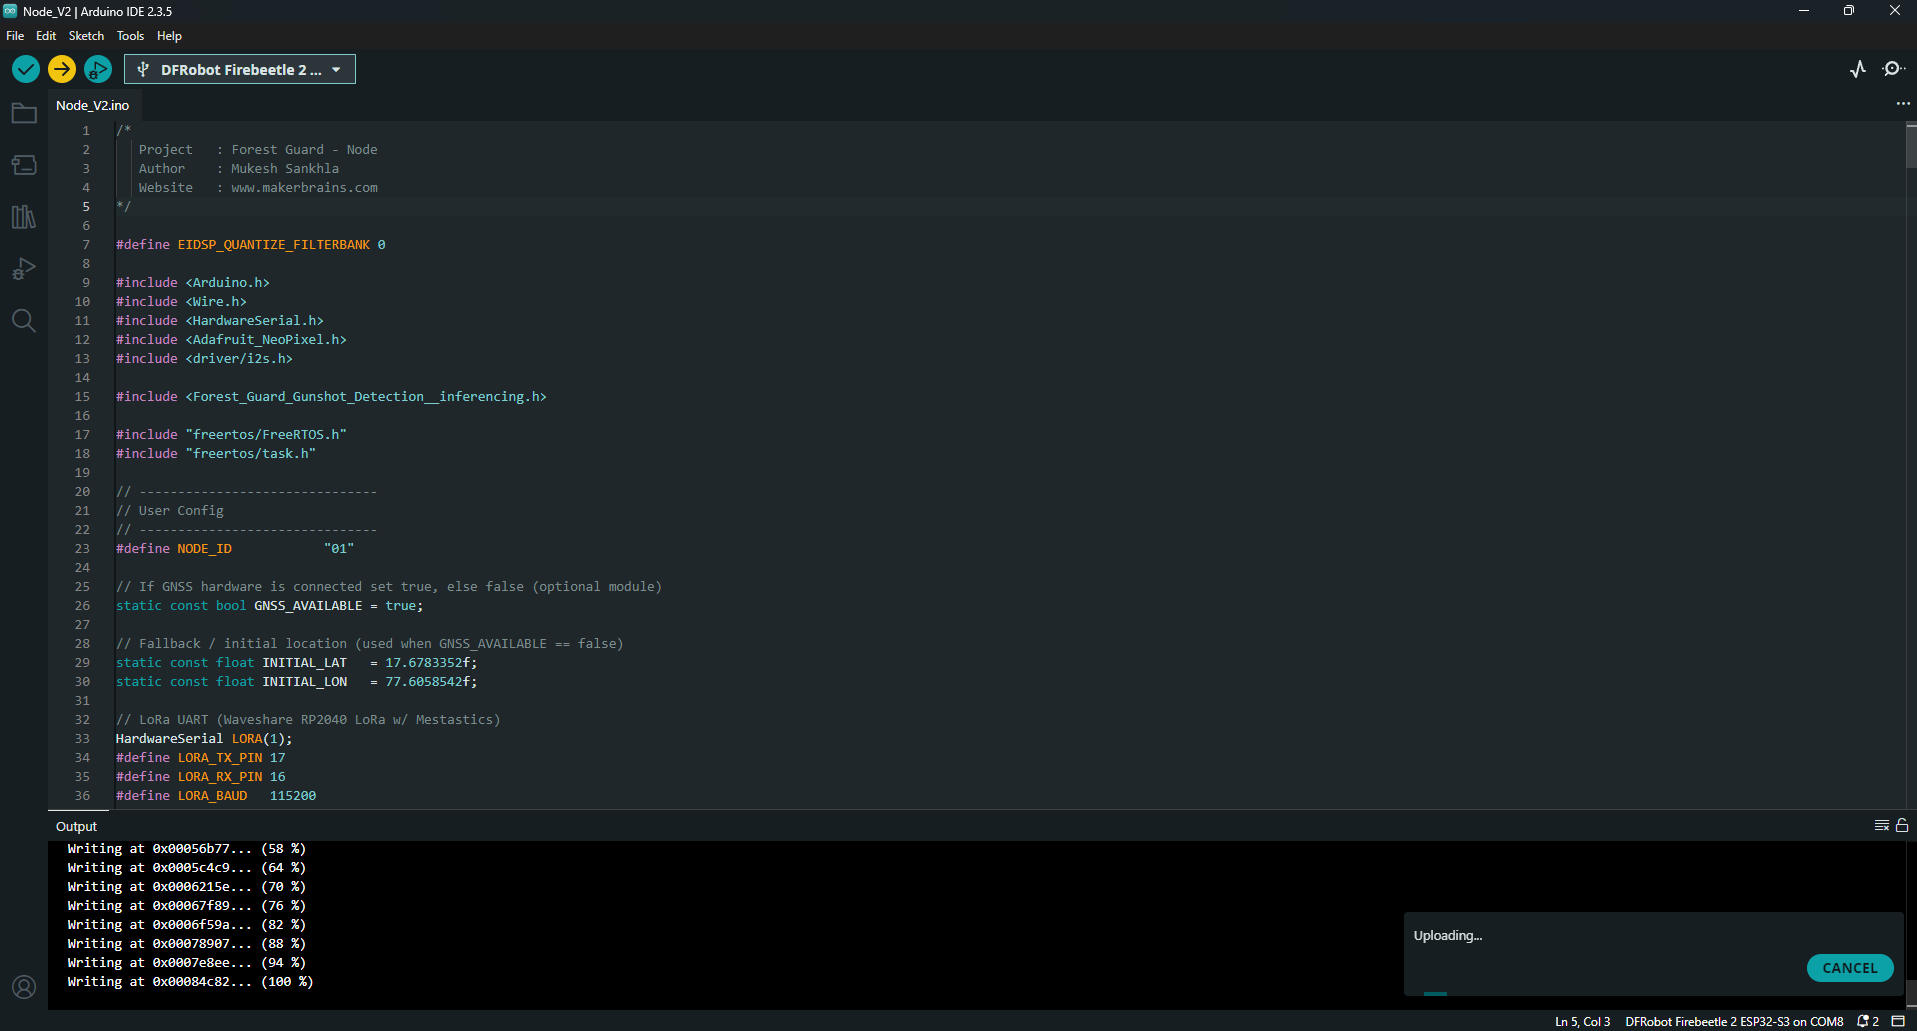
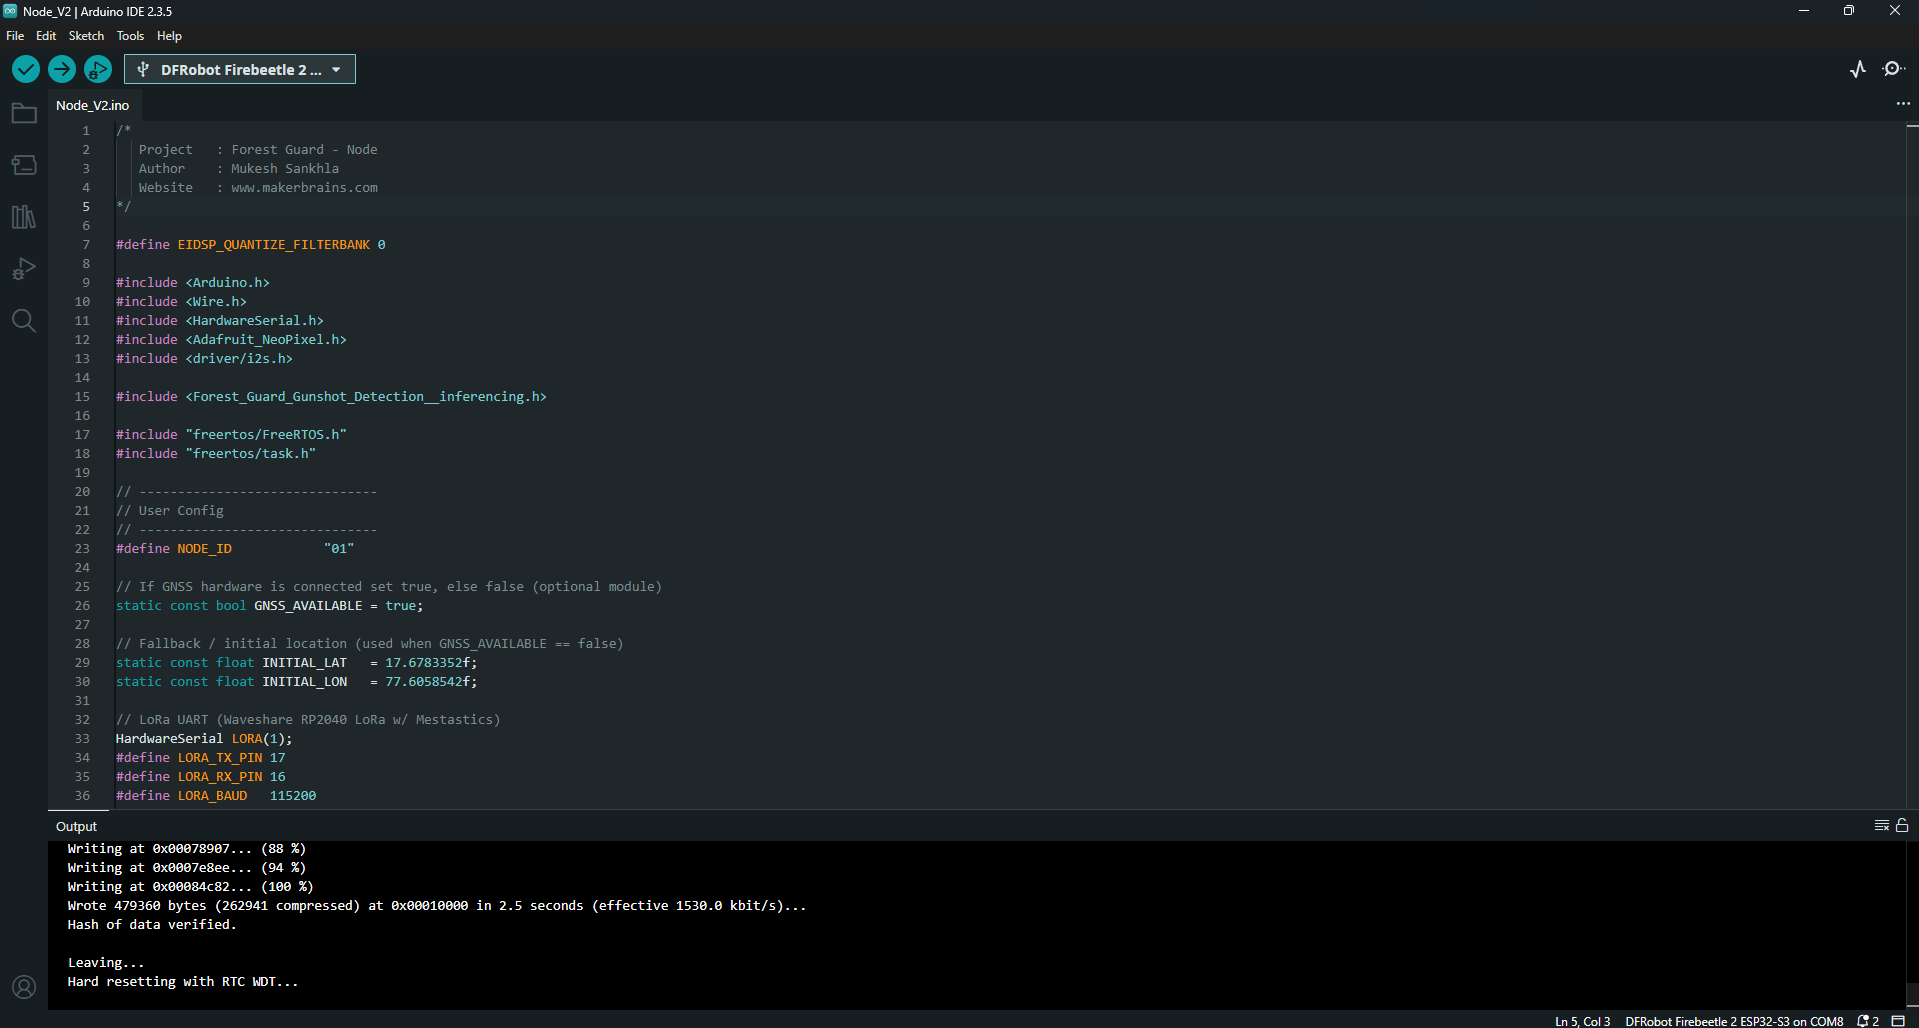
 **Upload the Code**
1. Click the **Upload** button in Arduino IDE.
2. The code will compile (this may take a while since the Edge Impulse model is large).
3. Once complete, the firmware will be flashed to your ESP32-S3 Node.
**Upload the Code**
1. Click the **Upload** button in Arduino IDE.
2. The code will compile (this may take a while since the Edge Impulse model is large).
3. Once complete, the firmware will be flashed to your ESP32-S3 Node.
 **After Upload**
1. The Node should boot with a **Blue breathing LED** (boot + LoRa init).
2. After registration with the Gateway, it will begin sending sensor data and detecting events.
## Step 24: Gateway Design and 3D Printing
**After Upload**
1. The Node should boot with a **Blue breathing LED** (boot + LoRa init).
2. After registration with the Gateway, it will begin sending sensor data and detecting events.
## Step 24: Gateway Design and 3D Printing
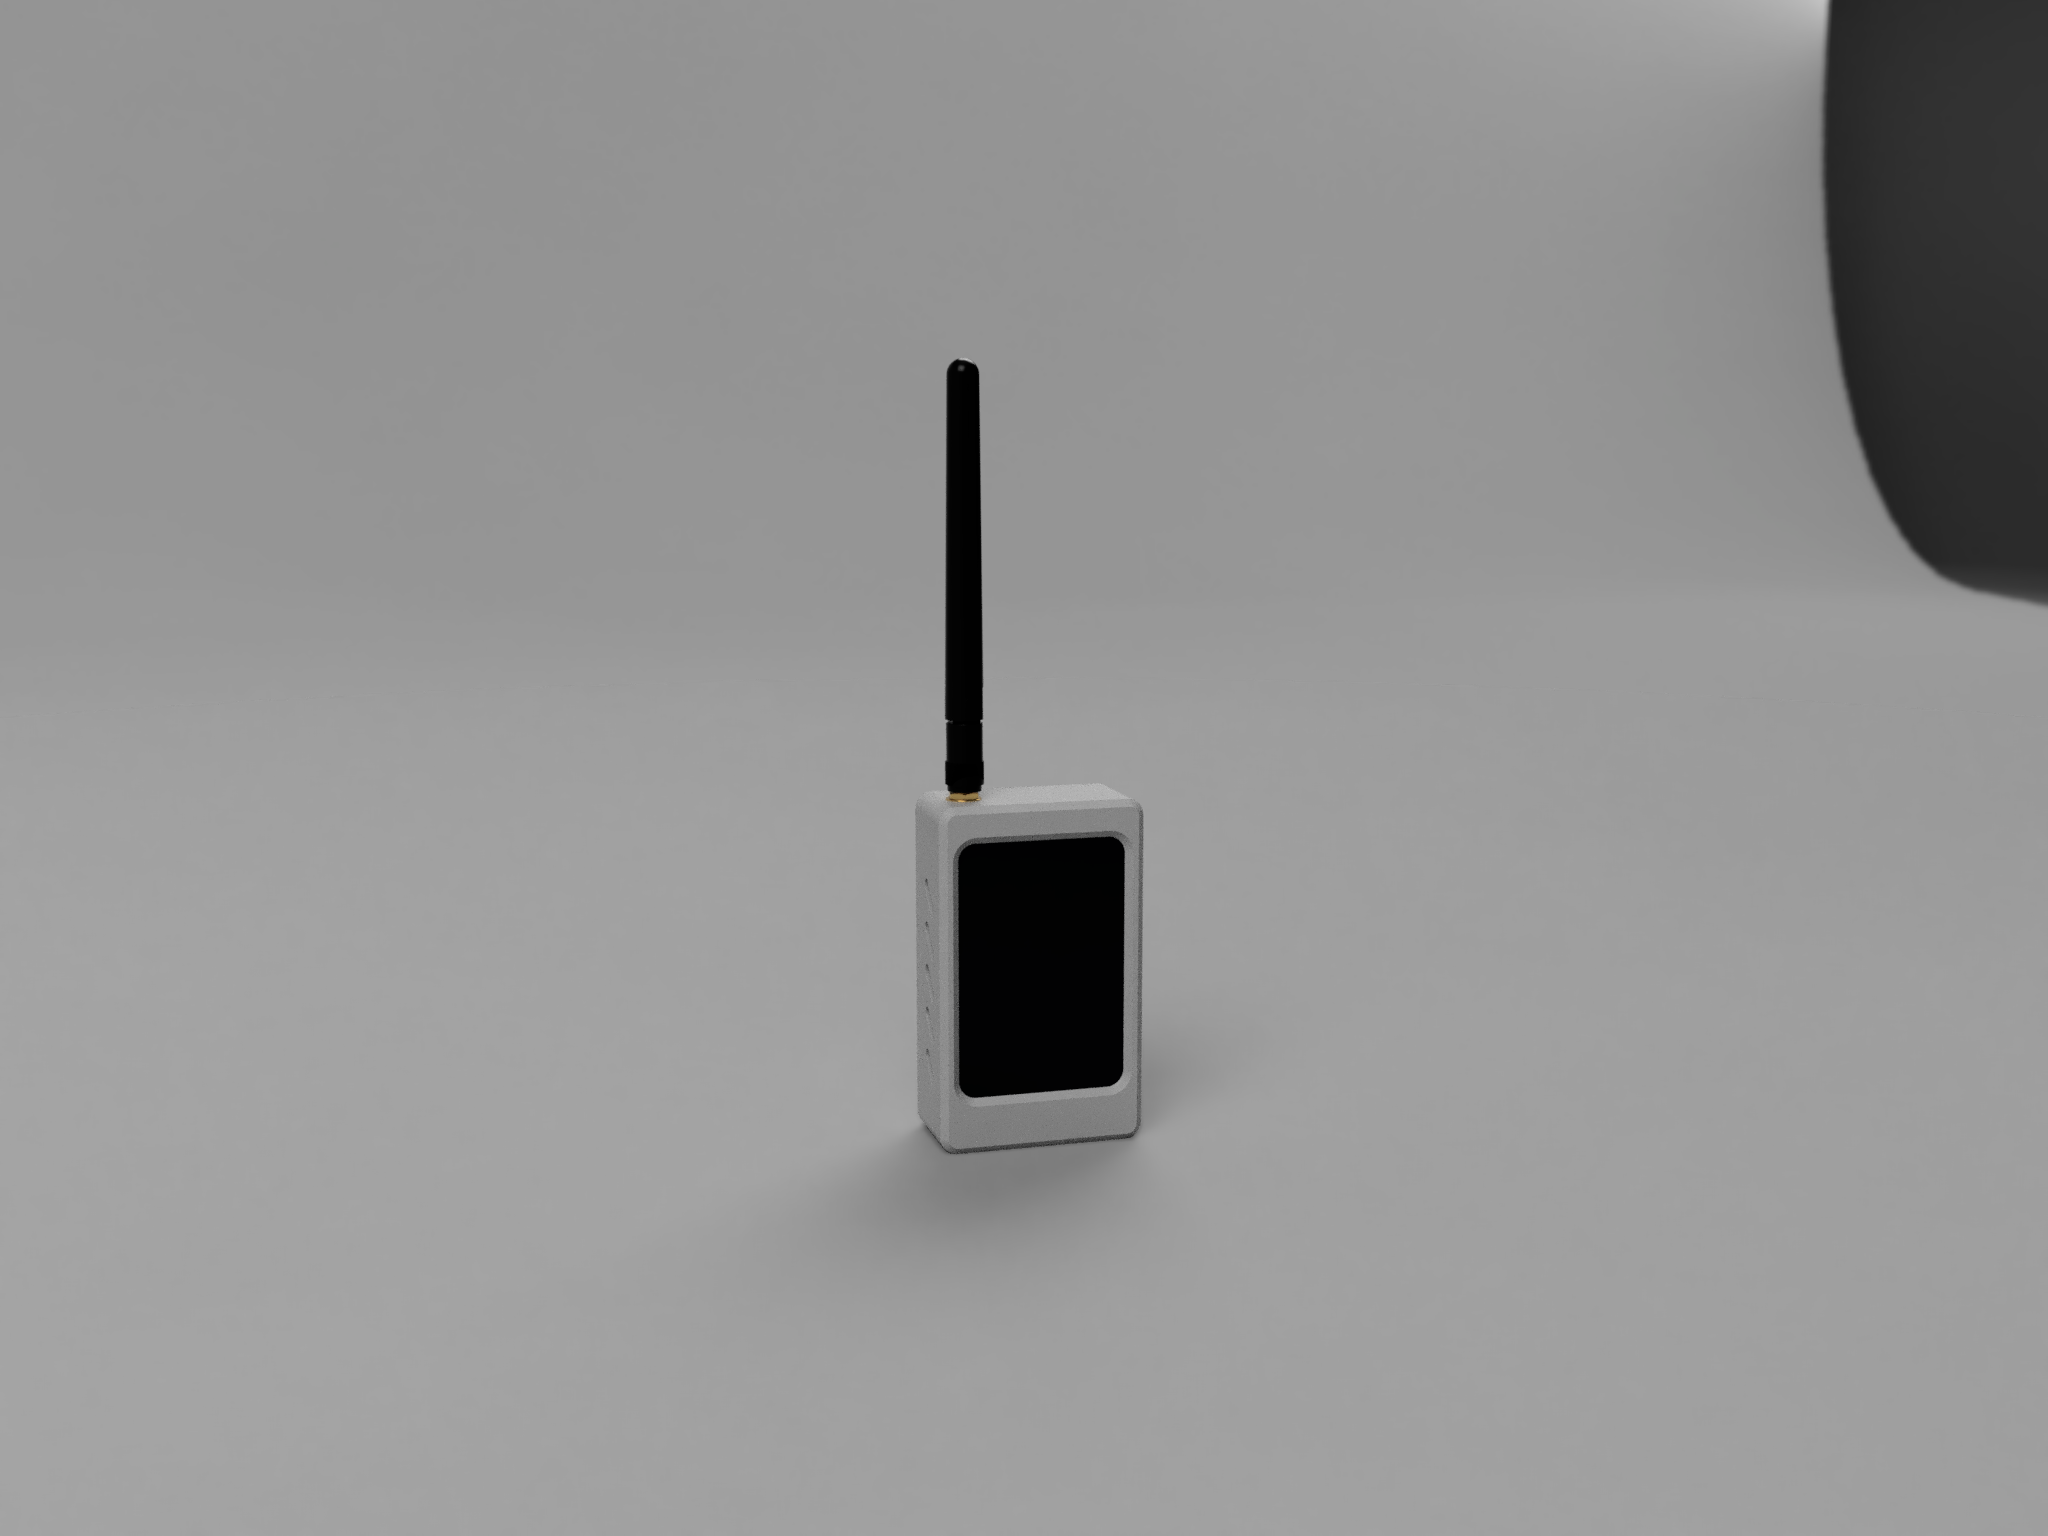
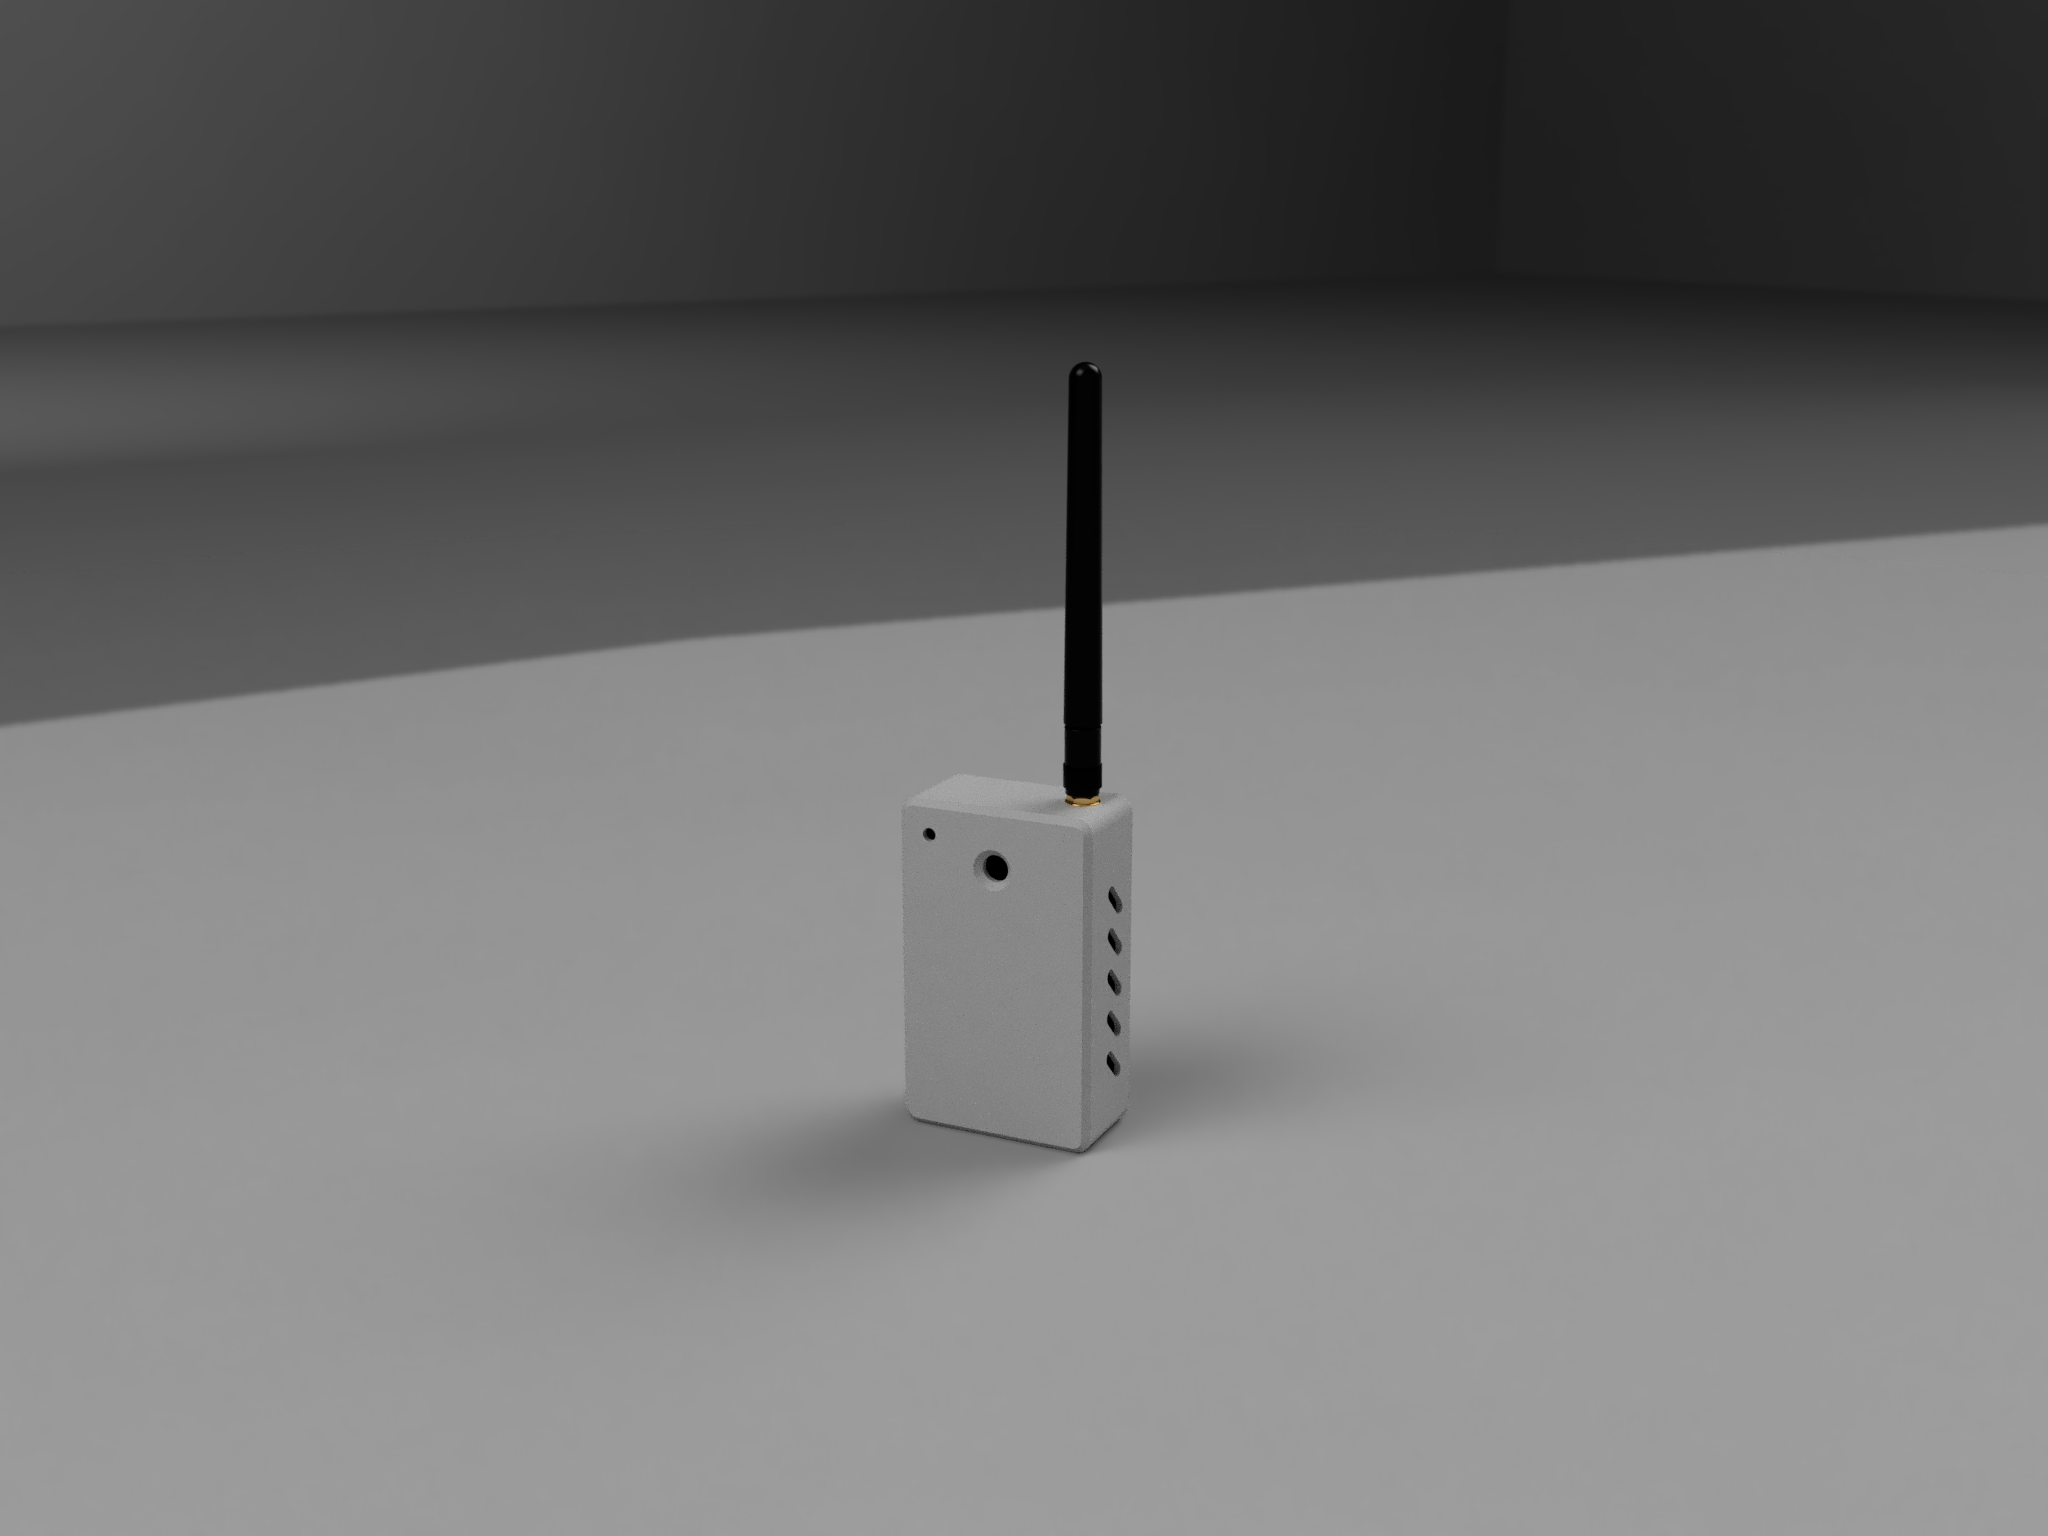
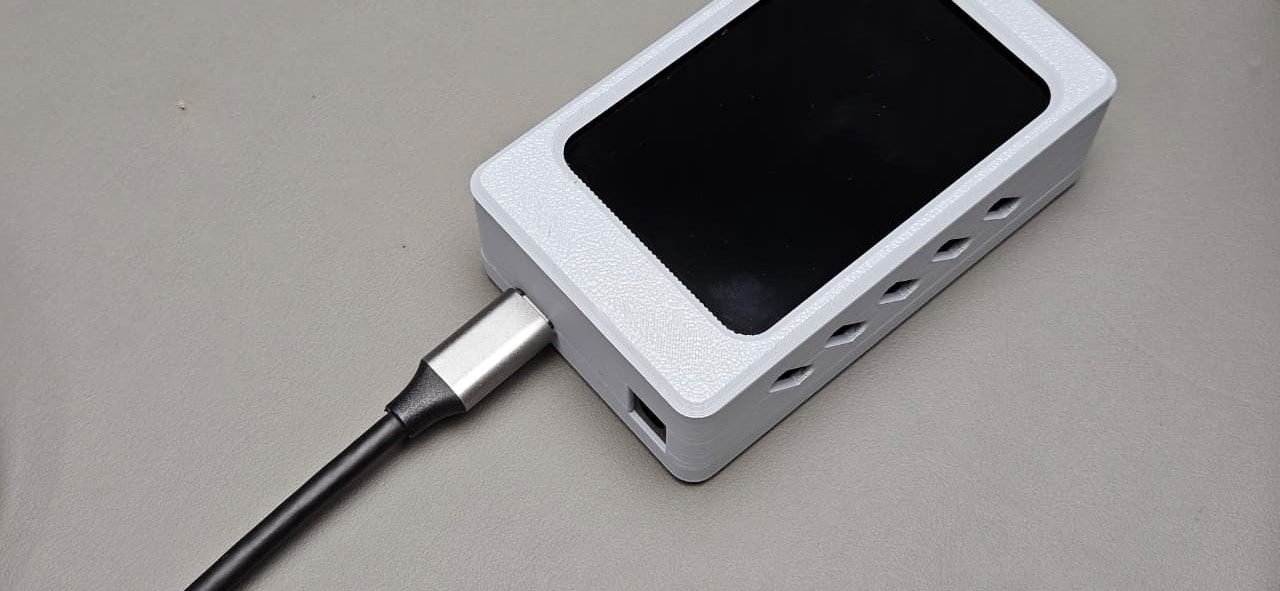
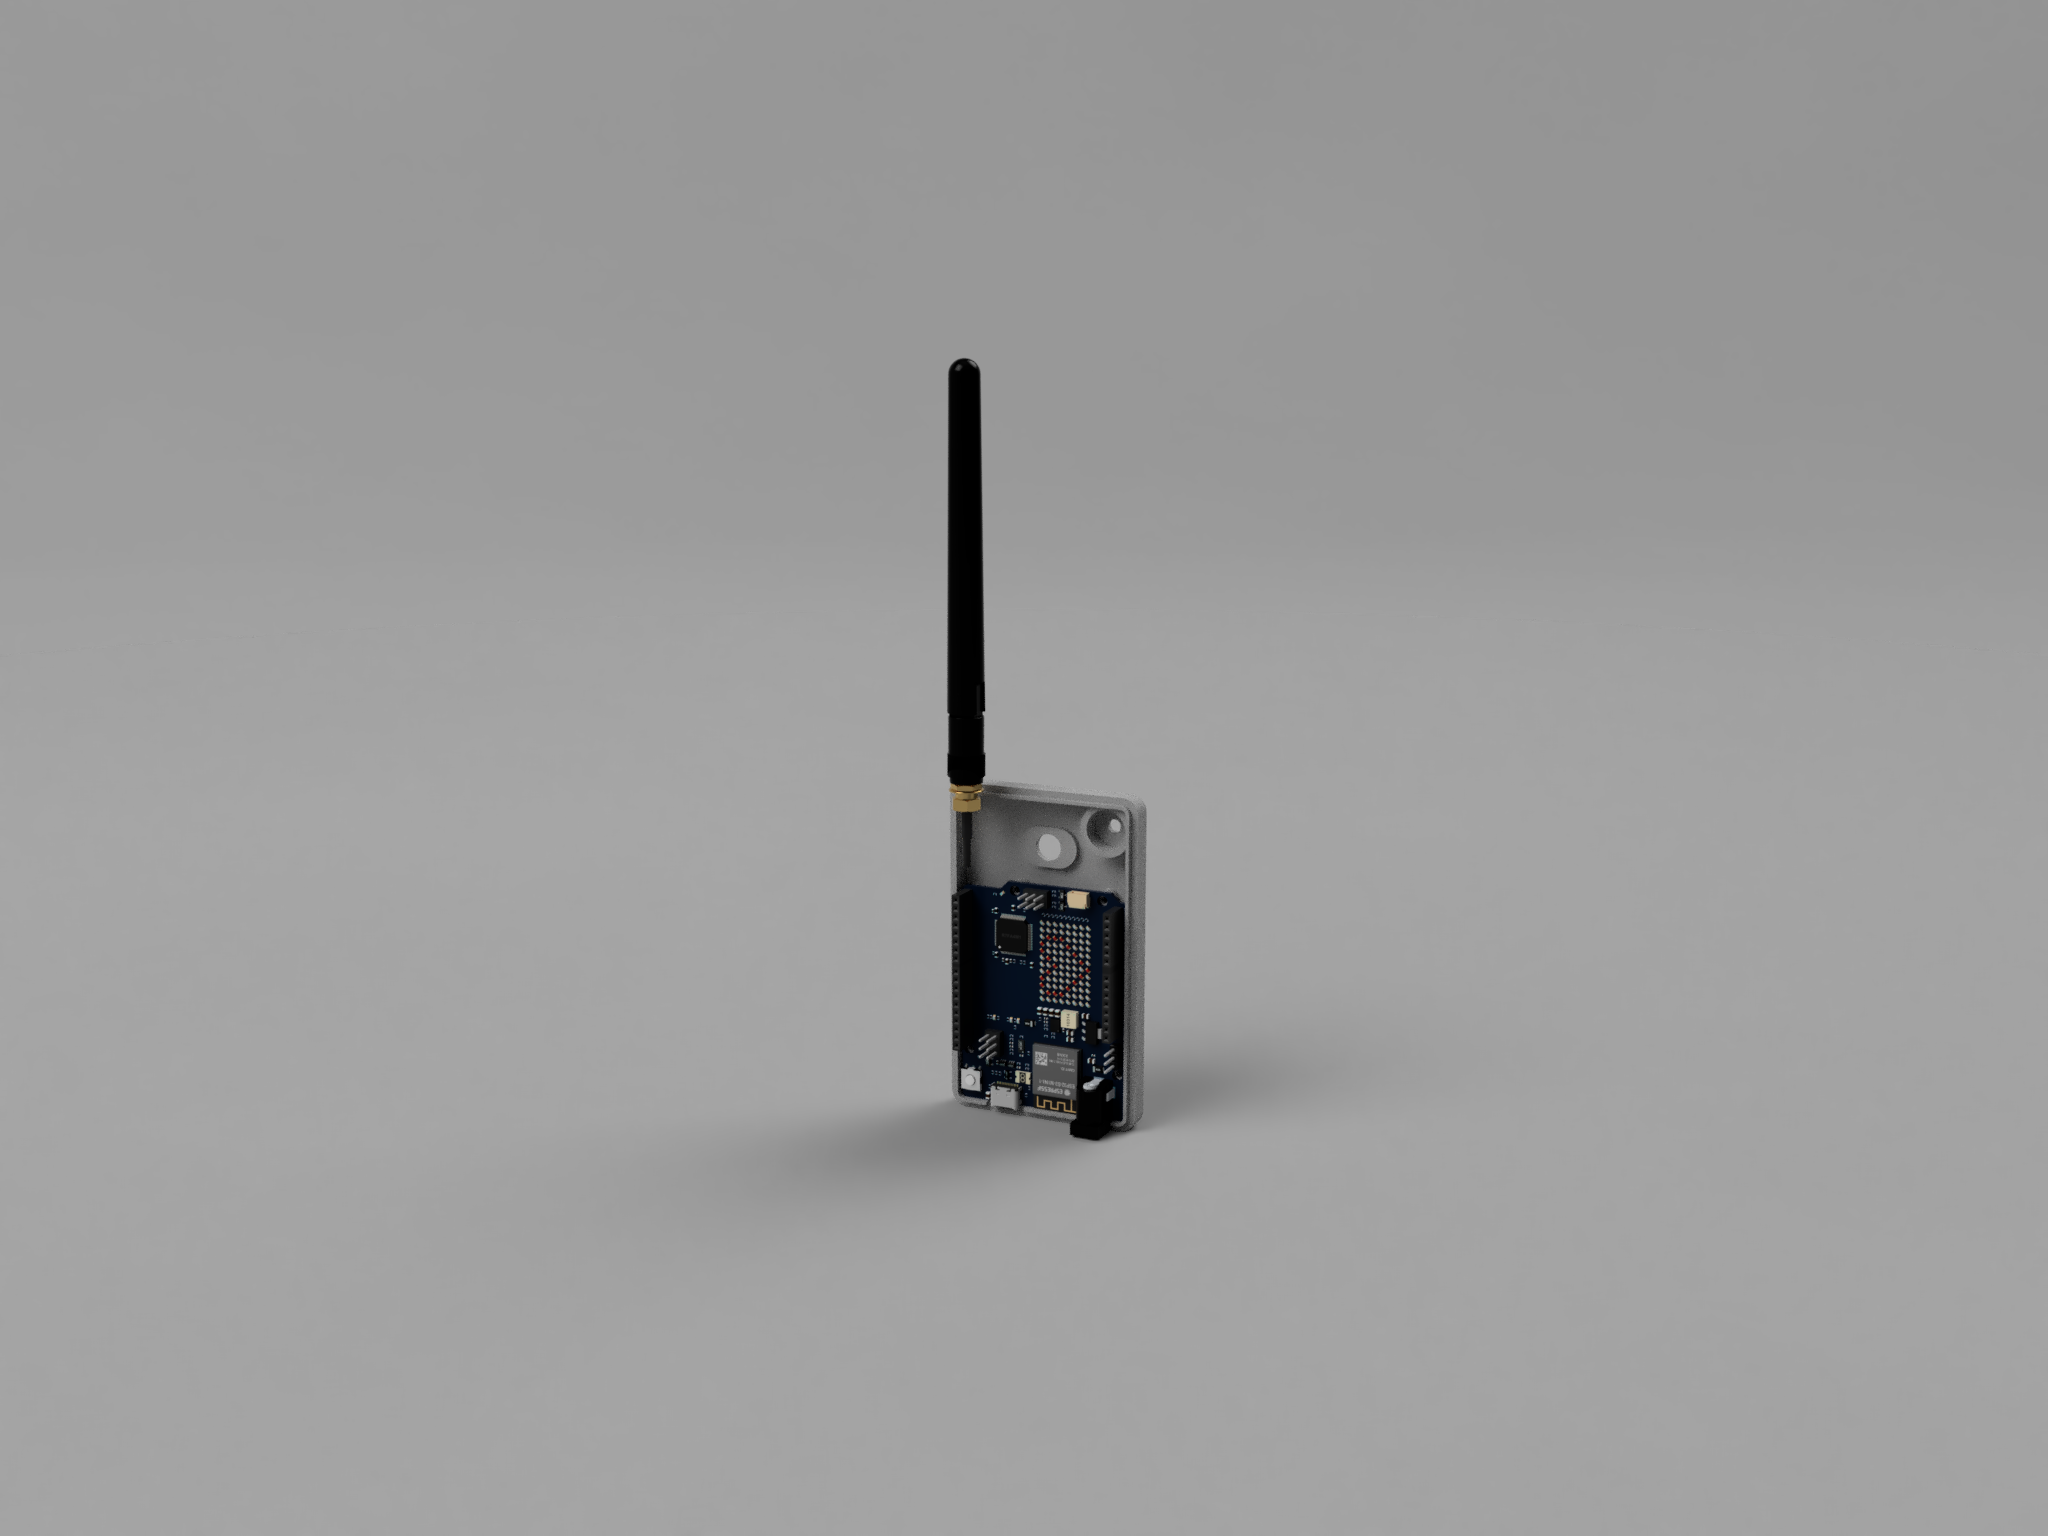 For the **Gateway enclosure**, I started by importing the **Arduino Uno R4 WiFi** and the **3.5” TFT display model** into **Fusion 360**. This allowed me to design the case around the exact dimensions of the components.
**Enclosure Features**
1. **Housing** - Includes cutouts for the TFT display, LoRa antenna, and the Arduino Type-C port.
2. **Cover** - Designed with mounting holes to securely fix the Arduino board inside.
**3D Printing**
For the **Gateway enclosure**, I started by importing the **Arduino Uno R4 WiFi** and the **3.5” TFT display model** into **Fusion 360**. This allowed me to design the case around the exact dimensions of the components.
**Enclosure Features**
1. **Housing** - Includes cutouts for the TFT display, LoRa antenna, and the Arduino Type-C port.
2. **Cover** - Designed with mounting holes to securely fix the Arduino board inside.
**3D Printing**


 I 3D printed both the housing and the cover in **light gray** using my Bambu Labs P1S printer. The parts came out strong, precise, and professional-looking, making the gateway unit both robust and visually consistent with the Node design.
#### [Forest Guard Rx Fusion 360 File](https://a360.co/4nx2MuO)
## Step 25: Housing Assembly
1. Take the **gateway housing** and the **TFT display**.
2. Place the display into the housing, making sure it is in the **correct orientation** with the screen aligned to the cutout.
3. Secure the display using **4× M2 screws**.
4. Double-check that the screen sits flush with the housing and is firmly fixed in place.
I 3D printed both the housing and the cover in **light gray** using my Bambu Labs P1S printer. The parts came out strong, precise, and professional-looking, making the gateway unit both robust and visually consistent with the Node design.
#### [Forest Guard Rx Fusion 360 File](https://a360.co/4nx2MuO)
## Step 25: Housing Assembly
1. Take the **gateway housing** and the **TFT display**.
2. Place the display into the housing, making sure it is in the **correct orientation** with the screen aligned to the cutout.
3. Secure the display using **4× M2 screws**.
4. Double-check that the screen sits flush with the housing and is firmly fixed in place.


 ## Step 26: Antenna Assembly
1. Take the **LoRa antenna**.
2. Unscrew the antenna connector from the module.
3. Pass the antenna through the **antenna hole** on the housing.
4. Screw the antenna back onto the LoRa module from the outside.
5. Make sure the antenna is firmly seated and facing upright.
## Step 26: Antenna Assembly
1. Take the **LoRa antenna**.
2. Unscrew the antenna connector from the module.
3. Pass the antenna through the **antenna hole** on the housing.
4. Screw the antenna back onto the LoRa module from the outside.
5. Make sure the antenna is firmly seated and facing upright.


 ## Step 27: Arduino Assembly
1. Take the **Arduino Uno R4 WiFi** and the **gateway cover**.
2. Align the Arduino with the **mounting holes** on the cover.
3. Secure it in place using **4× M2 screws**.
4. Ensure the **Type-C port** and headers remain accessible through the cover cutouts.
## Step 27: Arduino Assembly
1. Take the **Arduino Uno R4 WiFi** and the **gateway cover**.
2. Align the Arduino with the **mounting holes** on the cover.
3. Secure it in place using **4× M2 screws**.
4. Ensure the **Type-C port** and headers remain accessible through the cover cutouts.


 ## Step 28: Buzzer and Power Switch Assembly
1. Take the **buzzer**, the **power switch**, and some **quick glue**.
2. Insert the **buzzer** into its dedicated slot on the cover.
3. Insert the **power switch** into its cutout hole on the cover.
4. Apply a small amount of **quick glue** around the switch edges to secure it in place.
## Step 28: Buzzer and Power Switch Assembly
1. Take the **buzzer**, the **power switch**, and some **quick glue**.
2. Insert the **buzzer** into its dedicated slot on the cover.
3. Insert the **power switch** into its cutout hole on the cover.
4. Apply a small amount of **quick glue** around the switch edges to secure it in place.


 ## Step 29: Connections
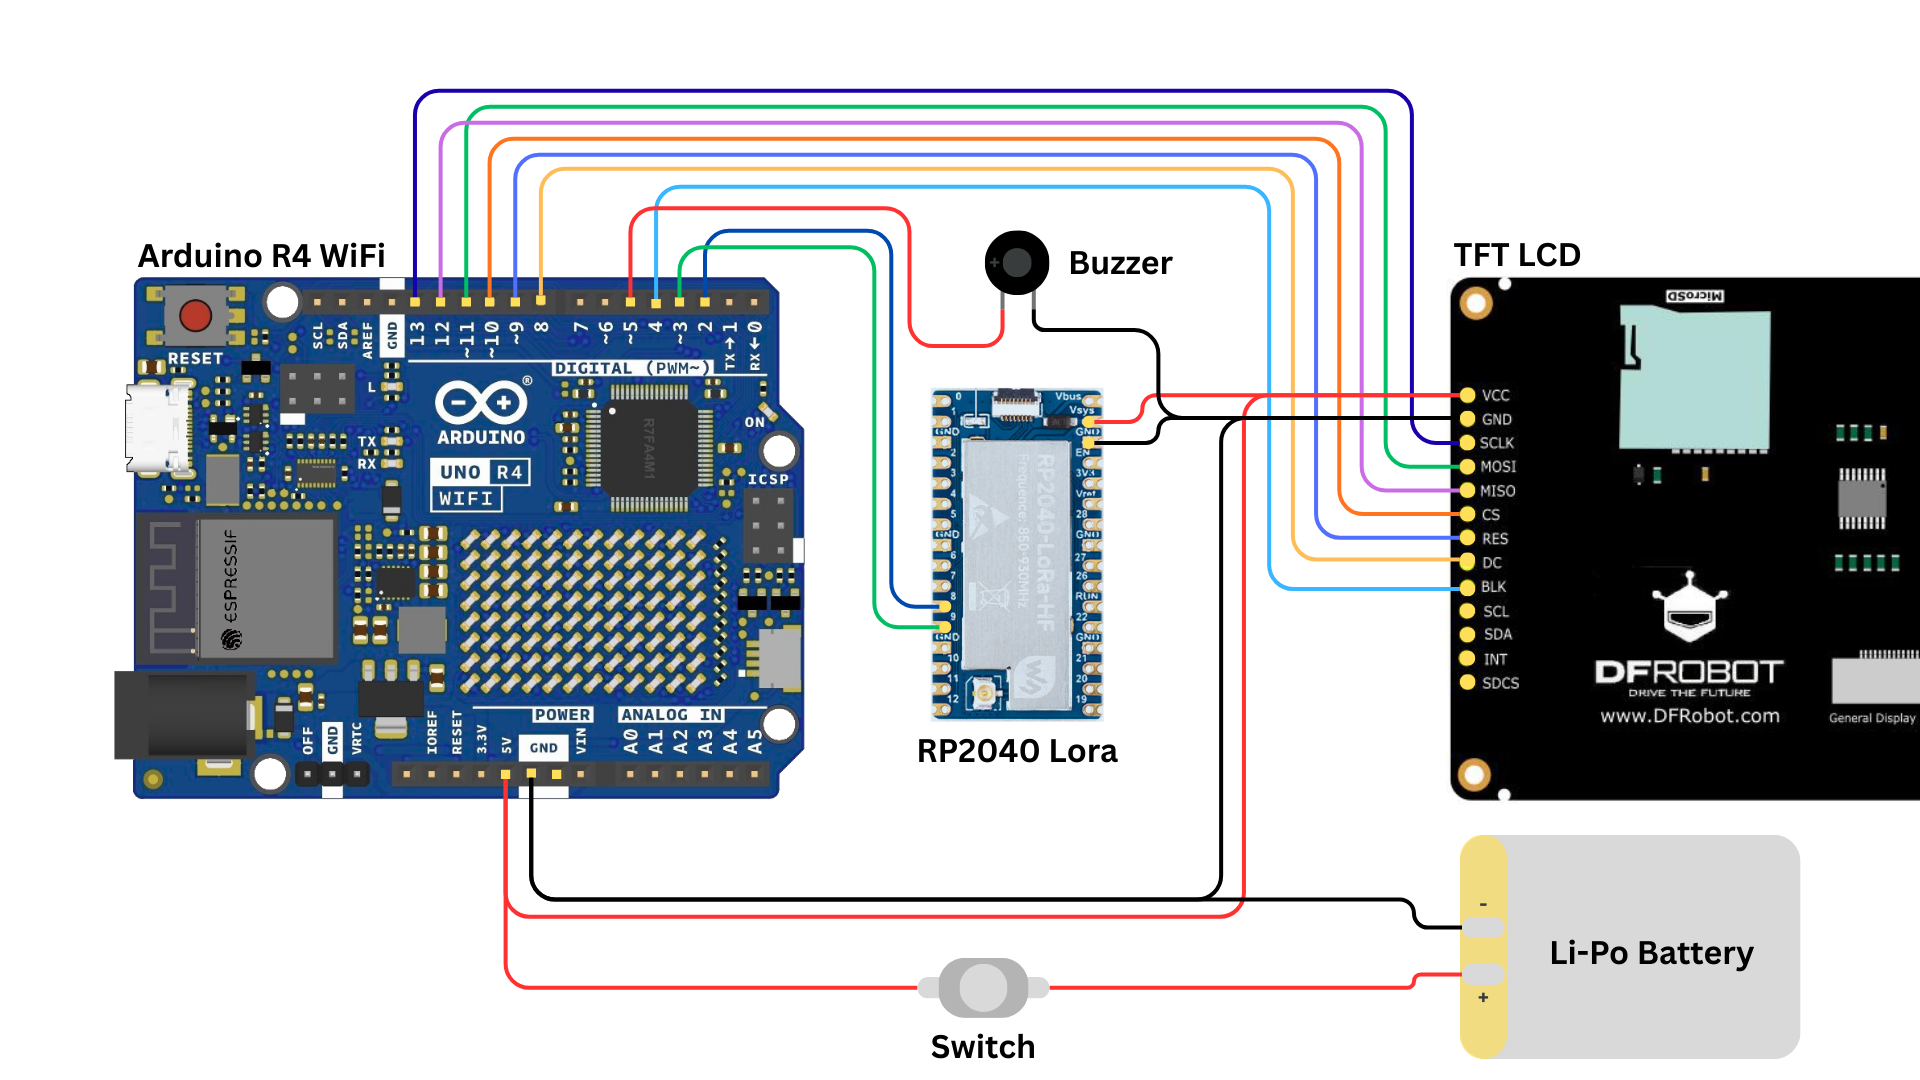 Now it’s time to wire everything together. Follow the **circuit diagram** carefully when connecting the **Arduino**, **TFT Display**, and **LoRa module**.
I used **male header pins** to avoid soldering directly to the Arduino. This way, the display and modules can be **plugged and unplugged** easily for debugging or replacement.
Arduino ↔ Display (TFT)
1. Connect as shown in the **wiring diagram above** (image).
2. Ensure all data and control pins are matched correctly, with **5V and GND** powering the display.
Arduino ↔ LoRa Module
1. **GND → GNS (LoRa GND)**
2. **5V → VSys (LoRa Power)**
3. **Pin 2 → Pin 9** (LoRa UART RX/TX pair)
4. **Pin 3 → Pin 8** (LoRa UART TX/RX pair)
Power & Peripherals
1. Connect the **battery and power switch** between **GND** and **5V** of the Arduino.
2. Connect the **buzzer**:
3. GND → Arduino GND
4. +Ve → Arduino Pin5
Now it’s time to wire everything together. Follow the **circuit diagram** carefully when connecting the **Arduino**, **TFT Display**, and **LoRa module**.
I used **male header pins** to avoid soldering directly to the Arduino. This way, the display and modules can be **plugged and unplugged** easily for debugging or replacement.
Arduino ↔ Display (TFT)
1. Connect as shown in the **wiring diagram above** (image).
2. Ensure all data and control pins are matched correctly, with **5V and GND** powering the display.
Arduino ↔ LoRa Module
1. **GND → GNS (LoRa GND)**
2. **5V → VSys (LoRa Power)**
3. **Pin 2 → Pin 9** (LoRa UART RX/TX pair)
4. **Pin 3 → Pin 8** (LoRa UART TX/RX pair)
Power & Peripherals
1. Connect the **battery and power switch** between **GND** and **5V** of the Arduino.
2. Connect the **buzzer**:
3. GND → Arduino GND
4. +Ve → Arduino Pin5


 ## Step 30: Arduino Code
Now let’s program the **Gateway** so it can communicate with the nodes, process sensor/event data, and upload everything to Firebase.
## Step 30: Arduino Code
Now let’s program the **Gateway** so it can communicate with the nodes, process sensor/event data, and upload everything to Firebase.
 **Download the Code**
1. Go to the [Forest Guard GitHub repository.](https://github.com/MukeshSankhla/Forest-Guard)
2. Download and extract the files.
3. Open **Gateway\_V1.ino** in the **Arduino IDE**.
**Setup Arduino IDE**
**Download the Code**
1. Go to the [Forest Guard GitHub repository.](https://github.com/MukeshSankhla/Forest-Guard)
2. Download and extract the files.
3. Open **Gateway\_V1.ino** in the **Arduino IDE**.
**Setup Arduino IDE**
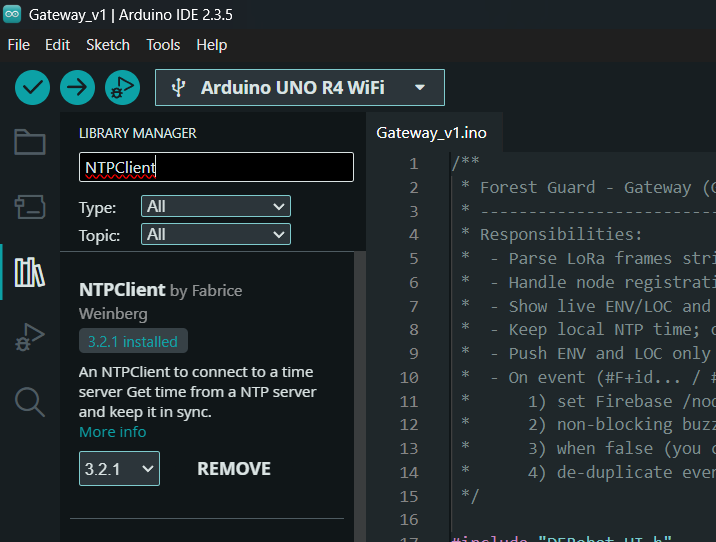
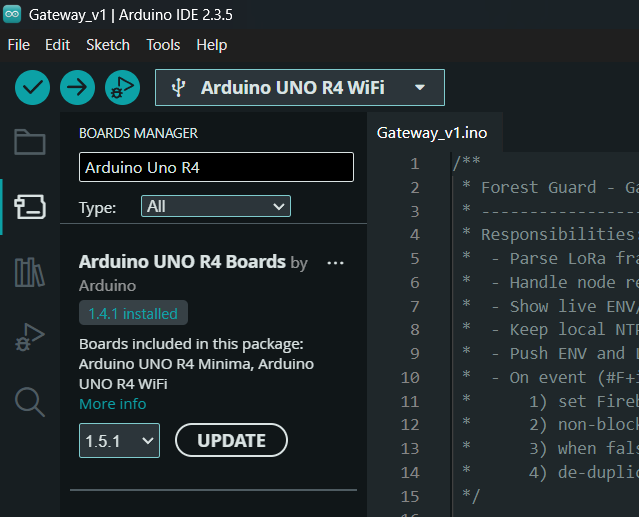 1. Make sure the **Arduino Uno R4 WiFi board package** is installed via **Board Manager**.
2. Install all required **libraries** as shown in the reference images (WiFiS3, ArduinoHttpClient, NTPClient, [DFRobot UI/TFT libraries](https://codeload.github.com/DFRobot/DFRobot_GDL/zip/master), etc.).
1. Make sure the **Arduino Uno R4 WiFi board package** is installed via **Board Manager**.
2. Install all required **libraries** as shown in the reference images (WiFiS3, ArduinoHttpClient, NTPClient, [DFRobot UI/TFT libraries](https://codeload.github.com/DFRobot/DFRobot_GDL/zip/master), etc.).
 **Add Your Credentials**
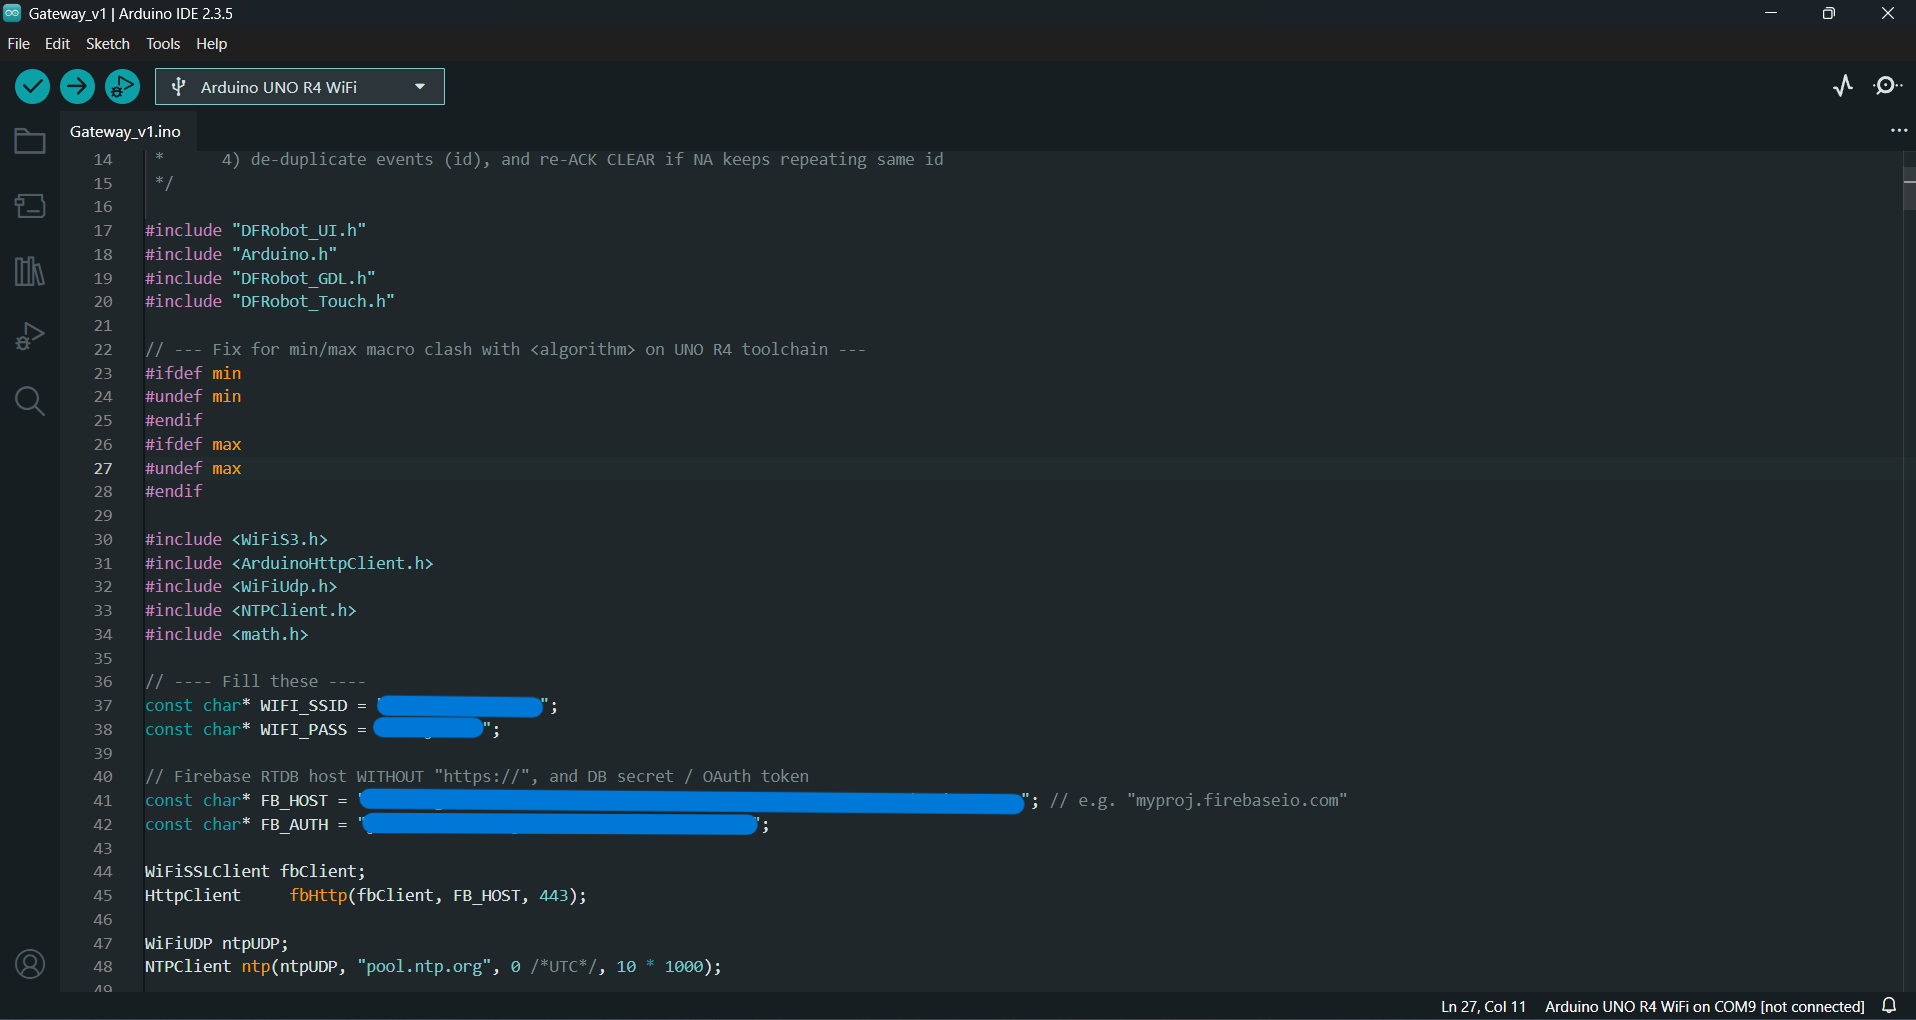 Inside the sketch:
1. Enter your **WiFi SSID and password**.
2. Enter your **Google Firebase host URL** and **authentication key**.
```cpp theme={"system"}
// Wi-Fi
const char* WIFI_SSID = "";
const char* WIFI_PASS = "";
// Firebase RTDB (no https://, no trailing slash)
const char* FB_HOST = "-default-rtdb.asia-southeast1.firebasedatabase.app";
// Legacy database secret copied in Step 3
const char* FB_AUTH = "";
```
**Upload the Code**
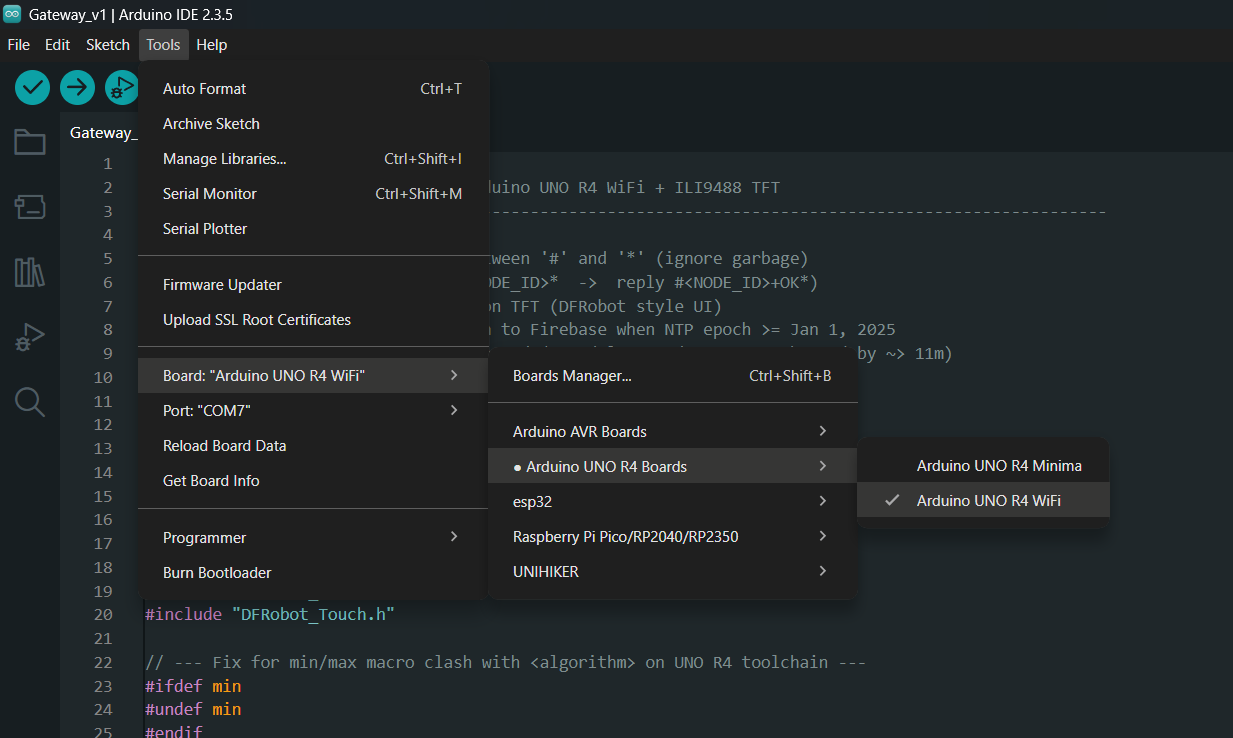
1. In **Tools → Board**, select **Arduino UNO R4 WiFi**.
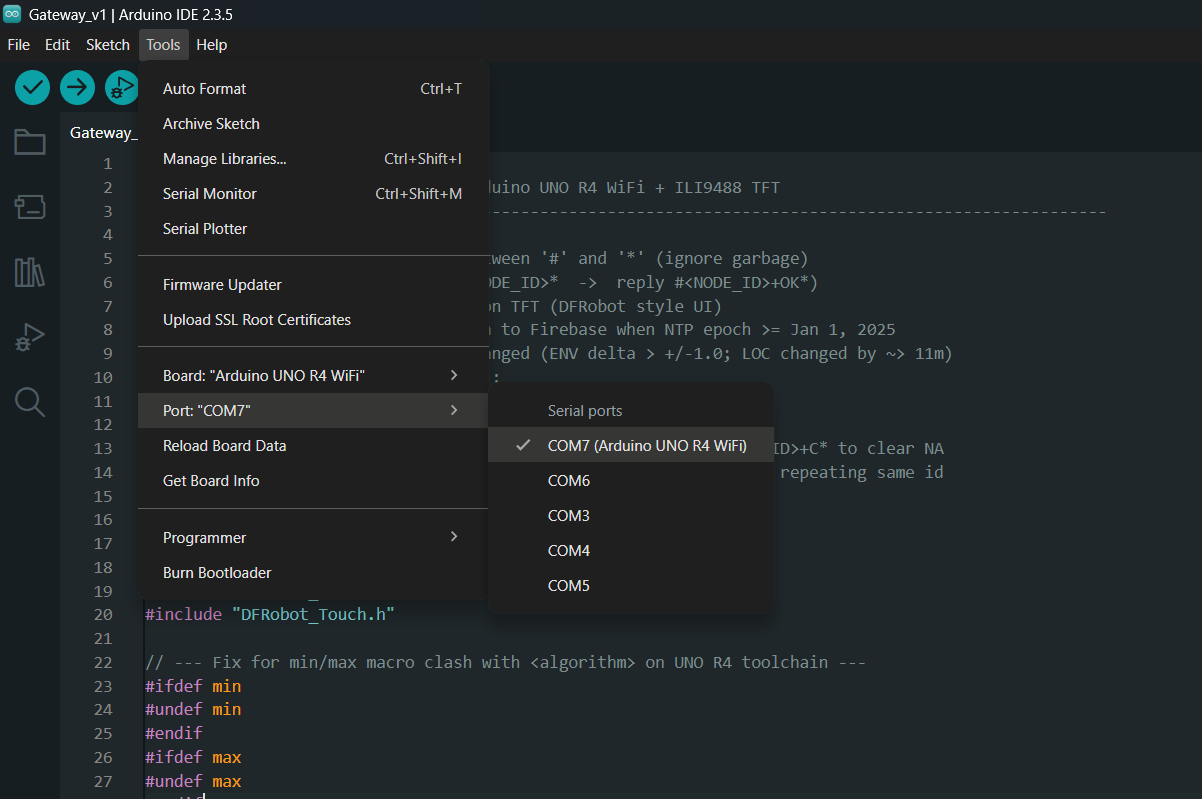
2. In **Tools → Port**, select the correct COM port for your board.
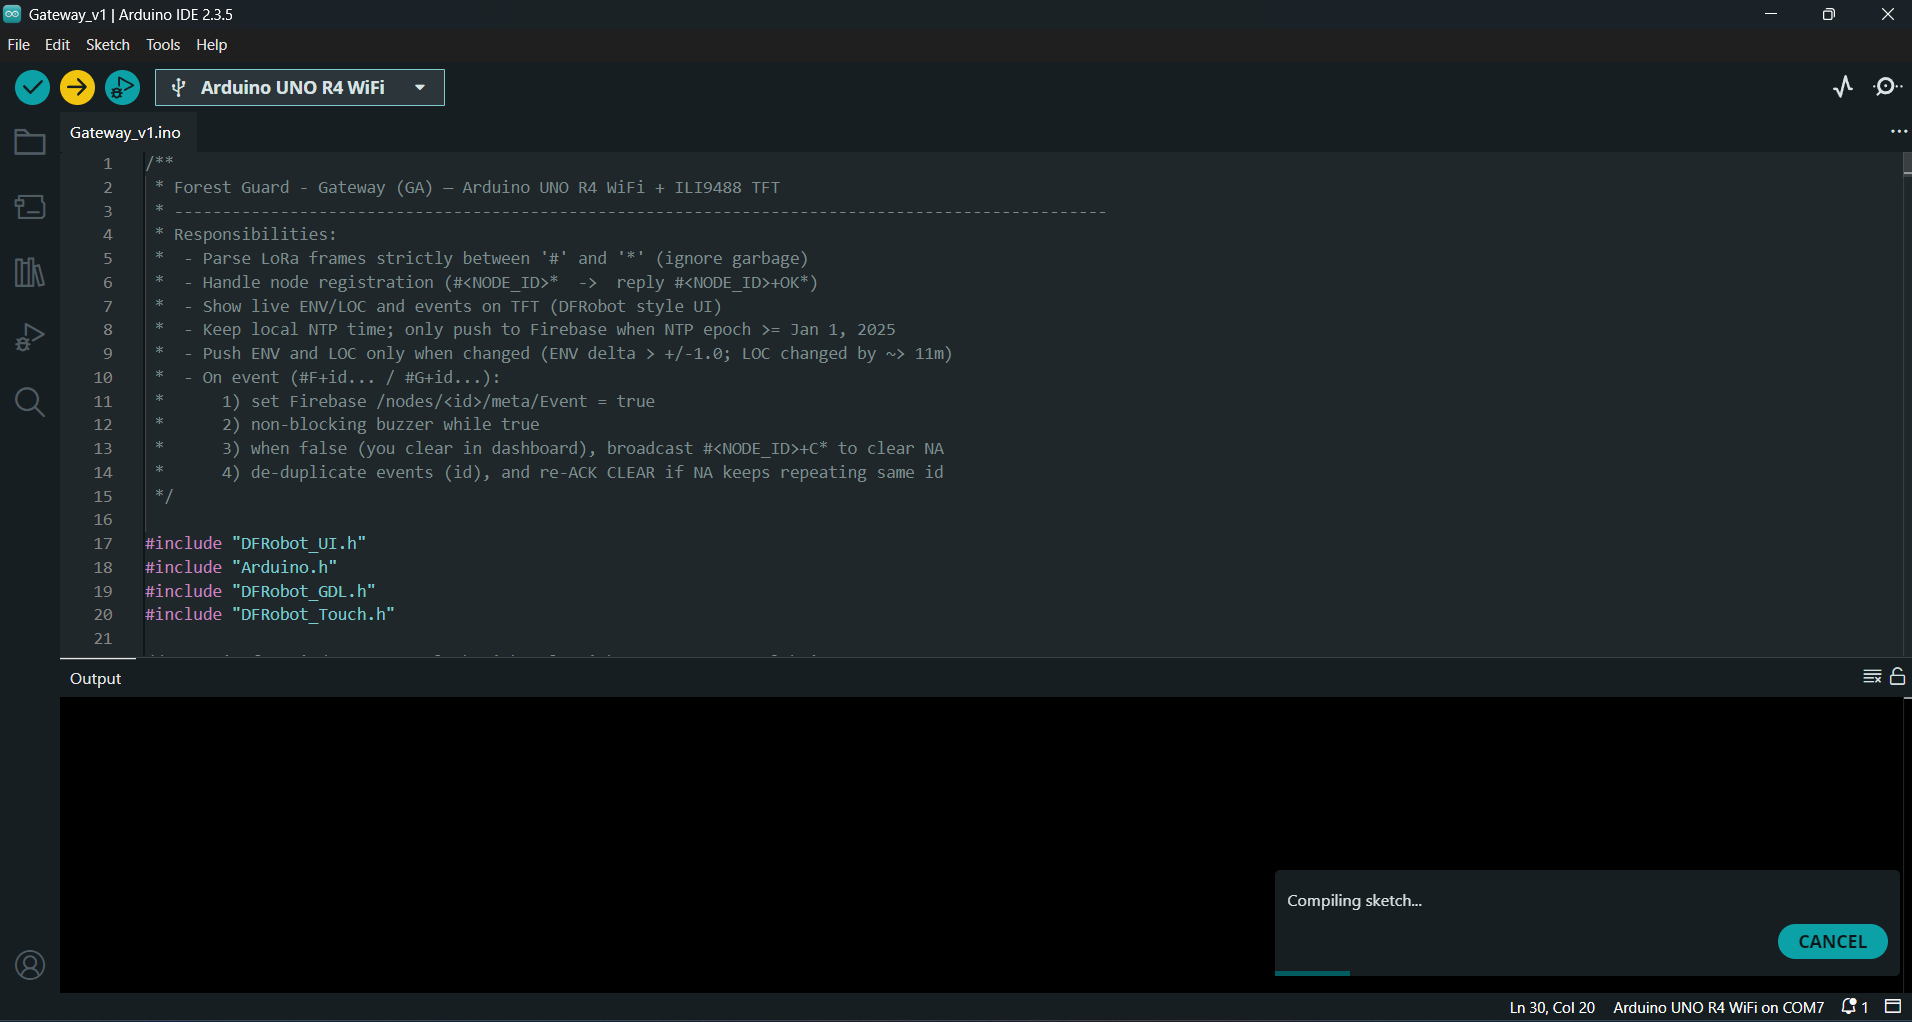
3. Click **Upload**.
Inside the sketch:
1. Enter your **WiFi SSID and password**.
2. Enter your **Google Firebase host URL** and **authentication key**.
```cpp theme={"system"}
// Wi-Fi
const char* WIFI_SSID = "";
const char* WIFI_PASS = "";
// Firebase RTDB (no https://, no trailing slash)
const char* FB_HOST = "-default-rtdb.asia-southeast1.firebasedatabase.app";
// Legacy database secret copied in Step 3
const char* FB_AUTH = "";
```
**Upload the Code**
1. In **Tools → Board**, select **Arduino UNO R4 WiFi**.
2. In **Tools → Port**, select the correct COM port for your board.
3. Click **Upload**.
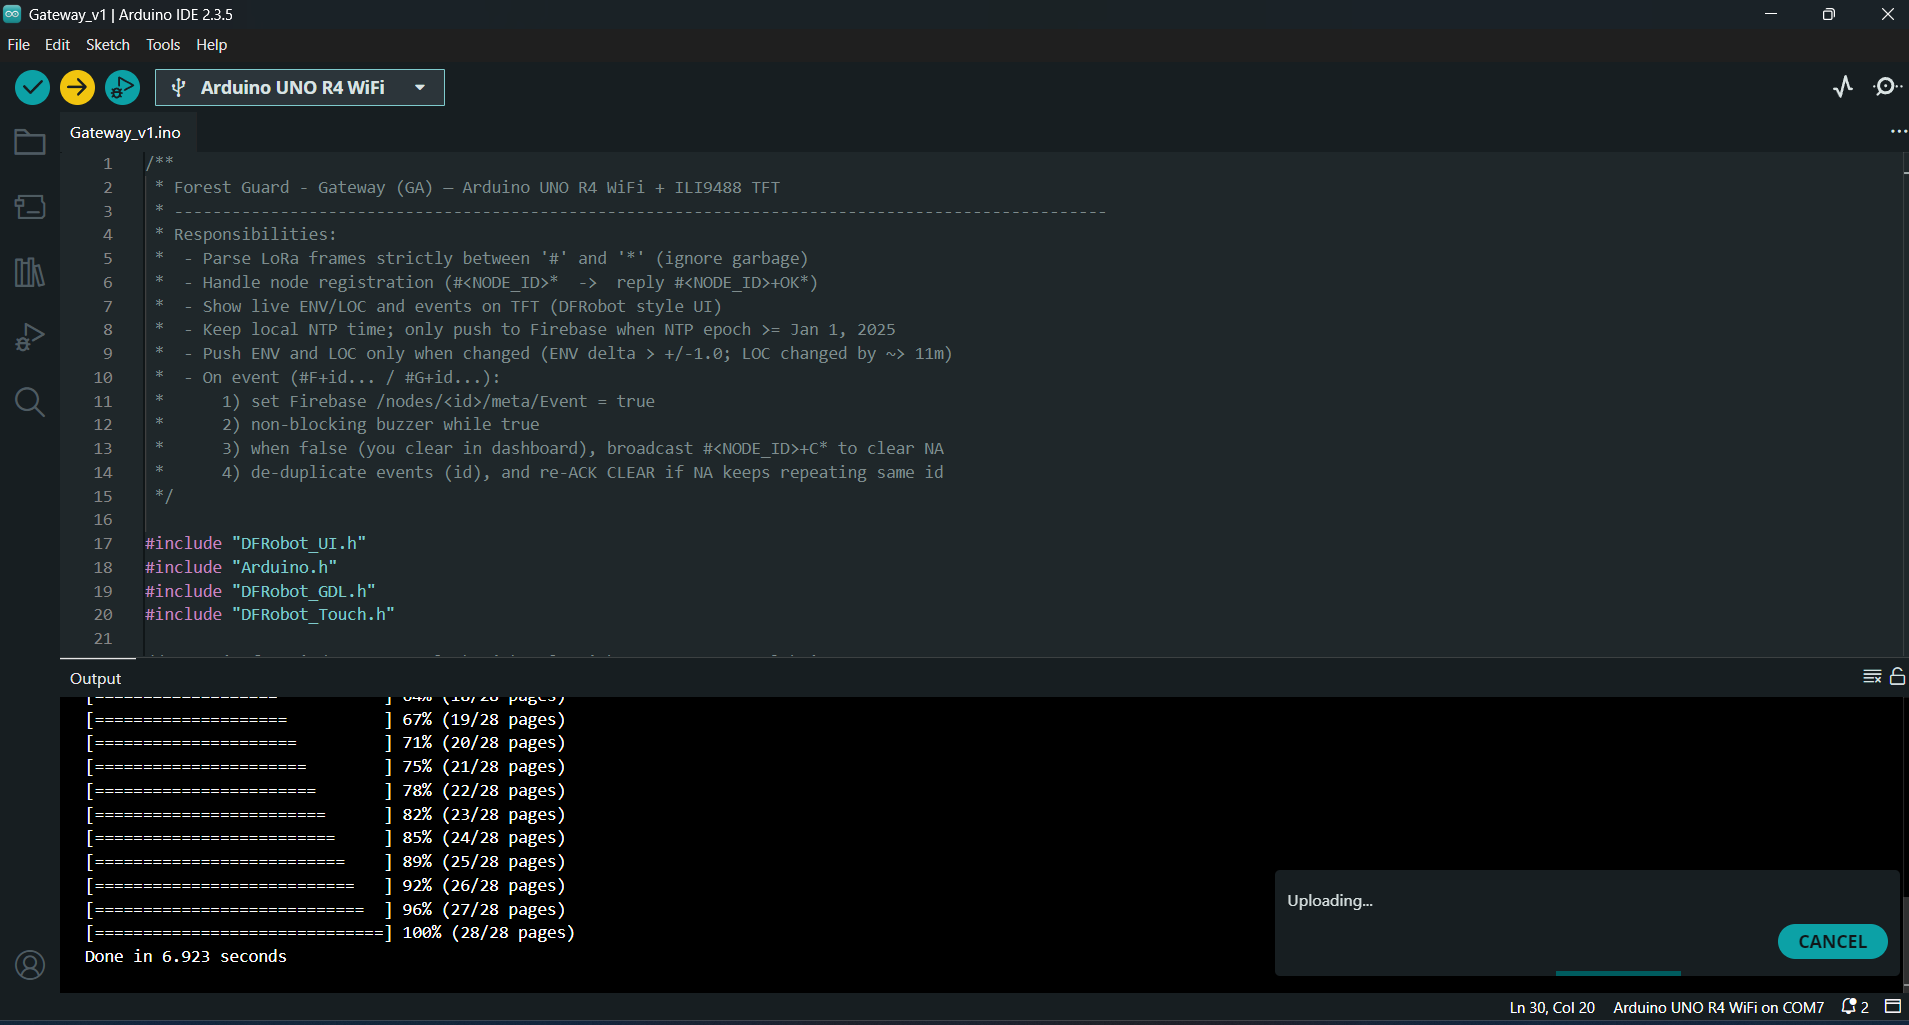
 Once uploaded, the Gateway will:
1. Connect to WiFi.
2. Sync time via NTP.
3. Register nodes and receive LoRa messages.
4. Push ENV, LOC, and event data into **Firebase**.
5. Drive the TFT display and buzzer for real-time monitoring.
## Step 31: Firebase Project Setup
**1) Create a Firebase project**
1. Open **[https://console.firebase.google.com/](https://console.firebase.google.com/)**
2. **Create project** → (Google Analytics optional; you can keep default).
3. Wait for provisioning to finish.
Once uploaded, the Gateway will:
1. Connect to WiFi.
2. Sync time via NTP.
3. Register nodes and receive LoRa messages.
4. Push ENV, LOC, and event data into **Firebase**.
5. Drive the TFT display and buzzer for real-time monitoring.
## Step 31: Firebase Project Setup
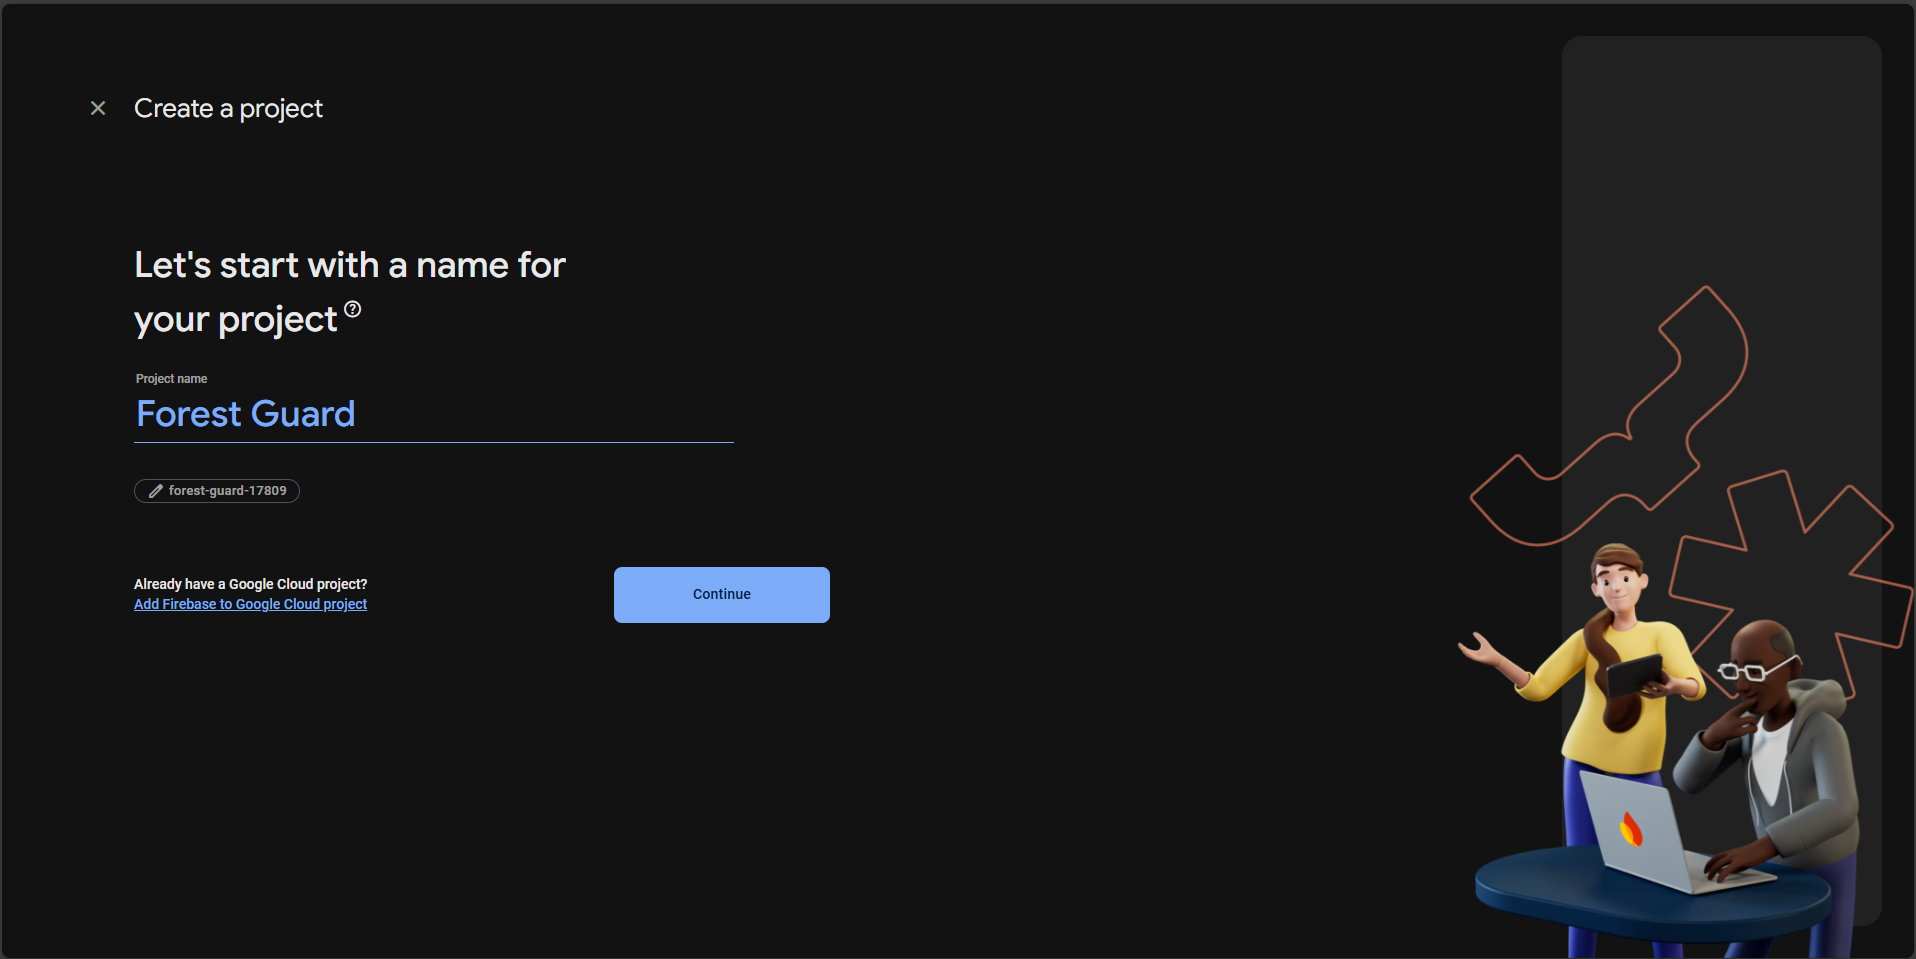
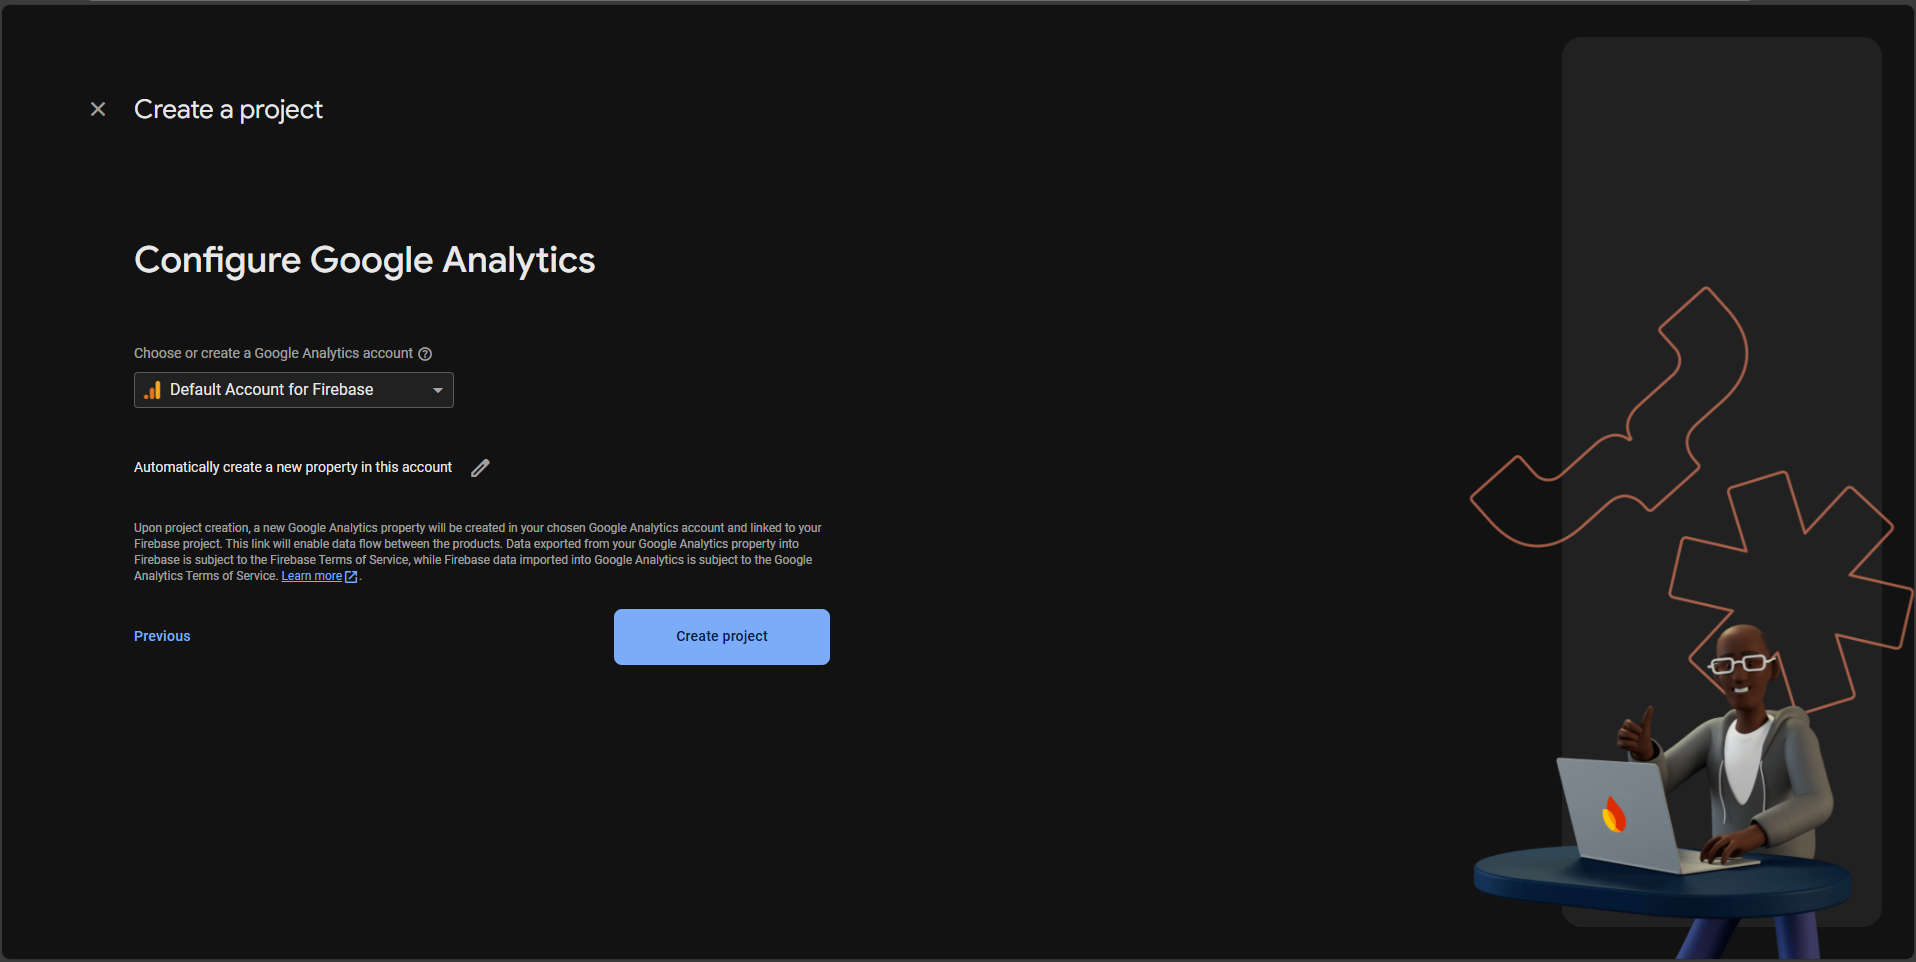
**1) Create a Firebase project**
1. Open **[https://console.firebase.google.com/](https://console.firebase.google.com/)**
2. **Create project** → (Google Analytics optional; you can keep default).
3. Wait for provisioning to finish.
 **2) Create a Realtime Database**
1. Left sidebar → **Build → Realtime Database** → **Create Database**
2. Choose a region close to you (e.g., **asia-southeast1 / Singapore**).
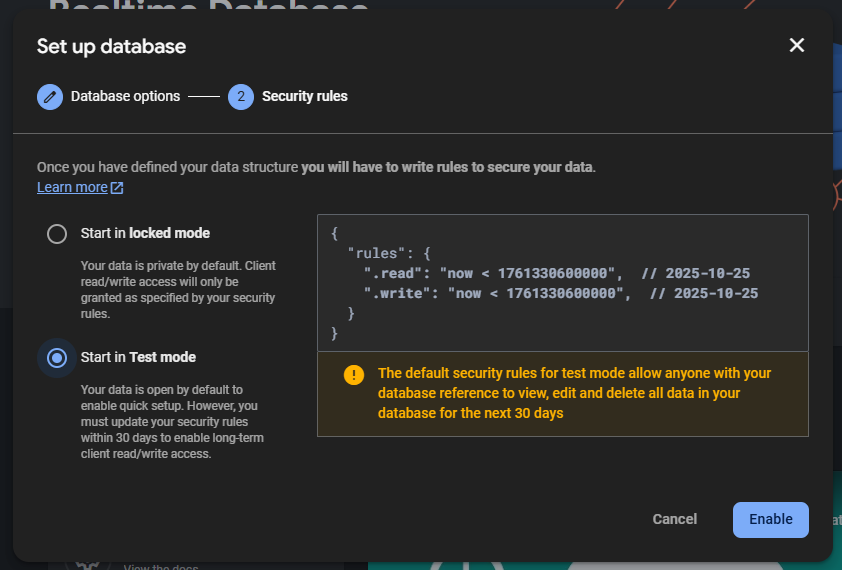
3. For quick testing select **Start in Test mode** (Firebase allows open read/write for 30 days).
**2) Create a Realtime Database**
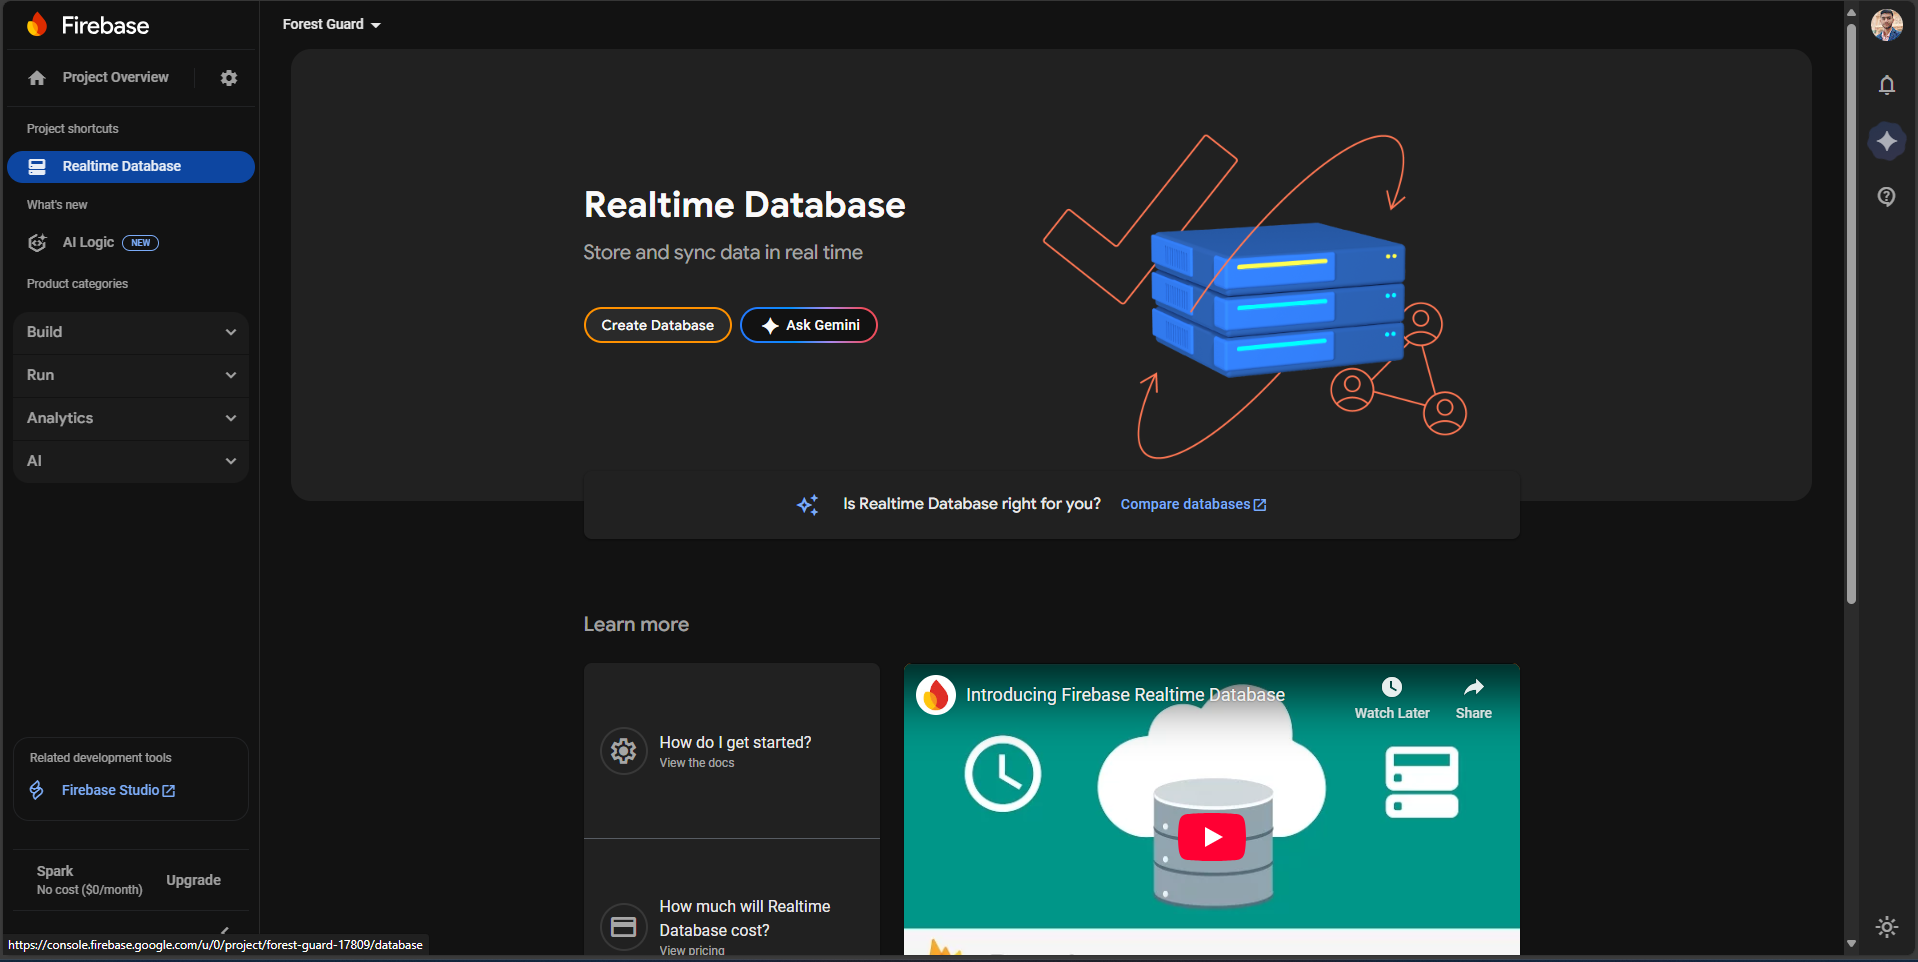
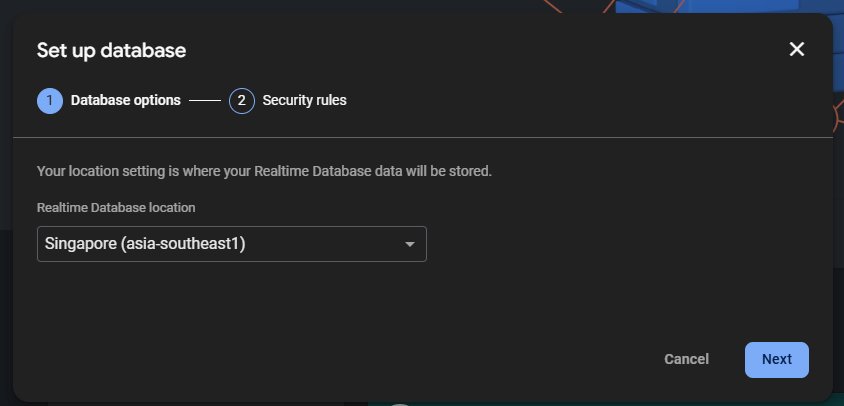
1. Left sidebar → **Build → Realtime Database** → **Create Database**
2. Choose a region close to you (e.g., **asia-southeast1 / Singapore**).
3. For quick testing select **Start in Test mode** (Firebase allows open read/write for 30 days).
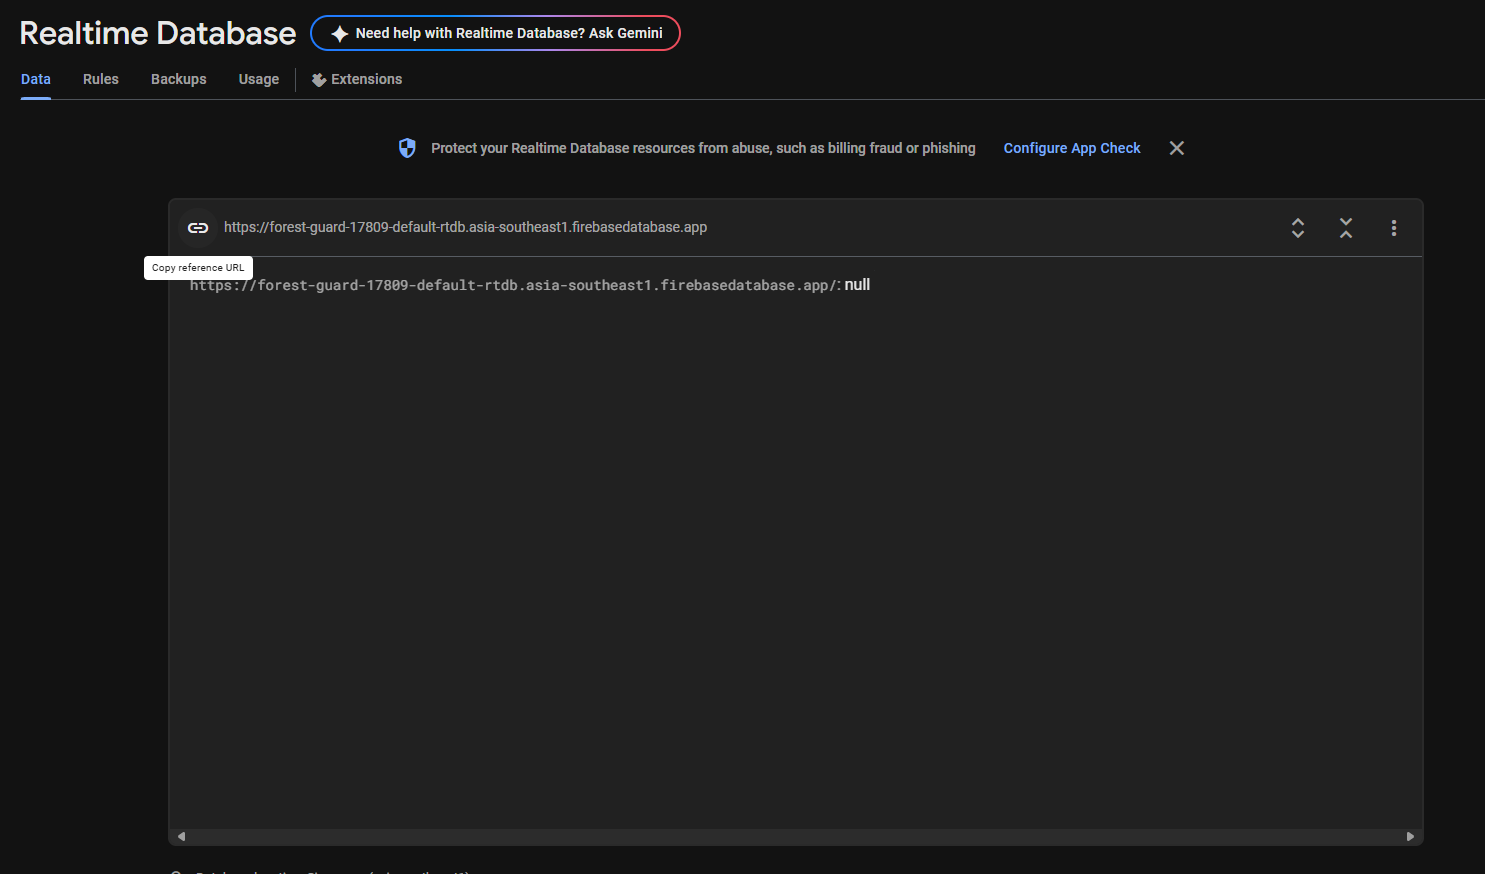 **Copy the Database URL** shown at the top of the Data tab.
It looks like:
```
https://-default-rtdb.asia-southeast1.firebasedatabase.app/
```
You will use this as FB\_HOST in the Gateway sketch.
**3) Get an auth token (Database Secret) for REST**
Your GA uses simple HTTPS REST with the ?auth=... query param.
1. **Project settings (gear) → Service accounts**
2. Click **Database secrets** → **Show** → **Copy** the secret.
You will use this as FB\_AUTH in the Gateway sketch.
**Add a Web App (for your dashboard)**
1. **Project Overview → Add app → Web**
2. Give it a name (e.g., **Forest Guard**) → **Register app**
3. On the next screen you’ll see your Web SDK config:
**Copy the Database URL** shown at the top of the Data tab.
It looks like:
```
https://-default-rtdb.asia-southeast1.firebasedatabase.app/
```
You will use this as FB\_HOST in the Gateway sketch.
**3) Get an auth token (Database Secret) for REST**
Your GA uses simple HTTPS REST with the ?auth=... query param.
1. **Project settings (gear) → Service accounts**
2. Click **Database secrets** → **Show** → **Copy** the secret.
You will use this as FB\_AUTH in the Gateway sketch.
**Add a Web App (for your dashboard)**
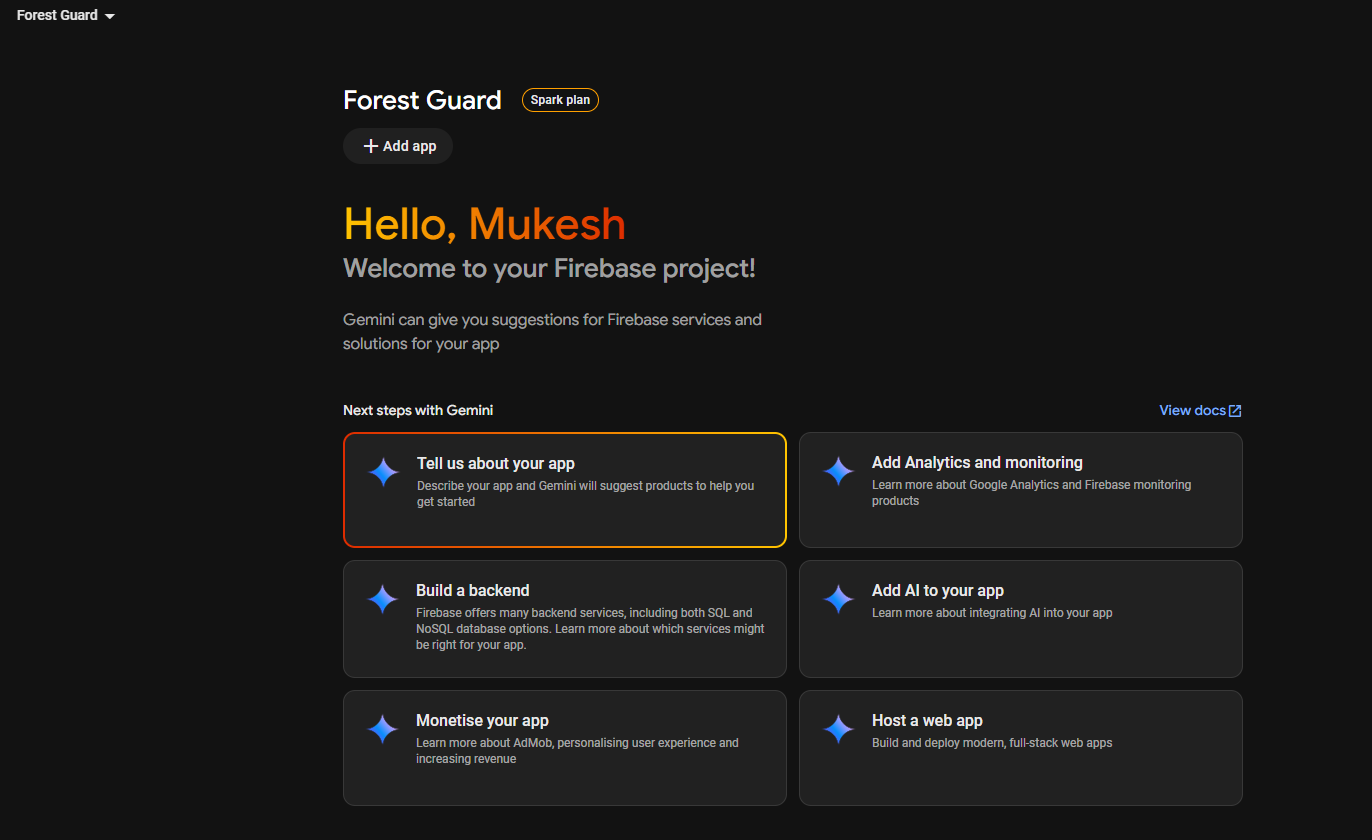
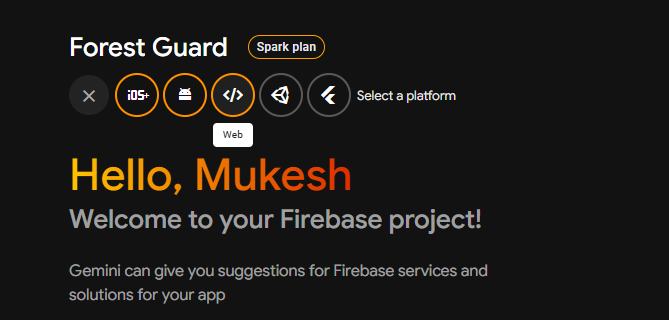
1. **Project Overview → Add app → Web**
2. Give it a name (e.g., **Forest Guard**) → **Register app**
3. On the next screen you’ll see your Web SDK config:
 ```javascript theme={"system"}
const firebaseConfig = {
apiKey: "...",
authDomain: "...",
databaseURL: "https://-default-rtdb..firebasedatabase.app",
projectId: "...",
storageBucket: "...",
messagingSenderId: "...",
appId: "..."
};
```
Copy these values into your dashboard (Lovable.dev) settings.
## Step 32: How the System Works
**1) Node (NA) boot & registration**
```javascript theme={"system"}
const firebaseConfig = {
apiKey: "...",
authDomain: "...",
databaseURL: "https://-default-rtdb..firebasedatabase.app",
projectId: "...",
storageBucket: "...",
messagingSenderId: "...",
appId: "..."
};
```
Copy these values into your dashboard (Lovable.dev) settings.
## Step 32: How the System Works
**1) Node (NA) boot & registration**
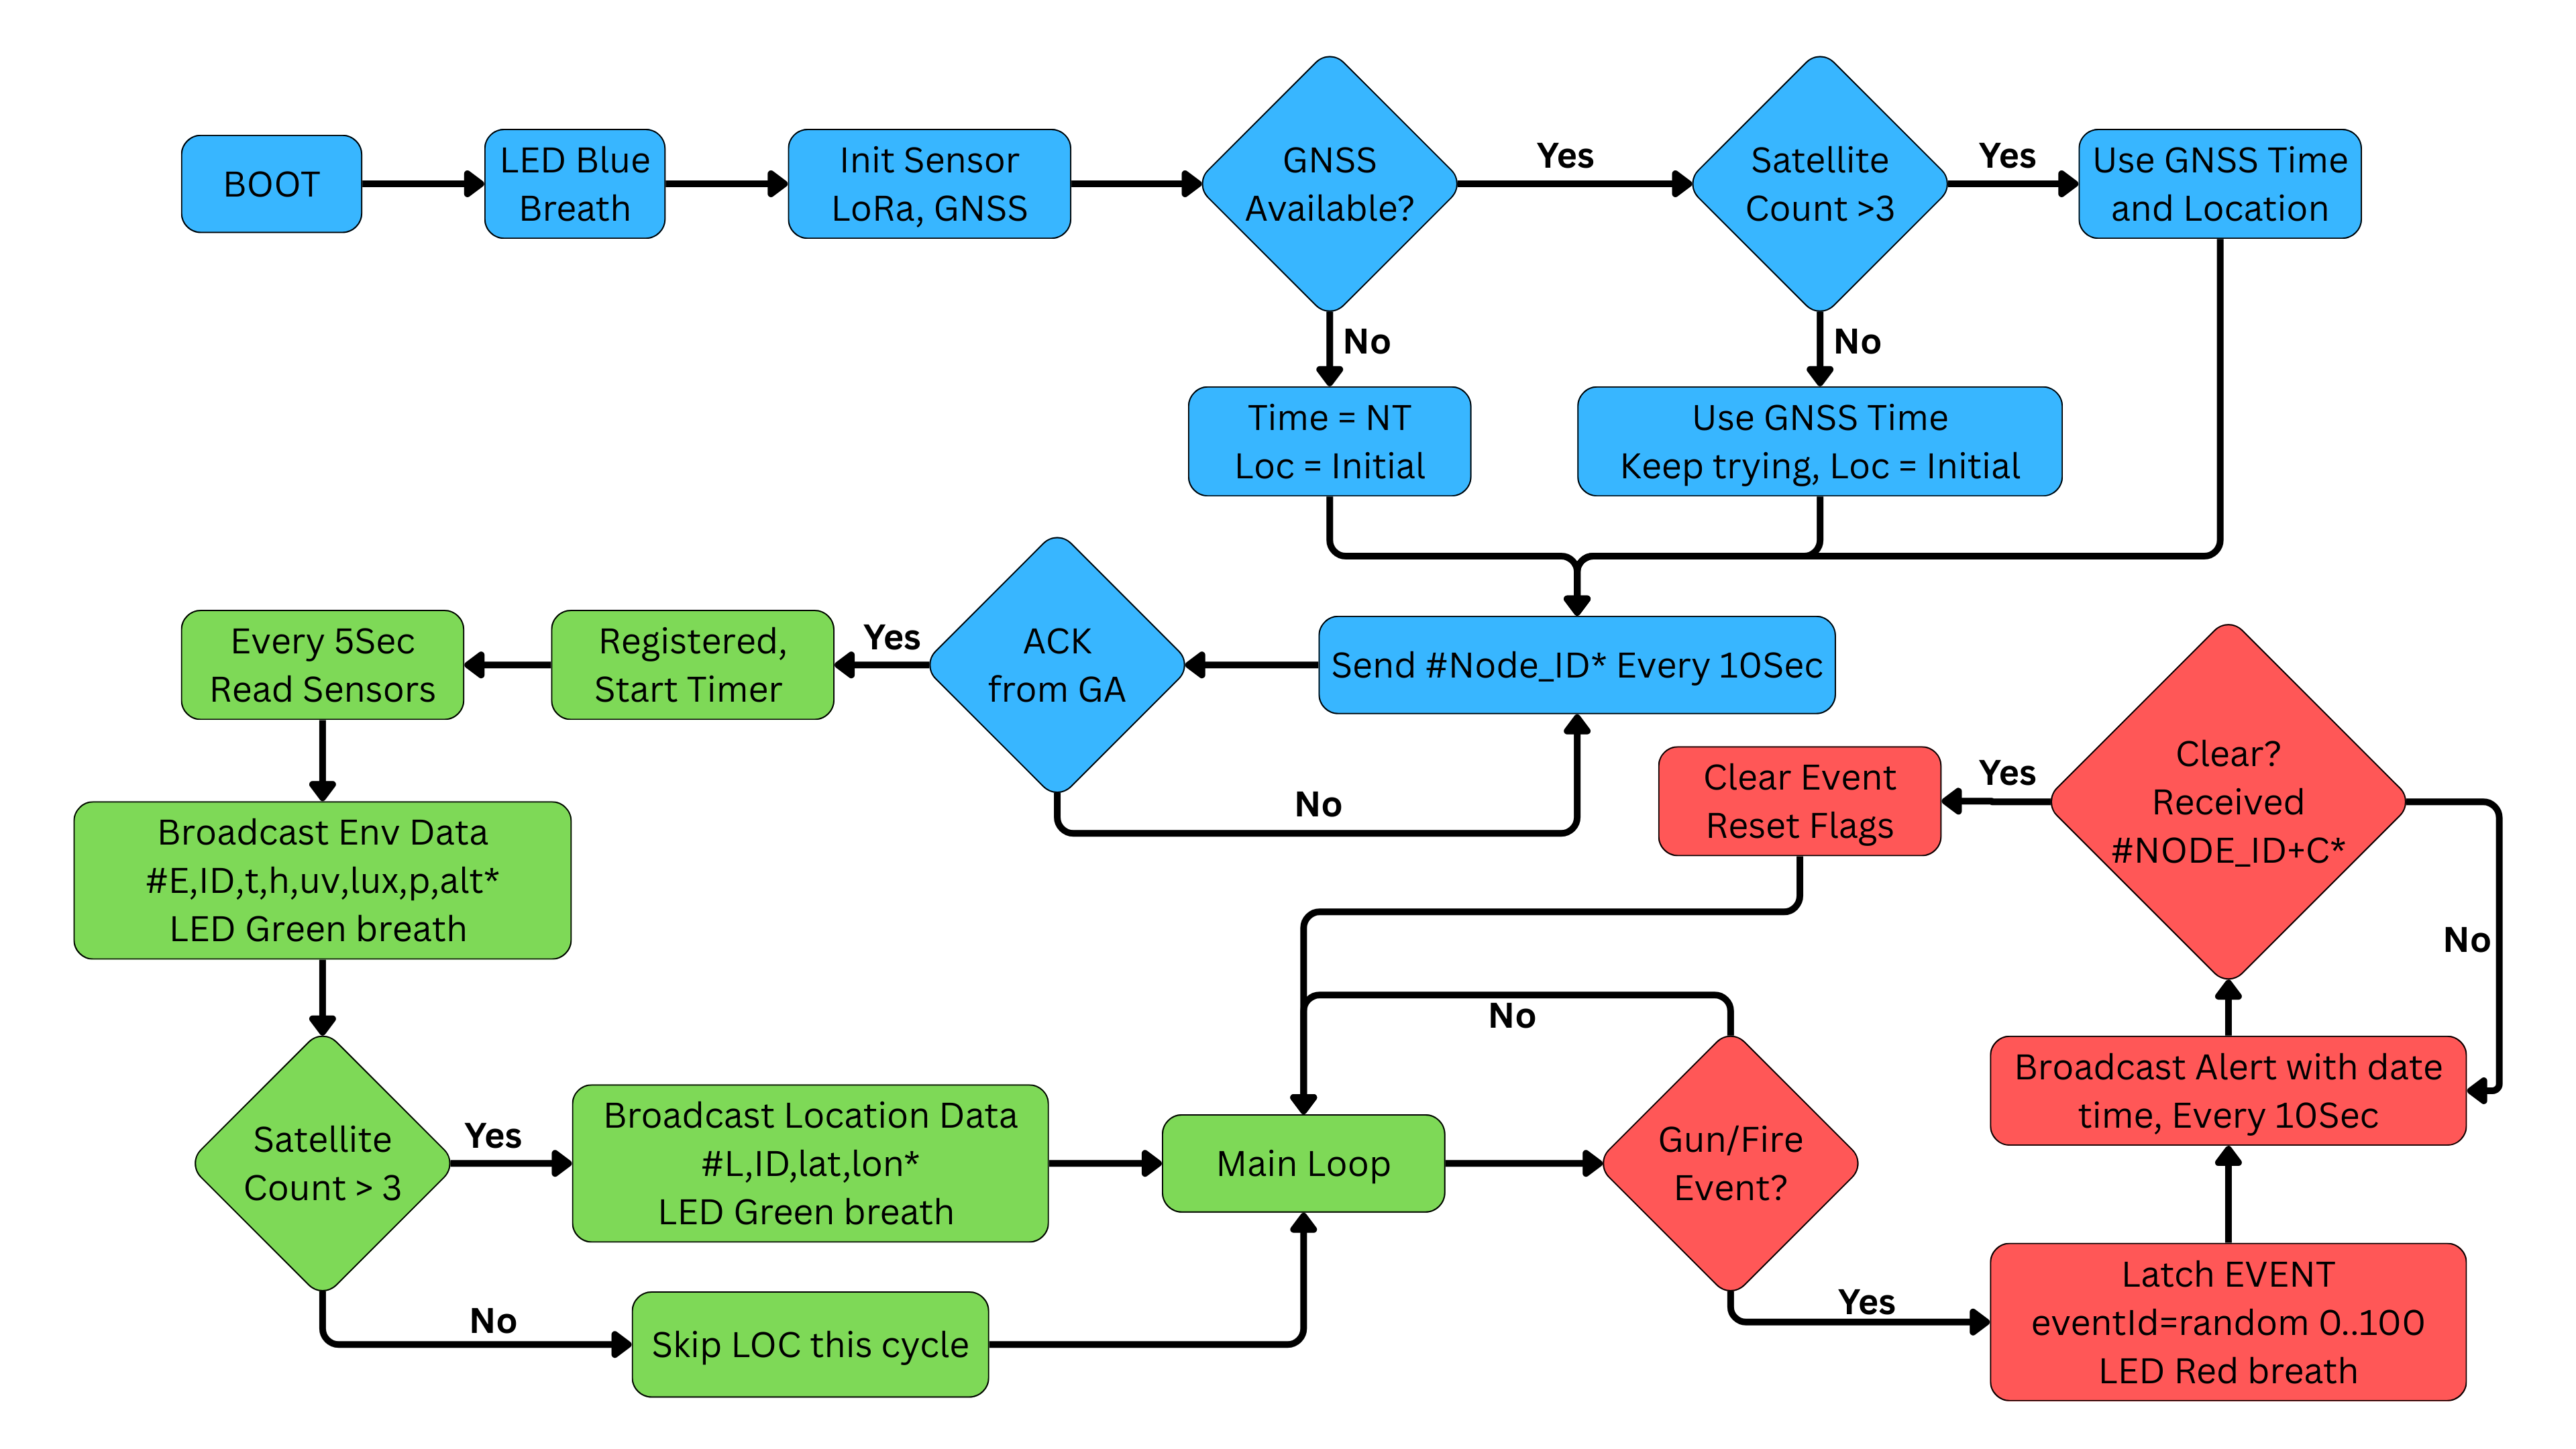 1. NA = **ESP32-S3** with Env + Smoke + Mic + (optional) GNSS + **RP2040 LoRa (Meshtastic)**.
2. On boot:
3. LED **Blue** breath.
4. Initializes sensors.
5. Checks GNSS\_AVAILABLE. If present, uses GNSS time; **location is sent only when satsUsed > 3**.
6. **Registers** with GA by broadcasting #\* every **10 s** until GA replies #+OK\*.
7. Only after registration do **Edge Impulse** (gunshot) and **fire/smoke** checks start.
**2) Periodic telemetry (non-blocking)**
1. Every **10sec** the NA sends:
2. **ENV:** #E,,temp,humidity,uv,lux,pressure,alt\*
3. **LOC:** #L,,lat,lon\* (only if GNSS fix has **>3 sats**; if GNSS is not fitted, system can use your initial set location).
4. LED **Green** breath on successful send.
**3) Event detection & retry**
1. **Gunshot:** Edge Impulse score crosses threshold (e.g., ≥0.90).
2. **Fire:** Smoke reading crosses threshold with hysteresis.
3. Node latches a single “current event” and creates eventId = random(0..100).
4. Sends every **10 s** until cleared by GA:
5. **Fire:** #F+,,,YYYY/MM/DD,HH:MM:SS\* or NT if no GNSS time.
6. **Gun:** #G+,,,YYYY/MM/DD,HH:MM:SS\* or NT.
7. LED **Red** breath while event is latched.
**4) Gateway (GA) reception & reliability**
1. GA = **Arduino UNO R4 WiFi** + TFT UI + Buzzer.
2. **LoRa noise-proofing:** both sides parse \*\*only bytes between # and \*\*\*; everything else is ignored.
3. On #\* → replies #+OK\* (register ACK).
4. On telemetry:
5. Maintains last posted values and **only uploads to Firebase when changed**
6. ENV changed by ≥ **±1.0** per field
7. LOC changed by ≥ **0.00010°** (\~11 m)
8. **NTP gate:** GA writes to Firebase **only after epoch ≥ 2025-01-01** (NTP warmup).
**5) Cloud logging (your schema)**
1. GA writes to Firebase RTDB paths:
2. nodes//env/ → `{ temp, humi, uvi, li, pres, alt }`
3. nodes//Loc/ → `{ lat, lon }` (capital **L**)
4. nodes//fire/ → `{ value, NodeTime }`
5. nodes//gun/ → `{ score, NodeTime }`
6. nodes//meta → `{ Event, lastSeenAt }`
7. When an event frame arrives:
8. Sets meta/Event = true.
9. Logs the event (de-duplicates by eventId).
10. Starts **buzzer** (non-blocking toggle).
**6) Dashboard + operator loop**
1. Dashboard reads RTDB to render **map, charts, and alerts**.
2. When the site is inspected and safe, the operator **sets meta/Event = false** in the dashboard.
**7) Clearing the event (end-to-end handshake)**
1. GA polls meta/Event. When it becomes **false**:
2. GA **broadcasts** #+C\* (a few times for reliability).
3. Stops buzzer, unlatches its local event, and remembers the last cleared eventId.
4. If NA keeps repeating the **same eventId**, GA does **not** re-log the event; it simply **re-ACKs CLEAR** and moves on.
5. NA receives #+C\* → clears its event latch and resumes normal telemetry.
**8) LED summary (NA)**
1. **Blue**: boot/LoRa/registration
2. **Green**: data sent
3. **Red**: event latched
1. NA = **ESP32-S3** with Env + Smoke + Mic + (optional) GNSS + **RP2040 LoRa (Meshtastic)**.
2. On boot:
3. LED **Blue** breath.
4. Initializes sensors.
5. Checks GNSS\_AVAILABLE. If present, uses GNSS time; **location is sent only when satsUsed > 3**.
6. **Registers** with GA by broadcasting #\* every **10 s** until GA replies #+OK\*.
7. Only after registration do **Edge Impulse** (gunshot) and **fire/smoke** checks start.
**2) Periodic telemetry (non-blocking)**
1. Every **10sec** the NA sends:
2. **ENV:** #E,,temp,humidity,uv,lux,pressure,alt\*
3. **LOC:** #L,,lat,lon\* (only if GNSS fix has **>3 sats**; if GNSS is not fitted, system can use your initial set location).
4. LED **Green** breath on successful send.
**3) Event detection & retry**
1. **Gunshot:** Edge Impulse score crosses threshold (e.g., ≥0.90).
2. **Fire:** Smoke reading crosses threshold with hysteresis.
3. Node latches a single “current event” and creates eventId = random(0..100).
4. Sends every **10 s** until cleared by GA:
5. **Fire:** #F+,,,YYYY/MM/DD,HH:MM:SS\* or NT if no GNSS time.
6. **Gun:** #G+,,,YYYY/MM/DD,HH:MM:SS\* or NT.
7. LED **Red** breath while event is latched.
**4) Gateway (GA) reception & reliability**
1. GA = **Arduino UNO R4 WiFi** + TFT UI + Buzzer.
2. **LoRa noise-proofing:** both sides parse \*\*only bytes between # and \*\*\*; everything else is ignored.
3. On #\* → replies #+OK\* (register ACK).
4. On telemetry:
5. Maintains last posted values and **only uploads to Firebase when changed**
6. ENV changed by ≥ **±1.0** per field
7. LOC changed by ≥ **0.00010°** (\~11 m)
8. **NTP gate:** GA writes to Firebase **only after epoch ≥ 2025-01-01** (NTP warmup).
**5) Cloud logging (your schema)**
1. GA writes to Firebase RTDB paths:
2. nodes//env/ → `{ temp, humi, uvi, li, pres, alt }`
3. nodes//Loc/ → `{ lat, lon }` (capital **L**)
4. nodes//fire/ → `{ value, NodeTime }`
5. nodes//gun/ → `{ score, NodeTime }`
6. nodes//meta → `{ Event, lastSeenAt }`
7. When an event frame arrives:
8. Sets meta/Event = true.
9. Logs the event (de-duplicates by eventId).
10. Starts **buzzer** (non-blocking toggle).
**6) Dashboard + operator loop**
1. Dashboard reads RTDB to render **map, charts, and alerts**.
2. When the site is inspected and safe, the operator **sets meta/Event = false** in the dashboard.
**7) Clearing the event (end-to-end handshake)**
1. GA polls meta/Event. When it becomes **false**:
2. GA **broadcasts** #+C\* (a few times for reliability).
3. Stops buzzer, unlatches its local event, and remembers the last cleared eventId.
4. If NA keeps repeating the **same eventId**, GA does **not** re-log the event; it simply **re-ACKs CLEAR** and moves on.
5. NA receives #+C\* → clears its event latch and resumes normal telemetry.
**8) LED summary (NA)**
1. **Blue**: boot/LoRa/registration
2. **Green**: data sent
3. **Red**: event latched
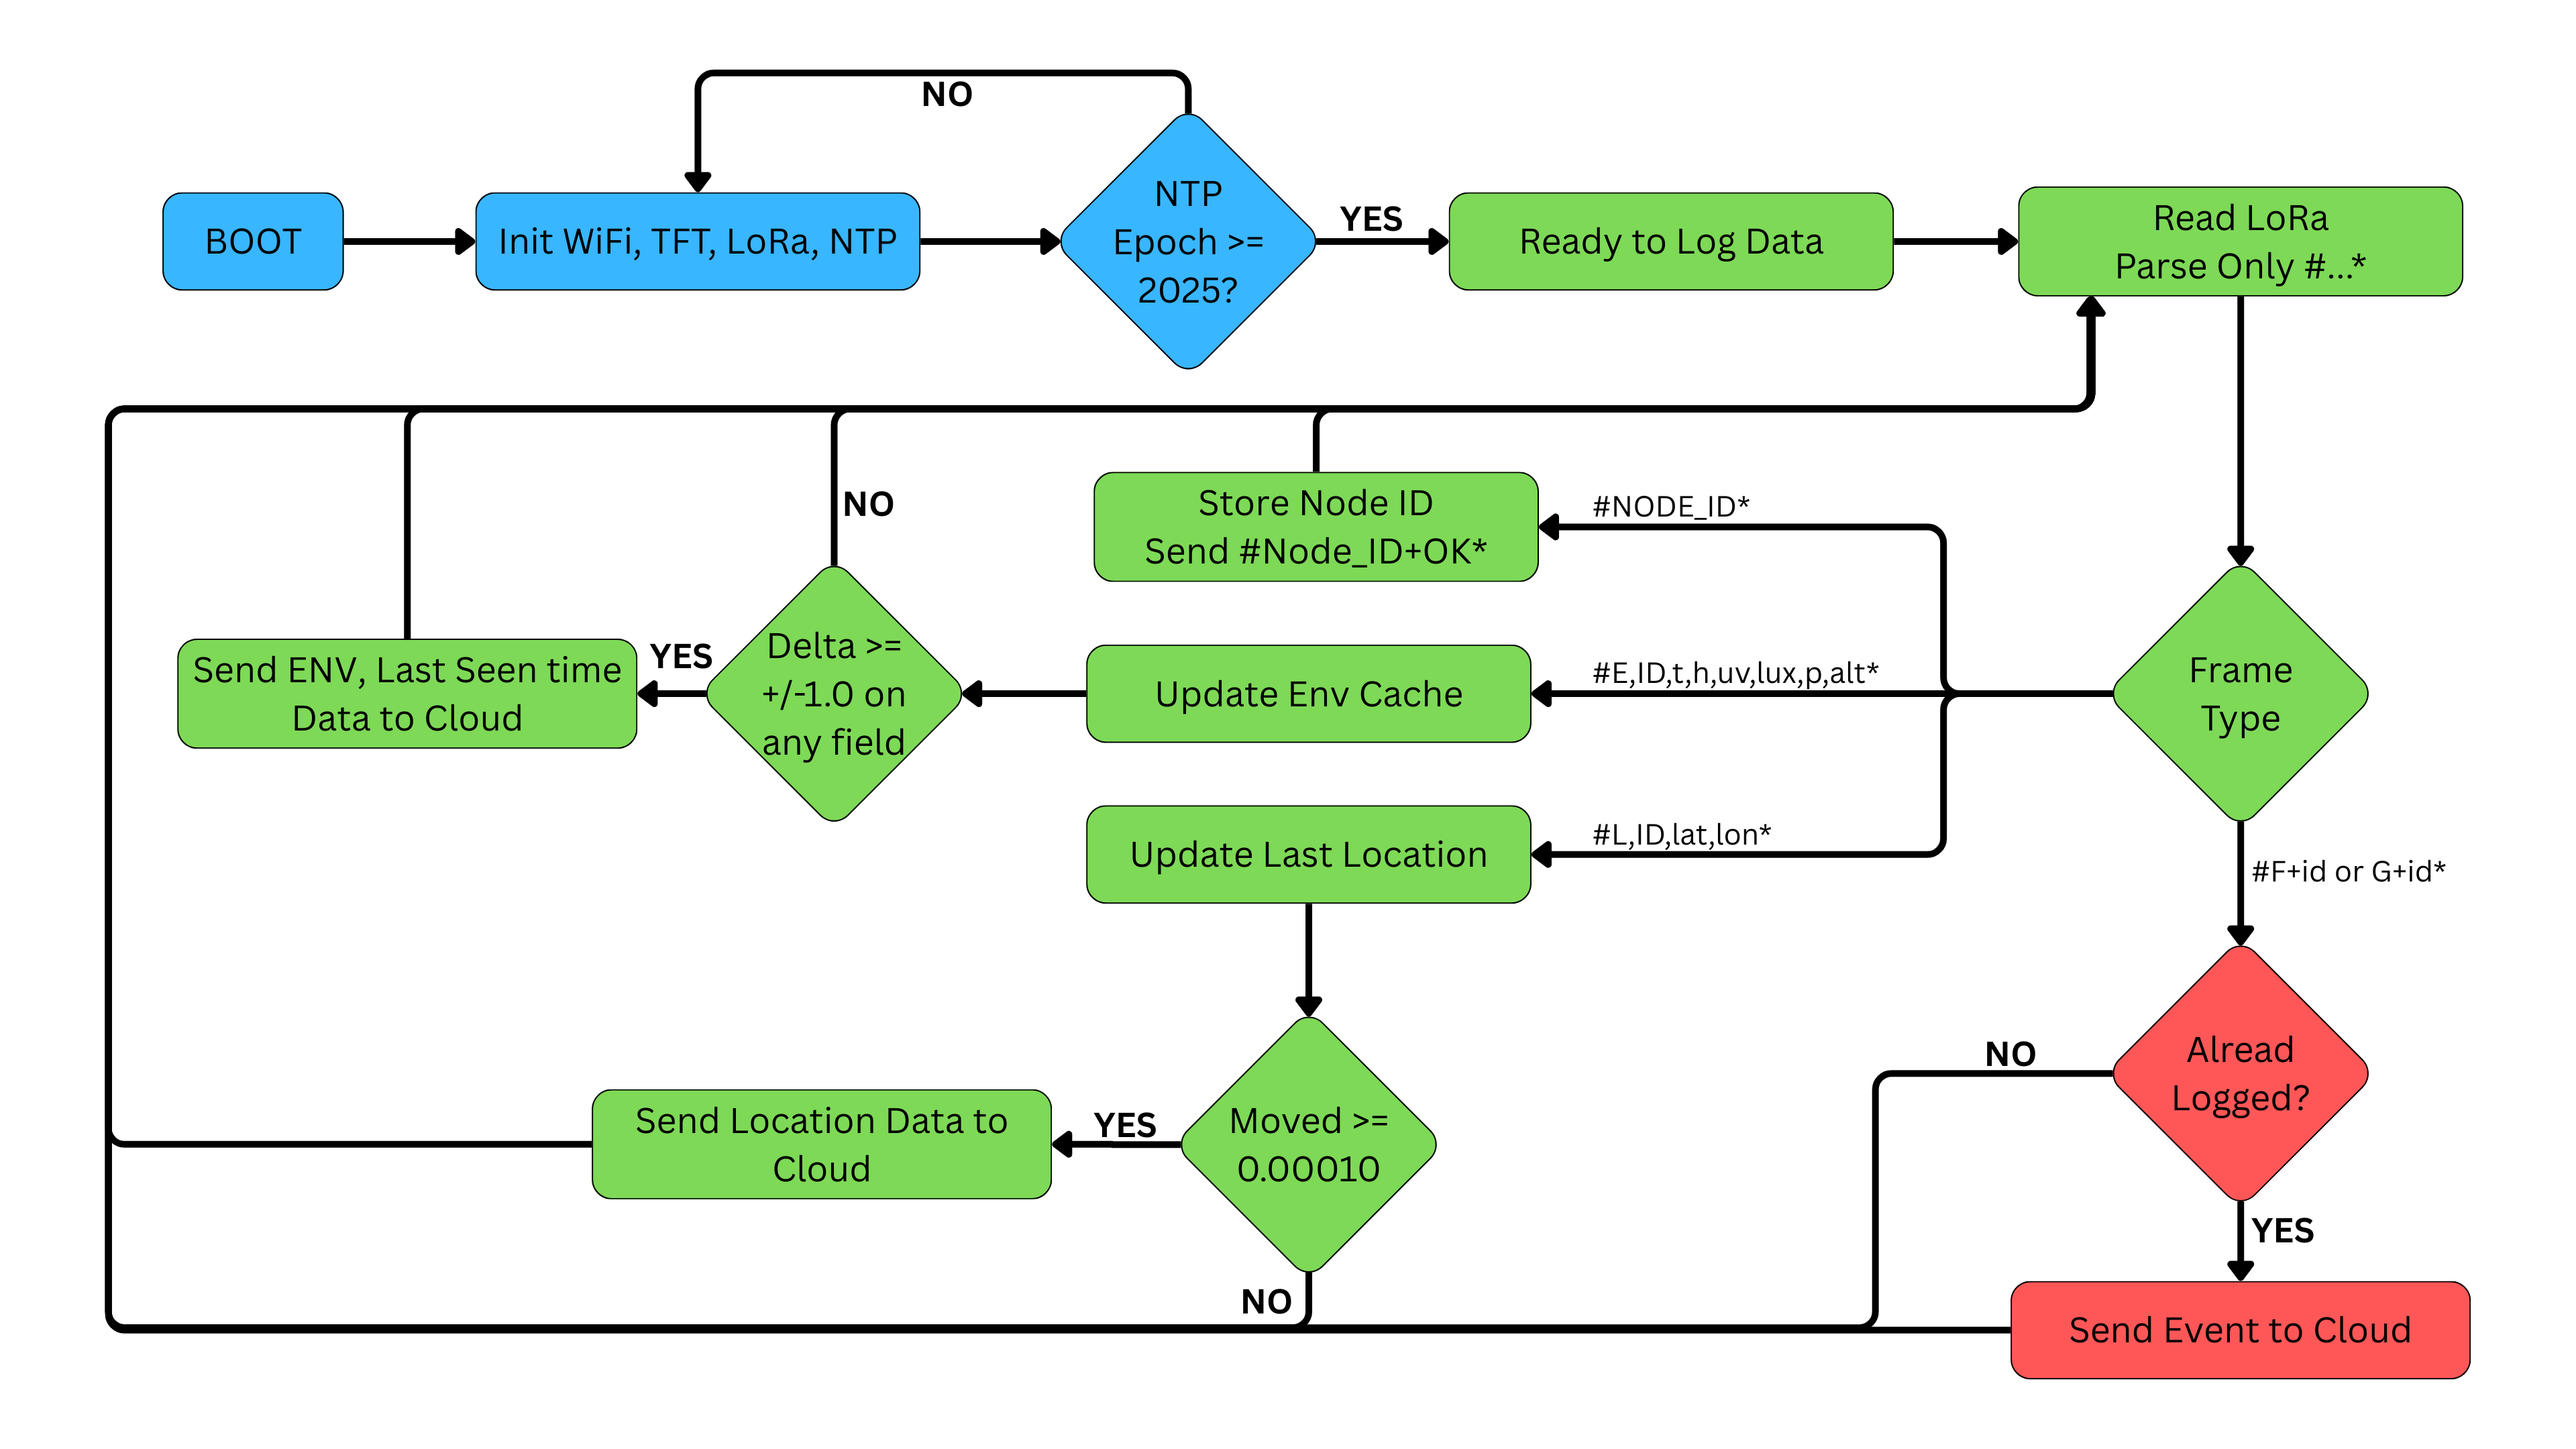
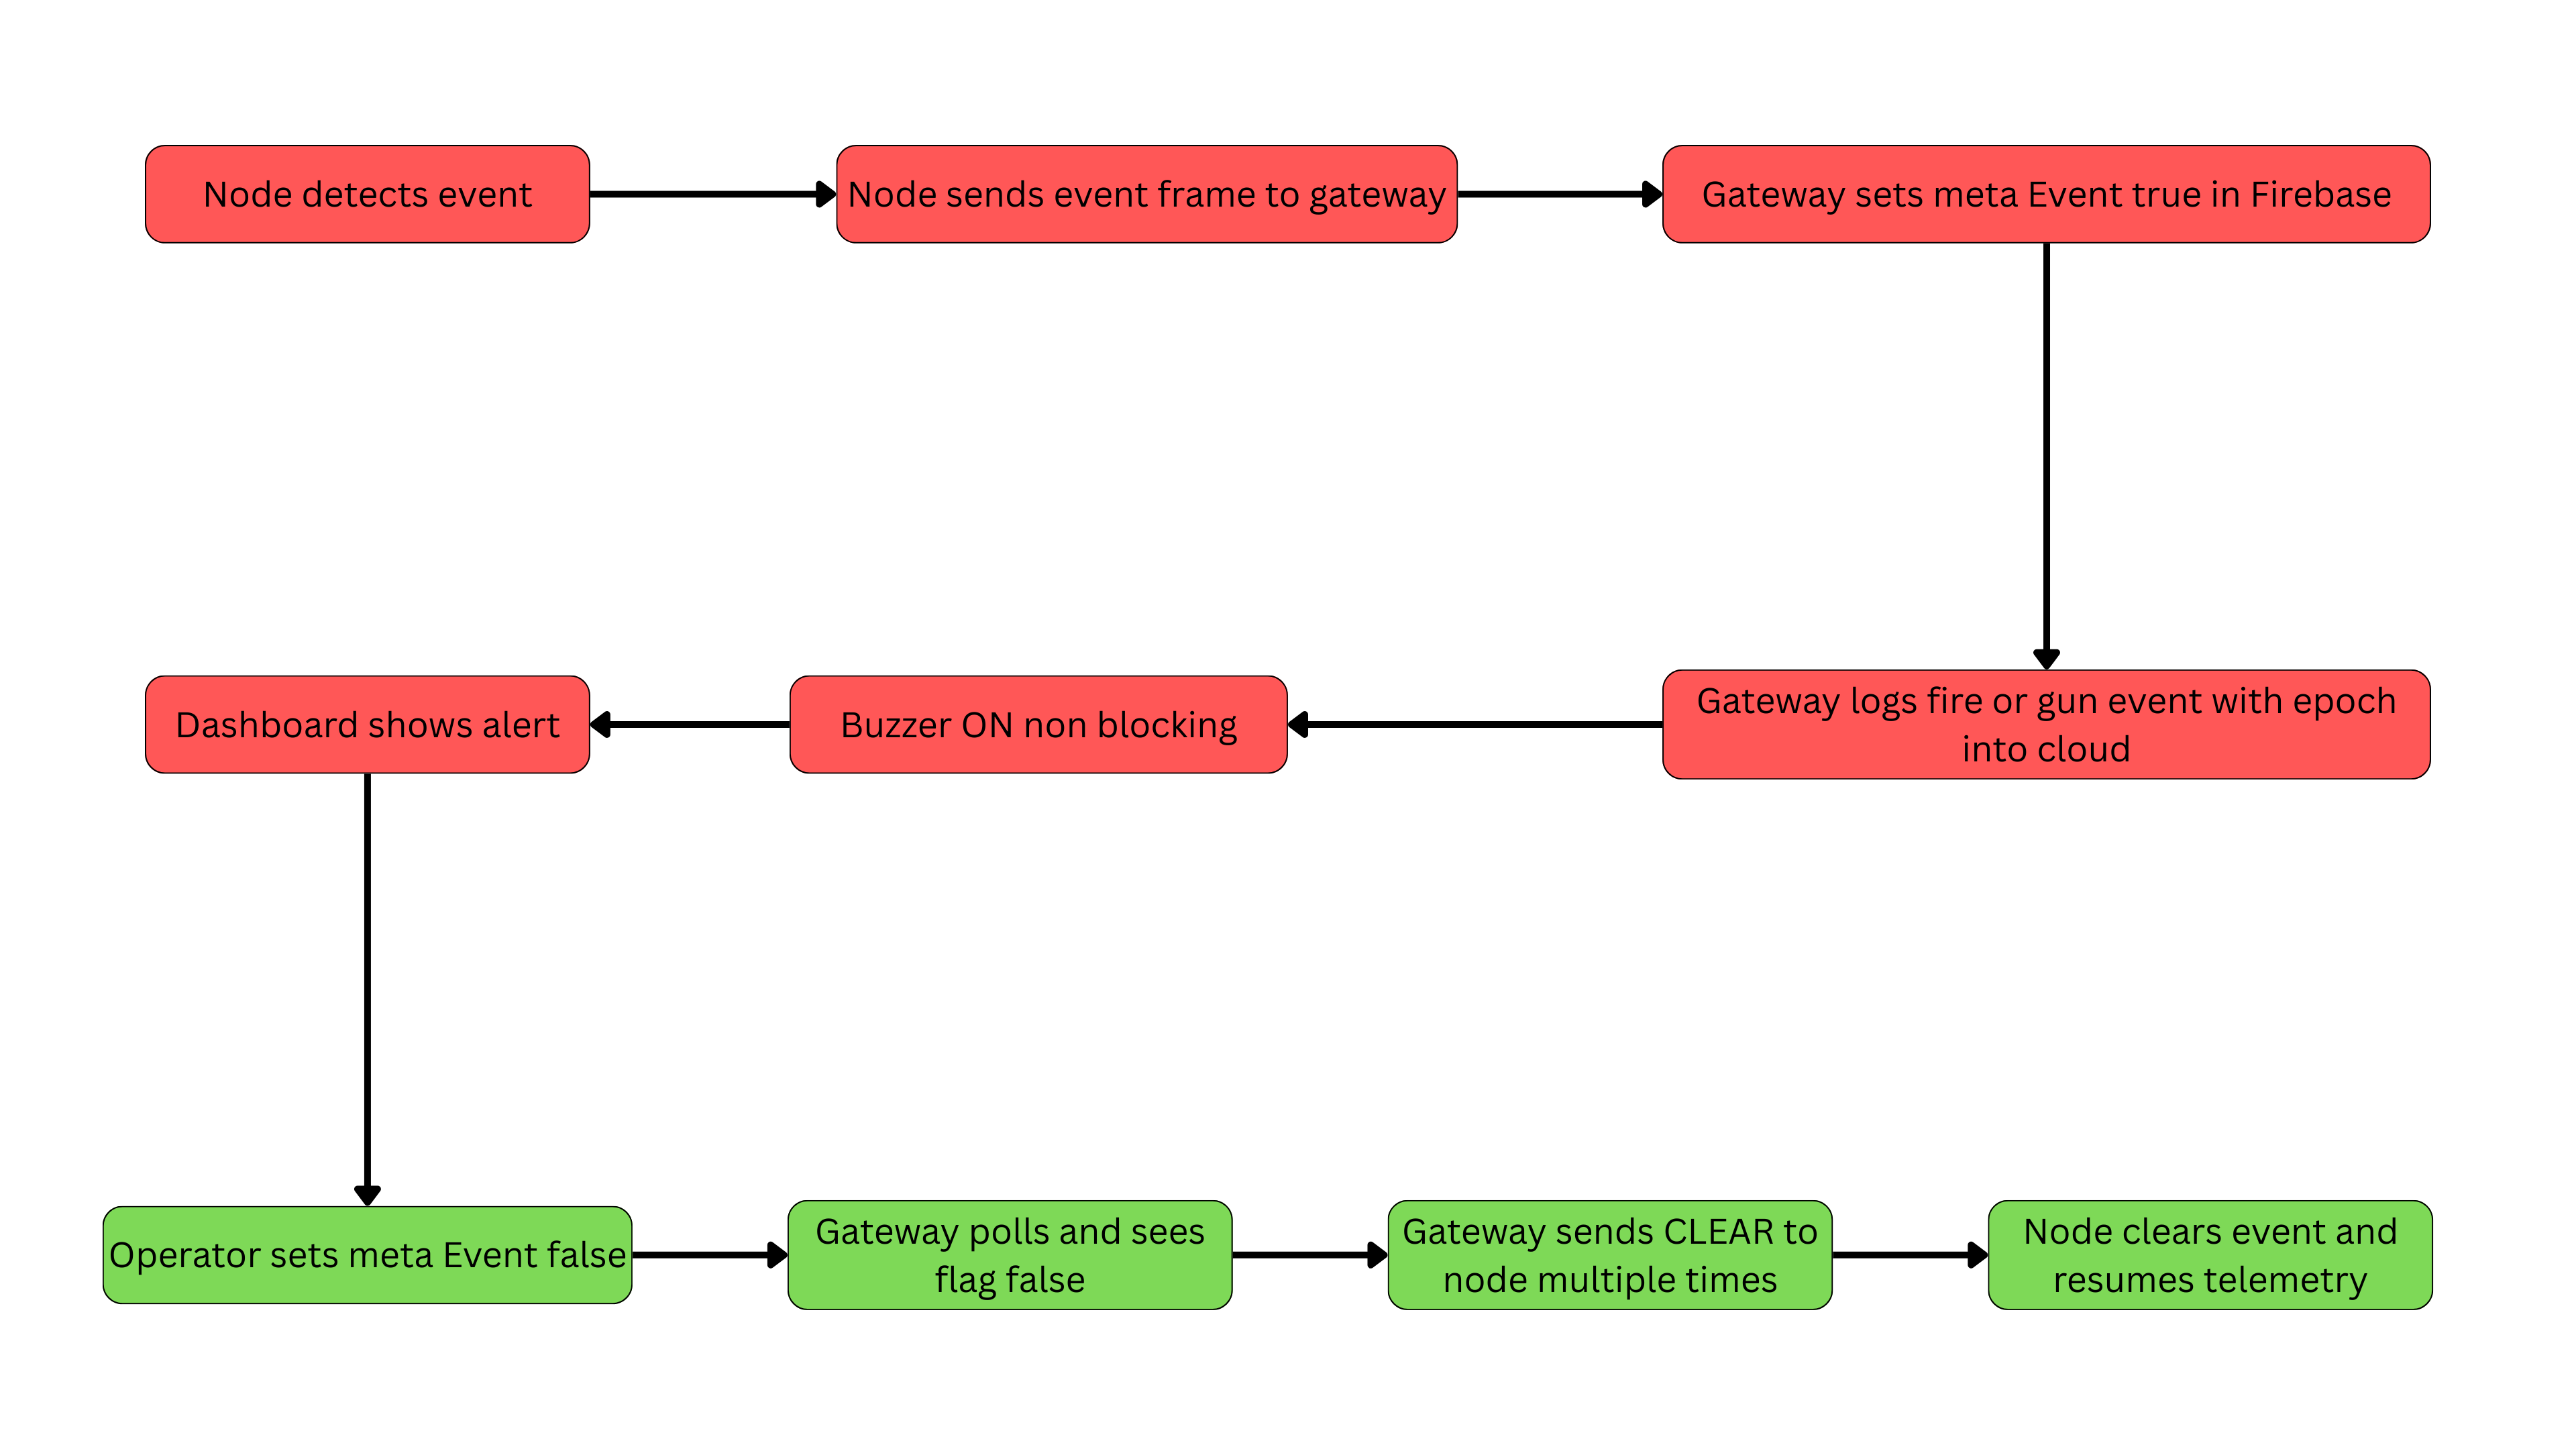 ## Step 33: Dashboard
To visualize the data coming from the **Forest Guard Nodes**, I built a custom **web dashboard** using **Lovable.dev**. This dashboard connects directly to **Firebase** and provides both a quick overview and detailed insights into the forest monitoring network.
[Forest Guard Dashboard](https://preview--wildfire-tracker.lovable.app/)
**Setup**
1. When the dashboard is first opened, it takes you to a **Firebase configuration page**.
2. Here, you enter your **Firebase host and authentication key**.
3. Once saved, the dashboard connects to the database and loads the real-time data.
**Map View**
1. The **map view** shows the live location of all deployed nodes.
2. Each node is color-coded by status:
3. **Gray** → Inactive
4. **Green** → Active
5. **Red** → Alert (fire or gunshot detected)
6. By clicking on a node, you can quickly check its latest sensor data and status.
## Step 33: Dashboard
To visualize the data coming from the **Forest Guard Nodes**, I built a custom **web dashboard** using **Lovable.dev**. This dashboard connects directly to **Firebase** and provides both a quick overview and detailed insights into the forest monitoring network.
[Forest Guard Dashboard](https://preview--wildfire-tracker.lovable.app/)
**Setup**
1. When the dashboard is first opened, it takes you to a **Firebase configuration page**.
2. Here, you enter your **Firebase host and authentication key**.
3. Once saved, the dashboard connects to the database and loads the real-time data.
**Map View**
1. The **map view** shows the live location of all deployed nodes.
2. Each node is color-coded by status:
3. **Gray** → Inactive
4. **Green** → Active
5. **Red** → Alert (fire or gunshot detected)
6. By clicking on a node, you can quickly check its latest sensor data and status.
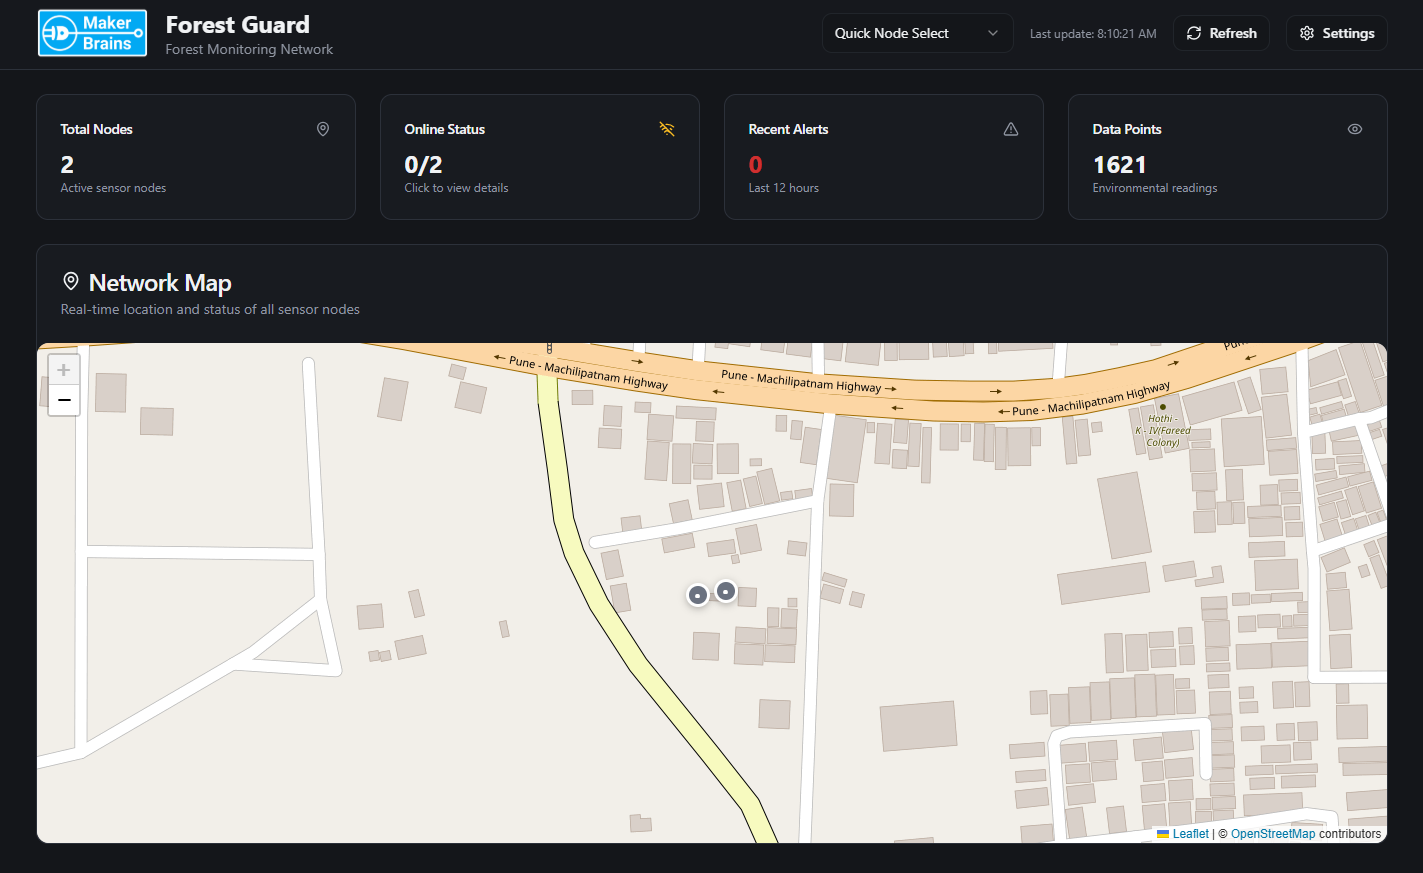
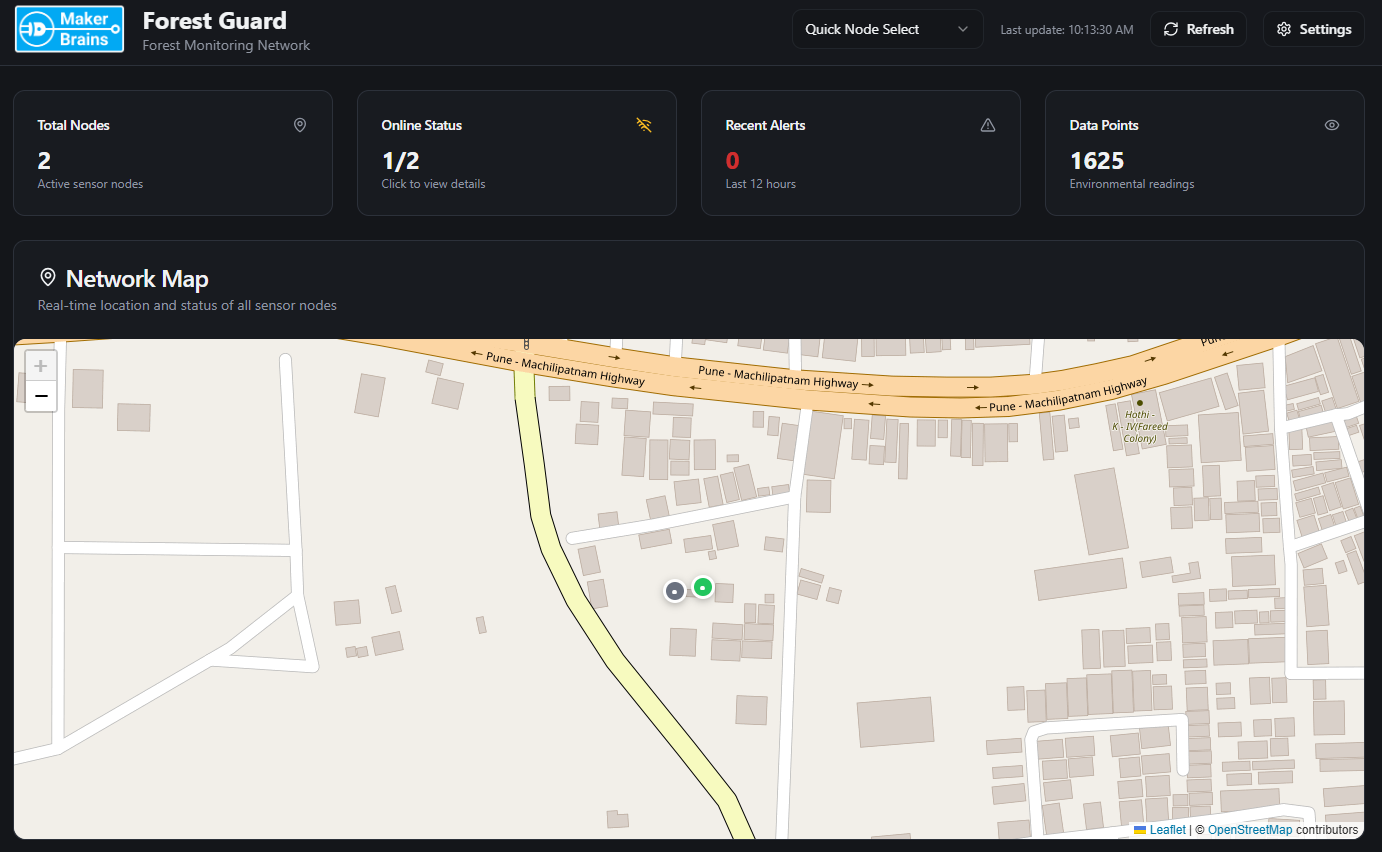
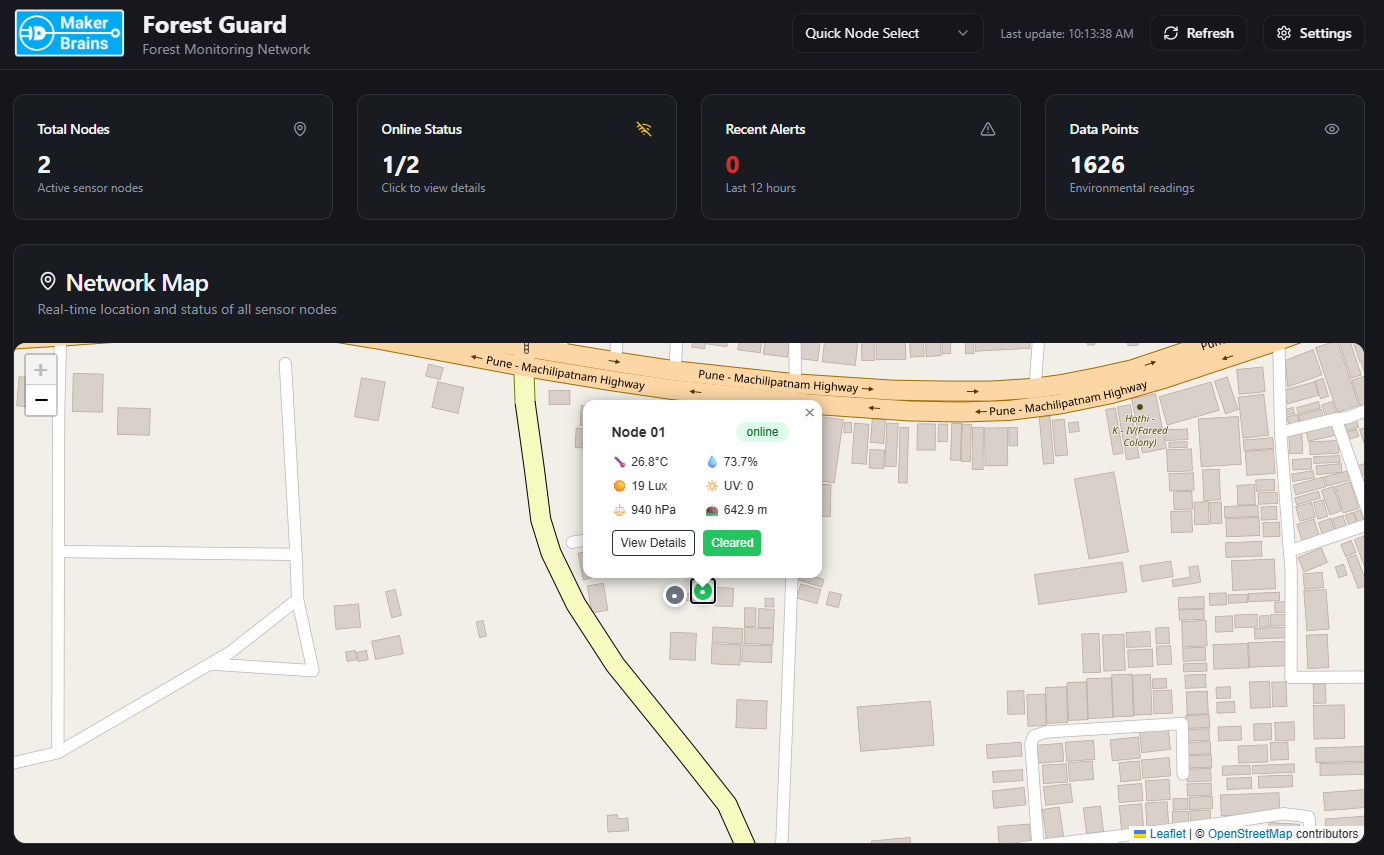
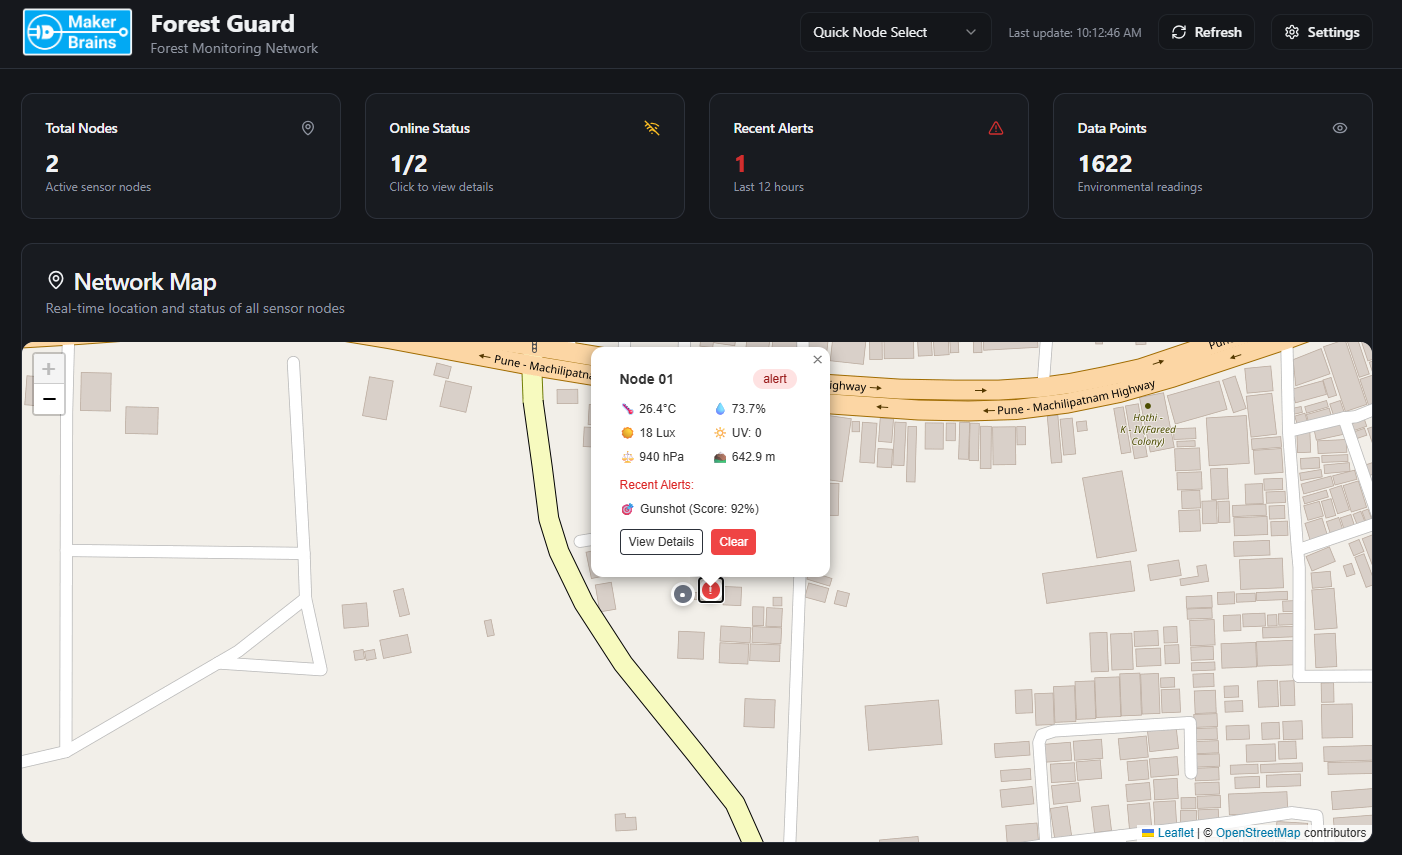 **Quick Cards**
At the top of the dashboard, quick cards summarize the system:
1. **Total Nodes** → Number of nodes in the network.
2. **Online Status** → Active vs inactive nodes.
3. **Recent Alerts** → Count of fire/gunshot events in the last 12 hours.
4. **Data Points** → Total environmental readings logged.
**Quick Cards**
At the top of the dashboard, quick cards summarize the system:
1. **Total Nodes** → Number of nodes in the network.
2. **Online Status** → Active vs inactive nodes.
3. **Recent Alerts** → Count of fire/gunshot events in the last 12 hours.
4. **Data Points** → Total environmental readings logged.
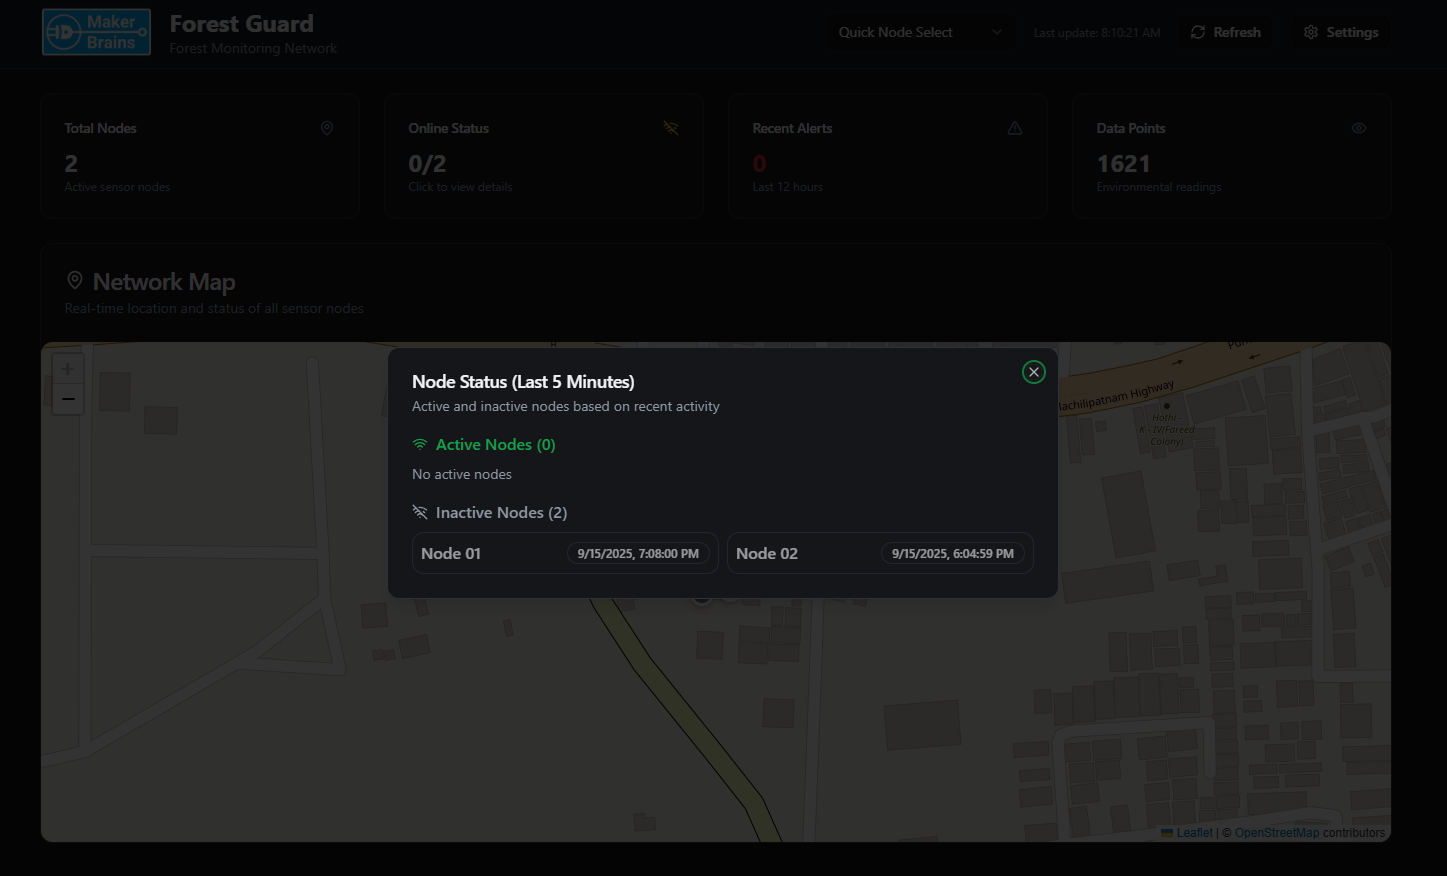
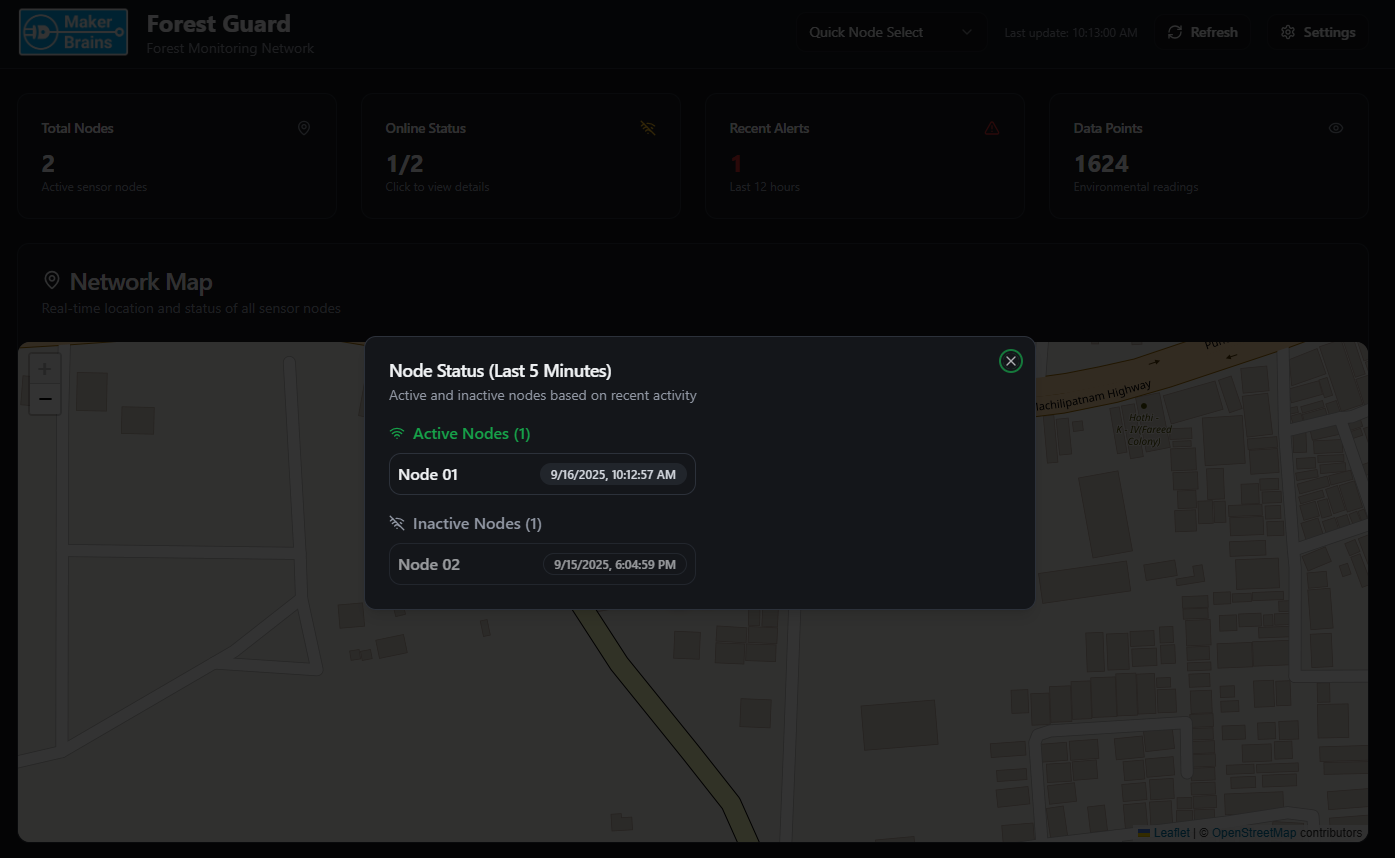 **Node Details**
Clicking on **“View Node Details”** opens a **full dashboard view** for that node. Here you can monitor:
1. **Current Environmental Conditions** (temperature, humidity, pressure, light, UV, altitude).
2. **Trends over Time** with graphs for Temperature & Humidity, Light & UV Index.
3. **Fire Detection Events** (timestamped alerts from smoke sensor).
4. **Gunshot Detection Events** (with AI confidence scores from Edge Impulse model).
**Node Details**
Clicking on **“View Node Details”** opens a **full dashboard view** for that node. Here you can monitor:
1. **Current Environmental Conditions** (temperature, humidity, pressure, light, UV, altitude).
2. **Trends over Time** with graphs for Temperature & Humidity, Light & UV Index.
3. **Fire Detection Events** (timestamped alerts from smoke sensor).
4. **Gunshot Detection Events** (with AI confidence scores from Edge Impulse model).
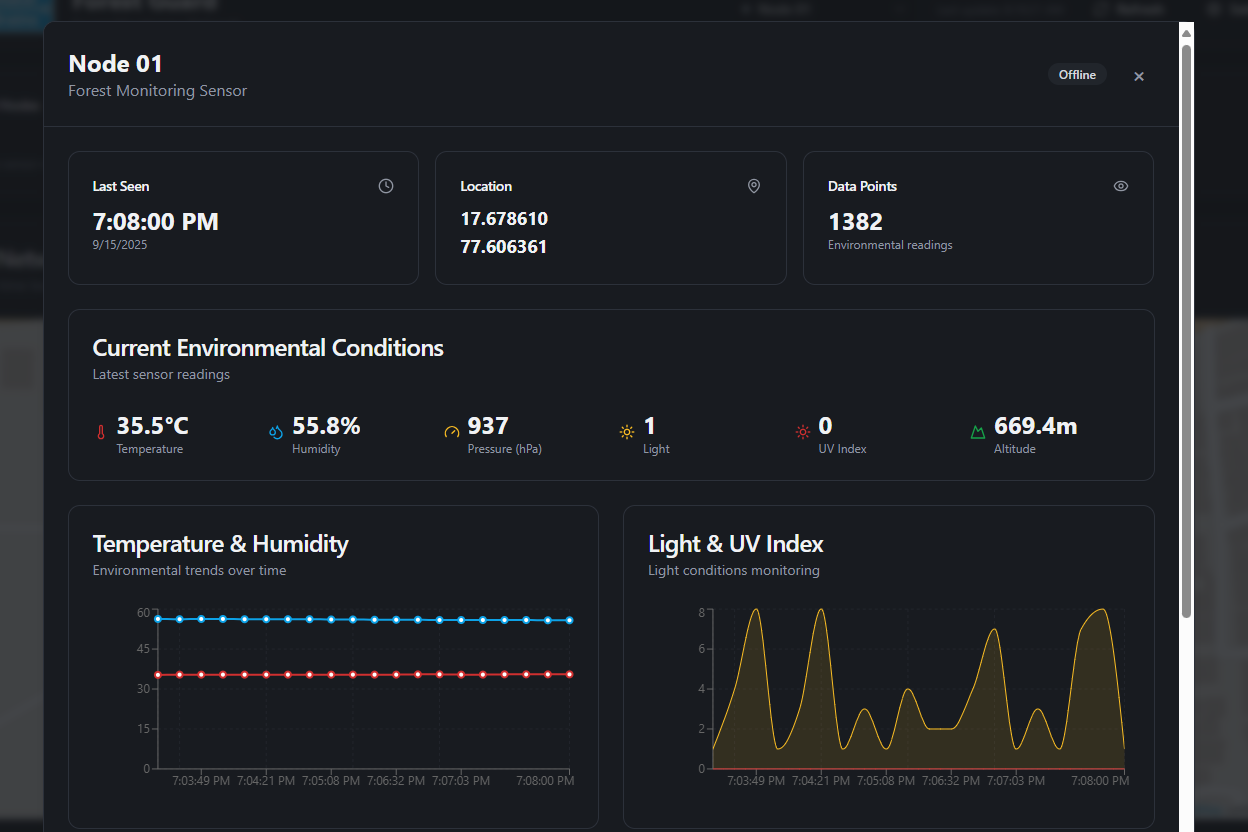
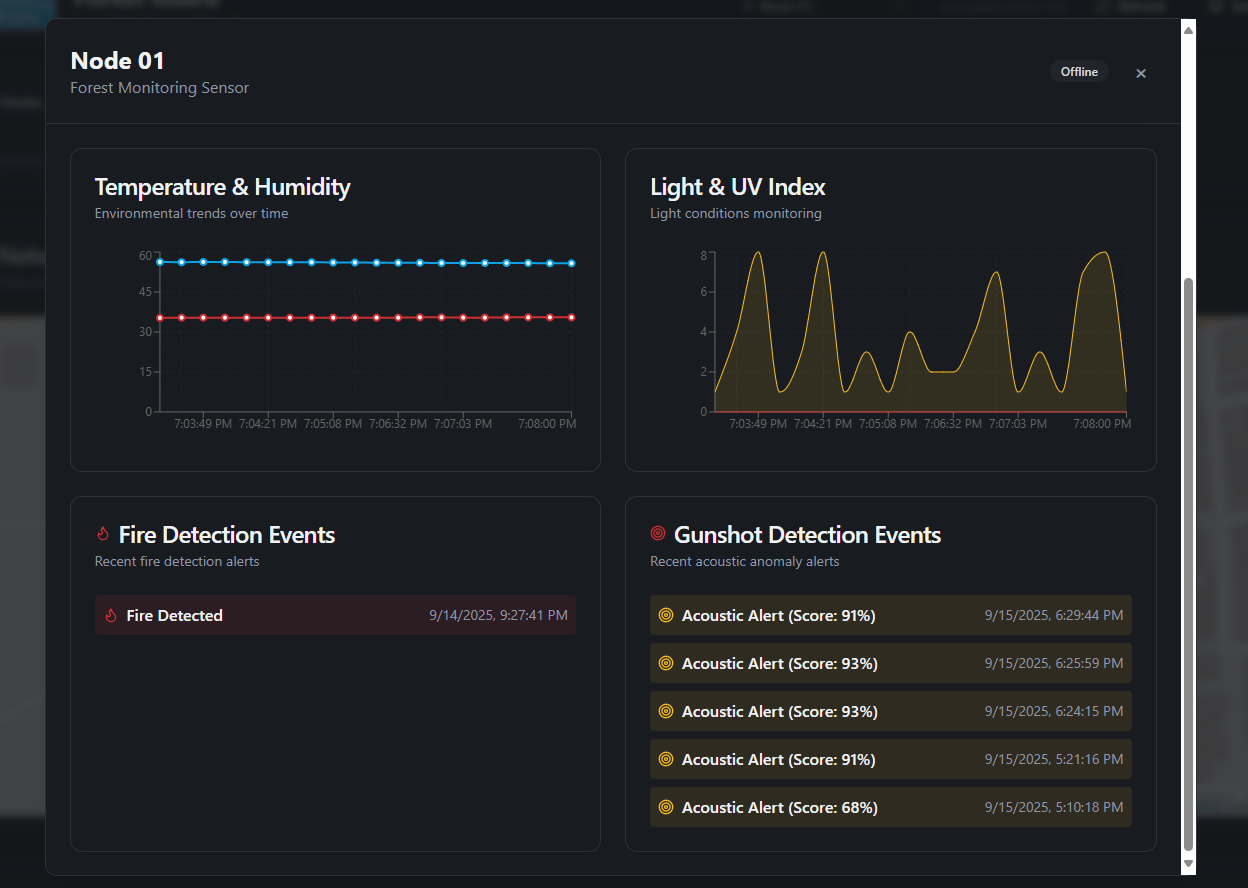 **Why It Matters**
This dashboard transforms raw sensor data into a **clear, real-time interface** for rangers, researchers, or conservation teams. With one glance, you can see:
1. Which nodes are active, where they are, and what conditions they’re reporting.
2. Whether a **fire or gunshot event** has been detected.
3. Historical trends that help understand the forest’s environmental conditions.
It essentially turns the **Forest Guard network** into a **living digital twin of the forest**.
## Step 34: Conclusion
**Why It Matters**
This dashboard transforms raw sensor data into a **clear, real-time interface** for rangers, researchers, or conservation teams. With one glance, you can see:
1. Which nodes are active, where they are, and what conditions they’re reporting.
2. Whether a **fire or gunshot event** has been detected.
3. Historical trends that help understand the forest’s environmental conditions.
It essentially turns the **Forest Guard network** into a **living digital twin of the forest**.
## Step 34: Conclusion


 With the completion of this build, we have created **Forest Guard**, a decentralized **forest surveillance system** that can detect and alert about critical events such as **gunshots** or **forest fires** — even in regions with no internet or cellular coverage. By combining **low-power LoRa mesh networking**, **solar-powered sensor nodes**, and **edge AI intelligence**, this project proves that modern technology can play a vital role in **safeguarding our forests** and protecting wildlife.
The **Gateway** provides a central bridge to the cloud, where data is stored and visualized in real time, while the **Nodes** tirelessly monitor the environment, detect anomalies, and forward alerts across the mesh. Together, they form a **scalable, resilient, and sustainable system** that can make a real difference for conservationists, rangers, and environmental researchers.
What makes this system truly exciting is the **flexibility of Edge AI**. Using the **Edge Impulse platform**, we trained a model to detect **gunshots**, but the same pipeline can be extended further:
1. By training on audio recordings of **chainsaws or tree cutting**, the system could become an **anti-illegal logging detector**.
2. With audio datasets of **endangered or extinct species calls**, it could serve as a **wildlife discovery and monitoring system**, helping scientists and communities identify rare animals in the wild.
This adaptability shows that Forest Guard is not just a single-purpose project, but a **platform for innovation in forest conservation**. From **early fire detection** to **biodiversity monitoring**, the possibilities are vast.
In the end, this project is a step toward a future where **technology and nature coexist**, where smart sensors and AI extend the eyes and ears of humans into places we cannot always reach — ensuring our forests remain safe, vibrant, and full of life for generations to come. 🌲🌍💡
With the completion of this build, we have created **Forest Guard**, a decentralized **forest surveillance system** that can detect and alert about critical events such as **gunshots** or **forest fires** — even in regions with no internet or cellular coverage. By combining **low-power LoRa mesh networking**, **solar-powered sensor nodes**, and **edge AI intelligence**, this project proves that modern technology can play a vital role in **safeguarding our forests** and protecting wildlife.
The **Gateway** provides a central bridge to the cloud, where data is stored and visualized in real time, while the **Nodes** tirelessly monitor the environment, detect anomalies, and forward alerts across the mesh. Together, they form a **scalable, resilient, and sustainable system** that can make a real difference for conservationists, rangers, and environmental researchers.
What makes this system truly exciting is the **flexibility of Edge AI**. Using the **Edge Impulse platform**, we trained a model to detect **gunshots**, but the same pipeline can be extended further:
1. By training on audio recordings of **chainsaws or tree cutting**, the system could become an **anti-illegal logging detector**.
2. With audio datasets of **endangered or extinct species calls**, it could serve as a **wildlife discovery and monitoring system**, helping scientists and communities identify rare animals in the wild.
This adaptability shows that Forest Guard is not just a single-purpose project, but a **platform for innovation in forest conservation**. From **early fire detection** to **biodiversity monitoring**, the possibilities are vast.
In the end, this project is a step toward a future where **technology and nature coexist**, where smart sensors and AI extend the eyes and ears of humans into places we cannot always reach — ensuring our forests remain safe, vibrant, and full of life for generations to come. 🌲🌍💡