> ## Documentation Index
> Fetch the complete documentation index at: https://docs.edgeimpulse.com/llms.txt
> Use this file to discover all available pages before exploring further.
# Audio Classification and GPIO Response - Rubik Pi 3
Created By: Roni Bandini
Public Project Link: [https://studio.edgeimpulse.com/studio/828677](https://studio.edgeimpulse.com/studio/828677)
GitHub Repo: [https://github.com/ronibandini/Rubik-Pi-AudioClassification](https://github.com/ronibandini/Rubik-Pi-AudioClassification)
 ## Intro
Crime patterns in the City of Buenos Aires change just like fashion trends. Right now, there seems to be an epidemic of car window smash-and-grabs where thieves steal items from inside parked cars. Since I have several cameras pointing toward the street, I'm often a privileged witness to these crimes, and victims sometimes ask me for the footage. However, the chances of recovering stolen goods drop significantly the longer it takes to report the incident.
Inspired by this problem — and also with the goal of testing new features of the Rubik Pi 3 — the aim of this project is to deploy a sound classification model on a Rubik Pi 3. This model will be trained to recognize the distinct sound of glass breaking and, upon detection, trigger GPIO responses (such as an immediate light/siren activation or a notification alert).
## What is the Rubik Pi 3?
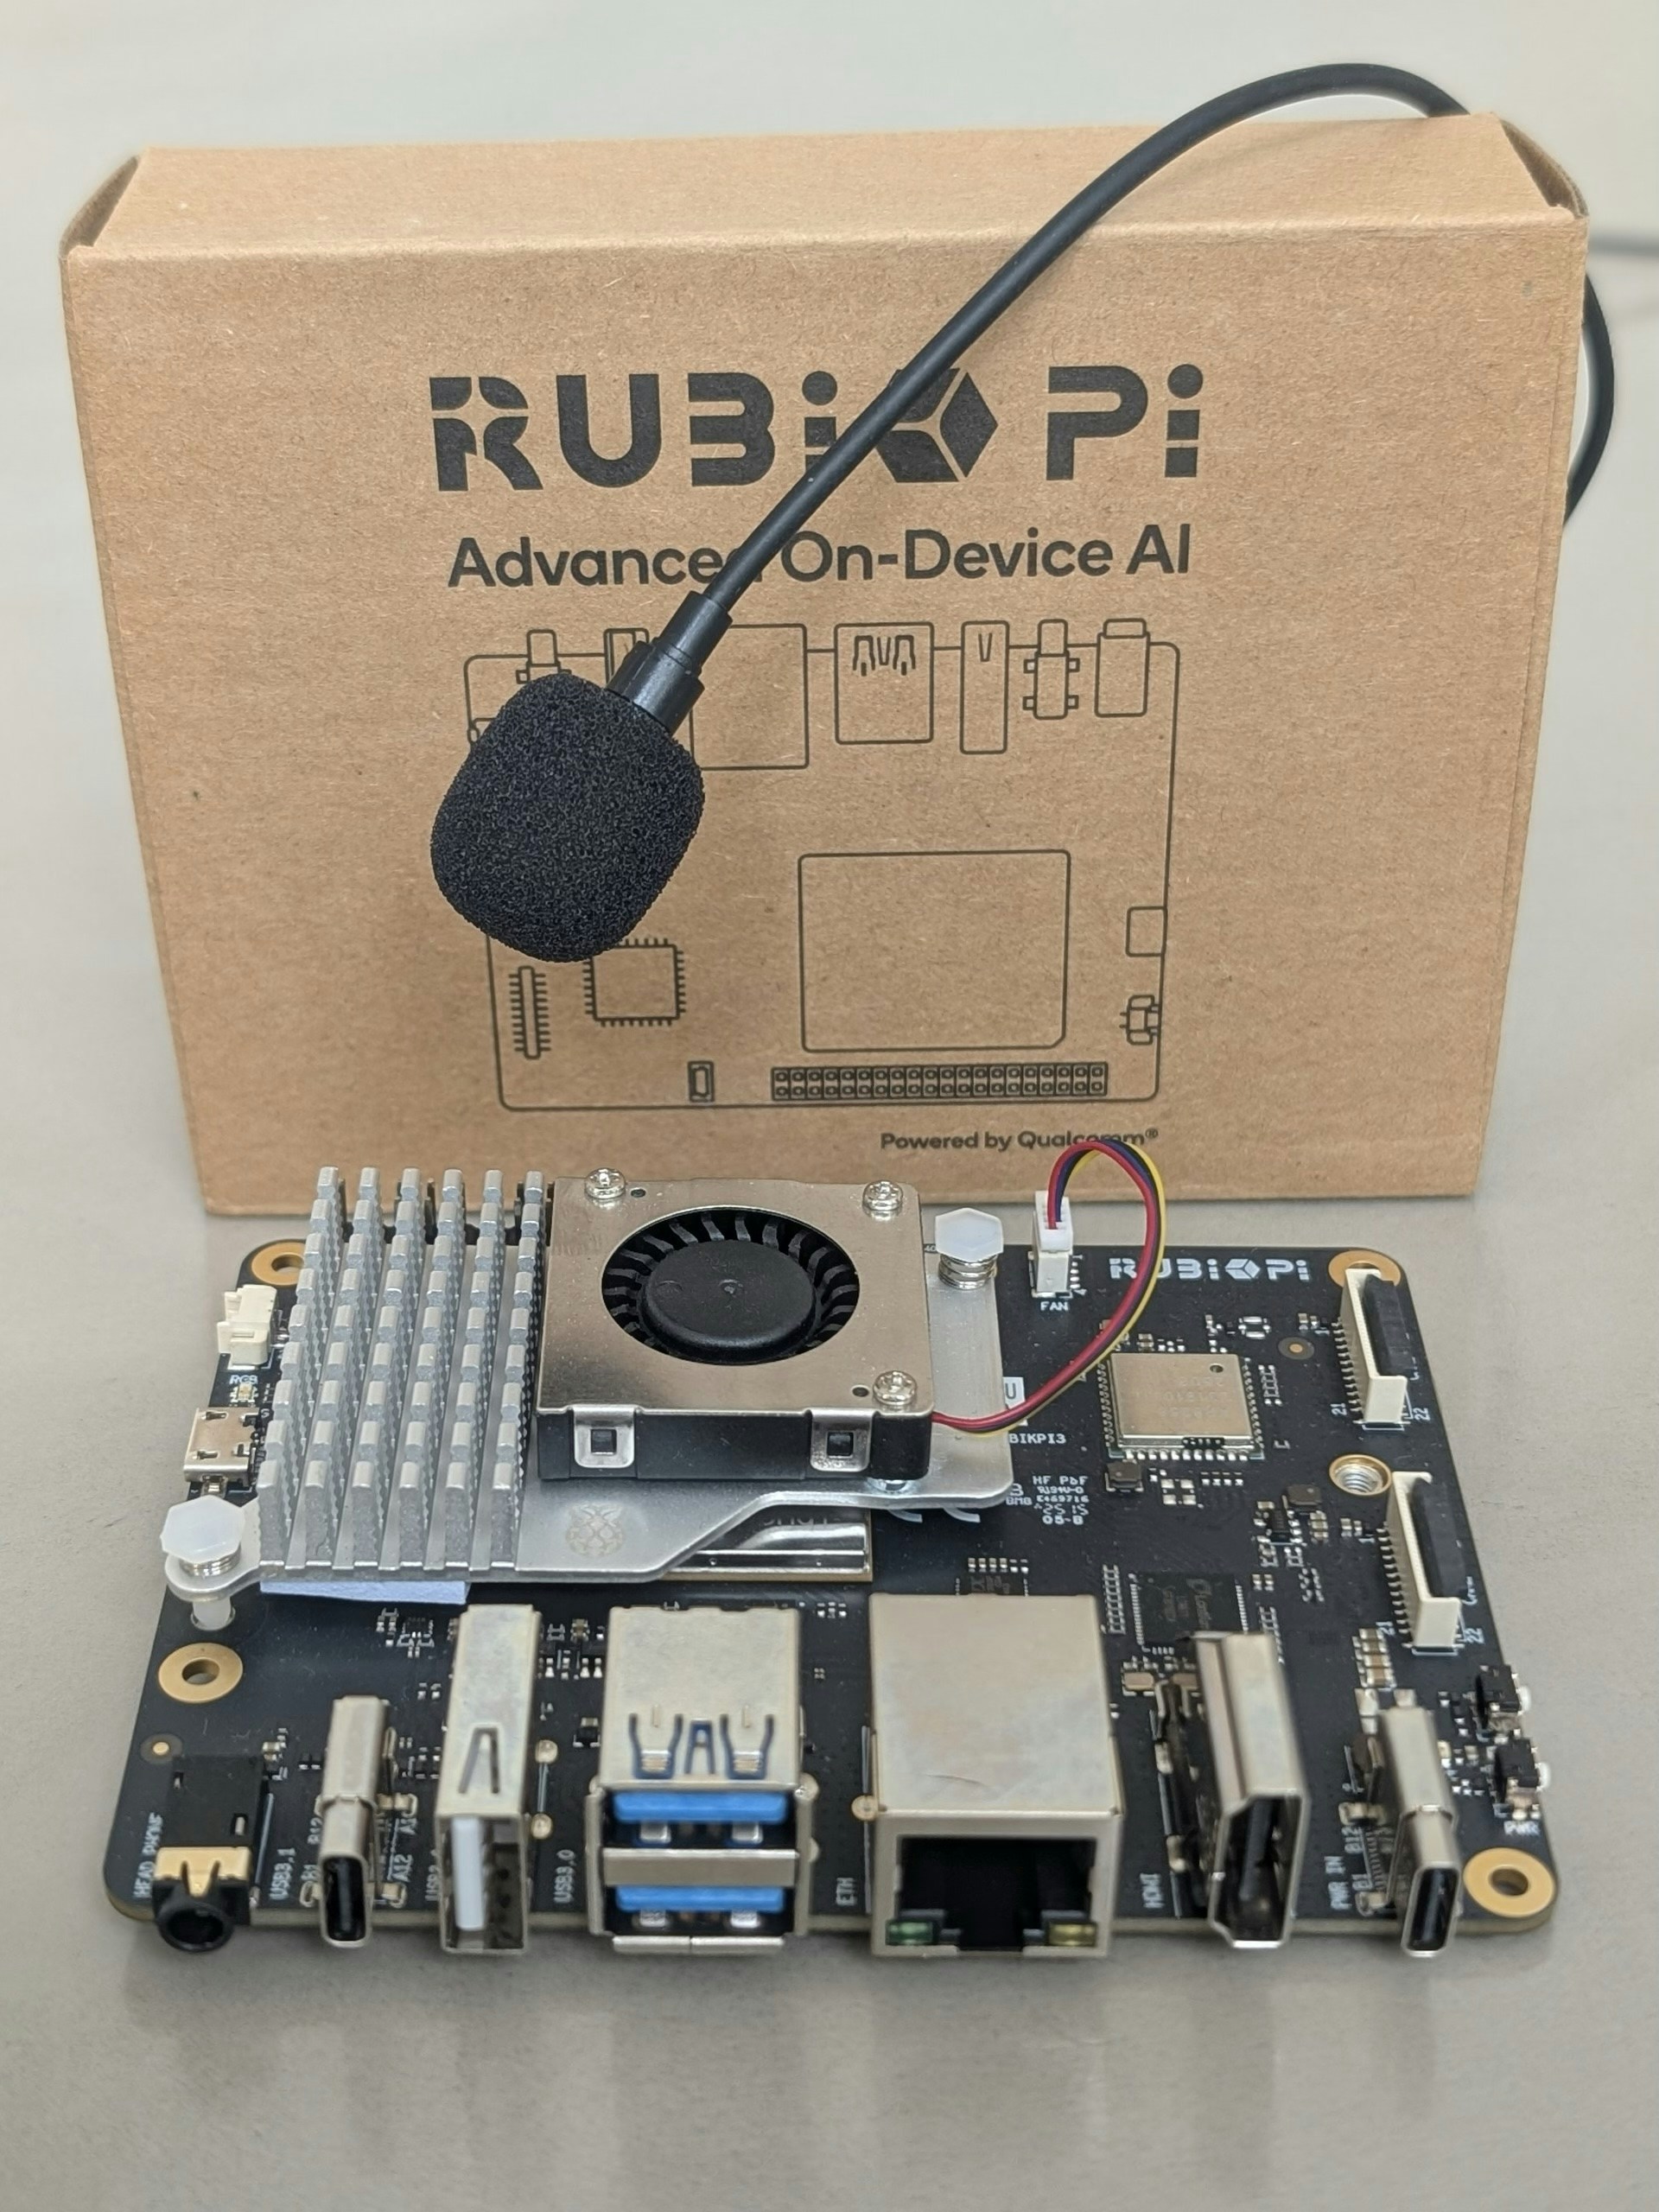
The Rubik Pi 3 is a powerful, lightweight development board built around the Qualcomm Dragonwing™ QCS6490 platform. It is notable for being the first Raspberry Pi-style board designed on a Qualcomm AI platform for developers, bringing high-performance edge AI capabilities to a developer-friendly form factor.Key Specifications:
* Platform: Dragonwing QCS6490
* Dimensions: 100 mm x 75 mm (a compact, desktop size)
* AI Performance: Offers up to 12 TOPS (Tera Operations Per Second) of AI computing power via the integrated Hexagon NPU.
* GPU: Adreno 643
* RAM: 8 GB LPDDR4x
* Storage: 128 GB UFS 2.2 (This is a more specific and faster storage standard than a typical eMMC or SD card slot found on many SBCs).
The Rubik Pi 3 supports multiple operating systems, including Qualcomm Linux, Android, and Ubuntu/Debian, making it highly versatile for various AI, IoT, and industrial applications.
## Parts Required
* [Thundercomm Rubik Pi 3](https://www.thundercomm.com/product/rubik-pi)
* Active Cooler
* Power Supply: Power Delivery over Type-C, 12V 3A
* USB Microphone (you can also use a standard mic connected to the 3.5mm jack)
* 1 LED
* 2 jumper cables, FF
## Hardware Setup
1. Plug in the power supply, USB microphone, and Ethernet cable to the Rubik Pi.
2. Connect the other end of the Ethernet cable to your router.
3. Press the power button and wait for the Rubik Pi to boot.
4. Log in to your router's admin interface to see the IP assigned to the Rubik Pi, or attach a keyboard, mouse, and monitor.
5. SSH into the Rubik Pi, or login directly on the console:
user: `ubuntu`
pass: `ubuntu`
> Note: This tutorial assumes your Rubik Pi is running Canonical Ubuntu. For Qualcomm Linux, `root / rubikpi` may be valid credentials.
## Sound Classification Project
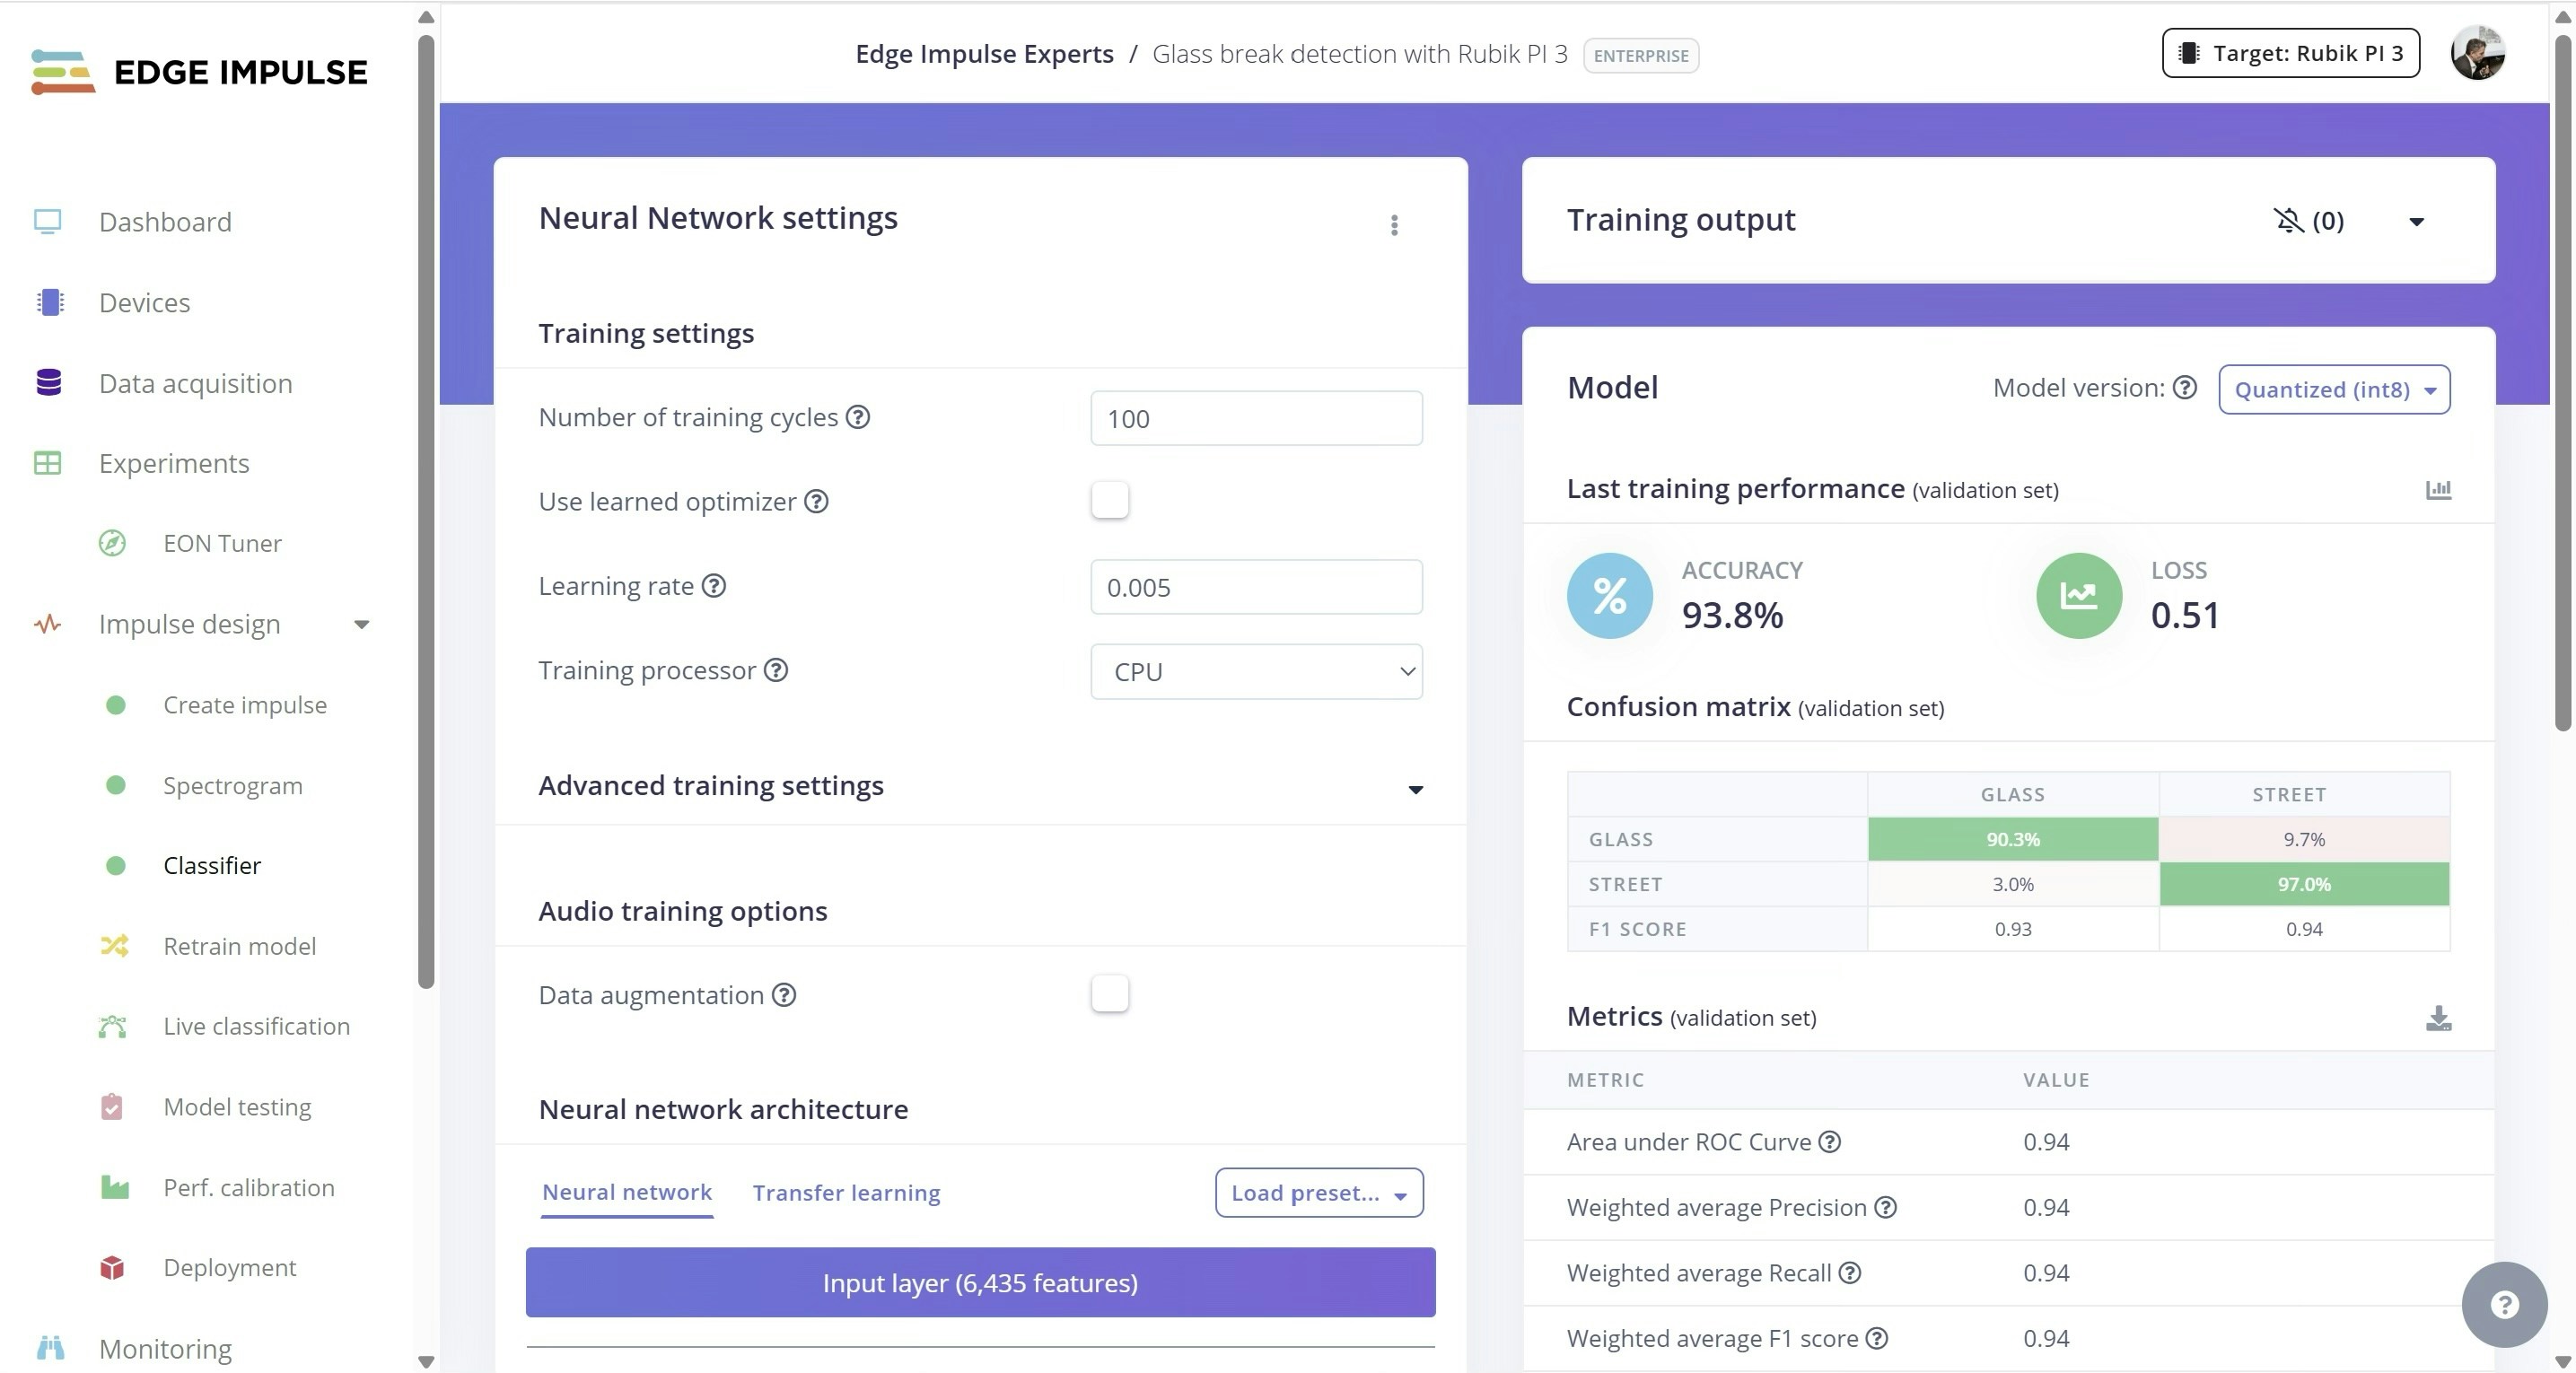
I have created a new Edge Impulse project, and uploaded sound files using the Data Acquisition tab, of both regular street sounds and also glass breaking sounds.
The glass breaking sound files (`.wav` file format) were obtained from another public project, built by [Zalmotek](https://zalmotek.com) in this [Edge Impulse tutorial](https://docs.edgeimpulse.com/projects/expert-network/glass-break-detection-nordic-thingy53). That project and it's audio files can be cloned from here: [https://studio.edgeimpulse.com/studio/828677](https://studio.edgeimpulse.com/studio/828677)
## Intro
Crime patterns in the City of Buenos Aires change just like fashion trends. Right now, there seems to be an epidemic of car window smash-and-grabs where thieves steal items from inside parked cars. Since I have several cameras pointing toward the street, I'm often a privileged witness to these crimes, and victims sometimes ask me for the footage. However, the chances of recovering stolen goods drop significantly the longer it takes to report the incident.
Inspired by this problem — and also with the goal of testing new features of the Rubik Pi 3 — the aim of this project is to deploy a sound classification model on a Rubik Pi 3. This model will be trained to recognize the distinct sound of glass breaking and, upon detection, trigger GPIO responses (such as an immediate light/siren activation or a notification alert).
## What is the Rubik Pi 3?
The Rubik Pi 3 is a powerful, lightweight development board built around the Qualcomm Dragonwing™ QCS6490 platform. It is notable for being the first Raspberry Pi-style board designed on a Qualcomm AI platform for developers, bringing high-performance edge AI capabilities to a developer-friendly form factor.Key Specifications:
* Platform: Dragonwing QCS6490
* Dimensions: 100 mm x 75 mm (a compact, desktop size)
* AI Performance: Offers up to 12 TOPS (Tera Operations Per Second) of AI computing power via the integrated Hexagon NPU.
* GPU: Adreno 643
* RAM: 8 GB LPDDR4x
* Storage: 128 GB UFS 2.2 (This is a more specific and faster storage standard than a typical eMMC or SD card slot found on many SBCs).
The Rubik Pi 3 supports multiple operating systems, including Qualcomm Linux, Android, and Ubuntu/Debian, making it highly versatile for various AI, IoT, and industrial applications.
## Parts Required
* [Thundercomm Rubik Pi 3](https://www.thundercomm.com/product/rubik-pi)
* Active Cooler
* Power Supply: Power Delivery over Type-C, 12V 3A
* USB Microphone (you can also use a standard mic connected to the 3.5mm jack)
* 1 LED
* 2 jumper cables, FF
## Hardware Setup
1. Plug in the power supply, USB microphone, and Ethernet cable to the Rubik Pi.
2. Connect the other end of the Ethernet cable to your router.
3. Press the power button and wait for the Rubik Pi to boot.
4. Log in to your router's admin interface to see the IP assigned to the Rubik Pi, or attach a keyboard, mouse, and monitor.
5. SSH into the Rubik Pi, or login directly on the console:
user: `ubuntu`
pass: `ubuntu`
> Note: This tutorial assumes your Rubik Pi is running Canonical Ubuntu. For Qualcomm Linux, `root / rubikpi` may be valid credentials.
## Sound Classification Project
I have created a new Edge Impulse project, and uploaded sound files using the Data Acquisition tab, of both regular street sounds and also glass breaking sounds.
The glass breaking sound files (`.wav` file format) were obtained from another public project, built by [Zalmotek](https://zalmotek.com) in this [Edge Impulse tutorial](https://docs.edgeimpulse.com/projects/expert-network/glass-break-detection-nordic-thingy53). That project and it's audio files can be cloned from here: [https://studio.edgeimpulse.com/studio/828677](https://studio.edgeimpulse.com/studio/828677)
 ## Software Setup
Run the following commands to install Edge Impulse on the Rubik Pi:
```
sudo apt update
wget https://cdn.edgeimpulse.com/firmware/linux/setup-edge-impulse-qc-linux.sh
sudo apt install selinux-utils
source ~/.profile
chmod +x setup-edge-impulse-qc-linux.sh
./setup-edge-impulse-qc-linux.sh
```
Connect the USB microphone, and then run the following command:
```
alsamixer
```
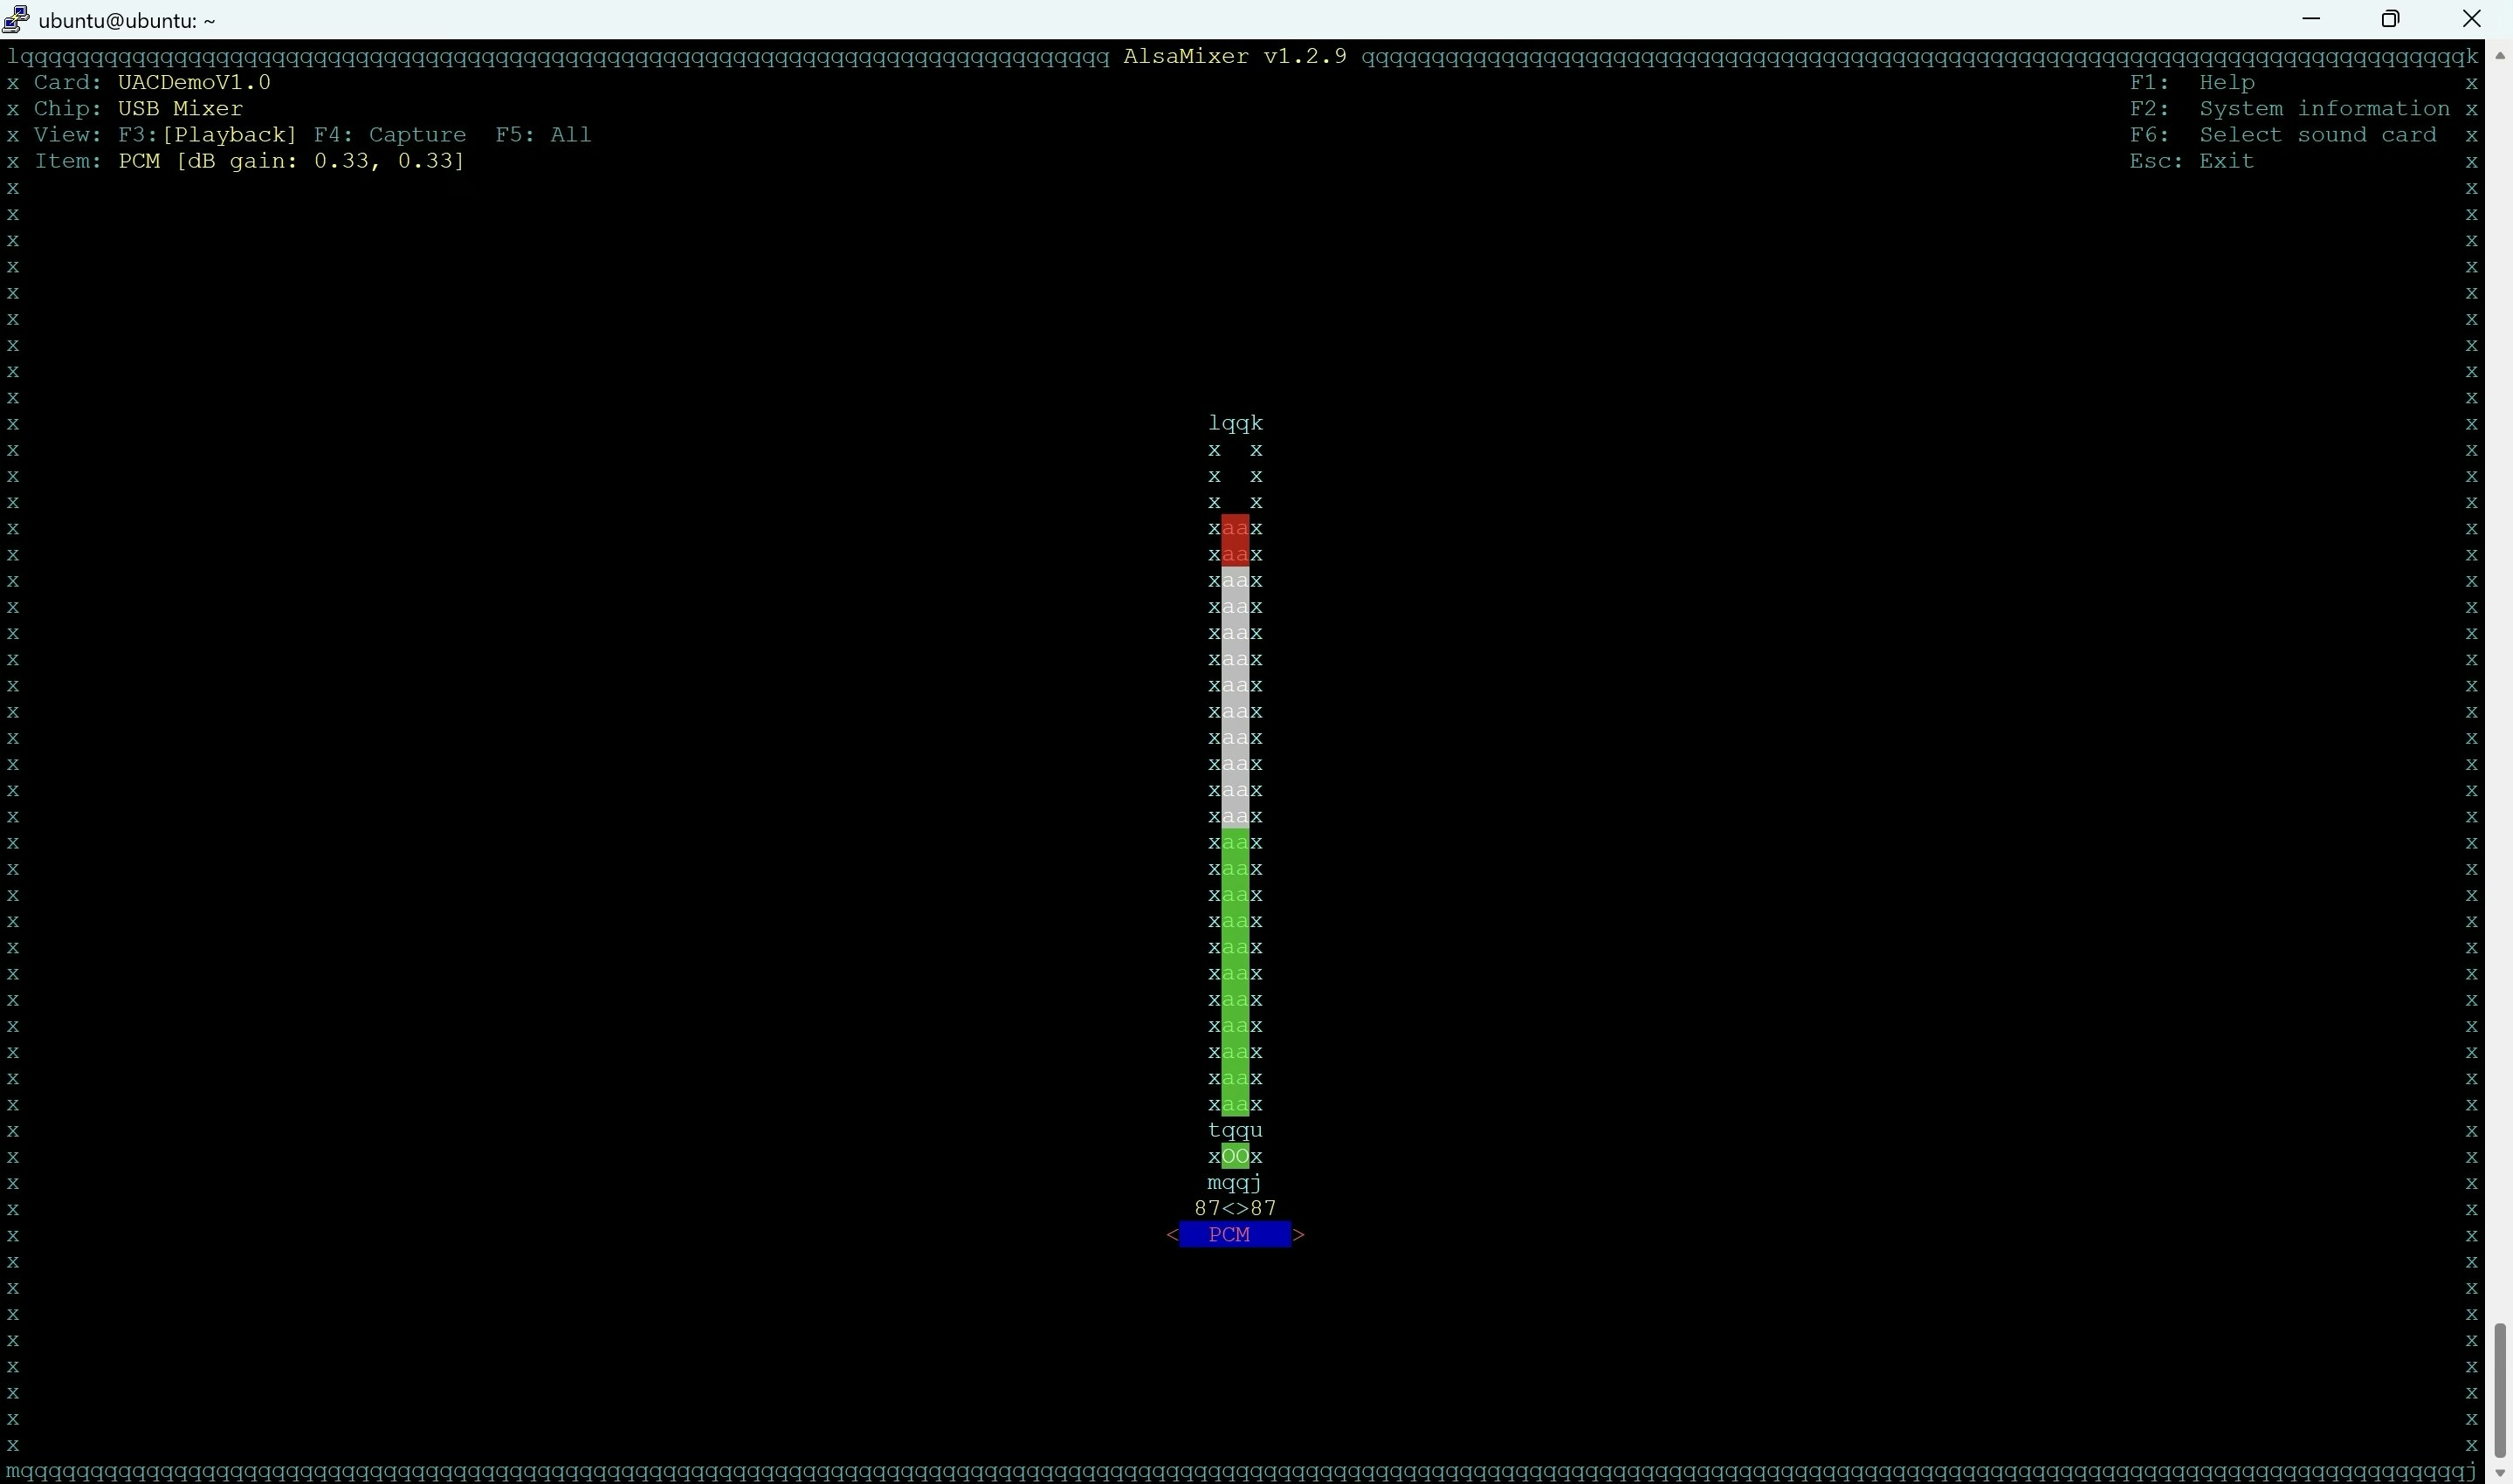
Press **F6** to select the USB microphone input, and press the up arrow several times to increase the input volume.
## Software Setup
Run the following commands to install Edge Impulse on the Rubik Pi:
```
sudo apt update
wget https://cdn.edgeimpulse.com/firmware/linux/setup-edge-impulse-qc-linux.sh
sudo apt install selinux-utils
source ~/.profile
chmod +x setup-edge-impulse-qc-linux.sh
./setup-edge-impulse-qc-linux.sh
```
Connect the USB microphone, and then run the following command:
```
alsamixer
```
Press **F6** to select the USB microphone input, and press the up arrow several times to increase the input volume.
 Exit and run the following commands to install Python and enable access to the GPIO pins:
```
sudo apt install python3-pip
sudo apt install python3-periphery
sudo groupadd -f gpio
sudo usermod -aG gpio ubuntu
sudo nano /etc/udev/rules.d/99-gpio.rules
```
Add the following lines to the file:
```
SUBSYSTEM=="gpio";, KERNEL==";gpiochip*";, GROUP=";gpio";, MODE=";0660";
SUBSYSTEM==";gpio";, ACTION==";add";, PROGRAM=";/bin/sh -c 'chown root:gpio /sys/class/gpio/export /sys/class/gpio/unexport; chmod 220 /sys/class/gpio/export /sys/class/gpio/unexport'";
SUBSYSTEM==";gpio";, ACTION==";add";, PROGRAM=";/bin/sh -c 'chown root:gpio /sys%p/direction /sys%p/value; chmod 660 /sys%p/direction /sys%p/value'";
```
Press Control-S to save the file, and Control-X to exit.
Finally, reload the `udev` rules and reboot with:
```
sudo udevadm control --reload-rules
sudo udevadm trigger
sudo reboot
```
Once rebooted and reconnected, run:
```
edge-impulse-linux-runner --clean
```
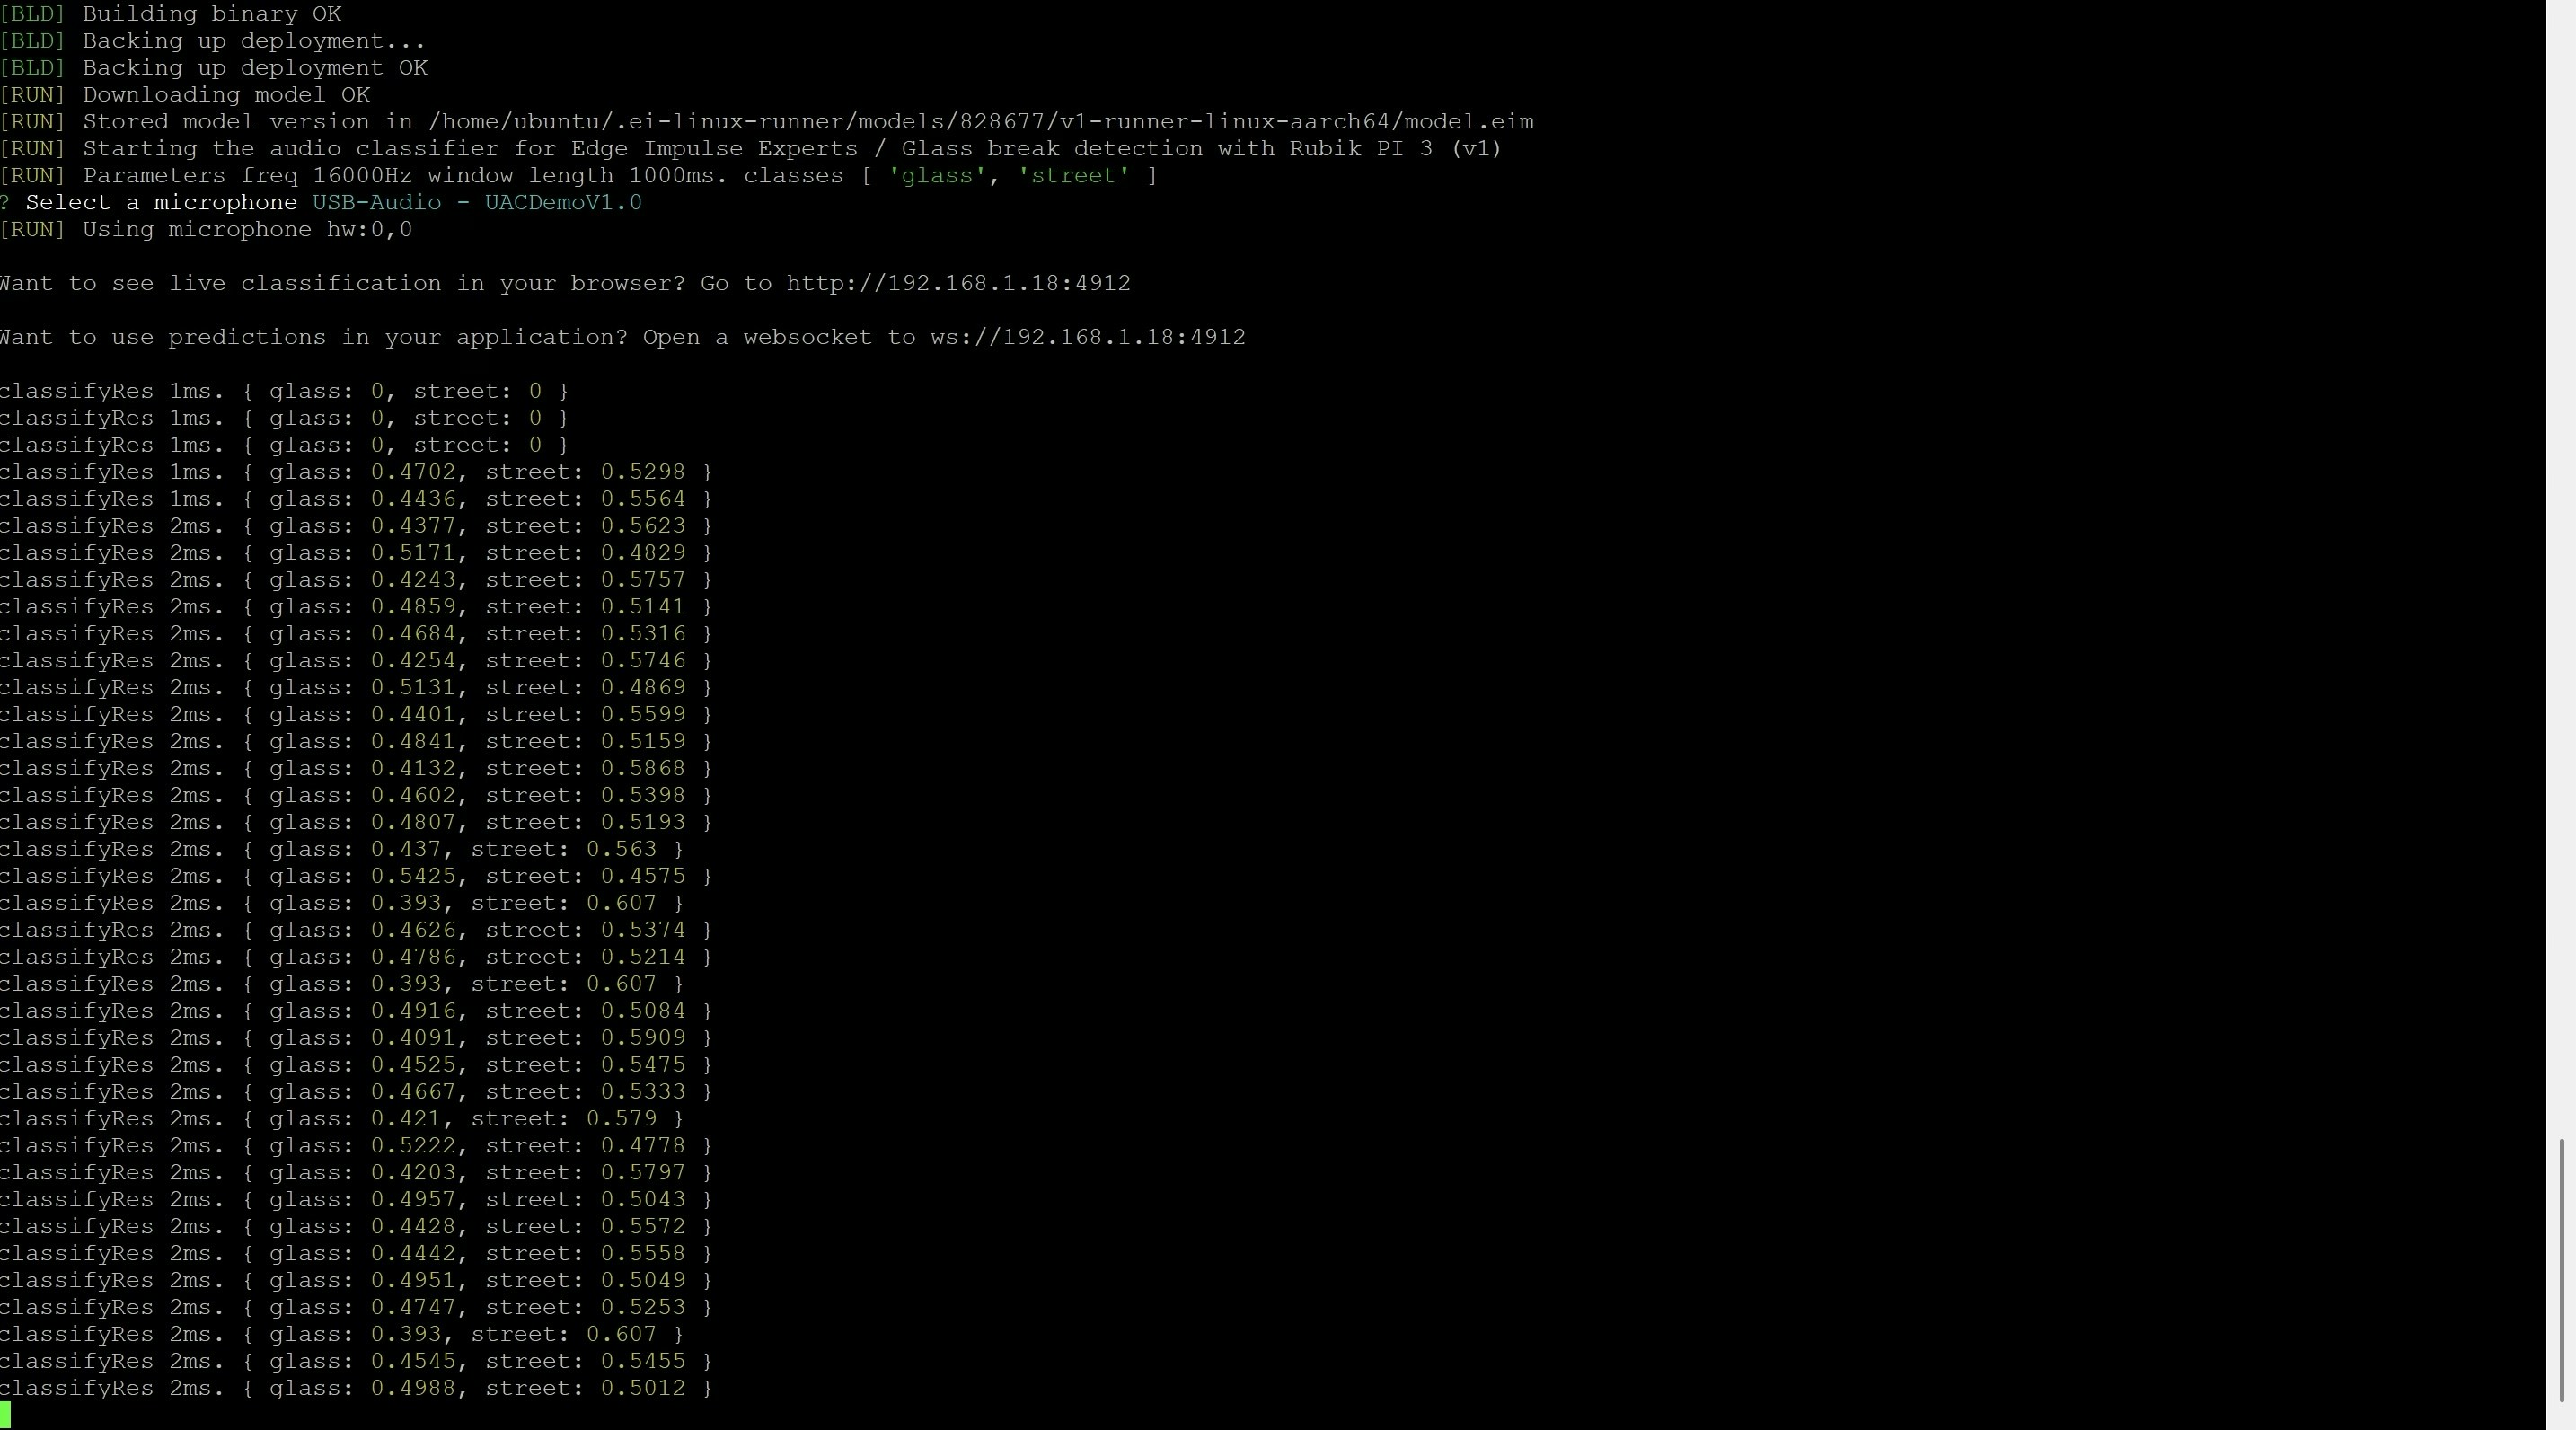
Login to your Edge Impulse account, select the project, and choose the USB microphone. Inference will begin, so you should see output similar to:
```
classifyRes 2ms. { street: 0.9999, glass: 0.0001 }
classifyRes 2ms. { street: 0.8629, glass: 0.1371 }
```
Press Control-C to exit the inference.
Exit and run the following commands to install Python and enable access to the GPIO pins:
```
sudo apt install python3-pip
sudo apt install python3-periphery
sudo groupadd -f gpio
sudo usermod -aG gpio ubuntu
sudo nano /etc/udev/rules.d/99-gpio.rules
```
Add the following lines to the file:
```
SUBSYSTEM=="gpio";, KERNEL==";gpiochip*";, GROUP=";gpio";, MODE=";0660";
SUBSYSTEM==";gpio";, ACTION==";add";, PROGRAM=";/bin/sh -c 'chown root:gpio /sys/class/gpio/export /sys/class/gpio/unexport; chmod 220 /sys/class/gpio/export /sys/class/gpio/unexport'";
SUBSYSTEM==";gpio";, ACTION==";add";, PROGRAM=";/bin/sh -c 'chown root:gpio /sys%p/direction /sys%p/value; chmod 660 /sys%p/direction /sys%p/value'";
```
Press Control-S to save the file, and Control-X to exit.
Finally, reload the `udev` rules and reboot with:
```
sudo udevadm control --reload-rules
sudo udevadm trigger
sudo reboot
```
Once rebooted and reconnected, run:
```
edge-impulse-linux-runner --clean
```
Login to your Edge Impulse account, select the project, and choose the USB microphone. Inference will begin, so you should see output similar to:
```
classifyRes 2ms. { street: 0.9999, glass: 0.0001 }
classifyRes 2ms. { street: 0.8629, glass: 0.1371 }
```
Press Control-C to exit the inference.
 ## GPIO Setup
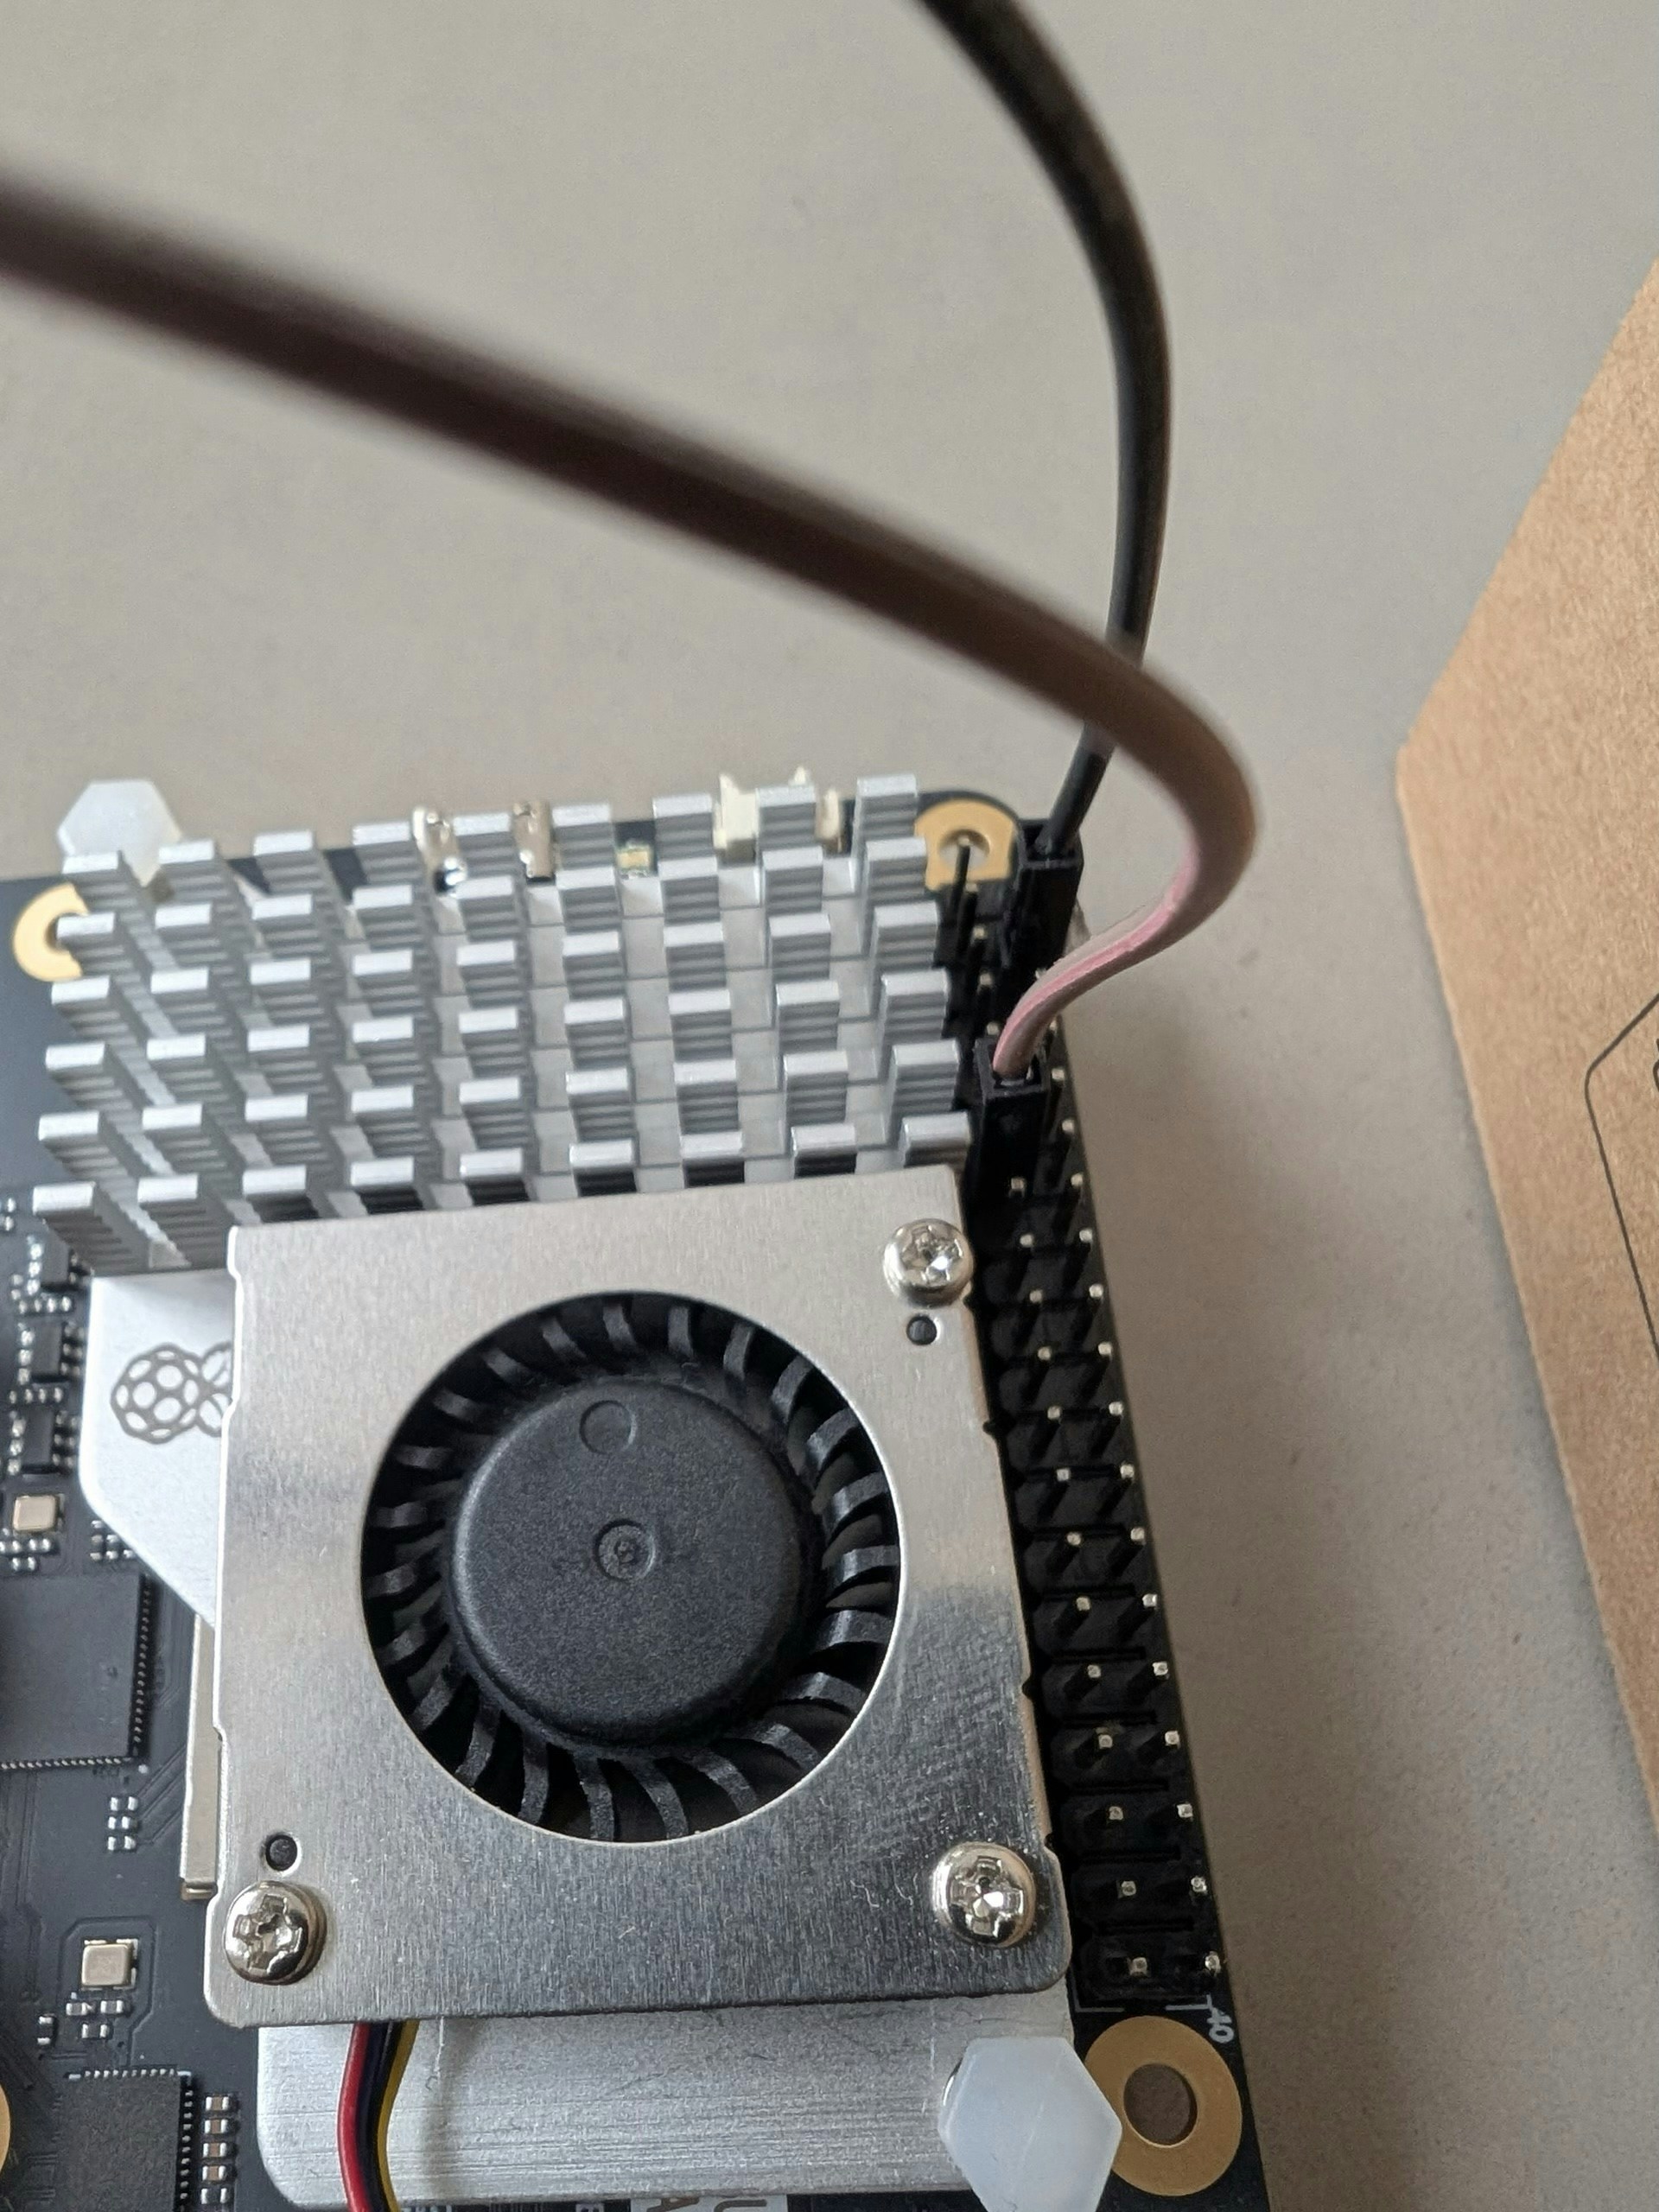
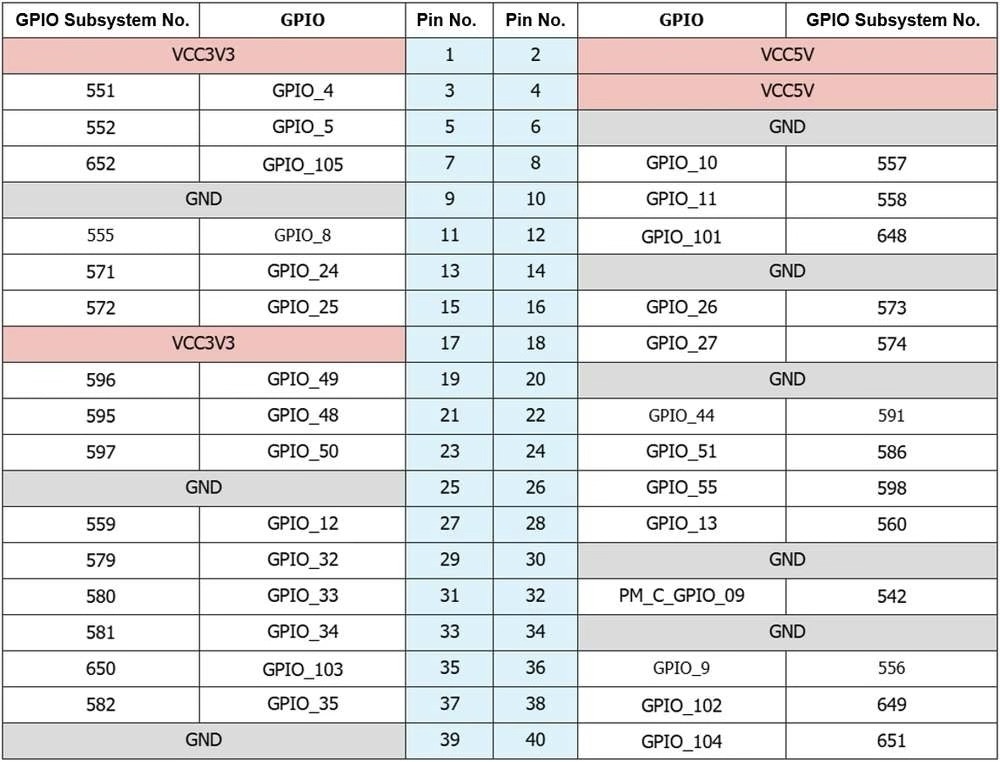
Now connect the LED to GPIO 13 and GPIO 6 (GND). Note that the Rubik Pi will use subsystem number 571 for pin 13. See the complete table below for all of the pin mappings.
## GPIO Setup
Now connect the LED to GPIO 13 and GPIO 6 (GND). Note that the Rubik Pi will use subsystem number 571 for pin 13. See the complete table below for all of the pin mappings.
 ### Python Parser
Upload `glass.py` which can be found in [the GitHub Repository for this project](https://github.com/ronibandini/Rubik-Pi-AudioClassification) to the Rubik Pi via SFTP, or clone the repo directly on the Rubik Pi.
Then run `python3 glass.py`.
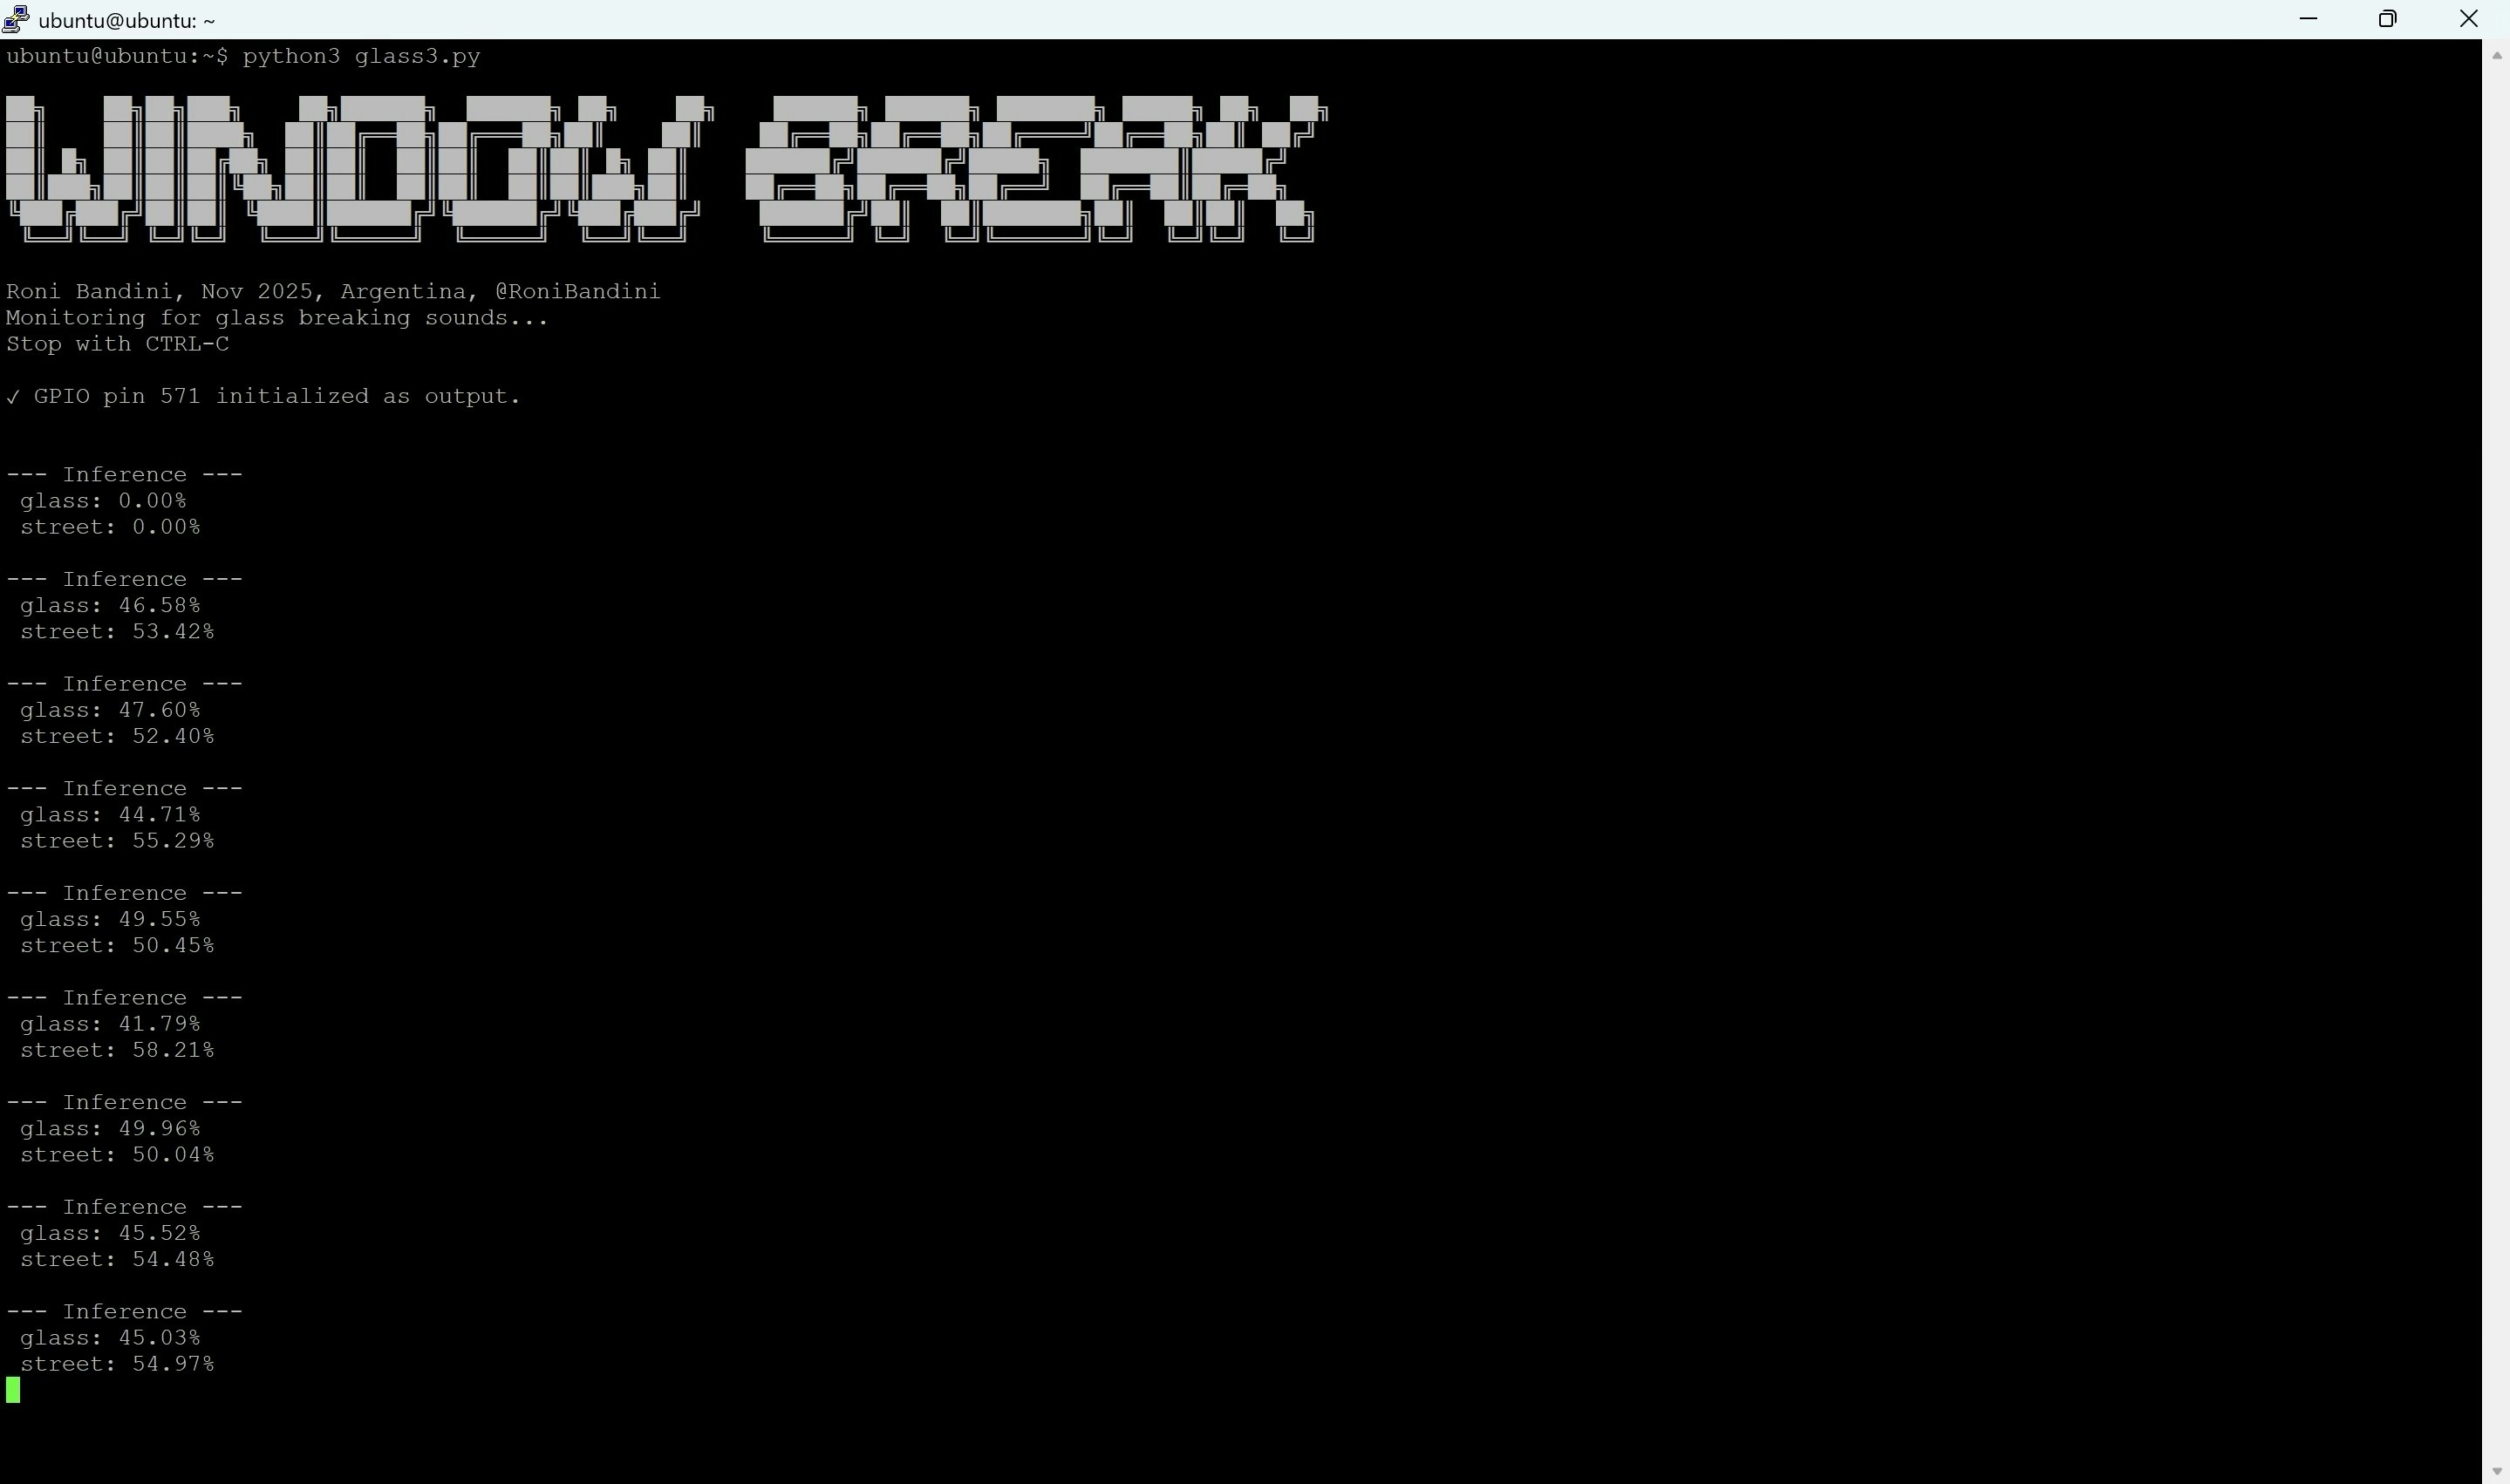
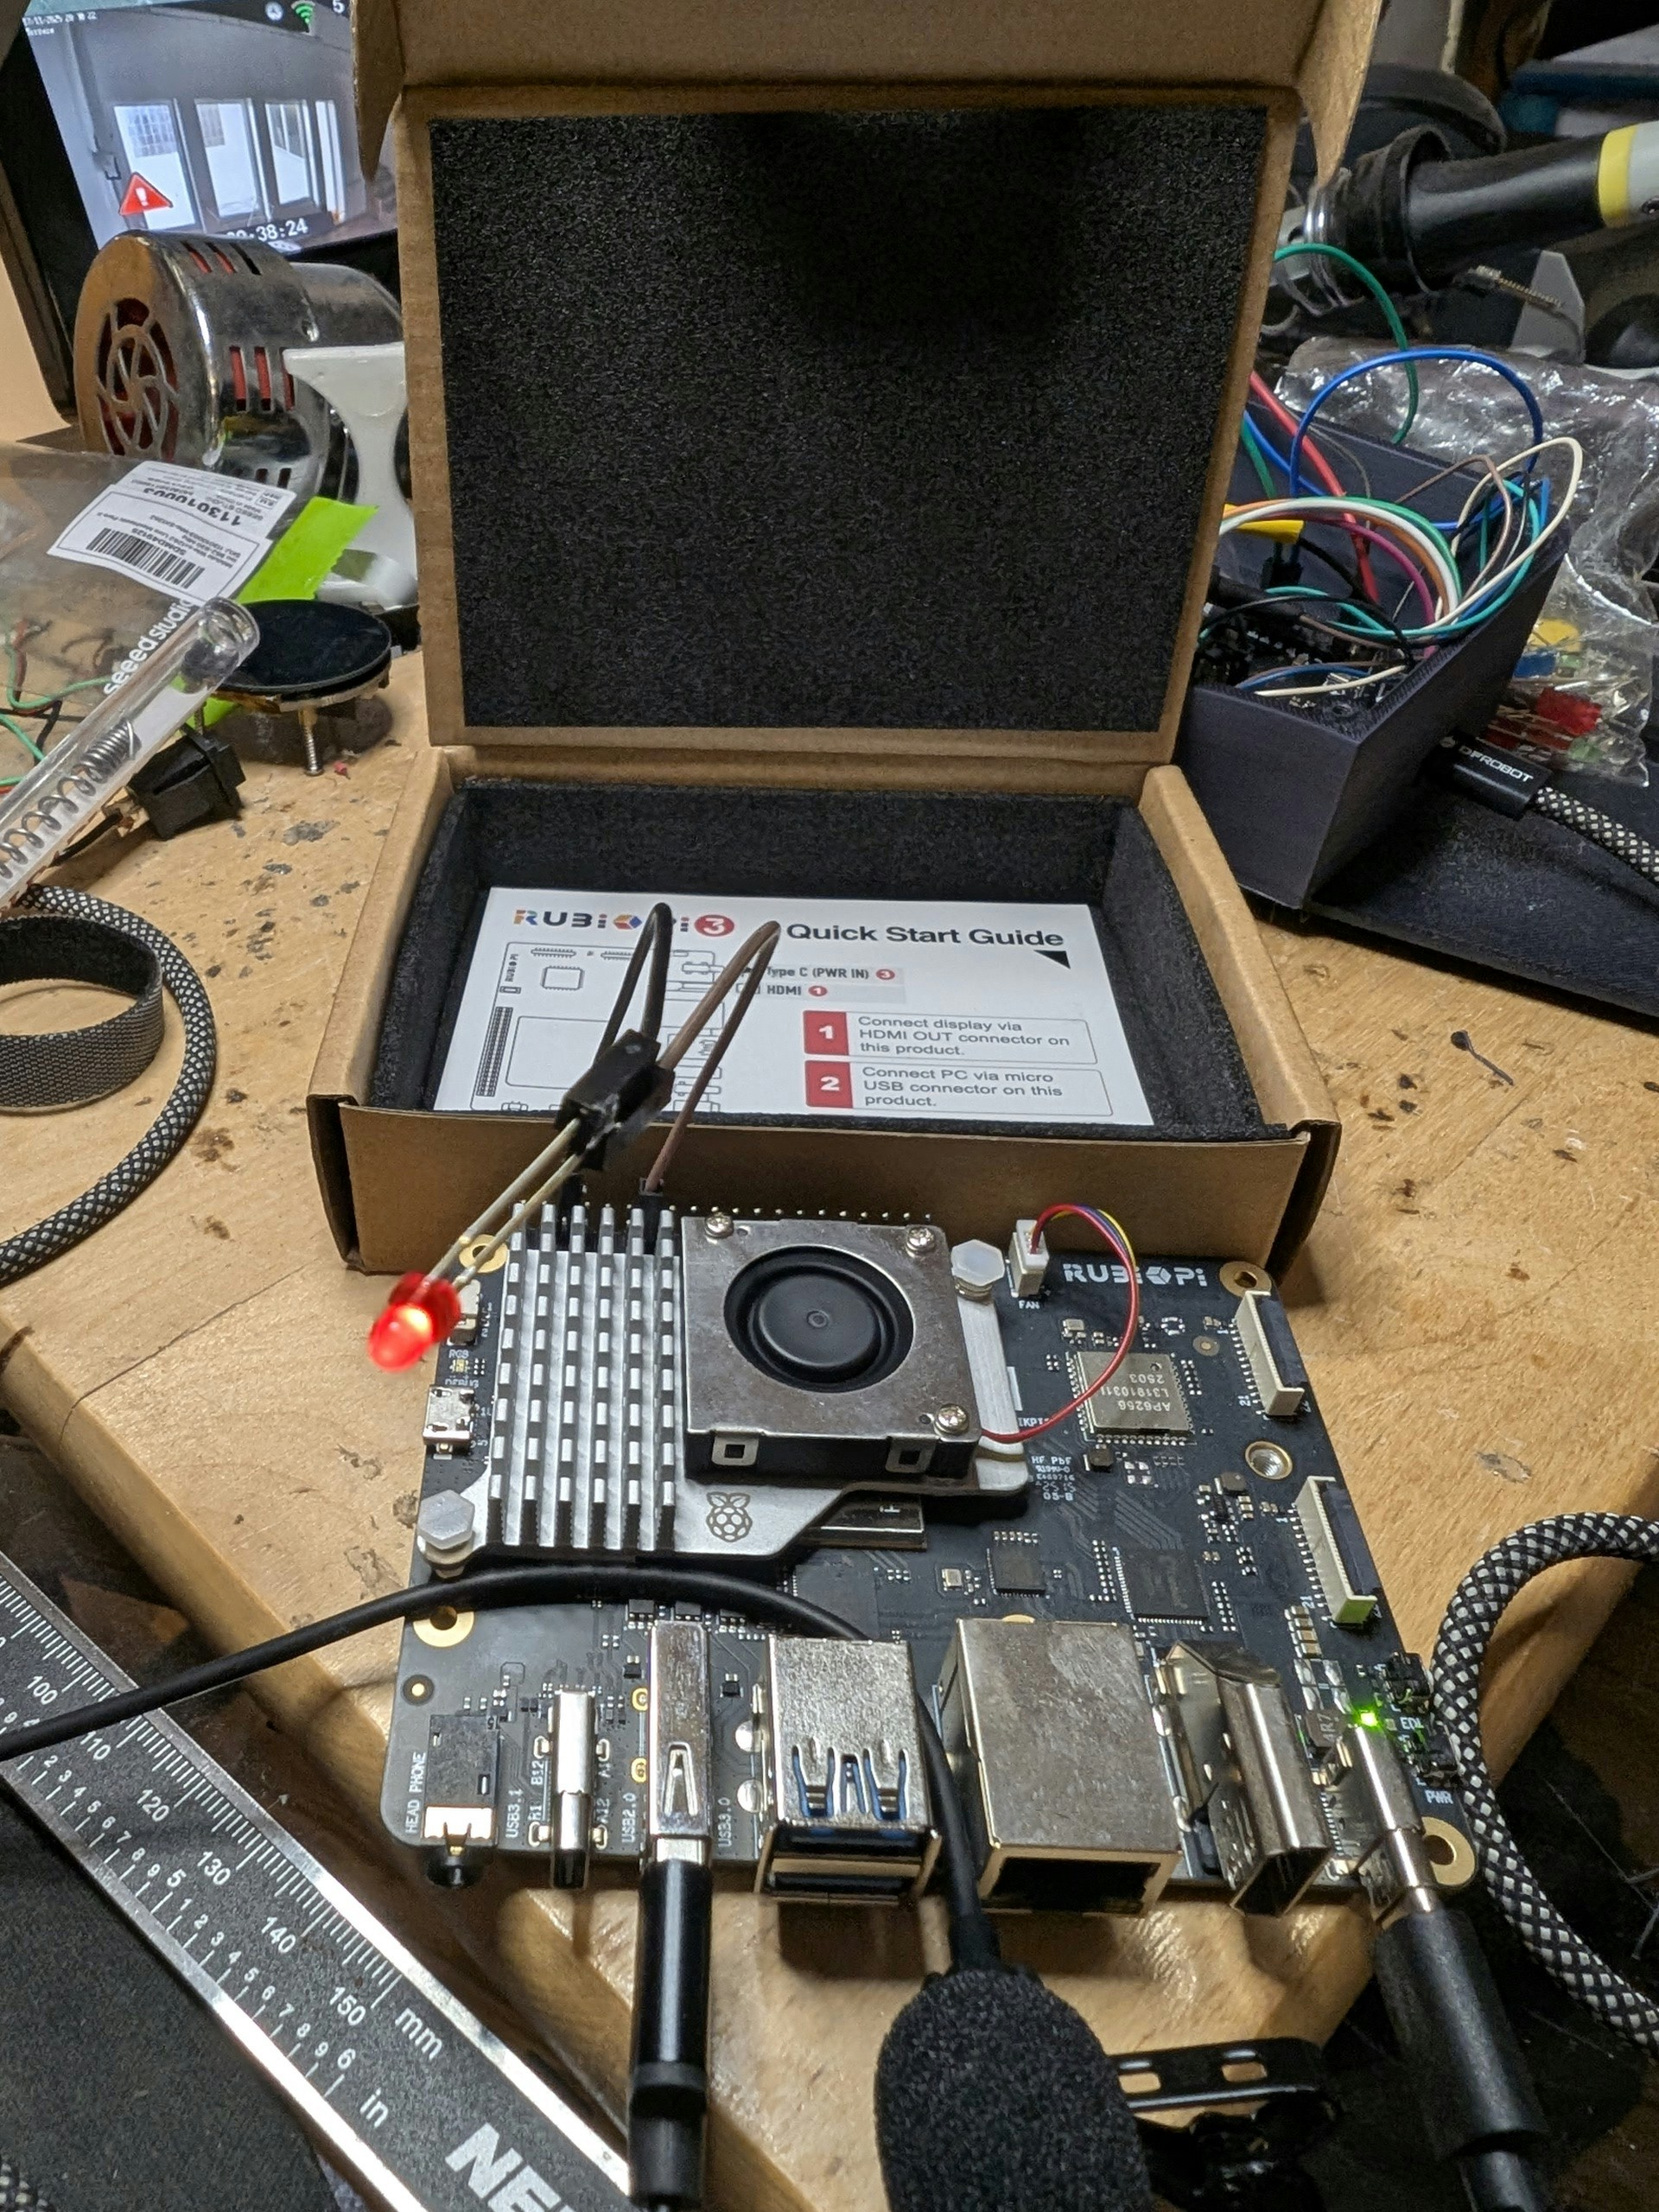
Inference will begin, and any time a glass break is heard, the GPIO pin will be triggered and set high...in this setup illuminating the LED, but application logic could be written to expand functionality for any number of use-cases.
### Python Parser
Upload `glass.py` which can be found in [the GitHub Repository for this project](https://github.com/ronibandini/Rubik-Pi-AudioClassification) to the Rubik Pi via SFTP, or clone the repo directly on the Rubik Pi.
Then run `python3 glass.py`.
Inference will begin, and any time a glass break is heard, the GPIO pin will be triggered and set high...in this setup illuminating the LED, but application logic could be written to expand functionality for any number of use-cases.
 ## Enhancements
You can also make the Rubik Pi call a webhook to send a WhatsApp or email when inference occurs. Here is a snippet of sample code for that functionality:
```
def call_webhook(webhook_url, confidence):
import requests
from datetime import datetime
try:
payload = {
"event": "window_break_detected",
"confidence": confidence,
"timestamp": datetime.now().isoformat(),
"device": "Rubik Pi 3"
}
response = requests.post(
webhook_url,
json=payload,
timeout=5
)
if response.status_code == 200:
print(f"✓ Webhook notification sent successfully")
else:
print(f"⚠️ Webhook returned status code: {response.status_code}")
except requests.exceptions.Timeout:
print("⚠️ Webhook request timed out")
except requests.exceptions.RequestException as e:
print(f"⚠️ Webhook error: {e}")
```
## Final Notes
Detecting glass breakage using audio used to be a challenging problem with the heuristic programming paradigm. Today, this is easily solved, provided the right tools are chosen. The Thundercomm Rubik Pi 3 integrates naturally with Edge Impulse, has more than enough resources for local Machine Learning inference, and offers all the flexibility needed to connect external devices via the GPIO header pins.
## Links
[https://studio.edgeimpulse.com/studio/828677](https://studio.edgeimpulse.com/studio/828677)
[https://github.com/ronibandini/Rubik-Pi-AudioClassification](https://github.com/ronibandini/Rubik-Pi-AudioClassification)
## Contact
Roni Bandini
[https://www.linkedin.com/in/ronibandini](https://www.linkedin.com/in/ronibandini/)
## Enhancements
You can also make the Rubik Pi call a webhook to send a WhatsApp or email when inference occurs. Here is a snippet of sample code for that functionality:
```
def call_webhook(webhook_url, confidence):
import requests
from datetime import datetime
try:
payload = {
"event": "window_break_detected",
"confidence": confidence,
"timestamp": datetime.now().isoformat(),
"device": "Rubik Pi 3"
}
response = requests.post(
webhook_url,
json=payload,
timeout=5
)
if response.status_code == 200:
print(f"✓ Webhook notification sent successfully")
else:
print(f"⚠️ Webhook returned status code: {response.status_code}")
except requests.exceptions.Timeout:
print("⚠️ Webhook request timed out")
except requests.exceptions.RequestException as e:
print(f"⚠️ Webhook error: {e}")
```
## Final Notes
Detecting glass breakage using audio used to be a challenging problem with the heuristic programming paradigm. Today, this is easily solved, provided the right tools are chosen. The Thundercomm Rubik Pi 3 integrates naturally with Edge Impulse, has more than enough resources for local Machine Learning inference, and offers all the flexibility needed to connect external devices via the GPIO header pins.
## Links
[https://studio.edgeimpulse.com/studio/828677](https://studio.edgeimpulse.com/studio/828677)
[https://github.com/ronibandini/Rubik-Pi-AudioClassification](https://github.com/ronibandini/Rubik-Pi-AudioClassification)
## Contact
Roni Bandini
[https://www.linkedin.com/in/ronibandini](https://www.linkedin.com/in/ronibandini/)