> ## Documentation Index
> Fetch the complete documentation index at: https://docs.edgeimpulse.com/llms.txt
> Use this file to discover all available pages before exploring further.
# macOS devices
You can use your Intel or M1-based Mac computer as a fully-supported development environment for Edge Impulse for Linux. This lets you sample raw data, build models, and deploy trained machine learning models directly from the Studio. If you have a Macbook, the webcam and microphone of your system are automatically detected and can be used to build models.
 ### Installing dependencies
To connect your Mac to Edge Impulse:
1. Install [Node.js](https://nodejs.org/en/).
2. Install [Homebrew](https://brew.sh).
3. Open a terminal window and install the dependencies:
```
$ brew install sox
$ brew install imagesnap
```
1. Last, install the Edge Impulse CLI:
```
$ npm install edge-impulse-linux -g
```
**Problems installing the CLI?**
See the [Installation and troubleshooting](/tools/clis/edge-impulse-cli/installation) guide.
### Connecting to Edge Impulse
With the software installed, open a terminal window and run::
```
$ edge-impulse-linux
```
This will start a wizard which will ask you to log in, and choose an Edge Impulse project. If you want to switch projects run the command with `--clean`.
#### Verifying that your device is connected
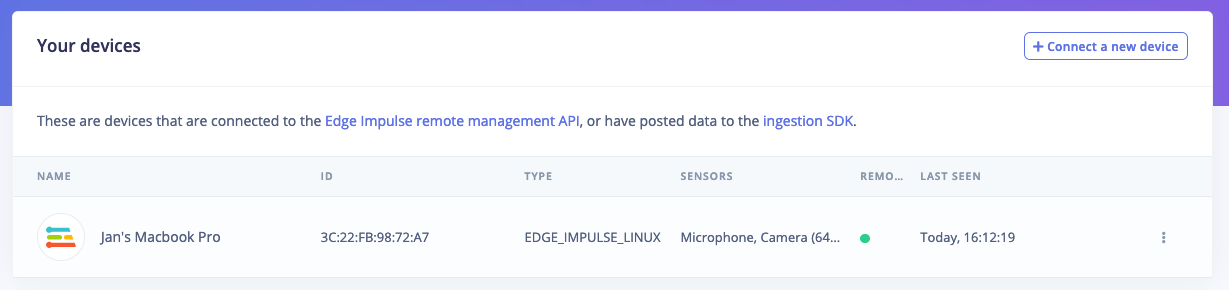
That's all! Your Mac is now connected to Edge Impulse. To verify this, go to [your Edge Impulse project](https://studio.edgeimpulse.com/studio/profile/projects), and click **Devices**. The device will be listed here.
### Installing dependencies
To connect your Mac to Edge Impulse:
1. Install [Node.js](https://nodejs.org/en/).
2. Install [Homebrew](https://brew.sh).
3. Open a terminal window and install the dependencies:
```
$ brew install sox
$ brew install imagesnap
```
1. Last, install the Edge Impulse CLI:
```
$ npm install edge-impulse-linux -g
```
**Problems installing the CLI?**
See the [Installation and troubleshooting](/tools/clis/edge-impulse-cli/installation) guide.
### Connecting to Edge Impulse
With the software installed, open a terminal window and run::
```
$ edge-impulse-linux
```
This will start a wizard which will ask you to log in, and choose an Edge Impulse project. If you want to switch projects run the command with `--clean`.
#### Verifying that your device is connected
That's all! Your Mac is now connected to Edge Impulse. To verify this, go to [your Edge Impulse project](https://studio.edgeimpulse.com/studio/profile/projects), and click **Devices**. The device will be listed here.
 ### Next steps: building a machine learning model
With everything set up you can now build your first machine learning model with these tutorials:
* [Keyword spotting](/tutorials/end-to-end/keyword-spotting)
* [Sound recognition](/tutorials/end-to-end/sound-recognition)
* [Image classification](/tutorials/end-to-end/image-classification)
* [object detection](/tutorials/end-to-end/object-detection-bounding-boxes).
* [Object detection with centroids (FOMO)](/tutorials/end-to-end/object-detection-centroids)
Looking to connect different sensors? Our [Linux SDK](/tools/libraries/sdks/inference/linux) lets you easily send data from any sensor and any programming language (with examples in Node.js, Python, Go and C++) into Edge Impulse.
### Deploying back to device
To run your impulse locally, just open a terminal and run:
```
$ edge-impulse-linux-runner
```
This will automatically compile your model with full hardware acceleration, download the model to your Raspberry Pi, and then start classifying. Our [Linux SDK](/tools/libraries/sdks/inference/linux) has examples on how to integrate the model with your favourite programming language.
#### Image model?
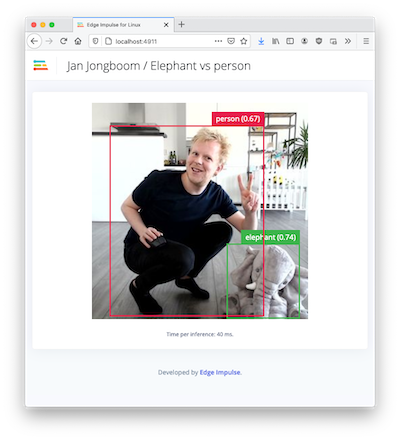
If you have an image model then you can get a peek of what your device sees by being on the same network as your device, and finding the 'Want to see a feed of the camera and live classification in your browser' message in the console. Open the URL in a browser and both the camera feed and the classification are shown:
### Next steps: building a machine learning model
With everything set up you can now build your first machine learning model with these tutorials:
* [Keyword spotting](/tutorials/end-to-end/keyword-spotting)
* [Sound recognition](/tutorials/end-to-end/sound-recognition)
* [Image classification](/tutorials/end-to-end/image-classification)
* [object detection](/tutorials/end-to-end/object-detection-bounding-boxes).
* [Object detection with centroids (FOMO)](/tutorials/end-to-end/object-detection-centroids)
Looking to connect different sensors? Our [Linux SDK](/tools/libraries/sdks/inference/linux) lets you easily send data from any sensor and any programming language (with examples in Node.js, Python, Go and C++) into Edge Impulse.
### Deploying back to device
To run your impulse locally, just open a terminal and run:
```
$ edge-impulse-linux-runner
```
This will automatically compile your model with full hardware acceleration, download the model to your Raspberry Pi, and then start classifying. Our [Linux SDK](/tools/libraries/sdks/inference/linux) has examples on how to integrate the model with your favourite programming language.
#### Image model?
If you have an image model then you can get a peek of what your device sees by being on the same network as your device, and finding the 'Want to see a feed of the camera and live classification in your browser' message in the console. Open the URL in a browser and both the camera feed and the classification are shown:
 #### Troubleshooting
If you get a warning from macOS about the app being from an unidentified developer for your .eim file you can adjust the quarantine attribute on the file like so:
```
% xattr -d com.apple.quarantine
```
#### Troubleshooting
If you get a warning from macOS about the app being from an unidentified developer for your .eim file you can adjust the quarantine attribute on the file like so:
```
% xattr -d com.apple.quarantine
```