> ## Documentation Index
> Fetch the complete documentation index at: https://docs.edgeimpulse.com/llms.txt
> Use this file to discover all available pages before exploring further.
# Run Cube.MX CMSIS-Pack
Impulses can be deployed as a CMSIS-PACK for STM32. This packages all your signal processing blocks, configuration and learning blocks up into a single package. You can include this package in any STM32 project with a single function call. The CMSIS-PACK uses [EON](https://edgeimpulse.com/blog/introducing-eon) to run any neural network, and CMSIS-DSP for all signal processing code - ensuring that models run as fast and efficiently as possible. In this tutorial, you'll export an impulse, import the impulse into STM32CubeMX, and then integrate it in your STM32 project to classify sensor data.
Using this CMSIS-PACK is only supported from C++ applications using STM32CubeIDE, on all Cortex-M MCUs.
### Prerequisites
Make sure you followed the [Continuous motion recognition](/tutorials/end-to-end/motion-recognition) tutorial, and have a trained impulse. Also install the following software:
* [STM32CubeIDE](https://www.st.com/en/development-tools/stm32cubeide.html).
Make sure you have a C++ project configured that compiles for your target. You can convert an existing project to C++ by right-clicking on your project and selecting **Convert to C++**.
#### Enabling the CRC
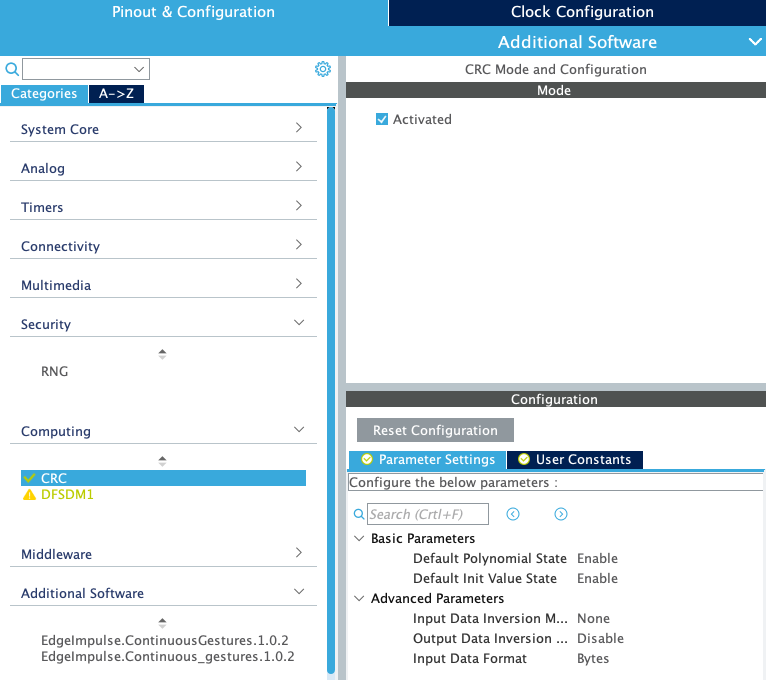
The CRC needs to be enabled for your target. Open your `.ioc` file, then:
1. Go to **Pinout & Configuration**.
2. Select **Computing > CRC**.
3. Enable the **Activated** checkbox.
 ### Adding the CMSIS-PACK
Head over to your Edge Impulse project, and go to **Deployment**. From here you can create the full library which contains the impulse and all external required libraries. Select **Cube.MX CMSIS-PACK** and click **Build** to create the library.
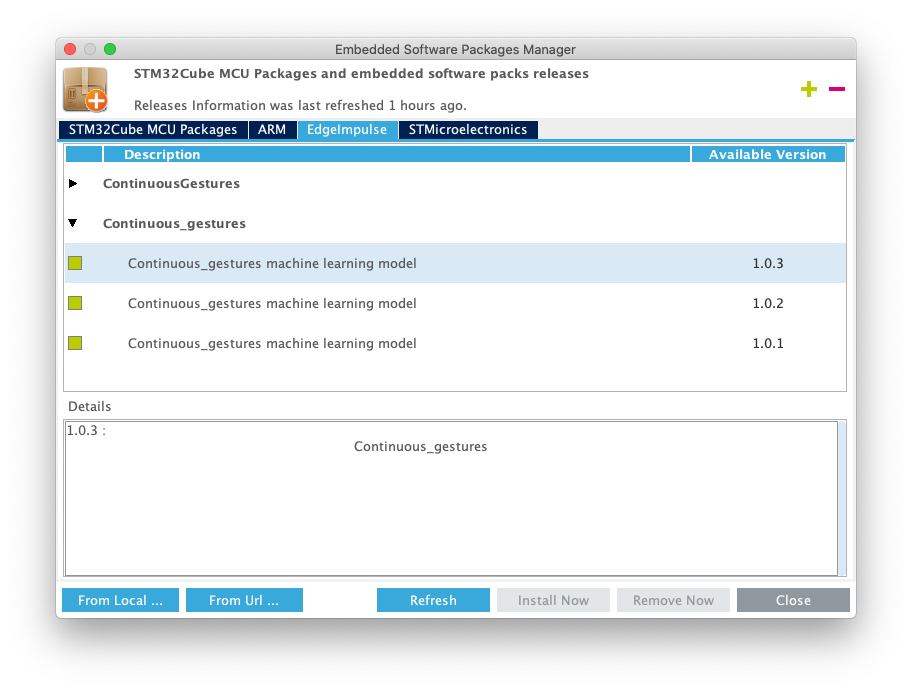
To add the CMSIS-PACK library to your project, open your `.ioc` file, then:
1. Go to **Help > Manage embedded software packages**.
2. Select **From Local ...** and select the `.pack` file you just downloaded.
3. Accept the license agreement, and the pack will be installed. The version number is automatically updated whenever you export the pack.
### Adding the CMSIS-PACK
Head over to your Edge Impulse project, and go to **Deployment**. From here you can create the full library which contains the impulse and all external required libraries. Select **Cube.MX CMSIS-PACK** and click **Build** to create the library.
To add the CMSIS-PACK library to your project, open your `.ioc` file, then:
1. Go to **Help > Manage embedded software packages**.
2. Select **From Local ...** and select the `.pack` file you just downloaded.
3. Accept the license agreement, and the pack will be installed. The version number is automatically updated whenever you export the pack.
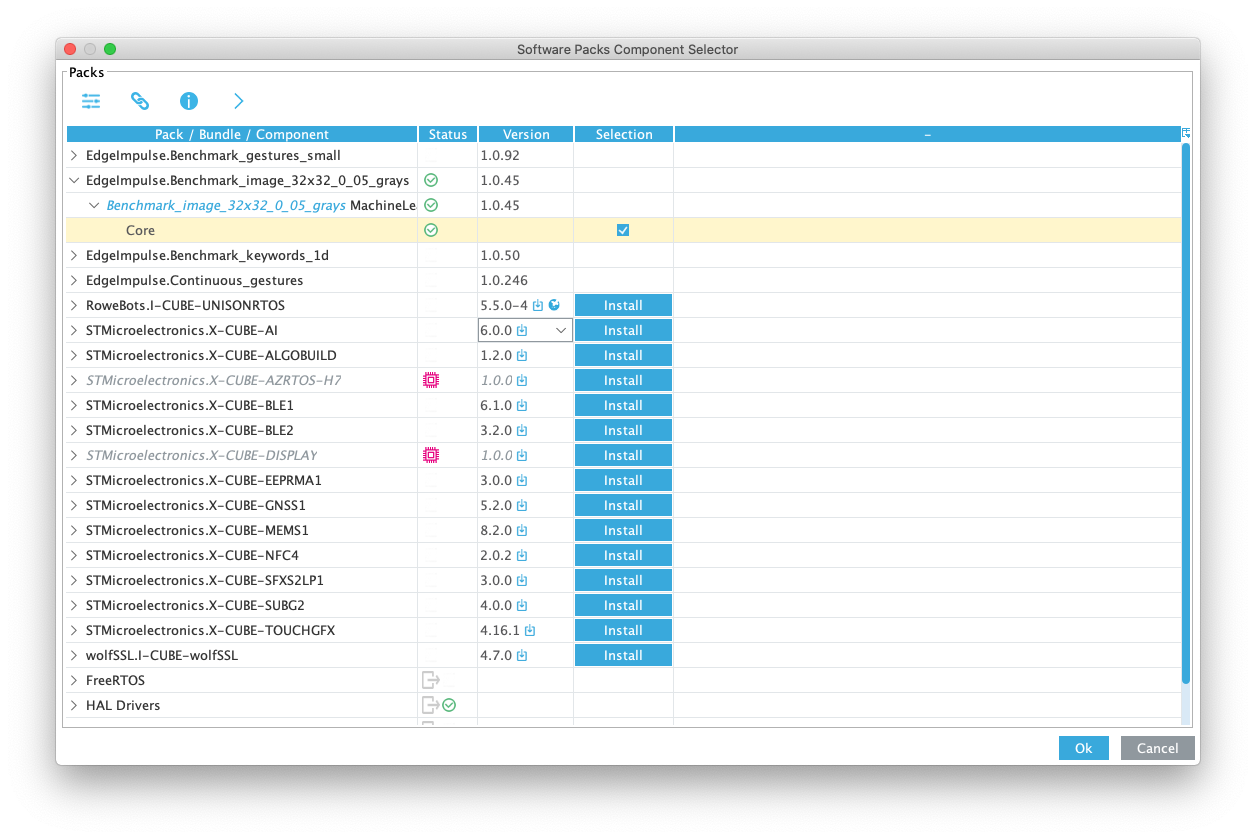
 1. Go back to your `.ioc` file, and go to **Pinout & Configuration**.
2. Click **Software packs > Select components**.
3. Select your project, expand the pack, and add a checkbox under 'Selection'.
1. Go back to your `.ioc` file, and go to **Pinout & Configuration**.
2. Click **Software packs > Select components**.
3. Select your project, expand the pack, and add a checkbox under 'Selection'.
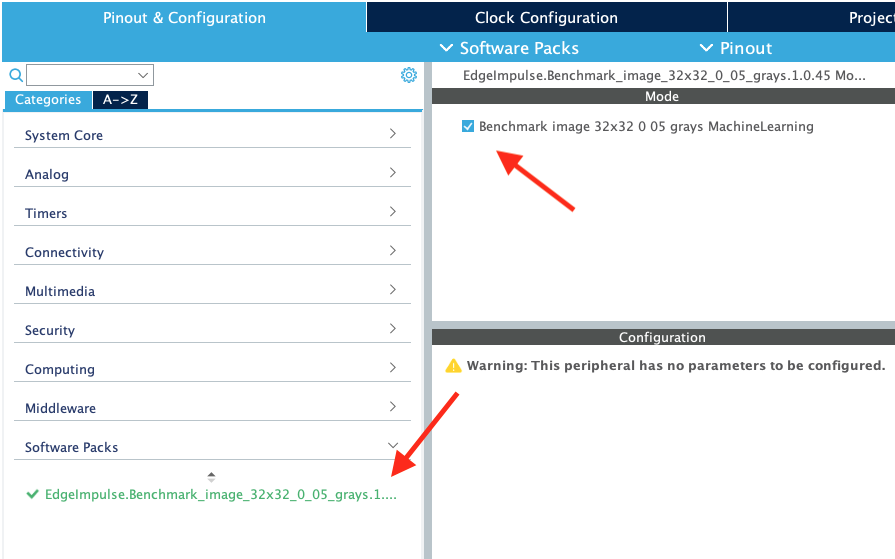
 1. Click **OK** to close the window.
2. Under **Pinout & Configuration**, select 'Additional software', and click on your project name. Place a checkbox next under 'Mode'.
1. Click **OK** to close the window.
2. Under **Pinout & Configuration**, select 'Additional software', and click on your project name. Place a checkbox next under 'Mode'.
 1. Click in the 'Project explorer' so the `.ioc` file loses focus.
2. Click `CTRL+S` or `CMD+S` to save the workspace. This will regenerate the code. Afterward you should have a 'Middleware' folder in your project with your impulse and all required libraries.
1. Click in the 'Project explorer' so the `.ioc` file loses focus.
2. Click `CTRL+S` or `CMD+S` to save the workspace. This will regenerate the code. Afterward you should have a 'Middleware' folder in your project with your impulse and all required libraries.
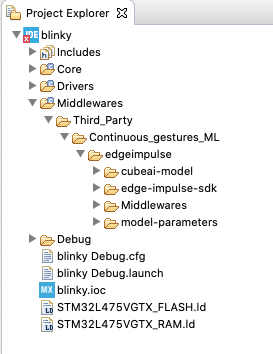 1. The code generator always generates a new `main.c` file, even for C++ projects. If you have both a `main.c` and a `main.cpp` file now, remove the `main.c` file.
### Configuring `printf`
To log debug information the CMSIS-PACK uses the (weak defined) `ei_printf` function. You need to override this function in your `main.cpp` (if you only have a `main.c` rename it) to log to your UART port. E.g. this is how you set this up on the ST B-L475E-IOT01A. Under `USER CODE BEGIN 0` add:
```cpp theme={"system"}
#include
#include "edge-impulse-sdk/classifier/ei_run_classifier.h"
void vprint(const char *fmt, va_list argp)
{
char string[200];
if(0 < vsprintf(string, fmt, argp)) // build string
{
HAL_UART_Transmit(&huart1, (uint8_t*)string, strlen(string), 0xffffff); // send message via UART
}
}
void ei_printf(const char *format, ...) {
va_list myargs;
va_start(myargs, format);
vprint(format, myargs);
va_end(myargs);
}
```
### Running the impulse
With the CMSIS-PACK included, and the UART set up, it's time to verify that the application works. Head back to the studio and click on **Live classification**. Then load a validation sample, and click on a row under 'Detailed result'.
1. The code generator always generates a new `main.c` file, even for C++ projects. If you have both a `main.c` and a `main.cpp` file now, remove the `main.c` file.
### Configuring `printf`
To log debug information the CMSIS-PACK uses the (weak defined) `ei_printf` function. You need to override this function in your `main.cpp` (if you only have a `main.c` rename it) to log to your UART port. E.g. this is how you set this up on the ST B-L475E-IOT01A. Under `USER CODE BEGIN 0` add:
```cpp theme={"system"}
#include
#include "edge-impulse-sdk/classifier/ei_run_classifier.h"
void vprint(const char *fmt, va_list argp)
{
char string[200];
if(0 < vsprintf(string, fmt, argp)) // build string
{
HAL_UART_Transmit(&huart1, (uint8_t*)string, strlen(string), 0xffffff); // send message via UART
}
}
void ei_printf(const char *format, ...) {
va_list myargs;
va_start(myargs, format);
vprint(format, myargs);
va_end(myargs);
}
```
### Running the impulse
With the CMSIS-PACK included, and the UART set up, it's time to verify that the application works. Head back to the studio and click on **Live classification**. Then load a validation sample, and click on a row under 'Detailed result'.
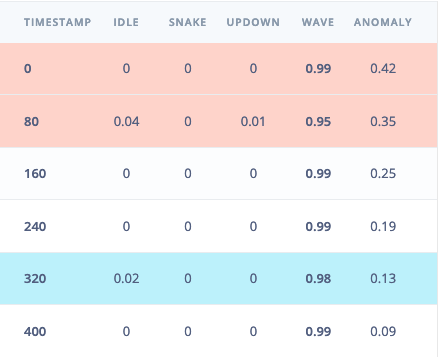 To verify that the local application classifies the same, we need the raw features for this timestamp. To do so click on the 'Copy to clipboard' button next to 'Raw features'. This will copy the raw values from this validation file, before any signal processing or inferencing happened.
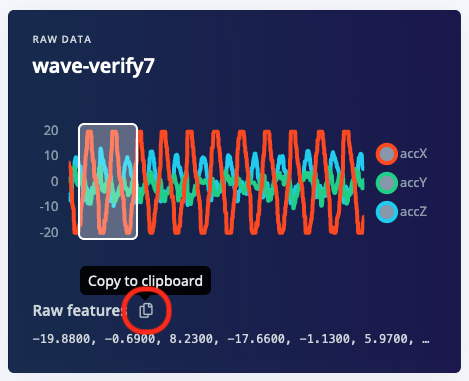 Open `main.cpp` (if you only have a `main.c` rename it) and add the following code under `USER CODE BEGIN Includes` (replace the `features` array with the data you just copied):
```cpp theme={"system"}
#include "edge-impulse-sdk/classifier/ei_run_classifier.h"
using namespace ei;
// paste the raw features here
static const float features[] = {
-19.8800, -0.6900, 8.2300, -17.6600, -1.1300, 5.9700, ...
};
int get_feature_data(size_t offset, size_t length, float *out_ptr) {
memcpy(out_ptr, features + offset, length * sizeof(float));
return 0;
}
```
Then, under `USER CODE BEGIN Init`, add:
```cpp theme={"system"}
signal_t signal;
signal.total_length = sizeof(features) / sizeof(features[0]);
signal.get_data = &get_feature_data;
```
And, under `USER CODE BEGIN WHILE`, add:
```cpp theme={"system"}
while (1)
{
ei_impulse_result_t result = { 0 };
EI_IMPULSE_ERROR res = run_classifier(&signal, &result, true);
ei_printf("run_classifier returned: %d\n", res);
ei_printf("Predictions (DSP: %d ms., Classification: %d ms., Anomaly: %d ms.): \n",
result.timing.dsp, result.timing.classification, result.timing.anomaly);
// print the predictions
ei_printf("[");
for (size_t ix = 0; ix < EI_CLASSIFIER_LABEL_COUNT; ix++) {
ei_printf_float(result.classification[ix].value);
#if EI_CLASSIFIER_HAS_ANOMALY == 1
ei_printf(", ");
#else
if (ix != EI_CLASSIFIER_LABEL_COUNT - 1) {
ei_printf(", ");
}
#endif
}
#if EI_CLASSIFIER_HAS_ANOMALY == 1
ei_printf_float(result.anomaly);
#endif
ei_printf("]\n\n\n");
HAL_Delay(5000);
}
```
Then build and flash the application to your development board, via **Project > Build All** and **Run > Debug**.
**Issues flashing through STM32CubeIDE?**
If you have issues flashing through the IDE, right click on your project name, select **Properties > Resources**, and note the location of your project under 'Location'. In this folder you'll find a `Debug` and/or a `Release` folder with the built binaries (end with `.bin`). Many ST boards mount as a mass-storage device (e.g. the ST IoT Discovery Kit and virtually all NUCLEO boards), and you can also flash by dragging the binary file to this mass storage device.
### Seeing the output
To see the output of the impulse, connect to the development board over a serial port on baud rate 115,200 and reset the board (e.g. by pressing the black button on the [ST B-L475E-IOT01A](/hardware/boards/st-b-l475e-iot01a). You can do this with your favourite serial monitor or with the Edge Impulse CLI:
```
$ edge-impulse-run-impulse --raw
```
This will run the signal processing pipeline, and then classify the output:
```
Running neural network...
Predictions (time: 1 ms.):
idle: 0.015319
snake: 0.000444
updown: 0.006182
wave: 0.978056
Anomaly score (time: 1 ms.): 0.133557
run_classifier_returned: 0
[0.01532, 0.00044, 0.00618, 0.97806, 0.134]
```
Which matches the values we just saw in the studio. You now have your impulse running on your STM32 development board!
### Upgrading the CMSIS-PACK
To upgrade your CMSIS-PACK do this:
1. Download the new version of the CMSIS-PACK from Edge Impulse.
2. Open your `.ioc` file, go to **Pinout & Configuration > Additional software** and select the CMSIS-PACK.
3. De-select the checkbox under 'Mode'.
Open `main.cpp` (if you only have a `main.c` rename it) and add the following code under `USER CODE BEGIN Includes` (replace the `features` array with the data you just copied):
```cpp theme={"system"}
#include "edge-impulse-sdk/classifier/ei_run_classifier.h"
using namespace ei;
// paste the raw features here
static const float features[] = {
-19.8800, -0.6900, 8.2300, -17.6600, -1.1300, 5.9700, ...
};
int get_feature_data(size_t offset, size_t length, float *out_ptr) {
memcpy(out_ptr, features + offset, length * sizeof(float));
return 0;
}
```
Then, under `USER CODE BEGIN Init`, add:
```cpp theme={"system"}
signal_t signal;
signal.total_length = sizeof(features) / sizeof(features[0]);
signal.get_data = &get_feature_data;
```
And, under `USER CODE BEGIN WHILE`, add:
```cpp theme={"system"}
while (1)
{
ei_impulse_result_t result = { 0 };
EI_IMPULSE_ERROR res = run_classifier(&signal, &result, true);
ei_printf("run_classifier returned: %d\n", res);
ei_printf("Predictions (DSP: %d ms., Classification: %d ms., Anomaly: %d ms.): \n",
result.timing.dsp, result.timing.classification, result.timing.anomaly);
// print the predictions
ei_printf("[");
for (size_t ix = 0; ix < EI_CLASSIFIER_LABEL_COUNT; ix++) {
ei_printf_float(result.classification[ix].value);
#if EI_CLASSIFIER_HAS_ANOMALY == 1
ei_printf(", ");
#else
if (ix != EI_CLASSIFIER_LABEL_COUNT - 1) {
ei_printf(", ");
}
#endif
}
#if EI_CLASSIFIER_HAS_ANOMALY == 1
ei_printf_float(result.anomaly);
#endif
ei_printf("]\n\n\n");
HAL_Delay(5000);
}
```
Then build and flash the application to your development board, via **Project > Build All** and **Run > Debug**.
**Issues flashing through STM32CubeIDE?**
If you have issues flashing through the IDE, right click on your project name, select **Properties > Resources**, and note the location of your project under 'Location'. In this folder you'll find a `Debug` and/or a `Release` folder with the built binaries (end with `.bin`). Many ST boards mount as a mass-storage device (e.g. the ST IoT Discovery Kit and virtually all NUCLEO boards), and you can also flash by dragging the binary file to this mass storage device.
### Seeing the output
To see the output of the impulse, connect to the development board over a serial port on baud rate 115,200 and reset the board (e.g. by pressing the black button on the [ST B-L475E-IOT01A](/hardware/boards/st-b-l475e-iot01a). You can do this with your favourite serial monitor or with the Edge Impulse CLI:
```
$ edge-impulse-run-impulse --raw
```
This will run the signal processing pipeline, and then classify the output:
```
Running neural network...
Predictions (time: 1 ms.):
idle: 0.015319
snake: 0.000444
updown: 0.006182
wave: 0.978056
Anomaly score (time: 1 ms.): 0.133557
run_classifier_returned: 0
[0.01532, 0.00044, 0.00618, 0.97806, 0.134]
```
Which matches the values we just saw in the studio. You now have your impulse running on your STM32 development board!
### Upgrading the CMSIS-PACK
To upgrade your CMSIS-PACK do this:
1. Download the new version of the CMSIS-PACK from Edge Impulse.
2. Open your `.ioc` file, go to **Pinout & Configuration > Additional software** and select the CMSIS-PACK.
3. De-select the checkbox under 'Mode'.
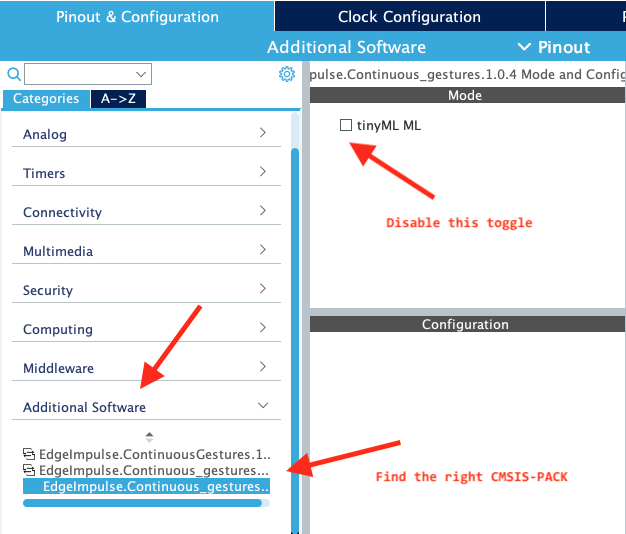 1. Click in the 'Project explorer' so the `.ioc` file loses focus, and press `CTRL+S` or `CMD+S`. This will generate some new code.
2. Remove the 'Middlewares/Third\_party' folder.
3. Go back to the `.ioc` file, select **Help > Manage embedded software packages** and add the new CMSIS-PACK.
4. On the `.ioc` page, click **Software Packs > Select Components**.
5. Find your CMSIS-PACK, and expand the line. If the 'Selection' checkbox is selected, uncheck this first.
6. Change the Version dropdown to the new CMSIS-PACK version.
7. Expand the item again, and enable the 'Selection' toggle. Press OK to exit the modal.
1. Click in the 'Project explorer' so the `.ioc` file loses focus, and press `CTRL+S` or `CMD+S`. This will generate some new code.
2. Remove the 'Middlewares/Third\_party' folder.
3. Go back to the `.ioc` file, select **Help > Manage embedded software packages** and add the new CMSIS-PACK.
4. On the `.ioc` page, click **Software Packs > Select Components**.
5. Find your CMSIS-PACK, and expand the line. If the 'Selection' checkbox is selected, uncheck this first.
6. Change the Version dropdown to the new CMSIS-PACK version.
7. Expand the item again, and enable the 'Selection' toggle. Press OK to exit the modal.
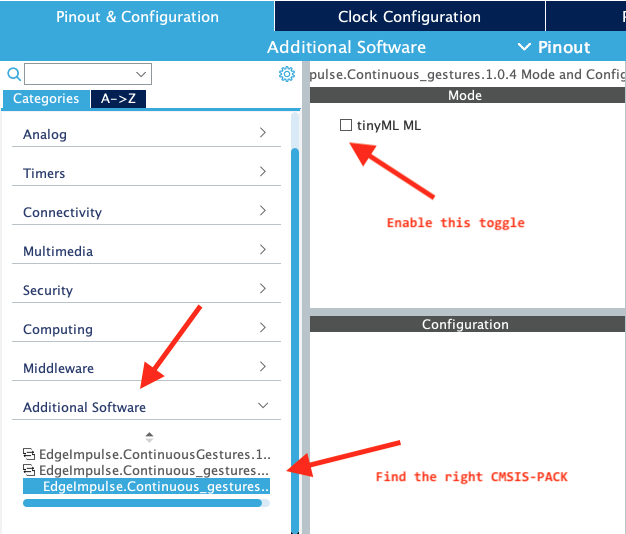
 1. Find the new CMSIS-PACK version under 'Additional software' in the item list, click on it (there are now probably multiple CMSIS-PACKs listed here for some reason), and set a new checkbox under 'Mode'.
 1. Click in the 'Project explorer' so the `.ioc` file loses focus, and press `CTRL+S` or `CMD+S`. This will generate some new code.
2. Remove `main.c` as it will be generated again.
3. You now have a new CMSIS-PACK version!
1. Click in the 'Project explorer' so the `.ioc` file loses focus, and press `CTRL+S` or `CMD+S`. This will generate some new code.
2. Remove `main.c` as it will be generated again.
3. You now have a new CMSIS-PACK version!