> ## Documentation Index
> Fetch the complete documentation index at: https://docs.edgeimpulse.com/llms.txt
> Use this file to discover all available pages before exploring further.
# Run C++ library on TI LaunchPad using GCC and the SimpleLink SDK
Impulses can be deployed as a C++ library. This packages all your signal processing blocks, configuration and learning blocks up into a single package. You can include this package in your own application to run the impulse locally. In this tutorial you'll export an impulse, and build an impulse using the Texas Instruments SimpleLink SDK for the CC1352P LaunchPad and Sensors BoosterPack.
**Knowledge required**
This tutorial assumes that you're familiar with building applications using the Texas Instruments SimpleLink SDK as well as ARM GCC toolchains. You will also need `make` set up in your environment. If you're unfamiliar with these tools you can build binaries directly for your development board from the **Deployment** page in the studio.
### Prerequisites
1. Make sure you followed the [Continuous motion recognition](/tutorials/end-to-end/motion-recognition) tutorial, and have a trained impulse.
2. Clone the [example-standalone-inferencing-ti-launchxl](https://github.com/edgeimpulse/example-standalone-inferencing-ti-launchxl) repository to your working directory.
3. Install [Texas Instruments UniFlash](https://www.ti.com/tool/UNIFLASH)
* Install the desktop version for your operating system [here](https://www.ti.com/tool/UNIFLASH)
* Add the installation directory to your PATH
* See [Flash the board](/hardware/deployments/run-cpp-ti-launchxl#flash-the-board) for more details
### Deploying your impulse
Head over to your Edge Impulse project, and go to **Deployment**. From here you can create the full library which contains the impulse and all external required libraries. Select **C/C++ Library** and click **Build** to create the library. Then download and extract the `.zip` file.
To add the impulse to your firmware project, paste the `edge-impulse-sdk/`, `model-parameters` and `tflite-model` directories from the downloaded '.zip' file into the `edge_impulse/` directory of the [example-standalone-inferencing-ti-launchxl](https://github.com/edgeimpulse/example-standalone-inferencing-ti-launchxl) repository. Make sure to overwrite any existing files in the `edge_impulse/` directory.
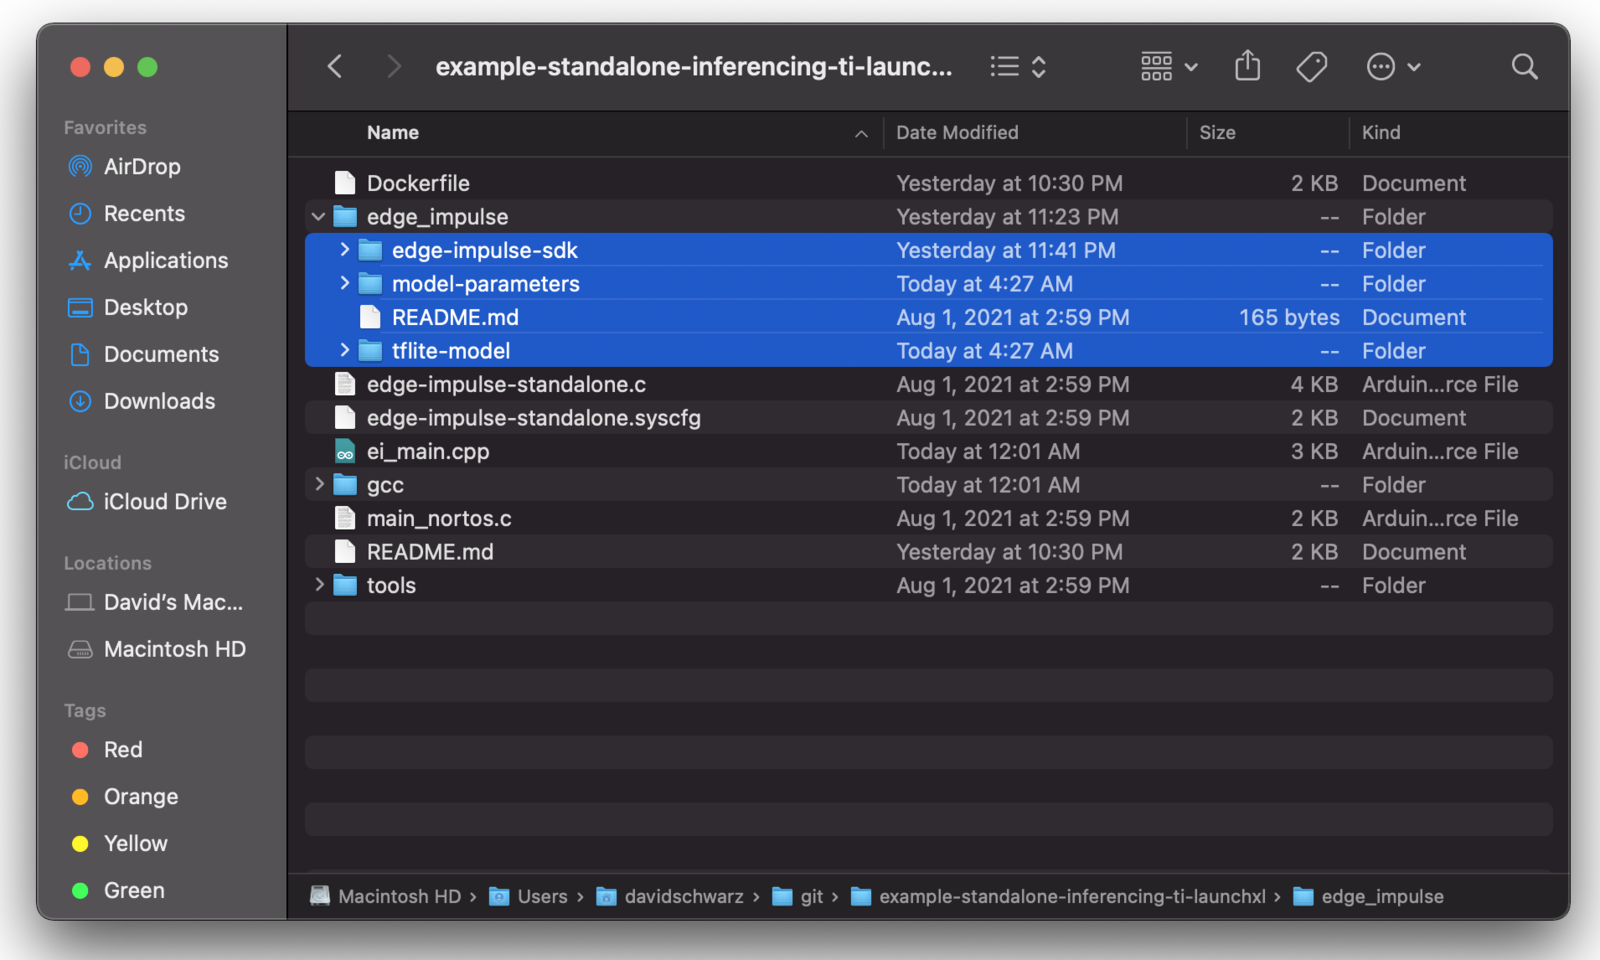 This standalone example project contains minimal code required to run the imported impulse within the SimpleLink SDK. This code is located in `ei_main.cpp`. In this minimal code example, inference is run from a static buffer of input feature data. To verify that our embedded model achieves the exact same results as the model trained in Studio, we want to copy the same input features from Studio into the static buffer in `ei_main.cpp`.
To do this, first head back to the studio and click on the **Live classification** tab. Then load a validation sample, and click on a row under 'Detailed result'.
This standalone example project contains minimal code required to run the imported impulse within the SimpleLink SDK. This code is located in `ei_main.cpp`. In this minimal code example, inference is run from a static buffer of input feature data. To verify that our embedded model achieves the exact same results as the model trained in Studio, we want to copy the same input features from Studio into the static buffer in `ei_main.cpp`.
To do this, first head back to the studio and click on the **Live classification** tab. Then load a validation sample, and click on a row under 'Detailed result'.
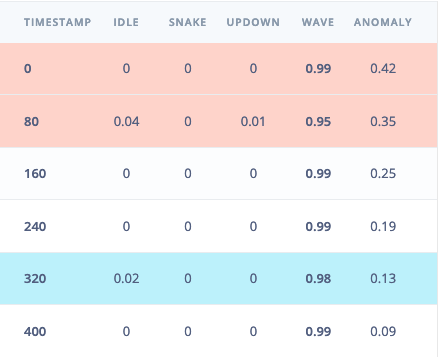 To verify that the local application classifies the same result, we need the raw features for this timestamp. To do so click on the 'Copy to clipboard' button next to 'Raw features'. This will copy the raw input values from this validation file, before any signal processing or inferencing happened.
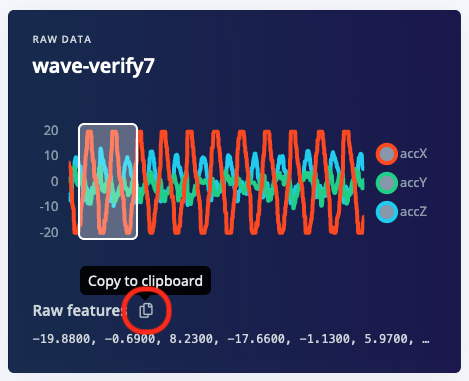 In `ei_main.cpp` paste the raw features inside the `static const float features[]` definition, for example:
```cpp theme={"system"}
static const float features[] = {
-19.8800, -0.6900, 8.2300, -17.6600, -1.1300, 5.9700, ...
};
```
The project will repeatedly run inference on this buffer of raw features once built. This will show that the inference result is identical to the **Live classification** tab in Studio. From this starting point, the example project is fully compatible with existing SimpleLink SDK plugins, drivers or custom firmware. Use new sensor data collected in real time on the device to fill a buffer. From there, follow the same code used in `ei_main.cpp` to run classification on live data.
### Building the project
There are two ways to build the project. The first uses the included Docker environment, pre-configured with the correct SimpleLink SDK version and ARM GCC toolchain. The other option is to build the project locally. This will require installing dependencies and making minor modifications to the makefile
#### Building with Docker
If you are building with Docker, you will need to have [Docker Desktop](https://www.docker.com/products/docker-desktop) installed.
1. Run the Docker Desktop executable, or start the docker daemon from a terminal as shown below:
```
dockerd
```
1. From the [example-standalone-inferencing-ti-launchxl](https://github.com/edgeimpulse/example-standalone-inferencing-ti-launchxl) directory, build the Docker image:
```
$ docker build -t ti-build .
```
1. Build the application by running the container as follows:
Windows
```
$ docker run --rm -it -v "%cd%":/app ti-build /bin/bash -c "cd gcc && make"
```
Linux, macOS
```
$ docker run --rm -it -v $PWD:/app:delegated ti-build /bin/bash -c "cd gcc && make"
```
1. Connect the board to your computer using USB.
2. [Flash the board](/hardware/deployments/run-cpp-ti-launchxl#flash-the-board)
#### Building locally
If you are building locally, You will first need to install the following dependencies. This guide assumes these are installed into the same working directory as the cloned standalone example repo.
* [TI Simplelink SDK](https://www.ti.com/tool/SIMPLELINK-LOWPOWER-SDK) version `simplelink_cc13x2_26x2_sdk_5.20.00.52`
* [ARM GCC toolchain](https://developer.arm.com/tools-and-software/open-source-software/developer-tools/gnu-toolchain/gnu-rm/downloads) version `9-2019-q4-major`
Next you will need to open the `gcc/makefile` file in the standalone example repository, and define custom paths to your installed dependencies.
Remove the `SIMPLELINK_CC13X2_26X2_SDK_INSTALL_DIR` on line 2 of the makefile, and add the following definitions at the top of the makefile
```
SIMPLELINK_CC13X2_26X2_SDK_INSTALL_DIR ?= ../../simplelink_cc13x2_26x2_sdk_5_20_00_52
SYSCONFIG_TOOL ?= ../../sysconfig_1.8.2/sysconfig_cli.sh
GCC_ARMCOMPILER ?= ../../gcc-arm-none-eabi-9-2019-q4-major
```
If you installed the dependencies to another directory, modify the paths as needed.
Now you should be ready to build, from the `gcc/` folder of the standalone firmware repo, run:
```
make
```
and then [Flash the board](/hardware/deployments/run-cpp-ti-launchxl#flash-the-board)
### Flash the board
If the UniFlash CLI is added to your PATH, run:
```
$ dslite.sh -c tools/user_files/configs/cc1352p1f3.ccxml -l tools/user_files/settings/generated.ufsettings -e -f -v gcc/build/edge-impulse-standalone.out
```
If the UniFlash CLI is added to not added to your PATH, the install scripts will fail. To fix this, add the installation directory of UniFlash (example `/Applications/ti/uniflash_6.4.0` on macOS) to your PATH on:
* [Windows](https://www.architectryan.com/2018/08/31/how-to-change-environment-variables-on-windows-10/)
* [macOS](https://www.architectryan.com/2012/10/02/add-to-the-path-on-mac-os-x-mountain-lion/)
* [linux](https://phoenixnap.com/kb/linux-add-to-path)
If during flashing you encounter issues after UniFlash is added to PATH, ensure:
* The device is properly connected and/or the cable is not damaged.
* You have the proper permissions to access the USB device and run scripts. On macOS you can manually approve blocked scripts by clicking the `System Preferences->Security Settings->Unlock Icon (Bottom Left)` and then approving the blocked script.
* If on Linux you may want to try copying `tools/71-ti-permissions.rules` to `/etc/udev/rules.d/`. Then re-attach the USB cable and try again.
Alternatively, the `gcc/build/edge-impulse-standalone.out` binary file may be flashed to the LaunchPad using the UniFlash GUI or web-app. See the [Texas Instruments Quick Start Guide](https://software-dl.ti.com/ccs/esd/uniflash/docs/v6_4/uniflash_quick_start_guide.html) for more info.
In `ei_main.cpp` paste the raw features inside the `static const float features[]` definition, for example:
```cpp theme={"system"}
static const float features[] = {
-19.8800, -0.6900, 8.2300, -17.6600, -1.1300, 5.9700, ...
};
```
The project will repeatedly run inference on this buffer of raw features once built. This will show that the inference result is identical to the **Live classification** tab in Studio. From this starting point, the example project is fully compatible with existing SimpleLink SDK plugins, drivers or custom firmware. Use new sensor data collected in real time on the device to fill a buffer. From there, follow the same code used in `ei_main.cpp` to run classification on live data.
### Building the project
There are two ways to build the project. The first uses the included Docker environment, pre-configured with the correct SimpleLink SDK version and ARM GCC toolchain. The other option is to build the project locally. This will require installing dependencies and making minor modifications to the makefile
#### Building with Docker
If you are building with Docker, you will need to have [Docker Desktop](https://www.docker.com/products/docker-desktop) installed.
1. Run the Docker Desktop executable, or start the docker daemon from a terminal as shown below:
```
dockerd
```
1. From the [example-standalone-inferencing-ti-launchxl](https://github.com/edgeimpulse/example-standalone-inferencing-ti-launchxl) directory, build the Docker image:
```
$ docker build -t ti-build .
```
1. Build the application by running the container as follows:
Windows
```
$ docker run --rm -it -v "%cd%":/app ti-build /bin/bash -c "cd gcc && make"
```
Linux, macOS
```
$ docker run --rm -it -v $PWD:/app:delegated ti-build /bin/bash -c "cd gcc && make"
```
1. Connect the board to your computer using USB.
2. [Flash the board](/hardware/deployments/run-cpp-ti-launchxl#flash-the-board)
#### Building locally
If you are building locally, You will first need to install the following dependencies. This guide assumes these are installed into the same working directory as the cloned standalone example repo.
* [TI Simplelink SDK](https://www.ti.com/tool/SIMPLELINK-LOWPOWER-SDK) version `simplelink_cc13x2_26x2_sdk_5.20.00.52`
* [ARM GCC toolchain](https://developer.arm.com/tools-and-software/open-source-software/developer-tools/gnu-toolchain/gnu-rm/downloads) version `9-2019-q4-major`
Next you will need to open the `gcc/makefile` file in the standalone example repository, and define custom paths to your installed dependencies.
Remove the `SIMPLELINK_CC13X2_26X2_SDK_INSTALL_DIR` on line 2 of the makefile, and add the following definitions at the top of the makefile
```
SIMPLELINK_CC13X2_26X2_SDK_INSTALL_DIR ?= ../../simplelink_cc13x2_26x2_sdk_5_20_00_52
SYSCONFIG_TOOL ?= ../../sysconfig_1.8.2/sysconfig_cli.sh
GCC_ARMCOMPILER ?= ../../gcc-arm-none-eabi-9-2019-q4-major
```
If you installed the dependencies to another directory, modify the paths as needed.
Now you should be ready to build, from the `gcc/` folder of the standalone firmware repo, run:
```
make
```
and then [Flash the board](/hardware/deployments/run-cpp-ti-launchxl#flash-the-board)
### Flash the board
If the UniFlash CLI is added to your PATH, run:
```
$ dslite.sh -c tools/user_files/configs/cc1352p1f3.ccxml -l tools/user_files/settings/generated.ufsettings -e -f -v gcc/build/edge-impulse-standalone.out
```
If the UniFlash CLI is added to not added to your PATH, the install scripts will fail. To fix this, add the installation directory of UniFlash (example `/Applications/ti/uniflash_6.4.0` on macOS) to your PATH on:
* [Windows](https://www.architectryan.com/2018/08/31/how-to-change-environment-variables-on-windows-10/)
* [macOS](https://www.architectryan.com/2012/10/02/add-to-the-path-on-mac-os-x-mountain-lion/)
* [linux](https://phoenixnap.com/kb/linux-add-to-path)
If during flashing you encounter issues after UniFlash is added to PATH, ensure:
* The device is properly connected and/or the cable is not damaged.
* You have the proper permissions to access the USB device and run scripts. On macOS you can manually approve blocked scripts by clicking the `System Preferences->Security Settings->Unlock Icon (Bottom Left)` and then approving the blocked script.
* If on Linux you may want to try copying `tools/71-ti-permissions.rules` to `/etc/udev/rules.d/`. Then re-attach the USB cable and try again.
Alternatively, the `gcc/build/edge-impulse-standalone.out` binary file may be flashed to the LaunchPad using the UniFlash GUI or web-app. See the [Texas Instruments Quick Start Guide](https://software-dl.ti.com/ccs/esd/uniflash/docs/v6_4/uniflash_quick_start_guide.html) for more info.