> ## Documentation Index
> Fetch the complete documentation index at: https://docs.edgeimpulse.com/llms.txt
> Use this file to discover all available pages before exploring further.
# Run C++ library on Sony Spresense
Impulses can be deployed as a C++ library. This packages all your signal processing blocks, configuration and learning blocks up into a single package. You can include this package in your own application to run the impulse locally. In this tutorial you'll export an impulse, and build an application for [Sony's Spresense](/hardware/boards/sony-spresense) development board to classify sensor data.
**Knowledge required**
This tutorial assumes that you're familiar with building applications for Sony's Spresense. If you're unfamiliar with either of these you build binaries directly for your development board from the **Deployment** page in the studio.
**Note:** Are you looking for an example that has all sensors included? The Edge Impulse firmware for Sony's Spresense has that. See [edgeimpulse/firmware-sony-spresense](https://github.com/edgeimpulse/firmware-sony-spresense).
### Prerequisites
Make sure you've followed one of the tutorials and have a trained impulse. Also install the following software:
* [Edge Impulse CLI](/tools/clis/edge-impulse-cli/installation).
* [GNU Make](https://www.gnu.org/software/make/).
* [GNU ARM Embedded Toolchain 8-2018-q4-major](https://developer.arm.com/tools-and-software/open-source-software/developer-tools/gnu-toolchain/gnu-rm/downloads) - make sure `arm-none-eabi-gcc` is in your PATH.
### Cloning the base repository
We created an example repository which contains a small application for Sony's Spresense, which takes the raw features as an argument, and prints out the final classification. Download the application [here](https://github.com/edgeimpulse/example-standalone-inferencing-spresense/archive/main.zip), or import this repository using Git:
```
$ git clone https://github.com/edgeimpulse/example-standalone-inferencing-spresense
```
### Deploying your impulse
Head over to your Edge Impulse project, and go to the **Deployment** tab. From here you can create the full library which contains the impulse and all required libraries. Select **C++ library** and click **Build** to create the library.
Download the `.zip` file and extract the directories in the `example-standalone-inferencing-spresense/edge_impulse/` folder. Your final folder structure should look like this:
```
example-standalone-inferencing-spresense/
|_ edge_impulse/
| |_ edge-impulse-sdk/
| |_ model-parameters/
| |_ tflite-model/
| |_ README.md
|_ mkspk/
|_ spresense-exported-sdk/
|_ stdlib/
|_ tools/
|_ .gitignore
|_ Dockerfile
|_ LICENSE
|_ Makefile
|_ README.md
|_ ei_main.cpp
|_ main.cpp
```
### Running the impulse
With the project ready it's time to verify that the application works. Head back to the studio and click on **Live classification**. Then load a validation sample, and click on a row under 'Detailed result'.
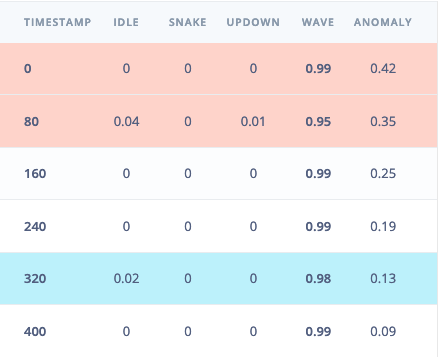 To verify that the local application classifies the same, we need the raw features for this timestamp. To do so click on the **Copy to clipboard** button next to 'Raw features'. This will copy the raw values from this validation file, before any signal processing or inferencing happened.
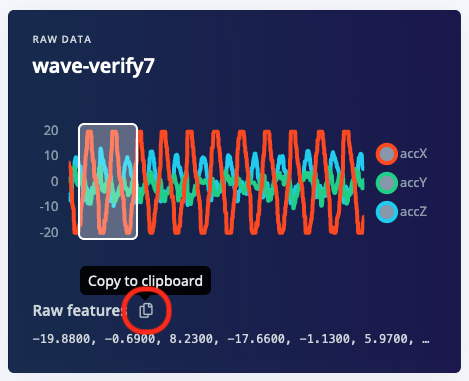 Open `ei_main.cpp` and paste the raw features inside the `static const float features[]` definition, for example:
```cpp theme={"system"}
static const float features[] = {
-19.8800, -0.6900, 8.2300, -17.6600, -1.1300, 5.9700, ...
};
```
Then build and flash the application to your development board:
#### Building the application (`make`)
1. Build the application by calling make in the root directory of the project:
```
$ make -j
```
2. Connect the board to your computer using USB.
3. Flash the board:
```
$ make flash
```
#### Building the application (Docker)
1. Build the Docker image:
```
$ docker build -t spresense-build .
```
2. Build the application by running the container as follows:
**Windows**
```
$ docker run --rm -it -v "%cd%":/app spresense-build /bin/bash -c "make -j"
```
**Linux, macOS**
```
$ docker run --rm -it -v $PWD:/app:delegated spresense-build /bin/bash -c "make -j"
```
3. Connect the board to your computer using USB.
4. Flash the board:
```
$ make flash
```
Or if you don't have `make` installed:
```
$ tools/flash_writer.py -s -d -b 115200 -n build/firmware.spk
```
### Seeing the output
To see the output of the impulse, connect to the development board over a serial port on baud rate 115200 and reset the board. You can do this with your favourite serial monitor or with the Edge Impulse CLI:
```
$ edge-impulse-run-impulse --raw
```
This will run the signal processing pipeline, and then classify the output, for example:
```
Edge Impulse standalone inferencing (Sony Spresense)
Running neural network...
Predictions (time: 8 ms.):
idle: 0.015319
snake: 0.000444
updown: 0.006182
wave: 0.978056
Anomaly score (time: 0 ms.): 0.133557
run_classifier_returned: 0
[0.01532, 0.00044, 0.00618, 0.97806, 0.134]
```
Which matches the values we just saw in the studio. You now have your impulse running on your Spresense development board!
Open `ei_main.cpp` and paste the raw features inside the `static const float features[]` definition, for example:
```cpp theme={"system"}
static const float features[] = {
-19.8800, -0.6900, 8.2300, -17.6600, -1.1300, 5.9700, ...
};
```
Then build and flash the application to your development board:
#### Building the application (`make`)
1. Build the application by calling make in the root directory of the project:
```
$ make -j
```
2. Connect the board to your computer using USB.
3. Flash the board:
```
$ make flash
```
#### Building the application (Docker)
1. Build the Docker image:
```
$ docker build -t spresense-build .
```
2. Build the application by running the container as follows:
**Windows**
```
$ docker run --rm -it -v "%cd%":/app spresense-build /bin/bash -c "make -j"
```
**Linux, macOS**
```
$ docker run --rm -it -v $PWD:/app:delegated spresense-build /bin/bash -c "make -j"
```
3. Connect the board to your computer using USB.
4. Flash the board:
```
$ make flash
```
Or if you don't have `make` installed:
```
$ tools/flash_writer.py -s -d -b 115200 -n build/firmware.spk
```
### Seeing the output
To see the output of the impulse, connect to the development board over a serial port on baud rate 115200 and reset the board. You can do this with your favourite serial monitor or with the Edge Impulse CLI:
```
$ edge-impulse-run-impulse --raw
```
This will run the signal processing pipeline, and then classify the output, for example:
```
Edge Impulse standalone inferencing (Sony Spresense)
Running neural network...
Predictions (time: 8 ms.):
idle: 0.015319
snake: 0.000444
updown: 0.006182
wave: 0.978056
Anomaly score (time: 0 ms.): 0.133557
run_classifier_returned: 0
[0.01532, 0.00044, 0.00618, 0.97806, 0.134]
```
Which matches the values we just saw in the studio. You now have your impulse running on your Spresense development board!